1
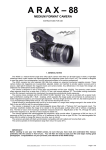
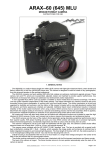
www.orphancameras.com
Kiev 88 / 88TT
Posted 2-12-'04
This camera manual library is for reference and historical purposes, all rights reserved.
This page is copyright© by [email protected], M. Butkus, NJ.
This page may not be sold or distributed without the expressed permission of the producer
I have no connection with any camera company
On-line camera manual library
If you find this manual useful, how about a donation of $3 to: M. Butkus, 29 Lake Ave., High Bridge, NJ 08829-1701 and send your e-mail address so I can thank you.
Most other places would charge you $7.50 for a electronic copy or $18.00 for a hard to read Xerox copy.
This will allow me to continue to buy new manuals and pay their shipping costs. It'll make you feel better, won't it?
If you use Pay Pal, use the link below. Use the above address for a check, M.O. or cash.
Back to main camera manual page
Since efforts are continually made to improve the reliability and performance of the product, minor changes may be introduced without special notice.
i
CAMERA
KIEV 88 KIEV 88 TTL
GENERAL
The KIEV 88 is a medium-size reflex camera with an all-metal curtain shutter and interchangeable magazines of sizes 6x6 cm.
The camera is available in two models: KIEV 88 and KIEV 88 TTL.
The KIEV 88 TTL differs from the KIEV 88 in that the former is complete with a prismatic view finder with a built-in exposure meter.
The camera is intended for amateur photography. With a proper handling and care it will enable you to obtain high-quality slides, large-size black and-white or colour pictures. The camera
is designed for use of a 61.5 mm wide un-perforated roll film (type 120).
The camera curtain shutter offers exposure times over a range from 1/1000 to 1/2 s and manual exposure ..B..
The shutter cocking mechanism is interlocked with the film transport mechanism, thus preventing double film exposure.
The camera comes complete with lens ARSAT B 2.8/80. The lens is provided with a special multilayer antireflection coating (MC) which upgrades the image quality and enhances its
contrast due to better integrated transparence and reduced light dispersion.
The focal length of the lens is 80 mm; the relative aperture is 1:2.8; the diaphragm setting limit is 22, the near focusing limit is 0.6 m. The sharp focusing is carried out with the aid of a
microscreen or a wedge arranged in the centre of the field of view and with the aid of a groundglass surface.
Design of the camera envisages the use of interchangeable lenses. The lenses are fitted on a threaded bayonet. The hood-type view finder enables the picture to be viewed on
the ground-glass surface with or without a magnifying lens. The field of vision of the hood-type view finder measures 53x53 mm. Magnification of the TTL prismatic view finder eyepiece
is 3", the field of vision measures 53x53 mm.
Schematic representation of the field of vision when operating with the interchangeable view finders is given in the Figure.
The camera is complete with two interchangeable magazines of sizes 6x6 cm which allow to
obtain 12 pictures on film type 120. The camera is provided with a synchronizer for
photographing with electronic cable and cableless flash lamps. The camera loading consists in
fitting the magazine with the film in the camera.
The interchangeable magazines offer the opportunity for quick change in the process of
photographing from a black-and-white to a colour film or to a more or less sensitive film. The
magazine may be removed from the camera irrespective of the number of the pictures taken.
Each magazine is provided with an automatic picture counter and a film speed setting scale of the loaded film.
The camera operates in the temperature interval from minus 15 to plus 45 ,'C.
Before starting the photographing, please get acquainted in detail with these Instructions and you will know all the peculiarities of use of the camera.
STANDARD EQUIPMENT
Kiev 88 Kiev 88 TTL
Camera with lens, finder hood, magazine and spool (set)
Camera with lens, prismatic view finder TTL, magazine and spool (set)
View finder hood
Front cap of lens
Light filters: K3-1,4" (YG-1.4")
YD-1" (UV-1") or 0-2.8' (0-2.8")
Spare magazine with spool
Lens hood
Eyecap
Shoulder strap
Case
Screw-plate
Packing box
Instructions for Use
1
1
1
1
1
1
1
1
1
1
1
MAIN UNITS AND PARTS
1 - lens;
2 - lens focusing ring; 3 - distance scale;
4 - depth-of-field scale;
5 - diaphragm and distance scale index;
6 - diaphragm scale;
7 - red dot for lens fitting;
8 - lens fixing screw;
9 - depth-of-field visual check lever;
10 - finder hood;
11 - exposure time scale index;
12 - shutter cocking and exposure time setting knob;
13 - red dot on camera for lens fitting;
14 - exposure time scale;
15 - shutter all-metal curtain; 16 - camera;
17 - release button;
18 - lens retainer button;
19 - finder hood button;
20 - flash lamp yoke;
21 - synchronizer plug socket;
22 - shoulder strap attachment button;
23 - tripod sockets;
I
1
1
1
1
1
1
1
1
1
1
1
1
www.orphancameras.com
24 - magazine;
25 - film rewinding knob;
26 - film exposure indicator window;
27 - picture counter window;
28 - film transport mechanism lock
handle;
29 - shutter;
30 - magazine lock button;
31 - take-up spool;
32 - film speed setting scale;
33 - magazine transport mechanism;
34 - feed spool support.
OPERATING PROCEDURE
Preparing the Camera for Loading
Take the camera out of the case. Insert shutter 29 as far as it will go. Having displaced button 30 in direction of the
arrow and having turned magazine 24, remove the magazine from the camera. The magazine lock will' open only
with the shutter pushed home.
Magazine Loading
CAUTION: When loading the magazine with a film take care that the number on the paper label of the transport mechanism complies with the number on the label glued on the magazine
body.
The magazine can be loaded with the film in daylight (preferably in a shade).
Remove shutter 29 from the magazine, lift handle 28, turn it fully counterclockwise and withdraw
transport . mechanism 33.
Tear off the paper label from the leader end.
Shift plate 35 through 90', place the spool with the film into the seat and reset the plate to the initial position. In this case the protruding centre of plate 35 should enter the spool hole. Turn
handle 28 fully clockwise, shift plate 37 through 90' and insert the take-up spool into the seat. Reset plate 37 to the initial position so that its driver would enter the spool end face slit.
Pass the film leader on the guide roller, thread it under pressure plate 36, pass it on the second guide roller, fit the leader end in the take-up spool and wind the leader by rotating the take-up
spool. In so doing, see to it that the leader would be wound without skewing or crumpling of its edges.
Turn handle 28 counterclockwise. In this case pressure plate 36 will press the leader to the table. When
the magazine is properly loaded, the film leader dark side should face the lens. Lift one of halves of
knob 25 by turning through 90' and set figure "I" in picture counter window 27 by rotating the knob in
the direction reverse to the arrow.
Insert transport mechanism 33 into the magazine housing as far as it will go, slightly turning knob 25 in the direction of the arrow. Reset knob 25 to the initial position.
Turn handle 28 fully clockwise and after making sure that the lock has fixed the transport mechanism, reset the handle
to the initial position. Insert shutter 29 home.
Preparing the Magazine for
Shooting
Open window 38.
Lift knob 25 and rotate it in the direction of the arrow until the figure "I" appears in window
38 which corresponds to the first picture in the film.
Set the loaded film sensitivity value on film speed setting scale 32. For this purpose turn the
disk with the scale until the sensitivity value coincides with the index.
CAUTION: When loading a magazine with a film make sure that figure "I" is set in windows 27 and 38. If you fail to meet the requirements, the shots will go superimposed in shooting.
Preparing the Camera for Shooting
Cock the shutter by turning knob 12 fully in the direction of the arrow available on its body. Fit loaded magazine 24 on the camera catches and, turning the magazine in the direction of the
arrow, attach it to the camera until the lock operate. Caution: Install the newly
loaded magazine on the camera only with the camera shutter cocked and magazine shutter 29 pushed home.
When installing the magazine with a partially exposed film, see to it that the colour of signals in windows 26 and 39
should be similar otherwise a double exposure or a picture omission may occur. The state of film and camera shutter is
determined depending on the colour of signals in these windows ( ref. to the Table).
www.orphancameras.com
Signal color
Window 26 (in the magazine)
White
Red
Film in the picture aperture has not been exposed
Film in the picture aperture has been exposed
Window 39
(in the camera)
Shutter cocked
Shutter released
Shooting
The process of photographing consists of the following jobs:
shutter cocking and film transporting;
exposure selling; diaphragm selling; viewing;
focusing;
shutter releasing.
Cock the shutter and transport the film by turning knob 12 fully. At the beginning of cocking the
shutter a slight increase of the force applied to the knob is possible. When the shutter is being
cocked: the film is automatically rewound; the next picture number is set in window 27;
the white signals are set in windows 26 and 39;
the mirror is lowered to the operating position;
the lens diaphragm aperture is fully opened.
Set the exposure time only when the shutter is cocked by knob 12. Pull the knob in the direction of
the arrow and turn it in any direction- until the exposure time value on scale 14 coincides with
index 11 arranged on the camera housing. Lower the knob in this position so that it would be
fixed.
Set the lens diaphragm by turning the ring with scale 6 until the chosen diaphragm aperture value coincides with index 5. The scale is fixed on all marked divisions of diaphragm apertures.
Open finder hood 10 for viewing by shifting button 19 in the direction
of the arrow. With the repeated shifting of the button the view finder magnifying lens is set to the operating position.
If the camera is outfitted with a magazine sizing 4.5x6cm, make framing as to the thickened lines in the view finder field of vision.
Focus the camera with the aid of the ground-glass surface with a microrasler and a rangefinder wedge or with the aid of the distance scale by turning ring 2 with the scale. The focusing is to
be carried out only with the shutter cocked when the mirror is in the working position and the diaphragm is fully opened. The depth of field is determined with the aid of the distance scale
by means of additional scale 4. The depth of field can be visually checked by the image of the object
components on the ground-glass surface in the field of view of the view finder after pressing on lever fully downward. In this case the lens is stopped down to the earlier preset value. When
released, the lever automatically returns to the initial position and the diaphragm is fully opened. The framing and focusing over, remove magazine shutter 29 and release the camera shutter
by pressing smoothly on release button 17 as far as it will go.
In releasing the camera shutter:
the mirror automatically swings to the upper position;
the diaphragm aperture closes to the preset value;
the film is exposed;
the red signals are set in windows 26 and 39.
At the exposure times over 1/30 s it is recommended to carry out the photographing from a tripod. With the use of exposure times from 1/8 to 1/2 S the release button is to be released after
the complete operation of the shutter. Tripod sockets 23 in the camera are provided with thread 3/8".
The camera shutter can be released with the aid of a straight thread which is screwed into the threaded hole of release button 17.
The shooting over, fold the finder hood. For this purpose press the view finder magnifying lens to cap 40 until it is fixed, fold the side walls, then the rear wall and, while holding the rear
wall, close cap 40 until it is fixed by a lock.
DETERMINING THE EXPOSURE TIME WITH THE AID OF PRISMATIC VIEW FINDER TTL
With the use of camera KIEV 88 TTL you can determine the exposure time and the diaphragm aperture with the aid of an exposure
meter built into the prismatic view finder. Advantage and convenience of the TTL measurement system lies in the automatic control
of all factors affecting the value of the exposure time. The field of measurement of the exposure time meter is in the central part of the
view finder field of vision and has an oval shape ( ref. to the Figure). The exposure time meter ensures
measurements in the range of brightness of 2 to 16 000 cd/m2, in this case the film-in-use sensitivity value is taken into account.
When preparing the prismatic view finder TTL for operation set the film sensitivity on its
calculator by turning handle 42 until the film speed value in ISO units appears in window 43. Set
on the calculator the value of the lens speed by turning scale 45 until the appropriate value
coincides with index 46.
The lens speed meats the number corresponding to the maximum relative aperture, e g. for lens
ARSAT B 2.8/80--2.8, Turn on the exposure time meter having depressed button 44. Upon its
turning-on, release the button. The exposure time meter will operate for 15 s, then it will
automatically turn off.
For its repeated turning-on depress the button again. While viewing in view finder eyepiece 47, aim the camera on the object so that its image would be arranged within the field of view of
the view finder. Depending on the brightness of the object being photographed, in the upper part of the field of view of the view finder you will see the luminescence of one of the signals:
Should the "Little light" red signal, located on the left in the field of view of the view finder,
be seen, slowly turn calculator ring 48 counterclockwise until the "Sufficient light"
second red signal appears. Should the "Much light" red signal, located on the right, be seen,
turn ring 48 clockwise until the second red signal appears. With the calculator in this
position (two red signals light up), choose the "exposure-diaphragm" pair required for
photographing by using the exposure scale and the diaphragm scale, e.g. exposure 1/30 S is
opposite diaphragm value 2.8 (ref to the Figure), 1/15 s is opposite 4, 1/8 s is opposite 5.6,
1/2 s is opposite 11.
Set the values of exposure and diaphragm, chosen for photographing, on the camera exposure scale and on the lens diaphragm scale.
REPLACEMENT OF POWER SUPPLY SOURCE
A battery with initial voltage of 4 to 4.5 V (dia. 11.6 mm, length 16.2 mm) is used as a power source of the
exposure time meter.
The battery may comprise, for example, three cells type PX675, RM675 or MS76.
www.orphancameras.com
The serviceability of the power supply source is controlled by means of lighting signals
which light up in the field of view of the view finder eyepiece. The absence of signals with
button 44 depressed is indicative of the necessity of replacement of the power supply source.
To replace or install the power supply source, unscrew cap 49 and, observing the polarity
("+" of the power supply source should be arranged from the end of the cap on which the "+,
• symbol is engraved), install it into the
seat.
UNLOADING THE CAMERA
The shooting can last until figure "12" appears in the picture counter window, indicating that the film has been fully used. After this fully insert magazine shutter 29 and remove the
magazine from the camera. Lift knob 25 and rotate it in the direction of the arrow until the film has been rewound on the take-up spool. The rewinding should be carried out smoothly,
without seizure. Otherwise it is essential to stop, the rewinding, extract the transport mechanism as it is indicated below and eliminate the cause of the film seizure. Check that the film
rewinding is over by looking into window 38. Lift and turn handle 29 fully clockwise.
Remove transport mechanism 33 from the magazine. Turn plate 37, remove the spool with exposed
film and glue the leader with a paper label.
Reset the spool into the seat and return plate 37 to the initial position, install the transport
mechanism into the magazine and close the magazine lock.
REPLACEMENT OF LENS
Design of the camera envisages the use of interchangeable lenses.
To remove the lens, depress button 18, turn the lens fully counterclockwise and detach it. When
fitting
the lens on the camera, match red dot 7 on its base with red dot 13 on the camera ring, insert the
lens and turn it clockwise until it is locked.
The ARSAT B interchangeable lenses released for the camera are as follows:
Lens
Superwide-angle
Wide-angle
Wide-angle
Long-focus
Long-focus
Long-focus
Long-focus
FLASH PHOTOGRAPHY
Relative
aperture
1:3.5
1:3.5
1:3.5
1:2.8
1:2.8
1:3.5
1:5.6
Focal
length, mm
30
45
65
120
150
250
250
Field of
view angle
180'
83'
66'
36'
28'
19'
18'
The camera incorporates a synchronizer which ensures a synchronous operation of the shutter with electronic
flash lamps. In case of photographing with a cableless flash lamp it should be mounted in yoke In
20. Connection of the flash lamp with cable is effected via plug socket 21. When photographing with
electronic flash lamps, the synchronization is ensured at the exposure of 1/3o s and over.
The photographing with flash lamps is to be carried out in accordance with the directions for use supplied
with them.
When the flash lamp is connected via plug socket 21, insert the screw-plate (available in the set) into yoke 20.
APPLICATION OF LIGHT FILTERS
me camera set includes the light filters with a M62x0.75 thread used as attachments screwed into the front part of the lens mount.
The Y(D-Ix (UV-lx) achromatic light filter is used for weakening the effect of ultraviolet rays, e.g. when photographing in high mountains or when using a colour film.
The 0-2.8x (0-2.8x) orange light filler fully absorbs ultraviolet rays. It is used to obtain a particular contrast in photographing the compositions with clouds, water surfaces, landscapes with
noticeable shading of verdure, etc. The )K3-1.4x (YG-1.4x) yellow-green light filter improves the tone reproduction of multicolour objects on
the high-sensitive photographic materials with - a slight loss of their sensitivity. With the medium-sensitive photographic materials the practically correct tone reproduction of
multicolour objects is attained.
CARE
Protect the camera from dust, moisture, snow, harmful vapours, jerks, jolting, impacts and sharp temperature variations.
Handle the camera with care, do not exert the excessive efforts in handling it, keep the camera clean.
Do not remove the lens without an utmost necessity since this may result in dirt and dust getting into the camera.
Clean the camera regularly. Remove the dust from its external and internal surfaces with a soft brush or blow off the dust with the aid of a rubber bulb. Thoroughly protect the optical
components from dust or dirt, try to avoid touching them with fingers. Protect the camera shutter curtains from mechanical damage as they are made of very thin stainless steel. Store the ,
camera in the case, close the lens with a cap. Having brought the camera from the frosty weather into the warm premises, do not open it immediately, let it become gradually warmed up in
the case for 2-3 h.
When some defects or faults have been discovered, do not carry out the repair on your own.
www.orphancameras.com