1
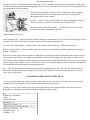
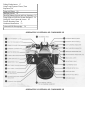
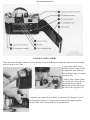
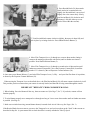
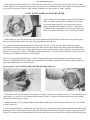
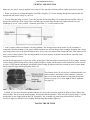
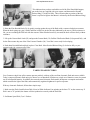
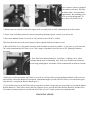
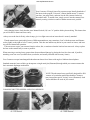
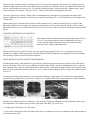
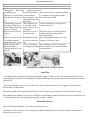
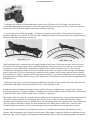
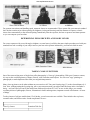
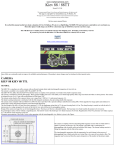
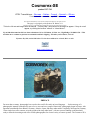
Cosmorex-SE
posted 1-17-'04
HTML Translations - German - Italian - French - Spanish - Others
These links will not translate any PDF files
This camera manual library is for reference and historical purposes, all rights reserved.
This page is copyright by mike@butkus. M. Butkus, N.J.
This page may not be sold or distributed without the expressed permission of the producer
This is the full text and images from the manual. This may take 3 full minutes for all images to appear. If they do not all
appear, try clicking the browser "refresh" or "reload button".
If you find this manual useful, how about a donation of $3 to: M. Butkus, 29 Lake Ave., High Bridge, NJ 08829-1701 ? This
will allow me to continue to purchase new manuals and their shipping. It'll make you feel better, won't it?
If you use Pay Pal, use the link below. Use the above address for a check, M.O. or cash.
Back to main Chinon site
PREFACE
For more than a century, photography has served as the world's first truly universal language . . . for the message of a
photograph is instantly understood by men of every race and every tongue. Historically, photography began in France, with
important contributions from Britain, Germany, America, Japan, and many other nations. Originally developed in Germany,
35mm single-lens reflex cameras are today produced in many other lands - with new sources standing on the threshold,
ready to meet the increasing needs of the world's photographers for a broad variety of camera systems. The Cosmorex SE is
www.orphancameras.com
the latest in a series of 35mm SLR cameras made in the U.S.S. R. and fully reflects the rugged construction, superb optics,
and functional design which European photographers have prized for years in the products of this increasingly sophisticated
and internationally-respected industry.
Thank you for selecting the Cosmorex. We are confident that, after reading the
instructions that follow, you will embark upon a life time of genuinely fine
photography with your new camera ....
Welcome ... to the Cosmorex world of single-lens reflex photography! Your new
Cosmorex camera is a precision 35mm SLR camera that gives you . . .
Through-the-lens viewing and focusing . . . your brilliant eye-level viewfinder
shows the exact image transmitted by your lens.
*Interchangeable 58mm f/2.0
Auto Cosmogon Lens ... with a fastworking automatic diaphragm mechanism that gives you an always bright image in your
viewfinder. The coated, color-corrected 6-element optics provide superior sharpness, too.
Low-Noise Focal-Plane Shutter ... highly accurate, with speeds to an action freezing 1/500th second plus "B'".
Built-in Exposure Meter ... ends guesswork by showing you the correct lens opening and shutter speed for well-exposed
pictures ... and more!
Because of its many unique features, operation of this camera is probably somewhat different from other cameras you may
have owned. For this reason, it is strongly recommended that after carefully reading these instructions, you shoot a "test"
roll of film, have this film processed, and examine the pictures before exposing additional rolls. This test roll will verify that
you are using your new camera correctly, and allow you to make any necessary changes in camera operation; additionally it
will confirm that all camera controls are functioning perfectly.
Now ... Please fold out the front and back pages showing the operating parts of your Cosmorex, and, with the camera at
hand, follow the operating instructions step by step. You will be rewarded by fine pictures right from the start - and for
many, many years to come ...
CONDENSED OPERATING INSTRUCTIONS
If you are familiar with 35mm single-lens reflex cameras from previous experience, and wish to use your new camera
immediately, please turn directly to the Condensed Operating Instructions on page 33.
*If this is your first 35mm or single-lens reflex camera, please take the brief period needed to learn your new camera
thoroughly by reading the more detailed instructions beginning on the next page .. .
TABLE OF CONTENTS
Preface 2
Operating Controls 3
Introduction 4
Loading Your Camera 6
Using Your Camera's Exposure Meter
Viewing and Focusing 12
Taking the picture 1a
Unloading 15
9
Taking Flash pictures 17
Using Long Exposure Times (Time
Exposures).20
Using Self-Timer 22
Changing Lenses 23
Choosing Shutter Speeds and Lens Openings. .25
Using Depth-of-Field for Greater Sharpness . .26
Caring for Your Camera & Lenses 29
Trouble Shooting Chart 31
Condensed Instructions 33
Advanced SLR Photography 36
OPERATING CONTROLS OF COSMOREX SE
OPERATING CONTROLS OF COSMOREX SE
www.orphancameras.com
LOADING YOUR CAMERA
Find a spot where the light is subdued (if you're outdoors, look for a shaded area or shield the camera from direct sunlight
with your body or coat). Then ...
1. Open Camera Back (38) by
raising Back Lock Latch (22) and
swinging back open. Make sure
Rewind Release Ring (3) is turned
clockwise fully.
2. Push up Film Cassette Spindle
(29) from inside camera; drop in
35mm film cassette. Pull out
enough film to insert film end in
any slot in Take-Up Spool (36).
3. Alternately press Shutter Release Button (2) and move Film Transport Lever (1)
until Film Sprocket Wheels (35) engage sprocket holes in film. Make sure film
cassette lies flat. Close Camera Back (38) by pressing firmly.
4. Press Rewind Knob (24) downwards
firmly and twist it counterclockwise
slightly; the Rewind Knob is now raised
slightly above the camera body. Slowly,
turn Rewind Knob (24) clockwise until
resistance is felt (this takes up excess
slack of film within the cassette).
5. Twist Rewind Knob counter-clockwise slightly, then press it down fully and
lock in place by twisting clockwise. Press Shutter Release Button (2).
6. Move Film Transport Lever (1) through two or more short strokes (letting it
return to the starting position after each stroke) until no further movement is
possible. Press Shutter Release Button (2).
7. Move Film Transport Lever (1) through a second series of short strokes until
further movement is impossible. Now, turn Exposure Counter Dial (4) until the
number "0" is shown by the red Exposure Counter Indicator (34).
8. Once more press Shutter Release (2), and wind Film Transport Lever (1) fully ... and your first film frame is in position,
as shown by the Exposure Counter Indicator (34).
When moving the Transport Lever as described above, the Film Rewind Knob (24) will rotate counter-clockwise by itself.
This provides positive assurance that your camera is correctly loaded, and that film is being wound through the camera.
IMPORTANT "REPEATS" FROM COSMOREX MANUAL
1. When loading, first wind shutter all the way, then set counter to 0 (See Page 7, No. 7). If you don't, counter will not
function properly.
2. To wind shutter properly move transport lever through one long or "two or more short strokes until no further movement
is possible. (See Page 8).
3. Make sure rewind release ring (around shutter button) is turned clock-wise al I the way (See Page 6, No. 1)
If the Rewind Knob does not rotate as you move the Transport Lever, and you have taken up the "slack" in the cassette as
described in Step No. 4, open camera back to check that film is securely attached to Take-Up Spool.
www.orphancameras.com
Always make sure the Transport Lever (1) has been fully wound. This is easiest when you move this lever in two short
strokes. When the lever stops during the second stroke, you are assured that the camera's film, shutter and exposure counter
are all ready for exposure. Failure to fully wind the Transport Lever may result in a "blank" exposure.
USING YOUR CAMERA'S EXPOSURE METER
Your Cosmorex SE incorporates a sensitive built-in Exposure
Meter. It contains a photoelectric (selenium) cell (25) that
converts the light reflected by your subject into electrical
energy, which activates the Meter Needle (17). Because the
"selenium" meter cell generates its own electrical energy, no
batteries are needed! Here's how to use your exposure meter:
1. Adjust Meter for ASA Film Speed. Move the Aperture Indicator Dial (20) until the ASA number for your film type is
shown by the black Index Mark in the ASA film Speed Indicator Window (19).
Your camera's meter has marked numerals for films rated at ASA 25, 50, 100, 200, 400, and 500: this speed range
encompasses virtually all general-purpose black-and-white and color films. Should your film be rated at an intermediate
ASA speed, such as ASA 64 or 80, simply position the ASA Index Mark so that it is between the next larger and smaller
numbers. (For example, for ASA 64 or 80 film position the index mark `been 50 and 100.) When this is done, your meter
will operate well within the tolerances of all film types.
NOTE: If you are using film marked only in "DIN" (European) film speed, enter this number in the DIN Film Speed
Indicator (18). Should the film be marked in an intermediate speed number, position indicator midway between the next
larger and smaller numbers as described above.
See also pages 31 and 32 PLEASE READ ENTIRE OWNER'S MANUAL
2. Aim Meter Cell (25) at your subject. (For a practice "reading", aim meter at a brightly-lit scene or if you are indoors, at a
nearby lamp.) As you do so, you'll note the Exposure Meter Needle (17) moves to a certain position, then stops. Holding
your camera in this position, you now .. .
3. Match the Needle (17) by turning the Shutter Speed Indicator Ring (21) until the Exposure Meter Circle (16) is centered
over the Needle (117).
4. Your light measurement or "reading" has now been taken! Any combination of lens opening (f/number) and shutter speed
appearing in black on the Aperture Indicator Ring (20) and Shutter Speed Indicator Ring (21) will give a perfectly-exposed
picture. For example, in the illustration shown, these scales show that correct exposure will be obtained with a shutter speed
of 1/125th second and a lens opening of f/5.6, or a speed of 1/250th second and lens opening of f/4, or, any other
combination shown on the scales.
5. Now, set the Shutter Speed Dial (5) to the desired speed by lifting the dial and turning it until the desired shutter speed is
indicated by the red dot in the center of the dial. (If the dial won't move in one direction, turn it in the other direction to
reach the desired speed,) Then, let the Shutter Speed Dial return to 'down' position.
6. Turn the Lens Aperture Ring (26) until the indicated lens opening is lined up with the red Distance/Aperture Index mark
(12).
HELPFUL HINTS FOR BETTER EXPOSURES
For outdoor photography, a shutter speed of 1/125th second (or, if possible, faster) is recommended whenever possible.
This speed is fast enough to prevent most "blur" due to camera or subject movement, yet is slow enough to permit picturetaking in a wide variety of lighting conditions with today's sensitive films. If it's necessary to shoot at
1 /60th or 1 /30th second, hold the camera as steady as possible - ideally by using a tripod, or by bracing your arms on a
nearby table or other support.
*Remember that your exposure meter measures all the light that reaches the meter cell (25). If your subject is much lighter
or darker than the background, it's a good idea to move up to your subject for a "close-up" reading. This simply means
aiming the meter cell (25) as close as possible to the most important part of the subject - for example: the face of a person
whose picture you are taking.
When shooting landscapes or other outdoor pictures where a large
part of the sky will appear, aim your camera's meter cell
downwards slightly when taking your "reading". This prevents the
exposure reading from being adversely influenced by the bright
light of the sky.
• In extremely dim lighting, the Exposure Meter Needle (17) may rest near the right hand edge of the transparent window.
Should this occur, place your hand in front of the Exposure Meter Cell (25) and watch the needle carefully. If the needle
moves when you block the Meter Cell, the exposure meter is able to function in the existing light; remove your hand from
the cell, and determine exposure in the normal way. However, if no needle movement occurs when you pass your hand in
front of the Meter Cell, the existing light is insufficient and the exposure meter cannot be used. In this event, either a time
exposure or use of an electronic flash are recommended.
www.orphancameras.com
VIEWING AND FOCUSING
Make sure your lens is securely attached to the camera. If not, turn lens clockwise until no further movement is possible.
• Frame your picture by looking through the Viewfinder Eyepiece (32). You're looking through the same lens that will
actually take the picture exactly as you see it.
• Focus to bring the image in clearly. To do this, just turn the Focusing Ring (13) in either direction until the subject is
sharp in the viewfinder. (If the image in the viewfinder appears dark, make sure the Auto/ Manual Switch for Lens
Diaphragm [14] is in "Auto" position - so that the green letter "A" is visible on the switch.)
• Your Cosmorex offers two alternative focusing methods. The microprism spot in the center of your viewfinder is
composed of literally hundreds of tiny prisms which accentuate out-of-focus images, then seemingly disappear into a single,
clear image when you're at the point of sharpest focus. (If you aim your camera at this instruction book, from about two feet
away, you'll see how it works.) This focusing method is best for a majority of subjects and conditions, especially when
using your standard f/2.0 lens.
Around the microprism spot is a clear ring of fine ground-glass. This also tends to accentuate out-of-focus images, showing
a clear, sharply-defined image at the point of greatest sharpness. (Again, aim the camera at this instruction book to see how
it works.) You'll find this groundglass area helpful when focusing on subjects which lack contrast or color; it's quite handy
when using wide-angle and long telephoto lenses, too.
The Distance Scale (28) of your lens is calibrated both in feet
(white numbers) and meters (yellow numbers). Generally,
there's no need to check distance except when taking flash
pictures (see page 17) or when depth-of-field is important
(see page 26).
The Red "R" next to the Distance/Aperture Indicator (12) shows the correction required for Infra-red films. When using
infra-red films, first focus in the normal manner, and note the indicated distance. Then, move the Focusing Ring (13) so that
that distance is now aligned with the Red "R". Remember - this is needed only when using infra-red films, which are
sensitive to light rays which focus at a slightly different plane than ordinary light rays.
TAKING THE PICTURE
Hold your camera steadily, using both hands. You'll
probably find it most convenient to grip the camera
firmly with your right hand, and trip the shutter release
button with your forefinger; here, your left hand can
easily turn the focusing ring and lend extra support at
the same time. For vertical shots, you may experiment
to see in which position the camera feels most secure
and the controls (focusing ring, shutter release) most
accessible.
And now ... press the Shutter Release Button (2) in a smooth, firm stroke. You've just taken your first picture!
FOR SUCCEEDING EXPOSURES .. .
You are ready for your next picture in an instant - just move the Film Transport Lever (1) until fully wound, and you're set:
just frame, focus, and shoot. As lighting may change, it's a good idea to check the Exposure Meter Needle (17) from time to
time, to make sure it's still lined up with the Exposure Meter Circle (16). If it is not, just take a new exposure "reading" of
your subject, move the Lens Aperture Ring (26) to the new aperture shown on the Exposure Meter Aperture Indicator (20) and continue shooting!
UNLOADING
When you've finished your roll of film, the film must be re-wound back into the cassette so it may be removed and
processed. Here's how:
1. When you have taken the last
exposure (number 20 or 36,
depending on the length of
cassette used), turn the Rewind
Release Ring (3) all the way to
the left so that the Red Dot
points at the "R" engraved on
the camera's top. Be sure the
Rewind Release Ring has been
moved fully towards the left
until no further movement is
possible.
(In some instances the film transport lever [1 ] will stop before it has been fully wound to position the last frame.
www.orphancameras.com
This indicates that you have reached the end of the film. Should this happen,
put on the lens cap, supplied with your camera, and then turn the Rewind
Release Ring [31 to the left fully. This will insure that no portion of the last
frame is exposed to light as the shutter is released by the Rewind Release Ring.)
2. Raise the Film Rewind Knob (24) by gently pressing against the top of the Knob with a counter-clockwise movement.
When the knob springs up, grip it firmly and turn it clockwise tin the direction indicated by the arrow). While resistance is
felt, you are rewinding the film back into the cassette. When film has been fully rewound, the knob will turn freely without
resistance.
3. Lift up the Camera Back Latch (22) and open the Camera Back (38). Pull the Film Rewind Knob (24) upwards fully , and
let the film cassette drop out of the Film Cassette Chamber (30). Your film is now ready for developing.
4. Push down Rewind Knob and lock in place. Close Back. Move Rewind Release Ring (3) clockwise fully so your
camera's ready for your next roll of film.
TAKING FLASH PICTURES
Your Cosmorex single-lens reflex camera operates perfectly with any of the excellent electronic flash units now available.
Today's compact electronic flash units give dozens or even hundreds of flashes on a single set of batteries; some also permit
use of rechargeable batteries. In addition, the most advanced electronic flash models incorporate a computer mechanism
which measures the light of the flash, and automatically regulates brightness for perfect exposure.
With any electronic flash unit, follow these simple steps:
1. Make sure the Flash Synch Selector Dial (6) has its White Indicator Line pointing to the letter "X" on the camera top. If
Dial is not at "X" position, the shutter will not synchronize correctly with the flash unit.
2. Set Shutter Speed Dial (5) to 1/30th sec.
3. Slide flash on your camera's Accessory
Shoe (15). (If your flash is made for use with
a separate mounting bracket, attach bracket
screw to camera's Tripod Socket [111 ).
4. Plug flash cord into camera's Flash Cord
Outlet (7). Push tip of cord in firmly.
5. Select correct lens opening for film/flash combination. The short burst of light produced by electronic flash (often
1 /1000th second or faster) is too brief for your camera's Exposure Meter to measure. For this reason, all electronic flash
units have calculator dials or scales which indicate the correct lens opening.
A. With Computer (Automatic) Flash Units. Set calculator dial of flash to correct ASA film speed. Your flash dial will now
indicate the correct lens opening for photography at a wide range of distances.
Set lens Aperture Ring (26) to the aperture indicated by your flash dial. You can now take pictures at any distance within
the range indicated by your flash without further adjustments.
B. With Manual (Non-Automatic) Flash Units. Set calculator dial of Flash to correct ASA film speed. Your flash dial will
now indicate the correct lens openings for various distances. Focus, and set lens Aperture Ring (26) to the aperture
indicated by your flash for the actual camera-to-subject distance, as shown by your lens' distance scale (28). All
photographs taken at this flash-to-subject distance will be properly exposed.
Different makes of electronic flash units use different calculator dials or scales; for exact information, please consult the
instruction manual for your flash or check with your camera dealer.
•In the event the flash unit does not fire when you press the Shutter Release Button (2), check to see that the flash cord is
securely plugged into Flash Cord Outlet (7), and that On/Off switch of flash unit is in "ON" position. Finally, make certain
the Selector Dial (6) is at "X" position.
Do not press down on Shutter Release Button (2) unless actually taking a flash picture. Pressing this button down fully
will fire the flash whether or not the Film Transport Lever (1) has been wound. Should this happen, however, no loss of
film will occur.
Always remember to set Shutter Speed Dial (5) to 1/30th second, and Flash Synch Selector Dial (6) to 'X' position for
electronic flash photography. At other speeds or settings, the flash will not synchronize fully with the shutter.
USING FLASHCUBE OR FLASHBULB GUNS
In general, flashcubes and bulbs are more costly than electronic flash, and less convenient to use as the bulbs must be
replaced after each picture (with flashbulbs) or each four pictures (with flashcubes). Should you wish to use these light
sources, however, follow Steps 1-5 above, with this exception:
For flashcubes or flashbulbs, move the Flash Synch Selector Dial (6) to "M" position. This adjusts the timing mechanism
of your camera to insure that the shutter opens when the flash of the bulb is at its' brightest. Leave the Shutter Speed Dial at
1/30th second for all flash pictures.
www.orphancameras.com
Determining exposure with flashcubes or bulbs is done the same way as with manual (non-automatic) electronic flash units,
as described above.
USING LONG EXPOSURE TIMES (TIME EXPOSURES)
Time Exposures are exposures of one second or longer. At these extra-long exposure times, you can photograph city streets
at night, dimly-lit interiors, and many subjects too faintly illuminated for normal picture-taking.
To take a time exposure with your Cosmorex, set the Shutter Speed Dial (5) to "B", press the Shutter Release Button (2) ...
and simply hold it down until the desired number of seconds has elapsed. When you release the Shutter Button, the shutter
will close.
4www.butkus.org/chinon
For extra steadiness, use of a locking Cable Release and a sturdy Tripod are recommended when taking time exposures.
In the event a locking cable release is not available, you can keep your camera's shutter open for extended periods quite
simply. With the shutter at "B" position, press down the shutter release firmly. Hold it down, and rotate the Release Button
(2) counter-clockwise (towards the left) until it stops. Now, the shutter remains open as long as desired. To close the shutter
when the exposure is completed, press down on the Release Button and turn Release clockwise until it stops.
After a time exposure using this method, always make certain the Shutter Release Button (2) and Rewind Release Ring (3)
are both turned fully towards the right: this will insure correct operation of shutter and exposure counter in subsequent
pictures.
•Under certain conditions, your camera's exposure meter may be used when making Time Exposures. First, make sure that
the existing light is sufficient for use of the meter (p. 12); then, "match the needle" and read the correct exposure time in full
seconds from the Red numbers 30, 15, 8, 4, 2, 1, which appear furthest from the Black numbers 30-500 on the exposure
meter Shutter Speed Indicator Dial (21).
The Red numbers 15, 8, 4, 2, appearing next to the Black numbers 30-500, represent fractions of a second: "15" is 1 /15th
second, and so on. These numbers appear for information purposes only, when using your camera's meter to determine
exposure with cameras lacking a built-in exposure meter.
USING SELF-TIMER
Your Cosmorex camera is equipped
with a built-in self-timer. This trips
the shutter after a 10-second delay
(approximate), thus enabling you to
get in your own photographs! To
use it, here's all you have to do:
1. Mount camera on a tripod or other firm support such as a nearby table or shelf, with transport lever fully wound.
2. Frame, focus, and adjust camera for correct lens opening and shutter speed - exactly as you always do.
3. Move Auto/Manual Switch (14) on lens to "M" position (so the red "M" is visible).
This closes down the lens to the correct aperture, and is required when the self timer is used.
4. Move Self-Timer Lever (10) counter-clockwise until no further movement is possible. (As you move it, you'll notice the
"M" sticker underneath the Self-Timer Lever. This is simply a reminder to move the lens to "M" [Manual] position as
described).
5. Press Self-Timer Release Button (9). You'll hear a "whirring" noise, which
indicates that the timer is functioning. Now, walk away from the camera into the
scene being photographed - the shutter will fire automatically in about ten seconds.
* Make sure you have moved the Self-Timer Lever as far as it will go before pressing the Release Button. If the Lever has
not been fully wound, the shutter will not operate. (Should this happen, just move the Self-Timer Lever downwards again fully this time - and press the Release Button again.)
4www.butkus.org/chinon
* If you decide not to use the Self-Timer after moving the lever down, simply take your next picture by pressing the Shutter
Release Button (2). Then, before moving the Film Transport Lever, press the SelfTimer Release Button (9) and the Timer
will return to normal position. Do not leave the Self-Timer Lever in "wound" position for extended periods.
CHANGING LENSES
www.orphancameras.com
Your Cosmorex SE single-lens reflex camera accepts literally hundreds of
fine lenses in the popular "Universal" (42mm) thread mount. To remove
your lens, just grasp firmly, and turn it to the left (counter-clockwise)
about three turns. To attach a lens, simply screw it into the camera's lens
mount by turning it clockwise until no further movement is possible.
After changing lenses, check that the Auto/ Manual Switch (14) is on "A" position before picture taking. This insures that
you will be able to frame and focus easily.
•Always screw the lens in firmly; when it stops, give it a slight extra twist to insure that it is securely attached.
Thread-mount lenses, particularly lenses of different manufacture, may sometimes "seat" with the aperture and distance
scales slightly to the right or left of "center" position. This does not indicate any defect in your camera or lenses, and in no
way affects camera/lens operation.
Take care not to expose your camera's interior to dust, dirt, or moisture when the lens has been removed. Always replace
the lens on the camera body as soon as possible.
When removing or storing lenses, protect them from accidental damage by placing the lens face down and, if possible,
attaching a rear lens cover (available from your dealer, and usually included with accessory lenses).
Your Cosmorex accepts interchangeable thread-mount lenses from 16mm wide angle to 1000mm ultra-telephoto.
Standard automatic lenses of this type incorporate a single metal pin (illustrated) through which your camera actuates the
lens' automatic diaphragm mechanism.
NOTE: Thread-mount lenses specifically designed for SLR
cameras of a particular model other than the Cosmorex
may incorporate special "keying" levers (illustrated). Such
lenses should not be used on your camera.
CHOOSING SHUTTER SPEEDS AND LENS OPENINGS
For the majority of outdoor subjects, a shutter speed of 1/125th second is suggested. This speed is fast enough to prevent
blur due to slight movement of the camera during exposure, and also fast enough to "freeze" most normal movement of the
subject - people walking, moving cars, etc. For situations when the subject is really moving fast - children at play, sports
events, racing cars, for example - shoot at 1/250 or 1 /500th second if there's enough light to allow this.
Conversely, shooting at 1/60th or 1/30th second is recommended only when there is no appreciable movement of the
subject (a landscape, for example), or when the use of small lens openings (f/11 or f/16) is desired to give the deepest zone
of sharp focus.
Shutter speeds may be selected before or after the Film Transport Lever (1) has been wound. However, always lift the
Shutter Speed Dial (5) before turning it to another speed, and return it "down" before shooting. Finally - always turn the
Shutter Speed Dial (5) to one of the marked speeds (B, 30, 60, 125, 250, or 500). Do not move to positions between marked
speeds.
CHOOSING DIFFERENT LENS OPENINGS
Your 58mm automatic standard lens has openings (apertures) from f/2 to
f/16. At f/2, the greatest amount of light is transmitted to the film; at
f/16, the amount of light transmitted is least. Each marked number
represents a 50% change in light transmitted.
The Aperture Ring (26) of your lens may be set at any marked lens opening (f/2, f/2.8, etc.) or at positions in between
marked lens openings. If the Exposure Meter Aperture Indicator Dial (20) indicates a lens opening between two f/numbers
(lens openings), turn the lens to the in-between position.
USING DEPTH-OF-FIELD FOR GREATER SHARPNESS
All photographic lenses, when focused on a given subject, will show some objects in front of, and in back of, that subject
more or less sharply. This "zone" of extra sharpness is called "depth-of-field", and varies with different lenses; it's greatest
with wideangle lenses, and least with telephoto lenses. With any lens, you'll find your depth-of-field is always greater (more
things in focus) at small lens apertures such as f/11 or f/16, and lesser (fewer things in focus) at larger lens apertures such as
f/2.8 or f/2.
In most picture taking, this phenomenon is of no particular importance, as the subject will, in most cases, appear equally
sharp at all lens openings. However, the area of sharp focus or "depth-of-field" does become important in certain situations.
Example: you're taking a picture of a landscape - and you want everything needlesharp from the foreground, all the way to
the background. Your Cosmorex lets you achieve this easily and reliably, in several ways:
A. Using Depth-of-Field Scale (27). Here's how:
1. Focus on the closest object which will appear in the picture. (Example: ten feet away as indicated by the white number on
your Distance Scale [28] .)
4www.butkus.org/chinon
www.orphancameras.com
2. Now, focus on the most distant object which will appear in the picture. (Example: "Infinity" as indicated
by your distance scale [28] .)
3. Move the Focusing Ring (13) of your lens until the greatest distance (infinity) and the closest distance (ten feet) appear in
front of the same lens aperture numbers on the Depth-of-Field Scale (27) of your lens. (Example: f/11). Set aperture ring
(26) to this opening.
4. Use your camera's built-in exposure meter to determine the correct shutter speed for an exposure at this lens opening.
(Example: shutter speed of 1/60th second for lens opening of f/11.) Set Shutter Speed Dial (5) to this speed.
5. Take the picture! Everything between the two distances (10' and infinity) shown by the matching f/11 numbers on the
Depth-of-Field Scale (27) will appear sharply.
It's a professional technique - but you don't have to be a professional to use it for better photographs.
The second way:
B. Using Viewfinder at Taking Aperture. Move the Auto/Manual Switch (14) on lens to "M" position. This closes down the
lens to whatever opening has been set on the Aperture Ring (26). You'll be able to see how distant and nearby objects
"sharpen up" at smaller lens apertures such as f/11 or f/16.
Naturally, when the lens is "stopped down," less light enters the viewfinder, and
it is more difficult to see or focus clearly. The principal benefit of this technique
is that it gives you a fast, accurate "preview" of what will and will not be sharp in
the finished photograph - for example, that telephone pole in back of your
subject.
If it appears sharply when the lens is "stopped down" to the intended aperture, it will appear sharply in the final photograph.
By 'previewing' your depth-of-field in this way, you'll soon learn to select the aperture required for the depth-of-field you
want .
Either of these techniques will prove valuable in the great majority of picture taking situations. For extremely critical
applications, a printed depth-of-field chart is available on request.
CARING FOR YOUR CAMERA AND LENSES
Your Cosmorex camera is a ruggedly-built camera, designed to provide many years of dependable performance. To get the
longest service, and best performance, always treat your camera and lenses as you would any precision instruments carefully!
Keep your camera within carrying case whenever possible. This protects your camera and lens from dust, dirt, moisture,
and knocks against hard surfaces - the natural enemies of all cameras.
The Case is designed to permit all camera functions except loading to be performed while the camera is inside. So, if you're
at the beach, by all means take lots of pictures with your camera - then, as soon as you're done, close the front cover and
your camera is now safely protected from the environment.
Should you prefer to carry your camera outside the case, your dealer can supply you with an accessory neckstrap, which
attaches to your camera's neckstrap eyelets (8) and (23). Be sure to guard the camera from bumps and jolts when using it
outside the case.
* Protect your camera from extreme heat or humidity. Never leave your camera inside a car trunk or glove compartment on a hot day, temperatures well over 1000 can build up!
When your lens is removed from the camera, avoid pressure on the metal pin (at rear) which controls the automatic
diaphragm mechanism by using a rear lens cap and case (available from your dealer) or storing the lens so that it rests on
the front.
Never touch your camera's mirror directly.
•Protect your camera's Exposure Meter Cell (25) from prolonged exposure to direct sunlight for a period of several hours or
more. When storing your camera, either place it in its case, or put in a drawer or other location out of the sun. Prolonged
exposure to intense sunlight can adversely affect the selenium cell which powers your meter. Additionally, take care not to
damage the meter "windows", which house the meter cell and indicator needle.
Do not rotate Shutter Speed Dial (5) between "B" and "500", or set at positions between marked speeds.
Protect the Shutter. Your camera's focal plane shutter (33) is a precision mechanism made to give accurate, trouble-free
operation through thousands of exposures. You'll insure utmost dependability by following these two simple rules:
a) Never touch the shutter curtains.
b) Whenever storing your camera for an extended length of time (several days or more) always release the shutter prior to
storage. When wound, the shutter mechanism is under strong spring tension; by releasing the shutter, you've eliminated the
tension and the shutter mechanism is completely at "rest".
When you build a "system", consider a compartment case. Your dealer can show you several different kinds: any one will
hold your camera, several lenses, basic accessories such as your flash, and even filters and film. When you have your entire
outfit with you, you'll probably find yourself using your different lenses and accessories much more ... and getting better
pictures because of it.
TROUBLE-SHOOTING
Your Cosmorex camera is designed to give you thousands of pleasurable photographs. Like any precision instrument, your
camera's controls must be operated correctly for best results. Should you at any time experience any apparent malfunction
with your camera, check this handy trouble-shooting chart ... and chances are, you'll be able to solve your own problem on
the spot!
If this happens ... Here's Why ... And how to correct it .. .
Shutter Release Button
Film Transport Lever
Always operate Transport
(2) does not trip shutter.
(1) not fully wound.
Exposure Counter (4)
"skips", counting in
correctly.
Film Transport Lever (1)
does not stop after 2 or or
more strokes.
See Above.
Rewind Release Ring
(3) and/or Shutter
Release Button (2) not
turned fully to right
(clockwise).
Lever in 2 strokes. It will stop mid-way
during the 2nd stroke assuring you that
shutter is completely wound.
See Above.
Turn Release Ring (3) and Release Button
(2) completely to the right, till further
movement is impossible.
www.orphancameras.com
If this happens ... Here's Why ... And how to correct it .. .
In loading, Film
Rewind Release Ring Turn Release Ring (3) and Release Button
Sprockets (35) do not turn (3) and/or Shutter
(2) completely to the right, till further
and film does not take up. Release Button (2) not movement is impossible.
turned fully to the right
(clockwise).
After loading, Exposure Film Transport Lever Advance Transport Lever fully before
setting counter to "0".
Counter (4) skips two or (1) not fully wound
more numbers after being before counter is set to
"0" position.
set to "0" position.
Self-Timer does not trip Self-Timer Lever (10) Wind Self-Timer Lever fully until lever
shutter.
not fully wound.
points downwards, with no further
movement possible.
Lens does not close down Auto/Manual Switch
Move Auto/Manual Switch (14)' to "M"
to indicated aperture
(14) on lens not set on whenever Self Timer is used.
when Self-Timer is used. "M"
"X" or "M" Indicator
Flash Unit fires when
Move Indicator (6) to "X" position for
(6) not aligned correctly. electronic flash, or "M" position for flash
Shutter Release is
partially pressed, or does
cubes and bulbs.
not fire.
CONDENSED OPERATING INSTRUCTIONS
Load Film
Press Shutter Release Button (2) and turn Rewind Release Ring (3) clockwise fully. Lift Camera Back Latch (22) and
swing Back open. Push Film Cassette Spindle (29) upwards and drop in film cassette. Insert film end into any slot on takeup spool (36).
Move Film Transport Lever (1) to verify that film is advancing and Sprockets (35) are engaged. Close Back; press
Rewind Knob (24) downwards.
When knob is flush with Aperture Indicator Dial (20), lock it in place by pressing down ward with clockwise motion.
Press Shutter Release Button (2); now, move Transport Lever through two strokes again. Set Exposure Counter Dial (4) to
"0". Release Shutter and wind film again to bring frame number 1 in place.
Determine Exposure
*Set ASA Film Speed Indicator (19) to correct speed for film in use.
•Aim Meter Cell (25) at subject. Turn exposure meter Shutter Indicator Dial (21) until meter needle is centered within
Exposure Meter Circle (16).
Read desired combination of lens opening and shutter speed from exposure meter Indicator Scales (20, 21).
Set desired shutter speed by lifting Dial (5) and rotating until
speed is indicated by Red dot in center.
Set desired lens aperture by turning Aperture Ring (26) until opening is indicated.
Take The Picture!
Make sure Auto/Manual Switch of lens (14) is at "A" position, and that lens is securely attached.
*Look through viewfinder, frame and focus. Gently press Shutter Release Button (2).
Always make sure Film Transport Lever (1) is fully wound before shooting.
Unloading
When last exposure is made, move Rewind Release Ring (3) counter-clockwise fully. Raise Rewind Knob (24) by
pressing gently in counter-clockwise motion; rewind film, open back, and remove cassette for processing.
Reminders
Always make sure Rewind Release Ring (3) is turned clockwise fully when taking pictures.
For flash, set shutter to 1/30th second and align Flash Synch Selector (6) line with "X" or "M" Mark.
To use Self-Timer, move Self-Timer Lever (10) counter-clockwise fully; set A/M switch of Lens (14) to "M" position, and
press Self-Timer Release Button (9).
Do not rotate Shutter Speed Dial (5) between "B" and "500" positions, or set shutter to positions between marked speeds.
ADVANCED SINGLE-LENS REFLEX PHOTOGRAPHY with your Cosmorex
This section of your owner's manual deals with more advanced photographic techniques and specialized areas of
www.orphancameras.com
photography such as close ups. While it is not required reading for genera photography, it contains many tips you will find
useful when you expand your picturetaking interests.
Taking Better Pictures
Lenses
37 Choosing and Using Interchangeable
40
Taking Close-up Pictures
46
Using Filters and Lens hoods
Choosing Films/Processing
Technical Specifications
51
54
56
TAKING BETTER PICTURES
A slight amount of extra thought and effort on your part can often turn an ordinary looking photograph into a stunninglyattractive one. While there are so many factors concerning this that probably thousands of books have been written on the
subject, here are some basic picture taking tips that will help you take better pictures starting with your very first roll of
film ...
Move in close to your subject. A tremendous advantage of your Cosmorex single-lens-reflex camera is the ability it gives
you to shoot at close distances, simply and precisely. Wherever possible, use this extended focusing range of your camera
by moving in as close as possible to your subject, thus eliminating extraneous foreground and background material and
concentrating the viewer's interest on the subject.
Choose backgrounds carefully. A photograph of a person standing in front of a building is seldom as attractive as a
photograph of the same person, kneeling in front of a nearby tree or bush. Choose surroundings and backgrounds which
complement your subject, yet do not take the viewer's interest away from it. If an attractive, or inconspicuous background is
not handy, expose at the widest possible lens opening (ideally, at f/2); usually this will throw the background out of focus,
and make your subject stand out clearly.
Don't be afraid to experiment. For example, a silhouette of a person watching a sunset can be much more attractive than
an ordinary photograph of the same scene. You can obtain a "silhouette" effect easily by shooting at a lens opening two or
three f/stops smaller than your meter indicates for the subject. (For example, by exposing at f/16 instead of f/5.6.)
Ask your subjects NOT to look at the camera. Pictures of people are usually much more natural looking when the people
are doing something, and looking at what they're doing. A picture of a do-it-yourself handyman absorbed in a project is
going to be more interesting - and a better photo - than a picture of the same person standing up, staring at the camera.
(Chances are, his expression will be a lot more relaxed and natural, too.) When your subject has forgotten about the camera
is when you'll probably get your best pictures.
Look for unusual subjects and viewpoints. A picture of the Washington Monument will be very attractive; take it. But also
take a picture of the schoolchildren gazing up at it. And the image of it reflected in the pool nearby ...
Bad weather can sometimes lead to very good pictures! A child gazing through a rain-splashed window, the play of bright
lights in the water at curbside, a figure walking through a snowstorm. Use your imagination, make your own "rules" as you
progress. Your pictures will be far more interesting, far more eye-catching.
•Shoot from higher or lower angles. Taking pictures of small children? Get down to their level - literally. Kneel down, so
that your camera is at eye-level with the child (instead of aiming down). The result, again, will be a much more interesting,
natural-looking photograph. Taking pictures of a group of people? See if there are stairs nearby, so you can shoot from a
higher angle. Each person in the group will be more visible than if you shot them at eye-level.
Try to get people in your pictures. A photograph of a winding country road is
good; a photograph of a boy walking down a winding country road may very well
be great. In all kinds of outdoor photography, people add life and impact to your
pictures. (If nobody's around, use your camera's self-timer to trip the shutter while
you become the subject.)
*Every time you raise your camera to your eye, you have the potential of creating
a genuinely great photograph. Subjects? The world's full of them.
The rest is up to you...
CHOOSING AND USING INTERCHANGEABLE LENSES
A major advantage of Cosmorex single-lens reflex photography is your ability to use literally hundreds of wide-angle,
telephoto, and zoom lenses. Any lens in the popular "Universal Thread Mount" shared by Cosmorex and other 35mm SLR
cameras with similar mounts may be used. You can choose from lenses made both by camera manufacturers, and by
respected independent lensmakers such as Tamron.
Which interchangeable lens should be your first choice? It depends ...
Wide-Angle Lenses, as their name implies, take in a broader field of view than your standard 58mm lens. This makes them
excellent choices for landscapes, interiors, architectural photography - any situation where a greater-than-normal area needs
to be recorded with your camera.
www.orphancameras.com
Wide-angles are available in focal lengths from 16mm to 35mm. The shorter the "focal length", the wider the area
covered. Most photographers find 28mm or 35mm wide-angle lenses the most useful types; they're relatively inexpensive,
usually faster, and less prone to distortion than 24mm or shorter wide-angles.
If you do a great deal of flash photography, a 35mm lens is probably your best choice. Most electronic flash units are
designed to light the area covered by a 35mm lens. Thus, flash pictures taken with 28mm or shorter focal-length lenses may
not show enough light at the edges of the picture.
•With wide-angle lenses, you benefit from an expanded "depth-of-field" range. (This means that more objects in front of,
and in back of, the subject will appear sharp in the final photograph.) Since more objects are in focus at a given distance,
focusing may be more difficult than with standard or telephoto lenses, and the microprism "spot" in your Cosmorex
viewfinder may not disappear entirely. This does not indicate any defect in your camera or lens! Focusing with wideangle
lenses is often easier if you first set the lens to the minimum focusing distance, then raise the camera to your eye and turn
the focusing ring as quickly as possible until the image appears sharpest. (if you start with the lens at or close to the correct
focusing distance, or hold the camera to your eye for a long period, it will probably be more difficult to distinguish the point
of sharpest focus.)
When using wide-angles, you may note an apparent darkening of the edges of the viewfinder. This effect takes place due
to the different light path of such lenses and has no effect on your final print or slide.
Telephoto Lenses make distant objects appear closer, just like a telescope. In addition, they "compress" space and give
more pleasing perspective to pictures of people. A telephoto lens is ideal for subjects which are impossible, or inconvenient,
to approach closely: sports, wildlife, distant objects of all kinds ... and people!
Why people? Well, you can get close enough with your standard or wide-angle lens to get a large-enough image on the film
- but you'll find that expressions are more natural, more relaxed, when you and your camera are further away. (This is
particularly true when taking pictures of children.) When you're shooting portraits with a telephoto lens, you're further away
- and your subject is either more relaxed, or totally unaware that you're taking pictures of him or her. You'll get some
beautifully-natural expressions, as well as a more pleasing perspective than standard or wide angle lenses can give.
*Telephoto lenses are available in focal lengths from 85mm (1.5x magnification compared to standard lens) to about
1000mm. Most photographers find 135mm lenses most useful, with perhaps a 200mm or 300mm lens in addition for extralong-range work. Lenses of longer focal length than 300mm normally require a tripod for sharp photographs; they magnify
even the smallest camera movement so greatly that most photographers cannot hand-hold them.
•When shooting with a telephoto lens, use the fastest possible shutter speed. Remember that telephotos magnify the image and magnify any movement of the camera (or subject) proportionately. As a general guide try to use a minimum shutter
speed roughly equivalent to the focal length of your lens - for example, 1/125th second for a 135mm lens.
When using "long" telephotos (200mm or greater focal length), you may notice that the top edge of the viewfinder
appears to darken. This phenomenon is caused by the fact that, with ultra-telephoto lenses, some of the light rays pass under
your camera's reflex mirror, and thus are not reflected into the viewfinder.
However, your film image is not affected as all light rays reach the film plane when the picture is taken.
*For telephoto shots in general, try to find ways of "bracing" yourself to hold your camera extra-steady during exposure. If
you're shooting over a fence, you might rest both elbows on the top post. Or, you could brace your body against a wall
during the exposure. Wherever you are, try to find the position that gives your camera and lens the best support. This slight
additional effort will pay off in sharper, clearer telephoto pictures.
Zoom and Variable Focal-Length Lenses let you select the exact focal length required for each picture. This is a tremendous
benefit when making color slides, where it's inconvenient (or, without special equipment, impossible) to "crop" or re-frame
the finished photograph.
Zoom lenses can also be more economical: a single 85-210mm zoom lens will cost less
than separate 85mm, 100mm, 135mm, and 200mm lenses, and give you the added benefit
of in between focal lengths as well. While a zoom is likely to be somewhat heavier than
any given "fixed" focal-length lens within its range, it will be lighter - much lighter - than
three or four separate lenses.
Most zoom lenses for your Cosmorex range from moderate telephoto (around 70mm 85mm) to ultra-telephoto (210mm - 250mm). Wide-angle to telephoto zoom lenses (such
as the Tamron 38-100mm lens) are also available.
When using any zoom, if possible focus at the longest focal length; then zoom to the desired image size and shoot. At
210mm, focusing will be more accurate than is optically possible at 85mm: at the longest focal length, magnification is
greatest and depth-of-field is narrowest - thus, critical focusing is easiest.
www.orphancameras.com
For greatest convenience and handling speed, automatic lenses are recommended. These operate like your camera's standard
lens: the lens remains at its widest opening (for brightest viewing and focusing) until the moment of exposure, when it
closes down automatically to the selected opening. Immediately after the exposure, the lens re-opens to maximum aperture
so you can compose your next shot.
DETERMINING EXPOSURE WITH ACCESSORY LENSES
For correct exposure with your wide-angle, telephoto, or zoom lenses, just follow the same simple procedure used with your
standard lens: take a reading of your subject and set your lens to the aperture indicated by your camera's built-in meter.
TAKING CLOSE-UP PICTURES
One of the most exciting areas of single-lens reflex photography is "close-up" picturetaking. With your Cosmorex camera,
it's easy to take excellent pictures of stamps, flowers, coins, and other small objects. You can even "copy" paintings or
photographs, or make duplicate slides from your original transparencies.
Many close-up pictures can be taken without any accessories at all. Turn your focusing ring (13) to the closest distance (1.8
feet). Now, without turning the focusing ring, move your camera towards your subject until the image in the viewfinder is
sharp ... and you'll find you can fill the entire frame with an object about 6'/2"x10" in area. At this range, you can take
excellent pictures of photographs, flowers, illustrations in books and magazines, important records or documents - all sorts
of things.
To take pictures of subjects smaller than 6'/2x10 inches, several accessories are available. These include close-up lenses,
extension tubes, and bellows units. Sound complicated? It's not ...
Close-Up Lenses
1
Extension Tube Set
Using Close-Up Lenses. This is the least expensive and easiest way to shoot ultracloseups. The close-up lenses are simply magnifying lenses of high quality, mounted
in metal rims that screw into your lens like a filter. You just move close to your
subject, and use the Lens Focusing Ring (13) to finetune focus. Many dealers carry
these in sets of three lenses of varying power, called No. 1, 2, and 3; the higher the
number, the stronger the magnifying power and the closer you can move in.
Close-up lenses have several advantages. They don't require any increase in exposure - you can shoot at the lens opening
indicated by your meter. More, you can screw one closeup lens into another, or even use all three at the same time to cover
an area of about 2x3" - one-half life size!
Extension tubes are tubes that go between your camera body and lens, and let you shoot at even closer range than close-up
lenses. They are normally sold in sets of three tubes of varying length; you can use any single tube or combination of tubes
to achieve the magnification that you want, then fine-tune focus by using the focusing mount of your lens. While not as
convenient to use as screw-in close-up lenses, they allow greater magnification: standard sets of three tubes allow shooting
an object as small as 1x11/2 inches (life size).
Bellows Units are devices that also go between your camera body and lens and allow continuous focusing down to close
range. Focusing is done by a knob on the bellows unit. These attachments are excellent for taking pictures of very small
objects, ranging from about 1%" x 234" to '/2"x%" or even smaller, depending on the bellows in use.
Both extension tubes and bellows units are somewhat more specialized than close-up lenses. Because they move the lens
further from the film, the light rays must travel further to reach the film ... and an increase in exposure is necessary, varying
according to the length of extension and the focal length of the lens. This exposure increase can be computed precisely from
the charts and tables supplied with bellows units and extension tube sets, or with the aid of a KODAK MASTER
DATAGUIDE, available from your dealer. (For critical work with extension tubes or bellows units, a special Technical
Data Sheet is available on request from the manufacturer.)
HINTS FOR BETTER CLOSE-UPS
Whenever possible, shoot at small lens openings (f/8, f/11, and f/16). The picture will be sharper, and you'll gain an extra
margin of depth-of-field to help in sure maximum sharpness.
*Hold your camera steady when shooting. Even a slight camera movement during exposure can cause blur. If possible,
mount your camera on a tripod and use a cable release (available from your dealer) to trip the shutter.
Whenever possible, use contrasting backgrounds for close-ups. Taking a close shot of a light-colored seashell? It will look
sharper when photographed on a piece of black cloth, than on a white paper or cloth. Photographing a dark mineral
specimen? Try putting it on a light-colored fabric for the picture. The contrast between your subject and the background
will make your subject stand out much more clearly... and appear even sharper.
Remember to take the meter "reading" for the subject. At distances closer than two feet, your meter is "seeing" an area
slightly higher than your lens. Ordinarily, this is overcome very easily by simply tilting your camera's meter down towards
your subject when taking your "reading" then raising the camera to the desired position for the final exposure.
Use extra lighting if possible. Close-up photographs taken indoors are sharper and clearer when extra lighting is used. For
copying 2-dimensional subjects (such as maps, documents, or photographs), an excellent (and quite inexpensive) indoor
lighting setup can be made using two Number "1" photoflood lamps, available from your dealer. These bulbs can be used in
ordinary goose-neck lamps, or in "clamp-on" sockets that easily attach to chairs, tables, or whatever's handy. To arrange
lights, just position both lamps on opposite sides of the subject, aimed at the center of the subject (a 450 angle is best).
Make sure both lamps are at about the same distance from the subject - this prevents one side of the picture from being
www.orphancameras.com
lighter or darker than the other.
Excellent close-up and copy pictures can be taken with color film, using the techniques suggested above. If you're shooting
indoors and using photofloods, always use an 80B filter (available from your dealer) when using daylight-type color film.
A NOTE ON FRAMING ...
As with virtually all modern single-lens reflex cameras, the Cosmorex viewfinder shows an overall area somewhat smaller
than the total film area. In practical picture taking, this insures that everything you see in the viewfinder appears in the
finished print or slide, despite the fact that slide mounts and masks in printing equipment actually cover some of the film's
image. The illustration above shows the total film area, the smaller area visible in a mounted slide, and the area displayed in
your camera's viewfinder. Use this illustration as a guide in framing for critical close-up photographs.
PHOTOGRAPHY THROUGH YOUR MICROSCOPE (Photomicrography)
Your versatile Cosmorex camera can even take pictures through a microscope! For pictures at moderate magnifications, no
accessory is needed other than a rigid tripod or copystand to hold your camera (with lens attached) over the eyepiece of the
microscope. For professional photomicrography or photomicrography at higher magnifications, the camera body is attached
directly to the microscope by means of a thread-mount Microscope Adapter available from your dealer. Detailed
information on this fascinating area is also available from your dealer.
USING FILTERS AND LENS HOODS ON YOUR COSMOREX
The 58mm f/2.0 automatic lens supplied with your Cosmorex
accepts standard 52mm screw-in filters and lens accessories.
Filters can be divided into two basic types: color conversion filters,
designed to convert color films balanced for a specific light source for
use with other light sources, and color correction or special-effects
filters, designed to change the overall colors of a scene and give more
pleasing or dramatic effects.
Many photographers find a 1A Skylight filter the most useful single type; this reduces the excess bluish content often
found in sunlight, requires no increase in exposure, and may be kept on the lens at all times for protection. See filter chart
for information on other filters.
Lens hoods are simply shields which screw into your lens, and protect it from glare caused by light entering the lens from
above and the sides. While under certain conditions all photographic lenses show some glare (Flare these inexpensive aids
prevent it in most instances. Both folding rubber and rigid metal types are available from your dealer.
FILTER REFERENCE CHART
Filter Type
Appearance
1A (Skylight) Pale Amber
UV (UV16)
Colorless
81 A
Red/Yellow
82A
Light Blue
80A
Med. Blue
80B
Dark Blue
85A
Orange
85B (TypeB) Red-Orange
FL-D
Filter
Type
Pink
Appearance Purpose
Polarizer
Neutral
K2 (Y2)
Yellow
02 (G)
Orange
Purpose
For Film
Types
Improves colors outdoors All
when light is blue
Warms colors at high
All
altitudes or when subject
is in shadows
Gives most pronounced Color
'warming' effect; use on
overcast or rainy days.
Color
Reduces excessive
reddishness of day-light
in early morning, late
evening.
Converts Daylight color Color
films for use with 3200K
floodlamps.
Converts Daylight color Color
films for use with
standard 3400K
floodlamps (No. 1, 2,
BEP).
Converts Type A color
Color
films for use in daylight
or with electronic flash.
Converts Type B color
Color
films for use in daylight
or with electronic flash.
Converts Daylight color Color
films for use under
fluorescent lighting.
For Film
Types
Eliminates reflections, glare from
water, glass, metal; darkens sky,
makes clouds more prominent,
improves color saturation.
Darkens sky, makes clouds stand out
clearly.
More pronounced cloud /sky
separation.
All
Exposure Increase*
f/Stops
Factor
0
0
0
0
1/2
1.4
1/2
1.5
11/2
3.2
1
2.0
1
2.0
1
2.0
1
2.0
Exposure
Increase*
f/
Stops Factor
1'/-2 3.04.0
B&W
1
2.0
B&W
2
4.0
www.orphancameras.com
R2 (25A)
Red
G2 (X1)
Green
Most pronounced cloud/sky
B&W
separation.
Lightens trees, grass, foliage; shows B&W
flesh tones more clearly where foliage
is visible.
3
8.0
1
2.0
*To compensate for the light absorbed by the filter, an increase in exposure is required (except for 1A and UV filters). To
obtain this, either (a) determine exposure in normal way, then open up lens the number of f/stops shown, or (b) divide ASA
Film Speed by the "Factor" listed, set the resultant (lower) film speed on your Exposure Meter or Flash Calculator, and then
determine and set exposure in the normal way.
(Please consult Film Instruction Sheet for recommendations for specific film types.)
CHOOSING FILMS/PROCESSING
Your Cosmorex camera accepts all standard 35mm film cassettes. Choose from these three basic film types:
Color Negative Films are designed principally for making color prints. These are ordinarily returned to you (along with
your negatives) in 3'/2x5" size - excellent for albums. From your color negatives, smaller or larger prints may also be
obtained (or ordered at any future time).
Today's color negative films are medium speed types, ranging from ASA 80 to 100. They're quite practical for use outdoors,
or indoors with flash (no filter is necessary). Their wide latitude generally provides good results even if somewhat under or
overexposed - a valuable extra "insurance" of good pictures. In addition, fine-quality color slides can be made from most
color negatives at moderate cost, should this later be desired. Color negative films can be processed through your dealer or
at home.
Color Slide Films are normally returned as mounted color transparencies for use in hand viewers or slide projectors. Many
types are available, ranging from relatively slow-speed (ASA 25) to ultra-speed (ASA 160 or more). Generally, most
photographers find medium-speed types (ASA 64-100) most pleasing for a majority of picture-taking situations. Usually,
slide films are "Daylight" balanced (making them suitable for use with electronic flash without filters, too); some films are
balanced for photoflood lamps, and require a filter when used in daylight. All slide films may be processed through your
dealer, and several at home, too.
Black and White Films produce negatives from which prints are made. Film types range from slow-speed, ultra-fine-grain
emulsions (ASA 32) to films fast enough to make most indoor pictures possible without flash (ASA 400). Normally, your
dealer makes 31/2x5" prints; enlargements are easily obtainable as well. Black-andwhite films are the simplest, and most
economical, of all film types for home processing and enlarging.
Standard 35mm films are supplied in 20 and 36 exposure rolls. If you use lots of film, ask your dealer about a Bulk Loader
which lets you load your own cassettes from long "bulk" film rolls, in any length up to 36 exposures. This can reduce the
cost of black-and-white film even further.
DOING YOUR OWN PROCESSING AND ENLARGING
For many photographers, one of the major joys of photography lies in processing and printing their own pictures ...
something that's simpler, and in many instances, more economical, than ever before. Even if you've never "processed your
own" before, you'll find yourself producing excellent negatives and prints - including color prints - almost from the
beginning with today's simplified processing and printing equipment. (Details on the comprehensive Omega system of
enlargers, accessories, and color processing materials may be obtained without cost by writing to our sister company,
Berkey Marketing Companies, Inc., Omega Division, 25-20 Brooklyn-Queens Expressway West, Woodside, New York
11377.) Talk it over with your dealer - you'll be surprised at how easy, and how satisfying, it is to do your own developing
and printing.
TECHNICAL SPECIFICATIONS
Camera Type:
meter.
35mm single-lens reflex camera with interchangeable lenses, focal-plane shutter, and built-in exposure
Format: 24x36mm; accepts standard 35mm 20 or 36-exposure cassettes.
Standard Lens:
42 degrees.
Automatic Cosmogon 58mm f/2.0; 6-elements in 4 groups. Hard-coated, color-corrected. Angle of view
Minimum Focus:
21.2" (0.54m) from film plane.
Aperture Range:
f/2.0 - f/16; positive click stops at full and intermediate apertures.
Filter/Accessory Size:
Diaphragm Type:
52mm x 0.75 screw-in.
Fully automatic, instant-reopen; optional manual aperture control.
Lens mount: Universal Thread Mount (42mm); accepts standard single-pin Automatic lenses and accessories. Flange/
Film Distance 45.5mm.
Shutter:
Horizontally-traveling cloth focal plane; speeds B, 1130t 1/60, 1/125, 1/250, and 1 /500th second.
Flash Synchronization:
Full M/X Synchronization at 1/30th second via selector switch.
Flash Contact: PC outlet accepts all standard flash cords.
Viewing/Focusing System: Eye-level pentaprism shows upright, laterally-correct image at life-size (1x) with 58mm lens;
instant-return mirror.
Focusing Screen:
Central Microprism surrounded by fine groundglass collar.
Exposure Meter: Built-in selenium-cell meter, with match-needle shutter/aperture readout. ASA Film Speed Range 25500. Equivalent DIN indices (13-28). Calibrated for apertures from f/2.0 to f/32, shutter speeds from 30 seconds - 1/500th
second.
Loading:
Hinged back, multi-slotted take-up spool.
Exposure Counter: Additive 0-36, manual resetting type.
Transport:
Two-stroke ratchet-action lever advances film, winds shutter, counts exposures, prevents double exposures.
Unloading:
Locking rewind release control; elevating rewind knob rises above camera body for convenient access.
Self-Timer:
Built-in with approximately 10 seconds delay. Maybe disengaged without firing shutter if desired.
Tripod Socket:
Construction:
Finish:
Standard 1 /4x20, accepts all standard tripod and bracket retaining screws.
Metal alloys used throughout.
Satin chrome, with black leather-grain trim.
www.orphancameras.com
Dimensions:
Weights:
Body Only: 2"x3.9"x5.4" With Lens: 3. 7 "x3.9"x5.4"
Body Only: 24.5 oz. Standard Lens: 10.3 oz.