1
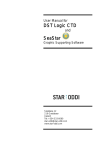
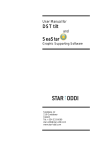
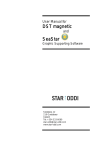
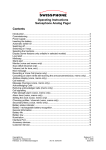
Trouble-shooter
for
Starmon
Skeidaras 12
210 Gardabaer
Iceland
Tel: +354 533 6060
[email protected]
www.star-oddi.com
User Manual
Trouble-shooter for Starmon
Table of Contents
1.
Connecting to the Recorder ...................................................................... 2
1.1
Communication Errors .............................................................................. 2
Defining the Com Port for USB Serial Converter ............................................. 2
1.2
CRC Error ................................................................................................. 5
1.3
Disable CRC Check .................................................................................. 6
Updating Settings to Recorder Fault ................................................................ 7
Comparison Test Error..................................................................................... 7
2.
Starting a New Measurement Sequence .................................................. 8
2.1
Communication Errors .............................................................................. 8
3.
Retrieving Data from the Recorder ........................................................... 9
3.1
Communication Errors .............................................................................. 9
©2014 Star-Oddi. All Rights Reserved
Page 1
User Manual
Trouble-shooter for Starmon
1. Connecting to the Recorder
In order to be able to communicate with the recorder, the cable must be connected to
the correct COM port, as indicated in SeaStar.
1.1 Communication Errors
1. If using a laptop, please make sure that the power cable/DC power supply are
located as far as possible away from the communication cable.
2. Make sure that no electrical devices/power sources are close to the
communication cable.
3. If a Device Error is reported upon connection, please check if the SeaStar
program has been opened more than once. This error can also occur if a
different program is open and is using the same communication port as
SeaStar.
Defining the Com Port for USB Serial Converter
The easiest way to find the correct Com Port is to use the Connection Wizard which
can be found under the Wizards menu in the software.
The wizard will display all the com ports available. Plug in the USB cable and the
selected com port will turn green.
Figure 1.1
©2014 Star-Oddi. All Rights Reserved
Page 2
User Manual
Trouble-shooter for Starmon
Figure 1.2
NOTICE: If no connection can be established with the logger using the USB serial
converter cable, the following procedure should be performed.
First connect the USB serial converter to a USB port. Open the Control Panel under
the Start menu and open the Device Manager.
Figure 1.3
©2014 Star-Oddi. All Rights Reserved
Page 3
User Manual
Trouble-shooter for Starmon
Click on Ports (COM&LPT).
Figure 1.4
Double click on USB Serial Port and select Port Settings.
Figure 1.5
©2014 Star-Oddi. All Rights Reserved
Page 4
User Manual
Trouble-shooter for Starmon
Click the Advanced button and the following window appears:
Figure 1.6
Under COM Port Number you can define a com port for the USB serial converter.
After having selected the COM Port Number, make sure to close SeaStar. When reopening SeaStar, the COM port should become active in SeaStar and can be viewed
either under the Connection Wizard or Settings > Communication > Serial Ports. If
the COM port number does not become active in SeaStar please try another COM
port number. Even though the Device Manager of the computer reports that a COM
port number is in use, it might be possible to define and use those COM ports for the
USB.
There is no
solution here, as it varies between computers, and the user may
have to try several times to define a few different COM port numbers. It might also be
necessary for the user to shift the USB plug between different USB inputs on the
computer. If the USB cable is switched to another port, the computer may not find it at
first, but if it is un-plugged and re-plugged it is likely to be found.
1.2 CRC Error
The CRC test is a safety check performed by the software when retrieving the
Recorder Information Data (RID). The CRC is a register in the RID file which is
calculated a
when starting up a new measurement
sequence. When retrieving the RID from the recorder, SeaStar calculates the CRC
from the retrieved data
If they do
not match, a CRC error is reported.
The reason why a CRC error occurs is most likely due to bad communication
condition. Check section 1.1. It is possible to disable the CRC check while
connecting. This is done under Settings Connection in the software. Normally, the
©2014 Star-Oddi. All Rights Reserved
Page 5
User Manual
Trouble-shooter for Starmon
CRC should not be disabled, but the following scenarios are an exception where
CRC check can be disabled:
a) Communication error occured while inititating a new measurement sequence.
b) A communication error occured after data retriaval, while updating status in the
recorder.
c) A communication error occured while putting the recorder to sleep.
d) A communication error occured while updating status in the recorder upon a
POR (Power On Reset) error detection. When connecting to the recorder and
POR error is detected, a new status is initiated in the recorder and the RAM
data is reset.
e) Repeated CRC error occurs and the above does not apply/has been checked.
This may though produce errors in the RID file, which again may produce errors
in the conversion of data.
1.3 Disable CRC Check
In case of persistent CRC check error, the CRC check can be disabled:
1.
2.
3.
4.
5.
6.
7.
Go to Settings Connection and disable the Perform CRC test
when retrieving RID.
Try connecting to the recorder Recorder Connect.
If connection is OK, then examine the RIT file for possible errors.
These possible errors may manifest themselves as very high (>E20)
or very low (<E-20) calibration constants. Other errors may be
abnormal times/dates and abnormally high measurement sequence
number in the RIT file. Usually SeaStar will come up with a warning if
the calibration constants or time/date is not normal. If the RIT shows
signs of these error, please request recorder backup file (RBD) from
Star-Oddi.
If the recorder has been measuring data, try to retrieve the data
Recorder Retrieve Data. If data cannot be retrieved there is fault
with the PC com port, the communication cable or the recorder. If
data retrieval is OK, continue to step 5.
Make a short measurement test and start the recorder in a new
measurement sequence Recorder
Start New Measurment
Sequence.
Connect to the recorder after the short measurement test, Recorder
Connect. The CRC check is automatically enabled. If a
communication/CRC error occurs, then there is fault with the PC
com port, the communication cable or the recorder. If this is the
case please contact Star-Oddi
Retrieve data from the short test Recorder
Retrieve Data.
Analyse the data and verify that the values are correct.
©2014 Star-Oddi. All Rights Reserved
Page 6
User Manual
Trouble-shooter for Starmon
Updating Settings to Recorder Fault
If there is an existing communication problem while using a USB serial converter the
user can try to disable the Check Data Echo in SNMS option. This option will bypass
data echo checks, resulting in less restriction on communication protocol.
By choosing the Settings menu and the Connection option command the following
window appears:
Figure 1.7 Connection Options
Disable the Check Data Echo in SNMS. Press OK and try to connect again.
Comparison Test Error
The comparison test takes place when the PC has sent all the settings data to the
recorder and it reads the whole file back and compares to what was sent. Bad
communication can cause errors in the information file when read back. If the data
echo check is enabled it is guaranteed that the information file was transferred
correctly to the recorder, therefore it is OK to disable the comparison test.
©2014 Star-Oddi. All Rights Reserved
Page 7
User Manual
Trouble-shooter for Starmon
2. Starting a New Measurement Sequence
2.1 Communication Errors
1. Timeout on command echo (no response from recorder).
Check if the cable is properly connected the PC COM port and the recorder.
2. Other communication errors.
Other communications problems can occur although the recorder is still online. The user is prompted to try starting the recorder again in a new
measurement sequence. If instead, the user chooses to connect to the
recorder again, a CRC error will most likely occur. In that case, the user should
disable the CRC check (Settings Connection).
©2014 Star-Oddi. All Rights Reserved
Page 8
User Manual
Trouble-shooter for Starmon
3. Retrieving Data from the Recorder
3.1 Communication Errors
1. Timeout on command echo.
There is no response from recorder. The recorder is off-line. Please try to
connect again.
2. Other communication errors while retrieving data.
The result of the retrieval can be viewed in the .MIT file. Usually, if the
communication is in order and all the data is retrieved correctly, SeaStar will
automaticlly convert the data from the decimal values (.DAD) to the unit values
(*.DAT). If this is not the case, then SeaStar may drop the conversion part and
it is up to the user to either retrieve the data again or manually re-convert the
data, depending on the status of the retrieval. If a communication error occurs
in the middle of data retrieval, the recorder goes off-line. The user must
connect to the recorder again and retrieve the data again.
3. Communication errors while updating recorder status.
In the event that a communication error occurs while updating the status in the
recorder, i.e. after retriving the data, the CRC register in the recorder is
probably corrupt. Thus when connecting again to the recorder, a CRC error
will likely occur. In this case, the CRC check should be disabled, as described
under CRC error in chapter 1.3.
©2014 Star-Oddi. All Rights Reserved
Page 9