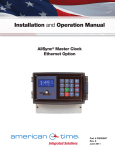
1
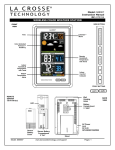
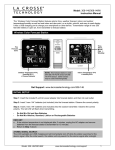
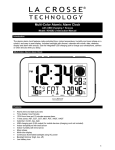
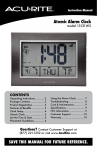
Model: 519-1416 Instruction Manual La Crosse Technology® introduces a Multifunctional Atomic Clock that is perfect for everyday use. This digital clock features a stopwatch function, countdown timer, and storable event countdown timer that counts down the days to a specific event. The clock also sets itself using the WWVB radio signal and features a large, easy-toread display. MULTIFUNCTIONAL ATOMIC CLOCK STOPWATCH | TIMER | EVENT COUNTDOWN AM/PM, Time Zone + WWVB Time Icon Hour, Minutes + Seconds Get Support: www.lacrossetechnology.com/519-1416 GET STARTED Step 1: Insert 3 new AA Alkaline batteries (not included) into the clock. Observe the correct polarity. Restart: If the time (12:00) is not displayed after 30 seconds, first, check the battery polarity. Second, remove batteries from the clock for 15 minutes. Return to Step 1 above. Battery Cover Fold out Stand Battery Compartment 3 “AA” Model: 519-1416 www.lacrossetechnology.com/support Page | 1 Table of Contents Multifunctional Atomic Clock Initial Setup Restart Table of Contents Features Function Buttons Program Menu WWVB time signal (On/Off) Time Zone - 7 time zones DST (Daylight Saving Time On/Off) 12/24 hour time format Set Time Set Calendar Alarm Time Set Alarm Activate/Deactivate Alarm Snooze Alarm Stopwatch Start/Stop Reset Countdown Timer Set Timer Timer Alarm Countdown Timer Memory Event Timer Set Event Timer Event Alarm Event Timer Memory WWVB Radio-controlled Time Signal Care and Maintenance Low Battery Icon Specifications Warranty and Support Information FCC Statement 1 1 1 2 2 3 4 4 4 4 4 5 5 5 5 5 5 6 6 6 6 6 6 6 7 7 7 7 8 8 8 8 8 9 Features Stopwatch Countdown Timer Event Timer 12/24 hour atomic time (manual set option) Calendar Alarm clock with snooze 7 DST time zones (AST, EST, CST, MST, PST, AKT, and HAT) Wall hanging or desktop Model: 519-1416 www.lacrossetechnology.com/support Page | 2 Button Functions Button Press and Release Functions Hold 3 seconds START/PAUSE/RESET Stopwatch mode: Start/Stop/Pause Timer mode: Start/Stop/Pause Event Timer mode: Start/Stop/Pause Stopwatch mode: Reset Timer mode: Reset Event Timer mode: Reset MODE Toggle between Time Mode, Timer Mode and Event Mode Time mode: Set Time/Date Timer mode: Set Countdown Timers Event Timer mode: Set Event Timers + (UP) 1 step forward (setup) any mode Fast advance (setup) Time Mode: hold for WWVB manual search - (DOWN) 1 step backward (setup) Fast backward ( setup) ALARM Press to display alarm time. Alarm mode: Activate/deactivate alarm Hold to set alarm time SNOOZE Time mode: press to activate the snooze for 10 minutes Timer mode and Event mode: when the timer alarm sounds, press to silence the sound. MEM Timer Mode: Press to view preset values: (MEM1: 5 min, MEM 2: 10min, MEM 3: 15 min, MEM 4: 20 min, MEM 5: 30 min) Timer and Event Mode: Hold to store a set number Program Menu (set time, date, 12/24) In time mode you can set: WWVB time signal (On/Off) Time Zone - 7 time zones DST (Daylight Saving Time On/Off) 12/24 hour time format Hour Minutes Model: 519-1416 www.lacrossetechnology.com/support Page | 3 Seconds Month Date Year Program menu buttons: 1. Hold the MODE button to enter time set mode. 2. To adjust values press the DOWN or UP buttons (on top). 3. Press the MODE button to confirm adjustments and move to the next item. 4. Press MODE to exit, or wait 30 seconds without pressing buttons to return to the normal time display. WWVB Reception ON/OFF The WWVB time reception defaults to ON. To turn the WWVB reception OFF: 1. 2. 3. 4. Hold the MODE button for 5 seconds. WWVB will show after the time and ON will flash above the time. Press and release the DOWN or UP buttons to turn this OFF. Confirm with the MODE button and move to the Time Zone. Note: When you select WWVB OFF, Time Zone and DST disappear from the time setting order. Time Zone This clock offers seven time zones listed in letter format (default is EST): 1. EST will flash. 2. Press and release the DOWN or UP buttons to select a different Time Zone. 3. Confirm with the MODE button and move to Daylight Saving Indicator. Daylight Saving Time Indicator ON/OFF DST will default to the ON position as most of the country observes the DST change. If you live in an area does not observe the DST change, switch this to the OFF position. 1. DST will show after the time and ON will flash above the time. 2. Press and release the DOWN or UP buttons to turn DST to OFF. 3. Confirm with the MODE button and move to 12/24 hour time format. 12-hour or 24-hour Time Format The Time may be displayed in 12-hour or 24-hour format. Default is 12-hour time. 1. 2. 3. 4. Hold the MODE button for three seconds to enter time set mode. 12H will flash. Use the UP OR DOWN buttons to choose 12-hour or 24-hour time format. Press the MODE button to confirm and move to set time. Set Time To set the time manually: 1. 2. 3. 4. 5. 6. 7. The Hour digit will flash. Use the UP OR DOWN buttons to choose the hour. Press the MODE button to confirm and move to minutes. The Minutes will flash. Use the UP OR DOWN buttons to choose the minutes. Press the MODE button to confirm and move to seconds. The Seconds will flash. Model: 519-1416 www.lacrossetechnology.com/support Page | 4 8. Use the UP OR DOWN buttons to rest the second to zero. 9. Press the MODE button to confirm and move to set calendar. Set Calendar To set the calendar: 1. 2. 3. 4. 5. 6. 7. 8. 9. The Month will flash. Use the UP OR DOWN buttons to choose the month. Press the MODE button to confirm and move to the date. The Date will flash. Use the UP OR DOWN buttons to choose the date. Press the MODE button to confirm and move to the year. The Year will flash. Use the UP OR DOWN buttons to choose the year. Press the MODE button to confirm and exit. Note: The day of the week will set automatically once the year, month and date are set. ALARM (“AL” will show in place of seconds) ALARM buttons: 1. Hold the ALARM button to enter alarm set mode. 2. To adjust values press the DOWN or UP buttons. 3. Press the ALARM button to confirm adjustments and move to the next item. Set Time Alarm From time mode, hold the ALARM button for three seconds to enter alarm set mode. 1. The Hour will flash. 2. Use the UP OR DOWN buttons to set the hour. 3. Press the ALARM button to confirm and switch to minutes. 4. The Minutes will flash. 5. Use the UP OR DOWN buttons to set the minutes. 6. Press ALARM button to confirm and exit. Note: When no buttons are pressed for 30 seconds the clock will save the last change and default back to normal time mode. Activate/Deactivate Time Alarm In normal mode, press and release the ALARM button once to show alarm time. Press and release the ALARM button repeatedly to turn ON/OFF alarm. The alarm icon appears when alarm is activated. Note: The crescendo alarm will ring for 2 minutes then turn off if no buttons are pressed. Snooze When the alarm sounds, press the SNOOZE button to snooze the alarm for 10 minutes. The snooze option can be repeated three times. The snooze icon Zz will flash while the snooze feature is active. STOPWATCH (Count up, tracks duration of events) The Timer icon with arrow pointing up will be displayed. Once the timer start the arrow will flash Start/Stop: Press the MODE button to switch to TIMER MODE. The default time is zero. 1. Press START/PAUSE button to start counting up. 2. After 23 hours and 59 minutes and 59 seconds the day number will start counting. 3. After counting for 23:59:59 and 364 days it will start displaying the years. Model: 519-1416 www.lacrossetechnology.com/support Page | 5 Alarm Icon Reset: 4. Hold START/PAUSE to reset the time and start from ZERO. Note: This clock has count up capacity of 9 years, 364 days, 23:59:59. At 24 hours, a DAY indicator will show At 365 days a YEAR indicator will show COUNTDOWN TIMER (cooking, exercising, preset times) The Timer icon with arrow pointing down will be displayed. Once the timer starts the arrow will flash The versatile countdown timer can be used for various activities including cooking and exercising. If the timer isn’t stopped when the time is up, it will begin to count up to track the time since the timer reached zero. Store up to five times in the countdown memory feature. Note: The timers will continue to run if you change modes, allowing full clock and ALARM function. Set Timer: 1. Hold the MODE button and the Seconds will flash. 2. Use the UP OR DOWN buttons to rest the seconds to zero. 3. Press the MODE button to confirm and move to minutes. 4. The Minutes will flash. 5. Use the UP OR DOWN buttons to choose the minutes. 6. Press the MODE button to confirm and move to hour. 7. The Hour digit will flash. 8. Use the UP OR DOWN buttons to choose the hour. 9. Press the MODE button to confirm and exit. Note: The countdown timer is programmable up to 23 hours, 59 minutes and 59 seconds. Start/Stop: Press START/STOP to start or stop the timer. Reset: Hold START/STOP to clear the timer numbers. Timer Alarm When the timer reaches zero, the alarm will sound for 20 seconds. The timer icon will flash. The clock will start counting up and display the + icon. Press any button to stop the alarm. Countdown Timer Memory Select preset memory value: 1. In timer mode, press the MEM button to select from 5 preset values from 5 minutes to 30 minutes: (MEM1: 5 min, MEM 2: 10min, MEM 3: 15 min, MEM 4: 20 min, MEM 5: 30 min). 2. Press the START/STOP button to start or stop the preset timer. Change any preset memory value: 1. Hold the MODE button and the Seconds will flash. 2. Use the UP OR DOWN buttons to reset the seconds to zero. Model: 519-1416 www.lacrossetechnology.com/support Page | 6 3. 4. 5. 6. 7. 8. 9. Press the MODE button to confirm and move to minutes. The Minutes will flash. Use the UP OR DOWN buttons to adjust the minutes. Press the MODE button to confirm and move to hour. The Hour digit will flash. Use the UP OR DOWN buttons to adjust the hour. Press the MODE button to confirm and exit. Memory Number Start/Stop: Press START/STOP to start or stop the timer. Reset: Hold START/STOP to clear the timer numbers. Note: The countdown timer is programmable up to 23 hours 59 minutes and 59 seconds. EVENT TIMER (holiday/appointment countdown, up to 5 events) The Event icon and Timer icon with arrow pointing down will be displayed. Once the timer starts the arrow will flash. Easily track the number of days to specific date using the event countdown timer. This timer is perfect for counting down the days to holidays or appointments. The event countdown timer allows you to program up to five events simultaneously. Note: The event timer is programmable up to 9 years, 364 days, 23 hours 59 minutes and 59 seconds. Set event timer: 1. The Month digit will flash. 2. Use the UP OR DOWN buttons to choose the month. 3. Press the MODE button to confirm and move to date. 4. The Date digit will flash. 5. Use the UP OR DOWN buttons to choose the date. 6. Press the MODE button to confirm and move to year. 7. The two digit Year will flash. 8. Use the UP OR DOWN buttons to choose the year. 9. Press the MODE button to confirm and move to hour. 10. The Hour digit will flash. 11. Use the UP OR DOWN buttons to choose the hour. 12. Press the MODE button to confirm and move to minutes. 13. The Minutes will flash. 14. Use the UP OR DOWN buttons to choose the minutes. 15. Press the MODE button to confirm and move to seconds. 16. The Seconds will flash. 17. Use the UP OR DOWN buttons to rest the second to zero. 18. Press the MODE button to confirm and exit. Event Time Note: The date information will be saved and displaying next to the EVENT icon. Start/Stop: Press the START/STOP button to start or stop the event timer. Reset: Hold the START/STOP button to clear the event timer. Event Alarm When the event timer reaches zero, the alarm will sound for 20 seconds. The event icon will flash. The clock will start counting up and display the + icon. Press any button to stop the alarm. Event Timer Memory The event timer does not have preset values. When you set events, they will store into memory for easy recall with the MEM button. Model: 519-1416 www.lacrossetechnology.com/support Page | 7 The first event will store in MEM 1. The next events will store MEM 2, MEM 3, MEM 4, and MEM 5. Then the next time an event is saved it will replace MEM 1 and start the sequence again. MEM and a number (MEM 1) will display above the event timer, when you use a preset event timer memory. Note: Multiple timers (event, stopwatch or countdown) can run at the same time. The timers will continue to run in the background, when the clock is displayed. MANUAL WWVB RADIO-CONTROLLED TIME SEARCH From time mode press the UP button to start or stop a manual signal search. WWVB Icon will flash WWVB Icon For information about WWVB, visit: www.nist.gov/pml/div688/grp40/wwvb.cfm LOW BATTERY ICON Low battery icon indicates low battery for the clock. If the icon is displayed replace batteries. Low Battery Icon SPECIFICATIONS Operating Temperature: 32°F to 122°F (0°C to 50°C) Power: 3-AA, IEC, LR6 batteries (not included) Battery Life: Battery life is over 24 months when using reputable battery brands. Dimensions: 11.81”L x 6.49”H (29.97cm x 16.51cm) CARE AND MAINTENANCE Do not mix old and new batteries Do not mix Alkaline, Standard, Lithium or Rechargeable Batteries Do not expose to extreme temperature, vibration or shock. Clean with a soft damp cloth. Do not use solvents. The product is not a toy. Keep it out of reach of children. The product is not to be used for medical purpose or for public information. It is intended for home use only. The specs of this product may change without prior notice. Improper use or unauthorized opening of housing voids warranty. WARRANTY AND SUPPORT INFORMATION La Crosse Technology, Ltd. provides a 1-year limited time warranty (from date of purchase) on this product relating to manufacturing defects in materials & workmanship. View full warranty details online at: www.lacrossetechnology.com/warranty_info.pdf For warranty work, technical support or other information contact: La Crosse Technology, Ltd 2817 Losey Blvd. S. La Crosse, WI 54601 Contact Support: 1-608-782-1610 Model: 519-1416 www.lacrossetechnology.com/support Page | 8 Product Registration: www.lacrossetechnology.com/support/register Online Product Support: www.lacrossetechnology.com/519-1416 Protected under U.S. Patents: 5,978,738, 6,076,044, 6,597,990 Scan for online information FCC STATEMENT This Device complies with Part 15 of the FCC Rules. Operation is subject to the following two conditions: (1) This device may not cause harmful interference, and (2) the device must accept any interference received, including interference that may cause undesired operation. NOTE: THE MANUFACTURER IS NOT RESPONSIBLE FOR ANY RADIO OR TV INTERFERENCE CAUSED BY UNAUTHORIZED MODIFICATIONS TO THIS EQUIPMENT. SUCH MODIFICATIONS COULD VOID THE USER AUTHORITY TO OPERATE THE EQUIPMENT All rights reserved. This handbook must not be reproduced in any form, even in excerpts, or duplicated or processed using electronic, mechanical or chemical procedures without written permission of the publisher. This handbook may contain mistakes and printing errors. The information in this handbook is regularly checked and corrections made in the next issue. We accept no liability for technical mistakes or printing errors, or their consequences. Model: 519-1416 www.lacrossetechnology.com/support Page | 9