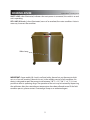
1
Moving
Rehabilitation
Forward™
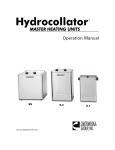
Hydrocollator
®
HEATING UNITS
User Manual
120 - Volt Units
E-2
SS
E-1
M-4
M-2
SS-2
ISO 13485 CERTIFIED
TABLE OF CONTENTS
Hydrocollator® Heating Units
Foreword. . . . . . . . . . . . . . . . . . . . . . . . . . . . . . . . . . . . . . . . . . . . . . . . . . . . . . . . . . . . . . . . . . . . 2
Safety Precautions. . . . . . . . . . . . . . . . . . . . . . . . . . . . . . . . . . . . . . . . . . . . . . . . . . . . . . . . . 2-5
Precautionary Definitions . . . . . . . . . . . . . . . . . . . . . . . . . . . . . . . . . . . . . . . . . . . . . . . . . . . . . . . . . . . . .
Cautions. . . . . . . . . . . . . . . . . . . . . . . . . . . . . . . . . . . . . . . . . . . . . . . . . . . . . . . . . . . . . . . . . . . . . . . . . . . . . .
Warnings . . . . . . . . . . . . . . . . . . . . . . . . . . . . . . . . . . . . . . . . . . . . . . . . . . . . . . . . . . . . . . . . . . . . . . . . . . . . .
Description of Device Markings . . . . . . . . . . . . . . . . . . . . . . . . . . . . . . . . . . . . . . . . . . . . . . . . . . . . . . .
2
3
4
4
Nomenclature . . . . . . . . . . . . . . . . . . . . . . . . . . . . . . . . . . . . . . . . . . . . . . . . . . . . . . . . . . . . . 5-7
Technical Specifications . . . . . . . . . . . . . . . . . . . . . . . . . . . . . . . . . . . . . . . . . . . . . . . . . . 8-10
Setup . . . . . . . . . . . . . . . . . . . . . . . . . . . . . . . . . . . . . . . . . . . . . . . . . . . . . . . . . . . . . . . . . . . . . . 11
Operation . . . . . . . . . . . . . . . . . . . . . . . . . . . . . . . . . . . . . . . . . . . . . . . . . . . . . . . . . . . . . . . . . . 11
Troubleshooting. . . . . . . . . . . . . . . . . . . . . . . . . . . . . . . . . . . . . . . . . . . . . . . . . . . . . . . . . . . . 12
Replacement Parts . . . . . . . . . . . . . . . . . . . . . . . . . . . . . . . . . . . . . . . . . . . . . . . . . . . . . .13-18
Maintenance . . . . . . . . . . . . . . . . . . . . . . . . . . . . . . . . . . . . . . . . . . . . . . . . . . . . . . . . . . . .19-20
Warranty . . . . . . . . . . . . . . . . . . . . . . . . . . . . . . . . . . . . . . . . . . . . . . . . . . . . . . . . . . . . . . . . . . . 21
Hydrocollator® is a registered trademark of Chattanooga Group
HotPac™ is a trademark of Chattanooga Group
Comet® of Prestige Brands, Inc.
Soft Scrub® of the Dial Corporation
Scotch-Brite™ of 3M
©2008 Encore Medical, L.P., and its affiliates, Austin, Texas, USA. Any use of editorial, pictorial or layout
composition of this publication without express written consent from Chattanooga Group of Encore Medical,
L.P. is strictly prohibited. This publication was written, illustrated and prepared for print by Chattanooga Group
of Encore Medical, L.P.
1
FOREWORD
Hydrocollator® Heating Units
This manual contains general instructions for operation, precautionary instructions, and
maintenance recommendations for the owners and operators of the Hydrocollator SS, SS-2,
E-1, E-2, M-2, and M-4 Heating Units. In order to obtain maximum life and efficiency of the
Hydrocollator Heating Units, please read this manual thoroughly and follow all instructions
prior to operating the unit.
Specifications put forth in this manual were in effect at the time of publication. However,
owing to Chattanooga Group's policy of continual improvement, changes to these
specifications may be made at any time without obligation on the part of Chattanooga
Group.
SAFETY PRECAUTIONS
Precautionary Definitions
The precautionary instructions found in this section and throughout this manual are indicated by specific
symbols. Understand these symbols and their definitions before operating this equipment. The definitions of
these symbols are as follows:
= CAUTIONS - Text with a “CAUTION” indicator explains possible safety infractions that could have the
potential to cause minor to moderate injury or damage to equipment.
= WARNINGS - Text with a “WARNING” indicator explains possible safety infractions that will
potentially cause serious injury and equipment damage.
= DANGERS - Text with a “DANGER” indicator explains possible safety infractions that are imminently
hazardous situations that would result in death or serious injury.
NOTE: Throughout this manual, “NOTE” may be found. These notes are helpful information to aid in the
particular area or function being described.
2
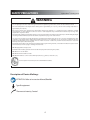
SAFETY PRECAUTIONS
Hydrocollator® Heating Units
CAUTION
• Read, understand, and practice the precautionary and operating instructions. Know the limitations associated with the
Hydrocollator SS, SS-2, E-1, E-2, M-2, and M-4 Heating Units. Observe the cautionary and operational decals installed on the
unit.
• DO NOT operate this unit in an environment where other devices are being used that intentionally radiates electromagnetic
energy in an unshielded manner. Portable and mobile RF communications equipment can affect Medical Electrical
Equipment.
• The Hydrocollator Heating Unit generates, uses, and can radiate radio frequency energy and, if not installed and used in
accordance with the instructions, may cause harmful interference to other devices in the vicinity. However, there is no
guarantee that interference will not occur in a particular installation. Harmful interference to other devices can be determined
by turning the Hydrocollator Heating Unit on and off. Try to correct the interference using one or more of the following:
reorient or relocate the receiving device, increase the separation between the equipment, connect the equipment to an
outlet on a different circuit from that which the other device(s) are connected and consult the Chattanooga Group Service
Department for help.
• Do not use accessories other than those supplied with the Hydrocollator Heating Unit or recommended by Chattanooga
Group. The safety of other products has not been established, and their use could result in injury to the patient.
• Never adjust the thermostat too high. The thermostat is extremely sensitive and the slightest adjustment will alter the
temperature several degrees. The recommended operating temperature is 160° F to 165° F (71° to 74° C). The temperature of
the water should be checked with a thermometer after every adjustment, before using the HotPac. Always allow sufficient
time for the water temperature to stabilize.
• The Hydrocollator Heating Unit should not be installed above a surface that is susceptible to casual water damage.
• Always keep the water level over the top of the HotPacs to avoid burning or scorching of the packs.
• Never allow the HotPac to dry after use.
• Check water level daily as it has a natural loss due to evaporation.
• Clean the tank as described in the maintenance portion of this manual.
• Check unit periodically for signs of leaking and contact service if leaks are noted.
• Always replace Hydrocollator HotPacs as soon as they show signs of wear.
• If the unit is to be left unattended for a period of time, unplug the unit, remove the packs, empty the water, and clean the
tank.
• Do not move the Hydrocollator Heating Unit while filled with heated water. Tipping over could result in burns to the user or
others.
• Always unplug the Hydrocollator Heating Unit from the power source before attempting to empty water from unit.
• Always use factory authorized replacement parts.
• Always destroy and replace HotPacs which are exposed to contamination: hazardous or cleaning materials, bodily fluids,
mold, etc.
• This unit should be operated, transported, and stored in temperatures between 0° F and 140° F (-18° C and 60° C) and
atmospheric pressure range between 50 kPa - 160 kPa, with relative humidity ranging from 10% - 100%.
• Treatment time should not exceed 30 minutes.
• DO NOT retrieve HotPacs from tank or replace HotPacs in tank with unprotected hand.
• Avoid direct contact with mounting rack in tank.
• Always wrap HotPac with towel or terry cover before handling or applying to patient.
• Constantly monitor HotPac application to ensure that the skin is not becoming too hot.
• Damage to skin can occur from exposure to extreme heat or cold. Note instructions for proper use.
• DO NOT apply over insensitive skin or in the presence of poor circulation.
• Never lay or sit on top of the HotPac.
• DO NOT use HotPac directly over cuts, abrasions or wounds.
• Consult health care professional before using HotPacs on non-communicative individuals.
• Exercise extreme caution when using HotPacs on non-communicative individuals.
3
SAFETY PRECAUTIONS
Hydrocollator® Heating Units
WARNING
• Grounding the Hydrocollator SS, SS-2, E-1, E-2, M-2, and M-4 Heating Units: Make certain the unit is electrically grounded by plugging
into a hospital grade electrical outlet with a ground terminal receptacle (U-ground outlet). Follow the National Electrical Code.
• The water temperature in the Hydrocollator Heating Unit is approximately 60° F (71° C), and the water scalding temperature is
approximately 120° F (49° C).
• Care must be taken when operating the Hydrocollator Heating Unit adjacent to or stacked with other equipment. Potential
electromagnetic or other interference could occur to this or other equipment. Try to minimize this interference by not using other
equipment in conjunction with it.
The Hydrocollator Heating Unit should be placed on a smooth, level surface. The surface should support up to the Filled Weight (weight
of heating unit filled with water) found in the Technical Specifications pages 8-10 of this manual.
• Use only accessories that are specially designed for the Hydrocollator Heating Unit. Do not use accessories manufactured by other
companies on the Hydrocollator Heating Unit. Chattanooga Group is not responsible for any consequence resulting from using
products manufactured by other companies. The use of other accessories or cables may result in increased emissions or decreased
immunity of the Hydrocollator Heating Unit.
• Periodically inspect unit for signs of damage and pitting during regular cleaning intervals, as described in maintenance portion of this
manual. Contact service if any signs of damage are discovered.
• DO NOT apply HotPac directly to skin.
• Individuals with circulatory problems should consult with a physician before using this product.
• DO NOT sit or lie on the HotPac.
• DO NOT add chlorine additive to water.
• DO NOT allow HotPac to come in contact with hydrocarbons (e.g., Comet®, Soft Scrub®, etc.).
Risk of explosion if used in the presence of flammable anesthetics.
Description of Device Markings
ATTENTION: Refer to Instruction Manual/Booklet
Type B equipment
Thermostat Intensity Control
4
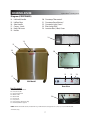
NOMENCLATURE
Hydrocollator® Heating Units
WHITE LAMP, when illuminated, indicates that main power is connected, the switch is on and
unit is operating.
RED LAMP (M-4 units), when illuminated, warns of an overheat/low water condition. Action is
necessary to correct the condition.
White Lamp
IMPORTANT: Some models (M-4 units) are fitted with a thermal cut-out thermostat which
acts as a “non self-resetting” thermal cut-out. In the unlikely event of a fault condition, this
device is designed to open the power circuit between 190° F ± 14° F (88° C ± 8° C). It is not
possible to alter its operating range. The operation of the unit may be restored by depressing
the red button after the water/element temperatures have been allowed to cool. If the fault
condition persists, please contact Chattanooga Group or an authorized agent.
5
NOMENCLATURE
Hydrocollator® Heating Units
Diagram
1.
2.
3.
4.
5.
6.
7.
Lid
Lid Rod
Pilot Lamp, Clear
Power Cord
On/Off Switch
Thermostat Intensity Control
Drain Valve
8.
9.
10.
11.
Heating Element
Drain
Hydraulic Thermostat
Bracket (Bracket & Bulb Thermostat A/B
Assembly)
12. Internal Wiring Harness
13. Drain, Copper Tube
1
4
6
5
Rear View
2
8
9
7
10
11
Inside View
12
Rear
v
13
2
iew E
3
E-2 Model
Underneath View
(J-Box Cover Removed)
E-1 Rear View
NOTE: E-2 and E-1 models shown above; models will vary. Nomenclature also applies to SS, SS-2, M-2 and M-4 models.
6
NOMENCLATURE
Hydrocollator® Heating Units
Diagram (CONTINUED)
14.
15.
16.
17.
18.
19.
Lid Knob/Handle
Lid Rod Nuts
Side Handle
Casters, 3-inch
Neck Pak Insert
HotPac
20.
21.
22.
23.
24.
Overtemp Thermostat*
Overtemp Reset Button*
Overtemp Light Cover*
Pilot Lamp, Red*
Junction Box (J-Box) Cover
18
14
15
19
16
20
Inside View
21
22
17
M-4 Model
Rear View
Not illustrated:
25.
26.
27.
28.
29.
30.
31.
32.
33.
Stainless Steel Wire Rack
Drain, Hose, Bib
Replacement Tank
Outer Jacket
Water Thief
Plastic Feet
Hose, Drain
Drain, Copper, Part B (SS only)
Bracket, Element Support
24
NOTE: M-4 model shown above; models will vary. Nomenclature also applies to E-1, E-2, SS, SS-2, and M-2 models.
* M-4 units only
7
23
TECHNICAL SPECIFICATIONS
Hydrocollator® Heating Units
SS Model
Power Supply
Rated Frequency
Power Consumption
Tank Capacity
Filled Weight
Temperature Range
Thermal Cut-out Temp
Heating Up Time
Cool Down Time
Safety Class
Safety Tests
Dimensions
Product Weight
Shipping Weight
110-120 V~
50 Hz
1000 W
31.64 Liters
56 kg (120 lbs)
160° F - 165° F (71° C - 74° C)
190° F ± 14° F (88° C ± 8° C)
Time to 160° F (70° C) - 3 Hours
Time from 160° F (70° C) - 2 Hours
Type B
UL 544
20 in H x 18 in L x 16 in W (51 cm H x 46 cm L x 41 cm W)
51 lbs (23.1 kg)
54 lbs (24.5 kg)
Standard Accessories: Includes eight Standard size HotPacs.
SS-2 Model
Power Supply
Rated Frequency
Power Consumption
Tank Capacity
Filled Weight
Temperature Range
Thermal Cut-out Temp
Heating Up Time
Cool Down Time
Safety Class
Safety Tests
Dimensions
Product Weight
Shipping Weight
110-120 V
60 Hz
1000 W
49.32 Liters
85 kg (140 lbs)
160° F - 165° F (71° C - 74° C)
190° F ± 14° F (88° C ± 8° C)
Time to 160° F (70° C) - 4 Hours
Time from 160° F (70° C) - 2 Hours
Type B
UL 544
33 in H x 21 in L x 16 in W (85 cm H x 52 cm L x 39 cm W)
68 lbs (30.8 kg)
74 lbs (33.6 kg)
Standard Accessories: Includes eight Standard size HotPacs.
8
TECHNICAL SPECIFICATIONS
Hydrocollator® Heating Units
E-1 Model
Power Supply
Rated Frequency
Power Consumption
Tank Capacity
Filled Weight
Temperature Range
Thermal Cut-out Temp
Heating Up Time
Cool Down Time
Safety Class
Safety Tests
Dimensions
Product Weight
Shipping Weight
110-120 V~
50 Hz
1000 W
15.44 Liters
25 kg (55 lbs)
160° F - 165° F (71° C - 74° C)
190° F ± 14° F (88° C ± 8° C)
Time to 160° F (70° C) - 2 Hours
Time from 160° F (70° C) - 1 Hour
Type B
UL 544
16 in H x 13 in L x 8 in W (41 cm H x 33 cm L x 20 cm W)
14 lbs (6.4 kg)
16 lbs (7.3)
Standard Accessories: Includes four Standard size HotPacs.
E-2 Model
Power Supply
Rated Frequency
Power Consumption
Tank Capacity
Filled Weight
Temperature Range
Thermal Cut-Out Temp
Heat Up Time
Cool Down Time
Safety Class
Safety Tests
Dimensions
Product Weight
Shipping Weight
110-120 V~
50 Hz
1000 W
43.23 Liters
60 kg (125 lbs)
160° F - 165° F (71° C - 74° C)
190° F ± 14° F (88° C ± 8° C)
Time to 160° F (70° C) - 4 Hours
Time from 160° F (70° C) - 2 Hours
Type B
UL 544
20 in H x 15 in L x 13 in W (51 cm H x 38 cm L x 33 cm W)
31 lbs (14.1 kg)
35 lbs (15.9 kg)
Standard Accessories: Includes two Oversize HotPacs, three Standard size HotPacs
and 1 Neck Contour HotPac.
9
TECHNICAL SPECIFICATIONS
Hydrocollator® Heating Units
M-2 Model
Power Supply
Rated Frequency
Power Consumption
Tank Capacity
Filled Weight
Temperature Range
Thermal Cut-Out Temp
Heat Up Time
Cool Down Time
Safety Class
Safety Tests
Dimensions
Product Weight
Shipping Weight
110-120 V~
60 Hz
1000 W
68.81 Liters
110 kg (190 lbs)
160° F - 165° F (71° C - 74° C)
190° F ± 14° F (88° C ± 8° C)
Time to 160° F (70° C) - 6 Hours
Time from 160° F (70° C) - 3 Hours
Type B
UL 544
33 in H x 27 in L x 16 in W (85 cm H x 67 cm L x 40 cm W)
86 lbs (39 kg)
93 lbs (42.2 kg)
Standard Accessories: Includes twelve Standard size HotPacs.
M-4 Model
Power Supply
Rated Frequency
Power Consumption
Tank Capacity
Filled Weight
Temperature Range
Thermal Cut-out Temp
Heating Up Time
Cool Down Time
Safety Class
Safety Tests
Dimensions
Product Weight
Shipping Weight
110-120 V~
60 Hz
1500 W
135.76 Liters
200 kg (340 lbs)
160° F - 165° F (71° C - 74° C)
190° F ± 14° F (88° C ± 8° C)
Time to 160° F (70° C) - 8 Hours
Time from 160° F (70° C) - 4 Hours
Type B
UL 544
33 in H x 35 in L x 20 in W (85 cm H x 89 cm L x 50 cm W)
135 lbs (61.2 kg)
143 lbs (64.9 kg)
Standard Accessories: Includes twenty-four Standard size HotPacs.
10
SETUP
Hydrocollator® Heating Units
Remove all of the contents inside the Hydrocollator Heating Unit and then replace the wire
rack. Make certain the drain valve is closed before filling the tank with water. The tank should
be approximately 3/4 full with packs removed. The tank may be filled from any standard type
faucet.
Check the voltage rating on the serial decal plate which is located on the back of the unit. To
turn the unit on, simply plug the unit into a 120 Volt~, 60 Hz outlet as indicated on the decal
plate. To turn the unit off, simply unplug from outlet. Do not attempt to use direct current.
Follow the procedures indicated in the Precautionary Instructions. Do not attempt to use the
unit if it is not properly grounded.
OPERATION
The Hydrocollator Heating Unit is simple and easy to operate. The controls are located in the
rear, near the bottom of the unit. The thermostat controls the temperature of the water. It is
located near the bottom of the unit on the control panel. It has been tested and preset at the
factory to normal operating temperature. If further adjustment is necessary, it can be easily
accomplished by turning the adjusting screw located on the thermostat. Turning the outer
screw counterclockwise lowers the temperature, while turning it clockwise raises it.
NOTE: Do not turn the inner stem under any circumstance! Stem is preset by the
manufacturer.
The Hydrocollator Heating units operate through the use of a hydraulic capillary-type
thermostat and can be left plugged in and turned on to provide a ready supply of heated
HotPacs .
The HotPac rack accommodates different sizes and types of packs.
SS Unit – Includes eight Standard Size packs. Special rack holds two Neck Contour packs.
SS-2 Unit – The unit comes complete with eight standard HotPacs.
E-1 Unit – With the insert in, the rack accommodates four Standard Size packs.
E-2 Unit – The E-2 unit comes complete with two Oversize, three Standard Size packs, and
one Neck Contour pack.
M-2 Unit - The M-2 unit comes complete with 12 standard HotPacs.
M-4 Unit - The M-4 comes complete with 24 standard HotPacs.
11
TROUBLESHOOTING
Hydrocollator® Heating Units
The following are solutions to minor performance problems. Only qualified personnel should service equipment
problems.
Problem
Possible Cause
Possible Solution
Unit plugged in,
Water does not get hot
1. Breaker for electric circuit off
2. Thermostat not functioning
3. Heating element burned out
1. Turn breaker on
2. Replace thermostat
3. Replace element
Cloudiness of water
1. Filler from packs is seeping
2. Too long a period between
cleanings.
1. Replace packs
2. Drain and clean
Packs too hot
1. Thermostat set too high
2. Thermostat failure
1. Adjust thermostat
2. Replace thermostat
Packs too cool
1. Thermostat set too low
2. Thermostat failure
1. Adjust thermostat
2. Replace thermostat
Unit boils
1. Thermostat failure
1. Replace thermostat
Rust/Discoloration
1. Contact with ferrous material
1. Remove the ferrous metal item from
the unit (staple, paper clip, safety pin,
tongs, etc.) and clean thoroughly. Add
a dechlorinating agent if local water
has high chlorine content.
2. Thoroughly clean tank and remove all
deposits.
3. Clean tank and rinse thoroughly. Add
a dechlorinating agent if local water
has high chlorine content.
2. Deposits on inside of tank
3. Too much chlorine in water
12
REPLACEMENT PARTS
Hydrocollator® Heating Units
Model SS - Standard
Cat. No. – 2202 w/packs
Key*
1
2
3
4
5
7
8
10
11
12
13
14
15
24
25
29
30
31
32
Part Description
Lid
Lid Rod
Pilot Lamp, Clear
Power Cord
On/Off Switch
Drain Valve
Element, Heating 120 Volt, 1000 Watt
Hydraulic Thermostat
Bracket & Bulb Thermostat A/B Assembly (2 each)**
Internal Wiring Harness
Drain, Copper Tube Part A
Handle, Lid Kit***
Lid Rod Nuts (2 required)
Junction Box (J-Box) Cover
Stainless Steel Wire Rack
Water Thief
Feet, Plastic
Hose, Drain
Drain, Copper, Part B
Part No.
22219
22231
22148
20568
23406
21373
10630
10631
21023
21031
21288
22171
21737
22223
22232
21882
75538
21635
21289
* Key numbers refer to Nomenclature Section (pages 5 and 6).
** Used to hold the hydraulic thermostat to the heating element.
*** Includes decorative handle, nut 10-32 acorn brass, screw 10-32x2, red logo decal, and flat
plastic washer.
13
REPLACEMENT PARTS
Hydrocollator® Heating Units
Model SS-2 - Standard
Cat. No. – 2302 w/packs
Key*
1
2
3
4
5
7
8
10
11
12
13
14
15
16
17
24
25
26
27
28
29
31
Part Description
Lid
Lid Rod
Pilot Lamp, Clear
Power Cord
On/Off Switch
DrainValve, Ball - 1/2 in Replacement
Element, Heating 120 Volt, 1000 Watt
Hydraulic Thermostat
Bracket & Bulb Thermostat A/B Assembly (2 each)**
Internal Wiring Harness
Drain, Copper Tube Part A
Handle, Lid Kit***
Lid Rod Nuts (2 required)
Handle, Side (2)
Caster, 3-inch
Junction Box (J-Box) Cover
Stainless Steel Wire Rack
Drain, Hose, Bib
Replacement Tank
Outer Jacket
Water Thief
Hose, Drain
Part No.
22219
22231
22148
20568
23406
21085
10630
10631
21023
61579
21286
22171
21737
20237
21259
22087
22259
23392
23385
22425
21882
21635
* Key numbers refer to Nomenclature Section (pages 5 and 6).
** Used to hold the hydraulic thermostat to the heating element.
*** Includes decorative handle, nut 10-32 acorn brass, screw 10-32x2, red logo decal, and flat
plastic washer.
14
REPLACEMENT PARTS
Hydrocollator® Heating Units
Model E-1 - Standard
Cat. No. – 2102 w/packs
Key*
1
2
3
4
5
8
10
11
12
14
15
21
24
25
Part Description
Lid
Lid Rod
Pilot Lamp, Clear
Power Cord
On/Off Switch
Element, Heating 120 Volt, 1000 Watt
Hydraulic Thermostat
Bracket & Bulb Thermostat A/B Assembly (2 each)**
Internal Wiring Harness
Knob, Lid
Lid Rod Nuts (2 required)
Handle, Side Kit***
Junction Box (J-Box) Cover
Stainless Steel Wire Rack
Part No.
21004
22668
22148
20568
23406
21007
10631
21023
21031
21025
21737
21994
21005
21062
* Key numbers refer to Nomenclature Section (pages 5 and 6).
** Used to hold the hydraulic thermostat to the heating element.
*** Includes E-1 side handle, 10-24x3/8 screw, nylon washer, 10-32 acorn nut, 10-32x1/4 screw, and
handle adapter.
15
REPLACEMENT PARTS
Hydrocollator® Heating Units
Model E-2 - Standard
Cat. No. – 2802 w/packs
Key*
1
3
4
5
7
8
10
11
12
13
14
24
25
29
31
Part Description
Lid
Pilot Lamp, Clear
Power Cord
On/Off Switch
Drain Valve
Element, Heating 120 Volt, 1000 Watt
Hydraulic Thermostat
Bracket & Bulb Thermostat A/B Assembly (2 each)***
Internal Wiring Harness
Drain, Copper Tube Part A
Handle, Lid Kit
Junction Box (J-Box) Cover
Stainless Steel Wire Rack
Water Thief
Hose, Drain
Part No.
23457
22148
20568
23406
21373
10630
10631
21023
21031
21288
20512
23460
22259
21882
21635
* Key numbers refer to Nomenclature Section (pages 5 and 6).
** Used to hold the hydraulic thermostat to the heating element.
*** Includes decorative handle, 1/4-20x1-1/4 screw, and red logo decal.
16
REPLACEMENT PARTS
Hydrocollator® Heating Units
Model M-2 - Standard
Cat. No. – 2402 w/packs
Key*
1
2
3
4
5
7
8
10
11
12
13
14
15
16
17
24
25
26
27
28
29
31
Part Description
Lid
Lid Rod
Pilot Lamp, Clear
Power Cord
On/Off Switch
Drain Valve, Ball - 1/2 in Replacement
Element, Heating 120 Volt, 1000 Watt
Hydraulic Thermostat
Bracket & Bulb Thermostat A/B Assembly (2 each)**
Internal Wiring Harness
Drain, Copper Tube Part A
Handle, Lid Kit***
Lid Rod Nuts (2 required)
Handle, Side
Caster, 3-inch
Junction Box (J-Box) Cover
Stainless Steel Wire Rack
Drain, Hose, Bib
Replacement Tank
Outer Jacket
Water Thief
Hose, Drain
Part No.
22297
22303
22148
20568
23406
21085
10630
10631
21023
61579
21286
22171
21737
20237
21259
22087
22304
23392
56314
22421
21882
21635
* Key numbers refer to Nomenclature Section (pages 5 and 6)
** Used to hold the hydraulic thermostat to the heating element.
*** Includes decorative handle, nut 10-32 acorn brass, screw 10-32x2, logo decal, and flat plastic
washer.
17
REPLACEMENT PARTS
Hydrocollator® Heating Units
Model M-4 - Standard
Cat. No. – 2502 w/packs
Key*
1
2
3
4
5
7
8
10
11
12
13
14
15
16
17
20
23
24
25
26
27
28
29
31
33
Part Description
Lid
Lid Rod
Pilot Lamp, Clear (Serial # Above 5840)
Lamp, Ind (Serial # Below 2550)
Lamp, Pilot Light (Serial # Above 2549)
Power Cord
On/Off Switch
Drain Valve, Ball - 1/2 in Replacement
Heating Element M-4, 120 Volt, 1500 Watt
Hydraulic Thermostat
Bracket & Bulb Thermostat A/B Assembly (2 each)**
Internal Wiring Harness
Drain, Copper Tube Part A
Handle, Lid Kit***
Lid Rod Nuts (2 required)
Side Handle (Serial # Above 5149)
Caster, 3-inch
Thermostat Low Water Kit**** (Overtemp Thermostat)
Pilot Lamp, Red
Junction Box (J-Box) Cover
Stainless Steel Wire Rack
Drain, Hose, Bib
Replacement Tank
Outer Jacket
Water Thief
Hose, Drain
Bracket, Element Support (2 each)
Part No.
22348
22361
22148
21665
20042
20568
23406
21085
22267
10631
21023
21617
21286
22171
21737
20237
21260
20548
22149
22360
22374
23392
22343
23384
21882
21635
22356
* Key numbers refer to Nomenclature Section (pages 5 and 6)
** Used to hold the hydraulic thermostat and overtemp thermostat to the heating element.
*** Includes decorative handle, nut 10-32 acorn brass, screw 10-32x2, red logo decal, and flat
plastic washer.
**** Includes gasket thermostat, nut 1/2-20 brass, and overtemp thermostat.
18
MAINTENANCE
Hydrocollator® Heating Units
The Hydrocollator Heating Unit is equipped with an immersion type heating element and a hydraulic capillarytype thermostat which evenly maintains the HotPac temperature in the water and provides a ready supply
of heated packs. It is critical to maintain the water level over the top of the HotPac to avoid damage to the
heating element, the stainless steel, or the HotPac. Water is constantly lost during operation due to evaporation.
Therefore, it is essential that water be added daily. The tank should also be drained and cleaned systematically,
at minimum intervals of every two weeks.
Always unplug the unit from the power source when emptying or cleaning the unit. Drain the unit by the drain
valve located at the bottom rear of the unit. Either move the unit to a floor drain or attach the extension hose to
it when draining. (E-1 units have no drain and can be emptied by turning unit upside down.)
WARNING
• Chattanooga Group does not recommend the Hydrocollator Heating Unit be moved while filled with
heated water. Tipping over could result in a burn to the user or others. If the Hydrocollator must be moved
while filled, exercise extreme caution! It is recommended to allow the water to cool below 120° F (49° C)
before moving the unit.
• Always unplug the Hydrocollator Heating Unit from the power source before attempting to empty water
from unit.
The Hydrocollator Heating Unit is made of high quality stainless steel that, with proper care and maintenance,
could easily last a lifetime. Improper care could allow the stainless steel to wear prematurely.
Follow these simple steps to ensure that the Hydrocollator Heating Unit remains in excellent condition.
1. Excessive chlorine can be detrimental to the stainless steel in the Hydrocollator Heating Unit . No bleach or
any cleaner with high chlorine content should be used under any circumstance.
2. Clean regularly for optimal service and operation.
NOTE: Failure to maintain the unit (including regular cleaning) will void the warranty.
3. Fill daily with water. Water is constantly lost during operation due to evaporation.
4. Chlorine in regular tap water may be present in high enough concentrations to damage the unit. If
you suspect high levels of chlorine are detected in the Hydrocollator Heating Unit, the addition of a
dechlorinator is recommended.
5. Certain additives (such as herbal teas, essential oils, etc.) will damage the HotPacs and components of the
heating unit, including the stainless steel. The Hydrocollator Heating Unit was designed to heat water and
HotPacs only. The addition of any such foreign substance (except dechlorinator) to the water in the unit will
void the warranty.
6. Inspect heating element for pitting and other visible damage during regular cleaning intervals.
7. Inspect power cord for wear, fraying, and other visible damage during regular cleaning intervals.
19
MAINTENANCE
Hydrocollator® Heating Units
To avoid potential for rusting:
1. Do not use bleach or cleaners with high chlorine content.
2. Do not use paper clips, safety pins, staples, coat hangers, etc., in, on, or near the unit.
3. Do not clean the unit with carbon steel wool or a carbon steel brush. Use only soft cloth, Scotch-Brite™ type
scouring pads of green, blue, or white abrasiveness, or stainless steel wool if absolutely necessary.
4. Do not use abrasive cleaners which tend to disturb the grain in the finish, especially on the exterior of the
unit. For exterior cleaning, use only non-abrasive stainless steel polish.
5. Water level is critical: Add water daily, if necessary, to keep unit full.
6. Regularly clean and drain the tank (every two weeks). Failure to properly maintain the unit will cause
premature wear and will void the warranty.
7. Remove all deposits from interior surfaces and parts. The deposits are concentrations of minerals that will
allow rusting to begin. If allowed to accumulate on the heating element, these deposits will lower the
efficiency of the element and increase the power consumption of the unit. Exercise extreme care if cleaning
the element or thermostat(s). These components can be easily damaged without proper care or caution.
8. If you suspect that you have “hard water”, you may need to change the water and clean the unit more
frequently. Salt deposits are an indication of hard water that will eventually cause rust.
Cleaning Tips
1. The interior of the unit should be cleaned, at least every two weeks, using a low abrasive bathroom cleaner
with a soft cloth or green, blue, or white Scotch-Brite™ type scouring pad. Stainless steel wool may be used if
necessary, but not regular carbon steel wool. Check for low or no chlorine content in your cleaner and make
sure that the residue is thoroughly rinsed away with water.
2. A strong solution of vinegar and water may be used to dissolve away deposits, which then must be
thoroughly rinsed away. Results may vary.
3. For exterior cleaning, use stainless steel polish and a soft cloth only. Numerous industrial stainless steel
polishes are available from various supply companies. Use of any cleaner except stainless steel polish on the
exterior of the unit is not recommended. Abrasive cleaners and scouring pads can damage the finish of the
unit.
Care of HotPacs
Always return the Hydrocollator HotPac to the hot water of the heating unit after each treatment. There it
is heated, kept clean, and ready for immediate use. The HotPac may be boiled; however, this hastens the
deterioration of the pack. The pack may also be cleaned by scrubbing the pack with soap and water. The
simplified method of keeping the pack clean is to keep it immersed in water.
The Hydrocollator HotPac, under constant daily use, should have a useful life of at least one year. When the
pack begins to wear out, the filler oozes and leaks through the fabric of the cloth; sections of the pack appear
to be loose and empty and will not retain heat properly. The pack should be replaced when it reaches this state.
Original replacement Hydrocollator HotPacs may be ordered from an authorized Chattanooga Group dealer.
NOTE: If HotPacs are to be stored for extended periods, they may be placed - while wet - in plastic bags and
stored in a freezer.
20
WARRANTY
Hydrocollator® Heating Units
Chattanooga Group, a division of Encore Medical, L.P., ("Company") warrants that the Hydrocollator
Models SS, SS-2, E-1, E-2, M-2, and M-4 Heating Units ("Products") are free of defects in material and
workmanship. This warranty shall remain in effect for one year (12 months) from the date of original
consumer purchase. If these Products fail to function during the one year warranty period due to a
defect in material or workmanship, at the Company's option, the Company or the selling dealer will
repair or replace this Product without charge within a period of thirty days from the date on which
the Product is returned to the Company or the dealer.
All repairs to the Product must be performed by a service center authorized by the Company. Any
modifications or repairs performed by unauthorized centers or groups will void this warranty.
To participate in warranty coverage, this Product's warranty registration card (included with Product)
must be filled out and returned to the Company by the original owner within ten (10) business days
of purchase.
This Warranty Does Not Cover:
• Replacement parts or labor furnished by anyone other than the Company, the selling dealer or a
certified Company service agent.
• Defects or damage caused by labor furnished by someone other than Company, the selling dealer
or a certified Company service agent.
• Any malfunction or failure in the Product caused by product misuse, including, but not limited to,
the failure to provide reasonable and necessary maintenance or any use that is inconsistent
with the Product User Manual.
COMPANY SHALL NOT BE LIABLE IN ANY EVENT FOR INCIDENTAL
OR CONSEQUENTIAL DAMAGES.
Some states do not allow the exclusion or limitation of incidental or consequential damages, so the
above limitation or exclusion may not apply to you.
To obtain service from the Company or the selling dealer under this warranty:
1. A written claim must be made within the warranty period to the Company or the selling dealer.
2. The Product must be returned to the Company or the selling dealer by the owner.
This warranty gives you specific legal rights and you may also have other rights which vary from state
to state.
The Company does not authorize any person or representative to create for it any other obligation or
liability in connection with the sale of the Product. Any representation or agreement not contained in
the warranty shall be void and of no effect.
THE FOREGOING WARRANTY IS IN LIEU OF ALL OTHER WARRANTIES, EXPRESSED OR IMPLIED,
INCLUDING ANY WARRANTY OR MERCHANTABILITY OR FITNESS FOR A PARTICULAR PURPOSE.
21
ISO 13485 CERTIFIED