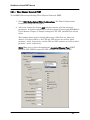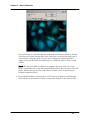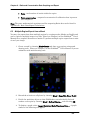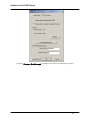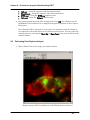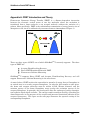
1
SlideBookTM 4.2
Ratio and FRET Modules
for Windows 2000/XP
User’s Manual
(Latest Revision 1.15.07)
SlideBookTM Ratio/FRET Manual
Table of Contents
TABLE OF CONTENTS ...........................................................................................................................................II
CONTACTING INTELLIGENT IMAGING INNOVATIONS, INC ................................................................. IV
MANUAL CONVENTIONS...................................................................................................................................... V
TYPOGRAPHIC CONVENTIONS ................................................................................................................................... V
1
INTRODUCTION TO RATIO AND FRET MODULES............................................................................ 1-1
1.1
RATIO AND FRET SYSTEM CONFIGURATION ............................................................................................. 1-1
1.2
RATIO TOOLS ............................................................................................................................................ 1-2
1.2.1 Calibration Guide ............................................................................................................................... 1-2
1.2.2 Real-time ratio and concentration display ......................................................................................... 1-2
1.2.3 Post-acquisition ratio and concentration display ............................................................................... 1-2
1.2.4 Ratio and concentration data export .................................................................................................. 1-2
1.3
FRET TOOLS ............................................................................................................................................ 1-2
1.3.1 Channel bleed-through calculation .................................................................................................... 1-2
1.3.2 Post-acquisition calculation of Sensitized Emission/Direct FRET ................................................... 1-2
1.3.3 Post-acquisition calculation of Acceptor Photobleaching FRET ..................................................... 1-2
2
CONFIGURING YOUR SYSTEM FOR RATIO OR FRET IMAGING ................................................. 2-1
2.1
DEFINING RATIO CHANNELS ..................................................................................................................... 2-1
2.2
DEFINING FRET CHANNELS ..................................................................................................................... 2-2
2.2.1 Direct/Sensitized Emission FRET. ..................................................................................................... 2-2
2.2.2 Acceptor Photobleaching FRET ........................................................................................................ 2-5
3
REAL-TIME RATIO DISPLAY ................................................................................................................... 3-1
3.1
SETTING CAPTURE PARAMETERS FOR TIME-LAPSE RATIO IMAGING......................................................... 3-1
3.2
LIVE DISPLAY ........................................................................................................................................... 3-3
3.2.1 Selecting Regions of Interest .............................................................................................................. 3-5
3.2.2 Graph Display ..................................................................................................................................... 3-5
3.2.3 Focusing During Capture ................................................................................................................... 3-6
4
POST-ACQUISITION DISPLAY AND SETTINGS................................................................................... 4-1
4.1
VIEWING RATIO DATA IN PSEUDOCOLOR ................................................................................................. 4-1
4.2
RATIO SETTINGS ....................................................................................................................................... 4-5
4.2.1 Adding and Viewing Ratio Channel Information .............................................................................. 4-6
4.2.2 Calibration Parameters ....................................................................................................................... 4-7
4.2.3 Ratio Display Range ........................................................................................................................... 4-7
4.2.4 Background ROI ................................................................................................................................. 4-7
4.2.5 Thresholds for Ratio Computation ..................................................................................................... 4-7
4.2.6 Using Ratio Settings ............................................................................................................................ 4-7
5
RATIO CALIBRATION ................................................................................................................................ 5-1
5.1
SOLUTION-BASED IN VITRO CALIBRATION ................................................................................................ 5-1
5.1.1 Background Image.............................................................................................................................. 5-1
5.1.2 Ion-Free image ................................................................................................................................... 5-2
5.1.3 Ion Saturated image............................................................................................................................ 5-2
5.1.4 Generating Ratio Calibration Data .................................................................................................... 5-2
5.2
INTRACELLULAR CALIBRATION ................................................................................................................ 5-5
5.2.1 Selecting a background ROI and an ROI within a cell ..................................................................... 5-5
5.2.2 Finding Rmax and Rmin ......................................................................................................................... 5-7
ii
SlideBookTM Ratio/FRET Manual
6
RATIO AND CONCENTRATION DATA GRAPHING AND EXPORT ................................................. 6-1
6.1
QUICK GRAPHING AND DATA EXPORT...................................................................................................... 6-1
6.2
MULTIPLE REGION GRAPHING AND EXPORT FROM ROI SELECTIONS ....................................................... 6-2
6.2.1 Working with ROIs ............................................................................................................................. 6-2
6.2.2 Graphing and Exporting Data ............................................................................................................ 6-3
6.3
MULTIPLE REGION EXPORT FROM A MASK............................................................................................... 6-4
7
PROTOCOL FOR DIRECT FRET/SENSITIZED EMISSION FRET ..................................................... 7-1
7.1
CAPTURING IMAGES.................................................................................................................................. 7-1
7.1.1 Control Images .................................................................................................................................... 7-1
7.1.2 Experimental Sample .......................................................................................................................... 7-2
7.2
POST CAPTURE ANALYSIS TUTORIAL ....................................................................................................... 7-2
7.2.1 Performing Bleedthrough Calculations ............................................................................................. 7-2
7.2.2 Using FRET Settings .......................................................................................................................... 7-8
7.3
VIEWING FRET DATA ............................................................................................................................ 7-10
7.4
OBTAINING FRETC STATISTICS .............................................................................................................. 7-12
8
PROTOCOL FOR ACCEPTOR PHOTOBLEACHING FRET ................................................................ 8-1
8.1
8.2
8.3
9
CAPTURING IMAGES.................................................................................................................................. 8-1
PERFORMING POST-CAPTURE ANALYSIS .................................................................................................. 8-2
GENERATING PHOTOBLEACHING FRET STATISTICS ................................................................................. 8-4
SELECTED REFERENCES ......................................................................................................................... 9-1
APPENDIX A: FRET INTRODUCTION AND THEORY ................................................................................ A-1
ACCEPTOR PHOTOBLEACHING RECOVERY ............................................................................................................. A-2
DIRECT FRET/SENSITIZED EMISSION FRET .......................................................................................................... A-3
Three-Channel Corrected FRET ..................................................................................................................... A-3
Two-Channel Corrected FRET ....................................................................................................................... A-4
APPENDIX B: BUFFERS FOR RATIO CALIBRATION.................................................................................. B-1
ION-FREE BUFFER .................................................................................................................................................. B-1
ION-SATURATED BUFFER ....................................................................................................................................... B-1
APPENDIX C: RATIO CALIBRATION CALCULATIONS ........................................................................... C-1
APPENDIX D: RATIO DATA EXPORT CALCULATIONS........................................................................... D-1
TERMS................................................................................................................................................................... D-1
BACKGROUND ....................................................................................................................................................... D-1
ROIS AND THRESHOLDING.................................................................................................................................... D-1
RATIO COMPUTATION ........................................................................................................................................... D-1
RATIO ERROR CONDITIONS ................................................................................................................................... D-2
CONCENTRATION COMPUTATION.......................................................................................................................... D-2
CONCENTRATION ERROR CONDITIONS ................................................................................................................. D-2
APPENDIX E: DIRECT FRET CALCULATIONS............................................................................................. E-1
TERMS.................................................................................................................................................................... E-1
BACKGROUND ........................................................................................................................................................ E-1
THREE CHANNEL CORRECTED FRET - FRETC COMPUTATION.............................................................................. E-1
TWO CHANNEL CORRECTED FRET – FRETC COMPUTATIONS .............................................................................. E-1
APPENDIX F: PHOTOBLEACHING FRET CALCULATIONS...................................................................... F-1
TERMS.................................................................................................................................................................... F-1
BACKGROUND ........................................................................................................................................................ F-1
PHOTOBLEACH FRET - PBFRET COMPUTATION ................................................................................................... F-1
iii
SlideBookTM Ratio/FRET Manual
Contacting Intelligent Imaging Innovations, Inc
If you have any questions or experience any problems with SlideBookTM™, please contact us
by either phone or email. Our phone number is (303) 607-9429 and our email address is
[email protected].
iv
SlideBookTM Ratio/FRET Manual
Manual Conventions
Typographic Conventions
Menu commands are written in bold and follow the order of menu navigation. For instance,
choosing “Open” from the “File” menu is written as File > Open.
Dialog fields and other interface items are written in bold, as in Initial Offset.
References to other sections of the manual are underlined, as in Image Capture.
New terms are italicized.
v
SlideBookTM Ratio/FRET Manual
1 Introduction to Ratio and FRET Modules
The Ratio and FRET Modules add functionality that simplifies a wide variety of
quantitative techniques. Ratio imaging is a live cell imaging technique that measures pairs
of wavelengths. Quantification of ratio pairs is relatively unaffected by issues such as
photobleaching, uneven dye loading, and dye leakage. Thus, it is an excellent technique for
performing quantitative measurements. Commonly, ratio imaging techniques employ
ratiometric dyes that indicate ion concentration. Examples of such dyes are Fura-2 (for
Ca2++) and BCECF (for pH). Ratio imaging techniques may also be employed when
performing live Fluorescence Resonance Energy Transfer (FRET) experiments (e.g. TwoChannel Corrected FRET).
Measurement of FRET allows you to determine whether or not two molecules are
colocalized at a distance less than 10 angstroms, enabling measurements below the
resolution of a light microscope. FRET is a distance-dependent interaction between the
electronic excited states of two dye molecules where the excitation is transferred from a
donor molecule to an acceptor molecule without the emission of a photon. FRET
experiments may be performed on live or fixed cells. SlideBookTM supports two FRET
methods: Sensitized Emission/Direct FRET (both Two-Channel Corrected and ThreeChannel Corrected) and Acceptor Photobleaching FRET. For more information on FRET
methods, please see Appendix A: FRET Introduction and Theory on page A-1.
The Ratio and FRET Modules add the following components to the SlideBookTM base
package:
Ratio Module Tools
Ratio system configuration
Ratio indicator calibration guide
Real-time ratio and concentration display during capture
Post-acquisition ratio and concentration display
Ratio and concentration data export
FRET Module Tools
Channel bleed-through calculation
Post-acquisition calculation of Sensitized Emission/Direct FRET (Herman equation)
Post-acquisition calculation of Acceptor Photobleaching FRET
1.1
Ratio and FRET system configuration
Expanded filter definitions allow you to define two independent ratio channels (Ratio
Module) and FRET acceptor, donor and transfer channels (FRET Module). Ratio channel
definitions allow for real-time calculation of ratio values and subsequent viewing and
quantification of ratio data.
1-1
Chapter 1 – Introduction to Ratio/FRET Module
1.2
Ratio Tools
1.2.1 Calibration Guide
SlideBookTM provides an easy-to-follow guide for calibrating a fluoroprobe such as Fura-2
using the technique outlined in Grynkiewicz et al (1985).
1.2.2 Real-time ratio and concentration display
During capture, SlideBookTM permits you to delineate multiple regions of interest
(including a background) region and graph ratio or concentration change over time.
Simultaneously, SlideBookTM provides a pseudocolored image of ratio information across
the entire field.
1.2.3 Post-acquisition ratio and concentration display
All interactive SlideBookTM views (main view, three view, and tile view) allow you to display
ratio or concentration information as a pseducolored image. Further, each view can display
the computed ratio or concentration at the current cursor location.
1.2.4 Ratio and concentration data export
SlideBookTM can produce a tab-delimited text file that includes ratio and concentration data
for multiple regions of interest across time.
1.3
FRET Tools
1.3.1 Channel bleed-through calculation
SlideBookTM allows you to characterize the bleed-through coefficients of your particular
imaging system. Characterization of cross-talk between channels is necessary for making
quantitative measurements of Three-Channel Corrected Direct FRET. This feature is
discussed in the chapter titled Protocol for Sensitized Emission/Direct FRET.
1.3.2 Post-acquisition calculation of Sensitized Emission/Direct FRET
You may specify donor and acceptor channels, corresponding bleed-through coefficients, and
a background region in order to automatically calculate direct FRET. These settings may be
saved for each image. A complete protocol/tutorial for performing Direct FRET is provided.
1.3.3 Post-acquisition calculation of Acceptor Photobleaching FRET
You may specify donor and acceptor channels and a background region in order to
automatically calculate photobleaching FRET. A complete protocol/tutorial for performing
Acceptor Photobleaching FRET is provided.
1-2
SlideBookTM Ratio/FRET Manual
2 Configuring your System for Ratio or FRET Imaging
2.1
Defining Ratio Channels
In order for SlideBookTM to be able to capture ratio images, the filter configurations must be
set properly. One filter configuration should be defined as a Ratio Numerator and one filter
configuration should be defined as a Ratio Denominator. These two filter configurations
determine a ratio channel.
SlideBookTM lets you define two ratio channels: ratio channel 1 and ratio channel 2. If you
wish to view ratio values real-time, you must set ratio channel definitions before initiating
capture. You may also add ratio information post-capture as discussed in the section
Adding and Viewing Ratio Channel Information on page 4-6. The following example shows
how to set up a ratio channel for Fura-2.
NOTE: Ratio Channels may also used when performing Two-Channel Corrected FRET. See
Appendix A for an introduction to Two-Channel Corrected FRET.
1. Select Edit>Define Optics>Filter Configurations. The Filter Configurations
Parameters dialog box will appear.
2. Add a new channel by clicking Add and then entering all of the necessary
parameters. A detailed explanation of all the settings is found in the SlideBookTM
User’s Manual, Chapter 4. Sample settings for Fura-2 are shown below.
2-1
Chapter 2 – Configuring Your System for Ratio or FRET Imaging
NOTE: Make sure that the numerator and denominator configurations for a
particular indicator are associated with the same ratio channel.
3. Close and restart SlideBookTM to update your preferences.
2.2
Defining FRET Channels
FRET channels will be defined using a procedure similar to that discussed above. Channel
definitions for Direct FRET and Acceptor Photobleaching FRET will be discussed in this
section.
2.2.1 Direct/Sensitized Emission FRET.
In order to perform Direct FRET, the appropriate filter definitions must exist. The common
FRET pair, CFP and YFP, is used as an example. For three-channel corrected FRET, three
filter definitions are necessary: CFP (donor), YFP (acceptor), and FRET. For two-channel
corrected FRET, two filter definitions are necessary: either CFP or YFP, and FRET. CFP
and YFP filter sets are configured to use the respective exciters and emitters. The FRET
channel must use a CFP exciter and YFP emitter. The exact configuration of the filters will
depend on your particular hardware configuration.
2-2
SlideBookTM Ratio/FRET Manual
2.2.1.1 Three-Channel Corrected FRET
To add FRET filters for performing Three-Channel Corrected FRET:
1. Select Edit>Define Optics>Filter Configurations. The Filter Configurations
Parameters dialog box will appear.
2. Add a new channel by clicking Add and then entering all of the necessary
parameters. A detailed explanation of all the settings is found in the SlideBookTM
User’s Manual, Chapter 4. Sample settings for CFP, YFP, and FRET are shown
below.
This example shows typical settings when using a JP4 filter set, where the
dichroic is in filter position 1, the CFP and YFP exciters are in filter wheel
positions 1 and 2, respectively, and the CFP and YFP emitters are in filter wheel
positions 1 and 2, respectively.
NOTE: Make sure to select the appropriate Associated Channel Type (FRET
Donor for CFP, FRET Acceptor for YFP, and FRET Transfer for FRET).
2-3
Chapter 2 – Configuring Your System for Ratio or FRET Imaging
2-4
SlideBookTM Ratio/FRET Manual
3. Close and restart SlideBookTM to update your preferences.
2.2.1.2 Two-Channel Corrected FRET
For Two-Channel Corrected FRET, define a ratio channel with the FRET channel set as the
numerator, and the acceptor or donor channel set as the denominator (see page 2-1).
2.2.2 Acceptor Photobleaching FRET
In order to perform acceptor photobleaching FRET, you must define five channels: “donor
prebleach”, “acceptor prebleach”, “photobleach”, “donor postbleach”, and “acceptor
postbleach”. The common FRET pair, FITC (donor) and CY3 (acceptor), are used to
demonstrate filter configurations. A full protocol for performing acceptor photobleaching
FRET can be found in Protocol for Acceptor Photobleaching FRET on page 8-1.
1. Select Edit>Define Optics>Filter Configurations. The Filter Configurations
Parameters dialog box will appear.
2. Add a new channel by clicking Add and then entering all of the necessary
parameters. A detailed explanation of all the settings in the dialog box is found
in the SlideBookTM User’s Manual, Chapter 4. Sample dialog boxes for the five
required filter definitions are shown on the following pages.
The following example shows typical settings when using filter cubes. Note that
the Photobleach channel is the same filter cube as the Acceptor (CY3) channels.
3. Close and restart SlideBookTM to update your preferences.
2-5
Chapter 2 – Configuring Your System for Ratio or FRET Imaging
2-6
SlideBookTM Ratio/FRET Manual
2-7
Chapter 2 – Configuring Your System for Ratio or FRET Imaging
2-8
SlideBookTM Ratio/FRET Manual
.
2-9
SlideBookTM Ratio/FRET Manual
3 Real-time Ratio Display
In this chapter, you will learn how to set parameters for capture and interactively view
your data as it is captured.
3.1
Setting Capture Parameters for Time-lapse Ratio Imaging
Ratio capture works much like other image capture paradigms in SlideBookTM. For a more
detailed explanation of image capture, please see the SlideBookTM 4.2 User’s Manual,
Chapters 6 and 7. To capture a new time-lapse ratio image:
1. Bring your sample into view and focus in the Focus Window (Chapter 5, User’s
Manual).
2. Select Image > Capture New Image…. The Capture Dialog box will appear.
3-1
Chapter 3 – Real-time Ratio Display
3. Select the Time Lapse check box and specify the time interval between
collections as well as the total number of time points. Once you select Time
Lapse, you will activate other options in the capture window.
Note that currently, the time interval tells SlideBookTM how many milliseconds
to wait after completing the capture of one time point before initiating capture of
the next time point.
4. Select the appropriate checkboxes for live graphing:
Renormalize to first time point –uses the minimum and maximum pixel
intensity values for the first time point in a timelapse capture series to
determine the renormalization values of all subsequent time points. This
3-2
SlideBookTM Ratio/FRET Manual
option only affects the image display during capture and will not affect
the captured image
5. Specifiy a ratio capture by clicking on the checkboxes for both the ratio
numerator and denominator channels and testing the exposure length for each.
It is easy to collect other data (such as a GFP or DIC image) during ratio capture.
Simply select additional channels to capture as in normal time lapse imaging.
You may also capture a channel (such as DIC) at a slower rate than your ratio
data by selecting the Periodic tab found in the Capture Preferences dialog box
(use the Advanced button in the Capture Preferences section to access this dialog
box). Please see Changing the Channel Capture Frequency in Chapter 7 of the
SlideBookTM User’s Manual.
6. Once you have captured a test image, you may use the ROI tools to draw regions
to monitor during capture. To learn more about ROI tools, please see Creating
ROIs and Graphs to Monitor Regions of Interest in Chapter 7 of the SlideBookTM
User’s Manual.
7. If you would like to record events, such as reagent addition, set up Notes using
the Advanced button as discussed in the SlideBookTM User’s Manual, Chapter 7
Creating Notes.
8. Select OK when you are ready to begin capture.
NOTE: It is often advantageous to use binning for time lapse ratio capture. Not only will
this permit better temporal resolution, but it will also dramatically decrease the total size
of the collected data.
3.2
Live Display
During capture, SlideBookTM can display a pseduocolored image of ratio values for each
time point as well as update a graph of ratios for multiple regions of interest.
The Capture Status dialog box will appear and display the current single channel image in
the Status tab. The Image Window will display a pseudocolored ratio image.
3-3
Chapter 3 – Real-time Ratio Display
You may also select a channel and the Show button which allows you to display data
(background-subtracted if you have chosen a background region) for all channels for a
single region of interest, or for one channel (including the ratio channel) for all regions of
interest.
NOTE: In all display views, you can mark events using the Notes buttons you created when
setting capture parameters. The buttons are displayed on the Notes tab of the Capture
Status dialog.
3-4
SlideBookTM Ratio/FRET Manual
3.2.1 Selecting Regions of Interest
You may select regions of interest for graphing either before capture has started or during
capture. ROI tools may be used on test images generated before capture, or on the live
image display during capture please see Creating ROIs and Graphs to Monitor Regions of
Interest in Chapter 7 of the SlideBookTM User’s Manual. If you choose a background region,
the average value of this region will be subtracted from the average values in the other
regions of interest before ratio computation. The background region will also be stored in
the Ratio Settings dialog box (see next Chapter).
3.2.2 Graph Display
To display the ratio graph during capture, simply select the channel that you wish to graph
from the drop-down list, then press the Show button in the Graph Channels section of the
Capture Status dialog. Repeat for any additional channels you wish to display, or simply
select the channels from the channel menus on the graph. Note that you will only be able to
select channels of the same type, e.g., independent or ratio, from the channel menus. Thus,
you must have at least two graphs open to display 340, 380, and a ratio.
3-5
Chapter 3 – Real-time Ratio Display
Channel menus
Reset intensity
to full range
Zoom out
Zoom out
Zoom in
Zoom in
Reset time to full range
Scroll bar
Use the Zoom In and Zoom Out tools to explore your data. At any time, you may reset the
data to view full range using the Reset buttons. Once your capture is finished, your graph
will remain open for viewing.
To recreate this graph post-capture, on an open view, display the ROIs
(View>Annotations>ROIs), and then select View>Graph….
3.2.3 Focusing During Capture
You may adjust the focus of your image during capture. To do so, go to the Live tab. The
Live view works similarly to the Focus Window.
NOTE: Before using the Live tab, you must first select Pause. Once you are finished
focusing, you must select Continue to resume capture.
3-6
SlideBookTM Ratio/FRET Manual
The window has the following features:
Start/Stop – begins/ends the semi-live camera readout
Open Fluor/Close Fluor - opens and closes the fluorescent shutter
Open Bright/Close Bright – opens and closes the transmitted light shutter
Filter – moves motorized filters into position when you select Go.
Z Stage – allows you to refocus your sample using precise movements.
To use this window, press Start, open the desired shutter, select the appropriate filter, and
focus your sample. When you are finished, close the shutter, press Stop, and then Continue.
3-7
SlideBookTM Ratio/FRET Manual
4 Post-Acquisition Display and Settings
Ratio data is generally best displayed using Pseudocolor settings. This will be the default
setting if you define filters used for ratio imaging as discussed in Chapter 2 on page 2-1. We
will now explore display of ratio data using the example slide, ratiosample.sld. This slide is
included in the file RatioFRET.zip. If you are a new user, please complete the Quick Tour
tutorial in the SlideBookTM User’s Manual before beginning this tutorial.
4.1
Viewing Ratio Data in Pseudocolor
To begin this demonstration:
1. Open SlideBookTM and select File>Open Slide.
2. Navigate to ratiosample.sld and select Open.
3. Double-click on the “T Cell Calcium Flux” image to generate a main view. The
following image will appear.
Please see Chapter 8 of the SlideBookTM User’s Manual for further information
on data views.
(T-cell image courtesy of Dr. Jackson Egen, University of California, Berkeley.)
4-1
Chapter 4 – Post-Acquisition Display and Settings
Note that the image is displayed in pseudocolor, with the Ratio channel
appearing in the first channel menu. The ratio channel name will always be
called Ratio (or Ratio 1 and Ratio 2 if two ratios are defined and captured). Also
note that SlideBookTM stores both the numerator and denominator time-lapse
image. The ratio values are computed when the image is opened and are not
stored with the image.
NOTE: If you have not defined your ratio channels as discussed in Chapter 2, you
may view your data in Pseudocolor by selecting View > Pseudocolor.
In the pseudocolor view mode, there are two channel selections. The first
channel selects the hue of the display and should be set to the Ratio channel.
The second channel selects what determines the intensity, or brightness, of the
displayed colors. If it is set to either the numerator or denominator channel, the
pseudocolored display will be scaled by the selected fluorescence intensity, such
as in the example above. Thus, in the example above, an area with a high pixel
intensity for the ratio channel and a low pixel intensity on denominator channel
will appear as dim red. An area with a low pixel intensity for the ratio channel
and a high pixel intensity on the denominator channel will appear as bright blue.
This helps distinguish areas with real data from background. This is often
desirable as computed ratio values for regions of the image that are just slightly
above background can vary greatly. Please see Chapter 4 Default Color Display
in the SlideBookTM User’s Manual for further discussion of the pseudocolor view.
4. Set the second channel menu selection to None. The image is now displayed as a
range of blue (low ratio) to red (high ratio). The brightness/dimness of the hue is
not scaled.
4-2
SlideBookTM Ratio/FRET Manual
5. Note the large amount of noise in this image and return the second menu to
Fura-2 (380).
6. Set the Bkgnd drop down menu to Open. A DIC image is now displayed along
with the ratio data. For further instructions on displaying a background image
please see Chapter 8 Displaying a DIC image as Background of an
RGB/pseudocolor image in the SlideBookTM User’s Manual.
4-3
Chapter 4 – Post-Acquisition Display and Settings
7. Blend the DIC image with the fluorescence image by selecting View>Blend
Background.
8. Return the background channel to None.
9. Open the renormalization dialog box using the
following dialog box will appear:
icon on the tool bar. The
4-4
SlideBookTM Ratio/FRET Manual
10. Move the red bar back and forth. Note that the display does not change. Fura-2
(340) is not a displayed channel in this image.
11. Select Fura-2 (380) from the channel drop-down menu and move the red bar back
and forth. Note that the hue, or color, of the display does not change. Note also
that the intensity of the color becomes dim as you move the red bar to the right
and becomes bright as you move the red bar to the left.
Note that the hues that are displayed cannot be changed using the
renormalization dialog box, only the intensity of color may be changed. To change
the hues that are displayed, you must alter the Ratio Settings, as discussed in
the next section.
4.2
Ratio Settings
SlideBookTM lets you adjust, if necessary, many of the settings that go into both postacquisition display as well as analysis. These settings are accessed in the Ratio Settings
dialog box. A tutorial follows the explanation of this dialog box.
4-5
Chapter 4 – Post-Acquisition Display and Settings
4.2.1 Adding and Viewing Ratio Channel Information
The numerator and denominator are displayed for a given ratio channel, as well as the
exposure factor, which is the ratio of exposure times for the numerator and denominator
wavelengths. The channels used for calculating the ratio can be edited by selecting Redefine
Ratios…, which brings up the Add Ratio Information dialog box.
4-6
SlideBookTM Ratio/FRET Manual
4.2.2 Calibration Parameters
The Ratio Calibration Guide may be used to calibrate or recalibrate an image by selecting
Calibrate… The Ratio Calibration Guide is discussed in Chapter 5.
4.2.3 Ratio Display Range
You may select the range of ratio values that are displayed in any view of the ratio image.
Any ratios below the Low value are displayed as blue, and any ratios above the High value
are displayed as red. This operation will not affect the underlying data.
4.2.4 Background ROI
You may select a background region that will be used to subtract background intensities
from the numerator and denominator channel prior to calculating ratio and concentration
values.
4.2.5 Thresholds for Ratio Computation
This feature is important when generating statistical data. These thresholds allow you to
compute ratios for relevant data. This feature allows you to use simple masks to define
ROI’s, but only compute ratio data for objects that are within the desired intensity range.
This allows you to “qualify” pixels that should be used for ratio computation. Only pixels
that fall into the range for both the numerator and denominator values will be considered
when statistics are calculated.
4.2.6 Using Ratio Settings
We will now continue the Ratio Tutorial.
1. Make sure a view of the T Cell image is active and then choose Image > Ratio
Settings…. The following dialog box will appear.
4-7
Chapter 4 – Post-Acquisition Display and Settings
2. Now change the Ratio Display Range High edit field to 0.5 and click OK. Note
that the display hues have changed and more cells are red.
3. Bring up the Ratio Settings dialog box again by selecting Image>Ratio Settings..
4-8
SlideBookTM Ratio/FRET Manual
4. Change the Ratio Display Range High edit field to 2.0 and click OK. Note that
display hues are all blue/green.
5. Open the Ratio Settings dialog box again and return the Ratio Display Range
High edit field to 1.0 and click OK.
6. Activate the main view of the image and draw a box using the marquee tool in a
region that has no signal.
7. Open the Ratio Settings dialog box and click on the Import from Active View
button in the Background ROI section of the Ratio Settings dialog box. The ROI
dimensions and location will automatically be entered into the data entry fields.
8. Next, select Import from Default Renorm in the Threshold for Ratio
Computation section of the dialog box. The renormalization settings that you
have selected for the Fura-2 (380) channel will be displayed. Note that the Fura2 (340) settings will be set to the min and max of the channel, as it is not a
channel that is displayed in the view.
9. Select File>Save Slide to save your new settings.
In the next chapter, you will learn how these ratio settings affect ratio statistics.
4-9
SlideBookTM Ratio/FRET Manual
5 Ratio Calibration
Ratio channels can be calibrated so that ratio values correspond to concentrations.
SlideBookTM supports two different methods of calibration. The first is a solution-based in
vitro method that may be performed pre- or post-acquisition. This calibration may be
applied to multiple experiments. The second is an intracellular calibration that is
performed post-acquistion for each experiment. This method performs calibration within a
single cell and then applies those values to the entire data set. With either method, a ratio
calibration guide assists you in determining three important numbers for correctly
calibrated concentration display:
-
Rmin, the minimum ratio value (e.g., Fura-2 with no free Ca++ ions present)
Rmax, the maximum ratio value (e.g., Fura-2 in an ion-saturated solution)
beta, the ratio of the denominators of the minimum and maximum conditions
The ratio calibration guide is also where you specify three other parameters:
-
Kd, the dissociation constant of the fluoroprobe
Rlow, the ratio value below which a view displays the color corresponding to the
minimum value
Rhigh, the ratio value above which a view displays the color corresponding to the
maximum value
From these parameters, calcium concentration can be calculated from the following
equation:
[Ca++] = Kd * (R – Rmin)/(Rmax – R) * Beta
5.1
Solution-based in vitro Calibration
This type of calibration requires you to capture images of buffer solutions. When imaging
buffer solutions, you may wish to add a small amount of non-fluorescent polystyrene beads
to aid in obtaining focus. Alternatively, you may mark or scratch the surface of the coverslip
or dish used for imaging. Example buffer solutions for calibrating calcium concentrations
when using Fura-2 may be found in Appendix B: Buffers for Ratio Imaging.
NOTE: Do not attempt calibration using an AM ester derivative of an intracellular probe.
AM ester derivatives have little to no response to ion concentration differences. You must
use a salt form of your fluorophore for calibration.
5.1.1 Background Image
The first ratio image that you must collect (consisting of images of both the numerator and
denominator channels) is a background image. This is usually an image (or average of a set
of images) of the experimental setup with a buffer solution that has no fluoroprobe present.
Prior to starting the Ratio Calibration Guide, you should place buffer solution on the stage
5-1
Chapter 5 – Ratio Calibration
and adjust any microscope parameters in the Focus Window (please see the SlideBookTM
User’s Manual, Chapter 5 for instructions on using the Focus Window).
5.1.2 Ion-Free image
The second ratio image that you must collect is an ion-free image. This is usually an image
(or average of a set of images) of the experimental setup with a buffer solution that has
fluoroprobe present. The concentration of fluoroprobe should be approximately equal to the
concentration of fluoroprobe present in loaded cells.
5.1.3 Ion Saturated image
The third and final ratio image that you must collect is an ion saturated image. For this
image, you will need a ion saturated buffer solution. The buffer should contain the same
concentration of fluoroprobe as the buffer used to capture the ion-free images.
5.1.4 Generating Ratio Calibration Data
To generate your calibration data:
1. Place your background buffer solution in your experimental setup and bring your
sample into view and focus (Please see the SlideBookTM User’s Manual, Chapter
5).
2. Bring up the ratio calibration guide by selecting Edit > Setup Guides > Ratio
Guide. Alternatively, you may bring up the calibration guide after acquiring a
ratio image by selecting Image>Ratio Settings and selecting Calibrate…
5-2
SlideBookTM Ratio/FRET Manual
3. Enter the number of images that you wish to average in the data entry field. In
general, 3 images are sufficient.
4. Enter the exposure time in milliseconds for both the numerator and denominator
in the data entry fields.
Note that you should aim for an exposure length that yields only moderate
intensity values, since there is no fluoroprobe present. Otherwise, the
subsequent capture of ion-free and ion-saturated images will certainly exceed the
dynamic range of the camera.
5. Generate a test image by selecting Capture Background Image 1 and observe the
resulting intensity values reported beneath the image. You may recapture the
image if the maximum intensity is too high by selecting Recapture Background
Image 1.
6. After capturing the first background ratio image, select a region of interest by
clicking and dragging on the numerator image view in order to determine the
area over which the average background intensity (as well as ion-free and ionsaturated intensities) will be determined.
In general, try to select the largest region possible, as it means the ratio
calibration values will be computed from a larger sample. However, if there are
obvious anomalies in the field, the region of interest selection permits you to
exclude them.
7. Continue collecting background images by selecting Capture Background Image.
5-3
Chapter 5 – Ratio Calibration
8. When you have finished collecting the background image or images, click on
Proceed to Ion-Free Image.
9. Place your ion-free buffer solution (with fluoroprobe) in your experimental setup
and bring your sample into view and focus using the focus window.
10. Select Capture Ion-Free Image. The region of interest that you selected in the
background image collection will be used for these captures.
11. Continue collecting ion-free images by selecting Capture Ion-Free Image.
12. When you have finished collecting the ion-free image or images, click on Proceed
to Ion-Saturated Image.
13. Place your ion-saturated buffer solution (with fluoroprobe) in your experimental
setup and bring your sample into view and focus.
14. Select Capture Ion Saturated Image. The region of interest that you selected in
the background image collection will be used for these captures.
15. Continue collecting ion-free images by selecting Capture Ion Saturated Image.
16. When you have finished collecting the image or images, click on Compute
Parameters.
The guide will automatically compute the Rmin, Rmax, and beta values (see
definitions on page 5-1). For the exact mathematical equations used to compute
these parameters, please see Appendix B: Buffers For Ratio Calibration.
17. Enter the dissociation constant, Kd, for your fluorophore. This value is specific
for your fluorophore. A Kd calculator for Fura-2 is available at the Molecular
Probes website http://probes.invitrogen.com/resources/calc/kd.html. Please enter
the Kd value in units of nM concentration.
18. Enter the Rlow and Rhigh values (see definitions on page 2-8).
In general, you should set Rlow and Rhigh to be equal to Rmin and Rmax initially.
After running experiments, you may wish to revise the Rlow and Rhigh values to
reflect the actual range observed. You may access these values post-capture by
selecting Image>Ratio Settings..
19. Click OK to exit the Ratio Calibration Guide.
Your ratio calibration data will be used to generate concentration data for ratio
images.
5-4
SlideBookTM Ratio/FRET Manual
5.2
Intracellular Calibration
As described above, SlideBookTM provides an in vitro calibration tool for Ca++ imaging using
fura-2. However, often cellular physiology interacts with fura-2 such that the dye’s
behavior inside a cell does not match the dye’s behavior in calibration solutions. For more
accurate measurement of absolute [Ca++], it is best to measure the range of ratios observed
in vivo, or within the cells themselves.
The intracellular calibration guide in SlideBookTM 4.2 allows you to select representative
regions in a time series and use them as the basis for determining the maximum and
minimum ratios that are observed within cells.
Typically, intracellular Ca++ calibration is done as an “end-step” in a live cell experiment.
After observing meaningful Ca++ dynamics during an experiment, a calcium ionophore, such
as ionomycin, is introduced into a cellular buffer solution that has a high free [Ca++]. This
raises the intracellular [Ca++] dramatically and after the cytosol reaches equilibrium will
allow us to measure a maximum intracellular ratio (Rmax) as the 340 nm excitation signal
will be at its highest and the 380 nm excitation signal will be at its lowest.
After that, a calcium chelator, such as EGTA, is added to drop the intracellular [Ca++].
Again, after equilibrium, we can measure a minimum ratio (Rmin). A typical experimental
protocol is outlined below:
Perform experiment
Once the desired effect is observed, add solution so that final concentration in media
is 1 M ionomycin and 1.8 mM [Ca++] and wait for ratio to stabilize using live ratio
display. This will yield a maximal Fura-2 ratio.
Add solution of 1 M ionomycin and 2 mM EGTA and wait for ratio to stabilize. This
will yield a minimal Fura-2 ratio.
This is a guideline, you may need to experiment to find out what concentration of calcium
and EGTA is appropriate for your cells. The Rmax and Rmin from the intracellular
calibration must be higher and lower than that which you observe during your experiment.
If this is not the case, you must adjust the calibration solutions.
A tutorial for intracellular ratio calibration follows. Please use IntracellularCal.sld for the
tutorial.
5.2.1 Selecting a background ROI and an ROI within a cell
1. Open a Main View of sample 1.
2. Draw a region in an area with no signal using the square ROI tool.
3. Select the region by clicking on it, then right click and select Set as Background.
5-5
Chapter 5 – Ratio Calibration
It is a good idea to scroll through time and make sure that no debris or floating
cells enter this region during some later time point, as the background level is
evaluated for each time point. If you want to change the background ROI,
simply select the ROI and click and drag it to a different spot or delete it and
redraw.
NOTE: The size of an ROI for calibration purposes does not need to be large.
Even a small ROI such as the background ROI pictured above contains over 100
pixels, which is plenty to remove the effects of signal noise in determining a
reliable background level.
4. Draw an ROI within a representative cell. It may be helpful to scroll through
time and find a cell whose max ratio is among the highest in the field of cells.
5-6
SlideBookTM Ratio/FRET Manual
5.2.2 Finding Rmax and Rmin
1. Select Image>Ratio>Intracellular Calibration… to open the intracellular
calibration dialog box.
5-7
Chapter 5 – Ratio Calibration
Initially, the dialog box shows the computed Rmax and Rmin based on the first
timepoint and the first ROI.
2. Graph the ratio data of the ROI by selecting View>Graph…and setting the dialog
as follows:
A graph similar to the following will appear.
5-8
SlideBookTM Ratio/FRET Manual
Simply click on the highest ratio value in the graph, and the main view will
update to timepoint 26. The green line indicates the timepoint showing in your
main view.
3. Either type in “26” into the Timepoint edit field for Rmax, or if your main view is
on timepoint 26, simply press Set to current selection at current timepoint. If
your main view is not currently displaying timepoint 26, you may visit that
timepoint by pressing Visit after entering the timepoint in the edit field.
5-9
Chapter 5 – Ratio Calibration
4. Now repeat steps 2 and 3 for Rmin. In this example, Rmin is located between
timepoints 50 and 65. After timepoint 65, the sample begins to photobleach.
5-10
SlideBookTM Ratio/FRET Manual
5. Enter the dissociation constant, Kd, for your fluorophore. This value is specific for
your fluorophore and biological system. A Kd calculator for Fura-2 is available at the
Molecular Probes website http://probes.invitrogen.com/resources/calc/kd.html. Please
enter the Kd value in units of nM concentration. In this example, we will use 225
nm.
5-11
Chapter 5 – Ratio Calibration
6. Click OK to complete the calibration. Scroll over the main view and observe that
calcium concentrations are displayed next to the ratio channel menu.
7. To set your display back to ratio calculations, enter 0 in the Kd field and click OK.
5-12
SlideBookTM Ratio/FRET Manual
6 Ratio and Concentration Data Graphing and Export
There are three ways to mark areas for graphing and exporting ratio data from an image:
single region export from a marquee or point-and-click selection, multiple region export
from ROIs, and multiple region export from a mask created manually. You may wish to use
the ratiosample.sld file to experiment with data graphing and export.
6.1
Quick Graphing and Data Export
To rapidly generate ratio data:
1. Select a single cell region by selecting the Point Selection tool
.
2. Hold the CTRL key while clicking on a cell. A graph similar to the following will
appear.
You may select the data you wish to display using the drop-down channel menu.
You may increase the radius to increase the area that is being graphed.
3. To export the data, press the Export… button.
6-1
Chapter 6 – Ratio and Concentration Data Graphing and Export
4.
Type in the desired name of the text file where your data will be written.
5. Open the data file using Excel. You may wish to repeat steps 2 and 3 for different
fluorophores.
6.2
Multiple Region Graphing and Export from ROI selections
You may also export data from multiple regions that you selected during capture. You may
also add or delete regions post-capture.
6.2.1 Working with ROIs
You may display regions that you chose during capture, add or delete selections, and select
a background region.
Display ROIs – select View>Annotations>Regions.
Create new ROIs - use the ROI tools to draw regions (please see the SlideBook
User’s manual for a detailed description of ROI tools and usage).
Delete ROIs – click on the ROI identification number, then right click and select
Delete
Select Background Region – click on the ROI to select it, then right click and
select Set as Background.
6-2
SlideBookTM Ratio/FRET Manual
6.2.2 Graphing and Exporting Data
To graph your ROI data, select View>Graph.. and select the channel you wish to display.
You may explore the graph as described on page 3-5. To export the ratio/concentration data,
select Image>Export>Ratio/Timelapse Data…. The output should look similar to the
following:
Ratio information present.
Numerator channel: Fura-2 (340)
Exposure Length (ms): 25
Denominator channel: Fura-2 (380)
Exposure Length (ms): 25
Exposure factor: 1.000000
Plane
0
1
2
3
4
5
6
7
8
9
10
11
12
13
14
15
16
Time
Elapsed (s) Fura-2 (340) Fura-2 (380)
18:07:38
0
127.389
264.921
18:08:40
62
156.293
349.773
18:08:56
78
136.427
291.306
18:09:12
94
145.836
355.204
18:09:28
110
191.009
589.49
18:09:44
126
313.609
1168.469
18:10:00
142
337.471
1274.902
18:10:15
157
344.798
1320.493
18:10:31
173
325.764
1232.783
18:10:47
189
312.181
1196.042
18:11:03
205
326.45
1255.057
18:11:19
221
340.648
1320.662
18:11:35
237
339.289
1343.817
18:11:51
253
334.665
1339.098
18:12:06
268
297.382
1140.826
18:12:22
284
264.548
1009.849
18:12:38
300
246.754
920.529
open
Num Bkgnd Den Bkgnd
636.115
134
283
92.584
184
468
896.681
167
429
1613.015
149
349
1524.064
151
283
1563.009
155
311
1618.142
156
304
1641.541
149
261
1569.025
150
267
1535.664
154
280
1688.936
141
236
1622.681
137
227
1591.9
140
230
1494.662
139
232
1522.478
129
205
1507.147
125
192
1521.391
125
192
Ratio
Qualified Total
0.3125
3 529
0.181287
124 529
0.152749
307 529
0.18768
432 529
0.188592
471 529
0.186341
469 529
0.185284
449 529
0.176044
436 529
0.183691
455 529
0.187705
467 529
0.180893
454 529
0.178979
437 529
0.182955
376 529
0.176145
329 529
0.174486
308 529
Along with the ratio settings, SlideBookTM writes out for each time point the
following fields:
Plane – plane number
Time - time of day that the plane was captured
Elapsed (s) or (ms) - elapsed time in seconds or milliseconds
Numerator channel [Fura-2 (340)] - average numerator intensities for the
region of interest at the given time point; value is not background subtracted
Denominator channel [Fura-2 (380)] – average denominator intensities for
the region of interest at the given time point; value is not background
subtracted
Num Bkgnd or Den Bkgd - average numerator and denominator intensities
for the background region at that time point
Ratio - computed background-subtracted ratio for qualified pixels
Qualified - number of voxels within the region whose values satisfied all
threshold conditions (see Thresholds for Ratio Computation on p. 4-7 to set
conditions); only qualified pixels are used for computing ratio values
6-3
Chapter 6 – Ratio and Concentration Data Graphing and Export
Total - total number of voxels within the region
Total concentration – computed concentration if calibration data is present
(See Chapter 3)
Note: The exact mathematical equations used for computing Ratio data can be found in
Appendix D: Ratio Data Export Calculations.
6.3
Multiple Region Export from a Mask
You may also export data from multiple regions by creating masks. Masks are flexible and
can be copied to multiple images in a slide. Please see Chapter 9 of the SlideBookTM User’s
Manual for a complete discussion of masks. To perform multiple region export from a main
view of your image:
1. Create a mask by choosing Mask>Create and draw your regions using mask
drawing tools. Please see Chapter 9 of the SlideBookTM User’s Manual if you are
unfamiliar with mask drawing tools.
2. Extend the selection to all planes by choosing Mask > Copy This Plane To All.
3. Divide the mask into objects so that SlideBookTM can individually find and
number each region by choosing Mask > Define Objects…. and selecting OK.
4. To display a graph, select Image>Statistics>Ratio/Timelapse Data…. A graph
similar to the following will appear.
6-4
SlideBookTM Ratio/FRET Manual
You may choose to display all regions for a single channel or all channels for a
single region using the radio buttons.
5. To export the data, press the Export… button. (To export the data without first
viewing the graph, select Image > Export > Ratio/Timelapse Data….)
6.
Type in the desired name of the text file where your data will be written.
7. Open the data file using Excel. The output should look as shown above in the
section Graphing and Exporting Data. The object identity will be shown in
parentheses.
6-5
SlideBookTM Ratio/FRET Manual
7 Protocol for Direct FRET/Sensitized Emission FRET
Direct FRET/Sensitized Emission FRET can be performed with SlideBook TM 4.2 as shown
in the following protocol. This example protocol uses the common FRET pair, CFP and
YFP. You must first configure your filter definitions as discussed in Defining FRET
Channels for Direct/Sensitized Emission FRET on page 2-2. This protocol specifically
describes Three-Channel Corrected FRET. Two-Channel Corrected FRET is a technique
used when the donor and acceptor are present in a fixed concentration ratio (e.g. Cameleon
imaging). Two-Channel Corrected FRET can be viewed and analyzed as a ratio of FRET
intensity to donor or acceptor intensity using the ratio tools discussed in Chapters 4 and 5.
For further explanation on the theory and calculations for direct FRET, please see
Appendix A: FRET Introduction and Theory on page A-1.
This protocol includes procedures for:
Capturing Images
Performing Post-Capture Analysis
Viewing Direct FRET Data
Obtaining FRETc Statistics
7.1
Capturing Images
In order to perform direct FRET, you must be able to calculate bleedthrough coefficients, or
cross-talk, for your particular filter sets. In order to calculate bleedthrough coefficients, two
control samples must be imaged: one that contains donor only, and one that contains
acceptor only.
7.1.1 Control Images
1. Mount the donor sample on the stage and open the focus window in
SlideBookTM™. See Chapter 5 of the SlideBookTM User’s Manual for instructions
on using the Focus Window.
2. Select the CFP filter set, and bring the sample into focus.
3. Close the fluorescent shutter and then close the focus window.
4. Open the Capture Window. (See Chapter 6 of the SlideBookTM User’s Manual for
instructions on using the Capture Window).
5. Set the CFP exposure time by selecting the CFP checkbox and then pressing Test
and Once. See Chapter 6 for further instructions on setting exposure times.
6. Set the FRET exposure time by selecting the FRET checkbox and manually
entering the same exposure time from step 5. It is important that the exposure
times of both fluors are equal to each other.
7-1
Chapter 7 – Protocol for Direct FRET/Sensitized Emission FRET
7. Click OK to capture your image.
8. Repeat steps 1-7 with a sample containing only YFP, capturing with the YFP
and FRET channels.
7.1.2 Experimental Sample
Now bring your experimental sample into view and focus in the focus window. Use the
FRET filter when focusing your sample. Then, image your sample(s), capturing the CFP,
YFP, and FRET channels. Make sure that all exposure times are equal to each other. If you
are performing a live FRET experiment, you may wish to take advantage of the live
graphing features that are discussed above in Chapter 4.
7.2
Post Capture Analysis Tutorial
Next, you will perform background subtraction, calculate bleed-through coefficients, and
generate the corrected FRET signal. You may follow this protocol step-by-step using the
example file directFRETsample4-1.sld.
7.2.1 Performing Bleedthrough Calculations
Bleed-through is calculated using the two control images.
1. Open the sample slide by selecting File>Open Slide and navigating to
directFRETsample4-1.sld
2. Open a main view of the CFP only control by double-clicking on the thumbnail.
3. Next, go to Mask>Segment. Move the red bar on the histogram to the right to
segment your image. You should select a significant amount of sample to
increase the accuracy of the bleed-through calculation. For this example, a low
value near 240 can be used.
4. After segmentation is complete, draw a region in an area with no signal using an
ROI tool. A region will appear.
5. Select the region by clicking on it (the number will turn white), then right-click
on the region and select “Set as background”.
7-2
SlideBookTM Ratio/FRET Manual
6. Select Image > FRET > Compute FRET Bleedthrough …. The following dialog
will appear.
7-3
Chapter 7 – Protocol for Direct FRET/Sensitized Emission FRET
NOTE: If the channel selection is not appropriate, you may redefine the channels
as necessary.
7. Select Compute Bleedthrough to calculate the donor bleedthrough. Your dialog
will look similar to the one below.
7-4
SlideBookTM Ratio/FRET Manual
8. Select Make Default to use this bleedthrough coefficient for subsequent
calculations and then click OK to close the dialog box.
9. Open a main view of the YFP only sample, and create a mask and select a
background region as you did for the CFP only sample. Create the mask using
Mask > Segment and choose the YFP channel as the basis for segmentation. A
low value of about 300 is appropriate.
7-5
Chapter 7 – Protocol for Direct FRET/Sensitized Emission FRET
10. Select Image > FRET > Compute FRET Bleedthrough …. The dialog will appear
as follows.
7-6
SlideBookTM Ratio/FRET Manual
11. Select Compute Bleedthrough to compute the direct excitation of acceptor.
7-7
Chapter 7 – Protocol for Direct FRET/Sensitized Emission FRET
12. Select Make Default to retain the bleedthrough values you have generated.
Now, you will determine FRET settings and generate a corrected FRET, or FRETc, channel
for viewing your experimental sample images.
7.2.2 Using FRET Settings
FRET settings may be used to select the type of FRET calculation you wish to perform.
1. Open a Main View of the Dual Label image.
2. Select a background region as you did when calculating bleedthrough
coefficients.
3. Go to Image > FRET > FRET Settings... The FRET Settings dialog box will
appear.
7-8
SlideBookTM Ratio/FRET Manual
4. Select the Three Channel Correction radio button for this example. You will be
asked whether or not you would like to import default bleedthrough settings.
5. Select Yes, and the bleedthrough coefficients will be imported. You may have one
set of bleedthrough coefficients set as default at any time. If you do not wish to
use defaults, simply type in the bleedthrough coefficients in the edit fields.
Once the bleedthrough coefficients are imported, a new channel called FRETc
will be created. The Display Range will update to list the low and high intensity
values of the new channel. If you wish to change the values, enter the new values
in the edit fields for Low and High.
The corrected FRET values for your sample are calculated using equation (4)
described in Appendix A: FRET Introduction and Theory on page A-1.
6. If desired, you may choose to normalize your corrected FRET channel with either
the donor or acceptor intensity. This will create a new channel called <FRETc/D>
or <FRETc/A>. For this exercise, choose Donor and enter 50, 0 and 0.2 in the
Signal Threshold, Display Low and Display High edit fields, respectively.
7-9
Chapter 7 – Protocol for Direct FRET/Sensitized Emission FRET
Signal Threshold – the intensity above which FRETc and normalized FRETc
values will be calculated. This threshold is background subtracted. Therefore,
if you select a value of 50, any pixel that is above 50 after background
subtraction will be used for calculating FRETc.
Display Low – the value that corresponds to black in RGB display or blue in
pseudocolor display. See next section for further explanation of pseudocolor
display.
Display High – the value that corresponds to saturated color in RGB display
or red in pseudocolor display.
NOTE: The new channels <FRETc>, <FRETc/D>, or <FRETc/A> are created for
viewing purposes only. To obtain meaningful transfer efficiency (E%) data, three
channel FRET (FRETc) must be normalized for either donor or acceptor
concentration using masks statistics (see Obtaining FRETc Statistics on page 712).
7. Click OK to close the dialog box.
8. Repeat steps 1-7 for the Mutant image.
7.3
Viewing FRET Data
It is very easy to view your corrected FRET data with SlideBookTM’s pseudocolored main
views. Further explanations and an example for viewing data in pseudocolor can be found
above in Viewing Ratio Data in Pseudocolor on page 4-1.
1. Open a Main View of Dual Label.
2. Go to View > Pseudocolor.
Two channel menus will be available. The first channel will be displayed as a
pseudocolored image ranging from saturated red to saturated blue, known as
Pseudocolor (Color).
3. Select <FRETc/D> from the Hue (top) drop-down channel menu.
The second channel menu will act to gate the pseudocolor image based on
intensity. This second channel is called Pseudocolor (intensity). Thus, an area
with a high pixel intensity for the first channel and a low pixel intensity on the
second channel will appear as dim red. An area with a low pixel intensity for the
first channel and a high pixel intensity on the second channel will appear as
bright blue. This helps distinguish areas with high intensity from background.
4.
Select CFP from the second channel drop-down menu. Your image will appear
similar to the following.
7-10
SlideBookTM Ratio/FRET Manual
5. Repeat steps 1-4 for Mutant. In pseudocolor, red denotes high ratios and blue
denotes low ratios. Therefore, red regions have higher normalized FRET relative
to blue regions.
6. Compare the two images again. Decide which sample is a positive FRET control
and which is a negative FRET control.
7-11
Chapter 7 – Protocol for Direct FRET/Sensitized Emission FRET
7.4
Obtaining FRETc Statistics
You can now generate FRETc information using masks and statistics.
1. Open a main view of your sample image.
2. Go to Mask > Segment and generate a mask on the regions you wish to measure
FRETc (see Chapter 10 of the SlideBookTM User’s Manual for instructions on
masking). Alternatively, you may generate a mask manually.
3. Select Mask > Statistics…. Select the mask you have just created from the dropdown menu, and click on the + next to the Cross Channel category as shown
below.
7-12
SlideBookTM Ratio/FRET Manual
4. Select the Three Channel FRET statistic that you wish to calculate and click
Display to display the results. You may eliminate objects below a certain size
threshold by selecting the Gate Objects by Size checkbox.
Two Channel FRET – FRETc for two channel corrected direct FRET
Three Channel FRET – FRETc for three channel corrected direct
FRET
Three Channel FRET (Donor Norm) – FRETc normalized by the donor
channel for three channel corrected direct FRET
Three Channel FRET (Acceptor Norm) – FRETc normalized by the
acceptor channel for three channel corrected direct FRET
5. After viewing your data, you may select Export. Your data will be saved as a .txt
file. You may then open this using spreadsheet programs such as Excel.
7-13
SlideBookTM Ratio/FRET Manual
8 Protocol for Acceptor Photobleaching FRET
Acceptor Photobleaching FRET can be performed with SlideBookTM 4.1 as shown in the
following protocol. This example protocol uses the common FRET pair, Cy3 and FITC. For
further explanation on the theory and calculations for Acceptor Photobleaching FRET,
please see Appendix A: FRET Introduction and Theory on page A-1.
This protocol includes procedures for:
Capturing Images
Performing Post-Capture Analysis
Viewing Photobleaching FRET Data
Obtaining PB FRET Statistics
8.1
Capturing Images
In order to perform Acceptor Photobleaching FRET, you must first configure your filter
definitions as discussed in Defining FRET Channels for Acceptor Photobleaching FRET on
page 2-5. You will need to determine an appropriate photobleaching time before capturing
your desired sample. To begin capture:
1. Mount your sample on the stage and bring it into view and focus using the Focus
Window. See Chapter 5 of the SlideBookTM User’s Manual for instructions on
using the Focus Window.
2. Use the field diaphragm to create a small area of illumination on the sample.
You will be using this small area to determine an appropriate photobleaching
exposure time.
3. Select Image>Capture.. The Capture dialog box will appear.
4. Now, you must determine an appropriate exposure time for photobleaching.
Select the Photobleach channel and enter an approximate time for
photobleaching.
5. Select Test to generate a test exposure. Increase the illumination area and
observe the amount of photobleaching that has occurred via the oculars. Repeat
the testing procedure on fresh areas of sample until an appropriate
photobleaching exposure time is determined.
6. Use the Focus Window to move to an area of interest, and if desired open the
field diaphragm so that entire sample area is illuminated.
7. In the Capture dialog box, determine exposure times for CY3 pre and FITC pre
by generating test exposures (See Chapter 6 of the SlideBookTM User’s Manual).
8. Select the following channels for capture:
FITC pre – using the exposure time determined above
8-1
Chapter 8 – Protocol for Acceptor Photobleaching FRET
Cy3 pre – using the exposure time determined above
Photobleach – using the exposure time determined above
FITC post – using the FITC pre exposure time
Cy3 post – using the Cy3 pre exposure time
9. Set camera parameters and other settings and select OK. See Chapter 6 of the
SlideBookTM User’s Manual for a complete description of options in the Capture
Dialog box.
Five channels will be captured in succession. It is important that the channels
are captured in the order shown in the bulleted section above. You may alter the
channel order by selecting the Move Up or Move Down buttons located below the
channel listbox.
8.2
Performing Post-Capture Analysis
1. Open a Main View of the image you wish to analyze.
(Image courtesy of Dr. Luis Marrero, LSU Health Sciences Center.)
8-2
SlideBookTM Ratio/FRET Manual
2. Use an ROI tool to mark a background area with no signal. A region will appear.
3. Select the region by clicking on it (the number will turn white), then right-click
on the region and select “Set as background”.
4. Select Image>FRET> FRET Settings. The following dialog box will appear.
2. Select Acceptor Photobleaching and then OK.
3. Return to the Main View of your image and select <pbFRET> from any of the
channel menus to display and view your acceptor photobleaching FRET values.
4. To alter the display values in your image, alter the edit fields in the FRET
Channel Display section of the dialog box.
Signal Threshold – the intensity above which pbFRET values will be
calculated. This threshold is background subtracted. Therefore, if you
8-3
Chapter 8 – Protocol for Acceptor Photobleaching FRET
select a value of 50, any pixel that is above 50 after background
subtraction will be used for calculating pbFRET.
Display Low – the pbFRET value that corresponds to black in RGB
display or blue in pseudocolor display. See next section for further
explanation of pseudocolor display.
Display High – the pbFRET value that corresponds to saturated color in
RGB display or red in pseudocolor display.
8.3
Generating Photobleaching FRET Statistics
To obtain Photobleaching FRET statistics:
1. Create a mask using either segmentation or manual techniques. Please see
Chapter 10 of the SlideBookTM User’s Manual for information on creating masks.
2. Select Mask>Statistics and select Photobleaching FRET from Cross-Channel
statistics.
3. Select Display. This will generate statistics on a region basis using the following
formula:
PB FRET = [(Donor Post) – (Donor Pre)] / (Donor Post)
where the intensities in parentheses are first averaged for each region before
performing division.
NOTE: Confirm that the appropriate channels are being used for the calculation
by checking the FRET settings dialog box (Image>FRET>FRET Settings…).
4. To export the data, select Export, enter a location for the data and select Save.
You may now open your data file in Excel.
8-4
SlideBookTM Ratio/FRET Manual
9 Selected References
Bolsover, S. R. et al. (1993) Ratio imaging measurement of intracellular calcium and pH.
In Electronic Light Microscopy (New York: Wiley-Liss), 182-210.
Dunn, K. et al. (1994) Applications of ratio fluorescence microscopy in the study of cell
physiology. FASEB Journal 8: 573-582.
Grynkiewicz, G. et al. (1985) A new generation of Ca2+ indicators with greatly improved
fluorescence properties. Journal of Biological Chemistry 260: 3440-3450.
Moore, E. D. W. et al. (1990) Ca2+ imaging in single living cells: Theoretical and practical
issues. Cell Calcium 11: 157-179.
Sorkin, A. et al. (2000) Interaction of EGF receptor and Grb2 in living cells visualized by
fluorescence resonance energy transfer (FRET) microscopy. Current Biology 10: 13951398.
9-1
SlideBookTM Ratio/FRET Manual
Appendix A: FRET Introduction and Theory
Flourescence Resonance Energy Transfer (FRET) is a distance-dependent interaction
between the electronic excited states of two dye molecules where the excitation is
transferred from a donor molecule to an acceptor molecule without the emission of a
photon. More specifically, FRET is the radiationless transmission of energy from its site of
absorption to the site of its utilization by resonance between chromophores (Figure 1).
440 nm
520 nm
50Å
Figure 1
There are three types of FRET, two of which SlideBookTM™ currently supports. The three
types of FRET are:
Acceptor Photobleaching Recovery
Direct FRET/Sensitized Emission FRET
Fluorescence Lifetime Measuring
SlideBookTM™ supports Direct FRET and Acceptor Photobleaching Recovery and will
support Fluorescence Lifetime Measuring in the near future.
As stated above, FRET involves the non-radiative transfer of energy from a fluorophore in
an excited state to a nearby acceptor fluorophore. In order for this transfer to take place,
the donor and acceptor molecules must be within 10-50Å (Förster distance) and the
emission spectra of the donor fluorophore must overlap the excitation spectra of the
acceptor fluorophore. In principle, this overlap will allow the exchange of energy through a
non-radiative dipole-dipole transfer. The energy transfer manifests itself by quenching the
donor fluorescence in the presence of the acceptor and increased (sensitized) emission of the
acceptor fluorescence. The figure on the next page illustrates the spectral overlap of the
corresponding fluorphores.
A-1
Appendix A – FRET Introduction and Theory
Quenched Donor
Emission due to FRET
Sensitized Emission
due to FRET
Normal Donor
Emission
Acceptor
Absorbance
Donor
Absorbance
Normal Acceptor
Emission
WAVELENGTH ( )
Figure 2
The distance dependent characteristics of FRET make it an excellent tool for investigating
a variety of biological phenomena that produce changes in molecular proximity. Further,
this distance dependency also allows FRET to distinguish between two fluorophores that
are less than 200 nanometers apart.
Acceptor Photobleaching Recovery
The underlying principle of Acceptor Photobleaching Recovery takes advantage of
statistical probabilities. Whenever a molecule is excited by a photon, there is a statistical
probability of either of three things happening. These three things are:
A. The specimen under questions fluoresces and emits the exciter energy as the
electrons drop back to ground state.
B. The specimen becomes photobleached
C. The specimen FRETs – or rather it loses (in the case of the donor) energy
through a dipole transfer.
Knowing these three outcomes, it is possible to calculate FRET through a subtractive
process. Prior to photobleaching, the defining equation for the donor is as follows:
A + B + C =100% before photobleaching
(1)
Once the acceptor is photobleached, FRET cannot occur and C is set to 0. The equation is
then reduced to:
A + B = 100%after photobleaching
(2)
Subtracting equation 2 from equation 1, and assuming the probability of spontanteous
photobleaching of the donor remains the same, yields:
A-2
SlideBookTM Ratio/FRET Manual
A + C before photobleaching = A after photobleaching
(3)
Thus, after photobleaching, the amount of A is increased by C, the amount of FRET
occurring prior to bleaching. The process of photobleaching, a destructive process,
eliminates the possibility of FRET occurring in the acceptor. Therefore, if the donor cannot
FRET to the acceptor then the acceptor emission is increased.
In practice, there are three steps to calculating FRET using Acceptor Photobleaching
Recovery. These steps are
1. Capture an image of the donor
2. Bleach the acceptor
3. Capture an image of the donor
After taking these two images, FRET can be calculated by subtracting image one from
image three.
Direct FRET/Sensitized Emission FRET
Direct FRET/Sensitized Emission FRET is a faster, and less intrusive method of FRET
imaging than Acceptor Photobleaching FRET, at the cost of computational accuracy. As the
name of the technique indicates, FRET is measured directly by imaging the sample through
donor excitation and acceptor emission filters, or FRET filters. In theory, this would be the
only image necessary if the donor excitation and acceptor emission spectra were perfectly
separated. In practice, the spectra do overlap, and corrections for spectral bleedthrough
must be performed. There are two techniques for calculating Direct FRET:
Two-Channel Corrected FRET – applicable when donor and acceptor are present
in a fixed, stoichiometric ratio (e.g. Cameleon imaging)
Three-Channel Corrected FRET - separately corrects for donor bleedthrough and
direct excitation of the acceptor, appropriate when donor and acceptor are not
present in a fixed ratio
We will now discuss the details of Three-Channel Corrected FRET. A discussion of TwoChannel Corrected FRET follows.
Three-Channel Corrected FRET
For Three-Channel Correct FRET, three images are necessary:
8. Control containing donor only imaged with donor and FRET filters.
9. Control containing acceptor only imaged with acceptor and FRET filters.
10. Experimental sample containing both donor and acceptor imaged with donor,
acceptor, and FRET filters.
A-3
Appendix A – FRET Introduction and Theory
For demonstration purposes, let us assume CFP is the donor and YFP is the acceptor. When
CFP excites, a large portion will emit normally (corresponding to the CFP emission
spectrum). If the CFP FRETs, a radiationless energy transfer will occur that causes YFP to
emit. The CFP emission spectrum overlaps with the YFP emission spectrum, therefore
some of the normal CFP emission will be visible through the YFP emission filter. This
cross-talk confounds the signal due to FRET and must be corrected. The first image, the
CFP control, is used to calculate the spectral bleedthrough of CFP emission visible through
FRET filter set.
Additional corrections must be made for non-FRET signal due to the overlap of CFP and
YFP excitation spectra.. This overlap causes normal YFP fluorescence to be visible through
the FRET filter set. The second image, the YFP control, is used to calculate the spectral
bleedthrough of normal YFP emission through the FRET filter set..
The third image is the raw FRET image. Corrected FRET, or FRETc, is calculated with
consideration of all three images. The following equation is used to subtract the non-FRET
portions from the raw FRET signal:
FRETc = FRETraw – Df/Dd[CFP] – Df/Da[YFP]
(4)
where FRETraw,, [CFP], and [YFP] are the signals visualized through the FRET, CFP, and
YFP filter sets, respectively. The constants Df/Dd and Df/Da are the transmissivity, or bleedthrough, constants describing donor emission visible in FRET channel and direct excitation
of acceptor, respectively [Sorkin, et al.]. These constants are calculated using images 1 and
2. Failure to account for these intensities in raw FRET will result in erroneous data.
Two-Channel Corrected FRET
For Two-Channel Corrected FRET, a single two-channel image of the sample is required.
The two channels that must be captured are the donor (or acceptor) channel and the FRET
channel.
Continuing with the CFP/YFP example above, if the concentration of CFP equals that of
YFP, equation (4) reduces to:
FRETc = FRETraw + (Df/Da - Df/Dd)[CFP]
(5)
Dividing through by [CFP] yields:
FRETc/[CFP] = FRETraw/[CFP] + (Df/Da - Df/Dd)
(6)
Thus, the normalized, uncorrected values will differ from the normalized corrected values
by a constant offset. Further, for two-channel FRET, if the donor and acceptor bleedthrough
factors (Df/Dd and Df/Da) are unknown, changes in normalized, corrected FRET, FRETcN, can
still be measured:
FRETCN =
FRETc/[CFP]} =
{FRETraw/[CFP]}
(7)
A-4
SlideBookTM Ratio/FRET Manual
Therefore, simply measuring the ratio of the raw FRET channel to the donor channel allows
for comparison of two-channel corrected FRET values in various regions of the
experimental sample.
A-5
SlideBookTM Ratio/FRET Manual
Appendix B: Buffers For Ratio Calibration
You may wish to purchase a Fura-2 Calcium Imaging Calibration Kit from Molecular
Probes (Cat# F-6774). Sample buffer recipes are shown below. Rmin, Rmax and beta values
will vary depending on your particular setup, but typical values for Fura-2 may be Rmin ~
0.25, Rmax ~ 2.5 and beta ~ 5.
Background Buffer
10X stock solution
Dissolve in 90 ml H2O:
8.95 g KCl (1.2 M)
0.29 g NaCl (50 mM)
0.1 g KH2PO4 (7.4 mM)
0.42 g NaCO3 (50 mM)
4.77 g HEPES (200 mM)
Do not adjust pH
Bring volume to 100 ml with H2O
For 1X solution dilute 1:9 in H20, pH to 7.4
Ion-Free Buffer
Add 25-50 M (final concentration) fluorophore (not AM ester derivative, must be salt form)
to the Background Buffer. Note that this value may vary based on your fluorophore and
loading conditions. You will want to approximate the final concentration of fluorophore in
your loaded samples.
Ion-Saturated Buffer
10X stock solution CaCl2
Dissolve in 90 ml H2O:
0.22 g CaCl2 (20mM)
Do not adjust pH
B-1
Appendix B – Buffers for Ratio Calibration
Bring to 1X using 1 part CaCl2 10X solution, 1 part 10X background buffer solution, 8 parts
H2O, pH to 7.4 and add 25-50 M (final concentration) fluorophore.
B-2
SlideBookTM Ratio/FRET Manual
Appendix C: Ratio Calibration Calculations
Terms
Excitation wavelength used in ratio numerators
Excitation wavelength used in ratio denominators
Intensity of numerator background image n at position x, y
Intensity of denominator background image n at position x, y
Intensity of numerator ion-free image n at position x, y
Intensity of denominator ion-free image n at position x, y
Intensity of numerator ion-saturated image n at position x, y
Intensity of denominator ion-saturated image n at position x, y
Region of interest: a subset of all possible x, y positions
The number of positions in the region of interest
Correction factor: exposure time at 1 / exposure time at 2
1
2
B 1(n; x, y)
B 2(n; x, y)
If 1(n; x, y)
If 2(n; x, y)
Ib 1(n; x, y)
Ib 2(n; x, y)
ROI
|ROI|
Background
The background is computed from averaging intensities of N images 1…n at both 1and 2
over the region of interest:
b 1 = 1/N
b 2 = 1/N
n
n
1/|ROI|
1/|ROI|
ROI
ROI
B 1(n; x, y)
B 2(n; x, y)
Rmin
Rmin(n) is computed for each set of images 1…n and the minimum is taken for the
calibration value Rmin:
if 1(n) = 1/|ROI|
if 2(n) = 1/|ROI|
ROI
If 1(n; x, y)
x, y)
ROI If 2(n;
Rmin(n) = (if 1(n) - b 1) / ( (if 2(n) - b 2)
Rmin = minn Rmin(n)
Rmax
Rmax(n) is computed for each set of images 1…n and the maximum is taken for the
calibration value Rmax:
ib 1(n) = 1/|ROI|
ib 2(n) = 1/|ROI|
ROI
ROI
Ib 1(n; x, y)
Ib 2(n; x, y)
Rmax(n) = (ib 1(n) - b 1) / ( (ib 2(n) - b 2)
Rmax = maxn Rmax(n)
C-1
Appendix C – Ratio Calibration Calculations
Beta
is computed as the quotient of average denominator intensity in the ion-free images over
the average denominator intensity in the ion-saturated images:
= (1/N
n if 2(n)
- b 2) / (1/N
n ib 2(n)
- b 2)
C-2
SlideBookTM Ratio/FRET Manual
Appendix D: Ratio Data Export Calculations
Currently there are two ways of defining a ROI for post-acquisition analysis:
1) Using a selection cube for generating ratios (and concentrations) for a single rectangular
region across all time points included in the selection
2) Using a mask (divided into submasks) for contiguous isolated user-delineated regions
across all time points included in the mask
Each method uses the same ratio and concentration calculations.
Terms
1
2
I 1(t; x, y)
I 2(t; x, y)
ROI(n)
|ROI(n)|
1
2
1
2
Excitation wavelength used in ratio numerators
Excitation wavelength used in ratio denominators
Intensity of numerator image of time point t at position x, y
Intensity of denominator image of time point t at position x, y
Region of interest n: a subset of all possible x, y positions
The number of positions in the region of interest n
Correction factor: exposure time at 1 / exposure time at 2
Minimum threshold intensity for ratio numerator
Minimum threshold intensity for ratio denominator
Maximum threshold intensity for ratio numerator
Maximum threshold intensity for ratio denominator
Background
The background is computed for each time point for both the numerator and denominator
images by averaging intensities over the background region of interest ROIb:
b 1(t) = 1/|ROIb|
b 2(t) = 1/|ROIb|
I 1(t; x, y)
ROIb I 2(t; x, y)
ROIb
ROIs and Thresholding
Individual regions of interest for analysis are restricted by the minimum and maximum
thresholds for each wavelength. This means that a delineated region of interest ROI(n; t)
actually yields two regions, ROI 1(n; t) and ROI 2(n; t), which may not necessarily be
identical:
ROI 1(n; t) =
ROI 2(n; t) =
x,y such
x,y such
that (x, y)
that (x, y)
ROI(n; t) ^
ROI(n; t) ^
1
2
I 1(t; x, y)
I 2(t; x, y)
1
2
Ratio Computation
The ratio r(n; t) is computed for ROI(n; t) by first computing average intensities for the
numerator and denominator:
i(n; t
i(n; t
1(n)
= 1/|ROI 1(n; t)|
2(n) = 1/|ROI 2(n; t)|
ROI 1(n;
ROI
t) I 1(t; x, y)
2(n; t) I 2(t; x, y)
D-1
Appendix D – Ratio Data Export Calculations
and then computing the background and exposure time corrected ratio:
r(n; t) = (i(n; t
1(n)
- b 1(t)) / ( i(n; t
2(n)
- b 2(t)))
Ratio Error Conditions
The following conditions will prevent r(n; t) from being computed:
|ROI
|ROI
i(n; t
i(n; t
1(n;
t)| = 0
2(n; t)| = 0
1(n) < b 1(t)
b 2(t)
2(n)
Concentration Computation
The concentration c(n; t) is computed using the calibration parameters:
c(n; t) = Kd
(r(n; t) – Rmin) / (Rmax – r(n; t))
Concentration Error Conditions
The following conditions, in addition to those that prevent r(n; t) from being computed, will
prevent c(n; t) from being computed:
r(n; t) < Rmin
r(n; t) Rmax
D-2
SlideBookTM Ratio/FRET Manual
Appendix E: Direct FRET Calculations
Terms
D
A
F
Fd/Dd
Fa/Aa
I D(t; x, y)
I A(t; x, y)
I F(t; x, y)
ROI(n)
|ROI(n)|
FRET Donor emission wavelength
FRET Acceptor emission wavelength
FRET Transfer emission wavelength
Donor emission bleedthrough
Direct excitation of acceptor
Intensity of image measured through FRET Donor filter set of time point t at
position x,y
Intensity of image measured through FRET Acceptor filter set of time point t
at position x,y
Intensity of image measured through FRET Acceptor filter set of time point t
at position x,y
Region of interest n: a subset of all possible x, y positions
The number of positions in the region of interest n
Background
The background is computed for each time point for FRET donor, acceptor, and transfer
images by averaging intensities over the background region of interest ROIb:
b D(t) = 1/|ROIb|
b A(t) = 1/|ROIb|
b F(t) = 1/|ROIb|
I D(t; x, y)
ROIb I A(t; x, y)
ROIb I F(t; x, y)
ROIb
Three Channel Corrected FRET - FRETc Computation
FRETc (n; t) is computed for ROI(n; t) by first computing average intensities for the donor,
acceptor, and transfer channels:
i(n; t
i(n; t
i(n; t
D(n)
= 1/|ROI D(n; t)|
A(n) = 1/|ROI A(n; t)|
F(n) = 1/|ROI F(n; t)|
ROI D(n;
t) I D(t; x, y)
ROI 2(n; t) I A(t; x, y)
ROI F(n; t) I F(t; x, y)
and then computing the background corrected FRETc:
FRETc(n; t) = (i(n; t
F(n)
- b F(t)) – Fd/Dd*(i(n;t)
D(n)
- b D(t)) – Fa/Aa*(i(n;t)
A(n)
- b A(t))
Two Channel Corrected FRET – FRETc Computations
FRETc (n; t) is computed for ROI(n; t) by first computing average intensities for the donor
and transfer channels:
E-1
Appendix E – Direct FRET Calculations
i(n; t
i(n; t
D(n)
= 1/|ROI D(n; t)|
F(n) = 1/|ROI F(n; t)|
ROI D(n;
ROI
t) I D(t; x, y)
F(n; t) I F(t; x, y)
and then computing the background corrected FRETc:
FRETc(n; t) = (i(n; t
F(n)
- b F(t)) – Fd/Dd*(i(n;t)
D(n)
- b D(t))
E-2
SlideBookTM Ratio/FRET Manual
Appendix F: Photobleaching FRET Calculations
Terms
Donor emission wavelength measured before photobleaching
Donor emission wavelength measured after photobleaching
Intensity of image measured through FRET Donor filter set of time point t at
position x,y
Intensity of image measured through FRET Acceptor filter set of time point t
at position x,y
Region of interest n: a subset of all possible x, y positions
The number of positions in the region of interest n
pre
post
I
pre(t;
x, y)
I
post(t;
x, y)
ROI(n)
|ROI(n)|
Background
The background is computed for prebleach and postbleach images by averaging intensities
over the background region of interest ROIb:
b
b
pre =
post
1/|ROIb|
= 1/|ROIb|
ROIb
I D(x, y)
I A(x, y)
ROIb
Photobleach FRET - pbFRET Computation
pbFRET (n) is computed for ROI(n) by first computing average intensities for the prebleach
and postbleach channels:
i(n; t
i(n; t
pre(n)
post(n)
= 1/|ROI pre(n; t)|
= 1/|ROI post(n; t)|
ROI pre(n;
ROI 2(n;
t) I pre(t; x, y)
t) I post(t; x, y)
and then computing the background corrected pbFRET:
pbFRET(n) = [(i(n
post(n)
-b
pre)
– (i(n)
pre(n)
-b
post(t))
] / (i(n
post(n)
-b
pre)
F-1