1
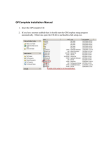
K4 Series
Network Camera
Quick Installation Guide
Ver.2013/ 04
Table of Contents
1. Quick Installation
Copyrights & Trademarks
Reading Before Using
Warning Before Using
Installation
Package Contents
The appearance of the product
Hardware Overview
Installed on the camera lens
Network and setup IP
Ready to start using your webcam
3
4
4
4
5
6
8
9
10
18
2
Copyrights & Trademarks
Copyright
© 2012
Trademarks
Microsoft and Windows are registered trademarks of Microsoft Corporation.
All other trademarks mentioned in this document are trademarks of their respective
owners.
Disclaimer
This document is intended for general information purposes only, and due care has
been taken in its preparation.
Any risk arising from the use of this information rests with the recipient, and nothing
herein should be construed as constituting any kind of warranty.
The distributor reserves the right to make adjustments without prior notification.
All names of people and organizations used in these documents examples are
fictitious. Any resemblance to any actual organization or person, living or dead, is
purely coincidental and unintended.
3
Reading Before Using
You should read all the safety and operating instructions before using this product.
The use of surveillance devices may be prohibited by law in your country. The IP
Camera is not only a high-performance web-ready camera, but can also be part of a
flexible surveillance system. It is the user’s responsibility to ensure that the operation
of such devices is legal before installing this unit for its intended use.
Warning Before Using
1. Abnormal: Power off the IP Camera immediately when the smoke or unusual
odors are detected.
2. Voltage: Don not use the power supply with other voltages, if you use a power
supply with different voltage than the one included with this device. It is likely to
be damaged or damage other equipments / personnel.
3. Humidity: Keep the IP Camera dry inside. If it becomes wet, power off is
necessary! Do not place it in high humidity environments.
4. Temperature: Refer to your user’s manual for the operating temperature; do not
place around heat sources, direct sunlight.
5. Disassemble: Do not open the housing of this IP Camera; avoid disassembling
and inserting the sharp or tiny things.
6. Accessory: Do not use attachment / accessory not recommend by Raylios.
All warranty will be voided in the situations above.
Installation
Please make sure you receive the product, complete, including the following is a list
of the contents. Read the installation manual and installation methods, in order to
avoid the wrong product assembly and installation, resulting in damage to the
product.
4
Package Contents
Box Camera
*Lens not included
Dome Camera
Power Adaptor
Bullet Camera
Software CD
5
The appearance of the product
Box Camera
6
Dome Camera
Bullet Camera
7
Hardware Overview
Ethernet Port
The IP device connects to the Ethernet via a standard RJ45 connector. Supporting
NWAY, this IP device can auto detect the speed of local network segment
(10Base-T/100Base-TX Ethernet).
Reset Button
Step 1: Switch off IP device by disconnecting the power cable
Step 2: Press and continue to hold the Reset Button (with a sharp tipped object, like a
pen.)
Step 3: Reconnect the power cable while continuing to hold the reset button. The
Power LED light will turn orange for about 15 seconds, and then turn green for about
5 seconds. By this time the reset to default operation is already completed. This reset
operation time fluctuates slightly with the environment.
Audio Input / Output
The IP device supports audio input and output with earphone jack.
Digital Input / Output
Used in applications like motion detection, event triggering, time lapse recording,
alarm notifications, etc., the I/O terminal connector provides the interface to:
1. Transistor output – for connecting external devices such as relays and LEDs.
Connected devices can be activated by Output buttons on the Live View page or
through video management software.
2. Digital Input – An alarm input for connecting devices that can toggle between an
open and closed circuit, for example: PIRs, door/window contacts, glass break
detectors, etc. The device will detect the change in digital input and transmit the
signal to video surveillance servers.
8
Installed on the camera lens
1. Turning the lens clockwise until it can no longer rotate.
2. The auto iris connector is connected to the auto iris slot. (This step is required
only auto iris lens)
Network and setup IP
If your network environment supports PoE (Power Over Ethernet), that is, a PoE
switch or PoE a injector:
1. The machine is connected to the PoE Switch or PoE Injector (CAT 5 / CAT 6
standard network cable with RJ45 connectors).
2. Your PoE Switch or PoE Injector is connected to a PC (CAT 5 / CAT 6 standard
network cable with RJ45 connectors).
If your network environment does not support PoE (Power Over Ethernet):
1. Included in the packaging power cord to the machine, and connected to a power
source.
2. The machine is connected to the Ethernet switch (Ethernet Switch).(CAT 5 / CAT 6
standard Ethernet cable with RJ45 connectors).
3. Ethernet switches (Ethernet Switch) connected to a PC.(CAT 5 / CAT 6 standard
Ethernet cable with RJ45 connectors).
9
Connect to IP Camera
The package includes the CD provides a convenient tool for webcam search software
(Skate).This software can help you search for and connect to the machine in a
network environment.
1. Insert the CD into the PC's CD / DVD player within.The CD will automatically
broadcasting (Autorun).
2. Select "Skate2"
3. If your PC does not support automatic broadcasting (Autorun), your own
implementation of the program in the CD "autorun.exe".
4. Search software window appears, press "Search", and can be detected webcams,
and the list shows the camera name and state.
10
5. Click on the webcam you want to link, click image window will appear below.
6. Press the button "Open Browser".
11
7. Login window appears, enter the following username and password, enter and
press the OK button.
Factory settings Username: admin Password: password
8. Successfully logged in, you can see the camera screen.To enter the Advanced
Settings page, the "Setup" button at the upper-right corner of the screen.
If you only use a single network camera install this.
If you are using a multi-branch network cameras, please repeat the previous steps,
one by one installation is complete.
12
If you complete the preceding steps, still can not connect to the camera to see the
image, it may be because your PC to set a fixed IP.In this case, follow these steps to
change the IP address of the network camera and PC the same subdomain.
1. Why to check your PC's IP address: Go to the Windows system Control Panel ->
Network and Sharing Center "->" Change adapter settings "->" Local Area
Connection "-> Select" Internet Road protocol Fourth Edition "→ click" content ".
2. "IP Address" field (IP Address), as well as the subnet mask cover column (Subnet
Mask) see the IP address of your PC, recorded.In our example, the IP
192.168.1.99, Subnet Mask to 255.255.255.0.Default Gateway field display digital
recorded.
Click on “OK”
3. Insert the CD into the PC's CD / DVD player within.The CD will automatically
broadcasting (Autorun).
4. Select "Skate"
5. If your PC does not support automatic broadcasting (Autorun), your own
implementation of the program in the CD "autorun.exe".
13
6. Search software window appears, press "Search", and can be detected webcams,
and the list shows the camera name and state.
7. Click on the webcam you want to link, click image window will appear below.
14
8. Press the right option "Network Setting", then press the "OK".The webcam
network settings window opens.
9. Select "Fixed IP".Enter the first three digits and your PC IP address number in the
address field.In our example, 192.168.0.The last column of arbitrary input any
number between 1-254, and the PC's IP last digit different can be.In our example,
the PC last column of figures is 101, so as long as we avoid the 101, enter any
number between 1-254, for example, 100
15
10. The Netmask field input and your PC subnet mask, mask (subnet mask) the same
number.In our example, 255.255.255.
11. In the same number of Gateway field and enter your PC default gateway.In our
example, is blank, no value, it is not necessary to fill in any value.Then press the
"Save".
12. Again press the "Search" button.You will find the IP address of the network
camera has become the address you set.
13. Click on the webcam you want to link, click image window will appear below.
16
14. Press the button "Open Browser".
15. Login window appears, enter the following username and password, enter and
press the OK button.
Factory settings Username: admin Password: password
17
16. Successfully logged in, you can see the camera screen.To enter the Advanced
Settings page, the "Setup" button at the upper-right corner of the screen.
Ready to start using your webcam
To search the network in accordance with the foregoing method webcams and see
the images in the browser.
18