Transcript
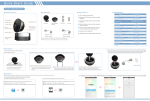
IP Cam 30
User manual
Produkt Strukture
Photosensitive
Setting button
Indicator light
Camera lens
90° swinging
infrared lamp
Delivery
Main features
• Camera
• WiFi wireless transmission
Specifications
Image sensor
1/4“ CMOS
Minimum illumination
0LUX (IR LED ON)
Video resolution
High: 1280 x 720 / Normal: 640 x 360
Frame rate
30 fps
Viewing angel
80°(horizontal)
Night vision distance
5 M
Audio input
Built-in microphone
Wireless network
802.11 b/g/n
• Wall hanging bracket
• Support 720P HD cloud video recording operation
• Wall dowel
• Can read images saved in cloud storage anytime
• Screws
• Easy to install and use, and can be easily set by QR code
Wireless safety
WEP/WPA/WAP2/WPA-PSK/WPA2-PSK
• Power adapter
• Built-in IR-CUT wide-angle lens,
images are with high definition and delicate
Operation system
Android / iOS
Motion detection
Support
• Support motion detection
Power supply
Micro USB 5 V
Consumption current
270 mA (IR LED off) / 490 mA (IR LED on)
Operation Temperature
10° ~ +50°
Storage Temperature
-20° ~ +60°
Operation humidity
15% ~ 85% RH
Dimensions
93.5 x 88.7 x 41 mm (Folded state)
Weight
159 g
Power
supply
360° swinging
• Message service, master trends at first time
Wall hanging
bracket
Installation
Place the camera on a plane surface
Fix and installation: users can choose to fix directly or install with side fastener to the wall.
Drill on the wall, knock in the nail, and then
fix the wall hanging bracket onto the proper
monitoring position with screws.
Place the camera lens directly
onto the horizontal plane.
Drill on the wall, knock in the nail, turn the
screws into the nail, and then slide the wall
hanging bracket onto the screws.
Operation
Android devices
1. Open iPhone client end, and click icon of App Store.
2. Search keyword „Walle“ in APP Store.
3. Click „install“ and the software will be installed to the
smart client.
1. Open Android smart client, and enter
GOOGLE PLAY store.
2. Search software „Walle“ and download.
3. Click „install“and the software will be installed to the
smart client.
Wall e
Google play
After fixing the wall hanging bracket, stick
the DV into the wall hanging bracket.
Notes: align the slots before pressing down.
Register an account.
Open APP software,
and register an account first.
Below image will show
if it is successful.
iOS devices
APP Store
Camera lens plug in. Insert one end of the power
line into the supply hub at the back of the camera
lens, and the other end into power outlet, and the
indicator light lights up. Notes: power line plug and
camera lens jack are marked as the same plane
Wall e
Power source