1
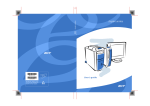
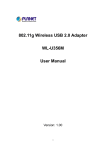
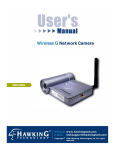
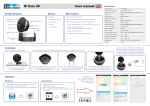
Pre-N Wireless PCI Adapter
WNL-9310
User Manual
Version: 1.00
Date: January
2007
PLANET WNL-9310
User Manual
Copyright
Copyright © 2007 by PLANET Technology Corp. All rights reserved. No part of this
publication may be reproduced, transmitted, transcribed, stored in a retrieval system, or
translated into any language or computer language, in any form or by any means, electronic,
mechanical, magnetic, optical, chemical, manual or otherwise, without the prior written
permission of PLANET.
PLANET makes no representations or warranties, either expressed or implied, with respect to
the contents hereof and specifically disclaims any warranties, merchantability or fitness for any
particular purpose. Any software described in this manual is sold or licensed "as is". Should the
programs prove defective following their purchase, the buyer (and not PLANET, its distributor,
or its dealer) assumes the entire cost of all necessary servicing, repair, and any incidental or
consequential damages resulting from any defect in the software. Further, PLANET reserves
the right to revise this publication and to make changes from time to time in the contents hereof
without obligation to notify any person of such revision or changes.
All brand and product names mentioned in this manual are trademarks and/or
registered trademarks of their respective holders.
Federal Communication Commission Interference Statement
This equipment has been tested and found to comply with the limits for a Class B digital device,
pursuant to Part 15 of FCC Rules. These limits are designed to provide reasonable protection
against harmful interference in a residential installation. This equipment generates, uses, and
can radiate radio frequency energy and, if not installed and used in accordance with the
instructions, may cause harmful interference to radio communications. However, there is no
guarantee that interference will not occur in a particular installation. If this equipment does
cause harmful interference to radio or television reception, which can be determined by turning
the equipment off and on, the user is encouraged to try to correct the interference by one or
more of the following measures:
1.
Reorient or relocate the receiving antenna.
2. Increase the separation between the equipment and receiver.
3. Connect the equipment into an outlet on a circuit different from that to which the receiver
is connected.
4. Consult the dealer or an experienced radio technician for help.
FCC Caution
To assure continued compliance. (example-use only shielded interface cables when
connecting to computer or peripheral devices). Any changes or modifications not expressly
approved by the party responsible for compliance could void the user’s authority to operate the
equipment.
This device complies with Part 15 of the FCC Rules. Operation is subject to the Following two
conditions: ( 1 ) This device may not cause harmful interference, and ( 2 ) this Device must
accept any interference received, including interference that may cause undesired operation.
Federal Communication Commission (FCC) Radiation Exposure Statement
This equipment complies with FCC radiation exposure set forth for an uncontrolled
environment. In order to avoid the possibility of exceeding the FCC radio frequency
I
PLANET WNL-9310
User Manual
exposure limits, human proximity to the antenna shall not be less than 20 cm (8 inches)
during normal operation.
R&TTE Compliance Statement
This equipment complies with all the requirements of DIRECTIVE 1999/5/CE OF THE
EUROPEAN PARLIAMENT AND THE COUNCIL OF 9 March 1999 on radio equipment and
telecommunication terminal Equipment and the mutual recognition of their conformity (R&TTE)
The R&TTE Directive repeals and replaces in the directive 98/13/EEC (Telecommunications
Terminal Equipment and Satellite Earth Station Equipment) As of April 8,2000.
Safety
This equipment is designed with the utmost care for the safety of those who install and use
it. However, special attention must be paid to the dangers of electric shock and static
electricity when working with electrical equipment. All guidelines of this and of the computer
manufacture must therefore be allowed at all times to ensure the safe use of the
equipment.
WEEE regulation
To avoid the potential effects on the environment and human health as a result of
the presence of hazardous substances in electrical and electronic equipment, end
users of electrical and electronic equipment should understand the meaning of the
crossed-out wheeled bin symbol. Do not dispose of WEEE as unsorted municipal
waste and have to collect such WEEE separately.
Revision
User’s Manual for PLANET Pre-N Wireless PCI Adapter
Model: WNL-9310
Rev: 1.0 (January. 2007)
Part No. EM-WNL9310
II
PLANET WNL-9310
User Manual
TABBLE OF CONTENTS
Chapter 1 Introduction .................................................................................2
1.1 Features ............................................................................................................2
1.2 Specification ....................................................................................................3
1.3 Package Contents .............................................................................................4
1.4 Minimum System Requirements......................................................................4
1.5 Installation Considerations...............................................................................4
1.6 PLANET WNL-9310.......................................................................................5
Chapter 2 Installation Procedure..........................................................6
2.1 Configuration Utility & Driver Installation .....................................................6
Chapter 3 Configuration Utility..........................................................14
3.1 Status Information..........................................................................................15
3.2 Site Survey .....................................................................................................15
3.3 Profile Manager .............................................................................................17
3.4 Advanced Setting ...........................................................................................22
3.5 Network Status...............................................................................................24
3.6 About..............................................................................................................25
Appendix A: Troubleshooting .....................................................................26
I
PLANET WNL-9310
User Manual
Chapter 1 Introduction
For higher wireless transfer performance, we are glad to introduce the PLANET Pre-N wireless
PCI adapter – WNL-9310. WNL-9310 is a PCI2.2 wireless adapter that can operate in either
Ad-Hoc mode (Point to Point/Point to Multipoint without an Access Point) or Infrastructure mode
(Point to Point/Point to Multipoint with an Access Point). Uses 2.4GHz frequency band; it is
backward environment base on your Existing wireless network. With the latest innovative Pre-N
technology integrated, the maximum date rate of WNL-9310 is up to 300Mbps which almost
three times of standard G.
Featuring smart antenna technology, the Pre-N design helps combat distortion and interference
so the Network Card can send its date streams greater distances, more reliably.
The WNL-9310 supports both 64/128-bit WEP (Wired Equivalent Privacy) and WPA/WPA2
(Wi-Fi Protected Access) for securing wireless network connections. The driver and utility
supports most popular operating systems: Windows 2000 Professional/XP SP2. With advanced
features and high performance capability, the WNL-9310 is an excellent choice for constructing a
wide range of wireless solutions.
1.1 Features
z
z
z
z
z
z
z
z
2.4GHz ISM band, unlicensed operation
Compliant with IEEE 802.11b, IEEE 802.11g, IEEE 802.11n (draft 1.0)
Support PCI v2.1/2.2 standard
Pre-N provides up to 300Mbps data rate
Support 64/128-bit WEP and WAP/WAP2 high-level security mechanisms
Support Ad-Hoc / Infrastructure mode
Provides three RP-SAM connector to connect external antenna
Support of most popular operating systems including Windows 2000 /XP
General Application
WNL-9310 offers a fast, reliable, cost-effective solution for wireless access to the various
network scenarios:
1. Remote access to corporate network for information
E-mail, file transfer and terminal service.
2. Difficult-to-wire environments
Historical or old buildings, public occasions, venues and open area where it is difficult
to wire.
2
PLANET WNL-9310
User Manual
3. Frequently changing environments
Factories, Retailers, and Offices that frequently change locations and rearrange the
workplace
4. Temporary network access
Events, exhibitions, construction sites or some important occasions that require
temporary network access.
5. Access to database for mobile workers
Doctors, nurses, retailers, white-collar workers who need access to database while
roaming in the hospital, retail store or office.
6. SOHO (Small Office and Home Office) users
SOHO users who are in need of easy-to-install and wide coverage networking.
1.2 Specification
Interface
Standards Conformance
Complaint with PCI v2.1/2.2 standard
Compliant with IEEE 802.11b, IEEE 802.11g, IEEE 802.11n
(draft 1.0)
Pre-N: Up to 300Mbps
Data Rate
802.11g: 54, 48, 36, 24, 18, 12, 9 and 6Mbps with auto-rate fall
back
802.11b: 11, 5.5, 2 and 1Mbps with auto-rate fall back
Working Mode
Infrastructure Mode, Ad-Hoc Mode
64/128 WEP
802.1x
Security
WPA-PSK(TKIP/AES)
WPA2-PSK(TKIP/AES)
WPA-RADIUS
WPA2-RADIUS
802.11b: DSSS, CCK, QPSK, BPSK
RF Modulation
802.11g: OFDM
802.11n: 64QAM, 16QAM, QPSK, BPSK
Channels
2.412~2.462GHz(FCC, Canada)/11 Channels
2.412~2.4835GHz(Japan, TELEC)/14 Channels
2.412~2.472GHz(Euro ETSI)/13 Channels
Media Access Protocol
CSMA / CA + ACK (Half-Duplex)
Transmit Power
16.5dBm (max.)
LED Indicators
LNK/ACT
Operating Systems
Windows 2000 / XP
3
PLANET WNL-9310
User Manual
Environmental & Mechanical Characteristics
Dimensions (D x W x H)
132 x 120 x 22 mm
Certifications
FCC Class B,CE
Operating Temp
0~55 degrees C
Storage Temp
-20~80 degrees C
Management
Built-in utility or Windows XP Zero Configuration utility
Humidity
0~90%, Non-Condensing
1.3 Package Contents
Before installation, please check the items of your package. The package should include the
following items:
1 x WNL-9310
3 x External Antenna (with antenna rack)
1 x Driver and User’s manual CD
1 x Quick Installation Guide
If any of the above items is missing, contact your supplier as soon as possible.
1.4 Minimum System Requirements
Before installation, please check the following requirements with your equipment.
Pentium Based (above) IBM-compatible PC system with one vacancy PCI slot.
CD-ROM drive
Windows 2000/XP or above
At least 10MBytes of free disk space for utility and driver installation
1.5 Installation Considerations
Beware of the walls and ceilings. Each wall or ceiling can reduce your wireless cover range form
3-90 feet. Properly position your Access Points, Residential Gateways, and computers so that
the number of walls or ceilings residing between Access Points and clients is minimized.
Building materials make a difference - A solid metal door or aluminum studs may have a negative
effect on signal coverage range. Try to properly position Access Points and computers with
wireless adapters so that there would be less obstacles existing between them.
Keep your wireless LAN devices away from microwaves, cordless phones and child incubators.
It is likely that the latter will cause interferences to the operation of your wireless LAN devices.
4
PLANET WNL-9310
User Manual
1.6 PLANET WNL-9310
The status LED indicators of the PLANET WNL-9310 are described in the following.
z
Green: Power on
z
Flashing: Indicates the Adapter is transmitting or receiving data.
5
PLANET WNL-9310
User Manual
Chapter 2 Installation Procedure
Before you proceed with the installation, it is necessary that you have enough information about
the Wireless PCI Adapter. Follow the procedure described below in this chapter to install the
USB adapter under Windows 2000 / XP.
2.1 Configuration Utility & Driver Installation
The following installation operates under Window XP. The procedure also applies to Windows
2000.
Note : If you had ever installed the other Wireless Cards before, please uninstall the
existed drivers and utilities first
z
Please shut down your computer and insert the WNL-9310 into the PCI slot on your computer. Please
power on your computer, when your computer enter the Windows XP, you will see the below message
prompt. Please click “Cancel”.
z
Insert the bundled CD into the CD-ROM driver.
z
The Wizard should run automatically. Once completed, a welcome menu screen will appear.
6
PLANET WNL-9310
z
User Manual
Click the “WNL-9310 Utility” hyperlink in the WNL-9310 filed to initiate the installation
procedure. You will see the below InstallShield Wizard dialog box. Please select the desired
installation language on the screen and click “Next” to continue.
Note: If the welcome screen does not appear, click “Start” at the taskbar. Then, select “Run”
and type “D:\Utility\WNL-9310\setup.exe”, where “D” is your CD-ROM drive.
z
The “Welcome to the InstallShield Wizard for WNL-9310” will display on the screen and click
“Next” to continue.
7
PLANET WNL-9310
User Manual
z
Please select your Country Domain and click “Next” to continue.
z
Please click “Next” to continue.
8
PLANET WNL-9310
z
User Manual
If your operation system is Windows XP, the below window will pop up. Please
select “Continue Anyway” to continue.
z
The program will start installing the WNL-9310 drivers and utility automatically. You
will see the below pop-up screen. When the system stops prompting, the system
starting to automatically search and installed the WNL-9310 driver. Please wait for
a moment.
9
PLANET WNL-9310
z
User Manual
Windows will detect the new driver and show you the “Found New Hardware
Wizard”, please select “No, not this time” and click “Next” to continue.
z
Please choose “Install the software automatically (Recommended)”. Then click
“Next” to continue.
10
PLANET WNL-9310
z
User Manual
When this screen appear to inform you that the USB adapter has not passed
Windows Logo testing (WHQL). Click “Continue Anyway” to proceed.
z
Please click “Continue Anyway” to continue.
11
PLANET WNL-9310
User Manual
z
Please click “Finish” to complete the driver installation.
z
A screen will appear to inform you that you most restart your computer. Click “Yes”
to restart your computer now.
12
PLANET WNL-9310
User Manual
13
PLANET WNL-9310
User Manual
Chapter 3 Configuration Utility
The Configuration Utility is a powerful application that helps you configure the WNL-9310 and
monitor the link status and statistics during the communication process.
When the WNL-9310 is installed, the configuration utility will be displayed automatically. This
card will auto connect to wireless device which has better signal strength and no wireless
security setting
If the Configuration Utility does not appear, you can double-click the
on your
system desktop start it. Another way to start the Configuration Utility is to click on Start >
Programs > PLANET > WNL-9310 > WNL-9310 Configuration Utility.
14
PLANET WNL-9310
User Manual
3.1 Status Information
The menu options available from the system tray icon are:
z
Restore – This will display the main screen.
z
Radio Off – The wireless adapter is not associated with the network when the radio is off.
z
Exit – Terminate the connection to the WNL-9310.
Connection is established. The number of green bar indicates signal strength.
All red bars are mean that no connection.
WNL-9310 is unplugged.
3.2 Site Survey
This screen is displayed when the WNL-9310 utility start.
15
PLANET WNL-9310
Display PC to
User Manual
Select this check box to display ad-hoc (computer-to-computer) networks.
PC (Ad-Hoc)
Display 802.11b
Select this check box to display 802.11b (infrastructure) network.
Access Point
Display 802.11a
Select this check box to display 802.11a (infrastructure) network. This
Access Point
function is disable now.
Display 802.11g
Select this check box to display 802.11g (infrastructure) network.
Access Point
Network Name
Available wireless networks are listed.
MAC Address
This is the MAC address of the Access Point (or Wireless station, if the
network is an Ad-hoc network).
Security
Data encryption and authentication methods used on the wireless network
CH.
The channel used by the Wireless network.
Signal
This is displayed as percentage (0~100%)
Frequency
The Wireless band used by this Wireless network.
Network Type
This will indicate “Infrastructure” (displayed device is an Access Point) or
“Ad-hoc”. (displayed device is a Wireless station)
Rescan
Click this button to rescan for all Wireless networks.
Connect
Click the desired network to which you want to connect, and then click
connect
16
PLANET WNL-9310
User Manual
3.3 Profile Manager
This screen is accessed by clicking the Profile Manager tab on the main screen.
Profile Name
Enter or select a suitable name for this profile. Each profile must
have a unique name.
Network Name (SSID)
If the desired wireless network is currently available, you can select
its SSID. Otherwise, type in the SSID of the desired wireless
network.
Advanced Setting
On the resulting sub-screen, enter the required data for the
advanced settings.
Network Type
Select the desired option:
z
Infrastructure – This operation mode requires the presence of
an 802.11 Access Point. All communication is done via the
Access Point or Router.
z
Ad-Hoc – Select this mode if you want to connect to another
wireless station in the Wireless LAN network without through
an Access Point or Router.
Wireless Mode
Select the desired wireless mode to which you want to connect.
17
PLANET WNL-9310
User Manual
Prefer Channel
Select the channel you would like to use.
Authentication Mode
This setting has to be consistent with the wireless network that the
device intends to connect. You must select the option to match the
wireless LAN you wish to join. The available option are:
Open System – No authentication is needed among the wireless
network.
Shared Key – Only wireless devices using a shared key (WEP Key
identified) are allowed to connecting each other.
Auto Switch – This is another WEP system; it will select either
Open System or Shared Key as required.
802.1x – You can also enable IEEE 802.1x setting to use the
authentication server or certification server to authenticate client
users.
WPA-PSK –PSK means “Pre-sharked Key”. It is a special mode
designed for home and small business users who do not have
access to network authentication servers. In this mode, known as
Pre-Shared Key, the user manually enters the starting password in
their access point or gateway, as well as in each wireless stations in
the network. WPA-PSK takes over automatically from that point,
keeping unauthorized users that don't have the matching password
from joining the network, while encrypting the data traveling
between authorized devices
WPA2-PSK –This is a further development of WPA-PSK, and offers
even greater security. WPA2-PSK is also for home and small
business. The difference between WPA-PSK and WPA2-PSK is that
WPA2-PSK provides data encryption via the AES. In contrast,
WPA-PSK uses Temporal Key Integrity Protocol (TKIP)
WPA Radius - This version of WAP require a Radius server on your
LAN to provide the client authentication according to the 802.1x
standard. Data transmissions are encrypted using the WPA
standard.
WPA2 Radius – This version of WAP2 require a Radius server on
your LAN to provide the client authentication according to the
802.1x standard. Data transmissions are encrypted using the WPA2
standard.
Encryption Method
The available options depend on authentication method selected
above. The possible option are:
18
PLANET WNL-9310
User Manual
Security Off – Disable the encryption mode.
WEP – Enable the WEP Data Encryption. When the item is
selected, you have to continue setting the WEP Encryption keys.
TKIP – TKIP (Temporal Key Integrity Protocol) changes the
temporal key every 10,000 packets (a packet is a kind of message
transmitted over a network.) This insures much greater security
than the standard WEP security.
AES – AES has been developed to ensure the highest degree of
security and authenticity for digital information and it is the most
advanced solution defined by IEEE 802.11i for the security in the
wireless network.
Note: All devices in the network should use the same encryption
method to ensure the communication.
Create with
Enable this check box and enter a word or group of printable
Passphrase
characters in the Passphrase box, select the desired encryption to
automatically configure the WEP Key.
Enter Key Manually
Enable this check box and select the desired key in the drop down
list. Then enter the key values you wish to use and select the
desired encryption. Other stations must have matching key values.
The WEP keys are used to encrypt data transmitted in the wireless
network. There are two types of key length: 64Bits and 128Bits.
Fill the text box by following the rules below.
64Bits – Input 10-digit Hex values (in the “A-F”, “a-f” and “0-9”
range) as the encryption keys. For example: “0123456aef“.
128Bits – Input 26-digit Hex values (in the “A-F”, “a-f” and “0-9”
range) as the encryption keys. For example:
“01234567890123456789abcdef“.
Passphraes
The WPA-PSK / WPA2-PSK can be from 8 to 64 characters and can
be letters or numbers. This same key must be used on all of the
wireless stations in the network. Data is encrypted using a 256Bit
key derived from this key.
Confirm
For WAP-PSK and WAP2-PSK modes, re-enter the value in this
filed.
802.1x Authentication
Protocol
The EAP authentication protocols this device has supported are
included as follows. This setting has to be consistent with the
wireless APs or Routers that the card intends to connect.
For WPA Radius and WPA2 Radius modes, select the desired
option in the drop-down list.
EAP/TLS (User Certificate) –EAP/TLS is the most secure of the
EAP protocols but not easy to use. It requires that digital certificates
be exchanged in the authentication phase. The server presents a
19
PLANET WNL-9310
User Manual
certificate to the client. After validating the server’s certificate, the
client presents a client certificate to the server for validation.
PEAP - PEAP is similar and easier than TLS in that they specify a
stand-alone authentication protocol be used within an encrypted
tunnel.
LEAP - LEAP is a pre-EAP, Cisco-proprietary protocol, with many of
the features of EAP protocols. Cisco controls the ability of other
vendors to implement this protocol, so it should be selected for use
only when limited vendor choice for client, access-point, and server
products is not a concern. When you have set up LEAP
authentication, you have to enter the user name and password of
your computer.
Configure WPA Radius
For WPA Radius and WAP2 Radius modes, click this button to open
a sub-windows where you can enter details of this Radius server.
To add a profile
1.
On the Profile Manager tab, complete the settings on this screen.
2.
Verify that the settings you configured are correct.
3.
Click Save Profile.
To export profile
1.
On the Profile Manager tab, click Export Profile. The Save As dialog box appears.
2.
Type a name for the profile that you are saving, and then verify that the file name extension
is set to “.cfg”.
3.
Click Save
To import profile
1.
On the Profile Manager tab, click Import Profile. The Open dialog box appears.
2.
Select the profile set that you want to import.
20
PLANET WNL-9310
3.
User Manual
Click Open
To delete a profile
1.
On the Profile Manager tab, select the profile that you want to delete.
2.
Click Delete Profile.
To edit a profile
1.
On the Profile Manager tab, select the profile that you want to edit.
2.
Change the profile settings as necessary.
3.
Click Save Profile.
To enable a profile
1.
In the list of available profiles, click the profile that you want to edit.
2.
Click Apply Profile.
21
PLANET WNL-9310
User Manual
3.4 Advanced Setting
Once you have created a profile, as described above, the Advanced Settings tab will be available
on the Profile Manager screen.
Do not change settings
Enable this check box if you don’t want to modify the settings in
this screen.
Preamble (2.4GHz)
Select the desired channel width. The preamble defines the Auto
of the CRC block of communication among wireless devices. This
option is only active in the Ad-Hoc network.
Transmit Rate
Use this to manually set the speed, if desired. This default is
“Auto”. There are several options including
Auto/1/2/5.5/6/9/12/18/24/36/48/54Mbps and MSC 0~15 for you to
select. When the “Auto” is selected, the device will choose the
most suitable transmission rate automatically. The higher data
rate you designated in the network, the shorter distance is allowed
between the device and wireless stations.
Fragment Threshold
The value defines the maximum size of packets; any packet size
larger that the value will be fragmented. If you have decreased
this value and experience high packet error rates, you can
22
PLANET WNL-9310
User Manual
increase it again, but it will likely decrease overall network
performance. Select a setting within a range of 256 to 2346 bytes.
Minor change is recommended.
The default value is 2346. In some case, you may be able to
improve performance by adjusting this value.
RTS/CTS Threshold
RTS / CTS(Request To Send / Clear To Send) is the mechanism
used by the 802.11 wireless networking protocol to reduce frame
collisions introduced by the hidden terminal problem and exposed
node problem.
RTS / CTS packet size threshold is 0 ~ 2346. Typically, sending
RTS frames is turned off by default (threshold ≧ 2346). If the
packet size the node wants to transmit is larger than the threshold,
the RTS / CTS handshake gets triggered. If the packet size is
equal to or less than threshold the data frame gets sent
immediately
The default value is 2346. In some case, you may be able to
improve performance by adjusting this value.
802.11n
Enable 802.11n Network
Enable this if you want to use the 802.11n network.
Channel Width
Select the desired channel width.
Guard Interval
Use this to manually set the interval, if desired. The default is
“Auto”.
Extension Channel
Select the desired channel.
Antenna Selection
Select the desired option. The default is set to “Auto”.
23
PLANET WNL-9310
User Manual
3.5 Network Status
This screen displays the status of the current wireless link. Clicking the Network Status tab will
display a screen like the following.
Link information
Current Status
It will indicate the current link status.
Network SSID
It shows the SSID or network name of the selected wireless network.
Network BSSID
It shows the MAC address of the access point.
Network Type
This will indicate “Infrastructure” or “Ad-hoc”.
Security Mode
It shows the wireless security that the wireless network is using.
TX/RX Speed
It shows the current wireless connection speed.
Internet Protocol
DHCP Option
It shows if the IP address was automatically obtained from a DHCP
server.
IP Address
It shows the current IP address on the wireless interface.
Subnet Mask
Subnet mask for the current IP address.
Default Gateway
Gateway IP address associated with the current IP address.
24
PLANET WNL-9310
DHCP Server
User Manual
It shows the IP address of the DHCP server.
Channel Performance
Channel
It graphically presents the transmission (TX) rate and Receiving (RX)
Performance
rate over time.
Signal
Signal
It graphically presents the signal strength.
3.6 About
This screen displays details of the traffic sent or received on the current wireless network.
This tab shows the following in information:
z
Regional Domain
z
Firmware Version
z
Driver Version
z
MAC Address
z
PLANET DLL Version
z
PLANET Utility Version
25
PLANET WNL-9310
User Manual
Appendix A: Troubleshooting
This chapter provides solutions to problems that may occur during the installation and operation
of the PLANET WNL-9310. Read the descriptions below to solve your problems.
Q. The PLANET WNL-9310 does not work properly.
A:
1. Right click on My Computer and select Properties. Select the device manager and click on the
Network Adapter. You will find the Adapter if it is installed successfully. If you see the yellow
exclamation mark, the resources are conflicting. You will see the status of the Adapter. If there
is a yellow question mark, please check the following:
2. Make sure that your PC has a free IRQ (Interrupt Request, a hardware interrupt on a PC.)
3. Make sure that you have inserted the right adapter and installed the proper driver. If the
Adapter does not function after attempting the above steps, remove the adapter and do the
following:
4. Uninstall the driver software from your PC.
5. Restart your PC and repeat the hardware and software installation as specified in this User
Guide.
Q. I cannot communicate with the other computers linked via Ethernet in the
Infrastructure configuration.
A:
1. Make sure that the PC to which the Adapter is associated is powered on.
2. Make sure that your Adapter is configured on the same channel and with the same security
options as with the other computers in the Infrastructure configuration.
Q.What should I do when the computer with the Adapter installed is unable to connect to
the wireless network and/or the Internet?
A:
1. Check that the LED indicators for the broadband modem are indicating normal activity. If not,
there may be a problem with the broadband connection.
2. Check that the LED indicators on the wireless router are functioning properly. If not, check that
the AC power and Ethernet cables are firmly connected.
3. Check that the IP address, subnet mask, gateway, and DNS settings are correctly entered for
the network.
4. In Infrastructure mode, make sure the same Service Set Identifier (SSID) is specified on the
settings for the wireless clients and access points.
5. In Ad-Hoc mode, both wireless clients will need to have the same SSID. Please note that it
26
PLANET WNL-9310
User Manual
might be necessary to set up one client to establish a BSS (Basic Service Set) and wait briefly
before setting up other clients. This prevents several clients from trying to establish a BSS at
the same time, which can result in multiple singular BSSs being established, rather than a
single BSS with multiple clients associated to it.
6. Check that the Network Connection for the wireless client is configured properly.
If Security is enabled, make sure that the correct encryption keys are entered on both the
Adapter and the access point.
27