1
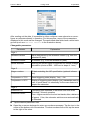
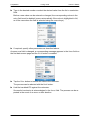
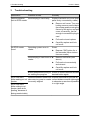
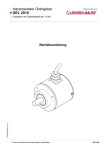
RW2510 Read and write application for GEL 2510 odometers Operating Instructions Right to technical changes and errors reserved. 2009-12 Device manufacturer and publisher: Lenord, Bauer & Co. GmbH Dohlenstraße 32 46145 Oberhausen ● Germany Phone: +49.208.0 ● Fax: +49.208.676292 Internet: www.lenord.de ● E-Mail: [email protected] 2 Doc. no. D-02B-2510RW RW2510 Lenord + Bauer Table of contents Table of contents 1 General .............................................................................................................. 5 1.1 About these instructions .......................................................................... 5 1.2 Target group ............................................................................................ 5 1.3 Symbols, markings and notes .................................................................. 5 1.4 Designated use ........................................................................................ 6 1.5 Revisions ................................................................................................. 6 2 Operation .......................................................................................................... 7 2.1 Start ......................................................................................................... 7 2.2 Read mode .............................................................................................. 8 2.3 View logfile ............................................................................................. 11 2.4 Config mode .......................................................................................... 12 3 Trouble-shooting ........................................................................................... 16 4 Appendix: Use ................................................................................................ 17 4.1 Read operating data .............................................................................. 17 4.2 Configure odometer ............................................................................... 18 RW2510 3 4 RW2510 Lenord + Bauer 1 1.1 About these instructions 1 General General About these instructions These operating instructions form part of the RW2510 user software and describe how to use it properly. Read the operating instructions carefully before use and observe. Keep the operating instructions for the entire period in which you use the software. As proprietor/using company, ensure that these operating instructions are accessible to the operating personnel at all times. Pass the operating instructions on to any succeeding owner or user of the software. Include all supplements received from the manufacturer. 1.2 Target group The operating instructions are intended for persons already familiar with the function and mode of operation of the GEL 2510 odometer (see Operating Manual no. D-02B-2510). Familiarity with Windows-based operating systems is required for use of the RW2510 user software as described below. The user manual included with the handheld PC provides suitable information. Please also note the information given there on the following items: ● Battery power ● Memory ● Data backup and restoration Configuration of the odometer is permissible only by the owner of the vehicle or other authorized person. 1.3 Symbols, markings and notes The following symbols, markings and notes are used in this description to ensure quick recognition of certain information: RW2510 5 1 General Designated use Symbol Lenord + Bauer Description Possible impending danger; failure to observe can result in serious or fatal injury Indicates important information for avoiding damage to equipment and maintaining proper operation. ► Required work step → page 5 Cross-reference to a place in this manual Times New Roman Windows-specific menu items and control elements are displayed in this font Courier 1.4 File names appear in this font Designated use Ensure that data transmission with the handheld PC is accomplished only outside of explosion hazard areas. The odometer itself may be used in such areas. RW2510 is a Windows user software application for reading, processing and writing data in conjunction with the GEL 2510 electronic odometer. Basically, the software runs on handheld PCs with WindowsMobile™ 5.0 Microsoft® operating system or higher, which have an RFID hardware extension. It is factory-installed on a Recon™ handheld PC and sold together with it. The data is transmitted inductively and encrypted using the RFID protocol. The data is stored in the odometer, where it is protected against power failure. It consists of ● factory-programmed identification data ● configuration data to be specified by the owner and ● regularly-updated operating data such as mileage and temperature alarms. The standard handheld PC, provided as an option, is factory-equipped with an RFID data transmission module (plug-in card with coil cover). Remove this module only in the event of a malfunction to avoid damaging the sensitive internal wiring (→ page 16). 1.5 6 Revisions Date Version What's new? 2009-12-18 1.0 First edition RW2510 Lenord + Bauer 2 Start 2 Operation Operation The program is basically operated by pressing specific buttons on the touchscreen of the handheld PC . Some functions can, however, be performed with certain keys on the handheld PC. All information on specific (hardware) keys refer to the Recon™ handheld PC, on which RW2510 has been preinstalled. Application windows shown in this manual may differ in minor detail from those on the device used. Handheld PC keys - standard factory settings 3 4 2 5 1 6 7 2.1 1 On/Off button If the display is not illuminated when you switch on, hold the button down a little longer. 2 Windows Start menu 3 Windows: Start/access RW2510 RW2510: no function 4 Windows: context menu RW2510: Info screen (from Start page only) 5 Close active window or screen and quit program (Back- or Escape) 6 Enter/Return key, enable selected entry or press active button 7 Cursor keys Start To switch the handheld PC on: Press button It is important that the date and time on the system are correct for logging the read and write procedures in the odometer. For this reason, check whether the date in the system and the time on the handheld PC are set correctly; if necessary, correct the settings. RW2510 7 2 Operation Read mode Start the application by pressing the left the RW2510 entry in the file explorer. Lenord + Bauer button on the handheld PC or by tapping The program's Start screen has two buttons in the bottom row: ● Language for switching from German to English and vice versa ● Info for display of program information (quit with [ok]) The following functions can be called with the other Start screen buttons: ● Read mode For reading data out of odometer. This data is displayed on several screen pages. ● View logfile All (successful) read procedures are logged and saved as individual datasets in a text file in the program directory (RW2510_LogFile.txt). This function permits these datasets to be viewed. The last dataset is always shown first. The file can be scrolled with the scrollbar on the right side of the window. ● Config mode Use of this function is limited to the vehicle owner or other authorized person! This item allows configuration of the odometer. After reading out the existing data, some parameters can be changed and written back. ● Exit Close RW2510 application. key or tap the ok icon in the headline Alternatives: Press 2.2 Read mode Tap the Read mode button (the process is triggered as soon as the button is released). 8 RW2510 Lenord + Bauer Read mode 2 Operation The system then searches for the connected RFID reader (hardware extension) and displays the result in the Status field: Tap the Read button in the (empty) data screen displayed. An acoustic signal indicates that the handheld PC is now trying to establish a connection with the odometer (Status: Search for sensor …): The search routine is limited to approx. 30 seconds and then the process is aborted. (You can intentionally abort searching by tapping the Status field.) Hold the handheld PC with the coil cover a maximum distance of 3 cm from the odometer. After correct alignment, the acoustic signal stops and data transmission is started: RW2510 9 2 Operation Lenord + Bauer Read mode The progress is displayed in the Status field. Successful termination of the read process is confirmed by a brief acoustic signal and a corresponding message in the Status field. The first of three data screen pages is displayed: Buttons: ● Read = Start new read process ● Back = Quit read function and switch to Start screen (on first data screen page); go back to screen page shown before (from second page) ● Page 2/3 = Show next data screen page ● Page 2, Page 3 = Call desired data screen page directly (on first page only) The following table shows the parameters which can be read out. Parameter Explanation Page 1 Serial number Odometer serial number according to ID plate Mileage Figure currently saved in odometer (calculated from wheel revolutions displayed and specific wheel diameter setting for wheelset) Wheelset type Figure programmed by vehicle owner, determined by the wheelset design Wheelset number ID number programmed by vehicle owner Wheel diameter Value configured for the wheelset (cannot be changed here!); this is used to calculate the mileage (in km) from the counter reading recorded Page 2 VKM 10 Odometer owner's ID number programmed at factory (according to ERA-OTIF) RW2510 Lenord + Bauer 2 Operation View logfile Parameter Explanation Wagon number Standardised ID data (UIC); optional information Last read on Date of previous read process stored in odometer Mileage at Reconfigured on Date of last write process saved in odometer Mileage at Temp. > 70/85°C (Yes/No) Status display for temperature of 70 °C and/or 85 °C previously exceeded Page 3 Counter status Measured number of wheel revolutions (U) to date Memory cycles Number of mileage storage processes executed to date Resolution DZ Operating mode set in configuration mode: Standard = Normal operation Test = Higher resolution for short test tracks; after a distance of approx. 11 km, it switches over automatically to Standard Resolution PWRF Chip ID ID number of RFID chip used in odometer Firmware version Status of the currently installed odometer firmware Quit function by tapping the Back button. Alternatively: Press eral times). 2.3 key (possibly sev- View logfile This allows display of datasets saved automatically during readout in the Read mode menu. The associated file RW2510_LogFile.txt is located in the handheld PC's main directory. Tap the View logfile button. The dataset for the last readout process is displayed (number in Status field). The window may be moved towards the end or beginning of the dataset, using the slide control. RW2510 11 2 Operation Lenord + Bauer Config mode Buttons: ● Previous Dataset = Display dataset from older readout (lower number) ● Back = Close display function and switch to Start screen ● Next Dataset = Display dataset from more recent readout (higher number) The individual entries in the log file are described in Section 2.2 (Read mode). Differing and additional entries are listed below: Parameter Explanation Read on/at Date and time of last readout process in read and configuration mode saved in odometer Resolution DZ Factory-specified resolution in revolutions (U) and km; 1 U = test mode Resolution PWRF Reconfiguration on/at/at 2.4 Date of last write process saved in odometer with number of revolutions (U) and mileage Config mode Use of this function is limited to the vehicle owner or other authorized person! Tap the Config mode button. Display and functions are basically the same as in the menu item Read mode (→ page 10). Tap the button in the (empty) data entry box displayed: Read and hold the handheld PC against the odometer. 12 RW2510 Lenord + Bauer 2 Operation Config mode After reading out the data, it is possible to either configure a new odometer or reconfigure an odometer already in operation. For this purpose, some of the parameters displayed in this mode can be changed. The associated data fields have a white background (such as Wheelset version in the illustration above). Changeable parameters Parameter Explanation Page 1 Wheelset version Value determined by the wheelset version (e.g. from the wheelset ID plate) Wheelset number ID number (e.g., from the wheelset ID plate) Wheel diameter Entering the correct figure is important for internal mileage calculation (choice of 800...1000 mm in steps of 1 mm). Page 2 Wagon number ID data matching the UIC specification (optional information) Temperature > 70°C Reset triggering state (display: Yes) → No Temperature > 85°C Display of triggering state (display: yes), cannot be reset by user; in such cases it is necessary for the manufacturer to inspect the odometer Page 3 Resolution DZ Resolution PWRF Converting from standard to test mode and vice versa Standard = Normal operation Test = Higher resolution for short test tracks; after a distance of approx 11 km, the odometer switches over automatically to Standard Tap the desired parameter field. Open the on-screen keyboard to enter any numbers necessary: Tap the icon in the centre of the bottom row of the window. To select numbers from a list, tap the arrow to the right of the value. RW2510 13 2 Operation Config mode Lenord + Bauer Type in the desired number or select the desired value from the list in a selection field. Before a new value can be entered or changed, the corresponding values in the entry field must be deleted (occurs automatically if the value is highlighted in full, as is the case when the field is selected using the cursor keys). If required, specify other parameters as described above. As soon as a field is changed, a corresponding message appears in the Status field on the first data screen page and the Write button is enabled. Tap the Write button to transfer the data to the odometer. The process can be aborted with the Back button. Hold the handheld PC against the odometer. Successful conclusion is acknowledged in the Status field. The process can be repeated in the event of an error or after abortion. 14 RW2510 Lenord + Bauer Config mode 2 Operation Recommendation: Check whether the data has been entered correctly in the odometer. For this purpose, start a new read process by tapping the Read button. After successful configuration, quit the function with the Back button. RW2510 15 3 Trouble-shooting 3 Lenord + Bauer Trouble-shooting Malfunction Possible causes Data acceptance Inserted plug-in card faulty fault in RFID reader No RFID reader found Operating system error in reader Remedy Replace card with coil cover (both parts firmly connected by cable): ► Remove coil cover: Turn one locking screw on each side to the release position using the flat end of the stylus, and pull cover off carefully, just far enough to access the plug-in card ► Pull card out and replace ► Carefully replace and lock coil cover Reset: ► Inserted plug-in card loose in ► reader Depress "ON" button for a few seconds (follow instructions on screen) Remove coil cover (see above) ► Pull card out momentarily and reinsert ► Carefully replace and lock coil cover Button pressed too quickly af- Return to main menu and actuate ter starting the program desired button again Error code 0x01 Distance between reader and Repeat transmission process at while reading out od- odometer too great or reader correct distance and at right angle ometer. incorrectly aligned to odometer or as close a possible to a right angle. Error code 0x02 while writing to odometer (also while reading, because of saving readout date) 16 RW2510 Lenord + Bauer 4 Read operating data 4 Appendix: Use Appendix: Use The two most important RW2510 functions are shown below in a summary chart. 4.1 Read operating data Switch the reader* on Check/set date and time Start RW2510 application Tap the Read mode button Tap the Read button Bring the reader (coil module) in front of the sensor Transmission ok? no yes Browse pages Tap the Back button to complete the function * Reader = handheld PC RW2510 17 4 Appendix: Use 4.2 Configure odometer Lenord + Bauer Configure odometer Switch the reader* on Check/set date and time Start RW2510 application Tap the Config mode button Tap the Read button Bring the reader (coil module) in front of the sensor Transmission ok? no yes Change parameter (input or selection) Other? yes no Tap the Write button Bring the reader (coil module) in front of the sensor Transmission ok? no yes Recommendation:Check modifications (Read) Data ok? no yes Tap the Back button to complete the function * Reader = handheld PC 18 RW2510