1
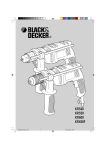
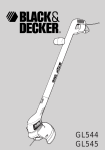
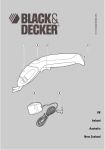
www.blackanddecker.com
4
3
2
8
1
7
5
6
UK
Ireland
Australia
New Zealand
1
12
16
13
11
13
14
13
14
9
10
25
A1
2
11 20 21
6
B
19
17
20
22
15
23
24
18
A2
C
D
E
3
Intended use
Your Black & Decker garden shredder GS2200 has been
designed for shredding most kitchen and garden waste,
including prunings, hedge trimmings, twigs and other organic
garden waste as well as paper and cardboard. The shredded
waste is ideal for composting purposes or to obtain a smaller
volume of waste for easy disposal.
This garden shredder is intended for consumer use only. It is
intended for intermittent use: the recommended material feed
time is 40% of the total run time of the shredder. Selecting
and picking up the material will normally provide a sufficient
idle time.
Safety instructions
◆
◆
◆
◆
Warning! When using mains-powered appliances, basic
safety precautions, including the following, should always
be followed to reduce the risk of fire, electric shock,
personal injury and material damage.
Read all of this manual carefully before operating the
appliance.
Retain this manual for future reference.
Remove the plug from the socket before carrying out any
adjustment, servicing or maintenance.
Training
◆ Never allow children or persons who are unfamiliar with
this type of appliance to use it, nor anyone who has not
read this user manual.
◆ Remember that the operator is responsible for accidents
or hazards occurring to other people or their property.
Preparation
◆ Do not operate this equipment in the vicinity of bystanders.
◆ Only operate the appliance in open space (e.g. not close to
a wall or other fixed objects) and on a firm, level surface.
◆ Wear safety glasses at all times while operating the
appliance.
◆ Hearing protection should be worn whenever the sound
level seems uncomfortable.
◆ Do not wear loose clothing or jewellery, as these can be
caught in moving parts. Preferably wear rubber gloves and
non-slip footwear when working outdoors. Wear
protective hair covering to keep long hair out of the way.
◆ Do not expose the appliance to rain. Do not use the
appliance where there is a risk of causing fire or explosion,
e.g. in the presence of flammable liquids and gases.
◆ Do not operate the appliance on a paved or gravel surface
where ejected material could cause injury.
◆ To prevent damage to the cutting gear, remove earth from
roots. Do not attempt to shred bones, stone, glass, metal,
plastics or rags.
4
◆
◆
◆
Before use, carefully check the appliance and mains cable
for damage. Check for misalignment and seizure of
moving parts, breakage of parts, damage to guards and
switches and any other conditions that may affect its
operation. Ensure that the appliance will operate properly
and perform its intended function. Do not use the
appliance if any part is damaged or defective. Do not use
the appliance if the switch does not turn it on and off.
Have any damaged or defective parts repaired or replaced
by an authorised repair agent. Never attempt any repairs
yourself.
If the supply cord is damaged, it must be replaced by the
manufacturer or its service agent or a similarly qualified
person in order to avoid a hazard. Replace damaged or
unreadable labels.
Guard against electric shock
◆ The appliance must be connected to a socket or extension
cable containing an earth connection.
◆ Electric safety can be further improved by using a highsensitivity (30 mA / 30 mS) residual current device (RCD).
◆ Your appliance is designed for use on AC (mains)
electrical supplies only. Do not attempt to use it on any
other supply.
Extension cables
◆ When using the appliance outdoors, only use extension
cables intended for outdoor use.
◆ Up to 25 m of Black & Decker 1.5 mm 3-core extension
cable can be used without loss of power.
Mains supply
The product meets the technical requirements of EN 61000-3-11.
This equipment is subject to conditional connection and the
user, in consultation with the supply authority if necessary,
shall be instructed to connect it only to a supply of impedance
0.087 + j0.087 Ohm or less.
Operation
◆ Before starting the appliance, look into the feeding
chamber to make certain that it is empty.
◆ Keep your face and body away from the feed intake
opening, long branches may lash out when being pulled in
by the cutting gear. Do not allow hands or any other part
of the body or clothing inside the feeding chamber,
discharge chute, or near any moving part.
◆ Keep proper balance and footing at all times. Do not
overreach. Never stand at a higher level than the base of
the appliance when feeding material into it.
◆ Always stand clear of the discharge zone when operating
this appliance.
◆
◆
◆
◆
◆
◆
◆
◆
When feeding material into the appliance be extremely
careful that pieces of metal, rocks, bottles, cans or other
foreign objects are not included.
If the cutting mechanism strikes any foreign objects or if
the appliance starts making any unusual noise or
vibration, turn the appliance off, remove the plug from the
mains and allow the appliance to stop.
- Inspect the appliance for damage.
- Check for and tighten any loose parts.
- Have any damaged parts replaced or repaired with
original parts by an authorised repair agent.
Do not allow processed material to build up in the
discharge zone; this may prevent proper discharge and
can result in kickback of material through the feed intake
opening.
If the appliance becomes clogged, turn the appliance off,
remove the plug from the mains and allow the appliance
to stop before clearing debris.
Keep all guards and deflectors in place and in good
working condition.
Do not transport or tilt the appliance whilst in operation.
Do not leave the appliance unattended. Whenever you
leave the work area, turn the appliance off, remove the
plug from the mains and allow the appliance to stop.
Children must be supervised to ensure they do not play
with the appliance.
Do not tilt the appliance while the power source is running.
Maintenance and storage
◆ When the appliance is stopped for servicing, inspection,
or storage, or to change an accessory, turn the appliance
off and remove the plug from the mains. Make sure that
all moving parts have come to a complete stop before
making any inspections, adjustments, etc.
◆ Store the appliance in a dry and locked location.
Children should not have access to stored appliances.
The following warning symbols are found on the appliance:
Before performing any maintenance, switch off
and unplug the appliance.
Keep bystanders away.
Wear safety glasses or goggles when operating
this tool.
Wear gloves when operating this tool.
Mains plug replacement (U.K. & Ireland only)
If a new mains plug needs to be fitted:
◆ Safely dispose of the old plug.
◆ Connect the brown lead to the live terminal in the new plug.
◆ Connect the blue lead to the neutral terminal.
◆ Connect the green/yellow lead to the earth terminal.
Warning! Follow the fitting instructions supplied with good
quality plugs. Recommended fuse: 13 A.
Additional safety instructions for Australia and
New Zealand
◆ This appliance is not intended for use by young or infirm
persons without supervision. Children must be supervised
to ensure they do not play with the appliance.
◆ If the supply cord is damaged, it must be replaced by the
manufacturer or an authorised Black & Decker Service
Centre in order to avoid a hazard.
Features
1.
2.
3.
4.
5.
6.
7.
8.
On/off switch
Body
Chute
Funnel
Stand
Collection bag
Power inlet
Adjustment knob
Assembly
Read the manual prior to operation.
Danger - rotating blades. Keep hands and feet
out of openings.
Do not expose the appliance to rain.
Never put your hands in the blade area while the
blades are running or the shredder is plugged in.
The blades will keep running for a few seconds
after the shredder has been switched off.
Warning! Before assembly, make sure that the appliance is
switched off and unplugged.
Fitting the stand (fig. A1)
Warning! Seek assistance when fitting the stand.
The appliance is too heavy to be handled by one person.
◆ Turn the appliance upside down and place it on the floor.
◆ Place the bumper bar (25) and the frame (16) onto the
appliance as shown.
◆ Align the screw holes in the bumper bar and the frame
with those in the appliance.
5
◆
Secure the bumper bar and the frame using the 4 screws
(9) and washers (10) as shown.
Fit the wheels as shown in fig. A2:
◆ Insert the two bushes (20) into the wheel (21).
◆ Fit the tube (22) in the centre of the wheel.
◆ Place the washer (15) onto the screw (23).
◆ Secure the wheel to the axle (11) with the screw (23).
◆ Press the wheel cover (24) into position.
◆ Repeat the above procedure for the other wheel.
◆ Fit the wheel axle (11) to the frame using the screws (12),
washers (13) and nuts (14) as shown in fig. A1.
◆ Turn the shredder into the upright position.
Fitting the collection bag (fig. B)
◆ Place the collection bag (6) under the outlet opening as
shown.
Connecting the appliance to the mains
Note: The UK version may be supplied with a wired in supply
cable or power inlet.
◆ Connect the female socket of a suitable extension cable
to the power inlet (7).
◆ Insert the mains plug into a mains outlet.
Warning! The extension cable must be suitable for outdoor
use and for the power consumption of the appliance.
Use
Warning! Let the appliance work at its own pace.
Do not overload.
Clearing a blockage (fig. C)
When the material is jammed:
◆ Switch the appliance off.
◆ Set the direction selector (17) to the upper position
(B in fig. C).
◆ Set the power switch (18) to position I until the blockage
is removed.
Warning! Branches may be ejected from the inlet funnel
when the appliance is running in reverse.
If the blockage has not cleared:
◆ Switch off and unplug the appliance.
◆ Use a piece of wood to loosen the debris within the
cutting chamber.
◆ Replace the plug in the mains socket and operate the
appliance as described above to remove any debris.
Warning! Always switch off and unplug the appliance when
removing a blockage. Do not attempt to remove blockages by
hand through the inlet funnel or outlet opening. Keep your
hands clear of the cutting chamber.
Hints for optimum use
◆ Shred dry materials last, as this will help to clear moist
material from the shredder.
◆ Do not allow material to pile up and compost prior to
shredding.
◆ You may feed shreddings into the shredder for a second
time to further reduce their volume.
◆ Refer to the chart at the end of this text.
Maintenance
◆
◆
◆
Do not switch the shredder off before it is completely
empty, as it may clog and be difficult to restart.
Remove soil and stones from plant roots before shredding.
Firmly hold branches when feeding them into the
shredder.
Switching on and off (fig. C)
Switching on
◆ Set the direction selector (17) to the lower position
(A in fig. C).
◆ Set the power switch (18) to position I.
Switching off
◆ Set the on/off switch to position O.
Emergency stop
◆ In an emergency, hit the stop button (19) to stop the
appliance.
6
Your Black & Decker appliance has been designed to operate
over a long period of time with a minimum of maintenance.
Continuous satisfactory operation depends upon proper
appliance care and regular cleaning.
◆ Keep the unit clean and dry.
◆ Do not use any abrasive or solvent-based cleaner.
◆ Regularly clean the ventilation slots in your appliance
using a soft brush or dry cloth.
Adjusting the pressure plate
The pressure plate is factory-adjusted and does not require
adjustment before first use. When the shredded material starts
to hang like a chain as shown in fig. D, adjust as follows:
◆ Switch the appliance on.
◆ Turn the adjustment knob (8) clockwise until you hear a
light grinding sound.
A small amount of aluminium shavings will fall out of the
appliance. The shredded material will now be separated as
shown in fig. E.
Overload protection
This appliance has an overload protection. If the appliance
becomes blocked and the motor stalls, the power will
automatically be switched off.
◆ Wait for a few minutes for the protection to reset.
◆ Clear the blockage as described above.
Guarantee
Black & Decker is confident of the quality of its products and
offers an outstanding guarantee. This guarantee statement is
in addition to and in no way prejudices your statutory rights.
The guarantee is valid within the territories of the Member
States of the European Union and the European Free Trade
Area.
Protecting the environment
Black & Decker provides a facility for recycling
Black & Decker products once they have reached the
end of their working life. This service is provided
free of charge. To take advantage of this service
please return your product to any authorised repair
agent who will collect them on our behalf.
You can check the location of your nearest authorised repair
agent by contacting your local Black & Decker office at the
address indicated in this manual. Alternatively, a list of
authorised Black & Decker repair agents and full details of our
after-sales service and contacts are available on the Internet
at: www.2helpU.com.
Technical data
Voltage
Power input
No-load speed
Weight
GS2200
V 230
W 2200
min-1 43
kg 35
EC declaration of conformity
Black & Decker declares that these products conform to:
98/37/EC, 89/336/EEC, 73/23/EEC, EN 55014, EN 61000,
DIN VDE 0730, DIN 11004,
2000/14/EC, shredder/chipper 2.1 kW, Annex V
LpA (sound pressure): 84 dB(A), LWA (acoustic power)
91 dB(A), LWA (guaranteed) 93 dB(A)
If a Black & Decker product becomes defective due to faulty
materials, workmanship or lack of conformity, within 24 months
from the date of purchase, Black & Decker guarantees to
replace defective parts, repair products subjected to fair wear
and tear or replace such products to ensure minimum
inconvenience to the customer unless:
◆ The product has been used for trade, professional or hire
purposes;
◆ The product has been subjected to misuse or neglect;
◆ The product has sustained damage through foreign
objects, substances or accidents;
◆ Repairs have been attempted by persons other than
authorised repair agents or Black & Decker service staff.
To claim on the guarantee, you will need to submit proof of
purchase to the seller or an authorised repair agent. You can
check the location of your nearest authorised repair agent by
contacting your local Black & Decker office at the address
indicated in this manual. Alternatively, a list of authorised
Black & Decker repair agents and full details of our after-sales
service and contacts are available on the Internet at:
www.2helpU.com.
Please register at our website www.blackanddecker.com
to be kept up to date on new products and special offers.
Further information on the Black & Decker brand and our range
of products is available at www.blackanddecker.com.
Kevin Hewitt
Director of Consumer Engineering
Spennymoor, County Durham DL16 6JG,
United Kingdom
7
Hints for optimum use
Material
Twigs and prunings
Branches
Bedding plants, weeds, shrubby growth
Freshly cut foliage, hedge prunings, vegetable waste
Fibrous foliage, pampas grass stems
Recommended condition Remarks
for shredding
As cut
Feed without overloading.
As cut
Clip off side growth Feed without overloading.
Firmly hold large diameter branches.
As cut, fairly dry
Knock soil and stones off roots.
Do not shred seeded weeds.
As cut, no surface moisture When shredding materials with a high moisture content,
regularly feed dry material to clean the shredder.
Very dry
Cut into short lengths before shredding.
The following materials are suitable for composting without shredding:
- Grass clippings
- Soft vegetation, especially when wet or when natural decomposition has commenced
- Damp paper or cardboard
8
TYP
1
GS2200
2
20
4
1
3
33
43
42
53
52
39
38
35
26
9
41
31
24
8
21
22
29
28
45
46
34
37
30
36
37
27
32
25
23
7
54
5
1
14
6
13
17
18
51
10
47
19
44
11
12
16
15
E13561
WWW.2helpU.com
25-03-03
9
10
11
Australia
DEWALT Industrial Power Tool Company
7 Clarice Road
Tel. 03 9895 9200
Box Hill, Victoria 3128
Fax 03 9899 7465
New Zealand
Black & Decker
Tel. 09 579 7600
81 Hugo Johnston Drive
Fax 09 579 8200
Penrose, Auckland, New Zealand
United Kingdom
Black & Decker
210 Bath Road
Slough, Berkshire SL1 3YD
584185-00
12
Tel. 01753 511234
Fax 01753 551155
Helpline 01753 574277
06/03