1
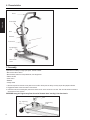
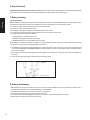
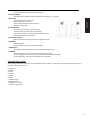
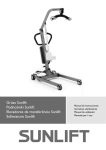
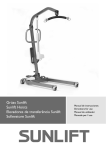
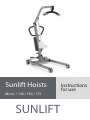
Sunlift Hoists
Micro / 130 / 150 / 175
SUNLIFT
Instructions
for use
1. Introduction
Thank you for choosing a Sunrise Medical product. You are advised to read this instruction manual and in particular the safety
recommendations and adjustments to make before using the hoist. If you have any questions about usage, maintenance or safety,
please consult an authorised distributor of our products.
ENGLISH
IMPORTANT:
DO NOT USE THIS PRODUCT UNTIL YOU HAVE READ AND UNDERSTOOD THIS INSTRUCTION MANUAL
Sunrise Medical has obtained certificate ISO 9001 which validates the quality of its products at all times. Sunrise
Medical declares under its own responsibility that this product meets the requirements of Medical Directive 93/42/
EEC of Directive 2007/47/EEC.
The Sunlift Hoists have the CE mark and meet the following CE directives:
Medical Devices Directive (93/42/EEC)
EMC Directive (89/336/EEC) (electrical components only)
Low Voltage Directive (73/23/EEC) (electrical components only)
The electrical equipment is approved in accordance with the standards: ETL (ul) Ul 60601, EN 6061, the Australian and Canadian
deviation. EN- 60601-1 and UL 2601-1.
Electrical specifications
12-volt batteries, rechargeable sealed lead-acid type.
Battery capacity 2.9 amp-hours.
Nominal input of charger 230 VCA 50/60 Hz
Nominal output of charger 27.4/29.0 [email protected]
Protection against electric shock
Charger – class II
Degree of protection IPX4
Elevator – internal power source
Degree of protection against electric shock
Charger – type B
Lift – type B
Use of sling/Oxford type/sunrise with grey loop
Operational environment: ..............> +5° < +40° C.
In conditions other than this environment, performance and safety may be compromised.
2. Recommended use
The hoists are designed for moving and lifting patients. They must always be operated by a healthcare professional or a user instructed
in their operation and safety. They are suitable for moving and lifting patients both in domestic settings and at hospitals or residential
homes (depending on the specification of the model).
Each lift is fully assembled, load tested and certified before being partially dismantled for packing. The packing consists of a strong,
purpose built carton and is used for both export and domestic markets to ensure the safe arrival of the lift.
A number of documents are supplied in a wallet packed with each lift and should be kept safely for future reference.
•
•
TEST CERTIFICATE
USER MANUAL
The TEST CERTIFICATE is an important document and will be required for your insurance records. It is valid for six months and
after it has expired the lift should be inspected and serviced for the next six months. Servicing and periodic testing can be carried
out by your supplier*. Please ensure your lift is included in their maintenance schedule
Note: These recommendations are in compliance with the requirements of 1998 No2307 Health and Safety: The Lifting Operations
and Lifting Equipment Regulations 1998.
This is a UK regulation. Outside the UK please check your local requirements
*Sunrise Medical Ltd recommends maintenance, inspection and certified testing is carried out by authorised service dealers only
2
ENGLISH
The Sunlift Hoist range is suitable for the following CATEGORIES of lift within the working parameters of the lifts specified in the
TECHNICAL SPECIFICATIONS.
. Category A - Wheelchair
. Category B - Bed
. Category C - Bath
. Category D - Toilet/Shower Chair
. Category E - Floor
. Category F - 90 degree Rotation
The Sunlift Hoist is suitable for patients in the SITTING, SITTING/RECUMBENT and RECUMBENT position
3. Safety instructions
• Always familiarise yourself with the controls and safety devices on your hoist before using it to lift a patient.
• Use only slings recommended for use with this hoist.
• Never force any control or safety device. All controls are easy to use and do not require any great physical force.
• Do not use hoists in showers.
• Do not charge hoists in bathrooms.
• Do not use these hoists for any purpose other than lifting and moving patients.
• For your safety please pay special attention to the yellow triangular warning labels indicating the areas where there is a danger
of finger entrapment.
• Use the hoist only as per the instructions in this manual.
Before and during each use of the hoist:
• Use the hoist only on flat, smooth surfaces.
• Please be aware that the physical forces required to move the hoist when laden on carpeted or uneven and rough textured
surfaces will be greater than those required on a flat or smooth surface. Careful planning of the lifting operation is recommended
in these environments to avoid potential damage to the hoist due to heavy handling
• Always check before use that the sling is of a type and size suitable for the patient.
• Do not use the lift until you have check that the actuator is secured at both ends by a bolt and nut.
• Check the parallelism of the legs of the hoist. If the legs are toed
inwards, see Fig.1 (by more than 3 degrees) and not parallel, (the
legs closed position(F) as described in Technical Specifications
section) and dimension F is reduced by more than 100 mm DO NOT
use the hoist in this position.
• Always check that the safe working load of the hoist is sufficient for
the weight of the patient.
• Adjust sling as per the relevant instructions for use.
• Do not lift the patient until you have ensured that the patient’s
hands are kept within the harness, making sure the patient does
not hold on to the actuator or the hoist’s mobile joints.
• When lifting or lowering the patient, the attendant and hoist operator must keep his or her hands away from the actuator
and the connecting and turning parts between the arm and the mast.
• Before moving a patient ensure that they are comfortable and as close as possible to the floor.
• Move the hoist with care: there is a risk of crushing the feet between the base of the hoist and the floor.
• To push the hoist along use the push handle on the mast, and never the mast itself, the boom or the patient.
• When transporting a patient never move the hoist at more than 3 kph or 0.8 metres per second.
• Do not try to push the hoist over any obstacle which its front castors cannot easily overcome.
• Do not use the hoist on inclines of more than approx. 5º. SUNRISE MEDICAL recommends that the aid of a third person be
enlisted when moving patients on slopes.
• Never leave the hoist with a patient unattended on a slope.
3
4. Characteristics
Boom
ENGLISH
Push handle
Mast
Batteries
Control box
Leg adjuasting
lever
.
Rear braked
castor
5. Assembly
Open the box carefully in a large open space. The box contains:
• Main chassis with 4 castors
• Mast assembly with boom and spreader bar, and charger base
• Electric actuator
• Hand control
• Batteries
• Charger cable
1. Remove all parts from the box and lay them out on the floor. Some parts are heavy and may require two people to lift them.
2. Engage the brakes on the rear castors of the chassis.
3. Insert the mast into the rectangular plinth in the chassis as far as the red arrow on its side. Then turn the handle clockwise to
ensure that it is firmly secured.
WARNING: keep your fingers away from the end of the mast when inserting it into the chassis.
Mast
Leg adjusting
lever
4
Mast locking
knob
4. Check that the legs open and close normally.
5. Assembly of the actuator:
Elevate the lift boom and place the actuator so that the holes in the mast plates are aligned with the actuator base. Insert the bolt
through and hole and tighten the nut
6. Connect the batteries box into the base by sliding it along the rail of the mast. To remove the battery box, pull it upwards by the
handle and then push it towards the outside.
7. Check that the red emergency stop button on the charger base is not pressed.
ENGLISH
8. Insert the plug of the hand control into its receiving socket under the charger base.
9. Plug the actuator into its socket under the charger base. For a correct positioning firmly press the pin up until completely inserted
in place.
10. Push the hand control buttons up and down and check that the boom moves up and down properly. The hoist is now ready for
use.
6. Use
1. Leg adjustment: The legs of the hoist can be moved apart or closer together to facilitate access to a wheelchair, toilet, etc.
When going through narrow doorways or passageways the legs should be fully closed. Adjust them by pressing downwards on the
foot pedal. (Operation force <300N)
Right pedal = legs fully closed
Left pedal = legs fully open
2. Rear
castors and braking: The hoist has two rear braked castors. The rear castors must be left free when the boom is raised
so that the hoist can move towards the centre of gravity of the hoisting line. If the brakes are engaged it will be the patient who
moves towards the centre of gravity, which may cause discomfort.
3. Raising and lowering the boom: Boom movement is via an electric actuator controlled by a simple hand control unit. This unit
has two buttons marked with arrows UP and . The actuator stops automatically at the end of its travel in both directions. The hand
control unit is connected to a socket under the battery box charger base.
4. Emergency stop button: The red emergency stop button in the frontal of the battery charger base cuts all power to the hoist.
Power cannot be restored until the button is turned in the sense of the arrows. It will be reset by twisting the button clockwise
and releasing.
5. Emergency
down: This allows you to automatically lower the hoist’s mast, if the hand control should fail. This last manoeuvre
can be done both manually and electronically.
• Manually (only Sunlift 130, 150 , 175 models): by twisting the cylinder at the top of the actuator clock-wise, the engine is
released mechanically, allowing safe descent of the user.
• Manually
(only Micro model): it is red, and is located at the bottom of the actuator. Pull it upwards, in the direction indicated
by the PULL EMERGENCY arrow
• Electronically (only Sunlift 130, 150 , 175 models): the button is located under the battery charger base. It is a switch that
requires operation with a fine point (such as a pen, for instance), and can be found under the word EMERGENCY, with an arrow
pointing down.
Batteries
Emergency stop
button
Hand control
Emergency down
button
Actuator
motor
Charging socket
5
6. Use (Continued)
6. Mobilising the hoist and patient transfer: Mobilising the hoist must always be performed with the caregiver firmly holding both
push handles. Transfer of the patient should be performed with the patient slung in front of the caregiver
7. Battery charging
ENGLISH
Charging the battery
Batteries are fitted in a battery case which fits into the charger base on the mast. Charge the batteries with the charger cable provided.
An additional charger base and battery are available as accessories, enabling one to be recharging at all times.
1. Connect the charger cable to the charging socket on the charger base.
2. Connect the cable to the mains (220V/ 240 V).
3. Recharging is automatic. A full battery charge lasts between 8 and 12 hours.
4. To use the hoist, first disconnect the charger cable from the mains, and then from the hoist.
5. The lights indicate the charge of the batteries:
• “ON” green light c Connected to the mains
• “CHARGE” orange light c Batteries are charging
• “CHARGE” light will turn off once batteries reach full charge
Before battery is completely discharged, every time you push the lift/descend button in the hand control, a beep will warn you that
you can perform one last action using the Emergency down button.
6. The
batteries are protected from fully discharging by a charge level alarm. If the hoist is not in use, the warning beep will not
sound. DO NOT IGNORE THIS WARNING SIGNAL. Finish the operation you are carrying out when it goes off and then connect
the hoist for recharging.
7. The recharging is done automatically. Note: Even if the charger is left connected for a long time, it will not allow the batteries to
overcharge.
8. In order to operate the hoist again, please disconnect the charger cable
Batteries
Charging socket
8. Battery maintenance
• Keep
batteries fully charged. When the hoist is not in use, keep it charging. Batteries may also be recharged overnight if this is
more practical: the charger will not allow the batteries to be overcharged.
• Charge batteries regularly even if the hoist is not used for a long period.
• Connect the charger cable first to the hoist and then to the mains.
• Do not leave the charger cable plugged into the hoist if it is not to be connected immediately to the mains.
• Never unplug the charger cable by pulling on the cable.
6
9. User guide for the quickfit sling
From a sitting position
Fig. 1
Fig. 2
Fig. 3
ENGLISH
Fig. 1
Ensure that the straps face outward. Pull the sling down over the user’s back until the top of the toilet seat opening is at the small of
the back. Check that the sling is aligned properly at shoulder height.
Fig. 2
Lift the patient’s leg and slip the strap under it and pull it up between their legs, ensuring that the sling is not creased under the thigh.
Repeat the procedure with the other leg.
Fig. 3
Cross the straps over the legs and attach them to the front hooks on the hoist spreader bar.
Fig. 4
Raise the hoist slightly and attach the shorter, shoulder straps to the spreader bar. Move the hoist towards the patient while doing
this.
Fig. 4
REMEMBER: THE LONG STRAPS ARE FOR THE LEGS, AND THE SHORT ONES FOR THE
SHOULDERS.
From a lying position
Fig. 5
Roll the patient over onto the sling, ensuring that the top of the toilet seat opening is at the small of the back.
Fig. 6
Cross the straps under the patient’s legs and fit the sling as indicated for the sitting position, keeping the shoulder straps as short
as possible.
Fig. 5
Fig. 6
NB: ENSURE THAT THE PATIENT’S HEAD IS SUPPORTED AT ALL TIMES
7
ENGLISH
10. Problems and solutions
PROBLEM
CAUSE
SOLUTION
Actuator does not work
Emergency button pressed
Total battery discharge protection activated
Poor connection of the control plug
Turn it in the sense of the arrows
Charge the batteries
Reinsert the control plug
Batteries do not charge
Fully charged battery (green light)
Verify power source
The actuator stops
Overload in the hoist
Reduce the load on the actuator
Batteries discharged (sound warning when pressing Charge batteries
the hand control: protection against total discharge
activated)
Fig. 4
11. Maintenance
Sunrise Medical Ltd recommend a thorough inspection and test of the Sunlift hoist and lifting accessories, slings etc. is carried
out every six months. Sunrise Medical Ltd recommends maintenance, inspection and certified testing is carried out by authorised
service dealers only.
Note: These recommendations are in compliance with the requirements of 1998 No2307 Health and Safety: The Lifting Operations
and Lifting Equipment Regulations 1998.
This is a UK regulation. Outside the UK please check your local requirements
All SUNRISE MEDICAL products are designed for minimal maintenance, but some regular safety checks are necessary.
SUNRISE MEDICAL recommends that the following checks be made every day, before the hoist is used.
• Ensure that the front castors of the hoist move normally.
• Ensure that the spreader bar rotated and rocks freely.
• Check that the spreader bar is securely attached to the boom.
• Ensure that the legs of the hoist open and close normally.
• Ensure that the hand control unit is being used properly.
• Check that the emergency stop button works properly.
• Check for wear on the hooks. Do not use slings which show signs of wear or damage in the lifting straps or sling body.
SUNRISE MEDICAL also recommends that the following parts of hoists be serviced by an authorised technician at least once a
year:
• SPREADER BAR
- Check that the spreader bar rotates and rocks freely
- Check that the spreader bar is securely attached to the hoist boom
• BOOM
- Check the coupling between boom and mast
- Check that the boom rotates fully on its bearing
• MAST
- Check that the mast is properly fitted into its plinth
- Check the hydraulic actuator assembly
• BATTERY CASE
- Check that the emergency stop button works properly
8
ENGLISH
- Check the plug of the hand control unit and actuator
• LEG ADJUSTMENT
- Check legs open and close smoothly and that these are parallel (+/-3º) - see Fig1
• LEG PIVOTS
- Check that these are firmly secured
- Check that the legs pivot freely
- If they are stiff, lubricate them with mineral oil
- Check for excessive play
• FRONT CASTORS
- Check that these are firmly secured to the legs
- Check that castors and their supports rotate freely
- Clean away any threads, hairs or fluff which might have built up.
- Lubricate with mineral oil if necessary
• ELECTRIC ACTUATOR
- Check that this works properly and without any abnormal noises
• BATTERIES
- Recharge regularly
- Do not allow them to become completely discharged
• CHARGE TEST
- The charge test should be performed by an authorised service technician
• CLEANING
- Clean with ordinary soap and water or a disinfectant for hard surfaces
- Do not use aggressive or abrasive cleaners, as the surface finish might be damaged
- Do not allow water to come into contact with electrical components
AVAILABLE SPARE PARTS:
When ordering spare parts it is important to indicate the hoist’s series number to ensure that you receive the right spare part for your
hoist. The available spare parts are:
• Harnesses
• Batteries
• Joystick
• Control box
• Actuator
• Wheels
• Complete hanger
• Complete chassis
• Complete arm and mast
• Charger or charging lead
9
12. Technical specifications
ENGLISH
Measurements
130 kg
130 kg
150 kg
150
Midi
Major
175
Max total length
1010 mm
1120 mm
1215 mm
1340 mm
Min total length
970 mm
1090 mm
1155 mm
1265 mm
Safe working load
(w ith w heels facing outw ards)
(w ith w heels facing inw ards)
Micro
Mini
130
175 kg
Max width with legs closed
575 mm
575 mm
665 mm
665 mm
Max height (without load) A
1835 mm
1865 mm
1930 mm
1985 mm
Min height (without load) (B)
1085 mm
1255 mm
1255 mm
1425 mm
Max spreader bar heigt (without load) (C)
1590 mm
1610 mm
1680 mm
1755 mm
350 mm
460 mm
450 mm
550 mm
1130 mm
1240 mm
1380 mm
1500 mm
Max width (external)
965mm
1055 mm
1205 mm
1220 mm
Max width (internal)
885 mm
980 mm
1120 mm
1140 mm
Max width (external)
535 mm
535 mm
625 mm
625 mm
Max width (internal)
455 mm
455 mm
545 mm
545 mm
Total leg height
100 mm
100 mm
100 mm
115 mm
Ground clearance
20 mm
20 mm
20 mm
15 mm
Castor wheels
75 mm
75 mm
75 mm
75 mm
Rear wheels
100 mm
100 mm
100 mm
100 mm
Mast, boom and electric components
assembly weight
Base assembly weight
18,65 kg
19 kg
19,3 kg
22,65 kg
13,5 kg
14 kg
15,1 kg
18,1 kg
Min spreader bar height (without load)
Turning radius with legs open (D)
Legs open (E):
Legs closed (F):
Batteries weight
Batteries
Batteries capacity
Charger input
Chager output
Electric shock protection
Degree of shock protection
10
2,9 kg
2,9 kg
2,9 kg
2,9 kg
2x12v de gel ácido
2x12v de gel ácido
2x12v de gel ácido
2x12v de gel ácido
2.9 Amph
2.9 Amph
2.9 Amph
2.9 Amph
230v / 50 Hz 0.12 A 230v / 50 Hz 0.12 A 230v / 50 Hz 0.12 A 230v / 50 Hz 0.12 A
28v. 0.5 Amph
28v. 0.5 Amph
28v. 0.5 Amph
28v. 0.5 Amph
Charger: Clase II
Hoist: Internal
power source
Charger: Clase II
Hoist: Internal
power source
Charger: Clase II
Hoist: Internal
power source
Charger: Clase II
Hoist: Internal
power source
Charger and hoist:
Type B
Charger and hoist:
Type B
Charger and hoist:
Type B
Charger and hoist:
Type B
PRODUCT DURABILITY
• The minimum service life of the Sunlift hoists is five years, which can be extended significantly with appropriate maintenance.
• The service life of the batteries is of one to two years depending on usage and the number of times they are recharged.
• The service life of the harnesses is of one to two years depending on usage and the number of times they are washed, as well
as the detergents used and type of water.
ENGLISH
13. Warranty
SUNRISE MEDICAL guarantees this product for two years as from the date indicated on the invoice, receipt or delivery note. For
products containing batteries, the battery warranty is 6 months. This warranty covers parts in need of replacement, labour and
transport.
In warranty claims the user must submit the product and the purchase invoice as proof of delivery date.
This warranty does not cover:
• NORMAL WEAR AND TEAR, e.g. on upholstery, tyres, inner tubes, rims, wheels, fabric, etc.
• ACCIDENTS, e.g. bent structures, scratches, flat tyres, etc.
• IMPROPER USE and damage caused by users who weigh more than the weight limit indicated in the user’s manual.
• LACK OF MAINTENANCE and failure to follow the conservation instructions in the user’s manual.
• MODIFICATIONS or REPAIRS carried out by persons not authorised by Sunrise Medical.
• PRODUCTS WITH NO INVOICE OR SERIAL NUMBER (when appropriate).
14. Disposal
The symbols below mean that in accordance with local laws and regulations your product should be disposed of separately from
household waste. When this product reaches the end of its service life, take it to the collection point designated by local authorities.
Separate collection and recycling of your product at the time of disposal will help conserve natural resources and ensure that it is
recycled in a manner that protects the environment.
Ensure you are the legal owner of the product prior to arranging for its disposal in accordance with the above recommendations.
11
Sunrise Medical GmbH & Co.KG
Kahlbachring 2-4
69254 Malsch/Heidelberg
Germany
Tel.: +49 (0) 7253/980-0
Fax: +49 (0) 7253/980-111
www.sunrisemedical.com
Sunrise Medical Limited
High Street Wollaston
West Midlands DY8 4PS
England
Tel.: +44 (0) 1384446688
www.sunrisemedical.com
Sunrise Medical S.L.
Polígono Bakiola, 41
48498 Arrankudiaga – Vizcaya
España
Tel.: +34 (0) 902142434
Fax: +34 (0) 946481575
www.sunrisemedical.com
Sunrise Medical S.A.
13, Rue de la Painguetterie
37390 Chanceaux sur Choisille
France
Tel.: +33 (0) 247554400
Fax: +33 (0) 247554403
www.sunrisemedical.com
Sunrise Medical Srl
Via Riva 20, Montale
29100 Piacenza (PC)
Italy
Tel.: +39 0523-573111
Fax: +39 0523-570060
www.sunrisemedical.com
Sunrise Medical A.G.
Lückhalde 14
3074 Muri bei Bern
Switzerland
Tel.: +41 (0) 31-958-3838
Fax: +41 (0) 31-958-3848
www.sunrisemedical.com
Sunrise Medical AS
Rehabsenteret
1450 Nesoddtangen
Norway
Tel.: +47 (0) 66963800
Faks: +47 (0) 66963838
www.sunrisemedical.com
Sunrise Medical AB
Britta Sahlgrens gata 8A
421 31 Västra Frölunda
Sweden
Tel: +46 (0) 31-748 37 00
Fax: +46 (0) 31-748 37 37
www.sunrisemedical.com
Sunrise Medical B.V.
Groningenhaven 18-20
3433 PE Nieuwegein
Nederlands
Tel.: +31 (0) 3060-82100
Fax: +31 (0) 3060-55880
www.sunrisemedical.com
G2 A/S
Graham Bells Vej 21-23 A
8200 Arhus N
Denmark
Tel.: +45 87 41 31 00
Fax: +45 87 41 31 31
www.G2.dk
OM Sunlift Hoist 25.07.14
Pantone (Spot Colors):
Cool Gray 10
Cool Gray 6
Ref. P19107