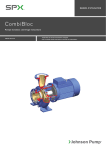
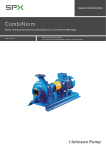
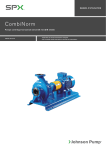
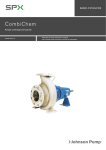
1
INSTRUCTION MANUAL CombiBloc Horizontal centrifugal monobloc pump CB/EN (1501) 6.6 Orginal instructions Read and understand this manual prior to operating or servicing this product EC Declaration of conformity (Directive 2006/42/EC, appendix II-A) Manufacturer SPX Flow Technology Assen B.V. Dr. A.F. Philipsweg 51 9403 AD Assen The Netherlands hereby declares that all pumps member of productfamilies CombiBloc, CombiBlocHorti, CombiChem, CombiLine, CombiLineBloc and CombiNorm whether delivered without drive (last position of serial number = B), or delivered as an assembly with drive (last position of serial number = A), are in conformity with the provisions of Directive 2006/ 42/EC (as altered most recently) and where applicable the following directives and standards: • EC directive 2006/95/EC, "Electric equipment for use within certain voltage limits" • standards EN-ISO 12100 part 1 & 2, EN 809 The pumps to which this declaration refers may only be put into operation after they have been installed in the way prescribed by the manufacturer, and, as the case may be, after the complete system of which these pumps form part, has been made to fulfil the requirements of Directive 2006/42/EC (as altered most recently). EC Declaration of conformity (Directive 2009/125/EC, Annex VI and Commission Regulation (EU) No 547/2012) (Implementing Directive 2009/125/EC of the European Parliament and of the Council with regard to ecodesign requirements for water pumps) Manufacturer SPX Flow Technology Assen B.V. Dr. A.F. Philipsweg 51 9403 AD Assen The Netherlands Hereby declares that all listed pumps member of product families CombiBloc, CombiBlocHorti, CombiChem, CombiLine, CombiLineBloc and CombiNorm are in conformity with the provisions of Directive 2009/125/EC and Commission Regulation (EU) No 547/2012 and the following standard: • prEN 16480 EC-ECO/EN (1501) 1.1 1 Declaration of incorporation (Directive 2006/42/EC, appendix II-B) Manufacturer SPX Flow Technology Assen B.V. Dr. A.F. Philipsweg 51 9403 AD Assen The Netherlands hereby declares that the partly completed pump (Back-Pull-Out unit), member of productfamilies CombiBloc, CombiBlocHorti, CombiChem, CombiLine, CombiLineBloc and CombiNorm is in conformity with the following standards: • EN-ISO 12100 parts 1 & 2, EN 809 and that this partly completed pump is meant to be incorporated into the specified pump unit and may only be put into use after the complete machine of which the pump under consideration forms part has been made and declared to comply with that directive. Assen, January 1st 2015 G. Santema, Ad Interim statutory director 2 EC-ECO/EN (1501) 1.1 Instruction manual All technical and technological information in this manual as well as possible drawings made available by us remain our property and shall not be used (otherwise than for the operation of this pump), copied, duplicated, made available to or brought to the notice of third parties without our prior written consent. SPX is a Fortune 500, global multi-industry manufacturing leader. SPX divides its business into four segments and one of these is the SPX Flow Technology segment. SPX Flow Technology Assen B.V. is part of SPX Flow Technology segment. SPX Flow Technology Assen B.V. P.O. Box 9 9400 AA Assen The Netherlands Tel. +31 (0)592 376767 Fax. +31 (0)592 376760 Copyright © 2008 SPX Corporation INT/EN (1107) 1.1 3 4 INT/EN (1107) 1.1 CombiBloc Table of Contents 1 1.1 1.2 1.3 1.4 1.5 1.5.1 1.5.2 1.5.3 1.6 1.7 2 2.1 2.2 2.3 2.4 2.5 2.5.1 2.5.2 2.5.3 2.6 2.6.1 2.6.2 2.6.3 2.6.4 2.6.5 2.7 2.8 2.9 3 3.1 3.2 3.3 3.4 3.5 3.6 3.7 4 CB/EN (1501) 6.6 Introduction Preface Safety Guarantee Inspection of delivered items Instructions for transport and storage Dimensions and weight Use of pallets Hoisting Storage Ordering parts General Pump description Type code Serial number Applications Construction Design Mechanical seal Bearing construction Ecodesign Minimum Efficiency Requirements Water Pumps Introduction Implementing Directive 2009/125/EC Energy Efficient Pump Selection Scope of Implementing Directive 2009/125/EC Product information Application area Re-use Scrapping Installation Safety Preservation Environment Installation of a pump unit Piping Accessories Connection of the electric motor Commissioning 9 9 9 10 10 10 10 10 11 11 11 13 13 13 13 14 14 14 14 14 15 15 15 18 19 19 22 23 23 25 25 25 25 25 26 26 26 27 5 4.1 4.2 4.3 4.4 4.5 4.6 4.7 5 5.1 5.2 5.3 5.4 5.5 5.6 5.7 Maintenance Regular maintenance Mechanical seal Lubrication of the bearings Environmental influences Noise Motor Faults 27 27 27 27 27 28 28 29 29 29 29 29 29 29 30 6 Problem solving 31 7 Disassembly and assembly 33 7.1 7.2 7.3 7.4 7.4.1 7.4.2 7.4.3 7.5 7.5.1 7.5.2 7.5.3 7.5.4 7.6 7.6.1 7.6.2 7.6.3 7.7 7.7.1 7.7.2 7.7.3 7.7.4 8 8.1 8.2 8.3 8.3.1 8.3.2 8.4 8.5 8.5.1 8.5.2 8.6 8.7 9 6 Inspection of the pump Inspection of the motor Preparing the pump unit for commissioning Checking the sense of rotation Start-up Pump in operation Noise Precautionary measures Special tools Liquid draining Disassembly Back-Pull-Out system Disassembling the Back-Pull-Out unit Assembling the Back-Pull-Out unit Replacing the impeller and the wear ring Disassembling the impeller Mounting the impeller Disassembling the wear ring Assembling the wear ring Mechanical seal Instructions for mounting a mechanical seal Disassembling a mechanical seal M1 Assembling a mechanical seal M1 Replacing the stub shaft and the motor Disassembling the stub shaft and the motor of pump size 25-... Assembling the stub shaft and the motor of pump size 25-... Disassembling the stub shaft and the motor Assembling the stub shaft and the motor Dimensions Dimension drawings Motor feet dimensions Flange dimensions Cast iron and bronze G, B Stainless steel R Pump dimensions Overall length (ta) Cast iron and bronze G, B Stainless steel R Dimension vt Weight Parts 33 33 33 34 34 34 34 35 35 35 36 36 37 37 38 39 40 40 40 41 42 43 44 45 46 46 46 47 48 48 49 50 51 53 CB/EN (1501) 6.6 CombiBloc 9.1 9.1.1 9.1.2 9.2 9.2.1 9.2.2 9.3 9.3.1 9.3.2 9.4 10 10.1 10.2 10.2.1 10.2.2 10.3 10.4 10.5 10.5.1 10.5.2 10.6 10.6.1 10.6.2 10.7 10.7.1 10.7.2 CB/EN (1501) 6.6 Ordering parts Order form Recommended spare parts Pump with shaft sealing M1 Sectional drawing Parts list Pump sizes 25-125 and 25-160 with shaft sealing M1 Sectional drawing Parts list Additional parts of pump size 200-160 Technical data Recommended locking liquids Tightening moments Tightening moments for bolts and nuts Tightening moments for cap nut Maximum allowable speed Maximum allowable working pressures Hydraulic performance Performance overview cast iron and bronze pumps G, B Performance overview stainless steel pumps R Permitted forces and torques on the flanges, based on EN-ISO 5199 Cast iron and bronze pumps Stainless steel pumps Noise data Pump noise as a function of pump power Noise level of entire pump unit 53 53 53 54 54 55 56 56 57 58 59 59 59 59 59 60 61 62 62 65 67 68 69 70 70 71 Index 73 Order form for spare parts 75 7 8 CB/EN (1501) 6.6 CombiBloc 1 Introduction 1.1 Preface This manual is intended for technicians and maintenance staff and for those who are in charge of ordering spare parts. This manual contains important and useful information for the proper operation and maintenance of this pump. It also contains important instructions to prevent potential accidents and damage, and to ensure safe and fault-free operation of this pump. ! Read this manual carefully before commissioning the pump, familiarize yourself with the operation of the pump and strictly obey the instructions! The data published here comply with the most recent information at the time of going to press. However they may be subject to later modifications. SPX reserves the right to change the construction and design of the products at any time without being obliged to change earlier deliveries accordingly. 1.2 Safety This manual contains instructions for working safely with the pump. Operators and maintenance staff must be familiar with these instructions. Installation, operation and maintenance has to be done by qualified and well prepared personnel. Below is a list of the symbols used for those instructions and their meaning: ! ➢ Personal danger for the user. Strict and prompt observance of the corresponding instruction is imperative! Risk of damage or poor operation of the pump. Follow the corresponding instruction to avoid this risk. Useful instruction or tip for the user. Items which require extra attention are shown in bold print. This manual has been compiled by SPX with the utmost care. Nevertheless SPX cannot guarantee the completeness of this information and therefore assumes no liability for possible deficiencies in this manual. The buyer/user shall at all times be responsible for testing the information and for taking any additional and/or deviating safety measures. SPX reserves the right to change safety instructions. CB/EN (1501) 6.6 Introduction 9 1.3 Guarantee SPX shall not be bound to any guarantee other than the guarantee accepted by SPX. In particular, SPX will not assume any liability for explicit and/or implicit guarantees such as but not limited to the marketability and/or suitability of the products supplied. The guarantee will be cancelled immediately and legally if: • Service and/or maintenance is not undertaken in strict accordance with the instructions. • The pump is not installed and operated in accordance with the instructions. • Necessary repairs are not undertaken by our personnel or are undertaken without our prior written permission. • Modifications are made to the products supplied without our prior written permission. • The spare parts used are not original SPX parts. • Additives or lubricants used are other than those prescribed. • The products supplied are not used in accordance with their nature and/or purpose. • The products supplied have been used amateurishly, carelessly, improperly and/or negligently. • The products supplied become defective due to external circumstances beyond our control. All parts which are liable to wear are excluded from guarantee. Furthermore, all deliveries are subject to our “General conditions of delivery and payment”, which will be forwarded to you free of charge on request. 1.4 Inspection of delivered items Check the consignment immediately on arrival for damage and conformity with the advice note. In case of damage and/or missing parts, have a report drawn up by the carrier at once. 1.5 Instructions for transport and storage 1.5.1 Dimensions and weight A pump or a pump unit is generally too heavy to be moved by hand. Therefore, use the correct transport and lifting equipment. Dimensions and weight of the pump or pump unit are shown on the label on the cover of this manual. 1.5.2 Use of pallets Usually a pump or pump unit is shipped on a pallet. Leave it on the pallet as long as possible to avoid damages and to facilitate possible internal transport. ! 10 When using a forklift always set the forks as far apart as possible and lift the package with both forks to prevent it from toppling over! Avoid jolting the pump when moving it! Introduction CB/EN (1501) 6.6 CombiBloc 1.5.3 Hoisting When hoisting a pump or complete pump units the straps must be fixed in accordance with figure 1. Never go underneath a hoisted pump! Lifting instructions. 4185 Figure 1: 1.6 Storage If the pump is not to be used immediately the stub shaft must be turned by hand twice per week. 1.7 Ordering parts This manual contains a survey of the spare parts recommended by SPX as well as the instructions for ordering them. A fax-order form is included in this manual. You should always state all data stamped on the type plate when ordering parts and in any other correspondence regarding the pump. ➢ This data is also printed on the label on the front of this manual. If you have any questions or require further information with regard to specific subjects, then do not hesitate to contact SPX. CB/EN (1501) 6.6 Introduction 11 12 Introduction CB/EN (1501) 6.6 CombiBloc 2 General 2.1 Pump description The CombiBloc is a range of horizontal non-self-priming centrifugal pumps. The pump and the standard IEC flange motor are assembled by means of a lantern piece and a stub shaft to one complete unit. The pumps are available in cast iron, bronze and stainless steel. The cast iron and bronze pump casings comply with EN 733 (DIN 24255), the stainless steel pump casings comply with EN 22858 / ISO 2858 (DIN 24256). 2.2 Type code Pumps are available in various designs. The main characteristics of the pump are shown in the type code. Example: CB 40-200 G2 Pump family CB CombiBloc 40 Pump size diameter discharge connection [mm] 200 nominal impeller diameter [mm] Pump casing material G cast iron B bronze R stainless steel Impeller material 2.3 1 cast iron 2 bronze 6 stainless steel Serial number Serial number of the pump or pump unit are shown on the name plate off the pump and on the label on the cover of this manual. Example: 01-1000675A 01 100067 5 A B CB/EN (1501) 6.6 year of manufacture unique number number of pumps pump with motor pump with free shaft end General 13 Example horticulture: 11-09 X123500 1/2 11-09 X123500 1/2 2.4 month-year of manufacture unique number number of pumps Applications • In general, this pump can be used for thin, clean or slightly polluted liquids. These liquids should not affect the pump materials. • Further details about the application possibilities of your specific pump are mentioned in the order confirmation and/or in the data sheet enclosed with the delivery. • Do not use the pump for purposes other than those for which it is delivered without prior consultation with your supplier. Using a pump in a system or under system conditions (liquid, working pressure, temperature, etc.) for which it has not been designed may hazard the user! 2.5 Construction 2.5.1 Design The design is characterized by a compact construction. The pump is mounted to a standard IEC flange motor by means of a lantern piece and stub shaft. The pump cover is clamped between the pump casing and the lantern piece. The electric motors up to and including frame size 112M have B5 mounting arrangement and the larger types have B3/B5 mounting arrangement. All vertically placed motors have mounting arrangement V1. For each individual pump type there is only one construction of pump casing and impeller. The pumps are available in cast iron, bronze and stainless steel. The cast iron and bronze pump casings are according to EN 733 (DIN 24255) and the stainless steel pump casings according to EN 22858 / ISO 2858 (DIN 24256). The stub shaft is made of stainless steel. 2.5.2 Mechanical seal The pump is provided with a mechanical seal with mounting dimensions according to EN 12756 (L1K) (DIN 24960 (L1K)). Only 3 diameters are used for the whole range: d1 = 30 mm, 40 mm or 50 mm. 2.5.3 Bearing construction The pump shaft bearing is provided by the motor bearings. The selection of the pump/ motor combination is such that the bearings of the applied electric motors can absorb the axial and radial forces without the bearing life being affected. The electric motors must be provided with a fixed bearing. 14 General CB/EN (1501) 6.6 CombiBloc 2.6 Ecodesign Minimum Efficiency Requirements Water Pumps • Directive 2005/32/EC of the European Parliament and of the Council; • Commission regulation (EU) No 547/2012 Implementing Directive 2009/125/EC of the European Parliament and of the Council with regard to ecodesign requirements for water pumps. 2.6.1 Introduction SPX Flow Technology Assen B.V. is an associate member of the HOLLAND PUMP GROUP, an associate member of EUROPUMP, the organization of European pump manufacturers. Europump promotes the interest of the European pump industry with the European institutions. Europump welcomes the aim of the European Commission to reduce eco-impact of products in the European Union. Europump is fully aware of the eco-impact of pumps in Europe. For many years the ecopump initiative is one of the strategic columns in the work of Europump. From the first of January 2013 the regulation is coming into force concerning minimum required efficiencies of rotodynamic water pumps. The regulation sets minimum efficiency requirements on water pumps set out under the Ecodesign Directive for energy related products. This regulation mainly addresses manufacturers of water pumps placing these products on the European market. But as a consequence customers may also be affected by this regulation. This document gives necessary information related to the coming into force of the water pump regulation EU 547/2012. 2.6.2 Implementing Directive 2009/125/EC • Definitions: “This Regulation establishes eco-design requirements for the placing on the market of rotodynamic water pumps for pumping clean water, including where integrated in other products.” “Water pump” is the hydraulic part of a device that moves clean water by physical or mechanical action and is of one of the following designs: 1 End suction own bearing (ESOB); 2 End suction close coupled (ESCC); 3 End suction close coupled inline (ESCCi); 4 Vertical multistage (MS-V); 5 Submersible multistage (MSS);” ‘End suction water pump’ (ESOB) means a glanded single stage end suction rotodynamic water pump designed for pressures up to 1600 kPa (16 bar), with a specific speed ns between 6 and 80 rpm, a minimum rated flow of 6 m3/h, a maximum shaft power of 150 kW, a maximum head of 90 m with nominal speed of 1450 rpm and a maximum head of 140 m with nominal speed of 2900 rpm; ‘End suction close coupled water pump’ (ESCC) is an end suction water pump of which the motor shaft is extended to become also the pump shaft; ‘End suction close coupled inline water pump’ (ESCCi) means a water pump of which the water inlet of the pump is on the same axis as the water outlet of the pump; ‘Vertical multistage water pump’ (MS-V) means a glanded multistage (i > 1) rotodynamic water pump in which the impellers are assembled on a vertical rotating shaft, which is designed for pressures up to 2500 kPa (25 bar), with a nominal speed of 2900 rpm and a maximum flow of 100 m3/h; CB/EN (1501) 6.6 General 15 ‘Submersible multistage water pump’ (MSS) means a multistage (i > 1) rotodynamic water pump with a nominal outer diameter of 4” (10,16 cm) or 6” (15,24 cm) designed to be operated in a borehole at nominal speed of 2900 rpm, at operating temperatures within a range of 0°C and 90°C; This Regulation shall not apply to: 1 water pumps designed specifically for pumping clean water at temperatures below 10°C or above +120°C; 2 water pumps designed only for fire-fighting applications; 3 displacement water pumps; 4 self-priming water pumps. • Enforcement: In order to enforce this there will be a Minimum Efficiency Index (M.E.I.) criteria set for the above list of pumps. The MEI is a dimensionless figure that is derived from a complex calculation based on the efficiencies at BEP (Best Efficiency Point), 75% BEP & 110% BEP, and the specific speed. The range is used so that manufacturers do not take an easy option of providing good efficiency at one point i.e. BEP. The value ranges from 0 to 1,0 with the lower value being less efficient, this provides the basis of eliminating the less efficient pumps starting with 0,10 in 2013 (the lowest 10%) and 0,40 (the lowest 40%) in 2015. The MEI value of 0,70 is classed benchmark for the most efficient pumps in the market at the time of developing the directive. The milestones for the MEI values are as follows; 1 1st January 2013 all pumps shall have a minimum MEI value of 0,10; 2 1st January 2015 all pumps shall have a minimum MEI value of 0,40. The most important point of this is that unless the pumps comply then they will not be allowed to have a CE marking. • Part Load Performance It is common practice that pumps spend much of their time working away from their rated duty, and efficiency can fall off rapidly below the 50% duty point, any scheme should take account of this real life performance. However, manufacturers need a pump efficiency classification scheme that makes it impossible to design pumps with a steep fall off in efficiency either side of the BEP point in order to claim a higher efficiency than would be typical of real life operation. • ‘House of Efficiency’ The decision scheme ‘House of Efficiency’ takes into account design and application purposes as well as the pump minimum efficiency dependence on flow. The minimum acceptable efficiency is therefore different for each pump type. The pass-or-fail scheme is based on two criteria A and B. 16 General CB/EN (1501) 6.6 CombiBloc Criterion A is the pass-or-fail minimum efficiency requirement at the best efficiency point (BEP) of the pump: η Pump 〈 n s, Q BEP〉 ≥ η BOTTOM Where Q BEP n s = n N × ------------------0.75 H BEP Criterion B is the pass-or-fail minimum efficiency requirement at part load (PL) and at overload (OL) of the pump: η BOTTOM – PL, OL ≥ x ⋅ η BOTTOM Therefore a method is devised what is called a “house of efficiency” scheme that also requires pumps to pass efficiency thresholds at 75% and 110% of rated flow. The advantage of this is that pumps will be penalised for poor efficiency away from rated efficiency, hence it will take account of real life pump duties. It should be stated that while the scheme may appear complicated at first sight, in practice it has been easy for the manufacturers to apply the scheme to their pumps. Figure 2: House of Efficiency System Curve Head BEP HBEP η η BEP Pump Eff. Curve η OL= 0.98 η BEP η PL= 0.94 η BEP 0 CB/EN (1501) 6.6 QPL General QBEP QOL Flow 17 2.6.3 Energy Efficient Pump Selection In selecting the pump, care should be taken to ensure that the duty point required is as close as possible to the pump’s Best Efficiency Point (BEP). Different heads and flows can be achieved by changing the diameter of the impeller and thereby eliminating unnecessary energy loss. The same pump can be offered at different motor speeds to allow the pump to be used over a much wider range of duties. For instance, changing from 4-pole motor to 2-pole motor will enable the same pump to deliver twice as much peak flow at 4 times the head. Variable speed drives allow the pump to operate efficiently over a wide range of speeds hence duties in an energy efficient manner. They are particularly useful in systems where is a variation in required flow. A very useful tool for energy efficient pump selection is the downloadable software program “Hydraulic Investigator 2” from the SPX website. Hydraulic Investigator is the selection guide for centrifugal pumps and search by pump family and pump type starting from entering required capacity and head. Further refine the pump curves to find the pump that meets your specification. The default setting of applicable pump types is prioritized on highest efficiency. In the standard automated selection procedure the optimum (trimmed) impeller diameter is calculated already, where applicable. Manually the rotating speed can be adjusted as well when a variable speed drive is preferred. Example: Curve 1: performance at maximum impeller diameter and 2960 rpm; Curve 2: performance at required duty point (180 m3/h, 30 m) with trimmed impeller, power consumption 18,42 kW; Curve 4: performance at required duty point with maximum impeller diameter and reduced rotating speed (2812 rpm), power consumption 18,21 kW. Figure 3: 18 Hydraulic Investigator 2 General CB/EN (1501) 6.6 CombiBloc 2.6.4 Scope of Implementing Directive 2009/125/EC The following SPX Flow Technology products are in the scope of the directive: • CombiNorm (ESOB) • CombiChem (ESOB) • CombiBloc (ESCC) • CombiBlocHorti (ESCC) • CombiLine (ESCCi) • CombiLineBloc (ESCCi) Pumps with half-open impeller are excluded from the scope of the directive. Half-open impellers are designed for pumping liquids containing solids. The vertical multistage pump range MCV(S) is out of the scope of the directive, these pumps are designed for pressures up to 4000 kPa (40 bar). Submersible multistage pumps are not available in the SPX product portfolio. 2.6.5 Product information Name plate, example: Figure 4: Name plate SPX Flow Technology Assen B.V. CR Nr. 04029567 Dr. A.F. Philipsweg 51, NL-9403 AD Assen Ø 5 No. 1 2 MEI ≥ eff. 3 4 Table 1: Name plate 1 2 3 4 5 CB 40C-200 G1 12-1000675A 0,40 [xx.x]% or [-,-]% 202 mm Product type and size Year and serial number Minimum Efficiency Index at max. impeller diameter Effciency for trimmed impeller diameter Fitted impeller diameter Or Figure 5: Name plate horticulture CR Nr. 04029567 Johnson Pump Horticulture De Hondert Margen 23 NL-2678 AC De Lier Ø 5 No. 1 2 MEI ≥ eff. 3 4 Table 2: Name plate horticulture 1 2 3 4 5 CB/EN (1501) 6.6 CB 40C-200 G1 11-09 X123500 1/2 0,40 [xx.x]% or [-,-]% 202 mm General Product type and size Month-year, serial number and number of pumps Minimum Efficiency Index at max. impeller diameter Effciency for trimmed impeller diameter Fitted impeller diameter 19 Figure 6: Name plate ATEX certified SPX Flow Technology Assen B.V. - www.johnson-pump.com Dr. A.F. Philipsweg 51, NL-9403 AD Assen - CR Nr. 04029567 Type: Code: No.: 1 2 3 Ø MEI ≥ eff. 6 7 8 4 5 Table 3: Name plate ATEX certified 1 2 3 4 5 6 7 8 CB 40C-200 G1 12-1000675A II 2G c T3-T4 KEMA03 ATEX2384 202 mm 0,40 [xx.x]% or [-,-]% Product type and size Smartcode Year and serial number Ex marking Certificate number Fitted impeller diameter Minimum Efficiency Index at max. impeller diameter Effciency for trimmed impeller diameter 1 Minimum efficiency index, MEI: Table 4: MEI value Speed MEI value according prEN16480 [rpm] Material 25-125 25-160 32-125 32C-125 32-160 32A-160 32C-160 32-200 32C-200 32-250 40C-125 40C-160 40C-200 40-250 50C-125 50C-160 50C-200 20 Cast iron 2900 2900 2900 2900 2900 2900 2900 2900 2900 2900 2900 2900 2900 2900 2900 2900 2900 Bronze1) Remarks St.St.2) Outside scope Outside scope > 0,40 > 0,40 > 0,40 > 0,40 > 0,40 > 0,40 > 0,40 > 0,40 > 0,40 > 0,40 > 0,40 > 0,40 > 0,40 > 0,40 > 0,40 General > 0,40 > 0,40 > 0,40 > 0,40 > 0,40 > 0,40 > 0,40 > 0,40 > 0,40 > 0,40 > 0,40 > 0,40 > 0,40 > 0,40 > 0,40 > 0,40 > 0,40 > 0,40 > 0,40 > 0,40 > 0,40 > 0,40 > 0,40 > 0,40 > 0,40 > 0,40 > 0,40 > 0,40 > 0,40 > 0,40 CB/EN (1501) 6.6 CombiBloc Table 4: MEI value Speed MEI value according prEN16480 [rpm] Material 50-250 65C-125 65C-160 65C-200 65A-250 80C-160 80C-200 80-250 80A-250 100-160 100C-200 100C-250 125-125 125-250 125-315 150-125 150-160 150-200 150-250 200-160 200-200 250-200 Cast iron Bronze1) St.St.2) > 0,40 > 0,40 > 0,40 > 0,40 > 0,40 > 0,40 > 0,40 > 0,40 > 0,40 > 0,40 > 0,40 > 0,40 > 0,40 > 0,40 > 0,40 > 0,40 > 0,40 > 0,40 > 0,40 > 0,40 > 0,40 > 0,40 > 0,40 > 0,40 > 0,40 > 0,40 > 0,40 > 0,40 > 0,40 > 0,40 > 0,40 > 0,40 > 0,40 x > 0,40 > 0,40 x > 0,40 > 0,40 x x x x x x x 2900 2900 2900 2900 2900 2900 2900 2900 2900 2900 2900 2900 1450 1450 1450 1450 1450 1450 1450 1450 1450 1450 > 0,40 > 0,40 ----> 0,40 > 0,40 > 0,40 ----> 0,40 --> 0,40 > 0,40 --> 0,40 > 0,40 Remarks Not available Outside scope, ns > 80 rpm Outside scope, ns > 80 rpm Not available Outside scope, ns > 80 rpm St.St. = stainless steel ¹) impeller or pump in bronze ²) impeller or pump in stainless steel x = not available in delivery program 2 The benchmark for most efficient water pumps is MEI ≥ 0,70. 3 Year of manufacture; the first 2 positions (= the last 2 positions of the year) of the serial number of the pump as marked on the rating plate. An example and explanation is given in paragraph 2.6.5 "Product information" of this document. 4 Manufacturer: SPX Flow Technology Assen B.V. Registration number at Chamber of Commerce 04 029567 Dr. A.F. Philipsweg 51 9403 AD Assen The Netherlands Location Horticulture: SPX Flow Technology Assen B.V. Registration number at Chamber of Commerce 04 029567 Johnson Pump Horticulture De Hondert Margen 23 2678 AC De Lier The Netherlands CB/EN (1501) 6.6 General 21 5 Product type and size identifier are marked on the rating plate. An example and explanation is given in paragraph 2.6.5 "Product information" of this document. 6 The hydraulic pump efficiency of the pump with trimmed impeller diameter is marked on the rating plate, either the efficiency value [xx.x]% or [-.-]%. 7 Pump curves, including efficiency characteristics, are published in the downloadable software program “Hydraulic Investigator 2” from the SPX website. For downloading “Hydraulic Investigator 2” go to http://www.spx.com/en/johnson-pump/resources/ hydraulic-investigator/ The pump curve for the delivered pump is part of the related customer order documentation package separate from this document. 8 The efficiency of a pump with a trimmed impeller is usually lower than that of a pump with the full impeller diameter. The trimming of the impeller will adapt the pump to a fixed duty point, leading to reduced energy consumption. The minimum efficiency index (MEI) is based on the full impeller diameter. 9 The operation of this water pump with variable duty points may be more efficient and economic when controlled, for example, by the use of a variable speed drive that matches the pump duty to the system. 10 Information relevant for disassembly, recycling or disposal at end-of-life is described in paragraph 2.8 "Re-use", paragraph 2.9 "Scrapping" and chapter 7 "Disassembly and assembly". 11 The benchmark efficiency Fingerprint Graphs are published for: MEI = 0,40 ESOB 1450 rpm ESOB 2900 rpm ESCC 1450 rpm ESCC 2900 rpm ESCCi 1450 rpm ESCCi 2900 rpm Multistage Vertical 2900 rpm Multistage Submersible 2900 rpm MEI = 0,70 ESOB 1450 rpm ESOB 2900 rpm ESCC 1450 rpm ESCC 2900 rpm ESCCi 1450 rpm ESCCi 2900 rpm Multistage Vertical 2900 rpm Multistage Submersible 2900 rpm Benchmark efficiency graphs are available under http:\\www.europump.org/ efficiencycharts. 2.7 Application area The application area globally looks as follows:, Table 5: Application area. Maximum value Capacity Discharge head System pressure Temperature 22 850 m3/h 105 m 10 bar 120 °C (briefly 140 °C) General CB/EN (1501) 6.6 CombiBloc 2.8 Re-use The pump may only be used for other applications after prior consultation with SPX or your supplier. Since the lastly pumped medium is not always known, the following instructions should be observed: 1 flush the pump properly. 2 make sure the flushing liquid is discharged safely (environment!) 2.9 Take adequate precautions and use the appropriate personal protection means like rubber gloves and spectacles! Scrapping If it has been decided to scrap a pump, the same flushing procedure as described for Re-use should be followed. CB/EN (1501) 6.6 General 23 24 General CB/EN (1501) 6.6 CombiBloc 3 Installation 3.1 Safety • Read this manual carefully prior to installation and commissioning. Non-observance of these instructions can result in serious damage to the pump and this will not be covered under the terms of our guarantee. Follow the instructions given step by step. • Ensure that the pump can not be started if work has to be undertaken to the pump during installation and the rotating parts are insufficiently guarded. • Depending on the design the pumps are suitable for liquids with a temperature of up to 110°C. When installing the pump unit to work at 65°C and above the user should ensure that appropriate protection measures and warnings are fitted to prevent contact with the hot pump parts. • If there is danger of static electricity, the entire pump unit must be earthed. • If the pumped liquid is harmful to men or the environment, take appropriate measures to drain the pump safely. Possible leakage liquid from the shaft seal should also be discharged safely. 3.2 Preservation In order to prevent corrosion, the inside of the pump is treated with a preserving agent before leaving the factory. Before commissioning the pump remove any preserving agents and flush the pump thoroughly with hot water. 3.3 Environment • The foundation must be hard, level and flat. • The area in which the pump is installed must be sufficiently ventilated. An ambient temperature or air humidity which is too high, or a dusty environment, can have a detrimental effect on the operation of the electric motor. • There should be sufficient space around the pump unit to operate and if necessary repair it. • Behind the cooling air inlet of the motor there must be a free area of at least ¼ of the electric motor diameter, to ensure unobstructed air supply. 3.4 Installation of a pump unit If the unit is delivered as a complete set, pump and motor are assembled in the works. In that case the impeller has already been properly adjusted axially. In case of permanent arrangement, level the pump on the foundation by means of shims and carefully tighten the nuts of the foundation bolts. CB/EN (1501) 6.6 Installation 25 3.5 Piping • The piping to the suction and delivery connections must fit exactly and must not be subject to stress during operation. For the maximum allowable forces and moments on the pump flanges see paragraph 10.6 "Permitted forces and torques on the flanges, based on EN-ISO 5199". • The passage of the suction pipe must be amply dimensioned. This pipe should be as short as possible and run towards the pump in such a way that no air pockets can arise. If this is not possible, a venting facility should be provided at the highest point of the pipe. If the inside diameter of the suction pipe is larger than the suction connection of the pump, an eccentric reducer should be applied to prevent air pockets and whirls. See figure 7. Figure 7: Eccentric reducer to suction flange. 4035_A • The maximum allowable system pressure is stated in paragraph 2.7 "Application area". If there is a risk that this pressure might be exceeded, for instance because of an excessive inlet pressure, appropriate measures should be taken by mounting a safety valve in the piping. • Sudden changes in the rate of flow can lead to high pressure impulses in the pump and the piping (water shock). Therefore, do not use quick-acting closing devices, valves etc. 3.6 Accessories • Fit any parts that may have been supplied separately. • If the liquid does not flow towards the pump, fit a foot valve at the bottom of the suction pipe. If necessary, combine this foot valve with a suction strainer to prevent impurities from being drawn in. • When mounting, place temporarily (for the first 24 operating hours) a fine gauze between suction flange and suction pipe to prevent internal pump parts from being damaged by foreign matter. If the risk of damage continues to exist, fit a permanent filter. • In case the pump is provided with an isolation, special attention has to be paid To temperature limits of shaft seal and bearing. 3.7 Connection of the electric motor The electric motor must be connected to the mains by an approved electrician, according to the locally prevailing regulations of the electricity company. • Refer to the instruction manual belonging to the electric motor. • If possible, fit a working switch as close as possible to the pump. 26 Installation CB/EN (1501) 6.6 CombiBloc 4 Commissioning 4.1 Inspection of the pump • Check whether the stub shaft turns freely. Do this by turning the shaft end at the coupling a few times by hand. 4.2 Inspection of the motor • Check whether the fuses have been mounted. 4.3 Preparing the pump unit for commissioning Proceed as follows, both when the unit is put into operation for the first time and after the pump has been overhauled: 1 Fully open the stop valve in the suction pipe. Close the delivery stop valve. 2 Fill the pump and the suction pipe with the liquid to be pumped. 3 Turn the stub shaft a few times by hand and add more liquid, if necessary. 4.4 Checking the sense of rotation Beware of possible non-screened rotating parts, when checking the sense of rotation! 1 The sense of rotation of the pump is indicated by an arrow. Check whether the sense of rotation of the motor corresponds with that of the pump. 2 Let the motor run for only a short time and check the sense of rotation. 3 If the sense of rotation is not correct, alter the sense of rotation. See the instructions in the user manual belonging to the electric motor. 4 Fit the guard. 4.5 Start-up 1 Start the pump. 2 As soon as the pump is under pressure, slowly open the delivery stop valve until the working pressure is attained. CB/EN (1501) 6.6 Make sure that when a pump is running, rotating parts are always properly screened by the guard! Commissioning 27 4.6 Pump in operation When the pump is in operation, pay attention to the following: • The pump should never run dry. • Never use a stop valve in the suction line to control pump output. The stop valve should always be fully opened during operation. • Check whether the absolute inlet pressure is sufficient, to prevent vaporization in the pump. • Check whether the pressure difference between suction and delivery side corresponds with the specifications of the pump's duty point. • A mechanical seal may never show visible leakage. 4.7 Noise The noise production of a pump depends to a great extent on the operating conditions. The values stated in paragraph 10.7 "Noise data" are based on normal operation of the pump, driven by an electric motor. In case the pump is driven by a combustion engine, or in case it is used outside the normal operation area, as well as in case of cavitation, the noise level may exceed 85 dB(A). In that case precautions should be taken, like building a noise-barrier around the unit or wearing hearing protection. 28 Commissioning CB/EN (1501) 6.6 CombiBloc 5 Maintenance 5.1 Regular maintenance Regularly check the outlet pressure. ! 5.2 No water should get into the terminal box of the electric motor when the pump room is sprayed clean! Never spray water on hot pump parts! The sudden cooling down may cause them to burst and hot water may flow out! Flawed maintenance will result in shorter lifespan, possible break down and in any event loss of warranty. Mechanical seal A mechanical seal generally requires no maintenance, however, it should never be allowed to run dry. If there are no problems, do not dismantle the mechanical seal. As the seal faces have run in on one another dismantling usually implicates replacement of the mechanical seal. If a mechanical seal shows any leakage it has to be replaced. 5.3 Lubrication of the bearings For maintenance of the motor bearings we refer to the instructions of the motor supplier concerned. 5.4 Environmental influences • Regularly clean the filter in the suction pipe or the suction strainer at the bottom of the suction pipe, as the inlet pressure may become too low if the filter or the suction strainer is fouled. • If there is a risk that the pumped liquid expands during solidification or freezing, the pump has to be drained and, if necessary, flushed after it has been put out of service. • If the pump is out of service for a long time, it has to be preserved. • Check motor for accumulation of dust or dirt, which might influence motor temperature. 5.5 Noise If a pump starts making noise, this may point to certain problems with the pump unit. A crackling noise can indicate cavitation or excessive motor noise can indicate deterioration of the bearings. 5.6 Motor Check motor specifications for start-stop frequency. CB/EN (1501) 6.6 Maintenance 29 5.7 Faults The pump, of which you want to determine the fault, may be hot or under pressure. Take the appropriate precautions first and protect yourself with the proper safety devices (safety goggles, gloves, protective clothing)! To determine the source of the malfunctioning of the pump, proceed as follows: 1 Switch off the power supply to the pump unit. Lock the working switch with a padlock or remove the fuse. 2 Close the stop valves. 3 Determine the nature of the fault. 4 Try to determine the cause of the fault with chapter 6 "Problem solving" and take the appropriate measures or contact your installer. 30 Maintenance CB/EN (1501) 6.6 CombiBloc 6 Problem solving Faults in a pump installation can have various causes. The fault may not be in the pump, it may also be caused by the pipe system or the operating conditions. Firstly, always check that installation has been executed in accordance with the instructions in this manual and that the operating conditions still correspond with the specifications for which the pump was purchased. In general, breakdowns in a pump installation are attributable to the following causes: • Faults with the pump. • Breakdowns or faults in the pipe system. • Faults due to incorrect installation or commissioning. • Faults due to incorrect choice of pump. A number of the most frequently occurring failures as well as their possible causes are shown in the table below. Table 6: Most frequently occurring failures. Most common faults Pump delivers no liquid Possible causes, see Table 7. 1 2 3 4 8 9 10 11 13 14 17 19 20 21 29 1 2 3 4 8 9 10 11 13 14 15 17 19 20 21 Pump has insufficient volume flow 28 29 Pump has insufficient head 2 4 13 14 17 Pump stops after start up 1 2 3 4 8 9 10 11 Pump has higher power consumption than 12 15 16 17 18 22 23 24 25 26 27 32 normal 38 39 Pump has lower power consumption than 13 14 15 16 17 18 20 21 28 29 normal Mechanical seal has to be replaced to 23 25 26 30 32 33 36 often 1 9 10 11 15 18 19 20 22 23 24 25 26 Pump vibrates or is noisy 27 29 37 38 39 40 Bearings wear too much or become hot 23 24 25 26 27 37 38 39 40 42 Pump running rough, hot or seizes 23 24 25 26 27 37 38 39 40 42 CB/EN (1501) 6.6 Problem solving 31 Table 7: Possible causes of pump failures. Possible causes 1 2 3 4 8 9 10 11 12 13 14 15 16 17 18 19 20 21 22 24 25 26 27 28 29 30 32 33 36 37 40 42 32 Pump or suction pipe is not sufficiently filled or de-aerated Gas or air coming from the liquid Air lock in the suction pipe Air leak in the suction pipe The manometric suction head is too high Suction pipe or suction strainer is blocked Insufficient immersion of foot valve or suction pipe during operation of the pump NPSH available too low Speed too high Speed too low Wrong sense of rotation Pump does not operate at the right duty point Liquid density differs from the calculated liquid density Liquid viscosity differs from the calculated liquid viscosity Pump operates when the liquid flow is too low Wrong pump selection Obstruction in impeller or pump casing Obstruction in the piping Wrong installation of the pump unit Rotating part running out of true Imbalance in rotating parts (for instance: impeller or stub shaft) Stub shaft is running out of true Bearings faulty or worn out Wear ring faulty or worn out Damaged impeller Seal faces of the mechanical seal are worn out or damaged Bad mounting of the mechanical seal Mechanical seal not suitable for the pumped liquid or operation circumstances Flushing liquid to the mechanical seal is polluted Axial retaining of impeller or stub shaft is defective Wrong or polluted lubricant Too high axial force because of worn dorsal blades or excessive inlet pressure Problem solving CB/EN (1501) 6.6 CombiBloc 7 Disassembly and assembly 7.1 Precautionary measures Take adequate measures to avoid that the motor is started while you are working on the pump. This is especially important for electric motors with remote control: • Switch the operating switch near the pump (if available) to "OFF". • Switch off the pump switch on the switchboard. • If necessary remove the fuses. • Hang a danger board near the switchboard cabinet. 7.2 Special tools Assembly and disassembly work requires no special tools. However, such tools can make certain jobs easier, for instance replacing the shaft seal. If such is the case it will be indicated in the text. 7.3 ! Liquid draining Make sure no liquid gets into the environment! Before starting any disassembly the pump should be drained. 1 If necessary, close the valves in the suction and delivery pipe and in the flushing or cooling supply lines to the shaft seal. 2 Remove the drain plug (0310). 3 If harmful liquids are pumped wear protective gloves, shoes, glasses, etc., and thoroughly flush the pump. 4 Refit the drain plug. CB/EN (1501) 6.6 Disassembly and assembly 33 7.4 Disassembly 7.4.1 Back-Pull-Out system The pumps are designed with a Back-Pull-Out system. The entire rotating section can be removed together with the motor. This means that almost the whole pump can be dismantled without having to detach the suction and delivery piping. 7.4.2 Disassembling the Back-Pull-Out unit 4195_A 0810 0900 Figure 8: 0850 Back-Pull-Out principle. 1 Open the terminal box and loosen the wires. 2 If the electric motor has been mounted on a separate foundation, loosen the electric motor. 3 Remove the nuts (0810). ! NEVER start dismantling by loosening the motor bolts (0850) and nuts (0900). This may result in irrepairable damage to the mechanical seal and the impeller! 4 Pull the motor together with the entire lantern piece out of the pump casing. The Back-Pull-Out unit large pumps is very heavy. Support it with a beam or hang it in a pulley sling. 7.4.3 Assembling the Back-Pull-Out unit 1 Fit a new gasket (0300) into the pump casing. 2 Mount the complete lantern piece with motor back into the pump casing. 3 Fit the nuts (0810) and tighten them crosswise with the proper tightening torque. See paragraph 10.2 "Tightening moments". 34 Disassembly and assembly CB/EN (1501) 6.6 CombiBloc 7.5 Replacing the impeller and the wear ring The play between the impeller and the wear ring is 0,3 mm to the diameter at delivery. In case the play has increased to 0,5-0,7 mm due to wear, the impeller and the wear ring should be replaced. 7.5.1 Disassembling the impeller 1820 0120 1860 1100 4192_A 0110 Figure 9: Disassembling the impeller. The item numbers used are referring to figure 9. 1 Remove the Back-Pull-Out unit, see paragraph 7.4.2 "Disassembling the Back-PullOut unit". 2 Remove the cap nut (1820). Sometimes the nut has to be heated to break the Loctite-contact. 3 Remove the impeller (0120) with a pulley puller, or wrest the impeller by inserting for instance 2 big screwdrivers between the impeller and the pump cover (0110). 4 Remove the impeller key (1860). 5 Remove the distance sleeve (1100) with the rotating part of the mechanical seal (1220). 6 Pump size 200-160 only: Loosen the set screws (1260). Remove the shaft sleeve (1200) and the rotating part of the mechanical seal (1220). 7.5.2 Mounting the impeller Pump size 200-160 only: 1 Fit the rotating part of the mechanical seal on the stub shaft. 2 Fit the shaft sleeve (1200) and set the distance to the shaft collar to 44 mm. See figure 13 of paragraph 7.6.3 "Assembling a mechanical seal M1". Tighten the set screws (1260). Other types: 1 Fit the rotating part of the mechanical seal on the distance sleeve. 2 Fit the distance sleeve with the rotating part of the mechanical seal on the stub shaft. CB/EN (1501) 6.6 Disassembly and assembly 35 All types: 1 Place the impeller key in the key way of the stub shaft. 2 Push the impeller onto the stub shaft against the distance sleeve. 3 Degrease the thread on the stub shaft and the thread in the cap nut. 4 Put a drop of Loctite 243 on the thread and fit the cap nut. For tightening moment of the nut see paragraph 10.2.2 "Tightening moments for cap nut". 5 Mount the Back-Pull-Out unit, see paragraph 7.4.3 "Assembling the Back-Pull-Out unit". 7.5.3 Disassembling the wear ring 4043 After removing the Back-Pull-Out unit the wear ring can be removed. In most cases the ring has been fixed so tightly that it cannot be removed undamaged. b d A C Figure 10: B D Removal of wear ring. 1 Measure the thickness (D) and the width (B) of the ring, see figure 10 A. 2 Make a centre hole in the middle of the edge of the ring at two opposite points, see figure 10 B. 3 Use a drill with a diameter just a little bit smaller than the thickness (D) of the ring and drill two holes in the ring, see figure 10 C. Don't drill deeper than the width (B) of the ring. Take care not to damage the fitting edge of the pump casing. 4 Use a chisel to cut the remaining part of the ring thickness. Now you can remove the ring in two parts from the pump casing, see figure 10 D. 5 Clean the pump casing and carefully remove all bore dust and metal splinters. 7.5.4 Assembling the wear ring 1 Clean and degrease the fitting edge of the pump casing where the wear ring is to be mounted. 2 Degrease the outer edge of the wear ring and put a few drops of Loctite 641 on it. 3 Fit the wear ring in the pump casing. Take care it is not pushed out of alignment! 36 Disassembly and assembly CB/EN (1501) 6.6 CombiBloc 7.6 Mechanical seal 7.6.1 Instructions for mounting a mechanical seal ➢ First read the following instructions regarding the mounting of a mechanical seal. Follow these instructions closely when mounting a mechanical seal. • Leave the assembly of a mechanical seal with PTFE (Teflon) covered Orings to a specialist. These rings are easily damaged during assembly. • A mechanical seal is a fragile precision instrument. Leave the seal in its original packing until you are ready to fit it! • Clean all receiving parts properly. Make sure your hands and working environment are clean! • Never touch the sliding surfaces with ones fingers! • Take care not to damage the seal during assembly. Never put the rings down on their sliding surfaces! ➢ Special tools: Mounting the mechanical seal unit is easier when you use a special tapered mounting bush. That way, the sharp shaft edges are covered so that the risk of damaging the seal during assembly is reduced. See figure 11. 4048 Figure 11: CB/EN (1501) 6.6 Special mounting bush. Disassembly and assembly 37 Disassembling a mechanical seal M1 4193 7.6.2 Figure 12: Mechanical seal M1. The item numbers used are referring to figure 12. 1 Remove the impeller, see paragraph 7.5.1 "Disassembling the impeller". 2 Pump size 200-160 only: Loosen the set screws (1260). See paragraph Figure 13: "Adjusting the mechanical seal M1 of pump size 200-160.". 3 Pull the distance sleeve (1100) (Pump size 200-160: spacer sleeve (1200)) and the rotating part of the mechanical seal (1220) off the shaft. 4 Mark the position of the pump cover (0110) in relation to the lantern piece (0250). Knock the pump cover loose and remove it. 5 Push the counter-ring of the mechanical seal (1220) out of the pump cover. 38 Disassembly and assembly CB/EN (1501) 6.6 CombiBloc 7.6.3 Assembling a mechanical seal M1 1 Make sure the stub shaft (2200) is not damaged. If it is, replace it. 2 Place the electric motor with the shaft upright. 3 Put the pump cover flat down and press the counter-ring of the seal straight into it. If necessary, use a plastic pressure piece. Never hammer it inside! The maximum axial turn of the counter-ring is 0,1 mm. 4 Mount the pump cover in the right position in the collar of the lantern piece. Check whether the pump cover is at right angles to the stub shaft. 5 Push the rotating part of the mechanical seal on the distance sleeve (1100). Put some glycerine or silicon spray on the bellows to facilitate the assembly! 6 Pump size 200-160 only: Push the rotating part of the mechanical seal and the spacer sleeve (1200)) on the the stub shaft. 7 Pump size 200-160 only: Set the distance between the spacer sleeve and the shaft collar at 44 mm. Fix the spacer sleeve by means of set screws (1260). See figure 13. 8 Mount the impeller, see paragraph 7.5.2 "Mounting the impeller".) 4410_A 1200 1260 93.5 44 Figure 13: CB/EN (1501) 6.6 Adjusting the mechanical seal M1 of pump size 200-160. Disassembly and assembly 39 7.7 Replacing the stub shaft and the motor 7.7.1 Disassembling the stub shaft and the motor of pump size 25-... Figure 14: Assembly of the stub shaft of pump size 25-... The item numbers used are referring to figure 14. 1 Dismantle the impeller and the shaft seal. See paragraph 7.5.1 "Disassembling the impeller" and paragraph 7.6.2 "Disassembling a mechanical seal M1". 2 Loosen the bolts (0850) and nuts (0900) and remove the lantern piece (0250) from the motor. 3 Remove the seal guards (0276). 4 Loosen the set screws (2280) and pull the stub shaft (2200) from the motor shaft. 7.7.2 Assembling the stub shaft and the motor of pump size 25-... 1 Remove the key from the motor shaft. 2 Put the motor in vertical position, shaft end up. Fit the stub shaft (2200) on the motor shaft. Make sure the set screws (2280) are positioned over the key way in the motor shaft. Do not fix the stub shaft yet! 3 Fit the lantern piece (0250) to the electric motor with bolts (0850) and nuts (0900). 4 Mount the pump cover (0110), the mechanical seal (1200) and the impeller (0120), see paragraph 7.6.3 "Assembling a mechanical seal M1" and paragraph 7.5.2 "Mounting the impeller". 5 Fit the pump casing (0100) to the lantern piece without gasket (0300). 6 Fix the pump casing temporarily with 2 nuts (0810). 7 Push the stub shaft towards the pump casing, until the impeller touches the pump casing. 8 Fix the stub shaft on the motor shaft with the set screws (2280). 40 Disassembly and assembly CB/EN (1501) 6.6 CombiBloc 9 Unscrew the nuts (0810) and remove the pump casing. 10 Place a new gasket (0300) and fit the pump casing. Fix the pump casing with nuts (0810). Tighten them crossways with the proper tightening moment. See paragraph 10.2 "Tightening moments". 11 Fit the seal guards (0276). 7.7.3 Disassembling the stub shaft and the motor 1100 1220 0110 2200 X 1820 0120 1860 0250 027 6 0850 0900 2280 IE C 80 9 0S / L 100L 112M 2200 2280 2200 Figure 15: IE C 132S/M 160M/L 180M/L 200L 225S/M 250M 280S/M Assembly of the stub shaft The item numbers used are referring to figure 15. 1 Dismantle the impeller and the shaft seal. See paragraph 7.5.1 "Disassembling the impeller" and paragraph 7.6.2 "Disassembling a mechanical seal M1". 2 Loosen the bolts (0850) and nuts (0900) and remove the lantern piece (0250) from the motor. 3 Remove the seal guards (0276). 4 Loosen the set screws (2280) and pull the stub shaft (2200) from the motor shaft. CB/EN (1501) 6.6 Disassembly and assembly 41 7.7.4 Assembling the stub shaft and the motor 1 For electric motors with IEC-size 80 upto and including 112M: Remove the key from the motor shaft. 2 Put the motor in vertical position, shaft end up. Fit the stub shaft (2200) on the motor shaft. Do not fix the stub shaft yet! 3 For electric motors with IEC size 80 upto and including 112M: make sure the set screws (2280) are positioned over the key way in the motor shaft. 4 Place shims between the lantern piece and the motor flange and fit the lantern piece (0250) to the electric motor. See Table 8 for the proper thickness X of the shims Table 8: Shim thickness X for adjusting the stub shaft Pump type 32-125 R6 (stainless steel) 32-160 R6 (stainless steel) 40-125 R6 (stainless steel) all other types Shim thickness X 2 mm 2,5 mm 3,5 mm 0,5 mm 5 Mount the pump cover (0110), the mechanical seal (1200) and the impeller (0120). 6 Push the impeller on the stub shaft until the back blades touch the pump cover. 7 Fix the stub shaft on the motor shaft with the set screws (2280). 8 Slightly loosen the fastening bolts (0850) of the electric motor and remove the shims. 9 Tighten the fastening bolts (0850) of the electric motor crossways with the prescribed tightening moment, see paragraph 10.2.1 "Tightening moments for bolts and nuts". 10 Place the gasket (0300) and fit the pump casing (0100). Fix the pump casing with nuts (0810). Tighten them crossways. see paragraph 10.2.1 "Tightening moments for bolts and nuts". 11 Fit the seal guards (0276). 42 Disassembly and assembly CB/EN (1501) 6.6 CombiBloc 8 Dimensions CB/EN (1501) 6.6 Dimensions 43 8.1 Dimension drawings ah af ad ab ajx∅al ta tu an zb am vf db dc ds zh aix∅ak aa ac vd vp vj 44 vt vn vm vo vc vb Figure 16: ve va vr vs ae ag Pump dimensions. Dimensions CB/EN (1501) 6.6 CombiBloc 8.2 Motor feet dimensions IEC 80 90S 90L 100L 112M 132S 132M 160M 160L 180M 180L 200L 225S 225M 250M 280S 280M CB/EN (1501) 6.6 dc 80 90 90 100 112 132 132 160 160 180 180 200 225 225 250 280 280 ds 100 100 100 125 125 150 150 175 175 175 175 200 200 200 275 275 275 vm vn vo vp vr vs 202 240 270 314 300 338 385 370 370 439 454 520 140 178 210 254 241 279 305 286 311 349 368 419 47 47 60 60 65 65 80 85 85 90 100 100 216 216 254 254 279 279 318 356 356 406 457 457 255 255 314 314 346 346 398 441 441 496 557 557 12 12 15 15 15 15 19 19 19 24 24 24 Dimensions 45 8.3 Flange dimensions 8.3.1 Cast iron and bronze G, B aa 32 ab 25 ac 64,5 ad 50,8 ae 90 ISO 7005 PN6 af ag ah 75 117,5 108 ai x ak aj x al 4 x 14 4 x 11 am 12 an 12 ae 86 125 145 145 160 180 180 210 210 240 240 ISO 7005 PN16 af ag 86 115 100 165 110 185 125 185 145 200 160 220 180 220 180 250 210 250 210 285 240 285 ah 115 140 150 165 185 200 220 220 250 250 285 ai x ak 4 x 14 4 x 18 4 x 18 4 x 18 8 x 18 8 x 18 8 x 18 8 x 18 8 x 18 8 x 23 8 x 23 aj x al 4 x 14 4 x 18 4 x 18 4 x 18 4 x 18 8 x 18 8 x 18 8 x 18 8 x 18 8 x 18 8 x 23 am 14 20 20 20 22 22 22 24 24 24 24 an 14 18 18 20 20 22 22 22 24 24 24 ae 295 295 350 ISO 7005 PN10 af ag ah 240 340 285 295 340 340 350 395 395 ai x ak 8 x 23 8 x 23 12 x 23 aj x al 8 x 23 8 x 23 12 x 23 am 26 26 28 an 24 26 28 ae 90 ISO 7005 PN6 af ag ah 75 117,5 108 ai x ak aj x al 4 x 14 4 x 11 am 12 an 12 ae 85 125 145 160 180 210 210 240 ISO 7005 PN16 af ag 85 115 100 165 110 185 125 200 145 230 160 255 180 255 210 285 ai x ak 4 x 14 4 x 18 4 x 18 8 x 18 8 x 18 8 x 18 8 x 18 8 x 22 am 16 22,5 22,5 22,5 26,5 26,7 26,5 28 an 16 20,5 20,5 22,5 22,5 23,1 26,9 27,1 ISO 7005 ≅ EN 1092-2 aa 25 50 65 65 80 100 100 125 125 150 150 ab 25 32 40 50 65 80 100 100 125 125 150 ac 68 102 122 122 138 158 158 188 188 212 212 ad 68 78 88 102 122 138 158 158 188 188 212 ISO 7005 ≅ EN 1092-2 aa 200 200 250 ab 150 200 250 ac 268 268 320 ad 212 268 320 ISO 7005 ≅ EN 1092-2 8.3.2 Stainless steel R aa 32 ab 25 ac 64,5 ad 50,8 ISO 7005 ≅ EN 1092-1 aa 25 50 65 80 100 125 125 150 ab 25 32 40 50 65 80 100 125 ac 68 99 118 132 156 184 184 216 ad 68 76 84 99 118 132 156 186 ah 115 140 150 165 185 200 230 255 aj x al 4 x 14 4 x 18 4 x 18 4 x 18 4 x 18 8 x 18 8 x 18 8 x 18 ISO 7005 ≅ EN 1092-1 46 Dimensions CB/EN (1501) 6.6 CombiBloc 8.4 Pump dimensions CB 25-125 25-160 32-125 32C-125 32-160 32A-160 32C-160 32-200 32C-200 32-250 40C-125 40C-160 40C-200 40-250 50C-125 50C-160 50C-200 50-250 65C-125 65C-160 65C-200 65A-250 80C-160 80C-200 80-250 80A-250 100-160 100C-200 100C-250 125-125 125-250 125-315 150-125 150-160 150-200 150-250 200-160 200-200 250-200 aa* ab* aa** ab** db* db** 32 25 32 25 100 100 25 25 25 25 132 132 112 112 112 112 132 132 132 132 50 32 50 32 132 132 160 160 160 160 180 180 112 112 132 132 65 40 65 40 160 160 180 180 132 132 160 160 65 50 80 50 160 160 180 180 160 160 160 160 80 65 100 65 180 180 200 200 180 180 180 180 100 80 125 80 200 225 200 225 125 100 - 200 125 100 125 100 200 200 125 100 125 100 225 225 150 125 - 225 150 125 150 125 250 250 150 125 - 280 150 150 - 280 150 150 - 250 150 150 - 250 200 150 - 280 200 200 - 280 200 200 - 280 250 250 - 315 - tu 100 100 100 100 100 100 100 100 100 100 100 100 100 100 100 100 100 100 100 100 140 140 140 140 140 140 100 140 140 100 140 140 140 100 140 140 140 100 140 va 100 100 100 100 100 100 100 100 100 125 100 100 100 125 100 100 100 125 125 125 125 160 125 125 160 160 160 160 160 125 160 200 160 160 160 200 200 200 200 vb 140 190 140 140 190 190 190 190 190 250 160 190 212 250 190 212 212 250 21 212 250 280 250 280 315 315 280 280 315 250 315 400 315 315 315 400 400 400 450 vc 170 220 190 190 240 240 240 240 240 320 210 240 265 320 240 265 265 320 280 280 320 360 320 345 400 400 360 360 400 320 400 500 400 400 400 500 500 500 550 vd 12 14 14 14 14 14 14 14 14 14 14 14 14 14 14 14 14 14 14 14 14 18 14 14 18 18 18 18 18 14 18 23 18 18 18 23 23 23 23 ve 70 70 70 70 70 70 70 70 70 95 70 70 70 95 70 70 70 95 95 95 95 120 95 95 120 120 120 120 120 95 120 150 120 120 120 150 150 150 150 vf* 10 10 10 10 12 12 12 12 12 14 10 12 12 14 10 12 12 14 10 12 14 14 14 14 15 15 15 15 16 14 18 20 18 18 18 20 22 22 22 vf** 10 10 14 14 14 14 14 14 14 14 14 14 14 16 12 14 14 16 12 14 16 14 16 16 18 18 15 16 18 - vj 35 35 50 50 50 50 50 50 50 65 50 50 50 65 50 50 50 65 65 65 65 80 65 65 80 80 80 80 80 65 80 100 80 80 80 100 100 100 100 zb* 62 64,5 80 80 80 80 80 80 80 100 80 80 100 100 100 100 100 100 100 100 100 100 125 125 125 125 125 125 140 140 140 140 160 160 160 160 200 200 200 zb** 62 64,5 80 80 80 80 80 80 80 100 80 80 100 100 100 100 100 125 100 100 100 125 125 125 125 125 125 140 140 - zh 115 152 140 140 160 160 160 180 180 225 140 160 180 225 160 180 200 225 180 200 225 250 225 250 280 280 315 280 280 300 355 355 400 315 315 400 400 400 450 * cast iron and bronze ** stainless steel CB/EN (1501) 6.6 Dimensions 47 8.5 Overall length (ta) 8.5.1 Cast iron and bronze G, B Motor 80 90S 90L 100L 112M 132S 132M 160M 160L 180M 180L 200L 225S 225M 250M 280S 280M CB 25-125 25-160 32-125 32C-125 32-160 32A-160 32C-160 32-200 32C-200 32-250 40C-125 40C-160 40C-200 40-250 50C-125 50C-160 50C-200 50-250 65C-125 65C-160 65C-200 65A-250 80C-160 80C-200 80-250 80A-250 100-160 100C-200 100C-250 125-125 125-250 125-315 150-125 150-160 150-200 150-250 200-160 200-200 250-200 ta (*) 491 491 512 512 512 512 512 512 512 532 512 512 532 532 532 532 532 532 532 532 532 - 513 513 534 534 534 534 534 534 534 554 534 534 554 554 554 554 554 554 554 554 554 568 579 594 593 593 594 - 537 537 558 558 558 558 558 558 558 578 558 558 578 578 578 578 578 578 578 578 578 592 603 618 617 617 618 618 - 581 602 602 602 602 602 602 602 622 602 602 622 622 622 622 622 622 622 622 622 636 647 662 661 661 662 662 676 662 676 682 697 697 737 - 607 628 628 628 628 628 628 628 648 628 628 648 648 648 648 648 648 648 648 648 662 673 688 687 687 688 688 702 688 702 708 723 723 763 - 706 706 706 706 706 726 706 706 726 726 726 726 726 726 726 726 726 740 751 766 765 765 766 766 780 766 780 802 786 801 801 808 841 840 848 778 804 803 803 804 818 818 840 839 839 846 879 878 886 834 834 854 898 932 834 854 854 898 932 854 854 898 932 854 898 932 854 854 898 932 854 898 932 868 912 946 879 923 957 894 938 972 893 937 971 893 937 971 894 938 972 894 938 972 908 952 986 894 908 952 986 930 974 1008 929 973 1007 929 936 980 1014 969 968 1012 1046 976 1020 1054 982 1008 1007 1007 1022 1044 1050 1082 1090 1060 1080 1060 1060 1094 1085 1100 1119 1119 1100 1100 1134 1134 1136 1135 1194 1202 1144 1143 1143 - 1142 1168 1167 1167 1168 1182 1203 - 1376 1395 1395 1376 1410 1411 - 1536 1555 1555 1536 1570 - 1536 1555 1555 1570 - (*): Motor length based on DIN 42677, could be different due to applied motor make. 48 Dimensions CB/EN (1501) 6.6 CombiBloc 8.5.2 Motor 80 Stainless steel R 90S 90L 100L 112M 132S 132M 160M 160L 180M 180L 200L 225S 225M 250M 280S 280M CB 25-125 25-160 32-125 32C-125 32-160 32A-160 32C-160 32-200 32C-200 32-250 40C-125 40C-160 40C-200 40-250 50C-125 50C-160 50C-200 50-250 65C-125 65C-160 65C-200 65A-250 80C-160 80C-200 80-250 80A-250 100-160 100C-200 100C-250 125-125 125-250 125-315 150-125 150-160 150-200 150-250 200-160 200-200 250-200 ta (*) 491 521 512 512 512 512 512 512 512 532 512 512 532 532 532 532 532 557 532 542 542 - 513 543 534 534 534 534 534 534 534 554 534 534 554 554 554 554 554 679 554 564 564 593 589 594 594 594 - 537 567 558 558 558 558 558 558 558 578 558 558 578 578 578 578 578 603 578 588 588 617 613 618 617 617 - 611 602 602 602 602 602 602 602 622 602 602 622 622 622 622 622 647 622 632 632 661 657 662 661 661 662 676 676 - 637 628 628 628 628 628 628 628 648 628 628 648 648 648 648 648 673 648 658 658 687 683 688 687 687 688 702 702 - 706 706 706 706 706 726 706 706 726 726 726 726 726 751 726 736 736 765 761 766 765 765 766 780 780 - 803 804 803 803 804 818 818 - 834 834 854 834 854 854 854 854 879 854 864 864 893 889 894 893 893 894 908 908 - 898 898 898 923 908 908 937 933 938 937 937 938 952 952 - 932 932 932 957 942 942 971 967 972 971 971 972 986 986 - 1007 1088 1007 1007 1022 - 1060 1105 1070 1070 1119 1095 1100 1119 1119 1100 1134 1134 - 1144 1143 1143 - 1167 1168 1167 1167 1168 1182 - 1376 1395 1395 1376 1410 - 1536 1555 1555 1536 1570 - 1536 1555 1555 1570 - (*): Motor length based on DIN 42677, could be different due to applied motor make CB/EN (1501) 6.6 Dimensions 49 8.6 Dimension vt Motor CB 25-125 25-160 32-125 32C-125 32-160 32A-160 32C-160 32-200 32C-200 32-250 40C-125 40C-160 40C-200 40-250 50C-125 50C-160 50C-200 50-250 65C-125 65C-160 65C-160* 65C-200 65C-200* 65A-250 80C-160 80C-160* 80C-200 80-250 80A-250 100-160 100C-200 100C-250 125-125 125-250 125-315 150-125 150-160 150-200 150-250 200-160 200-200 250-200 132S 132M 160M 160L 180M 180L 200L vt 230 230 230 230 279 230 279 218 267 267 280 230 230 279 230 279 218 267 267 280 230 230 279 230 279 279 292 304 218 267 267 280 312 218 267 218 267 267 280 292 228 277 277 290 302 218 267 267 280 292 228 277 277 290 302 220 220 269 269 282 282 314 218 267 267 280 292 228 277 277 290 302 233 233 282 282 295 295 307 220 220 269 269 282 282 314 220 220 269 269 282 282 314 221 270 270 283 295 221 221 270 270 283 295 220 220 269 269 282 314 218 267 220 220 269 269 282 282 314 226 226 275 275 288 288 300 205 221 221 270 270 283 295 221 221 270 212 212 261 261 274 274 205 205 254 205 205 254 254 267 267 299 212 212 261 261 274 274 306 225S 225M 250M 280S 280M 353 354 354 -- - - 340 353 340 340 341 340 341 - 372 379 379 360 379 360 - 394 401 401 382 401 - 394 401 401 401 - * stainless steel 50 Dimensions CB/EN (1501) 6.6 CombiBloc 8.7 Weight Weight [kg] excluding motor Motor CB 25-125 25-160 32-125 32C-125 32-160 32A-160 32C-160 32-200 32C-200 32-250 40C-125 40C-160 40C-200 40-250 50C-125 50C-160 50C-200 50-250 65C-125 65C-160 65C-200 65A-250 80C-160 80C-200 80-250 80A-250 100-160 100C-200 100C-250 125-125 125-250 125-315 150-125 150-160 150-200 150-250 200-160 200-200 250-200 CB/EN (1501) 6.6 80 90S 90L 27 29 27,5 27,5 31 31 31 38,5 38,5 54,5 26 32 40,5 55,5 27 34,5 40,5 53,5 33 38,5 46 59 46,5 58,5 67,5 67,5 71,5 71 87,5 62,5 108,5 105 86,5 87 144 141 - 100L 112M 29 27,5 27,5 31 31 31 40 40 54,5 26 32 42 55,5 27 34,5 41,5 53,5 33 38,5 47 59 46,5 60 67 67 72,5 72 87,5 62,5 108 106 87,5 88 145 141 - 132 S/M 160 M/L 180 M/L 200 L 32,5 32,5 32,5 41 43,5 41 43,5 55,5 57,5 57,5 28,5 33,5 36,5 43 45,5 56,5 58,5 58,5 29,5 37 35,5 38,5 43 45,5 45,5 50 54,5 56,5 56,5 61,5 35,5 43 40 43 43 46,5 48,5 51 51 55,5 60 62 62 67 47,5 50,5 50,5 54 61 63,5 63,5 68 68,5 70,5 70,5 75,5 68,5 70,5 70,5 75,5 74 76,5 76,5 81 73,5 76 76 80,5 88,5 90,5 90,5 95,5 64 67 109,5 111,5 111,5 116,5 135 137 137 139 107,5 89 91,5 91,5 96 89,5 92 144 146 146 146,5 149 142 144 144 149 190 192 192 197 Dimensions 225 S/M 68 68 76,5 76,5 80,5 96,5 96 - 250 M 280 S/M 75 75 82,5 82,5 82,5 82,5 87,5 87,5 102,5 102,5 103 - 51 52 Dimensions CB/EN (1501) 6.6 CombiBloc 9 Parts 9.1 Ordering parts 9.1.1 Order form You can use the order form included in this manual for ordering parts. When ordering parts always quote the following data: 1 Your address. 2 The quantity, the item number and the description of the part. 3 The pump number. The pump number is stated on the label on the cover of this manual and on the type plate of the pump. 4 In the event of different electric motor voltage you should state the correct voltage. 9.1.2 Recommended spare parts Parts marked with a * are recommended spare parts. CB/EN (1501) 6.6 Parts 53 54 Figure 17: 2200 2280 0325 0320 0810 0800 2415 2410 IEC 132S/M 160M/L 180M/L 200L 225S/M 250M 280S/M 2400 2405 IEC 80 90S/L 100L 112M 2400 2405 IEC 132S/M 160M/L 180M/L 200L 225S/M 250M 280S/M 9.2.1 Sectional drawing Parts 0110 0300 0250 2200 0276 0850 0900 0235/0240 IEC 80 90S/L 100L 112M Pump with shaft sealing M1 1820 1860 0120 0130 0100 0315 0310 1220 1100 2200 2280 9.2 Sectional drawing. CB/EN (1501) 6.6 CombiBloc 9.2.2 Item Parts list Materials Quantity Description 0100 0110 0120* 0130* 0235 0240 0250 0276 0300* 0310 0315 0320 0325 1 1 1 1 8 8 1 4 1 1 1 1 1 G1 pump casing pump cover impeller wear ring bolt washer lantern piece seal guard gasket plug sealing ring plug sealing ring c.i. c.i. G2 G6 B2 cast iron bronze cast iron bronze bronze st.st. bronze bronze st.st. bronze stainless steel stainless steel cast iron stainless steel -steel bronze not applicable steel bronze not applicable R6 st.st. st.st. st.st. st.st. st.st. PTFE st.st. PTFE 0800 4/8/12 *) stud steel stainless steel 0810 4/8/12 *) nut steel stainless steel 0850 4/8 **) 0900 **) 4/8 1 1 1 1 1 2 1 2 1 2 1100 1220* 1820* 1860* 2200* 2280* 2400 2405 2410 2415 bolt steel nut steel distance sleeve mechanical seal cap nut impeller key stub shaft set screw name plate rivet arrow plate rivet stainless steel -stainless steel stainless steel stainless steel stainless steel stainless steel stainless steel aluminium stainless steel c.i. = cast iron, st.st. = stainless steel *) Quantity depending on pump type, Quantity depending on motor type **) Item 0130: not for pumps in cast iron and bronze (G1, G2, G6 and B2), except 32-250, 65-250, 80-200, 80-250, 100-160, 100-200, 100-250, 125-250, 125-315, 150-160, 150200, 150-250, 200-200 and 250-200. CB/EN (1501) 6.6 Parts 55 9.3.1 Sectional drawing 0250 0300 0276 0120 0315 0310 1820 0110 56 1100 0100 Figure 18: 1860 1220 0235/0240 2200 Pump sizes 25-125 and 25-160 with shaft sealing M1 2400 2410 0325 0810 2405 2415 2280 0320 0800 0850 0900 9.3 Sectional drawing 25-125, 25-160. Parts CB/EN (1501) 6.6 CombiBloc 9.3.2 CB/EN (1501) 6.6 Parts list Item Quantity 0100 0110 0120* 0235 0240 0250 0276 0300* 0310 0315 0320 0325 0800 0810 0850 0900 1100 1220* 1820* 1860* 2200* 2280* 2400 2405 2410 2415 1 1 1 8 8 1 4 1 1 1 1 1 4 4 4 4 1 1 1 1 1 2 1 2 1 2 Description pump casing pump cover impeller bolt washer lantern piece seal guard gasket plug sealing ring plug sealing ring stud nut bolt nut distance sleeve mechanical seal cap nut impeller key stub shaft set screw name plate rivet arrow plate rivet Parts Materials G1A R6A cast iron stainless steel cast iron stainless steel cast iron stainless steel stainless steel stainless steel cast iron stainless steel -steel stainless steel copper PTFE steel stainless steel copper PTFE steel steel steel steel stainless steel -stainless steel stainless steel stainless steel stainless steel stainless steel stainless steel aluminium stainless steel 57 9.4 Additional parts of pump size 200-160 Figure 19: Item 1200 1260 58 Shaft sleeve of 200-160. Quantity Description 1 3 shaft sleeve set screw Parts Materials G1 G2 brass stainless steel B2 CB/EN (1501) 6.6 CombiBloc 10 Technical data 10.1 Recommended locking liquids Table 9: Recommended locking liquids. Description cap nut (1820) wear ring (0130) Locking liquid Loctite 243 Loctite 641 10.2 Tightening moments 10.2.1 Tightening moments for bolts and nuts Table 10: Tightening moments for bolts and nuts. Materials 8.8 Thread M6 M8 M10 M12 M16 10.2.2 Tightening moment [Nm] 9 6 20 14 40 25 69 43 168 105 Tightening moments for cap nut Table 11: Tightening moments for cap nut (1820). Size M12 (bearing bracket 1) M16 (bearing bracket 2) M24 (bearing bracket 3) CB/EN (1501) 6.6 A2, A4 Tightening moment [Nm] 43 105 220 Technical data 59 10.3 Maximum allowable speed Table 12: Maximum allowable speed CB 25-125 25-160 32-125 32C-125 32-160 32A-160 32C-160 32-200 32C-200 32-250 40C-125 40C-160 40C-200 40-250 50C-125 50C-160 50C-200 50-250 65C-125 65C-160 65C-200 65A-250 80C-160 80C-200 80-250 80A-250 100-160 100C-200 100C-250 125-125 125-250 125-315 150-125 150-160 150-200 150-250 200-160 200-200 250-200 60 Max. speed [min-1] 3600 3600 3600 3600 3600 3600 3600 3600 3600 3000 3600 3600 3600 3000 3600 3600 3600 3000 3600 3600 3600 3000 3600 3600 3000 3000 3600 3000 3000 1800 1800 1800 1800 1800 1800 1800 1800 1800 1800 Technical data Bearing group 0 0+ 1 1 1 1 1 1 1 1 1 1 1 1 1 1 1 1 1 1 1 2 1 2 2 2 2 2 2 1 2 3 1 2 2 3 2V 2 3 CB/EN (1501) 6.6 CombiBloc 10.4 Maximum allowable working pressures Table 13: Maximum allowable working pressure [bar] Materials 25-125 100-160 125-125 150-125 150-160 150-200 150-250 200-160 200-200 250-200 25-160 R all other [bar] 6 8 10 Test pressure: 1,5 x max. working pressure. CB/EN (1501) 6.6 Technical data 61 10.5 Hydraulic performance 10.5.1 Performance overview cast iron and bronze pumps G, B [m] 120 100 80 70 60 32-250 50 32-200 40-250 50-250 32C-200 25-160 30 32-160 32C-160 40C-160 32A-160 25 80-2 50 100C-250 65C-200 80C-200 40C-200 50C-200 40 H 65A-250 80A-250 10 0C -20 0 50C-160 65C-160 80C-160 100-160 50C-125 20 32-125 32C-125 25-125 15 65C-125 40C-125 10 8 4 6 7 8 10 15 20 30 40 50 60 80 100 150 200 Q 300 400 3 [m/h] Performance overview 3000 min-1. Figure 20: [m] 40 30 125-315 25 20 32-250 40-250 50-250 32-200 32C-200 10 8 7 6 25-160 32-160 32A-160 80-2 50 100C-250 125-250 150-250 10 0C -20 65C-200 80C-200 0 40C-200 150-200 200-200 50C-200 15 H 65A-250 80A-250 50C-160 65C-160 80C-160 100-160 32C-160 40C-160 5 250-200 150-160 200-160 50C-125 32-125 32C-125 25-125 4 65C-125 40C-125 150-125 125-125 3 2 2 3 4 5 6 7 8 10 15 20 30 40 50 60 Q Figure 21: 62 80 100 150 200 300 400 600 3 [m/h] Performance overview 1500 min-1. Technical data CB/EN (1501) 6.6 CombiBloc [m] 20 15 125-315 80-2 50 10 32-250 8 7 6 50-250 65A-250 80A-250 100C-250 125-250 150-250 10 0C -20 65C-200 80C-200 0 40C-200 150-200 200-200 50C-200 32-200 5 H 40-250 32C-200 250-200 4 25-160 3 32-160 32A-160 50C-160 65C-160 80C-160 100-160 32C-160 40C-160 150-160 200-160 50C-125 2 32-125 32C-125 25-125 150-125 65C-125 125-125 40C-125 1 1 2 3 5 6 7 8 10 4 15 30 20 40 50 60 80 100 150 200 Q Figure 22: 300 400 500 3 [m/h] Performance overview 1000 min-1. [m] 100 80 70 60 32-200 32C-200 50 25-160 40 32-160 32A-160 40C-200 32C-160 40C-160 30 H 65C-200 80C-200 50C-200 50C-160 65C-160 80C-160 100-160 50C-125 25 32-125 32C-125 25-125 65C-125 40C-125 20 15 10 4 5 6 7 8 10 15 20 30 40 50 60 Q Figure 23: CB/EN (1501) 6.6 80 100 150 200 300 400 3 [m/h] Performance overview 3600 min-1. Technical data 63 [m] 60 50 125-315 40 30 32-250 25 40-250 50-250 32-200 32C-200 25-160 H 10 8 7 6 32-160 32A-160 65A-250 80A-250 100C-250 125-250 150-250 10 0C -20 65C-200 80C-200 0 40C-200 50C-200 150-200 200-200 20 15 80-2 50 50C-160 65C-160 80C-160 100-160 32C-160 40C-160 150-160 50C-125 32-125 32C-125 25-125 125-125 40C-125 5 200-160 150-125 65C-125 250-200 4 3 2 2 4 3 5 6 7 8 10 15 20 30 40 50 60 80 100 150 200 300 400 600 800 3 [m/h] Q Figure 24: Performance overview 1800 min-1. [m] 30 20 125-315 15 32-250 80-2 50 40-250 50-250 8 7 6 H 32-200 32C-200 25-160 5 32-160 32A-160 4 65A-250 80A-250 100C-250 125-250 150-250 10 0C -20 65C-200 80C-200 0 40C-200 150-200 200-200 50C-200 10 50C-160 65C-160 80C-160 32C-160 40C-160 100-160 250-200 150-160 200-160 50C-125 3 32-125 32C-125 25-125 65C-125 40C-125 150-125 125-125 2 1 1 2 3 4 5 6 7 8 10 15 20 Q Figure 25: 64 30 40 50 6 0 80 100 150 200 300 500 3 [m/h] Performance overview 1200 min-1. Technical data CB/EN (1501) 6.6 CombiBloc 10.5.2 Performance overview stainless steel pumps R [m] 120 100 80 70 60 32-250 50 32-200 50-250 40C-200 32C-200 32-160 40 H 40-250 65A-250 80A-250 50C-200 65 32C-160 40C-160 50C-160 32A-160 25 100C-250 65C-200 25-160 30 80-2 50 C16 10 0C -20 0 80C-200 0 80C-160 20 32-125 32C-125 25-125 15 50C-125 65C-125 40C-125 10 8 6 7 8 10 4 15 20 30 40 50 60 80 100 150 200 Q Performance overview 3000 min-1. Figure 26: [m] 30 25 20 40-250 32-250 50-250 65A-250 80A-250 15 40C-200 32-200 32-160 10 H 32C-200 50C-200 65 32A-160 80-2 50 100C-250 125-250 10 0C -20 65C-200 0 80C-200 25-160 8 7 6 300 400 3 [m/h] 32C-160 40C-160 50C-160 C16 0 80C-160 5 32-125 32C-125 25-125 4 50C-125 65C-125 40C-125 3 2 2 3 4 5 6 7 8 10 15 20 Q Figure 27: CB/EN (1501) 6.6 30 40 50 60 80 100 150 200 300 3 [m/h] Performance overview 1500 min-1. Technical data 65 [m] 120 100 80 70 60 32C-200 32-160 50 25-160 40 H 65C-200 40C-200 80C-200 50C-200 65 C16 0 32C-160 40C-160 50C-160 80C-160 32-200 32A-160 30 25 32-125 32C-125 25-125 40C-125 20 50C-125 65C-125 15 10 4 5 6 7 8 10 15 20 30 40 50 60 80 100 Q Figure 28: 150 200 250 350 3 [m/h] Performance overview 3600 min-1. [m] 50 40 30 40-250 32-250 25 50-250 65A-250 80A-250 20 40C-200 32-200 32C-200 32-160 15 50C-200 10 H 32A-160 8 7 6 25-125 100C-250 125-250 10 0C -20 65C-200 0 80C-200 65 25-160 80-2 50 32C-160 40C-160 50C-160 C16 0 80C-160 32-125 32C-125 40C-125 5 50C-125 65C-125 4 3 2 2 3 4 5 6 7 8 10 15 20 Q Figure 29: 66 30 40 50 60 80 100 150 200 300 3 [m/h] Performance overview 1800 min-1. Technical data CB/EN (1501) 6.6 CombiBloc 10.6 Permitted forces and torques on the flanges, based on EN-ISO 5199 Forces and moments acting on the pump flanges due to pipe loads can cause misalignment of the pump, deformation and overstressing of the pump casing, or overstressing of the fixing bolts between the pump and the baseplate. The values can be applied simultaneously in all directions with positive or negative signs, or separately on each flange (suction and discharge). Z Y X Z Y X Figure 30: CB/EN (1501) 6.6 Coordinate system. Technical data 67 10.6.1 Cast iron and bronze pumps Table 14: Permitted forces and torques on the flanges, for cast iron and bronze pump casings. Pump unit rigid mounted CB 25-125 25-160 32-125 32C-125 32-160 32A-160 32C-160 32-200 32C-200 32-250 40C-125 40C-160 40C-200 40-250 50C-125 50C-160 50C-200 50-250 65C-125 65C-160 65C-200 65A-250 80C-160 80C-200 80-250 80A-250 100-160 100C-200 100C-250 125-125 125-250 125-315 150-125 150-160 150-200 150-250 200-160 200-200 250-200 68 Horizontal Pump, End branch, x-Axis Force (N) Horizontal Pump, Top branch, z-Axis Moment (N.m) Force (N) Moment (N.m) Fy Fz Fx ΣF My Mz Mx ΣM Fy Fz Fx ΣF My Mz Mx ΣM 315 263 525 525 525 525 525 525 525 525 648 648 648 648 648 648 648 648 788 788 788 788 1050 1050 1050 1050 1243 1243 1243 1243 1575 1575 1575 1575 1575 2100 2100 2100 2980 298 245 473 473 473 473 473 473 473 473 595 595 595 595 595 595 595 595 718 718 718 718 945 945 945 945 1120 1120 1120 1120 1418 1418 1418 1418 1418 1890 1890 1890 2700 368 298 578 578 578 578 578 578 578 578 735 735 735 735 735 735 735 735 875 875 875 875 1173 1173 1173 1173 1383 1383 1383 1383 1750 1750 1750 1750 1750 2345 2345 2345 3340 578 455 910 910 910 910 910 910 910 910 1155 1155 1155 1155 1155 1155 1155 1155 1383 1383 1383 1383 1838 1838 1838 1838 2170 2170 2170 2170 2748 2748 2748 2748 2748 3658 3658 3658 5220 263 210 350 350 350 350 350 350 350 350 385 385 385 385 385 385 385 385 403 403 403 403 438 438 438 438 525 525 525 525 613 613 613 613 613 805 805 805 1260 298 245 403 403 403 403 403 403 403 403 420 420 420 420 420 420 420 420 455 455 455 455 508 508 508 508 665 665 665 665 718 718 718 718 718 928 928 928 1460 385 315 490 490 490 490 490 490 490 490 525 525 525 525 525 525 525 525 560 560 560 560 613 613 613 613 735 735 735 735 875 875 875 875 875 1138 1138 1138 1780 560 455 718 718 718 718 718 718 718 718 770 770 770 770 770 770 770 770 823 823 823 823 910 910 910 910 1068 1068 1068 1068 1278 1278 1278 1278 1278 1680 1680 1680 2620 245 245 298 298 298 298 298 298 298 298 350 350 350 350 473 473 473 473 595 595 595 595 718 718 718 718 945 945 945 1120 1120 1120 1418 1418 1418 1418 1890 1890 2700 298 298 368 368 368 368 368 368 368 368 438 438 438 438 578 578 578 578 735 735 735 735 875 875 875 875 1173 1173 1173 1383 1383 1383 1750 1750 1750 1750 2345 2345 3340 263 263 315 315 315 315 315 315 315 315 385 385 385 385 525 525 525 525 648 648 648 648 788 788 788 788 1050 1050 1050 1243 1243 1243 1575 1575 1575 1575 2100 2100 2980 455 455 578 578 578 578 578 578 578 578 683 683 683 683 910 910 910 910 1155 1155 1155 1155 1383 1383 1383 1383 1838 1838 1838 2170 2170 2170 2748 2748 2748 2748 3658 3658 5220 210 210 263 263 263 263 263 263 263 263 315 315 315 315 350 350 350 350 385 385 385 385 403 403 403 403 438 438 438 525 525 525 613 613 613 613 805 805 1260 245 245 298 298 298 298 298 298 298 298 368 368 368 368 403 403 403 403 420 420 420 420 455 455 455 455 508 508 508 665 665 665 718 718 718 718 928 928 1460 315 315 385 385 385 385 385 385 385 385 455 455 455 455 490 490 490 490 525 525 525 525 560 560 560 560 613 613 613 735 735 735 875 875 875 875 1138 1138 1780 455 455 560 560 560 560 560 560 560 560 665 665 665 665 718 718 718 718 770 770 770 770 823 823 823 823 910 910 910 1068 1068 1068 1278 1278 1278 1278 1680 1680 2620 Technical data CB/EN (1501) 6.6 CombiBloc 10.6.2 Stainless steel pumps Table 15: Permitted forces and torques on the flanges, for stainless steel pump casings. Pump unit rigid mounted CB 25-125 25-160 32-125 32C-125 32-160 32A-160 32C-160 32-200 32C-200 32-250 40C-125 40C-160 40C-200 40-250 50C-125 50C-160 50C-200 50-250 65C-125 65C-160 65C-200 65A-250 80C-160 80C-200 80-250 80A-250 100C-200 100C-250 125-250 CB/EN (1501) 6.6 Horizontal Pump, End branch, x-Axis Force (N) Fy Fz Fx 630 525 1050 1050 1050 1050 1050 1050 1050 1050 1295 1295 1295 1295 1575 1575 1575 1575 2100 2100 2100 2100 2485 2485 2485 2485 2485 2485 3150 595 490 945 945 945 945 945 945 945 945 1190 1190 1190 1190 1435 1435 1435 1435 1890 1890 1890 1890 2240 2240 2240 2240 2240 2240 2835 735 595 1155 1155 1155 1155 1155 1155 1155 1155 1470 1470 1470 1470 1750 1750 1750 1750 2345 2345 2345 2345 2765 2765 2765 2765 2765 2765 3500 Horizontal Pump, Top branch, z-Axis Moment (N.m) ΣF My Mz 1155 910 1820 1820 1820 1820 1820 1820 1820 1820 2310 2310 2310 2310 2765 2765 2765 2765 3675 3675 3675 3675 4340 4340 4340 4340 4340 4340 5495 525 420 700 700 700 700 700 700 700 700 770 770 770 770 805 805 805 805 875 875 875 875 1050 1050 1050 1050 1050 1050 1225 595 490 805 805 805 805 805 805 805 805 840 840 840 840 910 910 910 910 1015 1015 1015 1015 1330 1330 1330 1330 1330 1330 1435 Mx Σ M 770 630 980 980 980 980 980 980 980 980 1050 1050 1050 1050 1120 1120 1120 1120 1225 1225 1225 1225 1470 1470 1470 1470 1470 1470 1750 1120 910 1435 1435 1435 1435 1435 1435 1435 1435 1540 1540 1540 1540 1645 1645 1645 1645 1820 1820 1820 1820 2135 2135 2135 2135 2135 2135 2555 Technical data Force (N) Fy Fz Fx 490 490 595 595 595 595 595 595 595 595 700 700 700 700 945 945 945 945 1190 1190 1190 1190 1435 1435 1435 1435 1890 1890 2240 595 595 735 735 735 735 735 735 735 735 875 875 875 875 1155 1155 1155 1155 1470 1470 1470 1470 1750 1750 1750 1750 2345 2345 2765 525 525 630 630 630 630 630 630 630 630 770 770 770 770 1050 1050 1050 1050 1295 1295 1295 1295 1575 1575 1575 1575 2100 2100 2485 Moment (N.m) ΣF My Mz 910 910 1155 1155 1155 1155 1155 1155 1155 1155 1365 1365 1365 1365 1820 1820 1820 1820 2310 2310 2310 2310 2765 2765 2765 2765 3675 3675 4340 420 420 525 525 525 525 525 525 525 525 630 630 630 630 700 700 700 700 770 770 770 770 805 805 805 805 875 875 1050 490 490 595 595 595 595 595 595 595 595 735 735 735 735 805 805 805 805 840 840 840 840 910 910 910 910 1015 1015 1330 Mx Σ M 630 630 770 770 770 770 770 770 770 770 910 910 910 910 980 980 980 980 1050 1050 1050 1050 1120 1120 1120 1120 1225 1225 1470 910 910 1120 1120 1120 1120 1120 1120 1120 1120 1330 1330 1330 1330 1435 1435 1435 1435 1540 1540 1540 1540 1645 1645 1645 1645 1820 1820 2135 69 10.7 Noise data 10.7.1 Pump noise as a function of pump power 4103_A [dB(A)] 98 96 94 92 90 88 86 84 82 80 78 76 74 72 70 68 66 64 62 60 58 56 54 A B 0,1 Figure 31: 10 P [kW] 200 100 Noise level as function of pump power [kW] at 1450 min-1 A = sound power level, B = sound pressure level. [dB(A)] 4104_A 100 1 95 A 90 85 B 80 75 70 65 60 0,1 Figure 32: 70 1 10 P [kW] 100 300 Noise level as function of pump power [kW] at 2900 min-1 A = sound power level, B = sound pressure level. Technical data CB/EN (1501) 6.6 CombiBloc 10.7.2 Noise level of entire pump unit L [dB] 4102 3,2 3,0 2,8 2,6 2,4 2,2 2,0 1,8 1,6 1,4 1,2 1,0 0,8 0,6 0,4 0,2 0,0 0 1 Figure 33: 2 3 4 5 6 7 8 9 10 11 12 13 14 15 16 17 18 19 20 |L1 - L2| [dB] Noise level of entire pump unit. In order to determine the total noise level of the entire pump unit, the noise level of the motor must be added to that of the pump. This can be easily done by using the graph above. 1 Determine the noise level (L1) of the pump, see figure 31 or figure 32. 2 Determine the noise level (L2) of the motor, see documentation of the motor. 3 Determine the difference between both levels |L1 - L2|. 4 Find the differential value on the |L1 - L2|-axis and go up to the curve. 5 From the curve go left to the L[dB] -axis and read out the value. 6 Add this value to the highest value of both noise levels (L1 or L2). Example: 1 Pump 75 dB; motor 78 dB. 2 |75-78| = 3 dB. 3 3 dB on the X-axis = 1,75 dB on the Y-axis. 4 Highest noise level + 1,75 dB = 78 + 1,75 = 79,75 dB. CB/EN (1501) 6.6 Technical data 71 72 Technical data CB/EN (1501) 6.6 CombiBloc Index A Accessories . . . . . . . . . . . . . . . . . . . . . . . . .26 Application area . . . . . . . . . . . . . . . . . . . . .22 Applications . . . . . . . . . . . . . . . . . . . . . . . . .14 F B G Back-Pull-Out system . . . . . . . . . . . . . . . .34 Back-Pull-Out unit assembly . . . . . . . . . . . . . . . . . . . . . . .34 disassembly . . . . . . . . . . . . . . . . . . . . .34 Bearing groups . . . . . . . . . . . . . . . . . . . . . .13 Bearings lubrication . . . . . . . . . . . . . . . . . . . . . . .29 Guarantee . . . . . . . . . . . . . . . . . . . . . . . . . . 10 C Construction . . . . . . . . . . . . . . . . . . . . . . . .14 bearing . . . . . . . . . . . . . . . . . . . . . . . . .14 mechanical seal . . . . . . . . . . . . . . . . . .14 Faults . . . . . . . . . . . . . . . . . . . . . . . . . . . . . . 30 Foundation . . . . . . . . . . . . . . . . . . . . . . . . . 25 H Hoisting . . . . . . . . . . . . . . . . . . . . . . . . . . . . 11 I Impeller disassembly . . . . . . . . . . . . . . . . . . . . . 35 mounting . . . . . . . . . . . . . . . . . . . . . . . 35 replacement . . . . . . . . . . . . . . . . . . . . . 35 Inspection motor . . . . . . . . . . . . . . . . . . . . . . . . . . 27 pump . . . . . . . . . . . . . . . . . . . . . . . . . . 27 D Daily maintenance mechanical seal . . . . . . . . . . . . . . . . . .29 Draining liquid . . . . . . . . . . . . . . . . . . . . . . . . . . .33 E Earthing . . . . . . . . . . . . . . . . . . . . . . . . . . . .25 Ecodesign . . . . . . . . . . . . . . . . . . . . . . . . . .15 implementing directive . . . . . . . . . . . .15 introduction . . . . . . . . . . . . . . . . . . . . .15 MEI . . . . . . . . . . . . . . . . . . . . . . . . . . . .20 minimum efficiency . . . . . . . . . . . . . . .20 name plate . . . . . . . . . . . . . . . . . . . . . .19 product information . . . . . . . . . . . . . . .19 pump selection . . . . . . . . . . . . . . . . . .18 Electric motor connection . . . . . . . . . . . . . . . . . . . . . .26 Environment . . . . . . . . . . . . . . . . . . . . . . . .25 Environmental influences . . . . . . . . . . . . . .29 CB/EN (1501) 6.6 L Lubrificants . . . . . . . . . . . . . . . . . . . . . . . . . 59 M Maintenance staff . . . . . . . . . . . . . . . . . . . . . 9 Max. allowable working pressure . . . . . . . 61 Maximum allowable speed . . . . . . . . . . . . 60 Mechanical seal . . . . . . . . . . . . . . . . . . . . . 37 assembly instructions . . . . . . . . . . . . . 37 with Teflon covered O-ring . . . . . . . . 37 Mechanical seal M1 assembly . . . . . . . . . . . . . . . . . . . . . . . 39 disassembly . . . . . . . . . . . . . . . . . . . . . 38 Monitoring . . . . . . . . . . . . . . . . . . . . . . . . . . 28 Motor replacing . . . . . . . . . . . . . . . . . . . . . . . 40 N Noise . . . . . . . . . . . . . . . . . . . . . . . . . . .28, 29 73 O Operational range . . . . . . . . . . . . . . . . . . . .62 P Pallets . . . . . . . . . . . . . . . . . . . . . . . . . . . . .10 Performance overview . . . . . . . . . . . . . . . .62 Permitted forces on flanges . . . . . . . . . . . .67 Permitted torques on flanges . . . . . . . . . .67 Piping . . . . . . . . . . . . . . . . . . . . . . . . . . . . . .26 Precautionary measures . . . . . . . . . . . . . . .33 Pump description . . . . . . . . . . . . . . . . . . . .13 Pump unit commissioning . . . . . . . . . . . . . . . . . . .27 installation . . . . . . . . . . . . . . . . . . . . . .25 Wear ring assembly . . . . . . . . . . . . . . . . . . . . . . . 36 disassembly . . . . . . . . . . . . . . . . . . . . . 36 replacement . . . . . . . . . . . . . . . . . . . . . 35 Working switch . . . . . . . . . . . . . . . . . . . . . 26 R Recommended locking liquid . . . . . . . . . .59 Regular maintenance . . . . . . . . . . . . . . . . .29 Re-use . . . . . . . . . . . . . . . . . . . . . . . . . . . . .23 S Safety . . . . . . . . . . . . . . . . . . . . . . . . . . . .9, 25 symbols . . . . . . . . . . . . . . . . . . . . . . . . . 9 Scrapping . . . . . . . . . . . . . . . . . . . . . . . . . .23 Sense of rotation . . . . . . . . . . . . . . . . . . . .27 Serial number . . . . . . . . . . . . . . . . . . . . . . .13 Special tools . . . . . . . . . . . . . . . . . . . . . . . .33 Start-up . . . . . . . . . . . . . . . . . . . . . . . . . . . .27 Static electricity . . . . . . . . . . . . . . . . . . . . .25 Storage . . . . . . . . . . . . . . . . . . . . . . . . . . . .10 Stub shaft adjusting . . . . . . . . . . . . . . . . . . . . . . . .42 assembling . . . . . . . . . . . . . . . . . . . . . .42 disassembling . . . . . . . . . . . . . . . . . . .41 replacing . . . . . . . . . . . . . . . . . . . . . . . .40 Stub shaft of pump size 25-... adjusting . . . . . . . . . . . . . . . . . . . . . . . .40 assembling . . . . . . . . . . . . . . . . . . . . . .40 disassembling . . . . . . . . . . . . . . . . . . .40 T Technicians . . . . . . . . . . . . . . . . . . . . . . . . . . 9 Tightening moments for bolts and nuts . . . . . . . . . . . . . . . . .59 for impeller nut . . . . . . . . . . . . . . . . . . .59 Transport . . . . . . . . . . . . . . . . . . . . . . . . . . .10 Type description . . . . . . . . . . . . . . . . . . . . .13 V Ventilation . . . . . . . . . . . . . . . . . . . . . . . . . .25 W Wear plate replacement . . . . . . . . . . . . . . . . . . . . .35 74 CB/EN (1501) 6.6 Order form for spare parts FAX Nr. ADDRESS Your order will only be dealt with if this order form has been correctly completed and signed. Order date: Your order number: Pump type: Execution: Quantity Item. No. Part Article number pump Delivery address: Ordered by: ORDFORM (1107) 3.2 EN Invoicing address: Signature: Telephone: 75 76 ORDFORM (1107) 3.2 EN CombiPrime H Horizontal self-priming centrifugal pump CombiBloc Horizontal centrifugal monobloc pump SPX Flow Technology Assen B.V. Dr. A. F. Philipsweg 51, 9403 AD Assen, THE NETHERLANDS Phone: + 31 (0) 592 37 67 67 Fax: + 31 (0) 592 37 67 60 E-Mail: [email protected] www.johnson-pump.com www.spx.com For more information about our worldwide locations, approvals, certifications, and local representatives, please visit www.johnson-pump.com. SPX Corporation reserves the right to incorporate our latest design and material changes without notice or obligation. Design features, materials of construction and dimensional data, as described in this bulletin, are provided for your information only and should not be relied upon unless confirmed in writing. ISSUED 11/2011 DV-1530 Copyright © 2011 SPX Corporation