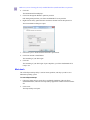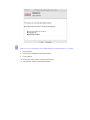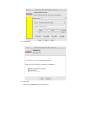
1
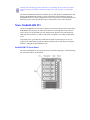
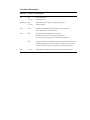
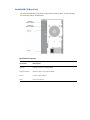
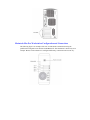
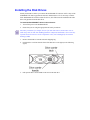
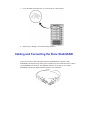
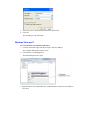
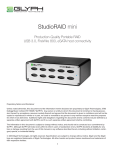
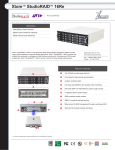
Xtore™ StudioRAID™ 5Ti
Setup and User’s Guide
Legal Notices
Product specifications are subject to change without notice and do not represent a commitment on the part of Advanced Industrial Computer, Inc.
The software described in this document is furnished under a license agreement. You can obtain a copy of that license by visiting Xtores Web site at
www.xtore.com. The terms of that license are also available in the product in the same directory as the software. The software may not be reverseassembled and may be used or copied only in accordance with the terms of the license agreement. It is against the law to copy the software on any
medium except as specifically allowed in the license agreement.
This document is protected under copyright law. An authorized licensee of may reproduce this publication for the licensee’s own use in learning how
to use the software. This document may not be reproduced or distributed, in whole or in part, for commercial purposes, such as selling copies of this
document or providing support or educational services to others. This document is supplied as a guide for . Reasonable care has been taken in
preparing the information it contains. However, this document may contain omissions, technical inaccuracies, or typographical errors. Avid
Technology, Inc. does not accept responsibility of any kind for customers’ losses due to the use of this document. Product specifications are subject
to change without notice.
Copyright © 2010 Advanced Industrial Computer, Inc. and its licensors. All rights reserved.
Xtore Pro StudioRAID 5Ti Setup and User’s Guide • XM‐UG‐A‐SR5TI‐A • February, 2010 • Created • 2/15/10
Contents
Using this Guide ...................................................................................................................5
Symbols and Conventions.........................................................................................................5
If You Need Help......................................................................................................................6
Chapter 1
Overview ....................................................................................................... 8
Features.....................................................................................................................................8
RAID ................................................................................................................................9
Shipping Kit ......................................................................................................................9
Xtore StudioRAID 5Ti............................................................................................................10
StudioRAID 5Ti Front Panel..........................................................................................10
StudioRAID 5Ti Rear Panel ...........................................................................................12
System Requirements..............................................................................................................13
HP Workstation Configuration and Connections ...........................................................13
Macintosh Mac Pro Workstation Configuration and Connections .................................14
Chapter 2
Installing the StudioRAID 5Ti .................................................................. 16
Preparing for Installation ........................................................................................................17
Environmental Requirements .........................................................................................17
Electrical Requirements .................................................................................................17
Installing the R380 HBA Controller Board ............................................................................18
Installing Drivers ...................................................................................................................18
Windows XP, Vista, and 7 ............................................................................................18
Macintosh Operating Systems.......................................................................................19
Installing the ATTO Configuration Tool ...............................................................................19
Launching the ATTO configuration Tool ....................................................................19
Accessing the ATTO Configuration Tool ....................................................................20
Installing the Disk Drives ......................................................................................................22
Cabling and Connecting the Xtore StudioRAID 5Ti..............................................................24
Using the Disk Management Utility .......................................................................................26
Windows XP ................................................................................................................26
Windows Vista and 7 ...................................................................................................27
Macintosh ....................................................................................................................28
Chapter 3
Configuring the StudioRAID 5Ti ............................................................. 34
Accessing the ATTO Configuration Tool ..............................................................................34
Configuring RAID Groups .....................................................................................................36
Rebuilding Disk Drives...........................................................................................................39
Chapter 4
Expanding the StudioRAID 5Ti................................................................ 44
Connecting the StudioSTOR 5T Enclosure ............................................................................44
Cabling and Connecting the StudioRAID/STOR 5Ti Enclosure.................................44
Configuring the Two StudioRAID/STOR Enclosures ................................................47
Using the Disk Management Utility .......................................................................................50
Windows XP ...............................................................................................................50
Windows Vista and 7 ..................................................................................................52
Macintosh ...................................................................................................................54
Appendix A
Regulatory and Safety Notices .................................................................. 58
Warnings and Cautions ...........................................................................................................58
FCC Notice .............................................................................................................................58
Canadian ICES-003 ................................................................................................................59
European Union Declaration of Conformity ...........................................................................59
Disposal of Waste Equipment by Users in the European Union .............................................61
Australia and New Zealand EMC Regulations .......................................................................61
Taiwan EMC Regulations .......................................................................................................61
Using This Guide
Congratulations on your purchase of an Xtore™ StudioRAID™ Serial Attached SCSI (SAS)
Tower (Xtore StudioRAID 5Ti) storage enclosure. Avid Technology is pleased to provide this
high-performance StudioRAID storage enclosure. The Xtore StudioRAID has been designed
to ensure maximum performance and is a result of a partnership with ATTO™ Technology,
Inc., a leading provider of premium RAID storage controllers and adapters. The Xtore
StudioRAID is “powered by ATTO” and uses an ATTO ExpressSAS R380 RAID controller
card designed to meet the demands and requirements of media editing and storage workflows
at real time speeds as tested and certified by Avid Technology.
The StudioRAID can be used with Avid products for both Windows and Macintosh®
operating systems. Unless noted otherwise, the material in this document applies to the
Windows XP and Mac OS® X operating systems. The majority of screen shots in this
document were captured on a Windows XP system, but the information applies to both
Windows and Mac OS X systems. Where differences exist, both Windows XP and Mac OS X
screen shots are shown.
The documentation describes the features and hardware of all models. Therefore, your system
might not contain certain features and hardware that are covered in the documentation.
Symbols and Conventions
Xtore documentation uses the following symbols and conventions:
Symbol or Convention Meaning or Action
A note provides important related information, reminders,
recommendations, and strong suggestions.
A caution means that a specific action you take could cause harm to your
computer or cause you to lose data.
A warning describes an action that could cause you physical harm.
Follow the guidelines in this document or on the unit itself when
handling electrical equipment.
>
This symbol indicates menu commands (and subcommands) in the order
you select them. For example, File > Import means to open the File menu
and then select the Import command.
This symbol indicates a single-step procedure. Multiple arrows in a list
indicate that you perform one of the actions listed.
(Windows), (Windows only), This text indicates that the information applies only to the specified
(Macintosh), or (Macintosh
operating system, either Windows or Macintosh OS X.
only)
Bold font
Bold font is primarily used in task instructions to identify user interface
items and keyboard sequences.
Italic font
Italic font is used to emphasize certain words and to indicate variables.
Courier Bold font
Courier Bold font identifies text that you type.
Ctrl+key or mouse action
Press and hold the first key while you press the last key or perform the
mouse action. For example, Command+Option+C or Ctrl+drag.
If You Need Help
If you are having trouble using your Xtore product:
1.
Retry the action, carefully following the instructions given for that task in this guide. It is
especially important to check each step of your workflow.
2.
Check the latest information that might have become available after the documentation
was published:
-
If the latest information for your Xtore product is provided as printed release notes,
they ship with your application and are also available online.
-
Online support is available at http://www.xtore.com/Support.aspx
If you are having trouble using your Avid product, please refer to the Avid readme.txt included
in the CD or you can visit the Avid online Knowledge Base at www.avid.com/onlinesupport.
For trouble using an ATTO product, please refer to ATTO online support at
http://www.attotech.com/support/index.html
1
Overview
The Xtore StudioRAID is a Serial Attached SCSI (SAS) storage enclosure featuring a
high-performance SAS interface supporting up to 5 Terabyte (TB) of disk storage for editing
and broadcast applications. The StudioRAID product is supported on the Windows Vista®,
Windows 7 and Windows XP operating systems and the Macintosh X 10.4.11 and later
operating systems.
See the following topics:
•
Features
•
Xtore StudioRAID 5Ti
•
System Requirements
Features
The Xtore StudioRAID 5Ti storage enclosure is a five-drive array supporting RAID Level 5.
SATA drives are available in both 1Terabyte (TB) and 2Terabyte (TB) capacity and provide a
scaling capacity from 5 TB to 10 TB in a single enclosure. The ATTO configuration tool, a
Graphical User Interface (GUI), allows both easy configuration and access to detailed
operational information about the StudioRAID.
The Xtore StudioRAID is powered by the ATTO SAS RAID R380 Host Bus Adapter (HBA)
controller board. Once installed in your Windows or Macintosh workstation in a PCI Express
(PCIe®) slot, the RAID controller board provides SAS connectivity and RAID functionality. In
addition, the Xtore StudioRAID can be extended up to 25 enclosures (125 SATA drives),
theoretically, supported by one RAID controller board. Performance level will be inversely
proportional to the amount of units daisy-chained.
Supported configurations are listed in the following table.
Key features of functions of the StudioRAID are that it:
•
Allows easy configuration with the ATTO configuration tool
•
Supports SATA and SAS disk drives
•
Displays LED indicators, activates audible alarms, and allows event e-mail notification
•
Expands to two StudioSTOR enclosures
•
Provides users with an simple, intelligent firmware design without complicated settings
At this time, the supported configurations are listed in the following table.
Supported Configurations
Configuration
Drive Size
Fully populated
1TB
Fully populated
2 TB
Expansion to
StudioSTOR enclosure
1 TB or 2TB
RAID
The Xtore StudioRAID supports RAID level 5. In a StudioRAID five-drive system, if a drive
fails, the StudioRAID can automatically begin the rebuild process once a new drive is installed
into the enclosure.
Shipping Kit
Each Xtore StudioRAID 5Ti is a desktop storage unit. Each StudioRAID 5Ti ships with a one
(1) meter miniSAS cable for desktop use, though cable lengths of three (3) and five (5) meters
are available.
Each Xtore StudioRAID 5Ti enclosure kit contains:
•
StudioSTOR 5T storage enclosure
•
ATTO R380 SAS RAID PCIe controller board
•
Five SATA Disk drives
•
Power cord
•
MiniSAS cable (one meter length)
•
Xtore StudioRAID User’s Manual and Installation CD
•
Xtore StudioRAID Quick Installation Guide
Visually inspect the shipping carton and if there is any damage, do not remove the contents.
Notify your Avid representative. Check the packing list to verify you have received all the
items.
The Xtore StudioRAID installation CD contains files for both the Xtore StudioRAID 5Ti and
the Xtore StudioRAID 16R products. The files and utilities on the installation CD for the
StudioRAID 5Ti are the ATTO configuration tool, the required drivers for both Windows and
Macintosh systems, the ExpressStripe™ utility, and electronic copies of this document.
Xtore StudioRAID 5Ti
The Xtore StudioRAID 5Ti front and rear panels are shown in the figures below. On the Xtore
StudioRAID 5Ti front panel, the status LEDs indicate the operating status of the enclosure
such as, the power and fan LEDs (no color during normal operation). Fan and temperature
LEDs only turn red if there is a failure of the fan or a temperature exceeding recommended
levels.
Upon initial power up, the disk drive LED indicator lights red. When the power up cycle
completes, the LED indicators light blue during normal operation, flash when accessing the
hard drive, and light red when hard drives fail.
StudioRAID 5Ti Front Panel
The Xtore StudioRAID 5Ti front panels are shown in the following figure. A table describing
the connections follows the illustration.
Front Panel LED Indicators
Indicator
LED Color Description
Fan
Red
No color
Indicates fan failure.
Normal operation.
Temperature
Red
No color
Indicates temperature range exceeding optimum range.
Normal operation.
Power
Green
The power button illuminates green when the unit is powered on.
This is also the power on and off button.
Drives
Blue
LED lights when hard disk drives are connected.
LED flashes when unit is accessing the hard disk drive.
LED is off when the system does not detect the hard disk drive.
Red
LED lights at power on and thereafter only when hard disk drives fail. Host
bus adapter (HBA) boards control the function of this LED. You can also
use the locate function in the configuration tool to locate failed drives.
No color
If alarm buzzer is enabled, the mute button silences the audible alarm.
Mute
StudioRAID 5Ti Rear Panel
The Xtore StudioRAID 5Ti rear panels are shown in the following figure. A table describing
the connections follows this illustration.
Mini SAS
Host Connector
Mini SAS
EXP Connector
Rear Panel Connectors
Connector
Description
Host (top)
miniSAS connector to workstation HBA.
Expansion (bottom)
MiniSAS connector to an expansion JBOD.
RS-232
Connects to host COM port.
Power
Power cord connection.
System Requirements
The Windows and Macintosh workstations currently supported with the StudioRAID 5Ti are
listed on the Xtore web site. As more systems and third-party boards are tested and qualified;
and as different configurations meet approval, they will be posted on the Xtore web site. For
the latest information concerning workstations qualified with the StudioRAID 5Ti, go to
www.xtore.com.
The following section describes and identifies the connections used on the rear of the
Hewlett-Packard® (HP®) qualified and Macintosh workstations. This information is for
informational purposes and is different for each individual workstation. See the manufacturer’s
instructions for your particular workstation.
HP Workstation Configuration and Connections
The following table lists the supported configurations and their respective qualified slot
configurations. For the latest information concerning qualified workstations and their
respective configurations for the StudioRAID 5Ti, go to www.xtore.com.
The following figure is an example of the rear of an HP workstation showing the qualified slot
configuration for the StudioRAID 5Ti. This illustration is shown only as an example. Because
each workstation is configured differently, connection locations can vary.
Although your workstation may have an existing SAS port, the HBA R380 controller board
provides the RAID support for the Xtore StudioRAID 5Ti. Native SAS ports on workstations do
not provide RAID support.
The rear panel also contains ports for connecting the mouse, keyboard, monitors, and
application key (dongle).
Macintosh Mac Pro Workstation Configuration and Connections
The following figure is an example of the rear of a Macintosh workstation showing the
qualified slot configuration for the Xtore StudioRAID 5Ti. This illustration is shown only as an
example. Because each workstation is configured differently, connection locations can vary.
2
Installing the StudioRAID 5Ti
Installation of the Xtore StudioRAID 5Ti enclosure requires installing the RAID controller
board in your Windows or Macintosh workstation. The RAID controller board provides SAS
connectivity and RAID functionality.
Although your workstation may have an existing SAS port, the HBA R380 controller board
provides the RAID functionality and the SAS connectivity for the Xtore StudioRAID 5Ti. Native
SAS ports on workstations do not provide RAID functionality.
Windows and Macintosh workstations require the same ATTO HBA R380 controller board.
The installation process for the Xtore StudioRAID 5Ti requires preparing for the installation,
installing the RAID controller board into your workstation, and installing the ATTO
configuration tool. The next steps in the process are to install the drivers, the disk drives, and
then to cable, connect and configure the StudioRAID 5Ti.
The installation process is the same for both the Windows and Macintosh workstations. Where
the procedure is different for Macintosh users, it is noted. The majority of screen shots in this
document were captured on a Windows system, but the information applies both to Windows
and Macintosh systems.
See the following topics:
•
Preparing for Installation
•
Installing the R380 HBA Controller Board
•
Installing Drivers
•
Installing the ATTO
•
Installing the Disk Drives
•
Cabling and Connecting the Xtore StudioRAID
•
Using the Disk Management Utility
Preparing for Installation
Preparing for installation includes ensuring that the area where you install the StudioRAID
5Ti meets the electrical and environmental conditions.
Environmental Requirements
The site you choose for your StudioRAID 5Ti workstation should meet the following
environmental requirements:
•
Clean and dust free.
•
Free from significant temperature or humidity changes.
•
Sturdy, level, and not subject to vibration.
•
Away from radio frequency emissions, high-traffic, or high-noise areas.
•
Adequate space in front of and behind the workstation components, so you can connect
cables and service your workstation. This also provides adequate airflow for cooling.
•
A minimum clearance of 3 inches (7.6 cm) for the side and back panels of the desk side
base unit.
Electrical Requirements
Select your site with the following electrical requirements in mind:
•
Make sure there are adequate power outlets for the StudioRAID 5Ti. This prevents the
need for extension cords.
•
Make sure your site is away from major electrical equipment such as motors, air
conditioners, or elevators.
•
Make sure the location is not subject to static electrical buildup.
•
Plug only the StudioRAID 5Ti and other system equipment into the power strip. Do not
plug in coffee makers, radios, lights, or other non-Avid devices. Avid recommends the use
of an uninterruptible power supply (UPS) appropriately sized for your system
configuration. The UPS provides system protection against sudden power surges or losses
that could cause you to lose your work.
The following table describes the electrical specifications for the StudioRAID 5Ti workstation:
Component
Voltage
Frequency
StudioRAID 5Ti
100 to 240 V ac
50 to 60 Hz
The following table lists the dimensions of the Xtore StudioRAID 5Ti enclosures.
Hardware component
Dimensions (Inches)
Dimensions (Centimeters)
StudioRAID 5Ti
Height: 17.6
Width: 5.2
Depth: 22.1
Height: 44.6
Width: 13.1
Depth: 56.1
Installing the R380 HBA Controller Board
The RAID R380 HBA controller board needs to be installed in both Windows and MAC
workstations to support RAID functionality. The RAID controller board ships with the Xtore
StudioRAID 5Ti and must be installed in a Windows or a Macintosh workstation in a
PCIe slot. See the manufacturer’s documentation that came with your workstation for
instructions on installing additional boards and for the location of your PCIe slots.
Anti-static precautions, for example, the use of an anti-static mat, or an anti-static wrist
or ankle strap, must be used when handling hardware components and boards. Never
touch any exposed electrical connectors on the components as they can be damaged by
electrostatic discharge (ESD).
The Windows and Macintosh workstations currently supported with the StudioRAID 5Ti are
listed on the Xtore web site. As more workstations are tested and qualified, and as different
configurations meet approval, these configurations will be posted on the Xtore web site. For
the latest information concerning workstations qualified with the StudioRAID 5Ti, go to
www.xtore.com.
Each Windows or Macintosh workstation has its own particular slot configuration location.
Refer to the documentation that came with your workstation for the location of the PCIe slots.
Installing Drivers
After the RAID controller board has been installed in your workstation, the next step is to
install the drivers for the enclosure and controller board. Thye driver for StudioRAID 5Ti
enclosure are located on the Xtore StudioRAID CD. Please follow the instruction included
with the driver. The drivers for the RAID controller board are also located on the Xtore
StudioRAID CD that ships with the Xtore StudioRAID 5Ti and are also available for
download at the download center at www.xtore.com. Depending on your operating system,
choose one of the following drivers for your system and follow the installation procedure.
Windows XP, Vista, and 7
If you are using a Windows XP or a Vista workstation, you need to install the driver for the
Windows operating system:
To install the drivers for Windows XP, Vista, and 7:
1.
Turn on your workstation.
2.
To access the drivers to install, follow the folder structure on the Xtore
StudioRAID Installation CD to the Xtore StudioRAID 5Ti folder.
3.
Inside the StudioRAID 5Ti folder, locate the RAID controller R380 driver for the version
of Windows you are using.
4.
Click on the R380 driver for the version of Windows you are using.
Follow the on-screen instructions to complete the driver installation.
Macintosh Operating Systems
If you are using a Macintosh workstation you will need to install the driver for the Macintosh
operating system:
To install the drivers for the Macintosh operating systems:
1.
Turn on your workstation.
2.
To access the drivers to install, follow the folder structure on the Xtore StudioRAID
Installation CD to the Xtore StudioRAID 5Ti.
3.
Inside the StudioRAID 5Ti folder, locate the RAID controller R380 driver for the version
of Macintosh you are using and click on the R380 driver.
Follow the on-screen instructions to complete the driver installation.
Installing the ATTO Configuration Tool
The ATTO configuration tool is a GUI which is both a configuration tool and a portal to view
operational information about your StudioRAID 5Ti enclosure. The configuration tool
requires the Sun® Java™ Virtual Machine application, version 1.5 or later. When the ATTO
configuration tool launches, if the latest version of Java is not resident on your workstation, the
application directs you to the Sun web site and installs the latest version of Java.
If you are using a Macintosh system, download the Java software from the Apple® Web site
(www.apple.com, use the Apple Software Update) or download it from
http://www.developer.apple.com/java/download/.
Detailed information on using the Avid Configuration tool follows in the “Configuring the
StudioRAID 5Ti”.
Launching the ATTO configuration Tool
The ATTO configuration tool ships on the Xtore StudioRAID installation CD with your
StudioRAID enclosure.
To install the Avid Configuration tool (Windows):
1.
Verify Java Virtual Machine (Java) version 1.5 or later is installed on your workstation.
2.
From the Xtore StudioRAID CD, follow the folder structure on the Xtore StudioRAID
installation CD to the Xtore StudioRAID and double-click the executable file.
The installation wizard installs the ATTO configuration tool.
3.
Follow the on-screen prompts to install the ATTO configuration tool on your workstation.
To install the Avid Configuration tool (Macintosh):
1.
Check Software update to ensure the latest Java updates have been applied.
2.
From the Xtore StudioRAID CD, follow the folder structure on the Xtore StudioRAID
installation CD to the Xtore StudioRAID and double-click the zip file.
The installation wizard installs the ATTO configuration tool.
3.
Follow the on-screen prompts to install the Avid Configuration tool on your workstation.
Accessing the ATTO Configuration Tool
The ATTO configuration tool allows you to view and configure your RAID drives. The
following is an overview of the functionality of the Avid Configuration tool.
To access the Avid Configuration Tool:
1.
Locate the application icon in the folder you created during installation or the shortcut
icon on your desktop.
2.
Double-click the icon to start the application.
The main window of the configuration tool displays.
The following information displays in the Avid configuration tool window:
-
The Device Listing window at the left of the display page lists all devices currently
connected to the system.
Expand the device tree to reveal additional detail on connected devices.
-
The Configuration Options window in the right window pane provides information
and options for a device highlighted in the device listing.
If you highlight a device in the Device Listing, specific tabs and panels display for
that device.
The display of the ATTO configuration tool is in a tree node design. You highlight a
device in the Device Listing in the left pane of the configuration tool, and specific
tabs and panels display for that device.
Installing the Disk Drives
Install your disk drives before you connect the StudioRAID 5Ti enclosure. All five bays of the
StudioRAID 5Ti must be populated at all times with disk drives. If it is necessary to run the
Xtore StudioRAID 5Ti with fewer than five drives, drive fillers must be installed in the other
drives not populated with the disk drives.
To install the StudioRAID 5Ti drives in the enclosure:
1.
Turn off the power to the StudioRAID 5Ti.
2.
Ensure that you are using the appropriate anti-static precautions.
Anti-static precautions, for example, the use of an anti-static mat or an anti-static wrist or
ankle strap, must be used when handling hardware components and boards. Never touch any
exposed electrical connectors on the components as they can be damaged by electrostatic
discharge (ESD)
3.
Remove the disk drive from the anti-static shipping bag.
4.
Push the drive carrier latch on the front of the disk drive to the right (see the following
figure).
5.
Pull open the drive carrier handle on the front of the disk drive.
6.
Insert the disk drive into the empty slot of the StudioRAID 5Ti enclosure. The drive snaps
into place.
7.
Close the handle on the disk drive to secure the drive in the enclosure.
8.
Repeat Steps 3 through 7 for each remaining disk drive.
Cabling and Connecting the Xtore StudioRAID
You are now ready to cable and connect the Xtore StudioRAID 5Ti enclosure. Each
StudioRAID 5Ti enclosure ships with a power cord and a one-meter miniSAS cable to connect
your StudioRAID 5Ti enclosure. The miniSAS connector can fit only one way into the
StudioRAID 5Ti and your RAID controller board in your workstation.
To connect your StudioRAID 5Ti:
1.
Turn off your workstation before connecting the Xtore StudioRAID 5Ti.
2.
Plug one end of the miniSAS cable into the top SAS connector on the rear of the
Xtore StudioRAID 5Ti enclosure.
3.
Plug the other end of the miniSAS cable into the R380 SAS (RAID controller board) port
on the controller board in your workstation.
4.
Plug one end of the power cord into the power connector on the Xtore StudioRAID 5Ti
and the other end into a properly grounded power outlet.
5.
Turn on your Xtore StudioRAID 5Ti and then turn on your workstation.
The blue LEDs on the disk drives flash as the drives boot up. On any workstation, when
the blue LEDs remain solid, you are ready to configure your StudioRAID 5Ti.
Using the Disk Management Utility
The Disk Management Utility on your workstation is the utility used to create partitions on the
disk drives of the Xtore StudioRAID 5Ti. It is recommended to always use the quick
initialization during RAID configuration, as it allows users to create their partitions while the
RAID initialization is active.
Windows XP
To create partitions on your RAID configuration:
1.
Click the Start button, right-click My Computer, and select Manage.
The Computer Management window opens.
2.
Select Storage > Disk Management.
The Disk Management area opens.
3.
Right-click the newly installed, unallocated disk drive.
Make sure you are choosing the newly installed disk drive (unallocated drive) to partition.
4.
Click New > Simple Volume.
The Initialization Wizard displays.
5.
Click Next through the Wizard to partition your disk.
Disk management partitions your Xtore StudioRAID 5Ti as one partition.
6.
Right-click the newly partitioned drive and choose Format from the drop-down list.
The Format dialog box opens.
7.
Select File system > NTFS and select Perform a quick format.
8.
Click OK.
The formatting of your disk begins.
Windows Vista and 7
To create partitions on your RAID configuration:
1.
Click the Start button, right-click My Computer, and select Manage.
The Computer Management window opens.
2.
Select Storage > Disk Management.
The Disk Management area opens.
3.
Right-click the newly installed disk drive, (unallocated drive) and select New Partition
(new drive).
Make sure you are choosing the newly installed disk drive (unallocated drive) to partition.
4.
Click OK.
The Initialization Wizard displays.
5.
Click Next through the Wizard to partition your disk.
Disk management partitions your Xtore StudioRAID 5Ti as one partition.
6.
Right-click the newly partitioned drive and choose Format from the drop-down list.
The Format Partition dialog box opens.
7.
Select File system > NTFS and select Perform a quick format.
8.
Click Next until the wizard finishes.
The formatting of your disk begins.
9.
Click OK.
The formatting of your disk begins. Upon completion, your Xtore StudioRAID 5Ti is
ready to use.
Macintosh
The ATTO ExpressStripe utility is used to format, partition, and stripe your drives on a
Macintosh operating system.
To launch ExpressStripe:
1.
Follow the folder structure on the Xtore StudioRAID installation CD to the Xtore
StudioRAID folder, and locate the ExpressStripe application. Double-click the installer
file.
2.
Click Create.
The ExpressStripe tool opens.
3.
Click Delete and then click Volume to delete the volume.
4.
Click Create and in the next window, click Initialize.
5.
Select the drives you want to initialize and click Next.
6.
Click the Drives verified button and then click OK.
Make sure you are choosing the newly installed disk drive (unallocated drive) to partition.
7.
Click Continue.
8.
Click Create a Standard Volume and click Next.
9.
Click Continue.
10. Choose how many volumes you want and click Next.
11. Select Format > Mac OS Extended (Journaled).
12. Click Finish.
13. Click Quit.
Your Xtore StudioRAID 5Ti is ready to use.
3
Configuring the StudioRAID 5Ti
For information about configuring the StudioRAID 5Ti, see the following topics:
•
Accessing the
•
Configuring RAID Groups
•
Rebuilding Disk Drives
Accessing the ATTO Configuration Tool
The ATTO configuration tool provides information about your StudioRAID and allows access
to configuration and viewing of your RAID drives as well as allowing the configuration of
event notifications. The ATTO Configuration tool can create and configure the disk drives into
RAID groups after the initial installation.
The RAID controller board provides the capability to configure disk storage into RAID
groups. Each RAID group can be divided into one or more partitions with each partition
appearing to the host operating system as a separate virtual disk.
To access the Avid configuration tool:
1.
Locate the desktop shortcut icon or the application icon in the folder you created during
installation.
2.
Double-click the icon to start the application.
The main window of the configuration tool opens.
The following information displays in the Avid configuration tool window:
-
The Device Listing window at the left of the display page lists all devices currently
connected to the system. You can also expand the device tree to reveal additional
details on connected devices.
The ExpressSAS R380 appears in the device listing.
-
The Configuration Options window in the right pane provides information and
options for the device highlighted in the device listing.
The following additional information displays:
•
The names of RAID controller boards installed in your workstation
•
Information about the drivers controlling the adapters, including version information for
both the currently executing driver and the flash image
•
Information about the devices attached to RAID controller board
By choosing the RAID controller board (ExpressSAS R380) in the Device Listing, you can
view information about the disk drives in the Xtore StudioRAID 5Ti, create disk groups, set
RAID levels, and expand your StudioRAID 5Ti to two bays.
The following table outlines the options available in the Device Listing window on the left
and which tab in the configuration window on the right displays information about that
particular device.
ATTO configuration Tool Display
Tree Node
Display Tab Options
Description
Local Hosts
Basic Info
The Basic tab provides basic information about the
device currently highlighted in the device listing or
the host if the local host is highlighted.
Notifications
User defined notifications tab.
Basic Info
The Basic tab provides basic information about the
device currently highlighted in the device listing or
the host if the local host is highlighted.
Flash
The Flash tab provides information about the
current revision of flash loaded on the highlighted
host adapter.
RAID
The RAID tab allows users to create groups, set
RAID levels, and initialize drives.
RAID CLI
For Technical Support only.
Advanced
NOT USED.
NVRAM
NVRAM panel displays the NVRAM parameters
applicable to the adapter and channel selected
PCIe
PCI information is displayed in the PCI Info tab
RAID controller
board (R380
SAS)
Channel
Configuring RAID Groups
The RAID controller board provides the capability to configure your disk drives into RAID
groups. Use the Avid configuration tool to set up RAID level 5 groups on your StudioRAID
5Ti.
Each RAID group may be divided into one or more partitions with each partition appearing to
the host operating system as a virtual disk. In the following procedure, a new 5-bay
StudioRAID 5Ti enclosure is being configured for RAID 5.
To configure your StudioRAID 5Ti for RAID Level 5:
1.
If this is not an initial installation, backup all existing data to another location.
This configuration destroys all existing saved data.
2.
Double-click the Avid configuration icon either in the folder you created during
installation or on your desktop to open the ATTO Configuration tool.
The Welcome screen opens.
3.
Select Hosts > Localhosts > ExpressSAS R380 (RAID controller board) in the Device
Listing on the left.
4.
Click the RAID tab in the right hand pane of the ATTO Configuration tool.
The application scans for drives and then populates the top pane of the right-hand window
with the list of drives installed in the StudioRAID 5Ti storage enclosure.
5.
Select Group from the bottom panel of the right-hand window and name your new RAID
group.
6.
Select the drives in the upper pane and drag and drop them into the new group area at the
bottom of the right-hand pane.
7.
Click Next and Select RAID level 5, Interleave 256 KB and Express initialization from the
Create New RAID group dialog box.
Selecting Express initialization allows you to begin using your StudioRAID 5Ti before the
initialization completes.
8.
Select Adaptive and Auto Rebuild on the Create New RAID group dialog box. Click Next.
The Confirm Operation dialog box opens.
9.
Click Yes.
The RAID initialization process begins. Express initialization allows you to begin using your
StudioRAID 5Ti while the initialization process is active. You can click on the RAID group in
the lower pan to view the status of the rebuild while it is in process.
Rebuilding Disk Drives
The Xtore StudioRAID 5Ti has the capability to rebuild a failed drive and restore RAID
Level 5 parity in your StudioRAID 5Ti in the unlikely event that a disk drive goes bad. Use the
ATTO Configuration tool to rebuild your RAID 5 group when a disk drives fails.
You are alerted to disk failures by the LED on the disk drive turning red, e-mail notification (if
configured), or by viewing the operational status of the StudioRAID 5Ti with the configuration
tool. When a disk drive fails in the StudioRAID 5Ti, the RAID group is degraded without
parity protection until a new disk is installed and rebuilt. You use the ATTO configuration tool
to replace failed drives and restore RAID level 5 parity to your Xtore StudioRAID 5Ti.
When rebuilding failed drives, you have the choice of pausing your work while the
StudioRAID 5Ti system rebuilds RAID level 5 parity, or you can continue to use your Xtore
StudioRAID 5Ti while the process is underway. If you choose to continue working while the
StudioRAID 5Ti is a failed drive, remember that there is no RAID level 5 parity available
during the process. If you choose to wait for the RAID level 5 parity to rebuild before using, a
StudioRAID 5Ti system with a 1 TB disk drives should take approximately six hours, and
approximately twelve hours for a system with 2 TB disk drives.
Use the following procedure to rebuild a failed disk drive.
To rebuild disk drives on your StudioRAID 5Ti for RAID Level 5:
1.
Visually inspect the StudioRAID 5Ti enclosure to see which disk drive has failed. This
information is also available through viewing the disk drive in the ATTO Configuration
tool.
2.
Remove the failed disk drive from the storage enclosure.
3.
Remove the new disk drive from the anti-static shipping bag.
Anti-static precautions, for example, the use of an anti-static mat or an anti-static wrist or
ankle strap, must be used when handling hardware components and boards. Never touch any
exposed electrical connectors on the components as they can be damaged by electrostatic
discharge (ESD)
4.
Ensure that you are using the appropriate anti-static precautions.
5.
Install the new disk drive into the StudioRAID 5Ti.
6.
Select Hosts > Localhosts > ExpressSAS R380 (RAID controller board) in the Device
Listing on the left.
The newly installed disk drive appears in the top pane of the configuration tool with an
empty usage field as shown in the following figure.
7.
Click the RAID tab in the right hand pane of the ATTO Configuration tool.
8.
Drag and drop the new drive into the bottom pane of the ATTO Configuration tool.
The new drive has an empty usage field.
9.
Click Next and Select RAID level 5, Interleave 256 KB and Express initialization from the
Create New RAID group dialog box.
10. Select Adaptive and Auto Rebuild on the Create New RAID group dialog box. Click Next.
The Confirm Operation dialog box opens.
11. Click Yes.
The RAID group initialization process begins. For 500-GB drives, the rebuild process
takes approximately three hours. For 1-TB drives, the rebuild process takes approximately
six hours.
12. When the rebuild is complete, the newly rebuilt drive automatically becomes part of the
existing RAID level 5 group and RAID level 5 parity is restored.
4
Expanding the StudioRAID 5Ti
For information about expanding the StudioRAID 5Ti, see the following topics:
•
Connecting the StudioSTOR 5T 5T Enclosure
•
Using the Disk Management Utility
Connecting the StudioSTOR 5T Enclosure
The StudioRAID 5Ti can be expanded by connecting it to StudioSTOR 5T storage enclosure.
StudioSTOR 5T is a five-drive enclosure that is specially packaged for the purpose to provide
an extra storage. Use the following procedure to connect StudioRAID 5Ti and StudioSTOR 5T
enclosures. After connecting the two enclosures, use the ATTO configuration tool to upgrade
the RAID configuration. The RAID level available is RAID Level 5.
The procedure to expand a single StudioRAID 5Ti includes connecting the enclosure and then
configuring the RAID drives into a group.
Cabling and Connecting the StudioRAID/STOR 5Ti Enclosure
Before beginning the expansion process you need to connect the StudioRAID 5Ti enclosure to
StudioSTOR 5T enclosure. Use the following procedures to connect the two storage
enclosures. Users have the option to connect enclosures to two ports of ATTO R380 or
daisy-chain the enclosures together. The former option has the expansion limit at 2 enclosures,
the latter option gives an expansion limit at 25 enclosures, theoretically. The process to
connect two enclosures is similar whether this is an initial installation or an add-on to an
existing installation.
Connecting two enclosures to ATTO R380 two ports:
1.
If this is an initial installation, follow the procedures in the Installation Chapter from
“Preparing for Installation” through “Installing the Disk Drives” on each enclosure.
2.
If this is an existing installation and you are expanding to two enclosures, back up all
existing data to another location as upgrading to two enclosures overwrites all existing
saved data on your existing drives.
Be sure to back up all of your existing data as the expansion process overwrites all
existing saved data.
3.
Turn off your workstation before connecting the Xtore StudioRAID 5Ti and StudioSTOR
5T.
4.
Plug one end of the first miniSAS cable into the top SAS connector on the rear of the
Xtore StudioRAID 5Ti.
5.
Plug the other end of the miniSAS cable into the R380 SAS (RAID controller board) port
in your workstation.
6.
Plug the second miniSAS cable into the second R380 SAS (RAID controller board) port in
your workstation.
7.
Plug the other end of the second the miniSAS cable into the top SAS connector on the rear
of the Xtore StudioSTOR 5T.
8.
Plug one end of each of the power cords into the power connector on each of the
enclosures and the other end of each power cord into a properly grounded power outlet.
The following figure is shown only as an example and shows two enclosures connected to
a PC workstation.
Each individual workstation has a particular PCIe slot configuration. See www.avid.com
for the most up-to-date slot configurations.
9.
Install your disk drives into the new StudioSTOR 5T or install the additional drives into
the original StudioRAID 5Ti (see “Installing the Disk Drives”). Be sure to follow
anti-static precautions.
10. Turn on each of your StudioRAID/STOR enclosures and then turn on your workstation.
11. Allow the drives to spin up and wait until the drive LEDs turn steady blue.
Daisy-chaining enclosures:
1.
If this is an initial installation, follow the procedures in the Installation Chapter from
“Preparing for Installation” through “Installing the Disk Drives” on each enclosure.
2.
If this is an existing installation and you are expanding to two enclosures, back up all
existing data to another location as upgrading to two enclosures overwrites all existing
saved data on your existing drives.
Be sure to back up all of your existing data as the expansion process overwrites all
existing saved data.
3.
Turn off your workstation before connecting the Xtore StudioRAID 5Ti and StudioSTOR
5T.
4.
Plug one end of the first miniSAS cable into the top (UP Port) SAS connector on the rear
of the Xtore StudioRAID 5Ti.
5.
Plug the other end of the miniSAS cable into the R380 SAS (RAID controller board) port
in your workstation.
6.
Plug the second miniSAS cable into the second (DOWN) port of the Xtore StudioRAID
5Ti.
7.
Plug the other end of the second the miniSAS cable into the top SAS connector on the rear
of the Xtore StudioSTOR 5T.
8.
Plug one end of each of the power cords into the power connector on each of the
enclosures and the other end of each power cord into a properly grounded power outlet.
The following figure is shown only as an example and shows two enclosures connected to
a PC workstation.
Each individual workstation has a particular PCIe slot configuration. See www.avid.com
for the most up-to-date slot configurations.
9.
Install your disk drives into the new StudioSTOR 5T or install the additional drives into
the original StudioRAID 5Ti (see “Installing the Disk Drives”). Be sure to follow
anti-static precautions.
10. Turn on each of your StudioRAID/STOR enclosures and then turn on your workstation.
11. Allow the drives to spin up and wait until the drive LEDs turn steady blue.
Configuring the Two StudioRAID/STOR Enclosures
The process to configure the two StudioRAID/STOR enclosures is basically the same as
configuring a single StudioRAID 5Ti enclosure. The screen shots that follow were taken on a
Macintosh system, but the process is the same whether you are using a Windows or a
Macintosh workstation.
To configure the dual StudioRAID/STOR 5Ti (multiple enclosure):
1.
Back up all existing data to another location; this configuration overwrites all existing
saved data (if this is not an initial installation).
2.
Double-click the Avid configuration icon either in the folder you created during
installation or on your desktop to open the Avid configuration tool.
The ATTO configuration tool welcome screen opens.
3.
Click Hosts and then the Express SAS R380 in the Device Listing on the left.
4.
Click the RAID tab in the right-hand side of the Avid configuration tool.
The application scans for drives and a list of available drives appears in the top panel.
5.
Click an existing Group in the bottom pane of the right-hand window and delete the
existing group.
Be sure you have backed up all your existing media to a separate, safe location before you
delete the Group.
6.
Click Yes to confirm the deletion of the existing RAID Group.
The existing RAID Groups are deleted.
7.
Right-click the bottom pane of the right-hand window selecting the ten drives, and select
Create New Group.
8.
Name new group.
9.
Select all ten drives in the upper pane of the RAID window and drag them to the bottom
pane.
10. Select Next in the Create dialog box and then select RAID level 5, Interleave 256K and
Express initialization from the Create New RAID group dialog box.
11. Select Adaptive, Low rebuild priority, and Auto Rebuild in the Create New RAID group
dialog box. Click Next.
12. Click Finish.
A confirmation window displays:
13. Click Yes.
The ATTO Configuration tool completes the configuration.
Using the Disk Management Utility
The Disk Management Utility on your workstation is the utility used to create partitions on the
disk drives of the Xtore StudioRAID 5Ti. It is recommended to always use the quick
initialization during RAID configuration, as it allows users to create their partitions while the
RAID initialization is active. (For your convenience, the following procedures are a copy of
those included in “Installing the StudioRAID 5Ti”.)
Windows XP
To create partitions on your RAID configuration:
1.
Click the Start button, right-click My Computer, and select Manage.
The Computer Management window opens.
2.
Select Storage > Disk Management.
The Disk Management area opens.
3.
Right-click the newly installed, unallocated disk drive.
Make sure you are choosing the newly installed disk drive (unallocated drive) to partition.
4.
Click New > Simple Volume.
The Initialization Wizard displays.
5.
Click Next through the Wizard to partition your disk.
Disk management partitions your Xtore StudioRAID 5Ti as one partition.
6.
Right-click the newly partitioned drive and choose Format from the drop-down list.
The Format dialog box opens.
7.
Select File system > NTFS and select Perform a quick format.
8.
Click OK.
The formatting of your disk begins.
Windows Vista and 7
To create partitions on your RAID configuration:
1.
Click the Start button, right-click My Computer, and select Manage.
The Computer Management window opens.
2.
Select Storage > Disk Management.
The Disk Management area opens.
3.
Right-click the newly installed disk drive, (unallocated drive) and select New Partition
(new drive).
Make sure you are choosing the newly installed disk drive (unallocated drive) to partition.
4.
Click OK.
The Initialization Wizard displays.
5.
Click Next through the Wizard to partition your disk.
Disk management partitions your Xtore StudioRAID 5Ti as one partition.
6.
Right-click the newly partitioned drive and choose Format from the drop-down list.
The Format Partition dialog box opens.
7.
Select File system > NTFS and select Perform a quick format.
8.
Click Next until the wizard finishes.
The formatting of your disk begins.
9.
Click OK.
The formatting of your disk begins. Upon completion, your Xtore StudioRAID 5Ti is
ready to use.
Macintosh
The ATTO ExpressStripe utility is used to format, partition, and stripe your drives on a
Macintosh operating system.
To launch ExpressStripe:
1.
Follow the folder structure on the Xtore StudioRAID installation CD to the Xtore
StudioRAID folder, and locate the ExpressStripe application. Double-click the installer
file.
2.
Click Create.
The ExpressStripe tool opens.
3.
Click Delete and then click Volume to delete the volume.
4.
Click Create and in the next window, click Initialize.
5.
Select the drives you want to initialize and click Next.
6.
Click the Drives verified button and then click OK.
Make sure you are choosing the newly installed disk drive (unallocated drive) to partition.
7.
Click Continue.
8.
Click Create a Standard Volume and click Next.
9.
Click Continue.
10. Choose how many volumes you want and click Next.
11. Select Format > Mac OS Extended (Journaled).
12. Click Finish.
13. Click Quit.
Your Xtore StudioRAID 5Ti is ready to use.
A
Regulatory and Safety Notices
Warnings and Cautions
Never install equipment if it appears damaged.
Disconnect the power cord before servicing unit.
Only perform the services explicitly described in this document. For services or
procedures not outlined in this document, speak with authorized Avid service personnel.
Follow all warnings and cautions in the procedures.
Operate the device within its marked electrical ratings and product usage instructions.
FCC Notice
This device complies with Part 15 of the FCC Rules. Operation is subject to the following two
conditions:
1.
This device may not cause harmful interference.
2.
This device must accept any interference received, including interference that may cause
undesired operation.
This equipment has been tested and found to comply with the limits for a Class B digital
device, pursuant to Part 15 of the FCC Rules. These limits are designed to provide reasonable
protection against harmful interference in a residential installation. This equipment generates,
uses, and can radiate radio frequency energy and, if not installed and used in accordance with
the instructions, may cause harmful interference to radio communications. However, there is
no guarantee that interference will not occur in a particular installation. If this equipment does
cause harmful interference to radio or television reception, which can be determined by turning
the equipment off and on, the user is encouraged to try to correct the interference by one or
more of the following measures:
•
Reorient or relocate the receiving antenna
•
Increase the separation between the equipment and receiver
•
Connect the equipment into an outlet on a circuit different from that to which the receiver
is connected
•
Consult the dealer or an experienced radio or television technician for help
Canadian ICES-003
This Class B digital apparatus meets all requirements of the Canadian Interference Causing
Equipment Regulations.
Cet appareil numérique de la classe B respecte toutes les exigences du Règlement sur le
matériel brouilleur du Canada.
European Union Declaration of Conformity
Declaration of conformity
Konformitätserklärung
Déclaration de conformité
Declaración de Confomidad
Verklaring de overeenstemming
Dichiarazione di conformità
We/Wir/Nous/WIJ/Noi:
Avid Technology
1925 Andover Street
Tewksbury, MA, 01876 USA
European Contact: Nearest Avid Sales and Service Office or
Avid Technology International B.V.
Sandyford Business Center
Unit 3
Dublin 18, Ireland
declare under our sole responsibility that the product,
erklären, in alleniniger Verantwortung,daß dieses Produkt,
déclarons sous notre seule responsabilité que le produit,
declaramos, bajo nuestra sola responsabilidad, que el producto,
verklaren onder onze verantwoordelijkheid, dat het product,
dichiariamo sotto nostra unica responsabilità, che il prodotto,
Product Name(s): StudioRAID 5Ti
Model Number(s): XJ-SA11-0053-SR1111-A1
Product Option(s): This declaration covers all options for the above product(s).
to which this declaration relates is in conformity with the following standard(s) or other
normative documents.
auf das sich diese Erklärung bezieht, mit der/den folgenden Norm(en) oder Richtlinie(n)
übereinstimmt.
auquel se réfère cette déclaration est conforme à la (aux) norme(s) ou au(x) document(s)
normatif(s).
al que se refiere esta declaración es conforme a la(s) norma(s) u otro(s) documento(s)
normativo(s).
waarnaar deze verklaring verwijst, aan de volende norm(en) of richtlijn(en) beantwoordt.
a cui si riferisce questa dichiarazione è conforme alla/e seguente/i norma/o documento/i
normativo/i.
The requirements of the European Council:
Safety: Directive 2006/95/EEC
UL 60950-1, 2nd edition (2007)
CAN/CSA-C22.2 No. 60950-1-07
IEC 60950-1,2nd edition, 2005-12
EN 60950-1: 2006
EMC: Directive 93/68/EEC
EN55022:2006
EN55024:1998 /A1:2001 /A2:2003
EN61000-3-2:2000 /A2:2005
EN60000-3-3:1995 /A1:2001 /A2:2005
February 15, 2010 4:33 PM
Issued in Tewksbury, MA USA 2008
Disposal of Waste Equipment by Users in the
European Union
This symbol on the product or its packaging indicates that this product must not be disposed of
with other waste. Instead, it is your responsibility to dispose of your waste equipment by
handing it over to a designated collection point for the recycling of waste electrical and
electronic equipment. The separate collection and recycling of your waste equipment at the
time of disposal will help conserve natural resources and ensure that it is recycled in a manner
that protects human health and the environment. For more information about where you can
drop off your waste equipment for recycling, please contact your local city recycling office or
the dealer from whom you purchased the product.
Australia and New Zealand EMC Regulations
Nigel Streatfield General Manager
Avid Technology (Australia
Unit B
5 Skyline Place
French Forest NSW 2086
Australia
Phone: 61-2-8977-4800
Taiwan EMC Regulations
Taiwan EMC Regulations BSMI Class A EMC Warning