1
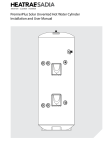
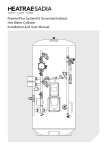
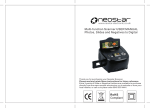
IP67
Waterproof
Electronics
Fan is Ip55
English
French
Deutsch
Designed and developed in England
Ste
rlin
gP
o
Co we
py r P
rig ro
ht duc
ts
STERLING POWER PRODUCTS
BATTERY CHEMISTRY MODULE
Advanced charging technology
Installations / Instructions
& manual
Inc temperature
sensor
Optional extra
Daisy chain digital
o
60 C battery
temp trip
WARNING
To remove upper lid
The lid is secured by two tabs
to the base.
Simply use one hand.
Thumb on one tab and finger
on the other tab. Press in no
more than about 3 mm for the
tab to clear the lid then simply
lift off the lid.
Do not press too far as excess
distance could break the tabs.
Damaged tabs cannot be
covered by warranty
Warranty:
www.sterling-power.com
2 year return to factory
www.sterling-power.usa.com Made in Taiwan conditional warranty
RoHS
compliant
including a de-sulphation cycle. LiFePO4 cycle with
BMS integrated off ability.
6) 4 models: 12V-12V up to 60A, 24V-24V up to 30A.
12-24V up to 30A at 24V and 24V - 12V, up to 50A at 12V.
7) Temperature sensor for each module. This
compensates for temperature and high battery
temperature trip, if required, reduces voltage of unit.
8) Remote battery sense for each module.
9) 6 LED charge and warning information LEDs
10) Fail safe, reverts to basic charge function in event of
a failure, replace/repair at convenience.
11) High battery temperature daisy chain trip. So, every
battery can be monitored and the unit’s voltage is
disconnected in the event of battery temperature
problems on any battery ( ie unit is switch off ).
12) Ignition / signal feed to link in with a Sterling Pro Split
R alternator splitter. This allows the output to be further
split.
What does it do?
This device will take the lower voltage power from the
battery charger and increase its voltage to match the
required charge curves of the other battery bank
chemistries. The output voltage is independent of the
charger’s input voltage this enables a totally different
chemistry profile (or even voltage scale i.e. 12-24V) to
be selected. This gives all the advantages of the multi
chemistry, multi output charger without the huge extra
cost. It can be simply retro fitted to any multi-output
charging system (within the limitations of the product).
Should only be fitted and operated by an individual
competent in electrical installations. If in doubt
please install using a competent electrical installer.
Remove the lid by pressing in carefully with your
thumb and finger, don’t push the tabs much more
than 5mm. Then the lid should slide off.
Set this unit as close to the battery charger as possible in
a cool dry ventilated space. As with most ideal conditions
on a boat, the cool, well ventilated part is a bit of wishful
thinking. With this in mind you may notice that the unit
comes with a heat sink and a cooling fan. This unit can
o
o
fully function in an ambient of 50 C. After about 55-60 C
o
the units performance will diminish down to about 80 C
where it will shut down.
If you have to fit it in a hot engine room then it should be
okay but try to fit it low down on the bulk head as it will be
a little cooler there.
Ste
rlin
gP
o
Co we
py r P
rig ro
ht duc
ts
Why do I need the chemistry module?
Most boats or specialised vehicles have multi-battery
bank installations. This type of installation can cause
problems if the battery chemistries in the installation are
very different from each other (e.g. gel and open lead
acid). Sometimes one battery bank may be on a totally
different voltage scale (i.e. you may have a 12V charger
and require 24V for 1 battery bank (or vice versa)). A
typical example of this is a GEL battery bank for your
starter, an Open Lead Acid battery bank for a secondary
/ aux battery system and a 24V lead acid sealed for the
bow thruster. This causes a problem for most multiple
standard output battery chargers as they can only be set
to 1 battery chemistry type and 1 voltage scale. The
traditional formality in this situation would be to set the
charger to the lowest voltage profile of all three banks.
This is problematic as many battery chemistries (GEL,
AGM and lithium) have sensitive / specific charging
profiles, similarly, too low voltage charging reduces the
potential performance of the charger.
Main Battery Charger requirements for this product
to work.
1) The battery charger should be a multi-output charger,
with 2 or more outputs. The charger’s voltage and
current must fall inside the BCM rating. I.e. no more than
60A if the BCM is a 60A model.
2) The charger’s output must be a power pack. I.e. if the
output charge cable is removed and the charger
switched on there should be about 13/14V or 26/28V (
depending on model ) on the actual charger terminal
with no cables connected.
3) If the charger’s output has a reverse polarity
disconnect on the terminal or requires a voltage
feedback to the terminal before activation then the
battery chemistry module will not work. I.e. we need an
active voltage on the charger terminal for our product to
work.
Installation:
Cables
The Positive Cables - carry the full current of the battery
charger and should be rated as such, look at the chart
over the page for recommended positive DC cable
sizes.
Fusing
DC - Fuse selection - as per the diagram, each positive
output from the module or charger to the battery must be
fused. Choose a fuse that is about 20% higher in
amperage rating than the maximum rating of the
charger, and round it up. Remember, this fuse is
Advantages of this unit.
primarily protecting the cables and not the product. E.g.
1) Easy to install, simply break the main charge cable
a 20A charger would have about a 25A fuse. A 60A
and insert the unit. Add a negative cable and a few small
charger about a 75A fuse. A full range of fuses and fuse
low current cables (temperature sensing and remote
holders are available at Sterling Power.
sensing).
2) Will convert single stage chargers into a multiple
The Negative Cable - due to the nature of this
stage chargers.
technology the negative only carries about 1/3 the
3) 12V-24V, 24V-12V, 24V-24V and 12V-12V models
current of the positive cable (about 20A on a 12V) unit.
available with 9 battery chemistries selectable.
This is why the stud is smaller and the cable requirement
4) Allows a retro fit on an older charger rather than
size is smaller (20A cable).
having to install an expensive new product.
Before starting ensure the battery charger is switched off
5) 9 selectable battery chemistries to chose from,
Gel / Exide spec. This program is, as per the
recommendation of Exide, set at a voltage of 14.4V for
about 10-12 hrs. The unit then drops to float.
Gel U.S.A. spec. For some reason known to someone,
but not to us, the American gel manufactures want a
different charging regime than the European ones. Don't
ask us why, if in doubt, ask the battery supplier, this
setting has a max charging voltage of 14.1V.
Sealed lead acid / A.G.M. This is set to a maximum
charging voltage of 14.4V with a software program to
match most of these battery types. Some AGM batteries
only want 14.1V, if so, set the unit to the American gel
setting. If in doubt ask the battery supplier.
Lithium LiFePO4, should only be used with a Battery
Management System for the batteries to balance and
protect them.
Ste
rlin
gP
o
Co we
py r P
rig ro
ht duc
ts
and the 230V /110V AC isolated, then, connect the input
positive cable first, then the output positive cable, then
the negative.
Remote sense, because the unit can compensate for
voltage drop in the cable (if required and fitted) it is best to
fit the unit as close as possible to the battery charger.
Setting the Main Battery charger ( not the module ).
The main a/c mulatable output battery charger must be
set to the lowest battery type setting , ie if you want to
charge a gel( 14.4 ) and a open lead acid battery ( 14.8 )
then the main charger must be set at the lowest voltage (
14.4 ) the battery module can only increase the voltage
above the main charger it cannot decrease the main
charger voltage. Failure to do this will prevent the Battery
chemistry unit from working correctly
Battery type selection - this is simple to do, simply
remove the lid exposing the rotary switch (number 16 on
Fig 1). Look closely for the small arrow to indicate what
position it is pointing at. On start up the top blue (number
7 on fig 1) LED will flash x number of times to indicate the
setting. E.g. 4 flashes when unit fires up every time =
position 4 on the switch. If this is not the correct setting
then simply rotate the knob to correct the position. Then
switch the battery charger off ( wait a few minutes ) then
back on again and the flashes will change. Ensure you
have the correct number of flashes for your battery type
(note: the incorrect battery setting for a few minutes will
not cause any damage to your batteries).
The battery type voltages are on the front label of the
product and on the table over leaf.
After selecting the battery type, make sure the voltages
fall into the battery companies range for their battery
requirements. It may be necessary to use a different
battery type to obtain the correct voltages you need for
your battery. Remember, it's the voltages which are more
important than our battery types - we have simply tried to
decipher a quagmire of different companies’
requirements and group them in some sort of order for
the general public to make what sense of them they can.
The voltage requirements of the battery company will
override our recommendations as it is them who are
supporting the battery warranty etc. Adjust to suit their
requirements.
Some basic battery type information
Flooded or open lead acid batteries, where you can
unscrew the lid of the battery and are able to top it up with
water, these are by far the best types for fast charging
and long life (max voltage 14.8V).
Fit the unit, as close as possible (taking into account the
above requirements) to the battery charger.
If you must fit it in an enclosed engine room (i.e. a small
yacht, where the engine room is fully enclosed with
sound proofing all over the place) then fit any equipment
as low as possible. It is best to fit it outside the engine
room near the battery box.
Battery temperature sensor: Simply connect one of
the enclosed temperature sensor to a battery terminal
post (negative) and to the 2 x small terminals marked
battery temperature sensor. Simply insert one wire into
each side, there is no polarity on these wires. Make sure
you do not crush the temp sensor which is a small device
inside the yellow ring terminal, as this will destroy the
processor chip. The output voltage will be reduced in
accordance with manufacturer’s battery charging
temperature curves. In the event of the battery
temperature increasing due to battery failure, if the
o
batteries exceeds 55 C, the unit would trip.
Battery temp trip ( daisy chain ) or BMS trip. This unit
has a circuit which, if opened circuited, the unit will stop
working (connector 1 on the information drawing). The
product comes with a link wire across the two terminals
to neutralise this trip, if you wish to use this circuit to
daisy chain or allow a BMS to trip the unit then remove
the link and add the devices. This can be used to daisy
chain high temp trips (the blue ones). These are
o
normally 60 C temperature trips, as such, they can be
linked in series to any number of batteries. If a battery
o
reaches over 60 C the link is broken - the product trips.
Or, this can be linked to a BMS ( Battery Management
System) for lithium this can break the circuit to trip the
high charged side of the unit.
WHAT CABLE TO USE (mm sq)
A charger or inverter up to
cable run distance 0-1.5m
1.5m - 4m
0-25 amps
6 mm sq
10 mm sq
25-45 amps
16 mm sq
25 mm sq
45-85 amps
25 mm sq
35 mm sq
85-125 amps
35 mm sq
50 mm sq
Please note that if there is a problem obtaining for example 90 mm sq cable, simply
Use 2 x 50 mm sq , or 3 x 35 mm sq , the cable is simply copper, and all you require
Is the copper. It does not matter if it is one cable or 10 cables as long as the square
area adds up. Performance of any product can be improved by thicker cable, so, if in doubt round up.
+ +
6
Negative
Positive
F
A
N
To Remove lid
Gently press in the
side slots and lift lid off
Aluminium
Heat sink
Ste
rlin
gP
o
Co we
py r P
rig ro
ht duc
ts
The product will auto start when power is supplied to the input
side of the device from the battery charger.
Number key
1) Optional. High battery temperature trip / BMS remote off. The
2 connectors in position 2 should come linked, if linked then the
port is operational. Any break in this link will shut down the
product. It can be used to daisy chain normally closed
temperature sensors or to a BMS for remote switching of unit (see
instructions later). Must have link wire in or daisy chain in for
unit to work ( not a required fit ).
1A) This link wire must be installed in standard setup if Daisy
chain thermal sensors not installed
2) Battery temperature sensor connection (unit will assume
default of 25°C ambient if sensor not connected) (Yellow enclosed
sensor).
3) Main Positive DC from unit to battery bank (OUT).
4) Main Negative (must be common negative system)
5) Main positive DC power input, from supply charger (IN).
6) DC feed control for fan to ease fan replacement.
7) Blue LED Charging information
3
4
16
7
+ + + + + +
OUT
IN
56
234
2
1
15
14
18
01
To
Remove
lid
Press
and lift
789
8) Yellow LED Charging information
9) Green LED Charging information
10) Red LED Fault information
11) Yellow LED Fault information
12) Blue LED, power input to unit - unit active
13) Remote control & re-programming port
14) Remote battery sense wire to compensate for voltage drop
in cable up to 1 v above set ( does not need to be used )
15) Dummy ignition output to operate sterling Pro Split R
splitter to split the output further if required
16) Battery type selector
17) 2 x Fuses, overload protection ( main current ) Model
dependent
18) 1 x Fuse for negative overload ( 25A ), model dependent
19) Battery temperature sensor, fits in position 2
20) Daisy Chain Temperature Trip ( optional )
12 v
40 mm
1A
13
19
Fig 1
o
2 x Flash =(EO2) = High Temp trip (80 C). The unit has
overheated, this could be due to a fan failure or simply installed in
too hot an environment.
o
3 x Flash = (EO3) = High Battery Temperature trip (55 C). Only
applicable if the battery temperature trip cable is connected. In
event of a battery overheating (unlikely under normal operations).
Nevertheless, this unit has a temperature / performance reduction
algorithm in the software to prevent unnecessary tripping.
5
7
8
9
10
11
12
To
Remove
lid
Press
and lift
20
5 x Flash = (EO5) = Daisy Chain Break. If the daisy chain connection
o
is broken then the unit will trip (60 C).
o
6 x Flash = (EO6) Mechanical trip (100 C). Last resort trip.
These trips open circuit the relay. They isolate the charger from the
batteries. They do not automatically reset, they require the user
(you) to manually turn the unit off and on again. To reset these trip
conditions you must shut down the input power to the unit ( i.e.
switch off the main battery charger ). This will kill the processor.
These trips will also automatically reset every time the main power
source / charger is switched off.
Yellow LED ( number 11 above ). WARNINGS
These are warnings and do not involve the unit tripping.
LED state:
On (solid) Low Input Voltage. Check charger power source voltage
is above 11.0V (x 2 for 24V).
1 x Flash = Low Output Voltage. The output voltage is too low for the
unit to activate.
o
LED functions
Red LED (number 10 above). ERRORS resulting in TRIPS
Alarm codes - there are 6 voltage reduction alarms
Remote control ERROR display stated in the form (EOx).
LED state:
On ( solid ) = (EOO) = High input voltage
1 x Flash = (EO1) = High Output Voltage. This could be caused by
a product malfunction or possible high voltage feedback from
other charging sources on the output battery bank.
17
2 x Flash = High Temperature Warning (65 C+). LED comes on to
o
warn that the temperature of the unit has exceeded 65 C.
3 x Flash = Remote sense voltage compensation maximised (only
relevant if the remote sense cable is used) check output cable
thickness. For safety reasons the remote sense has only the ability
to increase the voltage from the product by 1.5V to compensate for
output cable voltage drop (any more than this the cables could
overheat). The cable is too thin or the run too long. For the module to
fully compensate for the voltage drop, there is no problem as far as
safety is concerned, it shall just in a potential loss of performance.
To fix this, check your cable thickness and length is suitable for the
current used.
Manual / deliberate trip. If you wish to open circuit the BCM
manually, you can, with the remote control (see Remote Control
page ). This shall result in LEDs 7,8,9 (blue, yellow and green)
flashing. This display suggests the BCM has been manually tripped,
this is not a warning nor an error, simply initiated by the user. It results
in the total isolation of the battery charger from the batteries.
Ste
rlin
gP
o
Co we
py r P
rig ro
ht duc
ts
Start up and self test procedure.
Once the unit has been correctly installed and the main battery charger is off, there should be no LED on.
Start the battery charger, the start up sequence is:
1) blue ‘power on’ LED at the bottom will illuminate
2) Approx 0.5 seconds later all the LEDs will illuminate to show all LEDs are okay.
3) All LEDs off then the top blue LED will flash x times between 1 and 9 flashes, this shows what setting the
rotary switch is set to for battery profile type.
4) All LEDs off then the fan will ramp up to full speed to show the fan is okay and multi-speed functions are
okay.
5) After fan test the green LED (number 9 on fig 1) will flash 2 times indicating the battery temperature sensor
is connected, and, if there is no flashes (or even the green LED on) then the temperature sensor is not
connected and the unit will default to 20 Deg C (ambient control setting).
6) Unit will proceed to charging mode
Unit starting to charge going through its 5 stage charging cycle as per below graph
If, on start up, nothing happens, then check if the top blue LED is on. If not there is no electric going to the
unit, if so, measure the input and output voltages and see if the output is a larger voltage then the input to
confirm the unit is operating.
Remote control panel see fig 5
Charging profile Information displayed on top 3 LEDs on main unit
v
o
l
t
s
Fast charge
High absorptions
constant current charge rate constant
mode
voltage mode
Stage 1
Stage 2
LED
LED
Lower absorptions
charge rate constant
voltage mode
Stage 3
LED
Float/Power pack
mode, constant
voltage, full current
accessibility
Stage 4 LED
Backlash voltage. If
If voltage drops
due to heavy charger power exceeded
load in excess
and battery discharge
off unit current
unit resets to stage 1
ability to support
Stage 5 LED
Time ( depending on battery size, type, state of charge and charger battery ratio, Digitally processed)
Battery Chemistry selection
Charge Conditioning Float Min Boost
Switch position volts
volts
volts
mins
1) Gel USA
14.0
13.85
13.7
60
2) A.G.M
14.1
13.75
13.4
60
3) Sealed
14.4
14.15
13.6
120
4) Gel Euro
14.4
14.0
13.8
720
5) A.G.M 2
14.6
14.1
13.7
60
6) Flood/open 14.8
14.0
13.3
60
7) Calcium
15.1
14.3
13.6
60
8) De-sulphation 15.5
0
0
240
9) LiFePO4
14.6
14.4
14.4
30
Blue LED flash
and
Max Boost
mins
600
480
480
1440
480
480
360
240
30
Fuses: all wires directly connected to a battery must be fused, we recommend
a fuse about 20% larger than the max current to be carried ie a 60 amp battery
chemistry module should have approx 80 amp fuse on the output to the aux battery
, the fuse should be positioned within 15 inches / 350 mm of the battery, a range
of high current pre fused cables are available from Sterling Power products
Absorption
Condi
H Charge
Ste
rlin
gP
o
Co we
py r P
rig ro
ht duc
ts
Remote Control
The home screen displays the ouput voltage from the battery charger.
If ‘crc’ is displayed at any point, simply ignore, continue as you were, all this
mean is that the remote has received a corrupt readout signal from the
BCM (merely momentary).
Please note for 24V only operations you set up as 12V. I.e. if you want to set a
voltage, for example, 26V you set in the parameters for 13V.
Remote Buttons
Left Button (Volts Alarm Select). Press button for output voltage. Press
button again for remote sense voltage. If remote sense voltage cable is not
connected then the display is 0.0V (with a red backlight). Press button again to
revert back to home screen input voltage. Hold button for 4 seconds to set
alarm to ‘off’, repeat procedure to turn alarm to ‘on’.
Right Button (Temp Menu Setup). Press button for unit temperature. Press
button again for battery temperature (via batt temp sensor). If sensor is not
attached then the reading shall be nc (non compliant). Press again to view
unit temperature.
Float
Sterling Power Products
V
12.2
In / Unit Bat - Chem - Unit
Audible alarm on/off
hold >5 sec
Temp
Volts
Menu
Alarm
Unit on/off
Setup
Select hold > 5 sec
Out / Rem
Batt.
Fault
menu
scroll
(unidirection)
Manual / Deliberate open circuit feature via the
remote control. Ensure you are on the home screen
and hold both buttons simultaneously ~5 seconds. This
shall result in oFF being displayed on the remote. LEDs
7 (blue), 8 (green), 9 (yellow) on the BCM shall start
flashing, this suggests the latching relay has opened,
however, the charger is now 100% isolated from the
batteries. The unit shall remain open circuited until the
user (you) closes it. To close circuit, simply hold down
To exit from the menu, holding down both left and right buttons simultaneously the left and right buttons until ON appears. Then the
will result in END appearing on the screen. This shall ultimately revert back to LEDs (7,8,9) shall stop flashing and the blue LED (LED
7) should come on.
the home screen.
To access the menu and adjust parameters:
To access the menu and adjust the parameters press and hold the right button
(Temp Menu Setup) until SEL appears (approx 5 seconds), then let go. bPc
shall appear and you can now scroll through all of the 18 parameters
unidirectionally using the right button only. You can enter whichever parameter
you wish by pressing the left button (Volts Alarm Select). Certain parameters
are adjustable, the majority are, however, just a read out. Refer to the chart
below.
Setup - Menu: To eject from menu simply do nothing for 10 sec it will jump out
“bPc”
“btY”
“coU”
“IoU”
“C/F”
“buC”
“ASc”
“con”
“bLc”
“bLt”
“br9”
“b9b”
“LEd”
“uId”
“uSW”
“rSW”
“Loc”
“rSt”
* = only possible
if not locked
SEL “bPc” display boost current in percent.
“btY” displays battery profile type (0-9). This number denotes which charging profile the BCM
is set to. (Ref: table labelled ‘Battery Chemistry Selection’ on page 3).
“coU” displays cut off voltage (the voltage at which the BCM stops boosting) (12.5V)
“IoU” display input / output base voltage (12/24V). Essentially the voltage scale the system is
at.
“C/F” change from celcius to fahrenheit or back* (default = celcius). Press right button to
change between Fahrenheit (FAH) and Celsius (cEL)
“buC” turn Buzzer on/off* (default = on). Left button for off and right button for on
“Asc” Autoscroll on / off (default = off). Left button for off and right button for on
“con” change contrast* value from 0 to 7 (default = 3). Left button down and right button up.
“bLc” change backlight colour*. off <- auto -> green -> red -> blue (default = auto). To change
right button goes from off ---> blue and left button goes blue ---> off.
“bLt” change backlight time*. 1 - 600 seconds, 0 = always on, (default = 60). Right button
goes up the values, left button goes down the values. Hold button to accelerate.
“br9” change voltage from red to green backlight* 8.0 - 13.3V (default 12.4V). Press right
button to increase value, press left button to decrease value. Hold to accelerate.
“b9b” change voltage from green to blue backlight* 12.4 - 16.0V (default 13.4V). Press right
button to increase value, press left button to decrease value. Hold to accelerate.
“LEd” change LED on time 1 - 600 seconds, 0 = always on, (default = 60). Press right button
to increase in value, press left to decrease in value. Hold button to accelerate.
“uId” display Unit ID
“uSW” display unit software version
“rSW” display remote software version
“Loc” Lock unit lock code = 1 to 999 (default = unlocked). WARNING This mode shall lock
the unit by virtue of a pass code, be careful. Press right button to increase value, press left
button to decrease value. Please release button when on the number you require, the software
shall store this number, then the display shall read: loc -> on -> #. # = number you have
stored. To remove loc, return to loc and re-enter the number, release buttons and the display
should read: loc -> off (green backlight). Please make a note of this loc code.
“rSt” Reset to default values*. Left button NO, right button YES. Let go when on YES to reset.
* = only possible if not locked
Basic installation
Ste
rlin
gP
o
Co we
py r P
rig ro
ht duc
ts
more than one
unit can be used
this is all that is required to make the unit work
Ground / Chassis
Boat grounding
Pro
Negative
Positive
F
A
N
+ +
Any manufactures’ multi-output charger can be used,
(up to the product’s rating) and as long as the charger can deliver
power when not connected to a battery ie the terminal is live
12 v
40 mm
Aluminium
Heat sink
Charge ULTRA
AC circuit breaker
Sterling Power
GLOBAL A/C Input & Active Power Factor Correction
Progressive DIGITAL software control
www.sterling-power.com
www.sterling-power-usa.com
AC Power
Auto Temp Control
Amps
Volts
RoHS
compliant
Active PFC
0%
1 2 3
Absorption
De-sulphation
Open lead acid
DC Low Voltage
Sealed lead acid
DC High Voltage Trip
High Charger temp trip
GEL
Lithium (LiFePO4)*
Calcium / Custom
Check Fan
*Lithium must be used in conjunction
with a lithium balancing system.
To avoid serious injury High current capable
or death from electric
High Voltage A/C WARNING Low Voltage D/C
D/C fuse
D/C fuse
D/C fuse
20% larger
amperage than
charger output
20% larger
amperage than
charger output
20% larger
amperage than
charger output
_
+
12 or 24 v battery bank
OUT
DC Output Service
A.G.M
SETUP
ENTER
Float
CHARGE INFORMATION
+ + + + + +
Battery Type
_
+
12 or 24 v battery bank
_
IN
Fig 2
+
12 or 24 v battery bank
Battery temperature
sensors & trips ( if used )
56
234
Battery Health Program
+ +
Fault
Stand-by
Fast Charge
789
OK
Preset 1
System self test
100%
Charger Output
CHARGER MODE
Preset 2
Multi Speed Cooling
AUTO CONSERVATION MODES
01
Earth /chassis
boats bonding
Negative
Positive
F
A
N
12 v
40 mm
Aluminium
Heat sink
on battery being charged by chemistry module
Fit on battery terminals neg or pos
19
Temperature sensor (supplied with product)
used by the digital processors to adjust
charging curves against temperature rise. It
will also act as a high temperature trip - if, the battery it is
connected to is the one overheating .
Blue
234
56
01
Yellow
OUT
789
+ + + + + +
Fig 3
IN
2
1
20
Individual battery temperature trip ( daisy chained )
(optional). This product trips at 60 Deg C
(Recommended but can be increased if required ).
It can be connected to as many batteries in series (daisy chain)
and if any one of these batteries exceeds 60 Deg C
the unit will trip. The chemistry module will show a warning
Negative
Positive
F
A
N
+ +
Ste
rlin
gP
o
Co we
py r P
rig ro
ht duc
ts
Remote volt sensor
( if used )
12 v
40 mm
Aluminium
Heat sink
For compensating for voltage drop on long run cables
234
01
Fig 4
56
789
+ + + + + +
OUT
IN
14
Attach a small sense cable to position 14 ( remote voltage measurement ) and the system will
increase the voltage up to about 1V (if necessary) above set voltage to compensate for voltage drop in long
cable runs. This wire is purely optional and, if not used, the unit will simply default to measuring voltage
at the output stud of the module.
AMIC : D
I
G
N
DY
ignition feed
+ +
N
Engine start battery
15
L : DU R
ITA
A
E : DESIG
BL
alternator
d+ or
ignition feed
e
fus
Main domestic battery bank
fuse
engine
IN
Start Batt
Negative
starter motor
56
234
OUT
Aluminium
Heat sink
789
Alt in Batt 2
1 or 2
alternators
12 v
40 mm
+ + + + + +
Used to supply a false ignition feed to integrate the product into a
Sterling product called the Pro Split R to charge more battery banks.
Negative
Positive
F
A
N
01
Ignition out
(if used ) Position 15
Bow Thruster/ gen/ second eng/etc
Fig 5
Multiple units on single output charger
Ste
rlin
gP
o
Co we
py r P
rig ro
ht duc
ts
For information only to show product flexibility
12-12V
unit
12 v
_
24 v
+
12 or 24V battery bank
_
For this to
work
you must
remove
this wire
and add
another
module
56
234
OUT
Aluminium
Heat sink
IN
12-24V
unit
Fig 6
+
12 or 24V battery bank
How not to use this product
Single
output
charger
or power
supply
12 v
40 mm
+ + + + + +
234
+ +
+ + + + + +
IN
Negative
Positive
F
A
N
789
56
789
12 v
OUT
01
12 v
40 mm
Aluminium
Heat sink
01
AC circuit breaker
Negative
Positive
F
A
N
+ +
Single output charger
Ground / Chassis
Boat grounding
Single output charger How to use this product
Single
output
charger
or power
supply
Single output charger.
For a single output
charger the battery must
not be left directly
connected to a battery
bank as this effectively
connects the modules
directly to a battery bank
and this could damage
the unit.
Single output charger.
Remove the original charger
cable, reduce the charger to
its lowest chemistry setting (if
it has one) then all the current
must go direct to a chemistry
module and no cable must be
directed to the battery bank.
Fig 2
Fig 3
ENSURE ALL NEGS ARE COMMON
100mm x 140mm x 97mm deep
ENSURE ALL NEGS ARE COMMON
Customer Service & Warranty
Your 100 % satisfaction is our goal. We realise that every customer and circumstance is unique. If
you have a problem, question, or comment please do not hesitate to contact us. We welcome you to
contact us even after the warranty and return time has passed.
Product Warranty:
Each product manufactured by Sterling Power comes with at least a 2 year limited factory warranty.
Certain Products have a warranty period of time greater than 2 years. Each product is guaranteed
against defects in material or workmanship from the date of purchase. At our discretion, we will repair
or replace free of charge any defects in material or workmanship that fall within the warranty period of
the Sterling Power product. The following conditions do apply:
- The original receipt or proof of purchase must be submitted to claim warranty. If proof
cannot be located a warranty is calculated from the date of manufacture.
- Our warranty covers manufacture and material defects. Damages caused by abuse, neglect,
accident, alterations and improper use are not covered under our warranty.
- Warranty is null and void if damage occurs due to negligent repairs.
- Customer is responsible for inbound shipping costs of the product to Sterling Power either
in the USA or England.
- Sterling Power will ship the repaired or warranty replacement product back to the purchaser
at their cost.
If your order was damaged in transit or arrives with an error, please contact us ASAP so we may take
care of the matter promptly and at no expense to you. This only applies for shipping which was
undertaken by our company and does not apply for shipping organised by yourself. Please do not
throw out any shipping or packaging materials.
All returns for any reason will require a proof of purchase with the purchase date. The proof of
purchase must be sent with the returned shipment. If you have no proof of purchase call the vendor
who supplied you and acquire the appropriate documentation.
To make a claim under warranty, call our customer care line at ( USA 1-(207)-226-3500, England
01905 771771). We will make the best effort to repair or replace the product, if found to be defective
within the terms of the warranty. Sterling Power will ship the repaired or warranty replacement
product back to the purchaser, if purchased from us.
Please review the documentation included with your purchase. Our warranty only covers orders
purchased from Sterling Power. We cannot accept warranty claims from any other Sterling Power
distributor. Purchase or other acceptance of the product shall be on the condition and agreement that
Sterling Power USA LLC and Sterling Power LTD shall not be liable for incidental or consequential
damages of any kind. Some states may not allow the exclusion or limitation of consequential
damages, so, the above limitations may not apply to you. Additionally, Sterling Power USA and
Sterling Power LTD neither assumes nor authorizes any person for any obligation or liability in
connection with the sale of this product. This warranty is made in lieu of all other obligations or
liabilities. This warranty provides you specific legal rights and you may also have other rights, which
vary from state to state. This warranty is in lieu of all other, expressed or implied.
Sterling Power Products Ltd
Unit 8, Wassage way
Hampton lovett ind est
Droitwich
Worcestershire
ENGLAND WR9 0NX
Tel : 01905 771771
Fax: 01905 779434
www.sterling-power.com
Sterling Power USA
Warranty Service Center
406 Harold Dow Highway,
Suite#4
Eliot, ME 03903
Phone: 207-226-3500
Fax: 207-226-3449
www.sterling-power-usa.com