1
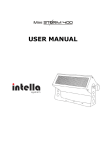
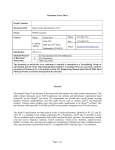
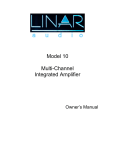
PARTS OF YOUR RITE2-167
SSPL 90
MAXIMUM OUTPUT (90dB Source)
120
RITE2-167 ANSI SPECIFICATIONS
S 110
S
P
100
L
9
0 90
80
.25
.5
1
2
4
8
FREQUENCY (kHz)
GAIN
FULL ON GAIN (50dB Source)
50
INDEPENDENCE
G
A
I
N
d
B
40
30
20
10
Use and Care of
Your Hearing Instruments
.25
.5
1
2
FREQUENCY (kHz)
4
MAX SSPL 90
HFA SSPL 90
MAX FOG
HFA FOG
THD 500Hz
800 Hz
1.6kHz
FREQ RANGE F1
F2
REF TEST GAIN
EIN
BAT DRAIN
112 dB +/- 4
106dB +/- 4
40dB +/- 5
35dB +/- 5
<=1.5% MAX
<=1% MAX
<=1% MAX
200Hz
7000Hz
30dB +/- 3
=<25dB MAX
1.35mA MAX
8
Tubing
Tube Plug
Model ID, Serial Number
Year of Manufacture
Microphone
Ports
Sound Tip
with WaxStop
Digital Volume
Control
Battery
Door
Concha Lock
Red Sound Tip = Right Aid
Blue Sound Tip = Left Aid
ACCESSORIES
Revision 07/09
RITE2-167
Since 1979
806 Beaver Street Bristol, PA 19007
800-492-4515
TUBING & BATTERIES
REMOVAL: Grasp the connector
Storing/Drying jar
Soft pouch
Cleaning tool
Your hearing instruments are shipped with a
variety of accessories, a sampling pictured above,
including the following:
Hard case
Soft pouch
1 box of batteries per instrument
Storing/Drying jar
Program selection wand
Cleaning tools
If you have any questions about the use of these
accessories please contact your hearing care
professional.
firmly. Do not pull the tubing itself,
as it can become stretched and
distorted. Insert finger nails into
the finger nail grooves. Pull
straight out. DO NOT TWIST.
ATTACHMENT: Align the tube
plug (tubing facing down) with
the opening. Apply gentle
pressure until the plug starts
into the socket. Push firmly
until the plug clicks into place.
A zinc-air type 312 battery is recommended,
but any 312 type or brand may be used. To
insert, remove the adhesive label and wait
thirty seconds for air activation. Any moisture
on the battery surface should be wiped off.
With the positive side up, insert into the
battery door. It may take several minutes for
the battery to work to its full effect.
To remove, open the battery door and lift the battery out of the
battery door.
Low battery indicator: When your battery voltage is low and in need
of replacement you will hear the low battery indicator. You will hear
five beeps indicating that it is time to change your battery. The
warning beeps will be repeated.
INSERTING HEARING AIDS
Inserting your hearing instruments for the first
time can be challenging. Until your hearing
aid is fully inserted there can be feedback
(whistle). We suggest that you practice
without the battery until you have perfected
this procedure. With practice, inserting your
hearing aids will become as easy as putting
on your glasses.
To insert your hearing instrument:
Grasp the hearing aid between your thumb
and forefinger.
Place it over your ear as shown.
Gently push the ear piece into the ear canal.
Tuck the concha lock into the bowl of your
ear.
When positioned correctly your hearing aid is
almost completely invisible.
Note: It is important to remove the instrument by
grasping the instrument itself. Please do NOT
remove the instrument by pulling the tubing, as it
can become stretched and distorted and may
void the warranty.
PROGRAM SELECTION
ON/OFF & VOLUME CONTROL
OFF
As you change programs, you will
hear a series of beeps, which will
represent the change, as listed
below.
ON
Your instrument is turned on and off by opening and closing the
battery compartment. Whenever you turn your hearing aid on it
is automatically set to program one.
Hint: Opening the battery door every time you remove your
instruments will prolong the life of your hearing aid batteries.
Louder
Softer
The digital volume control (VC) can be
rotated continually up or down. THERE IS
NO MECHANICAL STOP. Each time your
device is turned on the volume is
automatically set to mid volume.
Increase the volume by rotating the control forward and decrease the
volume by rotating the control down. You will hear a single beep each
time the volume is increased or decreased one step.
No beeps will be heard when the control is rotated beyond the
maximum or minimum volume.
Note: If you have to increase or decrease volume each time you turn
on your device ask your hearing professional to make a computer
adjustment to change the starting volume level.
Brush wax/debris from
sound port daily
Tip replacement
Custom mold replacement
Daily wipe your instruments,
tubing, sound port, and
tips/molds clean with a soft,
dry cloth, carefully removing
any traces of wax and
debris. A brush is provided
to further assist you in
cleaning.
After being disconnected
from
your
hearing
instrument, your tips/molds
can be washed in lukewarm
water with a mild detergent.
Reconnect after drying
thoroughly.
Shiny Side
Connect Flex Connector and Cord Here
When you turn your hearing aid on it
is automatically set to program one.
Program 1 (General Use): One Beep
Program 2 (Noisier Situations): Two Beeps
Program 3 (Windy Situations): Three Beeps
Program 4 (Not Active) : Four Beeps
Your hearing aids use a flex connector to connect the programming
cord to the hearing instruments.
Use the program wand to change between programs.
- Open the battery door slightly to create a space on the hinged
side of the battery door.
- Align red dots on the flex connector and programming cable.
- Connect programming cable to the flex connector.
To use the wand, touch it to your ear where the hearing
aid sits (as shown) and move it away. To change to
the next memory, again, bring the wand back up to
your ear and move it away.
Warning: Do not place the Program Wand on or near
computer equipment, software, discs or credit cards.
Information could be lost/destroyed as a result.
WAXSTOP INSTRUCTIONS
CLEANING TOOL
Wax buildup is the number
one cause of instrument
failure. It is important to
keep your instruments as
clean as possible.
PROGRAMMING CORD CONNECTION
Positive tip
- Insert the flex connector into the space created. The gold
(shiny) side of the flex connector must be facing away from
the battery compartment. Do not force this connection.
- Close the battery door.
Refer to the QuickStart Guide and/or the Virtual Office Tutor for
programming instructions.
STORING/DRYING JAR
Sound Tip with
WaxStop inserted
We recommend that you store
your hearing instruments in the
drying kit when the aids are not
in use.
The WaxStop tool has a positive and a negative tip. The
negative tip has a raised dot above it. The WaxStop is inserted
into the sound tip the tubing.
Open the battery door of your
hearing instruments, place them
on top of the circular foam piece,
Raised dot =
Negative tip
WaxStops
Negative tip
Positive
tip
Negative
tip
and firmly secure lid on the jar. Removing batteries
before storing will extend battery life.
To insert: Place a WaxStop on the negative tip of the WaxStop
tool. Insert the WaxStop into the sound tip of the tubing.
Remove the WaxStop tool, leaving the WaxStop securely in
place.
There is a small amount of blue beads in the jar that
are designed to fade and blend in with the other beads
when it is time to reactivate. After reactivation these
beads will return to their original blue color. Keeping
the lid firmly in place at all times will extend the time
between reactivation.
To remove: Place the positive tip of the WaxStop tool into the
WaxStop in the sound tip of the tubing. Remove the WaxStop
tool, pulling the WaxStop out of the sound tip.
The WaxStop can be cleaned in hot water with a mild
detergent, dried thoroughly and then reused. We
recommend that you change the WaxStop every time you
change your batteries.
Carefully follow the directions on the jar to reactivate
the beads. Allow the beads to cool to room
temperature before placing them back into the jar.
Never put your hearing instruments, batteries, glass jar,
lid or foam in the oven or microwave. Do not place
over an open flame.