1
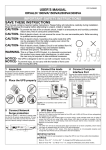
Technical data: Model Technology Power Power Input nominal voltage Input voltage range Input nominal frequency Input frequency range Surge protection EMI/RMI filter Output nominal voltage Output voltage range Output frequency Transfer time Battery battery capacity Recharge time Backup time Humidity Temperature Dimensions (D x W x H) Net Weight 650 VA W V % Hz % J MHz V % Hz ms Ah h min % C mm kg 750 900 Line - Interactive 650 750 900 390 450 540 230 25 50/60 5 175 30~1000 230 10 50/60 ~6 Sealed lead-acid, without maintenance 7 7 9 6~8 (90%) 5 – 15, depend on loas 0~90 0~40 260 x 170 x 80 6 6,5 USER MANUAL ORVALDI 650/750/900 SP ORVALDI Power Protection Sp. z o.o. Office: Aleje Jerozolimskie 123 02-017 Warszawa Poland Internet: www.orvaldi.com.pl e-mail: [email protected] ORVALDI Power Protection Sp. z o.o. Centre Logistics and Service 33D Wrocławska Str.; 55-090 Dlugoleka Poland www.orvaldi.com.pl [email protected] 1. INTRODUCTION 1.1 Safety Instruction Caution ! The UPS contains voltages which are potentially hazardous. All repairs should be performed by qualified service personnel. The UPS has its own internal energy source (battery). The output receptacles may be live even when the UPS is not connected to an AC supply. For safe and continuous operation of the UPS depend partially on the care taken by user. Please observe the following precautions. Do not disassemble the UPS. Do not attempt to power the UPS from any receptacle except a 2-pole 3-wire grounding receptacle. Do not place the UPS near water or in environment of excessive humidity. Do not allow liquid or any foreign object to get inside the UPS. Do not plug appliances, such as hair dryers, into the UPS receptacles. Do not place the UPS under direct sunshine or close to heat -emitting source. The power socket should be installed near the equipment and be easily accessible. To isolate from AC input, disconnect the plug in the power cord. The printer may best be connected directly to wall receptacle instead of UPS. (laser printer can't be connected to the UPS.) The battery will discharge naturally. If it is charged periodically, its life time will be prolonged. It will damage if long-term no use, which won't be covered in our warranty. 1.2 System Description The UPS equipped with Boost-up and Buck-down features Accepts wide range input windows without using batteries. It is your best choice for LAN and PC. Built-in RJ45 jacks protect your modem/fax line thoroughly. To enable user to start on the UPS without Utility Power, It is also equipped with "cold start function". 1. Sockets protected from grid failures and power surges. 2. Overload/fault indicator. 3. Battery mode indicator. 4. Normal mode. 5. On/off button (press at least 4 seconds). 6. Sockets protected from power surges. 7. Circuit breaker: protection from overloads. 8. RJ11/RJ45 connectors: protects a tel./network line from power surges (available in 750/900 SP). 9. USB connector: computer communication (available in 750/900 SP). 10. Power cord (input). 4. TROUBLESHOOTING 2. INSTALLATION AND OPERATION 2.1.Unpacking and Inspection Examine the packing carton for damage. Notify the carrier immediately if any damage occurs. Retain the packing for future use. The Troubleshooting chart covers most of the difficulties that you may encounter under normal working condition. Should the UPS fails to operate properly, please proceed the followings before calling for service. Is the UPS plugged into an incorrect wall receptacle? If AC input voltage out of windows? When calling for service, please offer the following information 2.2. Installation Connect the power cord to a verified grounded 3-wire receptacle. Charge the batteries for ten (10) hours before use. The UPS will recharge the batteries automatically whenever its power cord is plugged into a wall outlet. You may use the UPS immediately without recharging, but the backup time may be less than the rating. Connect the power cord of your computer equipment to the Backup Outlets of the UPS. Switch on the computer equipment. Caution : Do not plug laser printers into the Backup Outlets because they may draw too much power. Switch on the UPS by pressing the Main Switch. The "Mains" LED will light on. The UPS is now considered to be working properl If overload condition occurs, the alarm will beep continuously, it means you have connected too many devices. Please proceed to unplug the least critical equipment from Backup Outlets. To test backup function, you may disconnect the power cord of the UPS. The "Mains" LED of the UPS will Light intermittently and the alarm will beep every 4 seconds. 2.3. Storage Instruction For extended storage in moderate climates, the batteries should be charged for 12 hours every 3 months by plugging the power cord into the wall receptacle. Repeat it every 2 months in high temperature locations. 3. OVERVIEW Model No. and Serial No. Date of problem occur o Full description of the problem occur, Including condition happened, environment installed, devices connected to the UPS, etc.. 5. VISUAL & AUDIBLE ALARMS Normal mode without any load connected: diode no 4 is slowly flashing. Normal mode with load connected: diode no 4 is quickly flashing. Battery mode: 1 beep / 3 sec. Diode no 3 is slowly flashing. Low battery: 1 beep / sec. Diode no 3 is quickly flashing. Exhausted battery: Continuously beep (5 sec.) 6. BATTERY REPLACEMENT 1. Unplug the power cord from the socket. 2. Unscrew two screws from battery cover, slip out the cover. 3. Take off and unplug the battery. 4. Replace to battery this same type and connect properly (red to red). 5. Put in the battery, close the cover and screw in the screws.