1
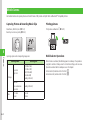
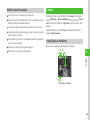
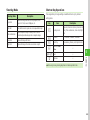
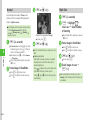
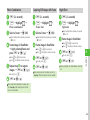
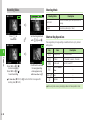
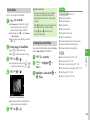
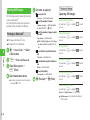
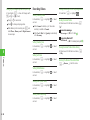
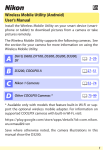
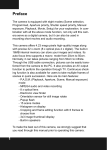
Camera
Mobile Camera . . . . . . . . . . . . . . . . . . . . . . . . . . . . . . . . . . . . . . . 6-2
Mobile Camera Precautions . . . . . . . . . . . . . . . . . . . . . . . . . . . . . . . . . 6-3
Camera . . . . . . . . . . . . . . . . . . . . . . . . . . . . . . . . . . . . . . . . . . . . . 6-3
Using Display as Viewfinder. . . . . . . . . . . . . . . . . . . . . . . . . . . . . . . . . 6-3
Single Shot. . . . . . . . . . . . . . . . . . . . . . . . . . . . . . . . . . . . . . . . . . . . . . 6-4
Normal. . . . . . . . . . . . . . . . . . . . . . . . . . . . . . . . . . . . . . . . . . . . . . . . . 6-6
Multi Shot . . . . . . . . . . . . . . . . . . . . . . . . . . . . . . . . . . . . . . . . . . . . . . 6-6
Photo Combination . . . . . . . . . . . . . . . . . . . . . . . . . . . . . . . . . . . . . . . 6-7
Capturing Still Images with Frame. . . . . . . . . . . . . . . . . . . . . . . . . . . . . 6-7
Night Shot. . . . . . . . . . . . . . . . . . . . . . . . . . . . . . . . . . . . . . . . . . . . . . 6-7
Viewing Captured Pictures (Quick Play). . . . . . . . . . . . . . . . . . . . . . . . . 6-8
Video Camera . . . . . . . . . . . . . . . . . . . . . . . . . . . . . . . . . . . . . . . . 6-9
Using Display as Viewfinder. . . . . . . . . . . . . . . . . . . . . . . . . . . . . . . . . 6-9
Recording Video. . . . . . . . . . . . . . . . . . . . . . . . . . . . . . . . . . . . . . . . . 6-10
Video Mode. . . . . . . . . . . . . . . . . . . . . . . . . . . . . . . . . . . . . . . . . . . . 6-11
Viewing Recorded Video. . . . . . . . . . . . . . . . . . . . . . . . . . . . . . . . . . . 6-11
Printing Still Images . . . . . . . . . . . . . . . . . . . . . . . . . . . . . . . . . . 6-12
Printing via Bluetooth®. . . . . . . . . . . . . . . . . . . . . . . . . . . . . . . . . . . . 6-12
Advanced Settings
Capturing Still Images. . . . . . . . . . . . . . . . . . . . . . . . . . . . . . . . . . . . . 6-12
Recording Videos. . . . . . . . . . . . . . . . . . . . . . . . . . . . . . . . . . . . . . . . 6-14
6
Mobile Camera
Use handset camera to capture pictures and record movies. Edit pictures and print them via Bluetooth®-compatible printers.
Capturing Pictures & Recording Movie Clips
Printing pictures
Select Scene, Multi Shot, etc. (fP.6-3)
Record up to one hour per clip (fP.6-9).
Print pictures via Bluetooth® (fP.6-12).
Capturing options and corresponding image sizes:
Multi Selector Operations
6
Camera
Shooting Mode
Single shot
Night shot
3M (2048×1536)
2M (1600×1200)
1.3M (1280×960)
VGA (640×480)
Standby (320×240)
Multi shot
Photo combination
Frame shot
Standby (320×240)
For S! Mail
Normal
176×144
128×96
Still Image
Video
6-2
Shooting Size
When Camera is activated, Viewfinder appears in Landscape. The operations
assigned to vertical scroll keys are set to horizontal scroll keys, and vice versa.
Operations are described in Landscape view in this chapter.
Vertical scrolls (horizontal scrolls in Portrait): j
Horizontal scrolls (vertical scrolls in Portrait): s
Mobile Camera Precautions
・ Use a dry soft cloth to remove debris from camera lens.
・ Avoid camera shake; hold handset steady or put it on a stable place and use
Self-timer to prevent objectionable image blur.
・ Do not expose handset to devices with static electricity at use of camera.
・ Camera employs high precision technology, however, some pixels may seem
brighter or darker than others.
・ Leaving handset in a hot place for an extended period before image capture/
save may affect image quality.
・ Exposing lens to direct sunlight may affect image color.
・ When battery is low, camera may be unavailable.
Camera
For taking still pictures, select Shooting mode: Normal to shoot single
picture, Multi shot or Photo combination to shoot multi-shot, Frame
shot to shoot picture with frame, Night shot to shoot in sunset or night
situation.
Captured images are saved into Picture. Insert Memory Card to save
images to Digital camera.
Using Display as Viewfinder
When Camera is activated, Viewfinder appears in Landscape.
b d
a c
e
6
Camera
fg
Still Image Viewfinder
6-3
aShooting mode
fSave to
: Single shot
: Phone or Ask each time
: Multi shot (6 shots)
: Memory card or Digital camera
: Multi shot (9 shots)
gNumber of remaining shots available
: Photo combination
: Frame shot
: Night shot
Single Shot
bShooting size
6
: 3M (2048×1536) *
: 2M (1600×1200) *
Camera
Press o in
Viewfinder
: 1.3M (1280×960) *
Set shooting methods
with j/s and c
: VGA (640×480) *
: Standby (320×240)
*Only when the shooting mode is set to Single shot or Night
shot
cSelf-timer
: Off
: 3 seconds
: 5 seconds
: 10 seconds
dWhite balance
: Auto
: Cloudy
eFocus frame
6-4
: Daylight
: Incandescent
: Fluorescent
Press k or c (
)
Confirmation window
for saving/sending/
registering still image
appears only when
Auto Save is set to Off.
・ Set Auto Save (fP.12-9) to Off to attach picture to messages after
capturing still image (fP.6-13) or set as Wallpaper (fP.6-13).
Shooting Mode
Shooting Mode
Single shot
Shortcut Key Operations
Description
Capture still image and select size for purpose; attach
images to S! Mail, save as Wallpaper, etc.
Multi shot
Press shutter once to capture six or nine sequential images.
Photo combination
Capture sequential images manually. Select Frame to
automatically combine images into a composite image.
Frame shot
Capture still image with frame.
Night shot
Capture still image in the dark scene at dusk or night.
Press assigned key to change settings. Available shortcuts vary by mode or
setting status.
Key
1
Item
Shooting mode
Description
Single shot, Multi shot (6 shots), Multi shot (9
shots), Photo combination, Frame shot, Night
shot
2
Self-timer
Off, 3 seconds, 5 seconds, 10 seconds
0
Quick Play
Phone memory, Memory card, Digital camera
w
Switch to Photo/
Video
s or b/n Zoom
Brightness
-
-
・While using Camera, pressing keys does not make operation tone.
6
Camera
j
-
6-5
Normal
ck or c (
)
Captured images are saved to Picture. Insert
memory Card to save images (VGA images and
larger) to Digital camera.
・Even if Memory Card is inserted and save location
is set to Digital camera folder, setting is
changed to Memory card when Standby size
images are saved.
ak (2+ seconds)
6
Camera
・If Record video is activated last time, Video
Viewfinder appears. Press w (Photo) to
switch to Still Image Viewfinder.
・Alternatively, press c → select Camera
→ Take photo.
・Adjust settings before capturing as required
(fP.6-12).
bFrame image in Viewfinder
・Press b/n or s to zoom in/out.
・Press j to brighten or darken an image.
6-6
Multi Shot
ak (2+ seconds)
bo → Highlight
→
Multi-shot → Select number
of shooting
Prompt for Saving Still Image
・To redo, press x.
dk or c (
)
・Zoom is not available when an image size is set to
3M.
・Using Auto Focus
When AF is set to On, Auto focus is available,
the subject at the center of the frame will be
automatically focused.
Press k halfway to focus on the subject. Then
press k all the way to take a picture.
If using c, press c to focus and take picture
simultaneously.
・Adjust settings before capturing as required
(fP.6-12).
cFrame image in Viewfinder
・Press b/n or s to zoom in/out.
・Press j to brighten or darken an image.
dk or c (
)
・To redo, press x.
eCheck images to save →
w(
)
・When using Multi shot, shooting size is set to
Standby. Other shooting sizes and Self-timer are
not available.
Photo Combination
Capturing Still Images with Frame
Night Shot
ak (2+ seconds)
bo → Highlight
ak (2+ seconds)
bo → Highlight
ak (2+ seconds)
bo → Highlight
Photo combination
→
Frame shot
cSelect a frame → c (OK)
・Adjust settings before capturing as required
(fP.6-12).
dFrame image in Viewfinder
→ Apply selected frame and
press k or c ( )
eRepeat step d to capture
images → k or c (
)
・To redo, press x.
fk or c (
cSelect a frame → c (OK)
・Adjust settings before capturing as required
(fP.6-12).
dFrame image in Viewfinder
・Press b/n or s to zoom in/out.
・Press j to brighten or darken an image.
ek or c (
)
・To redo, press x.
fk or c (
)
・When using Frame shot, shooting size is set to
Standby. Other shooting sizes are not available.
Night shot
→
・Adjust settings before shooting as required
(fP.6-12).
cFrame image in Viewfinder
・Press b/n or s to zoom in/out.
・Press j to brighten or darken an image.
dk or c (
)
・To redo, press x.
ek or c (
)
・When using Night shot, White Balance cannot be
set.
6
Camera
・Press b/n or s to zoom in/out.
・Press j to brighten or darken an image.
→
)
・When using Photo combination, shooting size is
set to Standby. Other shooting sizes and Selftimer are not available.
6-7
Viewing Captured Pictures
(Quick Play)
Use Quick Play to view still images.
ak (2+ seconds)
b0 → View still images
with n/b or s
6
・Press c (Zoom) → b/n to zoom in/out.
・When Memory Card is inserted, press 0
and select Phone, Memory card or Digital
camera to view images.
・Alternatively, check still images from Data
Folder (fP.10-3).
Advanced
brP.6-12
●●Switching Shooting Mode
●●Setting Shooting Size
●●Setting Self-timer
●●Setting White Balance
●●Setting Effect (Color Tone)
●●Viewing Captured Pictures
●●Viewing Capturing Shortcut Key Assignments
●●Entering File Name of Captured Still Image
●●Setting Captured Still Image as Wallpaper etc.
●●Enlarging Captured Still Image
Camera
●●Deleting Images Opened via Quick Play
●●Setting Still Image Opened via Quick Play to
Wallpaper etc.
●●Playing Quick Play Slide Show
●●Viewing Image Details via Quick Play
s
●●Show or hide Indicators (rP.12-9)
●●Set Auto-focus (rP.12-9)
●●Activate or cancel Auto Save (rP.12-9)
●●Show or hide menu item guidance (rP.12-9)
●●Select Quality (rP.12-9)
●●Set ISO (rP.12-9)
●●Set Exposure metering (rP.12-9)
●●Set save location (rP.12-10)
6-8
●●Show or hide Guideline (rP.12-9)
●●Set Shutter sound (rP.12-9)
dWhite balance
: Auto
: Daylight
Video Camera
Capture clips easily. Files are saved in 3GP format to Videos folder in
Data Folder. When recording a video to attach or insert into an S! Mail,
set Shooting size to For S! Mail (fP.6-14).
Using Display as Viewfinder
b d f
a c e
: Incandescent
: Fluorescent
: Cloudy
eSound
: Sound On
: Sound Off
fFocus frame
gElapsed recording time
hProgress bar
iExpected video size/Available recording time
・If Shooting size is set to For S! Mail, the shooting data size
appears; if Normal, available recording time appears.
Camera
g h
i
Video Viewfinder
6
aMode
: For S! Mail
: Normal
bSize
: 176×144
: 128×96
cSelf-timer
: Off
: 3 seconds
: 5 seconds
: 10 seconds
6-9
Shooting Mode
Recording Video
Shooting Mode
Press o in
Viewfinder
Set shooting methods
with j/s and c
For S! Mail
Record a short video (up to 295 KB) to attach to a
message.
Normal
Record a long video (up to 1 hour).
Shortcut Key Operations
Press assigned key to change settings. Available shortcuts vary by mode or
setting status.
Key
6
1
Camera
Press k or c ( )
to start recording
Press k or c ( )
to end recording
Confirmation window
for saving/sending
video appears only
when Auto Save is Off.
・ Set Auto Save (fP.12-9) to Off to attach the file to messages after
recording video (fP.6-14).
Description
Item
Shooting mode
Description
For S! Mail, Normal
2
Self-timer
Off, 3 seconds, 5 seconds, 10 seconds
3
Record sound
Sound On, Sound Off
w
Switch to Camera/
Video
s or b/n Zoom
j
Brightness
-
-
-
・While using Video camera, pressing keys does not make operation tone.
6-10
Video Mode
Up to 1 hour per clip can be recorded.
ak (2+ seconds)
・If Take photo is activated last time, Still
Image Viewfinder appears. Press w
(Video) to switch to Video Viewfinder.
・Alternatively, press c → select Camera
→ Record video.
・Adjust settings before capturing as required
(fP.6-14).
bFrame image in Viewfinder
・Press b/n or s to zoom in/out.
・Press j to brighten or darken an image.
)
・To pause while recording, press w ( ).
To resume the recording, press w ( ).
dk or c (
)
Advanced
brP.6-14
●●Setting Shooting Mode
●●Setting Shooting Size
●●Setting Self-timer
●●Setting White Balance
●●Setting Effect (Color Tone)
●●Setting Sound Recording
●●Viewing Recording Shortcut Key Assignments
Viewing Recorded Video
●●Viewing Recorded Video before Saving
View captured and saved videos by opening Videos
folder in Data Folder from Viewfinder.
●●Entering File Name of Recorded Video
ak (2+ seconds)
●●Show or hide Indicators (rP.12-9)
bo → Highlight
Videos
→
cHighlight a video with a →
c (Play)
s
●●Set Auto-focus (rP.12-9)
●●Activate or cancel Auto Save (rP.12-9)
6
Camera
ck or c (
・Using Auto Focus
When AF is set to On, Auto Focus is available,
the subject at the center of the frame will be
automatically focused (the focus is locked while
recording).
Press k halfway to focus on the subject. Then
press k all the way to start recording.
If using c, press c to focus and start
recording simultaneously.
●●Show or hide menu item guidance (rP.12-9)
●●Select Quality (rP.12-10)
●●Set save location (rP.12-10)
Prompt for Saving Video
・Recording ends. When recordable time has
elapsed, recording automatically ends.
ek or c (
)
6-11
Printing Still Images
Print still images saved on handset by connecting
a printer via Bluetooth®.
For more information about printer operations
and paper setting, see printer User Manual.
Printing via Bluetooth®
®
・ Print images with Bluetooth printer.
®
・ Pair Bluetooth printer beforehand.
6
ac → Data Folder → Select
a file location
Camera
bo → Print via Bluetooth
cCheck files to print →
w (Print)
dSelect destination device
・If no device is registered, search and register
new device (fP.11-4).
eSet items as required
■To set print size
Print size → Select an item to set
■To set the number of copies
Number of copies → Enter the number
of copies (1 to 99) → c (OK)
■To set the number of pages to print
per sheet
Page format → Select an item
・When selecting Duplicate, select Pages
per sheet and select a setting (1 to 16
up).
■To set whether to print the date or
not
Print date → Select an item
Advanced Settings
b
Capturing Still Images
Switching Shooting Mode
In Viewfinder, o → Highlight
an item
Setting Shooting Size
In Viewfinder, o → Highlight
an item
→ Select
Setting Self-timer
In Viewfinder, o → Highlight
an item
→ Select
Setting White Balance
■ To set whether to print a border or
not
Border → Select an item
In Viewfinder, o → Highlight
an item
■To set print quality
Print quality → Select an item
Setting Effect (Color Tone)
fc (Preview) → c (Print)
→ Select
In Viewfinder, o → Highlight
an item
→ Select
→ Select
Viewing Captured Pictures
In Viewfinder, o → Highlight
→
Pictures or Digital camera → Select a file
・ Digital camera can be selected when Memory
Card is inserted.
6-12
Viewing Capturing Shortcut Key Assignments
Enlarging Captured Still Image
In Viewfinder, o → Highlight
In Still Image Saved Confirmation window,
o → Zoom
Sending Captured Still Images
・ Press b or n to zoom in/out.
In Still Image Saved Confirmation window,
w ( )
・ Press a to change a display position.
■To send via message
Via message → (fP.4-4 S! Mail b)
Sending Still Images Opened via Quick Play
・If the captured image size exceeds 300 KB, a
window for resizing the image appears after
saving the image to Data Folder. Resize the
image before attaching it (fP.4-5 Attaching Files).
■To send via Bluetooth
Via Bluetooth → (fP.11-5 Sending One by One b)
®
In Still Image Saved Confirmation window,
o → Rename → Enter file name
Setting Captured Still Image as Wallpaper etc.
In Still Image Saved Confirmation window,
o → Set as
■To set image to Wallpaper
Wallpaper → Use w (Rotate) to adjust
position as required → Use n or b to adjust size
as required → c (Set)
■To set image to Incoming image
Caller ID → Search Phonebook and select an
entry (fP.2-17) → c (Set)
■To send via message
Via message → (fP.4-4 S! Mail b)
■To send via Bluetooth
Via Bluetooth → (fP.11-5 Sending One by One b)
®
In Viewfinder, 0 → View still images with
n/b or s → o → Set
■To set image to Wallpaper
Wallpaper → Use w (Rotate) to adjust
position as required → Use n or b to adjust size
as required → c (Set)
■To set image to incoming image
Caller ID → Search the phonebook and select an
entry (fP.2-17) → c (Set)
・ When Memory Card is inserted, press 0 and
select Phone, Memory card or Digital camera
to view images.
・ When Memory Card is inserted, press 0 and
select Phone, Memory card or Digital camera
to view images.
Playing Quick Play Slide Show
Deleting Images Opened via Quick Play
・ Press w (Stop) during playback to cancel Slide
Show.
In Viewfinder, 0 → View still images with
n/b or s → o → Delete
・ When Memory Card is inserted, press 0 and
select Phone, Memory card or Digital camera
to view images.
In Viewfinder, 0 → o → Slide Show
6
Camera
Entering File Name of Captured Still Image
In Viewfinder, 0 → View still images with
n/b or s → w (Send)
Setting Still Image Opened via Quick Play to
Wallpaper etc.
・ When Memory Card is inserted, press 0 and
select Phone, Memory card or Digital camera
to view images.
Viewing Image Details via Quick Play
In Viewfinder, 0 → View still images with
n/b or s → o → Details
・ When Memory Card is inserted, press 0 and
select Phone, Memory card or Digital camera
to view images.
6-13
Enlarging Still Images Opened via Quick Play
Recording Videos
In Viewfinder, 0 → View still images with
n/b or s → c (Zoom)
Setting Shooting Mode
・ Press b or n to zoom in/out.
・ Press a to change a display position.
・ When Memory Card is inserted, press 0 and
select Phone, Memory card or Digital camera
to view images.
In Viewfinder, o → Highlight
an item
Viewing Recording Shortcut Key Assignments
In Viewfinder, o → Highlight
→ Select
・ When Normal is selected, up to 1 hour video
recording is available in Normal.
・ When For S! Mail is set, Quality is automatically
set to Economy.
Setting Shooting Size
6
In Viewfinder, o → Highlight
an item
→ Select
Camera
→ Select
→ Select
Setting Effect (Color Tone)
In Viewfinder, o → Highlight
an item
→ Select
Setting Sound Recording
In Viewfinder, o → Highlight
an item
6-14
■To send via message
Via message → (fP.4-4 S! Mail b)
■To send via Bluetooth
Via Bluetooth → (fP.11-5 Sending One by One b)
®
Viewing Recorded Video before Saving
Entering File Name of Recorded Video
o → Rename → Enter file name
Setting White Balance
In Viewfinder, o → Highlight
an item
In Video Saved Confirmation window, w
( )
In Video Saved Confirmation window, o
→ Play
Setting Self-timer
In Viewfinder, o → Highlight
an item
Sending Recorded Video
→ Select