1
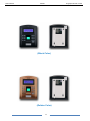
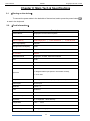
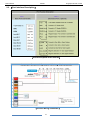
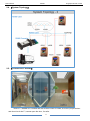
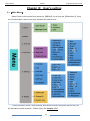
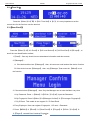
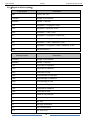
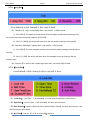
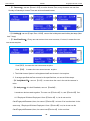
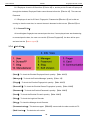
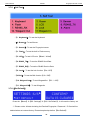
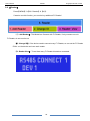
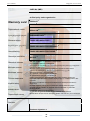
User’s Manual PK1001 Fingerprint Access Control Fingerprint Access Control (Model: PK1001) User’s Manual (Version: 7.0.17) 1 User’s Manual PK1001 Fingerprint Access Control (Black Color) (Golden Color) 2 User’s Manual PK1001 Fingerprint Access Control Contents Chapter I: Notice for using……………………………………………………………….…… 4 1.1 Operating environment ……………………………………………………………..…..……. 4 1.2 Description of pressing fingerprint……………………………………………………..……. 4 Chapter II: Main Tech & Specifications………….………………………………………….. 5 2.1. 【Turning on the device】…………………………………………………………………….. 5 2.2. 【Tech formation】……………………………………………..……….…………..…..……. 5 2.3. 【Port Interface Description】………..…………………….…………………………..…….. 6 2.4. 【System Topology】………………..….………………….……………..…..……..……….. 7 2.5. 【Connect to F1 Reader】………………..………………….……………..………….…….. 7 Chapter III: User’s Setting……………………………………………………..……….……. 8 3.1. 【Main menu】…………………………………………………………….……..……..……... 8 3.2. 【Time Set】…………………………………………..…………………….…….…….……... 9 3.3. 【User Enroll】……………………………………………………………….………..………. 9 3.4. 【Delete User】………………………………………………………………….….......……. 10 3.5. 【Log view】……………………………………………………..………………..……..……. 10 3.6 【Signal and Description】……………………………..……………………..….………..…. 11 3.7 【Settings】……….……………………………….…………...……………..………….……. 12 3.7.1 【Terminal】…………………………….…………...……………..………….……. 12 3.7.2 【Log】…………………………….…………...……………..…….………….…….. 13 3.7.3 【Lock Set】…………………………….…………...……………..…………..……. 13 3.7.4 【Info View】…………………………….…………...……………..………….……. 15 3.7.5 【Self Test】…………………………….…………...……………..…………..……. 16 3.7.6 【Set Default】…………………………….………...……………..………….……. 15 3.8 【Reader】……….……………………………….…………...……………..…….……….…. 17 Chapter IV: FAQ………………………………………………………….……………….……...……… 18 Chapter V: Warrantee Card…………………………….…………………….…..….……….……...… 19 3 User’s Manual PK1001 Fingerprint Access Control Chapter I: Notice for using Thanks for purchasing our Fingerprint Time Attendance and Access Control System Terminal. Please refer to this user manual carefully before using, which helps you improve the efficiency of using this product. 1.1 Operating environment Avoid installing the Fingerprint Time Attendance Terminal at places where irradiated by strong light directly. The strong light affects the collecting of fingerprints which would lead to the failure of the fingerprint authentication. The operating temperature of Fingerprint Time Attendance Terminal is 0℃–45℃ . Avoid the long term outdoor usage of the terminal. The normal working of the Fingerprint Time Attendance Terminal will be affected by the long term outdoor usage. If it is necessary to use outdoor, the sunshade and cooling equipment are recommended in summer and warm keeping facility is recommended in winter to protect the Fingerprint Time Attendance Terminal. 1.2 Description of pressing fingerprint Correct pressing method: Press with your finger right on the fingerprint collecting window, with the fingerprint’s center aligning to the center of the gathering window as much as possible. Finger pressing method is shown as follows: Correct Too Perpendicular Too Deflective Too Tilting Too Low Attentions: please press the finger correctly during the authentication. 4 User’s Manual PK1001 Fingerprint Access Control Chapter II: Main Tech & Specifications 2.1 【Turning on the device】 To connect the power cable in the backside of the terminal, and to press the power button to start in the keyboard. 2.2. 【Tech Information】 Function Description Product Name: Fingerprint Access Control System Access Control Yes User’s Capacity 2,000 Fingerprint User’ Log Capacity 100,000 Manager Record Capacity 2,000 Communication Method RS485 IC / ID Card Without Verification Mode Fingerprint, ID Card, Password or Mixed CPU 32 bit Optical Sensor: COTO CEN 931 LCD: Blue OLED 122 * 32 Input Port | 2,000 Password | 2,000 ID Card 1* Wiegand 26/34 input (built-in card reader module), 1 * 9 Pin Port Output Port 1 * Wiegand-26, Two relay outputs (lock, alarm) Power Input 9-12V Input threshold 1:N or 1:1 FAR: ≤0.0001% FRR: ≤0.001% Identification speed: ≤0.76s Keyboard: 4 * 4 Keyboard + Door Bell Key Temperature -10℃ - +60℃ Product Size: 145 X 100.0 X 50.0 mm Product Weight: 233.0 g (Net Weight) 5 User’s Manual PK1001 Fingerprint Access Control 2.3. 【Port Interface Description】 (Port Description and Function) (Access Wiring Schematic) 6 User’s Manual PK1001 Fingerprint Access Control 2.4. 【System Topology】 2.5. 【Connect to F1 Reader】 Notice: F1 Reader is in Outside and the Access Control is inside, so even if people broken and short circuit the F1, cannot open the door, it’s safer. 7 User’s Manual PK1001 Fingerprint Access Control Chapter III: User’s setting 3.1. 【Main Menu】 When Power on the terminal, then press the 【MENU】 key to enter the 【Main Menu】, there are 6 function Menu, below is the quick introduce for each function. * Every important: Please 【Set Default】 and reset the correct time when the first time use the attendance system terminal ! Please refer to the Chapter 3.7.6 8 User’s Manual PK1001 Fingerprint Access Control 3.2.【Time Set】 Press the 【Menu】【▼】【3/6. Time Set】【OK】, It’s every important to set the correct time for the first time use the terminal. 3.3.【User Enroll】 Press the 【Menu】【1/6. Enroll】【1/2 Level Select】【1/3 Enroll Set】【ID input】, to enroll the user identification method, 1.【User】: Can only check his own attendance information and door access. 2.【Manager】: A: If the device without set 【Manager】, then, all users can enroll and set the device function. B: If the device has set 【Manager】, then, only【Manager 】can enter the 【Menu】to set the function 3. If the terminal set 【Manager】, then, Only the Manager can to enter the Menu very time. A: by Password: Press –>【Menu】【ID No.:】【ok】,Input the Password. B: By Fingerprint: Press【Menu】【Manager Confirm】【Put manger Fingerprint】 C: By ID Card: This model do not support IC / ID Card Enroll. 4. Every Employee / User can register 3 fingerprint, 1 ID card, 1 Password. 5. Press 【MENU】 【Enroll】 【User Enroll】 【Finger】 【ID No.:】【ok】 【Finger】, can add User’s backup Fingerprint. 9 User’s Manual PK1001 Fingerprint Access Control (Backup User’s Fingerprint) 3.4.【Delete User】 Press 【MENU】 【2. Delete】【input the ID No.: 】【ok】. 3.5.【Log View】 Press 【MENU】 【4/6. Log View】 【1/3. Glog View】 【Input the ID No.:】【ok】. The Manager can view All Time Attendance /Access Data. 【Glog View】: The Manager enter to check the User’s Time Attendance Record. A: Input the User ID (e.g. 00011) to check 【ID 00011】 Time Attendance Record B: Input 【00000】 to check 【All users】 Time Attendance Record. 【Slog View】: The 【Manager / Super Manager】 check manager Record. A: Input the Manager ID (e.g. 00001) to check 【ID 00001】 Manager View Record B: Input 【00000】 to check 【All manager】check Record. 【Delete All Log】: The Manager delete 【All Log】Records. 10 User’s Manual PK1001 Fingerprint Access Control 3.6.【Signal and Description】 Login Signal Description TMP Tamper with Test C-003561 All login in/out Records N-000007 Number 7 Records V-FE Verification – Fingerprint - Enter V-PE Verification Password - Enter V-CE Verification – Card - Enter VFC Verification – Fingerprint + Card-Enter VFP Verification – Fingerprint + Password - Enter VCP Verification – Card + Password - Enter FCP Verification – Fingerprint + Card + Password - Enter UNK Unknown Method Manager Signal Description C-003561 All login in/out Records N-000007 Number 7 Records E-UF Enroll User’s Fingerprint E-UP Enroll User’s Password E-UC Enroll User’s Card E-MF Enroll Manager’s Fingerprint E-MP Enroll Manager’s Password E-MC Enroll Manager’s Card E-DF Erase User’s Fingerprint E-DP Erase User’s Password E-DC Erase User’s Card D-L Delete All Log Records S-S System Setting S-T Set Time S-L Set Login information S-C Set Communication S-TZ Set Time Zone 11 User’s Manual PK1001 Fingerprint Access Control 3.7. 【Settings】 Press【MENU】【5/6. Settings】【ok】, there are 6 Menu 【1. Terminal】【2. Log】【3. Lock Set】【4. Info View】【5. Self Test】【6. Set Default】. 3.7.1 【Terminal】 Press【MENU】【6/6. Settings】【1/6. Logl】【ok】. To set the Terminal function, every function introduce as bellows: *【1. Machine ID:】To set the Machine ID, so the PC can recognize the terminal for Network. *【2. Languages:】the initial Languages are: English, Simple Chinese, Traditional Chinese. *【3. Managers:】can set [1-10 Managers],Initial system is 5 Managers. *【4. Identify Mode:】can set the mix methods for [Password, ID Card, Fingerprint]. [FP/CD/PWD]: It means any one of 【Fingerprint, Card, Password】 is ok. [FP+CD+PWD]: It means only 【Fingerprint + Card + Password】all passed is ok. [CD+PWD]: It means only 【Card + Password】 passed is ok. [FP +PWD]: It means only【Fingerprint + Password】 passed is ok. [FP+CD]: It means only 【Fingerprint + Card】 passed is ok. Notice: This model without ID Card Swipe, so even if there is Menu show CD, It do not works. *【5. LCD Contrast】can set [0-10 Contrast Levels] *【6. Baudrate:】For communication , can set 【115200,9600, 19200, 38400,57600】. *【6. Voice out:】when Verification with Voice to indelicate:【Yes / No】 *【7. Sleep:】To set the [No.1-9999]minutes, the LCD and Fingerprint sensor will light off, and press any key to light again. *【8. Touch Sensor】To set the [ON/OFF] , *【9. Sensor Adjust:】If sometimes, the sensor do not work, can use this function. 12 User’s Manual PK1001 Fingerprint Access Control 3.7.2. 【Log Set】 Press【MENU】【6/6. Settings】【2/6. Logl】【ok】. *【1. Glog Wrn:】: Log in /out quantity Warn, can set [No, 1-1000] records. A: if set 【No】, the new log records will re-write the oldest records without warning if the log records more than the system capacity 【100,000】. B: if set 【1-1000】,the device will warn when the set record is closing to the quantity. *【2. Slog Wrn:】Manager quantity Warn, can set [No, 1-100] records. A: if set 【No】, the new manager records will re-write the oldest manager records without warning. B: if set 【1-100】,the device will warn when the manager record is closing to the set quantity warn. *【3. Reverify:】To set the user’s repeat login time warn, can set [0-255] minutes. 3.7.3. 【Lock Set】 Press【MENU】【6/6. Settings】【3/6. Lock Set】【ok】. *【1. Lock Ctrl】: set 【No, 1-10 seconds】, the lock will auto response in the set time. *【2. OpenTime】: can set 【No, 1-255 seconds】,the door open last time. *【3. Door Sensor】: can set 【Normal Close / Normal Open / None】,the door open sensor, if set the Door sensor open alarm *【4. Bell Time】: can set 【1-12 】,to set the Bell ring time. 13 User’s Manual PK1001 Fingerprint Access Control *【5. Timezone】: can set 【zone 1-50】,to set the Access Time, every timezone can set from Sunday to Saturday’s Access Time and all time allowed Access *【6. Holiday】: can set 【Input Zone 1-256】,can set the holiday date and holiday last days (Max Last 7 days) *【7. UserTimeZone】: Every user can set two time zone to access, if not set, it means the user can access anytime. If set【00】, it means the user can access anytime. If set 【50】,It means the user cannot access anytime 1. The Initial Access System is all registered staff can Access in /out anytime. 2. If arrange specified staff can access in the specified time, so can set follow steps: *【8. VerifyModeTZ】: can set 【1-10】, to warn when the user in the set time access in twice. *【9. Anti-pass】: It is Anti-Passback, can set 【Yes/No】, It needs two devices work together. The user use 【Device A】 in, and 【Device B】 Out. A: If Employee B follows Employee A from 【Device A】 in, he do not use his Card/Fingerprint/Password, then, he cannot 【Device B】 out even if he is authorized. In the same way, f Employee B follows Employee A from 【Device B】 out, he do not use his Card/Fingerprint/Password, then, he cannot use【Device A】 in the next time. 14 User’s Manual PK1001 Fingerprint Access Control B: If Employee A use his ID Card from 【Device A】in, and he put his ID card to Employee B through the windows, Employee B also cannot Access inform the 【Device A】. The same as Password. C: If Employee A use his ID Card / Fingerprint / Password at【Device A】,but he did not coming in, then the next time, he cannot Access in because he did not use 【Device B】out. *【10. DuressFP Set】: All enroll/register fingerprint can access/open the door, if an employee/user was threatening to access/open the door, the user can use this 【Duress Fingerprint】,the door will be open and send out the 【alarm signals】. 3.7.4. 【Info View】 *【User】: To check the Enrolled Employee/Users’ quantity. 【Max: 2000】 *【Manager】: To check the Enrolled Manager’ quantity. 【Max: 10】 *【Finger】: To check the Enrolled Fingerprints’ quantity. 【Max: 2000】 *【DuressFP】: To check the Enrolled Duress Fingerprints’ quantity. 【Max: 2000】 *【Password】: To check the Enrolled Password’s quantity. 【Max: 2000】 *【Card】: To check the Enrolled ID card’s quantity. 【Max: 2000】 *【Glog】: To check the Login/out Records. *【Slog】: To check the Manager check Records. *【Communication】: This device support 【RS485】connect with the other models to PC. *【Soft Version】: The device’s soft version 15 User’s Manual PK1001 Fingerprint Access Control 3.7.5. 【Self Test】 *【1. Keyboard】: To test the Keyboard. *【2. Buzzer】: To test Buzzer. *【3. Sensor】: To test the Fingerprint sensor *【4. Flash】: To test the built in Flash memory *【5. LCD】: To test LCD color 【Black / White】 *【6. RS485_TX】: To test the RS485 Send Data *【7. RS485_RX】: To test the RS485 Receive Data *【8. Lock】: To test the lock function 【On / Off】 *【9.Bell】: To test the Bell function 【On / Off】 *【10. Weigand Out】: To test WiegandOut 【ID: 1 ~ 95】 *【11. Wiegand IN】: To test Wiegandin. 3.7.6.【Set Default】 Press the 【Menu】【5/6. Settings】【6/6. Set Default】, it will reset the factory set. *** Please notice: All data including the Enrolled Fingerprint / Password / ID Card will be deleted when set restore factory. Please keep backup before 【Set Default】 16 User’s Manual PK1001 Fingerprint Access Control 3.8. 【Reader】 Press【MENU】【6/6. Reader】【ok】. If want to use this function, you need to buy additional F1 Reader! *【1. Add Reader】: This Model can Connect with F1 Reader, if only connect one unit F1 Reader, do not need to set. *【2. Change ID】: If the device need to connect many F1 Reader, so can set the F1 Reader ID No.: so the device can know each reader. *【3. Reader View】: To test how many F1 Reader this device connected. 17 User’s Manual PK1001 Fingerprint Access Control Chapter IV: FAQ 4.1. Is this fingerprint attendance secure from employee pranks? Answer: Yes, it is provided with a professional software application that keep tracks of everyone's. With its 3D sensor it can accurately faked fingers t, which means it cannot be fooled by fingerprint pictures or photocopies 4.2. What happens if I or one of my employees injures a registered finger and the fingerprint attendance terminal was no longer able to recognize the original finger Registration? Answer: Simple, you can connect it to this terminal or your computer and delete you registration details. After that, re-register and alternate finger. 4.3. How does fingerprint biometrics work? Answer: When an employee is first register in a fingerprint attendance system, the software records a template of the employee’s fingerprint and associates that template with the employee’s ID number. This template measures the relationship between various points in the fingerprint. Each time the employee attempts to clock in or out, the time and attendance software verifies that the newly scanned fingerprint matches the template originally stored for that ID number. If there is a match, the punch is recorded. 4.4. What are the advantages of fingerprint biometrics? Answer: Fingerprint biometric attendance terminal is generally lower cost and is normally used in all kinds of company, hospital, government, school. Based on the advantage technology, fingerprint attendance terminal can have a false-acceptance rate that is lower than other technologies. 4.5. The Computer show “wrong” when open the “Attendance Sheet”? Answer: Do not mind, there are many Excel version, so just ignore it. 4.6. There is no any response when we put our finger in the terminal for many times. Answer: Power off the terminal, and cut off the power for one minutes, then, connect the power cable and power on again. 18 User’s Manual Fingerprint Access Control CARD №, (IMEI) Is filled up by trade organization Warranty card PRODUCT 1 MODEL 2 Гарантийный талон SERIAL № 3 Երաշխիքային կտրոն PURCHASE DATE 4 Zəmanət talonu TRADE ORGANIZATION 5 საგარანტიო ტალონი TRADE ORGANIZATION ADDRESS 6 Garantiitalong TRADE ORGANIZATION PHONE 7 Garantijas sertifikāts NOTICE 8 Garantinis talonas With the conditions of guarantee is acquainted С условиями гарантии ознакомлен Երաշխիքային պայմանների և սպասարկման կենտրոնների ցանկի հետ ցանոթացել եմ Zəmanət şərtləri ilə və servis mərkəzlərinin siyahisi ilə taniş oldum გარანტიის პირობებს და სერვის ცენტრების სიას გავეცანი Garantiitingimustega olen tutvunud Ar garantijas nosacījumiem iepazīstināts Su garantinėmis sąlygomis susipažinau сервис орталығының кепілдік шарттары мен тізімімен таныспын Кепилдик шарттары жана тейлөө борборлорунун тизмеси менен тааныштым Бо шартх,ои кафолат ва руйхати марказх,ои хизматрасонй шинос карда шуд Kepilligiň talaplary we serwis merkezleriniň sanawy bilen tanyşdym Vaqolatli xizmat shartlari va vaqolatli xizmat markazlari ro’yxati bilan tanishib chiqdim З умовами гарантії ознайомлений Cu conditile de garantie si lista service centrelor sunt informat Баталгааны нөхцөл болон засварын төвийн жагсаалтыг үзэж танилцав Кепілдік талоны Кепилдик талону Талони кафолати Kepillik talony Kafolat taloni Гарантійний талон Remarks: Customer signature 9 19 51