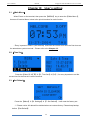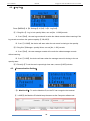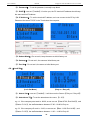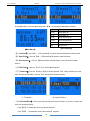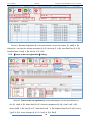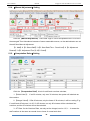
1
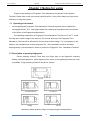
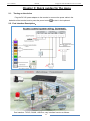
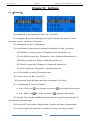
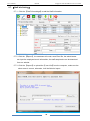
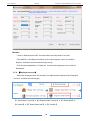
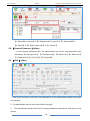
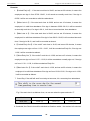
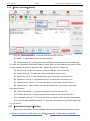
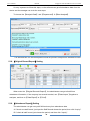
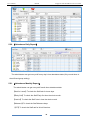
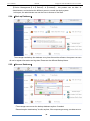
User’s Manual PK3001 Fingerprint Time Attendance & Access Control Fingerprint Access Control/ Time Attendance PK3001 User’s Manual (Version: 7.0.12) 1 User’s Manual PK3001 Fingerprint Time Attendance & Access Control Contents Chapter I: Notice for using………………………………………………………………… 4 1.1 Operating environment …………………………………………………………..….……. 4 1.2 Description of pressing fingerprint…………………………………………………..……. 4 Chapter II: Quick guides for the menu ………………………………………………….. 5 2.1. Turning on the device……………………………………….…………………………….. 5 2.2. Port Interface Description……………………………………..……….…………………. 5 2.2.1. 【USB Port】………………………………………………………………….…… 5 2.2.2. 【RS485 Interface】……………………………………………………………..… 5 2.2.3. 【Power Interface (J1)】…………………………………………………...……… 6 2.2.4. 【Signal Output Interface(J3)】……………………………………....…………… 6 2.2.5. 【Door Bell Interface(J6)】………………………………………………………… 6 2.2.6. 【Wiegand Input(J8)】…………………………………………………….……….. 6 2.2.7. 【Wiegand Output(J2)】…….………………………………………...………….. 7 2.3. 【Tech Information】………………………..…………………….……………..…..…….. 7 Chapter III: User’s Setting……………………………………………………..…………. 8 3.1. 【Main menu】…………………………………………………………………..………... 8 3.2. 【Time Setting】………………………………………………………………….………... 8 3.3. 【Set Default】…………………..……………………………………………….……….. 8 3.4. 【User Enroll】……………………………………………………………………..………. 9 3.5. 【Delete User】……………………………………………………………………...……. 10 3.6. 【Log view】……………………………………………………..………………..….……. 10 3.7 【USB Disk】…………………………………..…………..……………………..….……. 11 3.8 【Signal and Description】………………………….…………..……………..…….……. 12 Chapter IV: Function Setting…………………………………………………………… 13 4.1. 【Terminal】………………………………………………………………………..…….. 13 4.2. 【Log Set】………………………………………………………………………….……... 14 4.3. 【Communication】……………………………………………………….…….……….. 14 4.4 【Lock Set】…………………………………………………………………………….….. 15 4.5. 【Information】……………………………………………………………………………... 18 4.6.【Self Test】…………………………………………………………..………………..….. 19 4.7. 【Set Default】…………………………………………………………………….……... 19 2 User’s Manual PK3001 Fingerprint Time Attendance & Access Control Chapter V: Software in PC…………………………………………………………..……. 20 5.1. 【Very Important】…………………………………………………………………….…... 20 5.2. 【Download Software】……………………………………………………..…….……... 20 5.3. 【Software Languages Choose 】………………………………….…………..……….. 20 5.4. 【Basic Setting】………………………………………………………………..………….. 20 5.5. 【Company Set】………………………………………………………………………….... 21 5.6. 【Department Set】………………………………………………………………………… 21 5.7. 【Staff into Setting】……………………………………………………………..…………. 22 5.8. 【Personal Parameter Setting】………………………………………………..…………. 24 5.9. 【Shift Setting】…………………………………………………………………….………. 24 5.10.【Shift Pattern Setting】…………………………………………………………………… 26 5.11.【Start Scheduling Setting】…………………………………………………………...…. 27 5.12.【Holiday Registration Setting】………………………………………………..……….. 27 5.13.【Leave or be out registration Setting】……………………………………………….. 28 5.14.【Manual Adjustment Setting】…………………………………………………..………. 29 5.15.【Computation Rules Setting】……………………………………………………..……. 29 5.16.【Data Collection Setting】………………………………………………………..……… 30 5.17.【Attendance Analysis Setting】…………………………………………………..…….. 30 5.18.【Original Record Report Setting】………………………………..…………..…………. 31 5.19.【Attendance Report Setting】……………………………………….…………….…… 31 5.20. 【Attendance Daily Report】……………………………………….………………..…… 32 5.21. 【Attendance Monthly Report】……………………………………………………..…… 32 5.22. 【User Management】…………………………………….…………………………..… 33 5.23. 【Access 】Setting…………………………………….……………………………….… 33 5.24. 【Back up Database】………………………………….………………..……….….…… 34 5.25. 【Recover Database】……………………………….………………………….……...… 34 Chapter VI:【Quickly Use the Device】………………………………………….……………..… 35 Chapter VII:【Time Attendance Set Sample A】……………………………….………….… 36 Chapter VIII:【Time Attendance Set Sample B】…………………………………….……… 37 Chapter IX: FAQ………………………………………………………….……………….….……… 38 Chapter X: Warrantee Card…………………………….…………………….…..….…………...… 39 3 User’s Manual PK3001 Fingerprint Time Attendance & Access Control Chapter I: Notice for using Thanks for purchasing our Fingerprint Time Attendance and Access Control System Terminal. Please refer to this user manual carefully before using, which helps you improve the efficiency of using this product. 1.1 Operating environment Avoid installing the Fingerprint Time Attendance Terminal at places where irradiated by strong light directly. The strong light affects the collecting of fingerprints which would lead to the failure of the fingerprint authentication. The operating temperature of Fingerprint Time Attendance Terminal is 0℃–45℃ . Avoid the long term outdoor usage of the terminal. The normal working of the Fingerprint Time Attendance Terminal will be affected by the long term outdoor usage. If it is necessary to use outdoor, the sunshade and cooling equipment are recommended in summer and warm keeping facility is recommended in winter to protect the Fingerprint Time Attendance Terminal. 1.2 Description of pressing fingerprint Correct pressing method: Press with your finger right on the fingerprint collecting window, with the fingerprint’s center aligning to the center of the gathering window as much as possible. Finger pressing method is shown as follows: Correct Too perpendicular Too deflective Too low Tilting Attentions: please press the finger correctly during the authentication. 4 User’s Manual PK3001 Fingerprint Time Attendance & Access Control Chapter II: Quick guides for the menu 2.1. Turning on the device Plug the DC12V power adapter to the terminal or connect the power cable in the backside of the terminal, and to press the power button to start in the keyboard. 2.2. Port Interface Description: Port Interface: TCP/IP, RS485, USB Port, very interface function as follows: 5 User’s Manual PK3001 Fingerprint Time Attendance & Access Control 2.2.1. USB Port: USB upload/download data and USB communicate to PC for update device. 2.2.2. RS485 Interface(J15): Serial No.: Interface Diagram Definition 1 RS485B- Remarks Connect with B- of 485 converter 2 RS485A+ Connect with A+ of 485 converter 3 GND Connect with ground 2.2. 3. Power Interface ( J1 ): Serial No.: Interface Diagram Definition Remarks 1 RS485B- Connect with B- of 485 converter 2 RS485A+ Connect with A+ of 485 converter 2.2.4. Signal Output Interface( J3 ): Serial No.: Interface Diagram Definition 9 Exit Button 8 Door Sensor Remarks Open the door Door sensor signal 7 GND GND 6 Lock N.O Control lock signal interface 5 Lock N.C Control lock signal (normally close) interface 4 Lock COM 3 Alarm N.O Ring (Alarm) Output (normally open ) interface 2 Alarm N.C Ring (Alarm) Output (normally close) Control lock signal (public ) interface Alarm COM 1 Ring (Alarm) Output (public) interface 2.2.5. Door Bell Interface(J6): Serial No.: 1 2 Interface Diagram Definition No.1 and No.2 is the Door Bell Signal, No + and GND different. 6 User’s Manual PK3001 Fingerprint Time Attendance & Access Control 2.2.6. Wiegand Input( J8 ): Serial No.: 4 Interface Diagram Definition Remarks GND GND 3 Wgn-out 0 Wiegand 26 Signal Input ( F1, Connect to D0) 2 Wgn-out 1 Wiegand 26 Signal Input ( F1, Connect to D1) 1 +5V +5V(+), (If Power:: 12V, If F1: +5V) 2.2.7. Wiegand Output ( J2 ): Serial No.: Interface Diagram Definition Remarks 4 GND GND 3 Wiegand out D0 Wiegand 26 Signal output (Connect to D0) 2 Wiegand out D1 Wiegand 26 Signal output (Connect to D1) 1 +5V +5V(+), normally, do not connect any. 2.3. 【Tech Information】 Function Description Product Name: Fingerprint Time Attendance & Access Control Access Control Yes Time Attendance Yes User’s Capacity 2000 User’ Log Capacity 100,000 Manager Record Capacity 2,000 Communication Method USB,TCP/IP , RS485 , WI-FI (Optional) ID Card Wiegand MIFARE, RFID Verification Mode Fingerprint, ID Card, Password or Mixed CPU 32 bit Optical Sensor: COTO CEN 931 LCD: Blue OLED 128 * 64 USB Port USB Flash Disk | USB Data Transfer Input Port 1* Wiegand 26/34 input (built-in card reader module), 1 * magnetic switch input, 1 * disassemble the alarm input, 1 * the door open button input 7 User’s Manual PK3001 Fingerprint Time Attendance & Access Control Output Port Wiegand-26, Two relay outputs (lock, alarm) Power Input DC 12V threshold 1:N or 1:1 FAR: ≤0.0001% FRR: ≤0.001% Identification speed: ≤0.76s Keyboard: 4 * 4 Keyboard + Door Bell Key Temperature -10℃ - +60℃ Product Size: 125 X 46.5 X 230 mm 8 User’s Manual PK3001 Fingerprint Time Attendance & Access Control Chapter III: User’s setting 3.1. 【Main Menu】 When Power on the terminal, then press the 【MENU】 key to enter the 【Main Menu】, there are 6 function Menu, below is the quick introduce for each function. * Every important: Please 【Set Default】 and reset the correct time when the first time use the attendance system terminal ! Please refer to the Chapter 3.3 3.2.【Time Set】 Press the 【Menu】【▼】【3. Time Set】【OK】, It’s every important to set the correct time for the first time use the terminal. 3.3.【Set Default】 Press the 【Menu】【6. Settings】【7. Set Default】, it will reset the factory set. *** Please notice: All data will be deleted when set restore factory. Please keep backup before 【Set Default】 9 User’s Manual PK3001 Fingerprint Time Attendance & Access Control 3.4.【User Enroll】 Press the 【Menu】【1. Enroll】【1. User Enroll】, to enroll the user identification method, 1.【User】: Can only check his own attendance information and door access. 2.【Manager】: A: If the device without set 【Super Manager】, then, 【Manager 】can has all the 【Super Manager】rights. B: If the device has set 【Super Manager】, then, 【Manager 】only Enroll/Register New Users or Delete User, without the other function set. 3.【Super Manager】: The header of the User/Manager, the super manager can set all the function and can add / delete the 【Manager】 (Enroll user) (Input User’s Fingerprint) 4. If the terminal set 【Manager / super manager】, then, Only the Manager/super manager can to enter the Menu very time. A: by Password: Press –>【Menu】【ID No.:】【ok】,Input the Password. B: By Fingerprint: Press【Menu】【Manager Confirm】【Put manger Fingerprint】 C: By ID Card: Press【Menu】【Manager Confirm】【Swap manger ID Card】 5. Every Employee / User can register 3 fingerprint, 1 ID card, 1 Password. 6. Press 【MENU】 【Enroll】【ok】【Finger】, can add User’s backup Fingerprint. 10 User’s Manual PK3001 Fingerprint Time Attendance & Access Control (Backup User’s Fingerprint) 3.5.【Delete User】 Press 【MENU】 【2. Delete】【ok】【input the ID No.: 】【ok】. 3.6.【Log View】 Press 【MENU】 【4. Log View】【ok】. The Super Manager can view All Time Attendance /Access Data. 【Glog View】: The Super Manager enter to check the User’s Time Attendance Record. A: Input the User ID (e.g. 00011) to check 【ID 00011】 Time Attendance Record B: Input 【00000】 to check 【All users】 Time Attendance Record. 【Slog View】: The 【Manager / Super Manager】 check manager Record. A: Input the Manager ID (e.g. 00088) to check 【ID 00088】 Manager View Record B: Input 【00000】 to check 【All manager】check Record. 【Delete All Log】: The Super Manager delete 【Glog View】&【Slog View】 11 User’s Manual PK3001 Fingerprint Time Attendance & Access Control (Slog View) (Delete All Log) 3.7.【USB Disk】 Press 【MENU】 【5. USB Disk】【ok】. A: It can download / upload【1. Glog 】【2. Slog】【3. User 】information, we strongly suggest to connect the device to computer to upload /download by software in Chapter 5.16. 12 User’s Manual PK3001 Fingerprint Time Attendance & Access Control 3.8.【Signal and Description】 Login Signal Description TMP Tamper with Test C-003561 All login in/out Records N-000007 Number 7 Records V-FE Verification – Fingerprint - Enter V-PE Verification Password - Enter V-CE Verification – Card - Enter VFC Verification – Fingerprint + Card-Enter VFP Verification – Fingerprint + Password - Enter VCP Verification – Card + Password - Enter FCP Verification – Fingerprint + Card + Password - Enter UNK Unknown Method Manager Signal Description C-003561 All login in/out Records N-000007 Number 7 Records E-UF Enroll User’s Fingerprint E-UP Enroll User’s Password E-UC Enroll User’s Card E-MF Enroll Manager’s Fingerprint E-MP Enroll Manager’s Password E-MC Enroll Manager’s Card E-DF Erase User’s Fingerprint E-DP Erase User’s Password E-DC Erase User’s Card D-L Delete All Log Records S-S System Setting S-T Set Time S-L Set Login information S-C Set Communication S-TZ Set Time Zone 13 User’s Manual PK3001 Fingerprint Time Attendance & Access Control Chapter IV: Settings 4.1. 【Terminal】 Press【MENU】【6. Settings】【ok】【1. Terminal】. *【1. Languages:】the initial Languages are: English, Chinese, Thai, Spanish, Turkish, Indonesian, Korean, Vietnamese, Portuguese. *【2. Managers:】can set [1-10 Managers] *【3. Identify Mode:】can set the mix methods for [Password, ID Card, Fingerprint]. [FP/CD/PWD]: It means any one of 【Fingerprint, Card, Password】 is ok. [FP+CD+PWD]: It means only 【Fingerprint + Card + Password】all passed is ok. [CD+PWD]: It means only 【Card + Password】 passed is ok. [FP +PWD]: It means only【Fingerprint + Password】 passed is ok. [FP+CD]: It means only 【Fingerprint + Card】 passed is ok. *【4. LCD Contrast】can set [0-10 Contrast Levels] *【5. Volume:】 can set 【0,1,2,3,4,5,6,7】 *【6. Voice out:】when Verification with Voice to indelicate:【Yes / No】 *【7. LockPowerKey:】, can set 【Yes/No】, A: If set 【Yes】, the Key not works, to press the A: If set 【No】, the Key works, to press the will not power off the device will power off the device. *【8. Sleep:】To set the [No.1-9999]minutes, the LCD and Fingerprint sensor will light off, and press any key to light again. *【9. Auto Off:】To set the [No.1-9999] minutes, the device will power off automatically. *【10. Sensor Adjust:】If sometimes, the sensor do not work, can set this function. 14 User’s Manual PK3001 Fingerprint Time Attendance & Access Control 4.2. 【Log Set】 Press【MENU】【6. Settings】【ok】【2. Log Set】. *【1. Glog Wrn:】: Log in /out quantity Warn, can set [No, 1-1000] records. A: if set 【No】, the new log records will re-write the oldest records without warning if the log records more than the system capacity 【100,000】. B: if set 【1-1000】,the device will warn when the set record is closing to the quantity. *【2. Slog Wrn:】Manager quantity Warn, can set [No, 1-100] records. A: if set 【No】, the new manager records will re-write the oldest manager records without warning. B: if set 【1-100】,the device will warn when the manager record is closing to the set quantity warn. *【3. Reverify:】To set the user’s repeat login time warn, can set [0-255] minutes. 4.3. 【Communication Setting】 *【1. Machine ID】: To set the Machine ID, so the PC can recognize the terminal. 【1 ~9999】,the Machine ID should keep the same as the Computer software set. 15 User’s Manual PK3001 Fingerprint Time Attendance & Access Control *【2. Password】: To set the password, normally keep blank. *【3. DHCP】: can set 【Yes/No】,if set the yes, the PC terminal IP address should keep the same as this IP Address. *【4. IP Address】: To set the terminal IP address, so it can connect to the PC by LAN. Please set the same TCP/IP in the Terminal as the computer. *【5. Subnet Mask】: Do not set it, keep the same as initial factory set. *【6. Gateway】: Do not set it, the same as initial factory set. *【7. Port No】: Do not set it, the same as initial factory set. 4.4. 【Lock Set】 (Lock Set Menu) (Duty on / Duty off) *【1. Attend. Set】: can set 【Yes/No】, it will show on the Screen 【Duty on / Duty off】 *【2. Attendance TZ】: To set the attendance time zone, 【1-10】. e.g.: A: If the company start work is: 08:00, so we can set 【Start 07:00, End 09:00】, and 【Status: D. On】, the staff attendance between 07:00 ~ 09:00 is Duty on. e.g.: B: If the company off work is: 12:00, so we can set 【Start 11:30, End 14:00】, and 【Status: D. Off】, the staff attendance between 11:30 ~ 14:00 is Duty off. 16 User’s Manual PK3001 Fingerprint Time Attendance & Access Control In the Main Menu, the user also can press “▼/▲ ” to choose the Attendance Status. Status Description D. On Work Duty On D. Off Work Duty off O. On Work Overtime On O. Off Work Overtime Off In Access In Our Access Out (Description) (Main Menu) *【3. Lock Ctrl】: set 【No, 1-10 seconds】, the lock will auto response in the set time. *【4. OpenTime】: can set 【No, 1-255 seconds】,the door open last time. *【5. Door Sensor】: can set 【Normal Close / Normal Open / None】,the door open sensor. *【6. Bell Time】: can set 【1-12 】,to set the Bell ring time. *【7. Timezone】: can set 【zone 1-50】,to set the Access Time, every timezone can set from Sunday to Saturday’s Access Time and all time allowed Access (7. Timezone) (8. UserTimeZone) *【8. UserTimeZone】: Every user can set two time zone to access, if not set, it means the user can access anytime. If set【00】, it means the user can access anytime. If set 【50】,It means the user cannot access anytime 17 User’s Manual PK3001 Fingerprint Time Attendance & Access Control 1. The Initial Access System is all registered staff can Access in /out anytime. 2. If arrange specified staff can access in the specified time, so can set follow steps: *【9. Holiday】: can set 【Input Zone 1-256】,can set the holiday date and holiday last days (Max Last 7 days) *【10. VerifyModeTZ】: can set 【1-10】 *【11. Anti-pass】: It is Anti-Passback, can set 【Yes/No】, It needs two devices work together. The user use 【Device A】 in, and 【Device B】 Out. A: If Employee B follows Employee A from 【Device A】 in, he do not use his Card/Fingerprint/Password, then, he cannot 【Device B】 out even if he is authorized. In the same way, f Employee B follows Employee A from 【Device B】 out, he do not use his 18 User’s Manual PK3001 Fingerprint Time Attendance & Access Control Card/Fingerprint/Password, then, he cannot use【Device A】 in the next time. B: If Employee A use his ID Card from 【Device A】in, and he put his ID card to Employee B through the windows, Employee B also cannot Access inform the 【Device A】. The same as Password. C: If Employee A use his ID Card / Fingerprint / Password at【Device A】,but he did not coming in, then the next time, he cannot Access in because he did not use 【Device B】out. *【12. DuressFP Set】: All enroll/register fingerprint can access/open the door, if an employee/user was threatening to access/open the door, the user can use this 【Duress Fingerprint】,the door will be open and send out the 【alarm signals】. *【13. Wiegand】: can set 【User ID / MID+UID】. 4.5. 【Information】 *【User】: To check the Enrolled Employee/Users’ quantity. 【Max: 2000】 *【Manager】: To check the Enrolled Manager’ quantity. 【Max: 10】 *【Finger】: To check the Enrolled Fingerprints’ quantity. 【Max: 2000】 *【DuressFP】: To check the Enrolled Duress Fingerprints’ quantity. 【Max: 2000】 *【Password】: To check the Enrolled Password’s quantity. 【Max: 2000】 19 User’s Manual PK3001 Fingerprint Time Attendance & Access Control *【Card】: To check the Enrolled ID card’s quantity. 【Max: 2000】 *【Glog】: To check the Login/out Records. *【Slog】: To check the Manager check Records. *【Communication】: This device support 【USB & TCP/IP】 *【Soft Version】: The device’s soft version 4.6. 【Self Test】 *【1. Keyboard】: To test the Keyboard. *【2. Sound】: To test all sounds, Totally 22 sounds *【3. FP Sensor】: To test the Fingerprint sensor *【4. Flash】: To test the built in Flash memory *【5. LCD】: To test LCD color 【Black / White】 *【6. Lock】: To test the lock function 【On / Off】 *【7. Bell】: To test the Bell function 【On / Off】 *【8. WeigandOut】: To test WiegandOut 【ID: 1 ~ 83】 *【9. Wiegand IN】: To test Wiegandin. 4.7. 【Set Default】 ***【Very Important!】 To set the Default, all enrolled information and data will be deleted, the device will be set as a new one. Please refer to Chapter 3.3 20 User’s Manual PK3001 Fingerprint Time Attendance & Access Control Chapter V: Software in PC 5.1. 【Very Important】 The administrator should enroll/register the staff/Users any one of the Fingerprint / Password / ID card in the device before use the software, otherwise, the software cannot transfer data between the computer software and the terminal. please refer Chapter 2.4 【User Setting】. 5.2. 【Download Software】 Please download the software from the website. 5.3. 【Software Languages Choose】 5.4. 【Basic Setting】 Select the check box 【Show main function】,there are four main parts for the software, 21 User’s Manual PK3001 Fingerprint Time Attendance & Access Control 【1. Personnel】【2. Attendance】【3. Report】【4. System】 5.5. 【Company Set】 The administrator can set the Company information and company Logo(BMP, 174 * 174 Pixels), the Telephone/Fax can only input Number , hyphen(-) no characters, no spaces() 5.6. 【Department Set】 * Very important, the administrator should set the Department before to set the User’s information. * The administrator input the whole company departments and save it. * The system initial department No 1 is the company name, please do not change it. 22 User’s Manual PK3001 Fingerprint Time Attendance & Access Control 5.7. 【Staff info Setting】 5.7.1. Click the 【Staff info settings】to add the Staff information. 5.7.2 Click the 【Export】, the sowtware will creat a new Excel file, the administrator can input the employee/user’s informatioin, the staff sample also can be download from our website. 5.7.3 Click the 【Import】 to upload the 【user info】from the computer, make sure the sheet name is correct, otherwise, it will be failed to import. 23 User’s Manual PK3001 Fingerprint Time Attendance & Access Control Remarks: * Items in Red should be fulfil, the other items can keep blank if no need. * The Staff No. is the Basic information for the whole system, so do not modify it anytime, otherwise, the whole data will get wrong. * Free checking Attendance: if chose yes, it means this employee do not need for attendance. 5.7.4. 【Employee turnover】 When the employee leave the company, the administrator should set the Employee turnover, so follow the below steps: 【1. Show Main Function】【2. Register Staff Turnover】【3. Select Staff】 【4. Search】【5. Select those staff 】【6. Confirm】 24 User’s Manual PK3001 Fingerprint Time Attendance & Access Control 【1. Show Main Function】【2. Register Staff Turnover】【3. Select Staff】 【4. Search】【5. Select those staff 】【6. Confirm】 5.8. 【Personal Parameter 】Setting In the Personal Parameter Item, the administrator can set the employee/staff’s more information 【1. work type info】,【2. Education info】,【3. Nation info】,【4. Native Info】 【5. Position Info】【6. Title Info】【7. Policy Info】. 5.9. 【Shift 】Setting 1. Shift is the core part of the whole Time Attendance, so the Administrator should set this part very carefully. 2. The administrator can set every kind of shift in this part. 3. The administrator should list all kind of company department attendance, then input into the system. 25 User’s Manual PK3001 Fingerprint Time Attendance & Access Control Remarks: 1. 【Limited Early In】,if the start work time is 08:00, and we set 60 minutes, it means the employee can sign in from 07:00 ~08:00 , it will record as normally work time, if he sign in 06:59, it will be not recorded as valid time attendance. 2. 【Allow Late in 】: If the start work time is 08:00, and we set 10 minutes, it means the employee is in valid time attendance if he sign in between 08:00~ 08:10, it will be recorded as normally work time, if he sign in 08:11, it will be not record as later time attendance. 3. 【Max Later in 】: If the start work time is 08:00, and we set 30 minutes, it means the employee is in valid time attendance if he sign in from 08:10~ 08:30, it will record as later work time, if he sign in 08:31, and it will be recorded as absent. 4. 【Limited Early Out 】: if the out/off work time is 12:00, and we set 30 minutes, it means the employee can sign out from 11:30 ~12:00 , it will be recorded as Early Out, if he sign out 11:29, it will be recorded as absent. 5. 【Allow Early Out 】: if the out/off work time is 12:00, and we set 5 minutes, it means the employee can sign out from 11:55 ~ 12:00, it will be recorded as normally sign out, if he sign out from 11:30 ~ 11:54, it will be recorded as Early Out. 6. 【Max Later Out 】: if the out/off work time is 12:00, and we set 60 minutes, it means the employee is in valid time attendance if he sign out from 12:00~13:00 , if he sign out in 13:01, it will be recorded as Absent. 7. Cross Day: if the staff will work from today to tomorrow, it’s a cross day time attendance E.g. if the work time is as bellows: then, we can set select the pane and write “5”. Work In 08:00 (1) 14:00 (3) 21:00 (5) Work Out 12:00 (2) 18:00 (4) 01:00 (6) 8. If selected, the Clock in time will be calculate as Overtime works,the number is for minutes. 26 User’s Manual PK3001 Fingerprint Time Attendance & Access Control 9. If select it, the Clock out time will be calculate as Overtime works,the number is for minutes. 5.10. 【Shift Pattern】Setting 【Shift Pattern】Part is the 2nd important in the whole time attendance system. So please set it correctly following: 1. In this part, the administrator to set the employee/staff work attendance time. 2. The administrator arrange the employee into the correct 【Shift Pattern】. 3. The time attendance period can set per-day, per-week, per-month. 4. there are max 4 period for every scheduling period, you set one period, it means the shift recycled every week/month , if set 2 period, it means the first week, use the 【period 1】, the 2nd week use the 【period 2】, the 3rd week use the 【period 1】,….Keep on recycling shift attendance every week/month. 27 User’s Manual PK3001 Fingerprint Time Attendance & Access Control 5. All departments shift should be set in here. 5.11. 【Start Scheduling】Setting After Set all company shift and department and scheduling ,【1. Add】【2. Select Staff】【3. Choose Staff from the left List】【4. Select /Select All Staff 】【5. Confirm】【6. Choose the Shift Pattern from the List】【7. Choose the Start Date and End Date .】【8. Save to start .】 5.12. 【Holiday Registration】Setting Click the 【Holiday Registration】,so the administrator can set the Holiday.【1. Add】【2. Holiday No.: can input the holiday description】【3. Serial No.:】【4. Start Date/Time 】【5. Deadline Date / Time】【6. Save】【7. Exit】. If set the 【Holiday】, then, the staff in holiday will be not recorded as absent. 28 User’s Manual PK3001 Fingerprint Time Attendance & Access Control Click the 【Holiday Registration】,so the administrator can set the Holiday.【1. Add】【2. Holiday No.: can input the holiday description】【3. Serial No.:】【4. Start Date/Time 】【5. Deadline Date / Time】【6. Save】【7. Exit】. 5.13. 【Leave or be out registration】Setting Click the 【Leave or be out registration】,so the administrator can set the staff leave or Out.【1. Add】【2. Select Staff】【3. Select the department】【4. Staff List】【5. Select Staff】【6. Save】【7. Start Date/Time】. 【8. Deadline Date/Time】【9. Leave Type】【10. Leave Category】【11. Save】【12. Exit】 29 User’s Manual PK3001 Fingerprint Time Attendance & Access Control 5.14. 【Manual Adjustment】Setting Click the 【Manual Adjustment】, some staff login in /out is acceptable even if he is not in the arranged Time Attendance because of some reasonable excuse, so the administrator can set the staff time Manual Adjustment. 【1. Add】【2. Select Staff】【3. Start Date/Time,Dead Line】【4. Adjustment Reason】【5. Adjustment Time】【6. Save】. 5.15. 【Computation Rules】Setting Click the 【Computation Rule】,this is for staff work overtime calculate, 1. 【Initial Value】: if set 30 minutes, only over 30 minutes, the system will calculate as the overtime. 2. 【Integer Value】: If Set 30 minutes, only the times of 30 minutes, it will be rouding. E.g.: if a staff work 85 minutes, it is 30 *2 +25 minutes, so only 60 minutes will be calculated into overtime, and the 25 minutes will not be calculate. 3. OT Rate: it’s the Overtime Rate, can only set the integral, can be 1,2,3…..it means the staff overtime is the same as normal time or times of normal work time. 30 User’s Manual PK3001 Fingerprint Time Attendance & Access Control 5.16. 【Data Collection】Setting Click the 【Data Collection】, to set the terminal connect to the PC. 【1. Add】: To Add a New terminal into this software. 【2. Communication 】: to choose the communication method between the Terminal and PC, there are 3 methods: RS232/485, Ethernet (LAN), USB, for short distance, we prefer to USB, for long distance, we prefer to Ethernet(LAN), Details can prefer to Chapter 4.4 【3. Device No.】: please set the same 【Device ID】 No. on the Terminal, 【4. Online Testing.】: To check the communicate set is correct or not. 【5. Get Device info.】: To get the registered user’s information from the Device. 【6. Get Device Time.】: To get the device time, so can check it’s correct or not. 【7. updated Device Time.】: To correct the device time the same as the PC time. 【8. Read Photo.】: Some models can show the Staff photo in the Device, this model without this function. 【9. Collect New Data.】: To get any new data from the Device to the PC. 【10. Collect all Data.】: To get the specified time data from the Device to the PC. 【11. Initialization Device.】: To format the Device to Factory reset, all data will be deleted. 【12. Import U Disk Attendance Data】: To import the Attendance from the USB Flash Disk, it’s “.txt” format. 5.17. 【Attendance Analysis】Setting After the time attendance, and the manager want to get the staff attendance data, connect the device to computer by USB cable, then 【Data collection】【Attendance Analysis】. 31 User’s Manual PK3001 Fingerprint Time Attendance & Access Control It’s very important to follow this steps, so the software can get all attendance data from the device and the manager can to do the next steps. To choose the 【Analysis Date】 and 【Department】【Start Analysis】. The administrator can set the department and the period to analyses the Attendance Data. 5.18. 【Original Record Report】Setting When enter the 【Original Records Report】, the administrator can get all staff time attendance information, if the company has several terminal, can 【Data Import 】together to analyses, and then to 【Data Export】or 【Print】. 5.19. 【Attendance Report】Setting The administrator can get every staff All time/every time attendance data. A: if check one staff record, just input the Staff No and choose the period, then click “Inquiry”. B: if check all staff record, just choose the period, and then click “Inquiry”. 32 User’s Manual PK3001 Fingerprint Time Attendance & Access Control 5.20. 【Attendance Daily Report】 The administrator can get every staff every day’s time attendance data (Only record those in the shift and group setting). 5.21. 【Attendance Monthly Report】 The administrator can get every staff month time attendance data. 【Ask for Leave】To check the Staff ask for leave days. 【Early Out】To check the Staff Early Out time the whole month. 【Late in】To check the Staff Late in time the whole month. 【Absence】To check the Staff Absence days. 【OT】To check the Staff ask for Work Overtime. 33 User’s Manual PK3001 Fingerprint Time Attendance & Access Control 5.22. 【User Management】 To set the terminal Administrator, this product can set Max 10 Administrator, and authorize the different power to control the whole system. 5.23. 【Access 】Setting 34 User’s Manual PK3001 Fingerprint Time Attendance & Access Control 【 Device Management 】 【 Device 】 【 Access 】 , this product can set Max 10 Administrator, and authorize the different power to control the whole system. In this part, the administrator can set the time to Access of the Staff. 5.24. 【Back up Database】 The manager can backup the database every time after set the software, the system can save all user’s register information and log data. Please set the different Backup Name. 5.25. 【Recover Database】 * The manager can recover the backup database anytime if needed. * Please keep the “data backup” in safe, anytime, if the computer get wrong, can data-recover. 35 User’s Manual PK3001 Fingerprint Time Attendance & Access Control Chapter VI: Quickly Use the Device 1. Power on Device【Chapter 3.4】connect device to PC by USB/LAN/WIFI【Optional】 2. Run the “Software”, and set as follow Step 1-6. Prefer to 【Chapter 5.5 ~ 5.11】 3. Click the 【Data Collection】, Set as follow Step 1 ~ 7 , prefer to 【Chapter 5.16】 4. Set as follow Step 8 ~ 12, prefer to 【Chapter 5.16】 5. After finished all above setting, the Device can begin to work. 36 User’s Manual PK3001 Fingerprint Time Attendance & Access Control Chapter VII: Time Attendance Set Sample A. A: If the company work time as follows, and all employee use the same work time. Morning Work Time Sign in Sign Out (Monday ~ Friday) 08:00 17:30 So we can set the shift as follows: 【1. Shift】【2. Shift Pattern】【3.Start Scheduling】 (1. Shift Setting) (2. Shift Pattern Setting) (3. Start scheduling) 37 User’s Manual PK3001 Fingerprint Time Attendance & Access Control Chapter VII: Time Attendance Set Sample B. B: If the company work time as follows, so we can set the shift: Work Time Sign in Sign Out (Monday ~ Friday) 08:00 12:00 Afternoon (Monday ~ Friday) 13:30 17:30 Morning (1. Shift Setting) (2. Shift Pattern Setting) (3. Start scheduling) 38 User’s Manual PK3001 Fingerprint Time Attendance & Access Control Chapter IX: FAQ 9.1. Is this fingerprint attendance secure from employee pranks? Answer: Yes, it is provided with a professional software application that keep tracks of everyone's. With its 3D sensor it can accurately faked fingers t, which means it cannot be fooled by fingerprint pictures or photocopies 9.2. What happens if I or one of my employees injures a registered finger and the fingerprint attendance terminal was no longer able to recognize the original finger Registration? Answer: Simple, you can connect it to this terminal or your computer and delete you registration details. After that, re-register and alternate finger. 9.3. How does fingerprint biometrics work? Answer: When an employee is first register in a fingerprint attendance system, the software records a template of the employee’s fingerprint and associates that template with the employee’s ID number. This template measures the relationship between various points in the fingerprint. Each time the employee attempts to clock in or out, the time and attendance software verifies that the newly scanned fingerprint matches the template originally stored for that ID number. If there is a match, the punch is recorded. 9.4. What are the advantages of fingerprint biometrics? Answer: Fingerprint biometric attendance terminal is generally lower cost and is normally used in all kinds of company, hospital, government, school. Based on the advantage technology, fingerprint attendance terminal can have a false-acceptance rate that is lower than other technologies. 9.5. The Computer show “wrong” when open the “Attendance Sheet”? Answer: Do not mind, there are many Excel version, so just ignore it. 9.6. There is no any response when we put our finger in the terminal for many times. Answer: Power off the terminal, and cut off the power for one minutes, then, connect the power cable and power on again. 39