1
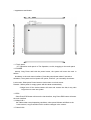
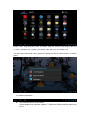
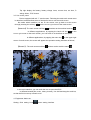
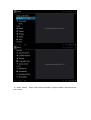
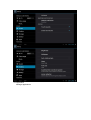
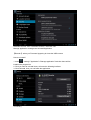
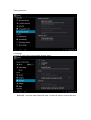
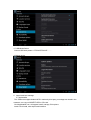
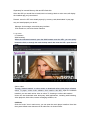
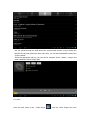
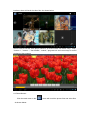
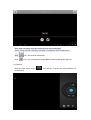
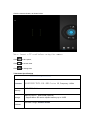
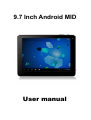
9.7 Inch Android MID
User manual
Thanks:
Dear User
Thank you for purchasing our product.
These operational guidelines for the user, to ensure you a quick and convenient to
use, read the instructions carefully before use.
Contents:
Attention
1. appearance and button
2. First use
2.1 Battery management and charge
2.2 Connection with PC
3. Equipment operation interface
3.1 Main interface describe
3.2 status bar describe
3.3 Use touch panel
4. Equipment basic set
4.1 Basic setting
4.2 Application
4.3 Privacy
4.4 Storage
4.5 Language & keyboard
4.6 Date & time setting
4.7 USB Mode Select
4.8 About device
5. Apps Install and manage
6. Operation
6.1 Network
6.2 Music
6.3 Video
6.4 Picture
6.5 Wallpaper
6.6 Camera
7. Hardware Specifications
8.Problem solution
Attention:
This handbook contains important security measures and the correct use of the product
information, in order to avoid accidents. Please make sure to reading the manual carefully
before use the device.
l Please don’t be in high temperature, moisture or very dust place
l Please don’t be in high temperature, Especially in summer don't put the device in the
car when Windows closed.
l Avoid fall or Violent collision of the device, don’t make the TFT display screen were
violent tremor, This could cause TFT display screen abnormal or damage.
l Please choose the appropriate volume, Use headphones should not be too big
volume, If feel tinnitus, Lower the volume or stop using it
l please charge In the following condition,
A、 The battery power ICONS shows have no power
B、 The system automatically shut off, startup after power off soon
C、 Operation buttons no response
D、 The machine that the top right corner show red icons
l
l
l
l
l
l
When the device in the format or ongoing upload and download file, please do
n't suddenly disconnect, This could cause application error.
For those who because of damage to the product, repair, or other causes of erased
the memory, The company shall not be liable for any responsibility, please follow the
user manual for the standardized operation to use the device.
Don’t disassemble the product, don’t use alcohol、Thinner or benzene to scrubbing
products
Don't use the device one of the place of prohibit to use electronic equipment in
regional (such as the plane)
Please don't using the Tablet PC when you in driving or walking down the street,
USB just only be used for data transmission
The company reserves the right to improve product, products specification and desi
gn have any change, The information is subject to changes without prior notice.
(This tablet is no waterproof function)
【Remark】All pictures in this manual is just for your reference. products specificati
on and design have any change, The information is subject to changes without pri
or notice.
1. appearance and button:
1.1 Touch panel
9.7” Capacitive touch panel: In The Operation, to click, dragging on the touch panel
1.2 POWER
startup: Long Press and hold the power button, the system will enter the main in
terface
shutdown: In the main menu interface, Press the power button about 5 second to
shutdown, The system can hint "power off" option, Clike”ok”. you can safely shut down.
Lock screen: Short press Power button to lock screen or unlock screen.
Remark 1.When power is empty,system will shut down automatically.
2.Illegal turn off the device,restart will scan and restore the disk,it may take
longer time to enter into system
1.3 ESC
Short Press ESC button will return the last interface, long Press ESC button will return
the main interface
1,4 Menu/VOL+
the Tablet under normal operating conditions, short press M button will Back to the
home screen; Long Press Menu/VOL+ achieve changes in the volume.
1.5 Home/VOL--
Short Press Home button back to the home screen; Long Press Home button
achieve changes in the volume
1.6 earphone jack
3.5 mm standard earphone jack
1.7 Video output interface
HDMI output interface
1.8 TF card
TF-CARD solt: external T-FLASH card
1.9 Micro USB(HOST)
Charging and external connection USB flash drive
1.10 Micro USB(OTG)
You can use it to connect the computer for data transmission,
1.10 Reset
When the Tablet under the condition of the crash, use the small objects to short press
RESET button, Tablet will force to shutdown.
【Remark】: unless unable to shutdown, otherwise don’t use the reset, suggest you to
shutdown by normal, if no will easy to damage the machine system.
2. First use
2.1 Battery management and charge
Before first use, please set the device's battery is fully charged
Just need to connect the adaptor or USB interface, then you can charge
The first two times charging please keep about 10 hours, after that you just need 8
hours to charge.
【Remark】: This tablet using Built-in type polymer battery, Charge must be to choose
standard adaptor (Input: AC110~240V 50/60Hz Max:180MA.. Output: DC5.0~5.5V/2.5A),
this device without supply DC charging, USB interface can charge, Choose USB interface
to charger
During the charging, the battery icon will scroll
When finished charging, battery icon will become green and stop rolling
In order to prolong the service life of the machine, suggest use out battery power before
charge it
【Remark】: 1. If you long time don’t to use this Tablet, ,in order to avoid power
consumption caused damage,pls charge/play the battery once a month.
2、After low battery shut down, connect DC adaptor, device will remind low battery,
charging, need to wait some time until the battery is enough power to enter into main
menu.
3. Device charging should be in standby status for reach normal charging time.
Because with device and screen consumption,it may cause longer charging time.
2.2 Connection with PC
Use USB cable to connect device to PC, device will pop up the USB connection
window, click Turn on USB storage to connect to PC
Into the load mode, you can copy, delete the file on thedevice and the file on the memory
card.
3. Equipment operation interface
3.1 Main interface describe
After startup will enter the main interface
In the main interface, you can :
Management main interface software ICONS: long press the icons 3 second, after t
he icons will biger, then you can drag anywhere in the interface.
Delete icons: long press the icons 3 second, drag the icons to the Recycle Bin ico
n, once it become red, Loosen your hand, after that you can delete icon
You touch the screen keep a time, appear the dialog box”Add yo Home screen” as shown
below:
3.2 status bar describe
l
The status bar above of the screen
Top left display main interface software, T-Flash card, USB connection status and
so on
Top right display the battery, battery charge icons, current time, set time, S
ettings Menu, ESC button.
3.3 Use touch panel
Device equipped with a 9.7 “ touch screen. Following the main touch screen area
is described, and describes some of the tips for how to use the touch screen.
No matter which interface you are on the screen, can go back to main screen
through pressing the soft key
on the bottom right corner of the main screen.
【Attention】The main screen soft key
functions as the machine back key
In different applications, by tapping the back soft key
on the
bottom right corner on the touch screen, you can return to its interface on the upfloor.
In different applications, by tapping the menu key
on the upper right
corner of touch screen, the screen will appear the operation setting interface as follows,
【Remark】: The main screen soft key
functions as the machine manu
In the main interface, you can touch the icon to open the APPs
In different browser(file, music, video, pictures), You shift and drag the scroll bar,
so that the file list can up or down to roll.
4. Equipment basic set
Setting: Click setting icons
, enter setting interface
4.1 Basic setting:
lock sounds,
Silent mode,Volume,Notifcation ringtone,Audible selection,Screen
4.2 Application
Manage applications
Unknown sources: Click “Unknown Sources”, then click “OK”
Manage application: manager and uninstall Application
【Remark】: when you Firmware Upgrade, pls close the USB connect
How to uninstall?
1. enter
“setting”>”Application”>”Manage application” And then there will be
installed the program list
2. Click you want to uninstall icons, will enter the following interface
3. Click Uninstall, then you can felete the application
4.3 Privacy
Factory data reset
4.4 Storage
Remove TF card, view of the available storage space
【Remark】: pls touch option”delete SD card”, so that can safety to romeve SD card
4.5. Language & keyboard
Setting: (Language), text input and automatic error correction options;
Select Language: 54 kind of national languages are available
Remark: Android system can support 54 kind of language, now manu interface just
suport 14 language,
Android keyboard: Android keyboard setting
Sound on Key-press
Auto-capitalisation
Show suggestions: Display suggested words while typing
Auto-complete: Specebar and punctuation automatically insert highlighted word
4.6. Date & time setting
Set date, set time, Select time zone and select date format
4.7 USB Mode Select
Choose USB work pattern: OTG/HOST/SLAVE……..
4.8 About device
5. Apps Install and manage
5.1 Appinstaller
This Tablet can support Android APP in market by third party, most Apps can install in the
netwaork, can copy to NAND FLASH or SD card.
Click Appinstaller icon, will appear Install, manage, Exit options.
Install: Click install, enter Apk install interface
Separately for Internal Memory disk and SD Card disk.
Selec the APK you would like to install,click it to install,go back to main menu,will display
the installed app you just selected.
Remark: some 3rd APP must install properly by memory card,downloaded 3rd paty app
may not install properly on device.
Manage: click manage, enter third party interface
Click install icon, will enter Action interface
6. Operation
6.1 Network:
Web browsing:
When the connected network, open the Web browser enter the URL, you can quickly
browse the Web; or through the main desktop search bar enter the URL, open the web
page.
Online video:
Through "Android market" or other means to download online video player software,
online TV player, online music software, then install to this MID. Open the software
installed, you can watch online video or online TV, listening to online radio stations.
Users can also download other third-party Web applications, including web browsing,
video playback, Web client, instant messaging software, etc.
6.2 Music:
Click the "music" icon in main menu, you can enter the music player interface. Here lists
the system default user data area of all audio files. As shown below:
We can spread through the USB audio files synchronized manner, or by inserting the
MICRO SD card with audio files were audio files, you can also download the audio files
via the network.
Select the appropriate tab key, you can see for example "Artist", "album", "songs" and
other interfaces. Select song to play.
6.3 Video:
Click the main menu in the " Video Player
" into the "Video Player" the main
interface, there will list all the video files. As shown below:
Select video file into the video player interface, as shown below. Can select "Play", "stop",
"Volume +", "Volume -", "fast forward", "rewind", "progress bar" and control keys to control
playback of the progress.
6.4 Photo Browse:
Click the main menu in the "
As shown below:
", there will list all the picture files and video files.
Select a picture file which you need, enter the picture play interface, as shown below.
6.5 Recording:
Click the main menu in the "
shown below:
" icon into the "recorder" the main interface. As
Note: when recording, audio file will be saved in the local Storage.
Select "Record" button recording, recording is completed, select "Stop" button.
Click
icon , will show all record files.
Click
icon , you can setting recording Bitrate,minimum disk space,Gain etc.
6.6 Camera:
Click the main menu in the "
shown below:
" icon into the "Camera" the main interface. As
Click the camera shutter, as shown below:
Note: Insert a TF card before using the camera.
Click
to take photo,
Click
to record vidoe
Click
to change lens
7.Hardware Specifications
MID hardware parameters
Processor
ALLWINNER TECH A10 : ARM Cortex A8, Frequency 1.2GHz
1GB DDR3 RAM
Memory
Storage
Memory built-in 8GB-16GB (optional)
Support Micro SD card to expand memory up to 16GB
IEEE802.11b/g/n wireless network
Wireless
USB2.0 OTG high speed interface and USB1.1
USB
Video
output
Audio
HDMI 1.3 Full HD Video Output Interface
3.5mm headphone jack
High-quality stereo loud speaker
Built-in microphone
Headset maximum output power of 40mW
Frequency response: 20Hz-20KHz
SNR: greater than 90db
9.7 inch
Size
Resolution
Screen
Color
Operating
Other
WVGA 1024*768
16 million colors
Capacitive touch panel
Size
243 x191 x 10.5mm
Color
Weight
Aluminium silver casing
About 600g
Battery
Built-in lithium polymer battery 7600AH
1pc Power adapter(DC V/A)
1pc Micro USB cable
Accessories
1pc OTG cable
1pc Instruction manual
8. Problem solution
1.Device can’t to open
1. Check the battery power
2. Connect adaptor first, then check again
3. After charging then can’t to open, pls contacy with the supplier
2. After startup the screen or the opening picture has been appear , the the device appear
shutdown
1. Power is not enough, please charge
3.Headset can't hear the voice
1. Pls check the volume whether set to 0
2. Check the music file wherther damaged. Try playing other music, if the file
have damaged may lead to serious noise or hop sounds.
4.Can
1.
2.
3.
4.
copy file or paly music and so on
Pls check between computer and device is correct connection
check the memory storage space is already full
checl the USB cable is good or not
USB connection is disconnected