1
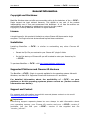
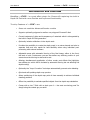
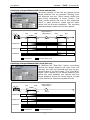
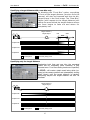
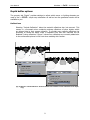
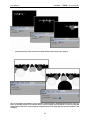
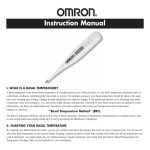
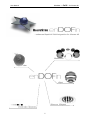
User Manual
BlackStar
enDOF
DOFin
DOF for Cinema 4D
BLACKSTAR
– enhanced Depth Of Field integration for Cinema 4D
Reflection
Hair
Alpha
Alp
ha
Source Object
Exclu
clude
Ex
clu
de Objects
1
User Manual
BlackStar
enDOF
DOFin
DOF for Cinema 4D
General Information
Copyright and Disclaimer
BlackStar Solutions does not offer any warranties arising by the behaviour of the enDOF
DOFin
DOF
Plugin beyond the legal minimal warranty. This applies to any part of the product
independently even if one part contravenes this disclaimer. In no case the authors are
responsible for any damage or misbehaviour occurring by this product.
Copyright © 2006 by BlackStar Solutions. All rights reserved.
Licence
A single licence for this product is limited to a unique Cinema 4D licence and a single
computer. The Plugin must not be transferred beyond these restrictions.
Installation
Installing BlackStar
Plugin:
enDOF
DOFin
DOF
is similar to embedding any other Cinema 4D
•
Extract the Zip-File you received to your Cinema 4D "plugins"-folder
•
On the first start-up of Cinema 4D you will be asked to enter your licence key for
enDOF
DOFin
DOF
To purchase BlackStar
enDOF
DOFin
DOF visit http://www.blackstar-solutions.de
Supported Platforms and Cinema 4D Versions
The BlackStar enDOF
DOFin
DOF Plugin is currently available for the operating systems Microsoft
Windows® and Mac OS X. Supported Cinema 4D Versions are 9.1 and above.
For detailed information about the availability of enDOF
DOFin
DOF on your
platform or 64-bit operating systems please contact us (further contact
information see below).
Support and Contact
For support and information beyond this manual please contact us via email:
[email protected]
Important:
Concerning support requests please be sure always to add information about
your operating system, your Cinema 4D version and your enDOF
DOFin
DOF version if
available. You can find your
"version_info.txt".
enDOF
DOFin
DOF
2
version in the supplied text file
User Manual
BlackStar
enDOF
DOFin
DOF for Cinema 4D
Introduction and overview
DOFin
BlackStar enDOF
DOF is a post effect plugin for Cinema 4D replacing the built-in
Depth Of Field with more flexible and improved functionality.
The Key Features of
enDOF
DOFin
DOF are:
•
Does not need the Advanced Render module
•
Supports optionally polygonal as well as non-polygonal Cinema 4D Hair
•
Correct treatment of alpha and transparency of materials which is disregarded by
the built-in Depth Of Field generation
•
Optionally includes reflections in the depth mask
•
Provides the possibility to create the depth mask in an extra channel and also to
separate front and rear masks for best flexibility when using individual postprocessing with external software
•
Adjustable areas with automatic blurring of the final image; either in the front,
the back or both. Furthermore you can also define any arbitrary position in your
scene where the blurring to start and to end.
•
Allowing simultaneously application of other render post effects like highlights,
lens effects etc. which will be included by automatic blurring but not affecting the
depth mask(s)
•
Optionally the "Layer Correction" technique automatically prevents color bleeding
•
Quick and self-updating depth map preview
•
Allows positioning of the depth map point-of-view manually to achieve individual
cheating positions
•
Offers the possibility to exclude specified objects from the depth map calculation
•
Comes with a nice T-Shirt with a duck upon it – the most convincing proof for
simply being the coolest guy on earth!
3
User Manual
BlackStar
enDOF
DOFin
DOF for Cinema 4D
Usage Instructions
Enabling the enDOF
DOFin
DOF post effect
DOFin
To enable enDOF
DOF just add it to the post effect list in the Cinema 4D render
settings dialog as seen in figure 1. You can add various other post effects like
lens effects; the order of enDOF
DOFin
DOF in the list does not matter – in any case
every built-in post effect will always be regarded just at the right render pass1.
If you want to view the generated depth mask(s) as separated channel in the
picture viewer make sure you enable multi-pass rendering and to add the
channel "Post Effects" like displayed in figure 2.
Note:
The rendered results of the enDOF
DOFin post effect is only visible when
DOF
rendering in the picture viewer – in the editor view post effects won't be
concerned due to offer a fast preview possibility.
[Fig. 1: Adding the enDOFin post effect to the
list and enabling post effects in the
render settings dialog]
[Fig. 2: To view the enDOFin depth masks as
separated channel(s) add "Post
Effects" to multi-pass rendering]
Specifying the focal distance
Basically you have two different opportunities to adjust the focussed area:
Enabling the option "Use camera settings" the target distance is equivalent to the
camera's target distance or the distance of the camera's target object. This
applies also to the Front- and Rear-Blur values. Defining own values in the
enDOF
DOFin
DOF basic properties the generated depth mask and the optional separated
front / rear masks depend on the input values as follows:
1
I.e. lens flares will be rendered afterwards and will therefore never be blurred; the cartoon posteffect instead will always be applied in advance – independent from the position of enDOFin in the list.
4
User Manual
BlackStar
enDOF
DOFin
DOF for Cinema 4D
Specifying a target distance with a front and rear blur
Using the settings on the left any objects at the
target distance will be focused. Starting from
this distance the two "Start"-values define the
area being completely in focus (sharp). The
"End"-values specify the size of the sharpness
falloff in each direction; areas beyond these
values will be blurred completely. The resulting
separated depth masks can be seen below:
End
Target Distance /
Target Object
Start
Start
Rear
Front
0m
1500 m
1000 m
End
2000 m
2500 m
3000 m
Depth mask
Depth Front
Depth Rear
Unsharp area
Focussed (sharp) area
Specifying a target distance with a front blur only
By disabling the "Rear Blur" option, everything
behind the target distance (as seen from the
camera) will also be focussed and thus be displayed sharp in the final image. The "Front Blur"
values (with respect to the target distance) still
define the area between the camera and the
target distance where the focus begins to fade
in and where the sharpness-gradient ends.
End
Target Distance /
Target Object
Start
Front
0m
1000 m
1500 m
2000 m
Depth mask
Depth Front
Depth Rear
Unsharp area
Focussed (sharp) area
5
User Manual
BlackStar
enDOF
DOFin
DOF for Cinema 4D
Specifying a target distance with a rear blur only
By disabling the "Front Blur" option, everything
in front of the target distance (as seen from the
camera) will also be focussed and thus be displayed sharp in the final image. The "Rear Blur"
values (with respect to the target distance) still
define the area behind the target distance where
the focus begins to fade out and where it's
completely lost.
Target Distance /
Target Object
End
Start
Rear
2000 m
0m
2500 m
3000 m
Depth mask
Depth Front
Depth Rear
Unsharp area
Focussed (sharp) area
Specifying only the target distance
Deselecting both front and rear blur, the separated
masks will be completely black indicating a fully
focussed area. If no focus-fading borders are specified,
enDOF
DOFin
DOF will create a depth mask being white (unsharp) at the camera position and subsequently turning
black (sharp) until the target distance is reached.
Everything beyond the target distance will also be
focussed.
Target Distance /
Target Object
0m
2000 m
Depth mask
Depth Front
Depth Rear
Unsharp area
Focussed (sharp) area
6
User Manual
BlackStar
enDOF
DOFin
DOF for Cinema 4D
Blurring the output image
provides the possibilities both to automatically blur the final image or
just to create the calculated depth mask(s) for further individual post-processing
with external software. Using the built-in blurring option you can adjust several
properties:
enDOF
DOFin
DOF
Specifying blur settings
•
You can choose between two different blur algorithms: the Median blur and the
widely common Gaussian. Note that choosing the Median blur, the blurred image
will be blended in the rendered image with respect to its corresponding depth
map value. The Gaussian blur instead does not maintain the edges because of
directly blurring the image itself. If you want the Gaussian blur to be blended in
the rendered image too, there is a third option called "Gaussian blending"
available.
•
The "Strength"-value specifies how much the output image will be blurred.
•
With the "Repetitions"-value you can define a factor how often the blurring will be
applied to the rendered image.
The "Layer Correction"-technique to suppress color bleeding
"Layer Correction" is a powerful option to prevent the well-known color bleeding artefacts
when blurring an image as post effect. It is important to differ between two forms of bad
color bleeding effects: If a sharp object overlays an unsharp background and the sharp
object is wrongly blurred at the silhouette. Figure 3 shows this effect and the result when
enabling the enDOF
DOFin
DOF option "Layer Correction Rear".
[Fig. 3: Preventing unwanted color bleeding artefacts with the "Layer Correction Rear" function]
The second form of wrong color bleeding can occur when an unsharp object
overlays a sharp background so that the silhouette of the unsharp object in front
wrongly misses color bleeding. This can be corrected by enabling the option
"Layer Correction Front" as can be seen in figure 4.
7
User Manual
BlackStar
enDOF
DOFin
DOF for Cinema 4D
[Fig. 4: Adding missing color bleeding with the "Layer Correction Front" function]
Important:
It is possible that the results of the layer correction algorithm
visually differ from your initial intent although being mathematically correct. This depends on the scene itself so disabling
this option and removing color bleeding artefacts manually via
post processing may individually lead to better results.
Note:
This option will be disabled if you select "Include Reflections" or
"Include C4D-Hair" from the property page "Depth" as the depth
mask is not separateable in front and rear masks for better
results when using these options.
8
User Manual
BlackStar
enDOF
DOFin
DOF for Cinema 4D
Depth buffer options
The property tab "Depth" provides settings to adjust which scene- or lighting elements are
DOFin
used by the enDOF
DOF depth map calculation as well as how the generated masks will be
available to you:
Reflections
Selecting "Include Reflection" takes the material reflections also into account. This
causes i.e. a focussed mirror containing unsharp reflections of other objects which
are blurred due to their camera distance. To provide more realistic reflections the
possibility to divide the depth mask in separate front and rear channels will be
disabled if using reflections. Figure 5 shows how reflections are correctly added also
to the unfocussed spheres in the front when enabling this function.
[Fig. 5: With the "Include Reflection" function enDOFin also calculates correct reflections for the depth
map]
9
User Manual
BlackStar
enDOF
DOFin
DOF for Cinema 4D
Hair
DOFin
The option "Include C4D-Hair" signs enDOF
DOF also to regard the built-in Cinema
4D non-polygonal hair when creating the depth mask as can be seen in Figure 6.
Like above, the channel separation is prohibited to guarantee the best results with
hair.
Note:
This option will only be available if your Cinema 4D version supports
hair (version 9.6+).
[Fig. 6: Non-polygonal C4D Hair can optionally be taken into account. Deselecting this function,
enDOFin calculates the depth map for the corresponding objects without hair.]
Channel management
You can choose whether enDOF
DOFin
DOF creates an extra channel for the calculated
depth mask in addition to the internal one; in case of deselecting this option the
internal mask will be overwritten. Optionally the separated depth masks in front and
behind of the target distance as viewed from the camera can be created as additional
channels, too.
Anti-Aliasing options
You can define own Anti-Aliasing options for the depth map. When choosing "Inherit"
enDOF
DOFin
DOF uses the same Anti-Aliasing type as specified in the general render
settings.
10
User Manual
BlackStar
enDOF
DOFin
DOF for Cinema 4D
Depth map preview
The preview image which is accessible in the "Preview" tab gives a quick
impression how the general depth map will look like with respect to the current
enDOF
DOFin
DOF settings. Using the option "Auto Update" every change of these settings will be
automatically displayed in the preview window so you can easily adjust enDOF
DOFin
DOF to create
the desired depth map with a quick what-you-see-is-what-you-get response.
Note:
Auto Update applies only to changes within the enDOF
DOFin settings but not
DOF
to changes of the geometry or other scene-related properties.
Special functions
Cheating depth map positions
In the property tab "Special" the point-of-view source can be forced to be different from the
camera. Via drag and drop you can assign any object as new position from which the
depth buffer will be calculated. This function is not needed for standard Depth Of
Field usage but very useful for cheating effects. For example may the Depth Of
Field blurring look artistically better from a position differing a bit from the real
camera coordinates as this is often the case during professional lighting. You can
easily accomplish such cheated DOF-perspectives by linking any object in the
enDOF
DOFin
DOF "Source Object" field causing its coordinates to act as new position for the
depth mask calculation. Figure 7 shows how the depth map point-of-view
changes with different source objects.
Excluding objects from the depth map
Similar to exclude option of lights you can mark objects not to be regarded when
calculating the depth map by dragging them onto the "Exclude Objects" area. In
the resulting depth map(s) these objects will always be black and hence not be
DOFin
blurred at all – uninfluenced by the enDOF
DOF basic settings. This can be seen in
Figure 8 below.
11
User Manual
BlackStar
enDOF
DOFin
DOF for Cinema 4D
[Fig. 7: A different source object influences the depth map point-of-view: the unfocussed area spreads
spherically from the center of the source object instead of with respect to the camera.]
[Fig. 8: The enDOFin focal distance is set to generate a blurred region in the background as well as in the very
front. By excluding objects in the "Special" tab you can force objects to be focussed in any case. Thus they will
always appear sharp in the output image and completely black in the depth map like the nearest sphere in this
example.]
12