1
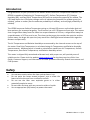
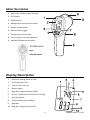
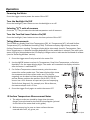
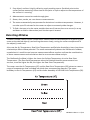
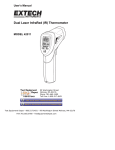
USER GUIDE Dew Point Temperature Detector with Laser Pointer MODEL IRT600 Introduction Congratulations on your purchase of the Model IRT600 Dew Point Temperature Detector! The IRT600 is capable of displaying Air Temperature (AT), Surface Temperature (ST), Relative Humidity (RH), and Dew Point Temperature (DP) and can analyze the potential for mildew. The LED lamp above the LCD display changes color to indicate the potential for mildew: green (no mildew), yellow or amber (low to moderate probability of mildew), and red (high probability of mildew). The IRT600 measures Surface Temperature using an infrared (IR) sensor and includes dual red laser pointers for improved targeting. The IR sensor has a 12:1 Distance to Spot ratio. This means that a target 30cm away from the meter has a spot diameter of 1.25cm, a target 45cm away has a spot diameter of 3.75cm, and so on. The closer to the target, the smaller the spot size and the further away, the larger the spot size (very much like a flashlight beam behaves with regard to distance‐to‐spot ratio). The Air Temperature and Relative Humidity are measured by the internal sensors at the top of the meter. Dew Point Temperature is calculated using Air Temperature and Relative Humidity measurements. Mildew analysis is based on calculations made from Air Temperature, Surface Temperature, Dew Point Temperature, and Relative Humidity values. This meter is shipped fully tested and calibrated and, with proper use, will provide years of reliable service. Please visit the website www.extech.com for the latest version of this User Guide, Customer Support, and information on other products offered by Extech Instruments and FLIR Systems. Safety Use extreme caution when the laser pointer beam is on Do not point the beam toward anyone’s eye or allow the beam to strike the eye from a reflective surface. Do not use the laser near explosive gases or in either potentially explosive areas. Do not clean the laser with any corrosive acids or liquids. Use an appropriate (9V) battery to power the meter. 2 IRT600‐EU‐EN v1.4 9/13 Meter Description 1. Multi‐color mildew status indicator 2. LCD display 3. MODE button 4. Backlight and Laser pointer button 5. Battery compartment 6. Measurement trigger 7. Temperature units button 8. Laser Pointers and Infrared sensor 9. Humidity/Temperature sensors Display Description 1. Emissivity setting (fixed at 0.95) 2. Air Temperature icon 3. Laser Pointer ON icon 4. Battery status 5. Bargraph range maximum (100%) 6. RH, Air Temperature or Dew Point reading 7. Unit of measure 8. Surface temperature reading 9. Bargraph 10. Bargraph range minimum (0%) 3 IRT600‐EU‐EN v1.4 9/13 Operation Powering the Meter Press the trigger once to power the meter ON or OFF. Turn the Backlight On/Off Press the backlight / laser button to turn the backlight on or off. Selecting oC/oF units of measure Press the oC/oF key to select the desired temperature unit of measure. Turn the Two Red Laser Pointers On/Off Press the backlight / laser button to turn the laser pointers ON or OFF. Taking Measurements The IRT 600 can display Dew Point Temperature (DP), Air Temperature (AT), Infrared Surface Temperature (ST), and Relative Humidity (%RH). The bottom display digits always show the Surface Temperature reading. The upper display digits alternately show Air Temperature, Dew Point Temperature, or Relative Humidity depending on the mode that is selected. The multi‐color status LED light (located above the LCD display) changes color to indicate the likelihood of mildew (see the ‘Detecting Mildew’ section). 1. Press the trigger once firmly to switch the meter ON. 2. Use the MODE button to select Air Temperature, Dew Point Temperature, or Relative Humidity % for the upper display digits. The meter will remember the display selection after the meter is switched OFF. 3. For Surface Temperature measurements, point the meter toward the surface under test. The lower display digits show the temperature of the surface under test. For precise targeting, use the dual red laser pointers (the backlight/laser pointer button switches the pointers ON or OFF). The IR sensor has a 12:1 distance‐to‐spot ratio (see accompanying ‘field of view’ diagram). For example, at a 30cm distance, the measured spot size is 2.5cm. 4. Press the trigger firmly again to switch the meter OFF. IR Surface Temperature Measurement Notes 1. The object under test should be larger than the spot (target) size calculated by the field of view diagram (printed on the side of the meter and in this guide). 2. Before measuring, be sure to clean surfaces that are covered with frost, oil, grime, etc. 4 IRT600‐EU‐EN v1.4 9/13 3. If an object's surface is highly reflective, apply masking tape or flat black paint to the surface before measuring. Allow time for the paint or tape to adjust to the temperature of the surface it is covering. 4. Measurements cannot be made through glass. 5. Steam, dust, smoke, etc. can obscure measurements. 6. The meter automatically compensates for deviations in ambient temperature. However, it can take up to 30 minutes for the meter to adjust to extremely wide changes. 7. To find a hot spot, aim the meter outside the area of interest then scan across (in an up and down or side to side motion) until the hot spot is located. Detecting Mildew To detect mildew, take a Surface Temperature measurement as described earlier by pointing the meter at the desired object(s) and moving the meter slowly, noting the surface temperature of the object(s) under test. Also note the Air Temperature, Dew Point Temperature and Relative Humidity to learn how these relationships affect mildew potential. The meter automatically detects the likelihood of mildew; nonetheless it is useful to see how one measurement affects another and how the combinations of these measurements and calculations lead to an accurate mildew analysis. The likelihood of mildew is higher the closer the Surface Temperature is to the Dew Point Temperature. (The Dew Point temperature takes the Relative Humidity measurement into account, since the higher the RH, the higher the Dew Point Temperature). The meter uses the Air Temperature (AT) and the Dew Point Temperature (DP) values to create a range of temperatures that is divided into thirds (see accompanying diagram). The upper boundary is the Air Temperature (AT) and the lower boundary is the Dew Point Temperature (DP). 5 IRT600‐EU‐EN v1.4 9/13 If the surface temperature lies within the upper third temperature range between the air temperature and the dew point temperature, the LED will be green, indicating that the surface temperature and humidity are both normal and mildew is unlikely (see diagram). If the surface temperature lies within the middle third temperature range between the air temperature and the dew point temperature, the LED will be yellow (amber), indicating that there is a low to moderate potential for mildew. If the surface temperature lies within the bottom third temperature range between the air temperature and the dew point temperature, the LED will be red, indicating that there is a high probability of mildew present on the surface under test. For example, if the air temperature is 25°C and the relative humidity is 50%, the dew point temperature is 13.8°C. In this example, the light would be green when the surface temperature is between 25 and 21.3°C; a yellow light would indicate a surface temperature between 21.2 and 17.4°C; and a red light would indicate a surface temperature between 17.3 and 13.8°C. Battery Replacement To replace the battery: 1. Open the battery cover (located on the handle grip) 2. Carefully remove the battery 3. Install new 9V battery 4. Close the battery cover before using the meter Never dispose of used batteries or rechargeable batteries in household waste. As consumers, users are legally required to take used batteries to appropriate collection sites, the retail store where the batteries were purchased, or wherever batteries are sold. Disposal: Do not dispose of this instrument in household waste. The user is obligated to take end‐of‐life devices to a designated collection point for the disposal of electrical and electronic equipment. Battery Safety Reminders o Never dispose of batteries in a fire. Batteries may explode or leak. o Remove battery from meter if it is to be stored for a long time period. 6 IRT600‐EU‐EN v1.4 9/13 Specifications Main Display Backlit LCD with multi‐function indicators Three‐color LED indicator Green, Amber, and Red to indicate mildew potential Response time < 1 second Diode Laser Pointers Output <1mW, Wavelength 630~670nm, Class 2 (II) Laser product Emissivity 0.95 (fixed) IR Spectral Response 8‐14µm IR Sensor Field of View 12:1 (Distance‐to‐Spot Ratio) Operating temperature 0oC to 50oC (32oF to 122oF) Storage temperature ‐20oC to 60oC (‐4oF to 140oF) Relative humidity 10%~90%RH operating, <80%RH storage Power supply 9V battery, NEDA 1604A or IEC 6LR61, or equivalent Weight 163g (5.7 oz.) Dimensions 168 x 82 x 58 mm (6.6 x 3.2 x 2.3”) Range Resolution Accuracy Air Temperature ‐50 to 350°C (‐58 to 662°F) 0.1°F/C ± 3.5°C (6.3°F) Surface temperature ‐50 to 350°C (‐58 to 662°F) ‐50 to 20°C (‐58 to 32 °F) Dew Point Temperature ‐30 to 100°C (‐22 to 212 °F) ± (1% rdg + 1.5°C [2.7°F]) Relative Humidity 0 to 100% 0.1°% ±3.5% (20% to 80%) 20 to 350°C (32 to 662°F) Note: Accuracy is given at 64 °F to 82 °F (18 °C to 28 °C); < 80% RH Copyright © 2013 FLIR Systems, Inc. All rights reserved including the right of reproduction in whole or in part in any form ISO‐9001 Certified www.extech.com 7 IRT600‐EU‐EN v1.4 9/13