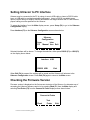
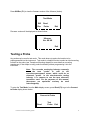
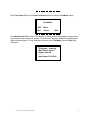
1
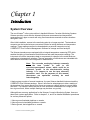
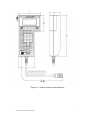
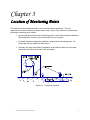
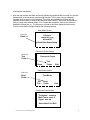
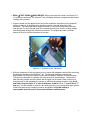
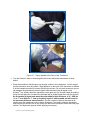
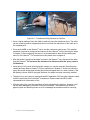
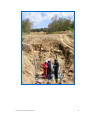
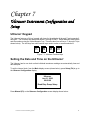
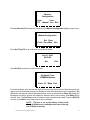
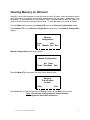
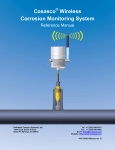
® Ultracorr Corrosion Monitoring System User Manual Rohrback Cosasco Systems, Inc. 11841 East Smith Ave Santa Fe Springs, CA 90670 Tel: (1) 562-949-0123 Fax: (1) 562-949-3065 E-mail: [email protected] Web Site: www.rohrbackcosasco.com P/N: 725050–MANUAL Rev A i ii © 2006 Rohrback Cosasco Systems, Inc. All rights reserved. Ultracorr® and CORRDATA® Plus are trademarks of Rohrback Cosasco Systems, Inc. Windows® is a trademark of Microsoft Corporation. No part of this manual may be reproduced or transmitted in any form or by any means, electronic or mechanical, including photocopying and recording, for any purpose, without the express written permission of Rohrback Cosasco Systems, Inc. iii iv Table of Contents Chapter 1 ............................................................................................................................. 1 Introduction ................................................................................................................... 1 System Overview .................................................................................................... 1 Major Components.................................................................................................. 3 Ultracorr Transducer ........................................................................................... 3 Signal Cabling..................................................................................................... 4 Reading Point ...................................................................................................... 4 Ultracorr Instrument ........................................................................................... 4 Personal Computer .............................................................................................. 4 CORRDATA Plus® Software ............................................................................. 4 Installation Toolkit .............................................................................................. 4 Chapter 2 ............................................................................................................................. 5 Specifications ................................................................................................................ 5 System ..................................................................................................................... 5 Thickness Measurement: .................................................................................... 5 Transducer Temperature: .................................................................................... 5 Temperature Compensation: ............................................................................... 5 Temperature Differential Error: .......................................................................... 5 Temperature Measurement: ................................................................................ 5 Data Storage:....................................................................................................... 5 Interface: ............................................................................................................. 5 Transducer Type: ................................................................................................ 6 Transducer Cable: ............................................................................................... 6 Ultracorr Instrument ............................................................................................... 6 Battery Requirements: ........................................................................................ 6 Battery Life: ........................................................................................................ 6 Operating Temperature: ...................................................................................... 6 Storing Temperature: .......................................................................................... 6 Dimensions: ........................................................................................................ 6 Weight: ................................................................................................................ 6 Supplied With: .................................................................................................... 6 Chapter 3 ............................................................................................................................. 9 Location of Monitoring Points ...................................................................................... 9 Chapter 4 ........................................................................................................................... 10 Transducer Mounting .................................................................................................. 10 Chapter 5 ........................................................................................................................... 10 Transducer Connection and Signal Cabling ............................................................... 21 Cabling .................................................................................................................. 21 Local Mount Junction Box ................................................................................... 22 Chapter 6 ........................................................................................................................... 25 Ultracorr Instrument ................................................................................................... 25 Unpacking ............................................................................................................. 25 Battery Installation ................................................................................................ 25 v Chapter 7 ........................................................................................................................... 29 Ultracorr Instrument Configuration and Setup ........................................................... 29 Ultracorr Keypad .................................................................................................. 29 Setting the Date and Time on the Ultracorr .......................................................... 29 Clearing Memory on Ultracorr ............................................................................. 31 Setting Ultracorr to PC Interface .......................................................................... 32 Checking the Firmware Version ........................................................................... 32 Testing a Probe ..................................................................................................... 33 Chapter 8 ........................................................................................................................... 35 Configuring a Probe .................................................................................................... 35 Manually Configure Probe and Save Setting to the Ultracorr .............................. 35 Use a PC to Configure Probe and Save Setting to the Ultracorr .......................... 37 Chapter 9 ........................................................................................................................... 41 Reading Ultracorr Probes............................................................................................ 41 Reading a Smart UST Probe ................................................................................. 41 Reading Previous Generation UST Probes ........................................................... 42 Chapter 10 ......................................................................................................................... 45 Displaying Data on the Ultracorr ................................................................................ 45 Displaying the Last Reading ................................................................................. 45 Chapter 11 ......................................................................................................................... 47 Transfer Readings from Ultracorr to the CORRDATA Plus ...................................... 47 CORRDATA Plus Installation.............................................................................. 47 Configuring CORRDATA Plus ............................................................................ 47 Connecting the Ultracorr to the PC....................................................................... 47 Ultracorr Data Transfer Procedure ....................................................................... 48 Chapter 12 ......................................................................................................................... 51 Troubleshooting .......................................................................................................... 51 Troubleshooting Guide ......................................................................................... 52 vi List of Figures and Drawings Figure 1.1 - Ultracorr Instrument and Transducer .............................................................. 2 Figure 1.2 - System Overview ............................................................................................ 3 Figure 2.1 - Ultracorr Instrument Specifications ................................................................ 7 Figure 3.1 - Transducer Location ....................................................................................... 9 Figure 4.1 - Installed Transducer ...................................................................................... 11 Figure 5.1 - Weather Resistant Connector ........................................................................ 21 Figure 5.2 - Pole Mount Junction Box .............................................................................. 22 Figure 5.3 - Wall Mount Junction Box ............................................................................. 23 Figure 6.1 - Battery Cover of Ultracorr Instrument .......................................................... 26 Figure 7.1 - Ultracorr Function Keys................................................................................ 29 vii viii Chapter 1 Introduction System Overview The new Ultracorr® is the next evolution in handheld Ultracorr Corrosion Monitoring Systems. Ultracorr provides a cost effective ultrasonic thickness measurement and temperature measurement of a pipe or vessel wall using fixed transducers mounted at various locations throughout a site. After initial installation, access to the monitoring point is no longer required. The transducer connector can be located at some convenient location for taking thickness and temperature readings. These readings can then be downloaded to a personal computer running CORRDATA® Plus Corrosion Management Software for storage and trend analysis. The Ultracorr transducers are equipped with an integral temperature measuring RTD which enables the taking of simultaneous metal thickness and metal temperature readings. The instrument will use the temperature data to compensate for changes in the metal thickness reading due to temperature variations. The new generation of transducers are embedded with smart sensors that retain user configured ID characteristics. Note: The corrosion monitoring industry commonly uses the term "probe" to refer to the corrosion measurement sensor, which could be an ultrasonic "probe". In the non-destructive testing industry, it is common to see the term ultrasonic transducer used. For the purposes of this manual, these terms are equivalent and may be used interchangeably. A basic system consists of a smart transducer, the new Ultracorr handheld instrument and the CORRDATA Plus Software package. Since it will often be advantageous to take a reading of the transducer from some remote point, there are numerous cabling options to connect these two items. For example, cables may be run from numerous transducers into a single junction box at ground level, where multiple readings may be taken very quickly. Although there are many applications for the Ultracorr Corrosion Monitoring System, there are three basic system applications. Refer to chapter 3, 4, and 5 for detailed installation procedures for various placement options. 1. Above ground insulated pipelines or vessels. 2. Above ground uninsulated pipelines or vessels. 3. Below ground, buried pipelines or vessels. Ultracorr Corrosion Monitoring System 1 Figure 1.1 - Ultracorr Instrument and Transducer Ultracorr Corrosion Monitoring System 2 System Diagram Figure 1.2 illustrates a typical installation of the Ultracorr Corrosion Monitoring System. The major components are described below. Figure 1.2 - System Overview A B C D E Ultracorr Transducer Signal Cabling Reading Point Ultracorr Instrument PC Running CORRDATA Plus Software Major Components Ultracorr Transducer The transducer (probe) is a small (1 inch diameter by 1 inch high) sensor which is permanently mounted to the monitoring point. This is accomplished using a special adhesive which also acts as an ultrasonic couplant. The transducer has a magnetic base to aid in holding it in position while the adhesive cures. The temperature sensor on the transducer allows for automatic correction of acoustic velocity as a result of the metal temperature. This provides a significantly more accurate reading of thickness. These newest generation transducers also have the capability of storing and transmitting location and configuration information to the Ulltracorr instrument, for ease of operation and to eliminate operator errors. Ultracorr Corrosion Monitoring System 3 Signal Cabling Two types of cables are available to bring the reading point to a convenient location. For example, if a monitoring point is on a vessel 20 feet above the ground, then access to the monitoring point location is only required for the initial installation of the transducer. A cable may then be run from the transducer to a junction box located at ground level. Each installation must be evaluated for the proper type of cable installation. Standard cables have a weather resistant polyurethane jacket and a stainless steel armored cable is available for severe applications. Reading Point There are various options available for a remote reading site. For a location with a single monitoring point, the transducer cable is fitted with a weather resistant connector. An optional NEMA 4X junction box with provision for up to seven connectors is available. Larger junction boxes are also available. For underground applications, standard above ground or flush-withgrade monitoring locations are available. Ultracorr Instrument The Ultracorr instrument is the heart of the Ultracorr Corrosion Monitoring System. A single Ultracorr instrument may be used to periodically take individual time and date stamped wall thickness and temperature readings of up to 50 sensors. It will store up to 256 readings for each of these sensors. Refer to chapters on Ultracorr for more information. Personal Computer The last readings from the Ultracorr instrument may be displayed on its LCD. For optimal data analysis, the Ultracorr instrument can download all of its data to a personal computer. Use the CORRDATA Plus Corrosion Management Software package for trend analysis, data analysis and storage. CORRDATA® Plus Software The CORRDATA Plus Corrosion Management Software controls the transfer of data from the Ultracorr instrument into a personal computer. It can display and print the data in tabular format. It can also convert the data to a CSV (comma separated value) format for export into any spreadsheet program. The CORRDATA Plus software is a powerful application that can perform the above functions and much more. For example it allows the graphical display of data along with integration of data with other process parameters, such as readings from CORROSOMETER and CORRATER instruments. Refer to Transfer Readings from Ultracorr to the CORRDATA Plus section for more information on transferring and analyzing data on a personal computer. Installation Toolkit Toolkits containing all the tools for uncoated and coated pipeline installations are available, or tools may be ordered on an individual basis. The toolkits contains such items as a cordless drill with a spare battery and charger, tools for paint removal and surface preparation, and the required epoxy to attach the transducer to the pipeline. Please contact RCS for further details. Ultracorr Corrosion Monitoring System 4 Chapter 2 Specifications System Thickness Measurement: Range: 0.1 to 2.0 inches, up to 100 ft. cable 0.2 to 2.0 inches, up to 200 ft. cable 0.4 to 1.25 inches, up to 300 ft. cable Resolution: 0.0001 inch Accuracy: ± 0.0002 inch at constant temperature ± 0.0005 inch from 0°C to +50°C (Instrument) ± 0.0003 inch from 0°C to +80°C (Transducer) Transducer Temperature: Range: +15°F to +185°F (-10°C to +85°C) Temperature Compensation: -0.0002 inch/inch/°C Temperature Differential Error: -0.0001 inch/inch/°C difference (inside to outside of wall) Temperature Measurement: Range: 0°C to +80°C Resolution: 0.1°C Accuracy: ±2°C (Transducer) ±2°C (Instrument) Data Storage: Memory Type: Nonvolatile Probes: Readings/Probes: 50 256 Time and Date Stamped Interface: Lemo to USB Ultracorr Corrosion Monitoring System 5 Lemo to RS232 (optional equipment) Transducer Type: Contact Transducer Cable: RG-174 up to 100 ft. RG-58 100 to 300 ft. Ultracorr Instrument Battery Requirements: 6 AA Alkaline Cells Battery Life: Over 600 readings Operating Temperature: 32°F to 122°F (0°C to 50°C) Storing Temperature: 0°F to 150°F (-18°C to 70°C) Dimensions: 7.75"H x 4.30"W x 2"D (196.8 mm x 109.2 mm x 50.8 mm) Weight: 1.6 lb. ( 0.71 kg ) Supplied With: Ultracorr Instrument 6 AA batteries Ultracorr to computer cable (Lemo to USB) CD-ROM with Ultracorr Corrosion Monitoring System User Manual and CORRDATA Plus Corrosion Management Software and Manual Carrying Case Ultracorr Corrosion Monitoring System 6 Figure 2.1 - Ultracorr Instrument Specifications Ultracorr Corrosion Monitoring System 7 Ultracorr Corrosion Monitoring System 8 Chapter 3 Location of Monitoring Points The small size of the transducer allows it to be mounted almost anywhere. The only requirement is a two inch diameter area of clean metal. Some of the factors to consider when selecting a monitoring point include: Access must be provided to the monitoring point for the initial transducer installation. After installation, access to the monitoring point is not required. Insulated vessels must have the insulation removed at the monitoring point. An access port can be installed at that location. Generally, the most cost effective installation is the shortest cable run to the most convenient and safe man access to the test station. Figure 3.1 - Transducer Location Ultracorr Corrosion Monitoring System 9 Chapter 4 Transducer Mounting Correct installation of the Ultrasonic Transducers is a critical step in obtaining proper functionality of your Ultracorr® System. Careful steps must be made with installation to ensure the best reading possible in order to get an accurate thickness measurement. A detailed step by step installation process follows to help make certain the transducers are properly installed. The first step in proper installation of the Ultracorr® transducers involves finding the proper locations to monitor. Locations that would most likely be ideal spots for Ultracorr® monitoring would be low spots on the pipe line. This is where water and other contaminants in the pipe line would settle and result in the highest corrosion rate. Also the areas wishing to be monitored must fall in the operational temperature range of the transducer. 185°F (85°C) to 14°F (-10°C). In order to obtain proper transmission of the ultrasonic sound waves through the pipe wall, the transducer must be mounted to the bare metal of the pipe. This means that all pipe insulation/coating must be removed prior to insulation. At the minimum, a 4in x 4in (100mm x 100mm) square of coating should be removed. Figure 4.1 – Coating Removal for Transducer Installation. If the pipe line is covered by paint or other hard type coating, it must be sanded off to expose the bare metal underneath. Ultracorr Corrosion Monitoring System 10 Figure 4.2 – Painted Pipeline with Paint Removed. After all insulation/coating is removed, the pipe surface must be properly prepared for mounting. 80 to 120 grit aluminum – oxide flexible sanding discs that can be mounted in a cordless drill are recommended. Often the same sanding disc can be used to remove pipe coating and prepare the pipe surface for mounting. Figure 4.3 – Sanding the Pipe Surface. The area that is sanded should be larger then the face of the transducer. You want to sand the surface flat and smooth. Some pipes have an uneven surface finish with small dimples similar to an orange peel. This should be sanded down so that it is a near polished surface. A good tip that is used when sanding is to sand the pipe with the sanding disk at a slight angle, so that the outer area of the disc is in contact with the pipe. This will help control the cordless drill better. While sanding, try to slightly flatten the curvature of the pipe at the mounting location. This will help to transmit the ultrasonic sound waves better when Ultracorr Corrosion Monitoring System 11 mounting the transducer. After the pipe surface has been sufficiently sanded and prepared the next step is to test the transmission of the ultrasonic wave through the pipe. This is done using an ultrasonic couplant such as glycerin (Not Supplied). First clean the sanded pipe surface with the supplied alcohol wipes to remove any debris left from sanding. Then clean the transducer face as it may have residual debris on it. Connect the transducer cable to the Ultracorr® handheld unit and turn on. The Ultracorr® will load up and then display the main menu. From the main menu navigate through the following screens. Main Menu Screen Push the Read key Ultracorr mmm dd, yyyy hh:mm:ss Read Disp Dump Setup Connect to Probe Screen Push the Test Probe key Connect to Probe Read Test Probe Exit Read Probe Screen Push the Read Probe key Test Mode SW Rev Read Probe Exit Continuous Read Screen Thickness: x.xxxx in Mat’l Temp: xxx.x C Signal: xx.x db Hold down F4 to Exit Ultracorr Corrosion Monitoring System 12 READ Æ TEST PROBE Æ READ PROBE. When you access this screen, the Ultracorr® is in continuous read mode. The Ultracorr® unit will display thickness, temperature and decibel readings every second. Glycerin should now be applied to the face of the transducer and placed on the prepared surface of the pipe. Enough glycerin should be used to cover the entire face if the transducer. The transducer has a magnet installed in it and should hold itself sufficiently onto the pipe. Do not press the back of the transducer as this will result in a false reading and can possible damage the piezoelectric element. The magnet provides a sufficient amount of force to hold the transducer to the pipe. Figure 4.4 – Glycerin on the Transducer. With the transducer on the pipe gently move it around the prepared surface while monitoring the db signal strength on the Ultracorr® unit. The db signal strength is actually the amplification of the echoed ultrasonic sound wave needed to measure the wall thickness. The higher the db signal, the weaker the echo received in the transducer. Therefore the ideal mounting location would be where the db signal is at its lowest. When looking for a mounting spot on the prepared pipe surface, a sufficient db reading would be in the 40 db and lower range for pipes .4” or less in thickness, 43 db for .4” to .7” and 45 db for .7” and up. If you are not able to achieve a db reading this low, you must sand the pipe surface further and retest until the reading becomes acceptable. A high db reading is unacceptable and will result in inaccurate thickness measurements. Ultracorr Corrosion Monitoring System 13 Figure 4.5 – Finding the Location of Lowest db Reading. After a location with an acceptable db reading has been found it should be noted. Hold down F4 on the Ultracorr® unit to stop the continuous read function. Lift the transducer off of the pipe and thoroughly clean its face with the supplied alcohol wipes. Also thoroughly clean the pipe surface with the supplied alcohol wipes. It is important that all glycerin be removed from transducer and pipe surface as it will prevent the epoxy from affixing to the pipe surface. Remove the supplied epoxy kit from its packaging. The epoxy kit is a two part epoxy. It is pre-measured to the required A to B ratio. All that is needed to be done is to combine the two parts and mix. Part A is supplied in the mixing cup and Part B is supplied in the syringe. Squeeze Part B out of the syringe and into the mixing cup with Part A and mix with the supplied mixing stick. The part B material in the syringe can become hard and difficult to squeeze out. If this is the case, simply snip the tip of the syringe with a pair of scissors to make the opening larger and then squeeze out. Mix the two parts together for at least one minute, scraping the walls of the mixing cup to insure all the epoxy is mixed thoroughly. Do not mix vigorously as it can trap air bubbles in the epoxy and degrade the measurements. Ultracorr Corrosion Monitoring System 14 Figure 4.6 – Mixed Cup of Epoxy. After the epoxy has been mixed thoroughly, use the mixing stick to scoop a generous amount of epoxy and place on the face of the cleaned transducer. Recommended installation is one epoxy kit per transducer; however one kit can be sufficient enough to install two transducers. Use enough epoxy to cover the entire face of the transducer with a thick layer. Ultracorr Corrosion Monitoring System 15 Figure 4.7 – Epoxy Applied to the Face of the Transducer. Turn the Ultracorr® back on and navigate back to the continuous read screen as done before. Place the transducer with the epoxy on the pipe surface in the noted place. Let the magnet pull the transducer onto the surface. Slight pressure on the back of the transducer is allowed to let the transducer make full contact with the pipe surface. Do not push excessively as you can damage the piezoelectric element. Again while monitoring the db signal on the Ultracorr® unit, slightly adjust the transducer on the pipe until you find the lowest db reading. Using the soft epoxy as a couplant the db signal will be slightly higher then with the glycerin. An acceptable db signal now would be under 44db for pipe thickness of .4”, 46db for .4” to .7” and 48db for .7” and up. Anything higher is unacceptable and will result in an inaccurate thickness measurement. If you are not able to achieve the required db reading, then the transducer must be taken off the pipe. Thoroughly clean the transducer face and the pipe surface free of any epoxy with the alcohol wipes and further sand the pipe surface. Test again with glycerin before applying more epoxy. Ultracorr Corrosion Monitoring System 16 Figure 4.8 – Located the best spot for mounting with the epoxy. Figure 4.8 – After locating the best spot for mounting with the epoxy. A preferred method of installing the transducers is to run the transducer cable parallel to the pipe line. Secure the cable with tape, straps or other material to the pipe about 6 inches or further from the transducer. This prevents the weight of the cable from pulling on the transducer and causing signal loss. Do not let the cable bend in any way near its junction with the transducer. Keep it straight and parallel to the pipe with as little tension as possible. Any type of force put from the cable will try to pull the transducer face off the pipe surface and degrade the signal strength and measurement. Ultracorr Corrosion Monitoring System 17 Figure 4.6 – Transducers Being Mounted on Pipeline. Once a signal reading of less then 44db is reached, leave the transducer alone. The cable can be moved beyond its wrapped point but do not touch the transducer or the cable up to the wrapped point. Press and hold F4 on the Ultracorr® unit to exit the continuous read screen. The installed transducer can now be configured and stored into the Ultracorr® unit by following the steps in chapter 8. After configuring the probe, it is recommended to take the first reading and store it in the Ultracorr®. For instructions on this please refer to chapter 9. After the probe is configured and data is stored in the Ultracorr® unit, disconnect the cable from the Ultracorr®. Do not touch the transducer for 24 hours while the epoxy cures to full hardness. Once epoxy is fully cured all securing tape, straps, etc. may be removed. Recheck probe reading and save data to Ultracorr® unit per instructions in chapter 9. At this time since the epoxy has cured the db signal reading should have dropped down to a lower number. If the db reading is above 45db for any pipe thickness, the probe has been incorrectly installed. The pipe line is now ready for repair and backfill if applicable. RCS provides a pipeline repair kit that is well suited for the Ultracorr® transducers. Please contact and RCS sales representative for information on this. With the epoxy fully cured the transducer is firmly attached to the pipe line. However it still can be easily damaged or knocked off the pipe if bumped. Take extreme care with the pipeline repair and backfill process so as to not damage the transducer and its mounting. Ultracorr Corrosion Monitoring System 18 Figure 4.7 – Different transducers affixed to pipelines and pipe repair being applied. Ultracorr Corrosion Monitoring System 19 Ultracorr Corrosion Monitoring System 20 Chapter 5 Transducer Connection and Signal Cabling Cabling The standard transducer is fitted with a weather resistant connector (see figure 5-1). This connector is suitable for outdoor environments, and therefore can be left at a convenient reading point without any further protection. If required, cable can be run through conduit to its desired location. Conduit must be 1-1/4” or larger, to accommodate the 1.25” diameter connector housing. Two types of cable are available. The standard has a thick, black polyurethane outer jacket, and is suitable for most environments. For more severe applications, this same cable is available with a braided, stainless steel armor jacket. Figure 5.1 - Weather Resistant Connector Ultracorr Corrosion Monitoring System 21 Local Mount Junction Box An alternative to leaving the connector exposed is to mount one or more connectors inside a NEMA 4X box. There are several advantages to doing this, including additional protection, security, and the ability to run multiple connections to a single point for rapid measurements. Two standard box configurations are available. RCS part number 744014 is designed to mount on a two inch pipe and has provisions for up to 5 transducer connectors (see figure 5-2). This configuration is particularly suitable for buried pipeline applications, as the cables can be run from the buried pipe, through the 2” supporting pipe and into the box. Figure 5.2 - Pole Mount Junction Box Ultracorr Corrosion Monitoring System 22 RCS part number 744017 is the same size box, but is configured for the transducer connectors to mount on the bottom of the box. Mounting ears are provided on the box for wall or pole mounting. This box may be more suitable for above ground transducer applications (see figure 5-3). Figure 5.3 - Wall Mount Junction Box Ultracorr Corrosion Monitoring System 23 Ultracorr Corrosion Monitoring System 24 Chapter 6 Ultracorr Instrument Ultracorr utilizes high sensitivity ultrasonic technology to provide nonintrusive, cost effective monitoring of corrosion and erosion. The instrument can be used to provide periodic time and date stamped measurements of wall thickness and temperature of up-to 50 transducers. The thickness and temperature data can then be downloaded to a personal computer running CORRDATA Plus Corrosion Management Software for storage and trend analysis. NOTE: Each Ultracorr instrument is carefully tested, inspected and packaged prior to shipment. Before unpacking the instrument, please inspect the packaged materials for shipping damage and retain all damaged packaged materials to support any claim against your freight carrier should this become necessary. Unpacking Carefully remove the instrument from its package. Included in the package you should find: Handheld Ultracorr instrument CD-ROM with Ultracorr Corrosion Monitoring System User Manual, CORRDATA Plus® Corrosion Management Software and User Manual 6 AA batteries Ultracorr to computer cable (Lemo to USB cable is provided as standard equipment, Lemo to RS232 adapter is available for purchase as an option, contact factory) Carry Case Battery Installation The Ultracorr is supplied with a set of six 1.5 Volt AA alkaline batteries. To install these batteries, remove the access panel on the back of the unit (see below) with the provided Allen Key and install the batteries with the polarities as indicated on the unit. Replace the back cover when finished. Ultracorr Corrosion Monitoring System 25 Figure 6.1 - Battery Cover of Ultracorr Instrument A secondary lithium battery mounted internally enables the non-volatile storing of readings in the Ultracorr. These batteries should provide 7-10 years of back up capacity. Replacement of these batteries requires the unit to be returned to Rohrback Cosasco Systems or an authorized dealer. Once the batteries are installed properly check the status of the batteries by pressing the ON button on the touch pad of the Ultracorr. The following display should appear: Rohrback Cosasco Systems Ver : xx.xx Please Wait Once the Ultracorr finishes its self test, the display will change to show the battery status as shown below: Ultracorr Corrosion Monitoring System 26 ROHRBACK COSASCO SYSTEMS Ver: xx.xx E F The number of solid boxes () will reduce with the depletion of the batteries. If the batteries are low or in need of replacement, a warning display will appear as follows: WARNING! LOW BATTERIES REPLACE NOW! If batteries are good, the instrument will proceed directly to the Main display shown below: Ultracorr mmm dd, yyyy hh:mm:ss Read Disp Dump Setup Ultracorr Corrosion Monitoring System 27 Ultracorr Corrosion Monitoring System 28 Chapter 7 Ultracorr Instrument Configuration and Setup Ultracorr Keypad The Ultracorr features a 34-key keypad, with keys for the alphabet A through Z and numerals 0 through 9. The numerals are shared with letters F through P and S. Switch between these letters and the numbers using the “Alpha/Numeric” key. There are also four soft keys, F1 through F4 (as shown below). The soft keys are multi-function keys used to make on-screen selections. ¿ F1 ¿ F2 ¿ F3 ¿ F4 Figure 7.1 - Ultracorr Function Keys Setting the Date and Time on the Ultracorr The Ultracorr has its own clock so that individual transducer readings are automatically time and date stamped. To set the internal clock, from the Main display screen (shown below), press Setup (F4) to go to the Ultracorr Configuration display. Ultracorr Jan 01, 2000 00:00:00 Read Disp Dump Setup Press Manual (F2) on the Ultracorr Configuration screen display shown below: Ultracorr Corrosion Monitoring System 29 Ultracorr Configuration from Inter PC Manual face Exit Pressing Manual (F2) advance the Ultracorr to the Manual Configuration display shown below: Manual Configuration Set Clear Probe Time Mem Exit Press Set Time (F2) to go to the next screen shown below: Jan 01, 2000 00:00:00 Set Exit Press Set (F2) to advance to the next screen: Set Date & Time YYMMDDHHmmss Enter Clr Bksp Exit From the keyboard, enter the last two digits of the year, two digit month and date followed by the time in hours, minutes and seconds (it is possible to enter 00 for seconds for user convenience). Clr (F2) button will clear all entered data and reset the cursor to the beginning. Bksp (F3) button will backspace one field to re-enter one character. When the time is set correctly, press Enter (F1) to start the clock. The Set Time screen will show the user entered time and date. Press the Exit (F4) to return to the Main screen where the set time will display. NOTE: The hour is set on the military 24 hour clock, where 00:00:00 hours is midnight at the start of the day, and 12:00:00 is mid-day. Ultracorr Corrosion Monitoring System 30 Clearing Memory on Ultracorr Normally it will not be necessary to clear the memory on the Ultracorr unless extraneous entries have been made, for example, when initially experimenting with the system. Alternatively, if the equipment is to be transferred to a new location, then it is recommended to clear the memory to avoid confusion with any previously collected data. To clear the memory, proceed as follows. From the Main display screen, press Setup (F4) to go to the Ultracorr Configuration display. Press Manual (F2) on the Ultracorr Configuration screen to go to the Manual Configuration display. Ultracorr Configuration from Inter PC Manual face Exit Manual Configuration display shown below: Manual Configuration Set Clear Probe Time Mem Exit Press Clr Mem (F3) to proceed to the next screen shown below: Warning! This will erase all data! Clear Exit Press Clear (F1) to clear the memory or Exit (F4) to return to the Main display screen. Note: This will clear readings stored in internal memory. All configuration information will be lost. Ultracorr Corrosion Monitoring System 31 Setting Ultracorr to PC Interface Ultracorr may be connected to the PC by using a Lemo to USB cable or Lemo to RS232 cable. Lemo to USB cable is provided as standard equipment. Lemo to RS232 is available as an option (consult factory for details). Before data transfer can begin between the PC and Ultracorr, proper cabling must be specified on the Ultracorr. To setup the interface, from the Main display screen, press Setup (F4) to go to the Ultracorr Configuration display. Press Interface (F3) on the Ultracorr Configuration screen shown below: Ultracorr Configuration from Inter PC Manual face Exit Selected Interface will be shown. To change the selection, either press RS232 (F1) or USB (F2) on the display shown below: Interface: USB RS232 USB Exit When Exit (F4) is pressed, the settings will be saved and the Ultracorr will advance to the Ultracorr Configuration screen. Press Exit (F4) again to return to the Main screen. Checking the Firmware Version Firmware version is displayed on the first screen at startup of the Ultracorr. An alternate way of accessing the Ultracorr firmware version is by pressing Read (F1) from the Main display and selecting Test Probe (F3) from the Connect to Probe display screen shown below: Connect to Probe Read Ultracorr Corrosion Monitoring System Test Probe Exit 32 Press SW Rev (F1) to view the firmware version of the Ultracorr (below): Test Mode SW Rev Read Probe Exit Firmware version will be displayed as shown below: Ultracorr Ver: XX.XX Exit Testing a Probe Any probe may be read in test mode. This mode does not require the location to be preprogrammed into the instrument. Test mode is a helpful function to select an ideal mounting location for the probe (see Transducer Mounting chapter for more details on mounting transducers). It also helps to verify probe functionality without programming it into the instrument. Note: The corrosion monitoring industry commonly uses the term "probe" to refer to the corrosion measurement sensor, which could be an ultrasonic "probe". In the non-destructive testing industry, it is common to see the term ultrasonic transducer used. For the purposes of this manual, these terms are equivalent and may be used interchangeably. To enter the Test Mode, from the Main display screen, press Read (F1) to go to the Connect to Probe display shown below: Connect to Probe Read Ultracorr Corrosion Monitoring System Test Probe Exit 33 Press Test Probe (F3) on the Connect to Probe screen to enter the Test Mode display. Test Mode SW Rev Read Probe Exit Press Read Probe (F2) to begin. The Ultracorr will show continuously updated readings with a screen refresh rate of about one second. The measured Thickness, Material Temperature and Signal will be displayed. To stop readings and return to the Test Mode, press the Stop (F4). See below: Thickness: x.xxxx in Mat’l Temp: xxx.x C Signal: xx.x db Hold down F4 to Exit Ultracorr Corrosion Monitoring System 34 Chapter 8 Configuring a Probe There are two ways to configure a probe with the Ultracorr handheld instrument. 1. Configure manually 2. Configure using a PC running CORRDATA Plus Corrosion Management Software Note: Ultracorr reads probes and stores data according to the ID of the probe. If two probes in different locations are set with the same ID and read with the same Ultracorr, it will not know to differentiate and will store data values in the same ID. Example: Location A with Probe ID 1 and Location B with Probe ID 1 is seen as the same ID if read by the same Ultracorr without clearing memory. Manually Configure Probe and Save Setting to the Ultracorr From the Main display screen, press Setup (F4) to go to the Ultracorr Configuration display. Ultracorr Configuration from Inter PC Manual face Exit Choose Manual (F2) to go the Manual Configuration screen. Manual Configuration Set Clear Probe Time Mem Exit Ultracorr Corrosion Monitoring System 35 Press Probe (F1) to begin configuring the probe. Following display will appear on the Ultracorr: Enter Probe ID ID > < 1 - 50 Enter Clr Bksp Exit Enter an ID number for the probe. ID numbers are restricted to be from 1 to 50. If the ID entered already exists, Ultracorr will display this information as follows: ID: XX Tag: XXXXXXXXXXXX Alloy: XXXXXX Save Change Exit Selecting Save (F1) will enable the user to keep the existing settings and continue to program the probe. Select Change (F2) to enter new Tag information on the Enter Probe Tag screen. If the probe being configured is a previous generation probe Save (F1) is disabled and the user must select the Change (F2) button. If a valid, never before configured ID was entered, the Ultracorr will proceed to the following Enter Probe Tag screen. Enter Probe Tag > < Enter Clr Bksp Exit Enter the desired probe tag. Press the Enter (F1) to proceed to the Select Alloy screen shown below: Select Alloy > < Enter Up Down Exit Ultracorr Corrosion Monitoring System 36 Use the Up (F2) and Down (F3) keys to scroll through to find the alloy of the pipe or vessel. Press Enter (F1) to proceed to the next screen. If the probe being configured is a previous generation probe, the user will be prompted to Select Cable Length. Use the Up (F2) and Down (F3) keys to scroll through to find the correct length of the probe and press the Enter (F1). Ultracorr has now completed programming the probe with the chosen ID and saved the settings on its memory. Following screen will display on the Ultracorr: Probe Configured Read Probe Exit Press Exit (F4) to return to the Main screen or Read Probe (F1) to conduct a reading of the configured probe. Refer to Reading Ultracorr Probes for details. Use a PC to Configure Probe and Save Setting to the Ultracorr Create the desired Site, Group, and Probe list running the CORRDATA Plus Corrosion Management Software program on the PC. To configure the Ultracorr with the above created probe list; click the Device Configuration command button on the CORRDATA Plus software program. Choose the Mate radio button on the Select Device area and choose Ultracorr from the Select Method drop down menu. Now, select a complete group or an individual probe from the list to configure the Ultracorr. Refer to the CORRDATA Plus Corrosion Management Software User Manual for more information on creating Sites, Groups, and Probes. CORRDATA Plus configured Probe IDs will take precedence over existing configured Probe IDs (This will erase any previously stored data and settings in the selected IDs in the Ultracorr). Press Setup (F4) on the Ultracorr from the Main screen to advance to the following display: Ultracorr Configuration from PC Ultracorr Corrosion Monitoring System Manual Exit 37 Press PC Conf (F1), following screen will appear: Connect to PC. Run Corrdata Plus. Press Configure Device Start Exit Click the Configure Device command button on the CORRDATA Plus software program. Following dialogue box will appear: Note: CORRDATA Plus configured Probe IDs will take precedence over existing configured Probe IDs (This will erase any previously stored data and settings in the selected IDs in the Ultracorr). Note: CORRDATA Plus must initiate the transfer. When the countdown begins, press Start (F1) on Ultracorr Select OK. Following dialogue box will appear: Press the Start (F1) on the Ultracorr. Successful configuration will yield “Ultracorr Configuration is complete!!!” message on the PC and Data transfer complete screen on the Ultracorr as shown below: Ultracorr Corrosion Monitoring System 38 Data transfer complete Exit Note: Any transfer errors encountered will be shown by the CORRDATA Plus Corrosion Management Software program. Ultracorr Corrosion Monitoring System 39 Ultracorr Corrosion Monitoring System 40 Chapter 9 Reading Ultracorr Probes Rohrback Cosasco Systems’ new generation UST transducers are referred to as smart transducers compared to the previous generation of UST transducers. Procedure for configuring the two types of probes varies slightly. Refer to the sections below for details. Note: The corrosion monitoring industry commonly uses the term "probe" to refer to the corrosion measurement sensor, which could be an ultrasonic "probe". In the non-destructive testing industry, it is common to see the term ultrasonic transducer used. For the purposes of this manual, these terms are equivalent and may be used interchangeably. Reading a Smart UST Probe Reading probes with the Ultracorr is simple and fast. To begin reading a probe, press the Read (F1) key from the Main display screen. On the Connect to Probe screen, press Read (F1), shown below: Connect to Probe Read Test Probe Exit All the new generation probes of Rohrback Cosasco Systems are smart probes. These probes have the capability to retain its ID and Tag. When an Ultracorr is connected to the probe, Ultracorr will automatically identify the Probe ID and Tag if the probe was previously configured. When reading a probe, if the probe is a smart transducer, the following screen will appear: Probe ID: XX Tag: XXXXXXXXXXXX Read Ultracorr Corrosion Monitoring System Exit 41 Note: If the smart probe has never been configured, Ultracorr will detect this and provide the user with the option to manually setup the probe at this time (refer to Configuring a Probe section). Select Read (F1) to start reading the probe. When Ultracorr completes the reading, it will display the following screen: Probe ID: XX Tag: XXXXXXXXXXXX Thickness: X.XXXX in Read More Save Exit Pressing the Read (F1) will reread the probe. To save the reading to the internal non-volatile memory, press Save (F3). Press More (F2) to see additional information (below). Pressing Back (F2) will return the display to the above screen. Thickness: x.xxxx in Mat’l Temp: xxx.x C Signal: xx.x db Back Reading Previous Generation UST Probes To begin reading a probe, press the Read (F1) key from the Main display screen. On the Connect to Probe screen, press Read (F1), shown below: Connect to Probe Read Test Probe Exit Ultracorr will automatically detect whether the probe is smart or of the previous generation. In this situation, the following screen will appear: Ultracorr Corrosion Monitoring System 42 Not smart probe… Read Read by by ID Tag Exit The user can choose to read the probe by ID or by Tag. Press Read by ID (F1) or Read by Tag (F2) and one of the following 2 displays will appear: Enter Probe ID ID > < 1 - 50 Enter Clr Bksp Exit or Enter Probe Tag > < Enter Clr Bksp Exit Enter the ID or Tag accordingly and press Enter (F1). Following will appear at this point: Probe ID: XX Tag: XXXXXXXXXXXX Read Exit Note: If the probe has never been configured, Ultracorr will detect this and provide the user with the option to manually setup the probe at this time (refer to Manually Configuring a Probe section). Ultracorr Corrosion Monitoring System 43 Select Read (F1) to start reading the probe. Once the reading is taken, the Ultracorr will display the following screen: Probe ID: XX Tag: XXXXXXXXXXXX Thickness: X.XXXX in Read More Save Exit Pressing the Read (F1) will reread the probe. To save the reading to the internal non-volatile memory, press Save (F3). Press More (F2) to see additional information (below). Pressing Back (F2) will return the display to the above screen. Thickness: x.xxxx in Mat’l Temp: xxx.x C Signal: xx.x db Back Ultracorr Corrosion Monitoring System 44 Chapter 10 Displaying Data on the Ultracorr Displaying the Last Reading The last probe data reading taken at each location may be viewed on the Ultracorr by choosing the current probe, probe ID (1 – 50) or the probe Tag. The data includes the ID Number, Tag ID, Thickness, Material Temperature, Alloy and the Signal. From the Main screen, press Disp (F2) to go to the Display Data screen shown below: Data Display by ID by Tag Curr Probe Exit A location may be selected by pressing either by ID (F1) or by TAG (F2). If Curr Probe (F3) is selected, Ultracorr will display the information for the last probe location the Ultracorr was used with. If by ID (F1) is selected, following will display on the Ultracorr: Enter Probe ID ID > < 1 - 50 Enter Clr Bksp Exit If by Tag (F2) is selected, following will display on the Ultracorr: Enter Probe Tag > < Enter Clr Bksp Exit Ultracorr Corrosion Monitoring System 45 Enter the ID or Tag accordingly and press Enter (F1). If the provided ID or Tag is invalid (usually this happens if the ID is not configured or if the Tag does not exist), following screen will appear with the option to manually configure the probe. Warning! ID or Tag not found Config Exit Press Config (F1) at this time to manually configure a probe if desired. Follow the instructions on Manually Configure Probe and Save Setting to the Ultracorr. If the entered data is valid, the last reading for that probe will be displayed as shown below: Probe ID: XX Tag: XXXXXXXXXXXX Thickness: x.xxxx in More Exit Press More (F2) (see below) to view the Material Temperature, Alloy, and Signal information. Pressing Back (F2) will return the display to the above screen. Mat’l Temp: XXX.X C Alloy: XXXXXX Signal: XX.X db Back Ultracorr Corrosion Monitoring System 46 Chapter 11 Transfer Readings from Ultracorr to the ® CORRDATA Plus The last reading for any probe may be displayed on the Ultracorr display. For maximum functionality and data management, all the data contained in the instrument may be downloaded to a personal computer running CORRDATA Plus Corrosion Management Software package. The CORRDATA Plus package is a flexible corrosion data management system that allows integration of all corrosion monitoring parameters. Refer to the CORRDATA Plus Corrosion Management Software documentation for installation, site setup, capabilities and other details. CORRDATA Plus Installation The CORRDATA Plus Corrosion Management Software can be found on the CDROM included with the instrument. Insert the auto-run CD-ROM and follow the onscreen instructions to install. The default installation directory is C:\Program Files\RCS\Corrdata Plus. Configuring CORRDATA Plus When the installation is complete, launch the CORRDATA Plus program from All Programs Æ Rohrback Cosasco Systems. Follow the instructions on the CORRDATA Plus User Manual provided on the CD-ROM for site setup and configuration. The manual can be accessed by right-clicking and selecting open on the CD-ROM device of the computer if the auto-run feature is disabled. Connecting the Ultracorr to the PC Connect the Ultracorr instrument to an USB port on the PC using the provided Lemo to USB cable (optional Lemo to RS232 cable is available, consult Rohrback Cosasco Systems for details). Check the port number used by the USB or the RS232 and make sure the same COM port is selected on the CORRDATA Plus (in most cases with RS232, this will be COM 1, however verify this in the device manager). Make sure to select the proper interface type on the Ultracorr instrument (refer to Setting Ultracorr to PC Interface). Launch CORRDATA Plus and Open an Existing Site or Create a New Site. Ensure the port number selected on the CORRDATA Plus software (Preferences Æ Settings Æ Default Port:) matches the port number of the Ultracorr connection. Ultracorr Corrosion Monitoring System 47 Ultracorr Data Transfer Procedure To begin the data transfer from the Ultracorr to the CORRDATA Plus press Dump (F3) from the Main display screen, following display will appear: First press START on Ultracorr. Then run Corrdata Plus on PC Start Exit Note: Ultracorr must initiate the data transfer. Press START on Ultracorr before “Read from Device” button is pressed on the CORRDATA Plus software. On the CORRDATA Plus Corrosion Management Software program, click the Receive Data command button, select Mate as the Select Device, and Ultracorr as the Select Method. Choose the appropriate To Group selection. Press Start (F1) on the Ultracorr first, then click the Read from Device command button to begin downloading data to the PC. The Ultracorr will show the following screen: Dumping data to PC Please Wait ID# XXXXXXXXXXXX Hold down F4 to Exit Note: Exit (F4) is disabled when data is being transferred. Any transfer errors encountered will be shown by the CORRDATA Plus Corrosion Management Software program. If CORRDATA Plus Corrosion Management Software prompts the user with the following error (see below), verify that the cable is properly connected between the PC and Ultracorr and the correct COM port is checked. It is also possible to receive this error if the Ultracorr has no saved data. Ultracorr Corrosion Monitoring System 48 A successful transmission of data will yield the following display: Data transfer complete Exit Ultracorr Corrosion Monitoring System 49 Ultracorr Corrosion Monitoring System 50 Chapter 12 Troubleshooting Failure to get proper readings from the Ultracorr system is normally attributed to one of three causes; the instrument, the cabling/connections, or the transducer. The instrument is simple to check if a spare transducer is available. Use water, or other suitable couplant and read the instrument in TEST mode. The only maintenance required on the instrument is battery replacement. If good batteries are in the instrument, and the unit still does not function properly, contact the factory. Cabling and connections is the most common cause of problems. Ensure proper cable connection with genuine Rohrback Cosasco Systems provided cabling. The transducer can be checked by using the instrument. The most common cause of transducer malfunction is improper coupling to the surface. This could be caused by improper surface preparation, or improper use of the adhesive couplant. See the following section on Troubleshooting Guide for common symptoms and solutions. Ultracorr Corrosion Monitoring System 51 Troubleshooting Guide Symptom Problem Solution Ultracorr will not turn on. Batteries not installed. Install batteries (see Chapter on Ultracorr Instrument) Battery voltage low. Install new batteries. Batteries installed incorrectly. Check the polarities as indicated on the unit. Ultracorr turns off before 2:30 minutes auto shutdown. Battery voltage low. Install new batteries. Ultracorr will not transfer data to the computer. CORRDATA Plus is not running. Launch CORRDATA Plus from the Start Menu. Click the Receive Data button. Refer to CORRDATA Plus manual Cable is not connected properly. Check that the cable is fully plugged into Ultracorr and that the other end is fully plugged into the USB connection or the optional 9 pin serial port on the back of the PC. Check that the COM port selected in CORRDATA Plus is the actual COM port to which the Ultracorr is connected to. Make sure the correct Interface is selected. See Setting Ultracorr to PC Interface Ultracorr not reading probe. Ultracorr Corrosion Monitoring System No probe connected to Ultracorr Connect probe to Ultracorr Cable is not connected properly. Ensure proper connection between Ultracorr and probe. 52 Ultracorr Corrosion Monitoring System 53