1
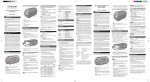
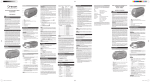
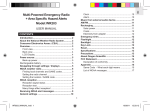
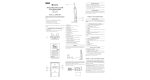
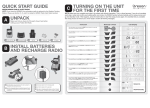
1. Solar panel
RECHARGING
2. SNOOZE: activate snooze alarm / backlight
SOLAR POWER
3. Antenna
4.
Multi-Powered Emergency Radio
+ Hazard Alerts
Model:WR202
Expose the solar panel directly to sunlight.
: turn flashlight on/off
TIPS
5. Light
6. Headphone jack
7. Audio line-in jack
8. DC adapter jack
9. Mobile phone charger jack and charger switch
10. Battery compartment
USER MANUAL
11. RESET: return unit to default settings
EN
Keep this manual handy as you use your new product.
It contains practical step-by-step instructions as well
as technical specifications and warnings you should
know about.
1
2
1.
: radio is on and AM/FM is selected
2.
3
4
5
6
: NOAA weather radio is on
•
It takes approximately 30 hours to fully charge
the battery by solar power (under strong light
conditions).
Do not scratch the solar panel’s surface or wipe it
with strong detergent.
Do not expose the solar panel to rain, snow or
moisture.
The duration of the rechargeable battery’s
charging or operating time is determined by either
the intensity of sunlight or the position of the solar
panel towards the sun.
Do not overcharge the batteries.
NOTE Solar panel cannot be used to charge
mobile phone.
CRANK
5.
Mobile phones can only be charged by cranking or
by adapter (separate purchase required).
6.
: back-up battery level indicator
: alarm clock is enabled
BACK-UP POWER
3
4
5 6
7
8
9 10
1. VOL knob: adjust volume (0-7)
: turn emergency alarm on/off
: turn radio on/off and toggle between AM/FM
4.
: auto search / adjust radio frequency
5.
: activate / deactivate alarm function; set alarm
6. MODE: toggle between different clock / calendar
displays; set clock; confirm clock setting
8.
Northern Hemisphere
4. Clock / calendar
: increase / decrease value of the setting
: turn NOAA weather radio on / off
9. Crank: wind to charge battery or mobile phone
10. LED indicator: continuous red light to indicate unit
/ mobile phone is charging; flashing red light to
indicate rechargeable battery is low; green light to
indicate radio is on
.
1. Slide charger switch to
2. Lift crank and wind clockwise.
In cases where rechargeable battery power is low or
has no power, the unit will source its energy from the
back-up batteries.
To charge mobile phone:
1. Using USB cable (not included) connect one end
to the mobile phone and the other end to mobile
phone charger jack.
Insert 3 AAA batteries:
2. Slide charger switch to select
3. Lift crank and wind clockwise.
indicates there is no back-up battery or back-up
battery is low.
7.
Southern Hemisphere
South
3. Radio frequency / volume
2. Insert the batteries matching the polarities.
3.
North
•
1. Slide open battery compartment.
2.
if you reside in the:
•
POWER SOURCE
FRONT VIEW
2
Direct solar panel as follows:
To charge unit:
OVERVIEW
1
•
Solar panel facing:
•
The Multi-powered emergency radio keeps you alert
of changing weather conditions and also entertained.
Plug in and listen to your personal music collection,
your favorite radio station or up-to-date weather
warnings.
With clock and alarm, keep track of time and wake
up bright and ready for a new day of exploring and
enjoying the natural surroundings. With the addition of
an emergency siren, flashlight and ability to charge your
mobile phone, this Multi-Powered Emergency Radio is
a must-have item for your outdoor adventures.
For best results when charging the battery, place
the solar panel directly with view to sunlight.
•
LCD DISPLAY
INTRODUCTION
•
.
NOTE 1 minute of winding can power the radio for
approx. 5 minutes. It would take approximately 85
minutes of continuous winding (2 turns per second)
to fully charge the battery.
It is recommended to insert back-up batteries in case
of power shortage during emergencies.
ELECTRICITY FROM ADAPTER
RECHARGEABLE BATTERY
1. Lift the soft plastic cover located on the back of the
unit.
This radio has a built-in rechargeable battery that can
store energy from different sources: a solar panel, a
manual hand crank or electricity via an adapter (not
included in package).
2. Plug adapter into the unit and the other end to wall
outlet.
When rechargeable battery level is low, red LED
indicator light will flash.
1. Remove battery compartment cover.
To use this feature, purchase a 5V adapter.
3. Slide charger switch accordingly.
charge mobile
charge unit
2. Insert battery pack.
NOTE It takes 7 hours to fully charge the battery by
using an adapter, which is not included.
3. Align holes in the connector with the pins, then
push connector in.
CLOCK AND CALENDAR
To set the clock:
1. Press and hold MODE to enter clock settings.
to change the settings. Hold to
2. Press
speed through the settings.
BACK VIEW
3. Press MODE to confirm and move to next setting.
The settings order is: hour format, hour, minute,
year, calendar format (M-D / D-M), month, day and
language (E, F, S).
1
2
To quick exit, press any button except MODE,
or SNOOZE.
3
To change display: press MODE.
4
5
6 7 8
9
10
11
4. Tuck wires in and ensure they are within the
battery compartment area.
ALARM
5. Close battery compartment cover.
1. Press and hold
to enter alarm setting.
2. Press
to change hour. Press
to
confirm. Continue with setting minute the same
way.
To display alarm time and activate / deactivate
alarm: Press
.
means alarm is ON.
-:-- means alarm is disabled.
To silence the alarm:
•
Press SNOOZE to silence it for 8 minutes
OR
•
Press any key to turn the alarm off and activate it
again after 24 hours.
MUSIC FROM EXTERNAL AUDIO DEVICE
NOTE NOAA weather radio has to be first turned off.
Using a cable (not provided), plug one end to your
music storage device and one end to audio line-in
socket located at the back of the unit.
AM/FM
To turn radio on / off:
Press
.
Examples of which radio to choose for a particular
location is given in the far right column in above
chart.
CHANNEL
CORRESPONDING
RADIO FREQUENCY
162.400 MHz
162.425 MHz
162.450 MHz
162.475 MHz
162.500 MHz
162.525 MHz
162.550 MHz
1
2
3
4
5
6
7
EMERGENCY SIREN
Push
alarm on.
switch outward to turn emergency
To turn alarm off, push
original position.
switch back to its
FLASHLIGHT
Press
to turn flashlight on / off.
Green light indicates radio is on.
BACKLIGHT
To select frequency:
Press SNOOZE to activate backlight for 5 seconds.
1. Press
again to select AM or FM.
2. Press and hold
to auto search or press
to manually select frequency.
RESET
To change volume: Turn VOL knob.
Press RESET (located in the back-up battery
compartment) to return to default settings.
NOTE When charging, even if radio is on, indicator
will be red.
SPECIFICATIONS
NOTE To listen to the radio, ensure line-in cable is
not connected.
NOAA WEATHER RADIO
FINDING LOCAL CHANNELS
National Weather Service uses one of 7 preset
radio frequencies for their NOAA Weather Radio
transmitters across the country. Please refer to the
below phone number and website link to find the right
channel for your local county:
To contact the NWS by telephone:
1. Phone 1-888-NWR-SAME (1-888-697-7263).
2. Follow prompts through a simple voice menu.
TYPE
LxWxH
Weight
AM radio
FM radio
Battery
DC adaptor
PRECAUTIONS
•
•
To obtain NWS radio channels on the internet:
1. Locate www.nws.noaa.gov/nwr/indexnw.htm
•
2. Click the State for which information is needed.
For example, clicking on “Montana” will give a list of
information relevant to the State of Montana including
the names of counties, NWR transmitter locations, the
frequency of the transmitter, the strength of the signal
in WATTS, and any remarks as applicable.
Example of the first 10 county radio channels:
FREQ CALL
CHOOSE
COUNTY NWR
TRANS
MHZ
RADIO
MITTER
CHANNEL
Beaverhead Butte,MT 162.550 WXL79
7
Beaverhead Dillon,MT 162.475 WNG638
4
Big Horn
Billings,MT 162.550 WXL27
7
Blaine
Havre, MT 162.400 WXL53
1
Blaine
Billings MT 162.475 WWG85
4
Broadwater Helena, MT 162.400 WXK66
1
Carbon
Billings MT 162.550 WXL27
7
Carter
Baker, MT 162.550 WXK57
7
Cascade
Great Falls, 162.550 WXJ43
7
MT
Chouteau Miles Hill, MT 162.500 WWG84
5
After identifying the frequency of your local NOAA
Weather Radio transmitter, refer to below table to
find the corresponding channel (1-7).
1. Press
to turn NOAA weather radio on.
2. Press
to select channel 1-7.
DESCRIPTION
7.5 x 2.1 x 3.9 in
(191 x 54 x 98mm)
14.1 oz (400g)
520 – 1710 KHz
88 – 108 MHz
3 x UM-4 AAA batteries
(for back-up)
600mAh 3.6V Ni-MH rechargeable
battery
DC5V 500mA (not included)
•
•
•
•
•
•
•
•
•
Do not subject the unit to excessive force, shock,
dust, temperature or humidity.
Do not cover the ventilation holes with any items
such as newspapers, curtains etc.
Do not immerse the unit in water. If you spill liquid
over it, dry it immediately with a soft, lint-free
cloth.
Do not clean the unit with abrasive or corrosive
materials.
Do not tamper with the unit’s internal components.
This invalidates the warranty.
Only use fresh batteries. Do not mix new and old
batteries.
Images shown in this manual may differ from the
actual display.
When disposing of this product, ensure it is
collected separately for special treatment and not
as household waste.
Placement of this product on certain types of
wood may result in damage to its finish for which
Oregon Scientific will not be responsible. Consult
the furniture manufacturer's care instructions for
information.
The contents of this manual may not be reproduced
without the permission of the manufacturer.
Do not dispose old batteries as unsorted municipal
waste. Collection of such waste separately for
special treatment is necessary.
Please note that some units are equipped with
a battery safety strip. Remove the strip from the
battery compartment before first use.
NOTE The technical specifications for this product
and the contents of the user manual are subject to
change without notice.
NOTE Features and accessories will not be available
in all countries. For more information, please contact
your local retailer.
ABOUT OREGON SCIENTIFIC
Visit our website (www.oregonscientific.com) to learn
more about Oregon Scientific products. If you're
in the US and would like to contact our Customer
Care department directly, please visit: https://
us.oregonscientific.com/service/support.asp
For international inquiries, please visit: http://
us.oregonscientific.com/about/international.asp
FCC STATEMENT
This device complies with Part 15 of the FCC Rules.
Operation is subject to the following two conditions: (1)
This device may not cause harmful interference, and
(2) This device must accept any interference received,
including interference that may cause undesired
operation.
WARNING Changes or modifications not expressly
approved by the party responsible for compliance could
void the user’s authority to operate the equipment.
NOTE This equipment has been tested and found
to comply with the limits for a Class B digital device,
pursuant to Part 15 of the FCC Rules. These limits
are designed to provide reasonable protection against
harmful interference in a residential installation.
This equipment generates, uses and can radiate radio
frequency energy and, if not installed and used in
accordance with the instructions, may cause harmful
interference to radio communications. However, there
is no guarantee that interference will not occur in a
particular installation. If this equipment does cause
harmful interference to radio or television reception,
which can be determined by turning the equipment
off and on, the user is encouraged to try to correct
the interference by one or more of the following
measures:
• Reorient or relocate the receiving antenna.
• Increase the separation between the equipment
and receiver.
• Connect the equipment into an outlet on a
circuit different from that to which the receiver is
connected.
• Consult the dealer or an experienced radio / TV
technician for help.
DECLARATION OF CONFORMITY
The following information is not to be used as contact
for support or sales. Please visit our website at
http://us.oregonscientific.com/service/ for all
enquiries.
We
Name:
Oregon Scientific, Inc.
Address:
19861 SW 95th Ave.,Tualatin,
Oregon 97062 USA
Telephone No.:
1-800-853-8883
declare that the product
Product No.:
WR202
Product Name:
Multi-Powered Emergency Radio
+ Hazard Alerts
Manufacturer:
IDT Technology Limited
Address:
Block C, 9/F, Kaiser Estate,
Phase 1, 41 Man Yue St.,
Hung Hom, Kowloon,
Hong Kong
is in conformity with Part 15 of the FCC Rules.
Operation is subject to the following two conditions: 1)
This device may not cause harmful interference. 2) This
device must accept any interference received, including
interference that may cause undesired operation.
© 2011 Oregon Scientific. All rights reserved.
P/N:300103042-00001-10