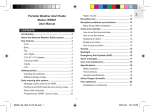
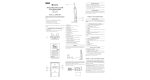
1
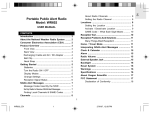
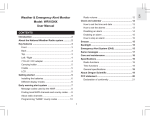
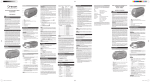
BACK VIEW
1
2
3
4
5
2. Radio status mode
To switch between the radio status mode displays,
press
NOAA.
6
ICON
A channel has been found.
The sensor cannot be found.
7
8
USER MANUAL
EN
Thank you for selecting the Desktop Emergency Weather
Station (WR606). This device operates on the same
radio frequencies used by the National Weather Radio
(NWR) and can send you NOAA alert messages to warn
you about weather and other environmental dangers.
This weather station is constructed of durable materials
and has a reception range of up to 50 miles (64 km). It
is also equipped with weather information display, digital
clock and daily alarm.
Keep this manual handy as you use your new product.
It contains practical step-by-step instructions, as well
as technical specifications and warnings you should
know.
ABOUT THE NATIONAL WEATHER RADIO SYSTEM
The National Weather Service (NWS) is an agency
within the National Oceanic & Atmospheric Administration (NOAA) that operates a nationwide network of radio
stations known as the NOAA Weather Radio (NWR).
The NWR radio system broadcasts warning information
for all types of hazards, both natural and technological.
Working in conjunction with the Emergency Alert System
(EAS), NWR is an all-in-one hazards radio network and is
considered to be the single source of all comprehensive
weather and emergency information.
1.
2.
3.
4.
5.
6.
7.
8.
NOAA: Press to switch between NOAA On /
Standby / Mute / Off modes; press and hold to turn
On / Off NOAA display
MSG: Press to switch between NOAA alert messages; press and hold to activate / deactivate keypad
lock
MEM: Press to switch between the current, maximum
and minimum temperature or humidity reading; press
and hold to clear all maximum / minimum records
CH: Press to switch between temperature and humidity display; press and hold to enable auto-scan
of remote outdoor sensor channels
PRESSURE: Press to select the barometric pressure
unit (mb and inHg); press and hold to set the altitude
compensation range for barometric reading
: Press to adjust the altitude when setting the
altitude compensation range
RESET: Press to reset the unit to default value
°C / °F: Switch to select the temperature unit
GETTING STARTED - MAIN UNIT
ADAPTOR AND BATTERIES
You must use the AC/DC adaptor as the main source of
power supply. Make sure the adaptor is not obstructed
and the adaptor socket is easily accessible to the unit.
NOTE Leaving the unit in NOAA ON mode will consume
substantially more power. To save power, set the unit
to NOAA Standby when you are not listening to radio
broadcasts.
CHANGE SETTINGS
To change clock, alarm, channel and location settings:
1. Press and hold MENU for 2 seconds to enter
setting mode.
2. Press
or
to scroll through the setting
options (Set Alarm / Set Clock / Set Channel / Set
Location) and press MENU to select the desired
one.
one.
3. Use
or
to change a setting, then press
MENU to confirm and move onto the next one.
4. Press EXIT to leave the setting mode at any time.
NOTE To reach a number quickly, press and hold
or
.
This product complies with the Consumer Electronics
Association (CEA) testing standards.
Batteries serve as back-up only. Use 3 pieces of AA
(UM-3) 1.5V batteries. Insert batteries before first use,
matching the polarity. Press RESET after each battery
change.
NOTE When the unit is set to NOAA ON, Standby or
Mute, it will continually search for NOAA signal.
GETTING STARTED - REMOTE OUTDOOR SENSOR
1
2
3
4
5
6
7
8
9
10
2
11
NOAA ALERT MESSAGES
SET THE LOCATION
When the NWR airs urgent warnings, a digital code
known as Specific Area Message Encoding (SAME) is
included as part of the message. This coding system
contains specific information including the localized
geographical area affected and the expiration time of
the message. The WR606 retrieves and interprets SAME
code messages and alerts the user. When SAME codes
for a specific region have been entered into the unit, the
unit alerts the user to relevant warning information for
the specified region. Once alerted, a voice broadcast
can be heard.
You need to set the location so that you can receive
weather and environmental information for an area that
is relevant to you.
FIND LOCAL CHANNELS AND SAME CODES
The codes are subject to change. Therefore, to ensure
successful operation you must obtain the most appropriate, up-to-date NWR radio channels and SAME
codes for a specific county or region, from the contact
details listed below.
To contact the NWS by telephone:
1. Phone 1-888-NWR-SAME (1-888-697-7263).
2. Follow prompts through a simple voice menu.
1
4
3
5
COUNTY
SAME#
NWR
TRANSMITTER
FREQ.
MHZ
CALL
Beaverhead 030001
Butte, MT
162.550
WXL79
100
Beaverhead 030001
Dillon, MT
162.475
WNG638
150
Big Hom
030003
Billings, MT
162.550
WXL27
300
Blaine
030005
Havre, MT
162.400
WXL53
300
Blaine
030005
Billingd, MT
162.475
WWG85
100
Broadwater 030007
Helena, MT
162.400
WXK66
1000
Carbon
030009
Billings, MT
162.550
WXL27
300
Carter
030011
Baker, MT
162.550
WXK57
300
Cascade
030013
Great
Falls MT
162.550
WXJ43
300
Chouteau
030015
Miles
Hill, MT
162.500
WWG84
300
12
13
LOCATION
MEANING
in outdoor
temperature area
Remote outdoor sensor
batteries low
in NOAA area
14
15
16
1.
2.
3.
4.
5.
6.
7.
8.
9.
10.
11.
12.
13.
14.
15.
16.
Remote outdoor sensor reception icon
Barometric pressure
Outdoor temperature and humidity
Weather forecast
Indoor temperature and humidity
Alarm icon
Radio channel
Clock / Alarm / Calendar / NOAA alert messages /
Setting options display
MENU: Press to switch between clock, calendar,
alarm 1 and 2 displays; press and hold to enter
setting mode; confirm setting value
EXIT: Press to exit any setting mode or return to
clock display
/
: Increase / decrease settings; increase /
decrease volume; enable / disable alarm 1 or 2
SNOOZE / LIGHT: Press to activate 8-minute
snooze or backlight for 5 seconds; press and hold
to disable snooze function
Antenna
External antenna jack
External speaker jack
AC / DC adaptor jack
WR606 EN UM R2.indd 1
2. Wall mount hole
3. Battery compartment
Main unit batteries low
4. RESET hole
5. CHANNEL switch
TURN THE NOAA RADIO ON / OFF
To turn the NOAA radio ON / OFF, press and hold
1. LED status indicator
NOAA.
When the unit is first connected or reset, it will immediately enter the clock / language setting mode (see
Change Settings section). It is advisable to set your
preferred language English (E), French (F) or Spanish
(S) at this time, so you can read the NOAA alert
messages.
DISPLAY MODES
There are 2 display modes:
1. Clock mode
To switch between the clock mode displays, press
MENU.
WATTS
To set the location:
1. Navigate to “Set Location” setting mode as shown
in the Change Settings section.
2. Select where you want to store the location e.g.
C1.
3. Select the 6-digit number e.g. “000000”. (“----“
means the location is disabled.)
4. Select “Name” or “FIPS”.
REMARKS
If you select “Name” you can select first the State
and then the County of your chosen location, then
press EXIT. (If you wish to receive State-wide NOAA
messages, press EXIT once you have selected the
State.)
• If you select “FIPS” you need to enter the 6-digit
SAME code of your chosen location and then press
EXIT (see Find Local Channels and SAME Codes
section for how to obtain a SAME code).
NOTE If at step 2 you select “C0:All” you will receive
all warnings within the unit’s reception range. This may
result in giving you information for regions that are not
relevant. The regions can be as large as 5,000 square
miles (13 sq km). If you select “CO:----” you will disable
the ALL option and will only receive warnings from
specified local areas.
NOTE Once the location name is selected, the corresponding FIPS code will be set into the memory.You
cannot convert the code back to the location name.(FIPS
is the Federal Information Processing System number
assigned to each State, or open waters in or around the
US. The SAME code comprises of numbers generated
by the FIPS system.)
ACTIVATE / DEACTIVATE LOCATION
You can activate / deactivate 1, some, or all of your
stored locations.
When a location is activated, the 6-digit SAME code can
be viewed in your stored locations display.
1
Northwest
2
North Central
3
Northeast
4
West Central
5
Central
6
East Central
7
Southwest
8
South Central
9
Southeast
1
2
3
4
5
6
7
8
9
RECEIVING NOAA ALERT MESSAGES
To receive NOAA alert message, press
NOAA to set
the unit to one of the following options:
]: The unit is ON and voice messages
• ON [
can be heard continuously.
• Standby [
]: The unit is in Standby and will switch
to ON when NOAA alert message is received.
• Mute [
]: The unit is in Standby with the sound
turned OFF. NOAA alert messages can be viewed but
not heard. Switch the unit ON to hear messages.
•
OFF: The unit is turned OFF and will not respond to
NOAA alert messages.
Turning the unit off by setting it to Standby, Mute or OFF
will help to save power.
RECEPTION TEST
N
NOTE Many counties have been subdivided into as
many as 9 smaller subsections. The numbers 1-9 in the
far left column of the SAME code identifies specific subsections of a county. If a county has not been subdivided,
the first digit of the SAME code will be 0.
When a location is deactivated, “----” can be viewed in
your stored locations display.
The NWR radio channels work in the same way as a
regular radio channel. All of the NWR transmission stations operate on 1 of 7 frequencies.
CORRESPONDING RADIO
FREQUENCY
To switch between activated or deactivated location status:
1
162.400 MHz
2
162.425 MHz
3
162.450 MHz
4
162.475 MHz
SAME CODE – WHAT EACH DIGIT MEANS
NOTE Use alkaline batteries for longer usage and
consumer grade lithium batteries in temperatures
below freezing.
5
162.500 MHz
6
162.525 MHz
A SAME code is broken into 3 sets of numbers.The
example below is the code for the northeast sub-section
of Cochise County.
7
162.550 MHz
A
Auto – the unit will tune to the
strongest RF signal available
The unit labels each frequency as a channel (1-7 or
Auto). Once the radio frequency for a region has been
selected the unit will receive voice and code information
from that station.
The channel number in use can be viewed on the top
left-hand corner of the LCD.
The fact that you can get clear voice reception does
not guarantee that an emergency alert will trigger your
unit’s alert tone. To test actual reception, your unit must
receive a test or emergency alert signal broadcast. The
National Weather Service (NWS) broadcasts a test alert
every week on Wednesday between 11AM and 12PM
(noon). To find out the specific test schedule in your area,
contact your local National Oceanic and Atmospheric
Administration (NOAA) or National Weather Service
(NWR) office. These offices are usually listed in the
telephone book under “US Government”.
REMEMBER For your system to be effective, you
must place the unit in a location where it can receive
an emergency alert signal, you can hear its siren, and
see its flashing indicator lights.
ABOUT RADIO CHANNELS
To set up the remote outdoor sensor:
1. Open the battery compartment and insert batteries,
matching the polarity.
2. Select a channel then press RESET.
3. Close the battery door.
4. Place the remote outdoor sensor within 30 m (98 ft)
from the main unit.
The remote outdoor sensor reception icon will show the
following status:
A county can be subdivided as follows:
NOTE If you do not set a location, the unit will use the
default setting “CO:All” for all counties.
CHANNEL
To search for a remote outdoor sensor:
Press MEM + CH.
NOTE If the county sub-section code is stated as 0,
then that county is not sub-divided and all alerts for that
county will be received. To receive all of the alerts for a
given county, insert 0 into the county sub-section.
You can choose the location by either the state and
county name, or FIPS code. Up to 9 locations (1-9)
can be stored.
The remote outdoor sensor can collect data from up
to 3 channels.
SENSOR DATA TRANSMISSION
County sub-section code:
The last digit on the left is for county sub-section coding. A county may be subdivided into nine sub-sections;
each number between (1-9) represents a specific county
sub-section.
•
Example of the first 10 county radio channels and SAME
codes for Montana.
No NOAA alert message has been
received for 10 days. Current selected
channel signal is strong
PRODUCT OVERVIEW
To change the radio channel, navigate to “Set Channel”
setting mode and select the desired Channel, as shown
in the Change Settings section.
Current selected channel signal is weak
DESCRIPTION
No NOAA alert message has been
received for 10 days. Current selected
channel signal is weak
CONSUMER ELECTRONICS ASSOC. (CEA)
TIP The transmission range may vary depending on
many factors. You may need to experiment with various
locations to get the best results.
Current selected channel signal is strong
RECEPTION SIGNAL STATUS
ICON
SET THE RADIO CHANNEL
To obtain NWS radio channels and SAME codes on
the internet:
1. Locate www.nws.noaa.gov/nwr/indexnw.htm
2. Click the State for which information is needed.
For example, clicking on “Montana” will give a list of
information relevant to the State of Montana including
the names of counties, SAME codes, NWR transmitter
locations, the frequency of the transmitter, the strength of
the signal in WATTS, and any remarks as applicable.
To check the status of the reception signal, look at the
reception icon on the display.
A nationwide network, the NWR consists of more than
900 stations in 50 states, Puerto Rico, the US Virgin
Islands and US Pacific Territories. Broadcasts are
designed to meet local needs. Routine programming is
repeated every few minutes and consists of local forecast, regional conditions and marine forecasts.
Additional information, including river stages and climatic
data, is also provided. During emergencies, these routine
broadcasts are interrupted to report specific warnings.
FRONT VIEW
State code:
Moving towards the left, the next 2 digits are for state
coding. Each of the 50 U.S. States has their own 2digit code.
Main unit is searching for sensor(s).
WR606
Desktop Emergency Weather
Station
INTRODUCTION
000 into the county section.
DESCRIPTION
1.
Navigate to “Set Location” setting mode as shown
in the Change Settings section.
2.
Select a stored location e.g. C4 and press MENU.
Then when “000000” or “----” is blinking, press
to activate or deactivate it and press EXIT to
or
confirm the setting.
3
04
003
Code for Cochise County
Code for Arizona
Code for northeast sub-section of
Cochise County
State-county code:
The 3 digits on the right are for state county coding. Each
county within a state has an independent 3-digit code.
NOTE To receive all of the alerts for a given state, insert
RECEPTION PROBLEMS AND SOLUTIONS
Forests, deserts, and hills / mountains tend to greatly
reduce reception. Reception in cities may be reduced
due to steel and concrete, while higher elevations will
enhance the signal. Reception can vary from room
to room. Moving even a few feet can enhance signal
reception.
RECOMMENDATION Place your weather station near
a window, away from other electronic equipment, and
on an upper level of your house.
INTERPRETING NOAA ALERT MESSAGES
This product is equipped to receive all required NOAA
and Emergency Alert System (EAS) events. When an
EAS event is sent by the NWS, any 1 of the following
NOAA alert messages will scroll across your weather
station display: “WARNING”, “WATCH”, or “ADVISORY”.
The unit can store up to 8 NOAA alert messages.
Additionally, to help you check that your unit is set-up
and working properly, your local NOAA will release a
Test NOAA message every Wednesday between 10am
and noon, local time. To receive the Test message make
sure that your unit is set to NOAA ON, NOAA Standby
or NOAA Mute mode, that a Channel has been selected
and a SAME code programmed in. If you have any
questions regarding alarm tests or to verify if a test was
5/27/08 3:02:35 PM
conducted, contact the programming office of your local
NOAA Weather Radio station.
Required Monthly Test
ADVISORY
To view NOAA alert messages, press MSG.
Required Weekly Test
ADVISORY
For more information on how to interpret the NOAA alert
messages, please refer to the list of National Events and
Messages below:
Special Marine Warning
WARNING
Special Weather Statement
ADVISORY
TEMPERATURE, HUMIDITY AND PRESSURE TREND
Shelter In-Place Warning
WARNING
The temperature, humidity and pressure trend icons are
based on recent remote outdoor sensor readings.
• Do not dispose old batteries as unsorted municipal
waste. Collection of such waste separately for special
treatment is necessary.
The following information is not to be used as contact for
support or sales. Please call our customer service number
(listed on our website at www.oregonscientific.com or on
the warranty card for this product) for all inquiries instead.
Severe Thunderstorm
Watch
WATCH
WARNING
NOTE The technical specifications for this product and the
contents of the user manual are subject to change without
notice.
ADVISORY
Avalanche Watch
WATCH
Avalanche Warning
WARNING
Severe Thunderstorm
Warning
Biological Hazard Warning
WARNING
Severe Weather Statement
ADVISORY
Boil Water Warning
WARNING
Tornado Watch
WATCH
Blizzard Warning
WARNING
911 Telephone Outage
Emergency
ADVISORY
Child Abduction Emergency
ADVISORY
Tornado Warning
WARNING
Civil Danger Warning
WARNING
Tropical Storm Watch
WATCH
Civil Emergency Message
WARNING
Tropical Storm Warning
WARNING
Coastal Flood Watch
WATCH
Tsunami Watch
WATCH
Tsunami Warning
WARNING
Volcano Warning
WARNING
WARNING
Contaminated Water
Warning
WARNING
Transmitter Backup On
ADVISORY
Dam Watch
WATCH
Transmitter Carrier Off
ADVISORY
Dam Break Warning
WARNING
Transmitter Carrier On
ADVISORY
Transmitter Primary On
ADVISORY
Wild Fire Watch
WATCH
Wild Fire Warning
WARNING
Winter Storm Watch
WATCH
Winter Storm Warning
WARNING
Unrecognized Watch
WATCH
Unrecognized Emergency
ADVISORY
Unrecognized Statement
ADVISORY
Unrecognized Warning
WARNING
Contagious Disease
Warning
WARNING
Practice / Demo
ADVISORY
Dust Storm Warning
Emergency Action
Notification
WARNING
WARNING
Emergency Action
Termination
ADVISORY
Earthquake Warning
WARNING
Immediate Evacuation
WARNING
Evacuation Watch
WATCH
Food Contamination
Warning
WARNING
Flash Flood Watch
WATCH
Flash Flood Statement
ADVISORY
BAROMETER
Flash Flood Warning
WARNING
Barometer readings from the past 24 hours are stored by
the main unit and used to provide weather forecast.
Flood Watch
WATCH
Flood Statement
ADVISORY
Flood Warning
WARNING
SET ALTITUDE
Fire Warning
WARNING
Flash Freeze Warning
WARNING
Freeze Warning
WARNING
Hurricane Statement
ADVISORY
To ensure barometric readings are reliable set the altitude
to reflect distance from sea level at your position.
1. Press and hold PRESSURE for 2 seconds.
2. Use
to set the altitude in 10 m (33 ft) increments
from -100 m (-328 ft) to 2500 m (8202 ft).
3. Press PRESSURE to confirm.
NOTE The 4 “Unrecognized” messages above will appear when a new NOAA alert message is created and
broadcasted. The unit will not be able to recognize the
message as it is not in the software database.
To select barometer measurement unit:
Press PRESSURE to toggle between mb and inHg.
Hazardous Materials
Warning
WARNING
NOTE The maximum operating altitude for the barometer
and weather forecast is 2500m (8202 ft).
Hurricane Watch
WATCH
WEATHER FORECAST
Hurricane Warning
WARNING
High Wind Watch
WATCH
This product forecasts the next 12 to 24 hours of weather
within a 30-50 km (19-31 mile) radius based on barometric
pressure trend readings.
High Wind Warning
WARNING
Iceberg Warning
RISING
STEADY
FALLING
ICE WARNING
If the channel 1 remote outdoor sensor falls between 3°C
to –2°C (37°F to 28°F),
flashes to warn you that the
temperature is approaching freezing.
Digital PLL tuning for 7 NOAA channels
CLOCK AND CALENDAR
SAME code
setting options
9 independent settings or ALL counties
To set the time and date, navigate to “Set Clock” setting
mode as shown in the Change Settings section. The
order of the settings is:
• 12 / 24 hour format, hour, minute, month / day format,
year, month, day and day of the week language (English, French or Spanish).
NOTE The day of the week language you select will also
be used for the NOAA alert messages.
The unit has 2 alarms (alarm 1 and 2). They can be used
together or independently. Alarms 1 and 2 have different
sounds so that you can differentiate them. The alarm will
sound for 1 minute unless it is disabled.
To set the alarm:
Navigate to “Set Alarm” setting mode as shown in the
Change Settings section. The order of the settings is:
alarm 1 or 2, hour and minute.
To silence the alarm:
• Press SNOOZE / LIGHT to silence it for 8 minutes.
• Press and hold SNOOZE / LIGHT, or press any button
except SNOOZE / LIGHT, to turn the alarm OFF and
activate it again at the same time the next day.
To enable or disable the alarm:
• Press MENU until you reach alarm 1 or 2 display.
• Press
or
to enable or disable the alarm.
The alarm icon
or
will appear on the clock display
when the alarm is enabled.
NOAA RADIO VOLUME
or
to adjust the volWhen NOAA radio is On, press
ume. (Maximum volume is 7 / minimum volume is 1.)
EXTERNAL ANTENNA JACK
There are chances that signal reception may experience
interference. The use of the RCA jack is an optional choice
to ensure clear and unobstructed signal reception.
7 adjustment levels
TIME FUNCTIONS
Clock
12 / 24 hr format
Calendar
Day of the week language in
English, French or Spanish
Daily alarm
2 x 1-minute duration alarms
Snooze
8-minute snooze
DD: MM or MM: DD format
Oregon Scientific, Inc.
19861 SW 95th Ave.,Tualatin,
Oregon 97062 USA
Telephone No.:
1-800-853-8883
Product No.:
WR606
Product Name:
Desktop Emergency Weather
Station
Manufacturer:
IDT Technology Limited
Block C, 9/F, Kaiser Estate,
Phase 1,41 Man Yue St., Hung
Hom, Kowloon, Hong Kong
is in conformity with Part 15 of the FCC Rules. Operation is
subject to the following two conditions: 1) This device may not
cause harmful interference. 2) This device must accept any
interference received, including interference that may cause
undesired operation.
GENERAL SPECIFICATIONS
Battery type
3 x UM-3 or AA size 1.5V (optional only)
AC / DC adaptor
7.5V
Unit dimensions
204 x 55.6 x 100 mm
(8 x 2.19 x 3.937 in)
Unit weight
300.6 g (10.6 oz) without battery
Operating
temperature
23°F to 122°F (-5°C to 50°C)
Temperature
resolution
0.2°F (0.1°C)
REMOTE OUTDOOR SENSOR (THGN132N)
LxWxH
50 x 22 x 96 mm
(1.97 x 0.87 x 3.78 in)
Weight
62 g (2.22 oz)
without battery
Transmission range
30 m (98 ft) unobstructed
Signal frequency
433MHz
Temperature range
-4°F to 140°F (-20°C to 60°C)
Humidity range
25% - 95%
Power
1 x UM-3 (AA) 1.5V battery
FCC STATEMENT
RESET
This device complies with Part 15 of the FCC Rules. Operation is subject to the following two conditions: (1) This
device may not cause harmful interference, and (2) This
device must accept any interference received, including
interference that may cause undesired operation.
Industrial Fire Warning
WARNING
Partially Cloudy
Local Area Emergency
ADVISORY
• Do not subject the unit to excessive force, shock, dust,
temperature or humidity.
Cloudy
• Do not cover the ventilation holes with any items such
as newspapers, curtains etc.
Law Enforcement Warning
WARNING
Land Slide Warning
WARNING
National Audible Test
ADVISORY
National Information Center
ADVISORY
Network Notification
ADVISORY
National Periodic Test
ADVISORY
National Silent Test
ADVISORY
Nuclear Power Plant
Warning
WARNING
To auto-scan between remote outdoor sensors:
Press and hold CH for 2 seconds.
• Images shown in this manual may differ from the actual
display.
Power Outage Advisory
ADVISORY
Radiological Hazard
Warning
To end auto-scan:
Press CH or MEM.
• When disposing of this product, ensure it is collected
separately for special treatment.
WARNING
To toggle between current, minimum and maximum
• Placement of this product on certain types of wood
may result in damage to its finish for which Oregon
To view different remote outdoor sensor temperature
readings:
Press CH.
Volume
Press SNOOZE / LIGHT to activate the backlight.
PRECAUTIONS
To toggle temperature unit:
Switch °C / °F.
Address:
BACKLIGHT
Sunny
TEMPERATURE AND HUMIDITY
50 miles (64 km)
EXTERNAL SPEAKER JACK
The external speaker jack allows you to connect the unit
with an external speaker system so that broadcasts can
be announced in public areas i.e. schools, hotels, train
stations etc.
Name:
Address:
RF reception
range
ALARM
We
declare that the product
Channels
WARNING
Rainy
SPECIFICATIONS
RADIO FUNCTIONS
DESCRIPTION
ICON
• Please note that some units are equipped with a
battery safety strip. Remove the strip from the battery
compartment before first use.
NOTE The warning will automatically stop if the temperature goes outside the ice-warning range.
The RESET button is located in the main unit battery
compartment. Press RESET when you change the batteries and whenever performance is not behaving as
expected.
WR606 EN UM R2.indd 2
Consult the dealer or an experienced radio / TV
technician for help.
DECLARATION OF CONFORMITY
Administrative Message
WARNING
•
• The contents of this manual may not be reproduced
without the permission of the manufacturer.
MESSAGE
Chemical Hazard Warning
Scientific will not be responsible. Consult the furniture
manufacturer's care instructions for information.
To clear the records:
Press and hold MEM for 2 seconds.
NATURE OF ACTIVATION
Coastal Flood Warning
records for the selected remote outdoor sensor:
Press MEM repeatedly.
• Do not immerse the unit in water. If you spill liquid over
it, dry it immediately with a soft, lint-free cloth.
• Do not clean the unit with abrasive or corrosive
materials.
• Do not tamper with the unit’s internal components. This
invalidates the warranty.
• Only use fresh batteries. Do not mix new and old
batteries.
WARNING Changes or modifications not expressly approved by the party responsible for compliance could void
the user’s authority to operate the equipment.
NOTE This equipment has been tested and found to
comply with the limits for a Class B digital device, pursuant
to Part 15 of the FCC Rules. These limits are designed to
provide reasonable protection against harmful interference
in a residential installation.
This equipment generates, uses and can radiate radio frequency energy and, if not installed and used in accordance
with the instructions, may cause harmful interference to
radio communications. However, there is no guarantee
that interference will not occur in a particular installation.
If this equipment does cause harmful interference to
radio or television reception, which can be determined by
turning the equipment off and on, the user is encouraged
to try to correct the interference by one or more of the
following measures:
• Reorient or relocate the receiving antenna.
• Increase the separation between the equipment
and receiver.
• Connect the equipment into an outlet on a circuit
different from that to which the receiver is
connected.
086L005565-0XX
5/27/08 3:02:48 PM