1
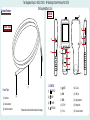
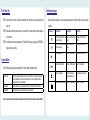
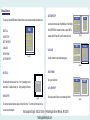
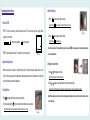
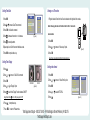
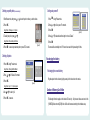
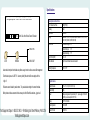
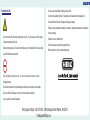
Visit us at www.TestEquipmentDepot.com
DCS1600
USER’S MANUAL
99 Washington Street
Melrose, MA 02176
Phone 781-665-1400
Toll Free 1-800-517-8431
HIGH-PERFORMANCE DATA LOGGING
VIDEO BORESCOPE SYSTEM
CONTENT
Product Features------------------------------------ 2
Viewing on a TV monitor---------------------------------11
First Time Use---------------------------------------- 4
Setting video format---------------------------------------11
System Modes---------------------------------------- 4
Deleting a specific photo (Browse mode only)---12
Multi-function keys---------------------------------- 5
Deleting all photos-----------------------------------------12
Manual Screen--------------------------------------- 6
Setting auto power off------------------------------------13
Operating Instructions----------------------------- 8
Re-charging the battery----------------------------------13
Power On/Off------------------------------------------ 8
Creation of Memory Card Folder--------------------- 13
Adjust the brightness------------------------------ 8
Specifications-----------------------------------------------15
Taking Photos-----------------------------------------8
Troubleshooting--------------------------------------------16
Video Recording------------------------------------- 9
Insert Tube Maintenance---------------------------------17
Viewing photos/videos-----------------------------9
Cautions for Use--------------------------------------------18
Setting Time/Date------------------------------------10
Setting Time Display--------------------------------10
Test Equipment Depot - 800.517.8431 - 99 Washington Street Melrose, MA 02176
TestEquipmentDepot.com
Product Features
DCS1600
(14)
INSERT TUBE
(8)
(9)
(11)
(10)
(12)
(4)
(7)
(5)
(6)
(2)
(1)
(3)
(13)
(3)
(1)
1-Insert Tube
(1) Insert tube
(2)
(2) Camera and lens
(3) Insert tube connector
(Please read the entire instruction manual before usage)
2-CONSOLE
(1)
RECORD
(2)
SNAP
(3)
POWER
(4)
PREVIOUS
(5)
NEXT
(10) AC Jack
(6) OK
(11) USB port
(7) ESC
(12) Light adjustment
(8) SD Port
(13) Hanger Hole
(9) TV out
(14) Console Connector
First Time Use
Multi-function keys
STEP 1-Insert the insert tube into the connector according to the direction of the arrow and tighten the
screw nut.
Each console button performs a unique function depending upon the Mode in which the system is being
operated
STEP 2-Press and hold down the power button on the console for 3 seconds until the image is displayed
Push-Buttons
on the monitor.
STEP 3-Aim the camera lens at the selected object. Press SNAP to capture a .jpg image, or RECORD to
begin recording a .asf video.
OK
System Modes
The DCS1600 provides three simple working modes: Preview, Browse and Manual Mode.
Preview Mode
Browse Mode
Manual Mode
The Preview Mode is activated as soon as the unit is turned on. The image received by the
camera is displayed in real time on the video monitor. The user can capture photos and
record video while in the Preview Mode.
In Browse Mode, users may view photos and video, and conduct basic file maintenance.
In Manual Mode, users may customize their set up preferences.
Note: The system returns to Preview Mode automatically after 10 seconds without any response in Manual Model.
ESC
Preview Mode
Browse Mode
Manual Mode
Switch to Browse Mode to view
photos and videos.
Move to previous photo or
video.
Move upward through the main
manual.
Switch to Browse Mode to view
photos and videos.
Move to next photo or
video.
Move the light bar downward.
Enter Manual Mode.
Delete photo or video.
Execute selected command.
Return to Preview Mode.
Return to Preview Mode.
Return to Preview Mode.
Capture a .jpg photo
View the next photo or
pause/play video clips.
Display various data for repair
Start and stop video recording
Return to Preview Mode
Return to Preview Mode
Manual Screen
• DATE/TIME SETUP
The user may press the MENU button in Manual Mode to execute desired commands as indicated below.
Use the arrow buttons to select Year/Month/Day or Hour/Min/Sec.
DELETE ALL
VIDEO OUTPUT
DATE/TIME SETUP
LANGUAGE
VIDEO FORMAT
MENU
MANUAL
Press RECORDING to increase the number, or press SNAP to
DELETE ALL
VIDEO OUTPUT
DATE/TIME SETUP
LANGUAGE
VIDEO FORMAT
AUTO POWER OFF
MANUAL
MENU
TIME SETUP
DELDTE ALL
VIDEO OUTPUT
DATE/TIME SETUP
LANGUAGE
VIDEO FORMAT
AUTO POWER OFF
decrease. Select “Display ON” to print the date on the photo.
2000/01/101
10:22:22
DISPLAY OFF
(Figure.3)
LANGUAGE
ENGLISH
LANGUAGE
日本語
ENGLISH
ESPANOL
FRENCH
ITALIAN
MANUAL
MENU
• LANGUAGE
(Figure.1)
Use this command to select the desired language.
AUTO POWER OFF
DELDTE ALL
VIDEO OUTPUT
DATE/TIME SETUP
LANGUAGE
VIDEO FORMAT
AUTO POWER OFF
(Figure.4)
• VIDEO FORMAT
• DELETE ALL
After initiating this command, select “yes” or “no” by pressing up or down
arrow buttons. To delete all, select “yes”. Exit by pressing the OK button.
• VIDEO OUTPUT
Set up your video format.
ERASE ALL
yes
no
(Figure.2)
• AUTO POWER OFF
TIME SET
POWER
OFF
DISABLE
5
MIN
10 MIN
15 MIN
30 MIN
POWER OFF
Set the auto power off feature to your desired length of time.
This command will send the video signal out through the AV port. The monitor will turn black until you
execute this command again.
MANUAL
MENU
DELDTE ALL
VIDEO OUTPUT
DATE/TIME SETUP
LANGUAGE
VIDEO FORMAT
AUTO POWER OFF
Test Equipment Depot - 800.517.8431 - 99 Washington Street Melrose, MA 02176
TestEquipmentDepot.com
(Figure.5)
Operating Instructions
Video Recording
1. Press
Power On/Off
button to start video recording.
Image Status:
sign will appear at the left bottom of the screen.
STEP1: To turn the console on, press the power button for 3~5 seconds until you see the sign below
(
SD card memory capacity
Battery capacity)
STEP2: Press the power button for 3~5 seconds to turn the console off.
(P.6)
(Figure.6)
Adjust the brightness
bright. In this case, please turn the light switch counterclockwise to reduce the brightness. Turn the light
switch clockwise to increase the brightness.
Image Status:
sign disappears.
Note: User may return to Preview Mode anytime by pressing ESC button regardless of working under Browse
mode or Manual mode.
1. Press
or
during preview mode.
/
(Figure.8)
(P.9)
Image Status: Display the latest photo/video.
2. Press
or
again to view the oldest or second to last photo/video.
Image Status: All files will be stored according to the time sequence of photo capture/video recording.
Taking Photos
Note: When viewing videos, the video will be displayed automatically until it ends and then the next photo or video
button during Preview mode to take the photo.
Or, continue pressing the
button again to stop recording.
Viewing photos/videos
When the objects on the screen or "fully-blank (light over)", it might be because the light source is too
Press
(Figure.8)
2. Press
appear on your monitor.
will be displayed.
button to show the photo that has just been taken.
Image Status: Returns to Preview Mode automatically after photo is taken.
(Figure.7)
Setting Time/Date
Viewing on a TV monitor
MANUAL
MENU
1.Press OK
2.Press
or
TIME SET
TIME
SET
2000/02/14
DELDTE ALL
VIDEO OUTPUT
DATE/TIME SETUP
LANGUAGE
VIDEO FORMAT
AUTO POWER OFF
to move to Date/Time command.
3.Press OK to initiate the command.
4.Press
to increase the number or to decrease.
5.Press
for next adjustment.
17:30:51
DISPLAY
OFF
1. Plug the included AV cord into the AV socket located on the right side of the console.
Notice: Please plug the other end of the AV cord into the “AV in” socket on the
external monitor.
(Figure.9)
2.Press OK
6.Repeat step 4 and 5 until the correct time/date are set.
3.Press
7.Press OK to complete the set up.
4.Press OK
or
to move to “Video output” option.
(Figure.11)
Image Status: image will be transmitted to the external monitor.
Setting Time Display
000/0/0 0::
1.Press OK
2.Press
or
4.Press
5.Press
1.Press OK
to move to “Date/Time” command.
3.Press OK
Setting video format
2.Press
NOT DISPLAY
or
for “Display” option.
to switch the “Display” function between ON/OFF.
Image Status: Press
once for ON, press again for OFF.
(P.10)
(Figure.10)
DISPLAY
or
to move to “Video Format” option.
3.Press OK
4.Press
or
to select NTSC/PAL.
5.Press OK
6. Press OK to complete set up.
7. Press ESC to return to Preview mode.
Test Equipment Depot - 800.517.8431 - 99 Washington Street Melrose, MA 02176
TestEquipmentDepot.com
MANUAL
MENU
TV
OUTPUT
TIME
SET
DELDTE ALL
VIDEO OUTPUT
DATE/TIME SETUP
LANGUAGE
VIDEO FORMAT
AUTO POWER OFF
NTSC
PAL
(Figure.12)
Deleting a specific photo (Browse mode only)
1. Enter Browse mode, then press
or
Setting auto power off
1.Press OK during Preview mode.
to locate the photo or video you wish to delete.
2. Press OK
2.Press
Image Status: “Delete yes or no” options
3. To select your option, press
DELETE
yes
or
no
Image Status: The selected option flashes.
(Figure.13)
4. Press OK to execute your selected option or press ESC to cancel.
Deleting all photos
1. Press OK during Preview mode.
Image Status: Showing the Main Manual
2. Press
or
for “Delete All” command.
3. Press OK
or
for “Auto power off” command.
4.Press
to select desired time length or choose “Disable”.
or
TIME SET
POWER
OFF
DISABLE
5
MIN
10 MIN
15 MIN
30 MIN
POWER OFF
(Figure.15)
5.Press OK
The console will automatically turn off if it has not been used for this preset length of time.
Re-charging the battery
MANUAL
MENU
DELDTE ALL
VIDEO OUTPUT
DATE/TIME SETUP
LANGUAGE
VIDEO FORMAT
AUTO POWER OFF
ERASE ALL
yes
no
Re-charging the console battery
Plug the adapter into the outlet and plug the power jack into the socket on the console.
(Figure.14)
Image Status: “yes” or “no” option appears
4. Use
or
3.Press OK
MANUAL
MENU
DELDTE ALL
VIDEO OUTPUT
DATE/TIME SETUP
LANGUAGE
VIDEO FORMAT
AUTO POWER OFF
to select “yes”.
5. Press OK to execute.
Creation of Memory Card Folder
The following information applies to the included SD card only. All photos and videos are stored in the
[100MEDIA] folder under the [DCIM] folder. All files will be named according to the time/date setup.
Specifications
The original setup date 1 Month 1 Date 6:14:23 Name of the file
The original setup date 1 Month 1 Date 6:14:23 Name of the file
11061423.JPG
1 1 0 6 1 4 2 3 .JPG
Month Date Hour: Minute: Second Extension
1 1 0 6 1 4 2 3 .JPG
Month Date Hour: Minute: Second Extension
Camera System and Insert Tube
0.2” Diameter Insert Tube
Housing
Light Source
Length
Depth of Field (DOF)
Water Resistant
325(H)*250(V)
Steel
White LED
OBEDIENT 3.3', 6.6', 9.8' (1M, 2M, 3M)SOFT METAL 3.3', 6.6', 9.8', 16.4',
32.8', 98.4' (1M, 2M, 3M, 5M, 10M, 30M)
Horizontal field angle 46 º
Vertical field angle
34º
Diagonal field angle
56º
0.4” ~ 2.4”
Only the InsertionInsert tube is water resistant
Working Temperature
32°F to 131°F
Field of View
11061423.JPG
DCIM
100MEDIA
11061435.ASF
●Users should complete the time/date setup before usage in order to achieve accurate file management.
●The time/date is pre-set to 2007/1/1. Users may identify this when the file name begins with the
digits 11.
●File names are not labeled by serial number. They are labeled according to the current time/date.
●Both photos and videos are named in the same way but with different file extensions, .jpg and .asf.
Test Equipment Depot - 800.517.8431 - 99 Washington Street Melrose, MA 02176
TestEquipmentDepot.com
System Console
System Dimension
System Weight
Power
Display
Recording Medium
8.5” x 4.7” x 1.4” (215 x 120 x 36 mm)
380g
Battery rechargeable Li-Polymer battery 3.7V power supply AC 100-240V
50-60Hz power consumption DC5.5 1.8A
3.5 TFT LCD QVGA
1G SD CARD
Video Out Format
NTSC & PA
Interface
Compression Format
Still Image Storage Format
Frame Rate
Exposure
White Balance
S/N Ratio
Language
Recharge Temperature
Working Temperature
AV out
Compliant with MPEG4
jpeg (640*480)
~30 fps
Automatic
Fix
42dB or more
English // Japanese // German // Spain // French // Italian // Traditional Chinese
// Simplified Chinese
32°F to 104°F
-4°F to 140°F
Storage Temperature
-4°F to 140°F
Troubleshooting
• 2. Can turn on the unit but the image does not appear on the monitor
Please check the insert tube connector or simply re-connect the insert tube to correct the problem.
• 3. Unable to capture photos/video
Please check the status of the SD card. Users will not be able to capture photos or video if the SD card is
not installed properly or if it is full, write protected or damaged.
Insert Tube Maintenance
»To avoid danger, please do not put the insert tube into any flammable liquid or gas.
»The insert tube contains a series of small wires that control the optics and electronics of the camera tip.
To ensure long-term reliability, do not bend the insert tube more than 180 degrees, and always bend the
• 1. Unable to turn on the console
Users will not be able to turn on the console when the battery is very low or empty. Please re-charge
before use.
insert tube in as large an arc as possible during usage and storage.
»Camera Lens cleaning
User may clean the camera lens with a cotton swab and small amount of cleaning naphtha
User Guide 19
Cautions for Use
»Do not use any corrosive liquid for cleaning, such as alcohol.
»Do not try to disassemble the product. This presents a shock hazard and could damage the unit.
»Do not bend the insert tube over 180 degrees during usage or storage.
»Please use only recommended components or accessories. Unapproved accessories and components
»Do not remove the SD card during capturing photos or video. This can cause a loss of the image or
video and may damage the SD card.
»Video recording requires an SD card with fast writing speed. We recommend 80X (or above) writing
may cause damage.
»Please do not use in a medical facility.
»Avoid direct exposure to sunlight for long periods of time.
Store the system in a cool, dry and well-ventilated place.
speed SD cards for better video quality.
»This is designed for industrial use only.
Do not use the system for human or any other
biological inspection.
»Do not insert the insert tube into any flammable gas or liquid (such as a fuel tank) to avoid dangers.
»Do not use this Video Borescope in a fuel tank or other dangerous environment
such as a gasoline or alcohol storage tank.
Test Equipment Depot - 800.517.8431 - 99 Washington Street Melrose, MA 02176
TestEquipmentDepot.com