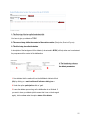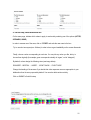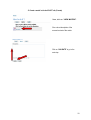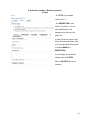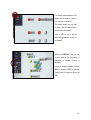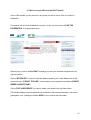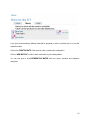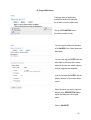
1
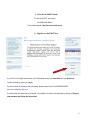
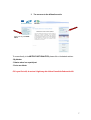
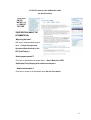
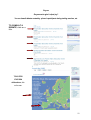
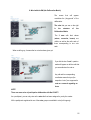
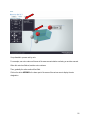
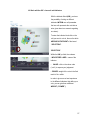
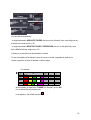
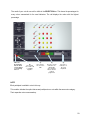
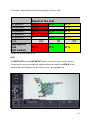
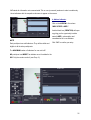
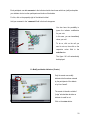
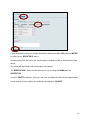
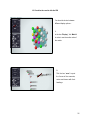
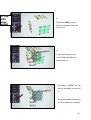
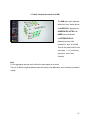
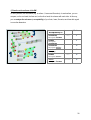
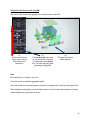
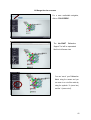
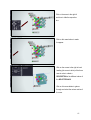
Project N° : 036992
ACRONYM: Science and Policy Integration for Coastal System
Assessment
DELIVERABLE D1.5
On-line “Beta” prototype of the “SPICOSA” DST with
comprehensive User’s Guide
WORK PACKAGE: WP1 Policy Interface
REPORTING PERIOD :
From : Month 13
To: Month 24
PROJECT START DATE:
st
1 February 2007
DURATION: 48 Months
Date of Issue of this report : February 2009
Document prepared by :
Partner 4
UVSQ
Integrated Project funded by The European Community
Under the Sixth Framework Programme
Priority 1.1.6.3
Global Change and Ecosystems
1
Warning
This DELIVERABLE is essentially
accessible online at:
http://kercoast.c3ed.uvsq.fr
The pages that follow contain the first draft of KerCoast user manual, which is
integral part of D1.5.
FEEDBACK FROM USER:
We will try as much as possible to be available for questions that this document and the process may
raise locally. All questions may be sent to Jean-Paul Vanderlinden, SPICOSA’s WT1.2 leader ([email protected]).
Objective of WT 1.2: Provide a methodological framework to include participation of
policy/stakeholders in the SAF assessment process, particularly, in the initial Policy-Issue negotiation
and in the final deliberation phases.
Description of D1.5: On-line “Beta” prototype of the “SPICOSA” DST with comprehensive Users’ Guide
The second prototype of the DST and its user’s guide should be made available on line with a mean to
get feedback from users.
IDEALLY this document is to be used in conjunction with training sessions that will be
organized in June and September 2009
2
KerCOAST
DRAFT
User’s Manual
3
Content
Enter the website of kerCOAST.............................................................................................................................6
Register as User of kerCOAST...............................................................................................................6
Two accesses to the deliberation matrix ..............................................................................................7
The First access to the deliberation matrix (on the left column) ............................................................8
The Second access to the deliberation matrix (on the right column) ..................................................9
Open a NewDebate (in the kerCOAST site) ........................................................................................................13
Create a matrix in the kerCOAST site ................................................................................................................18
Define Axis Variables (“Build your problem”) ....................................................................................19
Create a List of Indicators (and generate a KIK) ................................................................................21
Assign participants (as active contributors) ......................................................................................22
Work with the DM (the Deliberation Matrix .........................................................................................25
Work with the KIK : choose & add indicators .....................................................................................28
Modify & delete indicators ...................................................................................................................35
Visualise the Results with the DM.......................................................................................................................36
Read/ Interpret the result of the DM ....................................................................................................38
Manage the View on screen .................................................................................................................41
Return to an Open DM on the kerCOAST site ....................................................................................................44
Copy a DM .............................................................................................................................................45
4
5
1. Enter the kerCOAST website
To enter kerCOAST and access
the Deliberation Matrix,
Use the following link: http://kercoast.c3ed.uvsq.fr/
2. Register as a kerCOAST User
If you look at in the right hand column, you will be asked to enter your username and your password.
Confirm the data by clicking on Log in.
If you don’t have an username and a password, please contact Jean-Paul VANDERLINDEN :
[email protected]
If you have lost your username or password, it is possible to receive a new password by clicking on Request
new password and follow the instructions.
6
3. Two accesses to the deliberation matrix
Click here for your FIRST
VISIT.
To access directly to the MATRIX FUNCTIONALITIES, please click on the desired sections :
- My debates
- Debates where I am a participant
- Post a new debate
If it is your first visit, do not use it right away but click on Consult the Cube on the left.
7
3.1 The First access to the deliberation matrix
(on the left column)
TO ACCESS
ON THE
MATRIX, click
on CONSULT
THE CUBE
THREE SECTIONS ABOUT THE
DOCUMENTATION
Why using the cube ?
Click here to download the document
about : « Design Concepts and
Operational Specifications for the
DST (Draft Report) »
.
How to prepare oneself ?
Click here to download the document about : « User’s Manual for ICZM
Stakeholder-Policy Mapping with worked out examples »
- How to use the matrix ?
Click here to access on the documents about the use of the matrix.
8
THREE SECTIONS ABOUT
THE MATRIX
- Dry run ?
Click here to discover various test
debates or to get acquainted with the
matrix thourgh the setting up of many
mock deliberation debates of the
participants.
- Let’s use it in your Spicosa
SSA !
- Guest
It is possible to create a debate
êrtaining to ICZM if you are
not a SPICOSA member.
To have an account, contact :
Jean-Paul VANDERLINDEN
[email protected]
9
Dry run
Do you want to give it a (test) try ?
You can view all debates created by spicosa’s participants during training sessions, etc.
TO CONSULT A
DEBATE, click on a
title.
TO ACCESS
YOUR SSA
deliberations, click
on the map.
10
3-2 The Second access to the deliberation matrix
(on the right column)
To access directly to
the MATRIX, please
click on the desired
sections :
- My debates
- Debates where I
am a participant
To ACCESS your
DEBATES, click
here.
11
TO ACCESS your
DEBATES WHERE
YOU ARE A
PARTICIPANT, click
Click on POST A NEW
DEBATE on
the following page.
12
4- Open a New Debate in the kerCOAST site (Creator)
Click on POST A NEW
DEBATE on
the following page.
13
14
1- The first step; find an explicit and short title.
You have to give your debate a TITLE.
2- The second step; define the context of the matrix creation. (Study site, Guest or Dry run)
3- The third step; describe the debate.
A description of the background of the debate (to be entered in BODY) will help other user’s understand
the purposes and the context of the deliberation.
4- The fourth step; choose
1
3
the debate parameters.
2
1. Now indicate that the matrix will use the KerBabelTM Indicator Kiosk
(kik) by clicking on « matrix with small indicators dialog box ».
2. Under the option participative click on “yes”.
3. Leave the debate open as long as the deliberation is not finished. If
you want to close your debate (which means that it can not be changed
again), click on close under the option status of the debate.
15
5- The fifth step; select the different axis
On the same page, indicate which values to apply to each axis by selecting one of the options (ACTOR,
SCENARIO, ISSUE).
In order to rename one of the axes, click on “OTHER” and write the new name in the box.
Try to use short acronyms (max. 8 letters) in order to have a good readability on the screen afterwards.
Finally, choose a colour corresponding to each vote. You can pick any colour you like, but try to
choose them logically (for example, green corresponds naturally do “agree”, red to “disagree”).
By default, colours design the following votes (see image below) :
DISAGREE - NEUTRAL - AGREE - I DON’T KNOW - I DON’T CARE
Change the heading of the answers if you decide that other responses are more appropriate to your
deliberation than the ones proposed by default. You can also delete entries entirely.
Click on SUBMIT to finish this step
.
16
The presentation menu will
appear. In order to create the
structure of the matrix, click on the
“MATRIX”.
The button “EDIT” allows you to
return to the previous screen and to
modify the options chosen at the
previous step.
Nota bene :
The principal title is the name of the
debate (here How to do it ?). In this
same debate it is possible to create
many deliberation matrixes
17
5- Create a matrix in the kerCOAST site (Creator)
Now, click on “NEW MATRIX”.
Give a short description of the
use and context of the matrix.
Click on “VALIDATE” to go to the
next step.
18
6- De fine Axis Variables (“Build your problem”)
(Creator)
- The TITLE of your debate
(“How to do it ?”) ;
- The DESCRIPTION of your
matrix (“Test matrix”). You can
make modifications to the
descriptions by clicking on the
pencil icon.
In order to enter the names of your
Actors, Scenarios and Issues, click
on the corresponding button and fill
in the fields NAME and
DESCRIPTION.
In our example, we are about to
add one value of ACTORS.
Click on VALIDATE after every
new entry.
19
In this way, the list of values will grow
steadily.
In order to delete a value, click on the red
cross. Click on the blue cross for
modifications.
20
7- Create a List of Indicators (and generate a KIK) (Creator)
This step is optional.
The indicator allows the
« voter » to justify his position
and thus opens the debate
with other participants.
21
8- Assign participants as active contributors (Creator)
In order to design a participative debate, you
can assign registered users (obviously those
who you know) to the ACTOR categories
that you have set.
To assign participants as active contributors,
click here.
By clicking on “ACTORS”, you can view the
list of actor “roles” that you have assigned
(here: “Actor 1, 2, 3”).
22
Next, you assign the CATEGORY of
ACTOR to the participant. The user has
become a PARTICIPANT in your debate
and is now allowed to vote as the actor
1, 2…
As creator, you can MODIFY the actor
role that has been assigned to a
participant (by clicking on a different
CATEGORY of actor) and also DELETE
users from the participants list (by
choosing “NOT PARTICIPANT” from
the list).
NOTE
It is technically IMPOSSIBLE to assign the same person to several actor categories!
(However, if really required, the same person or group, etc., can register several times as a participant,
in order to be present in several actor categories...)
Ulterior modifications to the assignment of participants :
Change actor category of participants
The creator of the debate can change the actor category initially assigned to a participant anytime. In
this case, all the votes that the participant has already given will be transferred to the new actor
category. Thus, no data will be lost during this transfer process.
Delete a participant from the list
The creator of a debate is also authorised to delete a participant from the list.
23
ATTENTION!
In this case, all the votes this participant has given at that moment will be lost!
Once you have entered all your
values, click on the icon “ENTER IN
IN THE DELIBERATION”.
24
9- Work with the DM (the Deliberation Matrix)
The
screen
that
will
appear
constitutes the “playground” of the
deliberation.
The cube that you see on the right
is
the
structure
of
the
Deliberation Matrix.
The 3 axes with their values
(actors, scenarios, issues) are
visible, as well as the cells, each of
them corresponding to one vote
each.
When a cell is grey, it means that no vote has been given yet.
If you tick the box “I vote”, question
marks will appear on all the cells that
you are authorised to vote on.
Any cell and its corresponding
coordinates mean that you (the
respective “actor”) are supposed to
vote on a scenario regarding an
issue.
NOTE
There are some rules of participative deliberation with KerCOAST !
As a participant, you can only vote as the actor that has been assigned to you by the creator.
All the participants registered in one of the actor groups are entitled to vote (in this group).
25
It is preferable to process axis by axis.
For example, one actor votes on all issues of the same scenario before continuing on another scenario.
When this actor has finished, another actor continues.
Thus, gradually the entire matrix will be filled.
Click on the white ARROWS in the lower part of the name of the various axes to display the axis
designation.
26
10- Work with the KIK : choose & add indicators
With the Indicator Kiosk (KIK), you have
the possibility of voting on different
indicators WITHIN one cell (remember
that one cell represents the vote that an
actor gives about one scenario regarding
one issue).
To enter the indicator kiosk click on the
cell you want to vote in, then on the white
ARROW ON THE RIGHT of the board
“SELECTION”.
“SELECTION”.
Within the KIK you find, the columns:
- INDICATOR’S LABEL : name of the
indicator
- VALUE : click on the colour code
(“vote”) to express your judgement
- POWER : weight of the vote in the final
result of the cellule.
In order to give more or less importance
to the different indicators that define your
vote, you can give them a different
WEIGHT: (“POWER”)
27
You have the choice between :
- a weight expressed in ABSOLUTE FIGURES (see icon on the left hand). Here, each weight can be
expressed on a scale from 0 to 100.
- a weight expressed in RELATIVE FIGURES / PERCENTAGE (see icon on the right hand), sums
up the different indicator weights up to 100.
It allows you to pass from one representation to another.
To vary the weighting of the indicator, move the cursor on the bar, (regardless of whether you
choose to express it in terms of absolute or relative weight.
For example :
Indicator’s
label
Indicator 1
Value
Power
Strong
100
44
Indicator 2
Agree
Weak
25
11
Indicator 3
Agree
Medium
50
22
Medium
50
22
(225)
(100)
Disagree
Don’t
care
Indicator 4
Result of the vote : cell’s final colour
44
,,,
33
,,,
22
As the summary of importance (“POWER) for “Disagree” (red) is 44%,
it is considered the most relevant vote.
In consequence, the cell will look like this :
28
The result of your vote for one cell is visible in the SELECTION box. This shows the percentages for
every colour summarised for the used indicators. The cell displays the colour with the highest
percentage.
This cell
presents the
vote of Actor
1 on Scenario
1 concerning
issue 4
(4)
The overall
vote of this cell
is globally
negative.
(1)
Here, Actor 1
has chosen 3
indic
(2)
The votes on the
indicators are
divided into
(two) negative
values and one
neutral
judgement.
(3)
For Actor 1,
indicator 1 is
the most
important.
NOTE
Each participant is entitled to vote in this way.
This variation includes the option that several participants can vote within the same actor category.
Their respective votes are summed up.
29
For example: 5 participants (from the same actor category) vote on one cell :
1st person
2nd person
3rd person
4th person
5th person
Sum
Aggregated
vote
(cell colour)
Result of the vote
44 %
28 %
60 %
0
20 %
20 %
100 % 0
0
50 %
224
98
28 %
40 %
60 %
0
50 %
45 %
35 %
20 %
178
The final colour of the cell will be red.
NOTE
All PARTICIPANTS have the SAME WEIGHT within the vote for their respective actor category.
The final result of one actor constituted by several participants is therefore the AVERAGE of their
individual votes and is represented by the colour of the cell – the aggregated vote.
30
In order to be able to give a vote on your indicators, they have to be available.
You can either choose your indicators from a list (by clicking on the heading KiK -a) or add new ones
to it (by clicking on the little arrow -b)
a. Choose an indicator :
Click on the heading KIK.
Different types of information are visible in the box: the name (LABEL), and DESCRIPTION of the
indicator.
The columns on the right show the relevance of the indicator for the three axes chosen.
As each participant can define his/her PERSONAL RELEVANCE (from 0 to 4) of the indicator for
his/her judgement, anybody else participating in the same debate has the choice to let him/her show
only those with a certain relevance: 0 corresponds to no relevance at all, whereas 4 represents
correspond to a relevance.
31
NC stands for information not communicated. Tick on one (or several) numbers in order to enable only
those indicators with the respective relevance to appear on the screen.
b. Add an indicator:
Click on the ARROW in the column
“INDICATOR’S LABEL”.
Another black box (CREATION) will open
up giving you the opportunity to add a
name (LABEL), a description and
NOTE
Each participant can add indicators. They will be visible and
commentaries of a new indicator.
Click “OK” to confirm your entry.
eligible to all the other participants.
The MAXIMUM number of indicators for one vote is 5 !
NO participant can MODIFY an indicator once it is added to the
KIK. Only the creator can do it (see Chap.11).
32
Each participant can add comments to the indicators he/she has chosen which can justify and explain
your indicator choice to other participants and visitors of the debate.
For this, click on the paperclip right of the indicator’s label.
Add your comment in the “comments” field in the box that appears.
You also have the possibility to
ignore the indicator mobilisation
for your vote.
In this case, you can immediately
colour your cell.
To do so, click on the cell you
want to vote on, then click on the
respective colour field in the
selection box.
The figure 100 will automatically
be displayed.
11- Modify and delete indicators (Creator)
Only the creator can modify
indicators that have been entered
by the participants of the debate
or by him-/ herself.
The creator is therefore a kind of
“judge” who decides whether an
indicator is useful or not.
Click on the return button.
33
A list of the debate’s indicators is available (beneath the display mode within KIK) under the “MATRIX”
by clicking on the “INDICATOR(S)” button.
Anybody is allowed to view this list, but only the creator is enabled to modify or delete indicators from
this list.
Only he/she will view blue and red crosses right to the indicators :
For MODIFICATIONS : click on the blue cross next to it, then change the NAME and/or the
DESCRIPTION.
In order to DELETE an indicator : click on the red cross, then delete the entries in the respective fields.
In both cases you have to confirm your modification by clicking on “VALIDATE”.
34
12- Visualise the results with the DM
You have the choice between
different display options :
1.
In the box “Display”, tick “Matrix”
in order to see the entire cube of
the matrix.
2.
Tick the box “axes” to post
the 3 axes of the scenarios,
actors and issues with their
headings.
35
5- The
fifth
step;
s e le c t
3.
Tick the box “SUM” in order to
post the assessment of the votes
for each axis.
4.
If you tick all 3 boxes, you can
see the Deliberation Matrix as
represented here.
By clicking on “I VOTE”, you can
see the cells where you can vote
on.
The question marks will appear as
as long as a debate is not closed.
36
13- Read / interpret the results of the DM
The SUM option (here displayed
without the “inner” matrix) shows
the SURFACES : displaying the
AGGREGATED VOTES of all
INNER lines and columns
the EXTERIOR CELLS :
displaying the sum of the
transects (or “layer” of the DM).
There is one exterior cell for each
value (here: 1, 2, 3) of the three
axes (here : Actor, Issue,
Scenario).
Note
For the aggregation process, each cell has the same impact on the result.
There is no different weighting between them at this step of the deliberation, each vote being considered
equally.
37
1) Results on the surfaces of the DM
On every surface, two axes match (e.g. in surface 1, Issues and Scenarios). In each surface, you can
compare, on the one hand, the lines and, on the other hand, the columns with each other. In this way,
you can analyse the relevance (or acceptability) of your Actor, Issue, Scenario, each time with regard
to one other dimension.
Relevance /
Acceptability of
scenarios
with regard to issues
issues
In the DM
Surface
Lines
1
Columns
1
Lines
2
Columns
2
Lines
3
Columns
3
with regard to
scenarios
scenarios
with regard to actors
actors
with regard to
scenarios
issues
with regard to actors
actors
with regard to issues
38
2) Results in the Exterior Cells of the DM
The exterior cells represent the aggregate of one whole transect of the DM :
(1)
Scroll one of the three
lists in order to see the
DM transect you’re
interested in.
(3)
The overall result of the votes
for one transect (here Scenario
3) is displayed in the selection
box. The colour with the highest
percentage is highlighted.
(2)
The respective transect
will be displayed.
Note
Be careful with your “reading” in any case.
The colour codes are simplistic aggregated signals.
Half a red cell must not necessarily signal a result that is unambiguously “worse” than half a green cell.
When reading and interpreting, you should always take a look at the lower-level information conveying
individual statements coming from the actors.
39
14- Manage the view on screen
For a more comfortable navigation,
click on “FULLSCREEN”.
The
KerCOAST
Deliberation
Support Tool will be represented
like this in full screen view.
You can “move” your Deliberation
Matrix using the arrows and you
can zoom in or out of the matrix by
using the symbols “+” (zoom into)
and the “–“(zoom out of).
40
Click on the arrow to the right of
each box to hide the respective
box.
Click on this same button to make
it reappear.
Click on the arrows to the right of each
heading (the arrow in white) of the three
axes in order to obtain a
DESCRIPTION of the different values of
the SELECTED AXIS.
Click on this same button to glance
through and select the various entries of
the axes.
41
For a better representation of the
matrix cells on which to vote on,
you can view in mode 2D.
This mode shows only one axis
at a time – the one that you have
selected at that moment.
Click on “2D” on top on the left
after having selected the axis to
be studied.
Within the “DISPLAY” field, you can
choose whether the information is
displayed in English, French or
Spanish.
French is chosen by default. Click on
“EN” for English or “ES” for Spanish.
Switch back to French by clicking on
“FR”.
42
15- Return to an open DM on the kerCOAST website
Once a DM is created, you can go back to it at any time you want in order to finish or to change a
deliberation.
This remains true as long as the debate is not closed - for this, you must choose “CLOSE THE
DELIBERATION” in the presentation menu.
Whenever you go back to the KerCOAST Homepage, you enter your username and password in the
right hand column.
Click on “MY DEBATES” in order to consult the debates opened by you or other debates that are still
open (by the way “CONSULT THE CUBE”), or those where you are registered as participant (DEBATE
WHERE I AM PARTICIPANT).
Click on POST A NEW DEBATE if you want to create a new debate in the right hand column.
The list below displays several characteristics of the debates : their name and description, their status
(participative or not; including the Indicator KIOSK or not) as well as their last update.
43
If you have several matrixes, different dates will be proposed in order to continue with or to view the
respective matrix.
Click on the CREATION DATE of the matrix in order to continue the configuration.
Click on “NEW MATRIX” in order to add a new matrix to your existing debate.
You can now open a new DELIBERATION MATRIX with new actors, scenarios and evaluation
categories.
44
16- Copy a DM (Creator)
Copying a matrix is helpful when
you want to modify a full matrix but
do not want to lose the initial entries.
Click on “COPY MATRIX” next to
the matrix you want to copy.
You can copy the matrix with all entries
of the VALUES of the 5 axes (name and
description).
You can even copy the VOTES that have
been made. In this case, all the values
related to the votes are copied: indicator
choices, judgement and weighting.
If you do not import the VOTES, only the
(empty) “skeleton” of your matrix will be
copied.
Select the values you want to copy and
add text in the “DESCRIPTION” field to
explain the difference in this copied
matrix.
Click on “VALIDATE”.
45
Attention :
As soon as you unselect one of the
5 entries on the left (ACTOR,
SCENARIO, ISSUE, INDICATOR,
PARTICIPANT), the “VOTES”
option will also be unselected.
The reason is that the votes are
dependent on each of the 5 values.
NOTE
When copying, you can NOT change the participative option, i.e. change a participative debate
into a debate without participation (or vice versa).
46