Download Downloading
Transcript
A New Visual Ar ts
and Community Networking Software
The User’s Manual
www.lopart.net
TABLE OF CONTENTS
1 - Description of LopArt
Visual arts and community networking software .................................. p.3
LopArt Museum www.lopart.net ......................................................... p.4
Technical specifications ..................................................................... p.5
2 - How to use the software.......................................................................... p.6
3 - Tricks of the trade .................................................................................. p.9
4 - Edutainment
Exploring the software...................................................................... p.10
The idea zone ................................................................................. p.11
5 - Educational file....................................................................................... p.12
6 - Learning Situations................................................................................ p.14
Let’s explore LopArt together! ........................................................ p.15
Trees ............................................................................................. p.19
Chagall and the animal acrobats ................................................... p.22
Tribute to Jean-Paul Riopelle ........................................................ p.25
My name in animation .................................................................. p.29
Mail Art projects ............................................................................ p.32
7 - Feedback ............................................................................................ p.37
1
2
DESCRIPTION OF LOPART
LOPART
Visual Arts and Community Networking Software
LopArt is a program for the creation of images that takes its inspiration from traditional tools for drawing
and painting, but that also includes functions for interactive communication enabling the sending of images
by e-mail and their archiving in the LopArt’s Museum on the web site www.lopart.net.
Starting from the artist’s gestures, the creation functions give results that are very similar to those
obtained through the use of classical painting and drawing tools. The colour and texture palettes enable
the user, by modifying the width and transparency of the stroke, to create a work with the same finish as
one made using real gouache, watercolour, felt pen, spray can, pastel, charcoal or wax crayon.
LopArt also includes an animation function that makes possible the production of short films where each
stroke made by the artist is dynamically redrawn. The variable projection speed of the images and the ease
of making loops or sequences let the imagination of artists of all ages take flight.
The software’s ease of use and entirely graphical interface mean that a child of four is able to draw without being confronted with the hurdles associated with computer use, such as file management and menu
reading.
Drawings are automatically saved in the software’s portfolio. The portfolio interface offers options for
saving images on the computer’s hard drive, as well as printing, viewing or recycling them (equivalent to
the ‘trash’ function, since paper, virtual or otherwise, is recyclable!).
The publication functions include the ability to send an image by e-mail as well as to connect to the LopArt
web site, where one may hang a picture, visit an exhibition, learn to draw or consult the list of learning situations.
The Museum is the LopArt web site: a space for displaying works, a studio for creation and exploration of
the software as well as an information and resource centre for teachers, parents and artists.
Distinct Advantages of LopArt
A completely icon-based interface
Vector drawing technology allows easy animation
Community functionality: sending of images by e-mail, deposit of works in the Museum
Realistic textures
Extreme ease of use
Automatic saving of images in portfolios
Unlimited use of ‘undo’ and ‘redo’
Association with traditional painting and drawing tools
No prefabricated stamps or shapes
3
DESCRIPTION OF LOPART
THE WWW.LOPART.NET MUSEUM
The SEE Section
It is here that users of LopArt deposit their works for the benefit of visitors. It is extremely easy to hang
a drawing in the Museum since this function is integrated into LopArt’s software. All that is required is to
open a personal gallery, then give it a name and a password.
Public galleries are listed one after the other.
The PLAY Section
This section permits the exploration of the creative software and the domain of graphic arts, through invitations to a range of edutainment activities. At once a classroom, a playground and a drawing studio, there
one may learn to draw with LopArt, as each lesson is explained and illustrated.
• Exploration of the software
This workshop contains an array of works making use of the whole range of tools and techniques that
comprise the software.
The works offered as examples are made available by the members of the LopArt community. By sharing
their knowledge and techniques, users of the software, whether beginners or professionals, can demonstrate their know-how and push the limits of creation with LopArt.
• The Idea Zone
In this workshop we explore the technical aspects of using the creative part of LopArt. Also
covered are visual language, the composition of an image, and the development of ideas. To encourage the
discovery of varied and special possibilities within LopArt, information, explanations, internet references,
tricks and tips are revealed.
• Challenge of the Month
Each month there will be a new invitation to a playful contest. Youngsters are encouraged to create to a
theme and to send their images to the collective gallery associated with it in the Museum.
• Picture of the Week
The Picture of the Week is chosen, by the members of the LopArt team, from among all the new images
sent to the Museum. Good luck to all!
The EDUCATORS Section
This section consists of a repertoire of learning situations conceived by educators for different school curricula.
These situations respond to the requirements of modern pedagogical programmes and suggest adaptations
for the different primary levels. In the future, other educators wishing to share their good ideas may enrich
this ‘exercise bank’.
A template for lessons seeks to harmonise the presentation of the pedagogical scenarios presented in the
studio. It could be utilised by educators wishing to share their pedagogical experiences with visitors to the
LopArt web site. The team’s proposals will be placed online via the same template.
4
DESCRIPTION OF LOPART
TECHNICAL SPECIFICATIONS
Minimal Requirements
Memory:
20 MB
Platforms:
Macintosh, Windows
Monitor:
800x600 pixels, thousands of colours
Disk space:
100 MB available on the hard drive for images
Processor speed:
166 MHz
Image format:
720x405 pixels - 72 dpi
Images sent via e-mail in postcard format are in jpeg format and may be viewed with all drawing, layout,
or e-mail software as well as internet browsers.
Downloading
The demo version can be downloaded free of charge at: www.lopart.net
Download time
High speed connection: 10 - 20 seconds
56k modem: 4 - 5 minutes
28.8k modem: 10 minutes
Installation
Macintosh: Uncompress the software with Stuffit and double-click the LopArt icon.
Windows: Uncompress the software with WinZip. Double-click on LopArt.exe; click on Browse and select the
Desktop. Then click on Unzip.
WinZip and stuffit are normally provided with the system software.
5
MANUAL OF USE
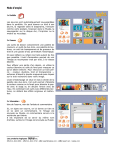
1 • Portfolio
Each of your works is automatically saved in the portfolio. You can give it a name, view it in a slideshow, send
it as a postcard, hang it in the Museum, save it to your
hard drive, print it or recycle it.
2 • Canvas
The drawing tools include a palette of colors, a halftone
tool, a texture palette, a transparency tool, a stroke size
selector, and a water drop for smudging.
You can make or unmake strokes as many times as you
like.
The animation tool lets you replay the construction of the
image stroke by stroke at any desired speed.
To erase a part of a picture, use either white colour or the
background colour to cover the part you wish to remove.
To reselect a stroke – color, halftone, stroke and transparency – hold down the shift key while clicking on the
desired stroke in your image.
The smudging tool is found at the lower right of the
halftone palette. It lets you extend or smear the colour
just as you would rub a pastel mark with your finger or
dilute ink with water. Combining this tool with different
textures gives rise to many original and surprising
effects.
3 • Information
title of the work, name of the artist, and comments
Here you sign your work, give it a title and add descriptive comments. If the image is sent to the Museum, the
comments can be used to find it using a thematic search.
It is important to use the same artist's name for your
works, especially if they will be sent to the Museum.
6
MANUAL OF USE
4 • Slideshow
This option lets you watch all the images in your
portfolio, just like a slideshow, and also replay
the making of the image using the animation
tool.
The small green square lets you zoom in to see
details of the work.
5 • Sending an image to the LopArt Museum
This option lets you exhibit your work in the
LopArt Museum. You must first register in order
to open your own gallery and hang your favourite
pictures there automatically.
6 • Sending a postcard
This option lets you send your work as a virtual
postcard, via e-mail. Enter the recipient's e-mail
address, your e-mail address, a title, a message,
and...send it!
7
MANUAL OF USE
7 • Copying an image
This option lets you save a drawing (.jpg) outside of
LopArt, enabling you to use it in another application.
To save the history of your drawing (.lop), simply click
the shift key and then press the copy icon.
8 • Printing an image
This option lets you print your works. LopArt automatically uses the computer's printer.
9 • Recycling
This option lets you trash your unwanted pictures, so
you can reuse the disk space.
8
TRICKS OF THE TRADE
• How do I save my .lop images outside LopArt’s Portfolio?
To copy the history of your drawing on a diskette or on your Desktop, click the Shift Key and then press
the copy icon in the Portfolio’s interface. To reimport your drawing, simply press the Shift Key before clicking the canvas icon.
• How do I send a virtual postcard to several people?
Separate e-mail addresses using a comma (no spaces).
• How do I mount a collective exhibition?
Choose the name of the gallery and share the password with your group.
• How do I re-use a specific stroke?
To find a stroke that you have used previously – colour, halftone, width and transparency – click on the
stroke in your image while pressing the Shift Key.
• How do I close a gallery or remove inappropriate images from the Museum?
Send an e-mail to LopArt at the following address: [email protected].
Your request will be reviewed by the team, and appropriate action will be taken.
• How do I run LopArt in full-screen mode?
Just set your monitor resolution to 800X600 pixels.
9
EDUTAINMENT - Activities for Learning LopArt
• STROKES
- Choose colors from the color palette to make a background.
Use wide strokes to completely fill the page.
- Then choose either black or white.
Use strokes of different widths to make a painting.
• THE HALFTONE PALETTE
Insects and reptiles are always interesting subjects for creators. They
have strange forms and varied colors.
- You can see insects at the site of the Montreal Insectarium:
http://www2.ville.montreal.qc.ca/insectarium/insect.htm.
- With the half-tone palette and strokes of different widths, create an
insect or a reptile.
• THE GRAYSCALE PALETTE
- Find a subject that you would like to paint using just grays. Close your
eyes and let the light grays, the medium grays and the dark grays float in
your mind. Do you start to get ideas?
- Use the grayscale palette and strokes of different widths to make a
painting.
• THE TEXTURE PALETTE
- Visit the wildlife of the ecosystems in the Montreal Biodome by going to
the site : http://www2.ville.montreal.qc.ca/biodome/ebdm.htm
- Create an animal of your choice or an imaginary animal.
- Use the texture palette to make its fur, feathers, scales or skin.
- Draw the environment of the animal, its surroundings.
• TRANSPARENCY
A stained glass window is an artwork made with colored glass. The transparency of the glass lets the light change the picture all day long.
- Use the color palette and transparencies to make a picture.Transparent
colors mix when they are laid on top of other colors. By layering the colors you can get new colors.
- Surround the transparent forms with a stroke that is not transparent,
but opaque. The image resembles a stained glass window.
10
EDUTAINMENT - The Idea Zone
• ANALOG IMAGES
Analog images are free-form pictures made from the inspiration of a word.
Make a figurative or a non-figurative (abstract) image starting from the
word 'fire', 'ocean', 'happiness'...
-Draw spontaneously, without thinking about what it looks like.
• COLLAGE MATERIAL
- With the palettes and tools, find different ways to fill the page.
- Print your productions.
- Use them to make a collage.
- Put it all together with colored construction paper.
• COSTUMES
In every country, traditional costumes are different. Fabrics, colors and
patterns reflect the varied traditions of human beings.
- You can find lots of costume ideas at
http://www.siue.edu/COSTUMES/COSTUME1_INDEX.HTML.
- Create a person dressed in a traditional costume, with different colors and
textures.
- Use transparency to create special effects.
• CURVES
Curves are rounded lines like circles or parts of circles. The painter Henri
Matisse was an expert at curves.
- The works of Matisse are on view at http://www.musee-matisse-nice.org/.
- Use different tools to create an image composed of curved lines and
rounded forms.
• MAIL ART
Mail Art is a more recent artistic genre. In Mail Art you produce messageworks that mix painting and writing.
- Visit this site dedicated to Mail Art : http://www.phi.lu/gallery.html.
- Choose the person you'll send the image to.
- Create a work of Mail Art using the various palettes and tools.
- Send your creation by e-mail.
• PALEOLITHIC PAINTING
Before inventing writing, humans made pictures on the walls of caves. They
used charcoal, ochre, and chalk.
You can see some magnificent paleolithic paintings at
: http://www.culture.fr/culture/arcnat/lascaux/fr/index.html.
- Use the palettes and tools of your choice to show a cave wall. Find a way
to depict the roughness of a wall of stone.
- Outline animals, then add details.
11
EDUCATIONAL FILE
LOPART
a fine arts application for everyone
LopArt's designers wished to develop a creative graphical tool for young children, one that would engage
similar actions to those used in the traditional visual arts. They thus opted for functions that solicit the
same gestures and render in a similar way to materials used in drawing and painting. Offering a palette of
27 different textures and a range of seven halftones that may be mixed, LopArt also allows the creation of
entirely new materials. Testing of LopArt with different age groups has demonstrated the enthusiasm
aroused not just in children from five to twelve years of age, but also in adolescents and adults.
The youngest will find in LopArt an easy-to-use graphic arts application. No need to know how to read to
use LopArt. The range of tools provided does not include automatic fills, cut-and-paste, or geometric
primitives, things which bring a mechanical rigidity to many of the images made these days on computers
by children. Young children thus play at LopArt, enchanted by the interactivity of the software. In front of
the screen, without realizing it, they exploit the elements of visual language. The animation functions,
which allow the reenactment of the creative process by drawing the colors and strokes in the order of execution, as well as the possibility of sending images by e-mail, are features they really 'get into'.
Older users find that the animation functions make it easy to make short animated movies. The idea of the
moving image becomes clear in the eyes of its creators. Different playback speeds, loops and sequences
challenge them to find solutions to express their ideas. The ease of execution of animated drawings offered
by LopArt lets their imagination take flight. LopArt also makes it easy to create textured backgrounds for
Web pages.
LopArt thus complements a traditional artistic education. For budding artists in day-cares, primary and
secondary schools and beyond, it will become one of their favourite creative tools.
LOPART
an ideal creative software for child-minders
Workers at child-care services equipped with computers will be charmed by LopArt. Its ease of use lets children from four to twelve years old create images on their own and send them to their loved ones or to the
LopArt virtual Museum. In the context of workshops, it enables playful and educational activities that may
be pursued freely or by following specific cues. Saving the images in the portfolio makes it easy to show
parents their children's work.
LopArt provides hours of calm and creative play that truly engages a child. It also permits the production
of pictures without the usual organization of materials and tedious cleaning up. Graphic arts can now be
an activity for any time of day.
12
EDUCATIONAL FILE
LOPART
a creativity application for primary and secondary schooling
In common with all computerized tools, LopArt accelerates the execution of gestures and enables the undoing of mistakes. The computer can be used to rapidly verify one’s ideas and to try out various possibilities.
Those who fear their clumsiness need not worry: nothing is unrepairable! Employing these features enables
us to propose explorations that, with traditional materials, would be impractical. For example, in half an
hour a child using LopArt can produce three studies of complementary colors, a feat that would take far
longer using ordinary paint. Images created with LopArt can thus be final works or preparatory studies for
a real work. Research, experimentation, exploration and development of one's creative thoughts are particularly well served by LopArt.
LopArt offers relevant tools to support the exploration of the elements of graphic language. The use of the
color palette, for example, will contribute to the understanding of the spectrum and colour mixing. Light
and dark values of the same color may be explored with the transparency tool. One might, for example,
explore with students ways of producing with real materials the effects created using the computer. The
avenues of exploration opened up by LopArt are numerous and varied, limited only by the imagination of
the teachers and their pupils. The animation functions included with LopArt add a unique element to the
appreciation of an image, by allowing the display of all the strokes that make up the picture in the order
of their execution. Critiquing of the students' works is thus enriched by the possibility of watching them
being drawn all over again while commenting on them.
The ability to send pictures by e-mail is a valuable asset for schools participating in exchange programs
and makes possible a variety of communication projects. The LopArt Museum is also a source that can be
mined by educators for ideas to propose to their students, as well as being a space in which to display
works outside the school's walls. Youngsters can open their own individual galleries or show in a group
gallery devoted to a specific project undertaken by one or more groups, or even groups from different
schools.
LopArt is a tool for learning and creation that fits in easily with the approaches envisaged by modern pedagogical approaches. It offers varied means of creation and permits the exploration of different artistic
ideas. LopArt facilitates the retrieval of pupils' images and offers different methods of showing them. But
above all, LopArt is a highly stimulating application for pupils.
In the Play section of the LopArt site, you will find individualized learning activities for your pupils. Some
of them provide links to other sites, allowing them to explore themes, while others are designed to highlight specific functions of the software. New invitations to participate in collective exhibitions are posted
regularly. Classes are encouraged to respond to these invitations and participate in these exhibitions
throughout the year. In the Educators section, we offer lesson plans that can be applied in various classroom situations.
13
PLANNING FOR A LEARNING
AND EVALUATION SITUATION
The lesson plans proposed here are conceived for specific levels but are easily adapted to other student
groups. We suggest you take a look at the summaries for all the activities.
With “Let’s explore LopArt together!“, for the Preschool level, pupils explore the software and share their
discoveries with their classmates. Students of all ages can benefit from participation in these group activities in meaningful contexts, thanks to the numerous creative possibilities the software offers.
The “ Mail Art “ activity revolves around communication; stimuli to creation are proposed and replied to.
Students are invited to reflect on themes that interest them, a reflection that can be carried out by younger
students as well. The list of schools where LopArt software and the LopArt museum are used can be consulted to set up electronic mail art exchanges between teaching institutions.
In the “ Chagall and the animal acrobats “ activity, students are introduced to an artist’s work before being
asked to create their own images, inspired by these works of art. This activity, proposed here for 3rd and
4th grades, can also be carried out with grade 5th of 6th students as well as for the Secondary level.
Do not hesitate to contact us to share your ideas and class experiences with other users of LopArt in a
scholastic environment.
14
Planning for a Learning
and Evaluation Situation
Title : Let’s explore LopArt together!
Level : Preschool
Time needed : Determined by teacher
Summary
The children share their knowledge of computers, and work with an electronic mouse. While reciting a
rhyme, they imitate the movement of the mouse. After a basic demonstration by the teacher, students
are encouraged to explore the LopArt software to make their own images. Each student’s discoveries are
named and written down as the different functions of the software are explored. By naming their discoveries with the help of the teacher, students broaden their vocabulary and build their knowledge together. Finally, the group will open a gallery in the LopArt Museum to post their creations.
Broad area of learning
Media literacy
Introduction to computer tools
Educational aim
Understanding of media communication materials and their use
Axis of development
Provide the students with opportunities to produce images using media communication materials
Cross-curricular competencies
• Using the computer and communication technologies
Evaluation criteria
• Effective use of the computer tool
Competencies
• To perform fine motor actions effectively
• To affirm his/her personality
• To interact harmoniously with others
• To communicate using the resources of language
Evaluation criteria
• Performance of necessary gestures to create an
electronic image
• Pertinent expression of ideas and discoveries
• Participation in the project of exploring the LopArt
software
• Message production
Cultural references
The LopArt Museum site: www.lopart.net
Subject-specific content
Gestures and technique
• Drawing: freehand sketching
Materials
• Mouse or electronic pen
• LopArt visual arts software
Visual arts language
• To be determined by the children’s explorations:
• Names of colours, narrow and thick lines, transparencies, textures, patterns, etc…
Terminology
• Mouse or electronic pen
• Names given to the elements of visual arts language explored by the children
15
Class Activity
Teacher
Preparation
Asks the children questions
about their knowledge of
computers and use of the
mouse.
Students
Share what they
about computers.
Evaluation
know
• Have you ever played
with a computer? What do
you do on a computer?
• Do you know people who
use computers? What kind
of things do they do on the
computer?
• Show students a computer mouse: Do you know
what this tool is? Do you
know what it is called? Do
you know how it is used?
Tell the class that a new
software for making drawings is available to children
at the preschool, and that
before trying it they have to
practise using the mouse.
Guide the children in learning the rhyme and the
accompanying movements.
It is best to practise the
rhyme sitting around a
table, and to rehearse the
movements
with
fists
closed and index finger
pointing outwards to imitate the handling of the
mouse.
Rhyme
I look, both eyes,
In front, away,
I move the mouse
Then make it stay
I click with my finger,
That’s the way!
Instruction
Continues with a demonstration of the basic elements of the LopArt software. The words of the
rhyme will help students
remember.
• Go from the portfolio to
the creative tools (The
Canvas), by selecting the
first white rectangle in the
portfolio.
• Find the template and the
drawing tools.
• Choose a color and start
drawing.
16
Memorize the rhyme and
accompanying movements.
Teacher
Students
Evaluation
(It is not necessary to hold
the mouse button down
with the index finger while
drawing. Instead, click on
the desired colour or tool.
The tool remains active
until you click the button
again.)
• Change color
• Save the image by clicking on the portfolio icon.
• Begin a new creation by
selecting the first white rectangle in the portfolio, then
click on the icon of the
artist’s palette to go back to
the template.
Invites the children to create images with the LopArt
software, exploring the various tools. No one yet
knows all the things that
can be done with the software, so the children will
discover the possibilities
together.
Create images while experimenting with the mouse.
Exploring the
different
functions of the software.
Share their discoveries with
the teacher and their peers.
Execution of the necessary
gestures to create an electronic image.
Helps the children name
their discoveries and write
them down for the next
time the group does the
activity.
Explain their discoveries to
the teacher and memorize
the appropriate vocabulary.
Participation in the project
of exploring the LopArt
software.
Has the class return to the
images they have made.
Supports each student in
the sharing of his/her discoveries. (This activity can
be carried out in several
stages, so as to keep the
children’s attention.)
Present their works to their
peers and name their discoveries, using the appropriate vocabulary.
Pertinent expression of
his/her ideas and discoveries.
Message production.
This exploration activity can
be carried out over several
days. Some children will be
satisfied just experimenting
with the palette, whereas
other children will want to
try all the functions of the
software.
Integration
17
Teacher
Students
Proposes the opening of a
gallery
in the
LopArt
Museum. Visits several
rooms of the Museum with
the children.
Comment on the images
they have seen.
Guides children in choosing
a name for their gallery and
a password.
Propose names for the
gallery and suggest ideas
for a password.
Sends the children’s works
to the gallery.
Prepares, with the children,
an invitation to parents to
visit the group’s gallery on
the LopArt Museum site.
Reinvestment
Suggest sentences for the
message to be written
down by the teacher.
Invites the children to create an electronic postcard
with the LopArt software
and send it to a person they
care for.
Template : Andrée-Caroline Boucher, arts education advisor, Commission scolaire des Patriotes,
Service national du RÉCIT domaines des arts, February, 2002
Activity : Paule Belleau, educational advisor, Loplop/LopArt, September, 2002
18
Evaluation
Planning for a Learning
and Evaluation Situation
Title : Trees
Grade : 1-2 (Elementary)
Time needed : About 3 periods of 45 minutes
Summary
To start with, students are invited to take a few minutes to draw a tree using traditional drawing materials, with no particular specifications. This drawing will be compared with the final product in the integration phase of the activity. Students are then invited to observe the trees in the school’s immediate environment. They discover the different textures of the bark, the various dimensions of the branches, and
the way in which the leaves hide the branches or leave them exposed. They use LopArt to draw the trees,
using the different tools available to them (brushstrokes of different widths, colors, textures, halftones).
Finally, they compare their productions with the tree drawing they did in the beginning of the activity;
viewing reproductions of works of art in which trees are represented, they observe the ways in which the
artists approached the same subject.
Broad area of learning: Environmental awareness and consumer rights and responsibilities
Educational aim: To encourage students to develop an active relationship with their environment while
maintaining a critical attitude towards the exploitation of the environment, technological development and
consumer goods
Axis of development: Awareness of his/her surroundings
Cross-curricular competencies
• To use information
• To use his/her creative mind
• To use information and communication technologies
Subject-specific competencies
• To produce an individual work in the visual arts
• To appreciate works of art
Evaluation criteria
• Selection of pertinent data
• Active participation in the creative process
• Effective use of the computer tools
Evaluation criteria
• Relationship between his/her production and the
stimulus to creation
• Pertinent use of subject-specific vocabulary
Cultural references
Site of the Montreal Museum of Fine Arts
Virtual exhibitions, scenes of autumn
http://www.mbam.qc.ca/lundi/ancien-lundi-23-09-96/lundi1502.html
and all reproductions of related works of art
Connections to other subjects
Natural science
Subject-specific content
Gestures and technique
• Drawing : Freehand drawing
Materials
• Wax crayons, oil pastels or magic markers
• Mouse or electronic pen
• LopArt visual arts software
Visual arts language
• Thin and thick lines
• Textures
Terminology
• Thin and thick lines
• Textures
• Mouse or electronic pen
19
Class Activity
Teacher
Students
Preparation
Invites students to start by
drawing a tree as they normally
would.
He/she
explains that this drawing
will be compared, at the
end of the activity, with the
drawing made with the
LopArt
software,
after
observing trees in the
school’s immediate environment.
Draw a tree with traditional drawing materials (oil
pastels, wax crayons or
magic markers).
Inspiration
Takes students outside to
observe the trees:
• Do these trees look like
the ones you just drew?
• What do you feel when
you touch the bark of a
tree? Is the texture smooth
or rough?
• Is tree bark just one
color? Do you see different
shades of color in the trees
that you are obser-ving ?
• Are the tree branches visible?
• Are the tree branches all
the same size?
• Where do you see the
thinnest branches? The
thickest branches?
• Are all the branches the
same shape ?
• How would you go about
drawing a tree, keeping in
mind all the things you
have observed?
Carefully observe the trees
and describe the colors, the
size of the branches, and
the textures.
Instruction
Development
Propose ideas for the different steps in making the
drawing.
Verification of the pertinence of the LopArt software tools with which the
students have proposed to
draw their trees, based on
their observations.
Asks students to explore
the LopArt software tools,
naming the ones that they
think could be helpful to
them in drawing a tree,
taking account of all the
observations they have
made.
Explore the software to
select
the
appropriate
tools.
Verification of how the students use the tools they
have selected.
Invites students to draw a
tree, or several trees, using
the appropriate tools.
Produce an individual work
of visual art based on the
theme of trees.
Explains to the students
that to find a stroke they
have already used in their
drawing, all they need to do
is to press the shift key and
click on the stroke in question. The software automatically
retrieves the
parameters.
20
Evaluation
Teacher
Integration
Focus
Asks students to compare
the two drawings they have
made on the theme of
trees.
• What differences do you
see between your two
drawings?
• Which of the two drawings looks more like the
trees you have observed ?
• Do you think it is possible
to draw a tree the way you
have done with LopArt, but
this
time
using
wax
crayons, magic markers or
oil pastels?
• Did the tree observation
activity help you to find
new ways to draw trees?
• Did you find it easy or difficult to make the change
to drawing trees based on
your observations?
Presents reproductions of
art works in which trees are
represented. (Site of the
Montreal Museum of Fine
Arts or all other pertinent
reproductions).
Students
Compare the differences
between their two pictures.
Make connections between
their
observations and
their drawings.
Anticipate the ways in
which they can repeat the
same exercise using traditional materials.
Evaluation of student’s
pertinent use of
specialized vocabulary: thin
and thick lines, textures,
mouse or electronic pen.
Evaluate their creative procedure.
Evaluate the degree of difficulty experienced during
the activity.
Observe works of art and
voice their opinions.
• What did these artists do
to represent trees in a realistic way?
• Are the trees you see in
these art reproductions all
alike? How do they differ
from one another?
• In the future, do you
think you will be able to
draw trees in different
ways?
Reinvestment
Evaluation
Evaluation, in later activities, of how this activity
has affected the student’s
repertory
of
drawing
strategies.
Draw an imaginary tree,
playing
with
different
shapes and colors.
Draw a tree using traditional materials.
Observe an assortment of
gourds in order to draw
them
Template : Andrée-Caroline Boucher, arts education advisor, Commission scolaire des Patriotes,
Service national du RÉCIT domaines des arts, February, 2002
Activity : Paule Belleau, educational advisor, Loplop/LopArt, September, 20
21
Planning for a Learning
and Evaluation Situation
Title: Chagall and the animal acrobats
Grade(s): 3-4 (Elementary)
Time needed: 4 periods of 60 minutes (minimum)
Summary
After a visit to the Chagall exhibit at the Musée d’art de Mont-Saint-Hilaire and/or a research assignment
about the painter, students draw an animal acrobat flying in the sky. They use the LopArt software to
produce their drawings. All drawings are mounted in Power Point with the goal of creating an installationslide show (“diaporama“).
Broad area of learning: Environmental awareness and consumer rights and responsibilities
Educational aim: To encourage students to develop an active relationship with their environment while
maintaining a critical attitude towards the exploitation of the environment
Axes of development: Awareness of his/her surroundings: sensitivity to natural and human environment; understanding of certain characteristics and phenomena of his/her milieu
Cross-curricular competencies
• To use ICTs
• To use information
Subject-specific competencies
• To produce individual works in the visual arts
• To appreciate works of art
Evaluation criteria
• Effective use of computer tools
• Acquisition of ICT related terminology
• Consultation of varied sources
• Selection of pertinent data
Evaluation criteria
• Relationship between his/her production and the
stimulus for creation
• Pertinent use of spontaneous transforming gestures and visual arts language
• Pertinent elements in his/her description of the
creative experience
Cultural references
(visual repertory) Marc Chagall, his life and works
Connections to related subjects
English: Oral or written presentation of an animal acrobat. This activity could take several different
forms: a game, web riddle, calligramme, rebus, invitation card, pamphlet, interactive postcard, or animation in hyper studio.
ICT: Use of the computer (LopArt software http://www.lopart.net, mouse, electronic pen) to produce a
work of visual art.
Essential knowledge
Gestures, techniques and materials
• Freehand drawing virtual style, using the computer
Tools
• LopArt visual arts software
• Mouse or electronic pen
Visual arts language
• Textures and patterns
Vocabulary
• Textures and patterns
• Electronic pen
22
Class Activity
Teacher
Preparation
Presents different works of Chagall in
which animals are
featured.
Organizes internet image-search
work groups. Each group is required
to select a work of its choice.
See these internet sites:
• Google : http://images.google.ca
• Marc Chagall online:
http://www.artprintcollection.com/c
hagall_marc_1.html
• Presents the Clic Art internet site.
h t t p : / / n t a p o. c s v d c . q c . c a : 5 9 1 / c l icart/
• Leads an exchange and
brainstorming about the stimulus to creation.
• Outlines the educational aim.
• Outlines the evaluation criteria and
invites students to suggest others.
Instruction
• Invites students to do basic exercises and sketches, to do experiments and make choices.
Students
Inspiration
• Discusses his/her knowledge of different painters, including Chagall.
• Looks for information on the internet.
• Shares found information with
classmates.
• Observes digital reproductions of
the works.
• Consults the various documents
contributed by peers and the teacher.
• Writes notes on the characteristics
of his/her painted work.
Evaluation
• Verification of student’s understanding of evaluation criteria.
• Explores the Clic Art internet site.
• Becomes familiar with the various
steps of a creative process.
• Makes adjustments when necessary.
Development
• Does exploration exercises and
makes sketches using the electronic
pen and the LopArt software.
1. Makes six different shapes and fills
them in with six different textures.
• Verification of the effective use of
the computer tools with an observation or self-evaluation sheet.
2. Makes an animal sketch with a contoured outline.
• Makes his/her final drawing,
inspired by the following stimulus to
creation: an animal-acrobat with the
ability to fly!
• Verification of the pertinent use of
spontaneous, precise transforming
gestures, the pertinent use of visual
arts language, the making of connections between the art work or product
and the student’s feelings
about it, with a self-evaluation
sheet.
• Invites students to create their
final product; draws special attention
to the dominant colors in the works
of Chagall, the colored surfaces in
superimposition, the strange and
unusual elements.
• Verification of written notes in student’s sketchbook, to ascertain
understanding of the elements of the
lesson.
23
Teacher
• Invites students to carefully
observe their own creations, ask
themselves questions about the
result: whether it corresponds to
their original idea and finally, if the
work is really finished.
• Invites students to share their creative experiences.
Students
Focus
• Focuses his/her production on a frequent basis throughout the creative
process, alone or with classmates, to
make adjustments if necessary.
• Talks about what he/she has
learned, the steps of his/her process,
and the difficulties encountered.
• Shares his/her good moves, successes, things he/she is proud of.
• Exchanges with the others about
his/ her choice of animal and about
the choices of classmates.
• Sends his/her drawing to Clic Art
h t t p : / / n t a p o. c s v d c . q c . c a : 5 9 1 / c l icart/default.htm
and to LopArt.net http://lopart.net
Reinvestment
Integration
• What is a texture?
• What is a superimposition?
• What is the difference between
opaque and transparent?
• Draws circus characters: jugglers,
acrobats, etc.
• Creates an illustrated book of poetry about a magic circus.
• Creates a media image to announce
the arrival of an imaginary circus.
• Creates a deck of cards, a calendar,
a computer screen background with
his/her drawings.
Template : Andrée-Caroline Boucher, arts education advisor, Commission scolaire des Patriotes,
Service national du RÉCIT domaines des arts, February, 2002
Activity : Louise Nadeau, Teacher, Commission scolaire des Patriotes.
24
Evaluation
• Verification of student’s motivations for his/her decisions in the
appreciation phase, and his/her pertinent use of subject-specific vocabulary, in oral or written form.
Planning for a Learning
and Evaluation Situation
Title: Tribute to Jean-Paul Riopelle
Grade(s): 3-4 (Elementary)
Time needed: Two periods of 45 minutes
Summary:
Students are introduced to the artistic production of Jean-Paul Riopelle, an artist who was especially interested in exploring the textures and reliefs of paint. Students try out the LopArt software tools to invent
new paint textures and effects. After sharing the results of their explorations, they create an abstract
image. Students then proceed to a visual arts appreciation activity, discussing the varied interpretations
that abstract art works allow for.
Broad area of learning : Citizenship and community life
Educational aim :To ensure that students take part in the democratic life of the class, develop a spirit
of openness to the world and respect for diversity
Axis of development: Participation in class activity in a spirit of cooperation and solidarity
Cross-curricular competencies
• Use his/her creative mind
• Use information and communication technologies
• Cooperate
Subject-specific competencies
• Produce individual works in the visual arts
• Appreciate works of art
Evaluation criteria
• Diversity of creative possibilities listed
• Effective use of computer tools
• Attitudes and behaviours adopted
Evaluation criteria
• Relationship between his/her production and the
stimulus for creation
• Making connections between the art work or production and what he/she felt
Cultural references
Works of Jean-Paul Riopelle
http://www.peinturequebec.com/peinture4/francais/histo/artistes/riopelle/riopelle_p.html
Related subjects
History, geography, citizenship education (history of modern Quebec)
Subject-specific content
Gestures and technique
• Freehand drawing.
• Applying a coloured pigment in flat and varied
brushstrokes
Materials
• LopArt visual arts software
• Mouse or electronic pen
Visual arts language
• Textures
• Light and dark values
Terminology
• Abstraction
• Textures
• Light and dark values
• Mouse or electronic pen
25
Class Activity
Teacher
Preparation
Presents to the students
abstract works by JeanPaul Riopelle, emphasizing
the goals of the Automatist
movement, which sought to
transmit sensations rather
than represent reality. The
spontaneous gesture, creation of textures with paint,
and movement are
key
characteristics of the works
of this group of artists.
• What do you feel when
you look at Riopelle’s
images? Why do you feel
that way?
• When Riopelle presented
his abstract works of art for
the first time, what do you
think were the reactions of
people who were used to
seeing paintings that represent reality?
• If you touched the paintings of Riopelle, do you
think the surface would
have a smooth texture or a
bumpy one?
• Do you think Riopelle
decided in advance what
kind of painting he was
going to paint ?
• Do you think it would be
enjoyable to paint abstract
works of art in the way
Riopelle did, that is, “gesturally“ and spontaneously?
Inspiration
26
* It is foreseeable that not
all students will like the
works of Riopelle. Some will
think his paintings look like
scribbles. Mention to students that it is not necessary to like an artist’s work
to be interested in his/her
creative process, and that
the activity to follow the
appreciation activity, in
which they will produce
their
own spontaneous
work of art, is well worth
trying.
Students
Observe the works of
Riopelle, voice their
opinions, ask the teacher
questions.
Evaluation
Teacher
Instruction
Inspiration
Invite the students to do an
exercise in exploration with
the LopArt software tools,
to discover new paint
reliefs and effects. The textures and halftones can be
combined to create new
and original paint effects.
The blending tool in the box
at the bottom of the
halftone section can also be
used with different textures
to produce different sorts of
paint effects. The transparencies allow users to
play with the light and dark
values of the colors.
Invite students to get into
groups of three or four to
show each other the results
of
their
explorations.
Remind students of the
attitudes to be adopted in
order for this exhange to
proceed in a harmonious
fashion.
Presents the instructions
for the activity:
• Create an image, putting
the emphasis on the material.
• Work in a spontaneous
fashion without trying to
represent something specific.
Students
Explore the software tools
to produce new and original
paint effects.
Save their exercises in the
software’s portfolio and
memorize the procedures
used so as to be able to
explain them to their classmates and reinvest them in
their creation.
Present their explorations
Evaluation
Assessment of the quantity and variety of stimuli for
creation developed by the
students over the course
of the exercise.
to the members of their
group, explaining what they
did to obtain different sorts
of
effects. Listen to the
presentations of the others,
ask questions and take
notes whenever necessary
to help them remember
procedures they would like
to use in their own productions.
Proceed to the production
phase.
Following this exchange
the teacher guides students to assess themselves on how well they
cooperated.
27
Teacher
Integration
Focus
Reinvestment
Returns to the creations
produced by the students :
• While you were doing this
activity, did you discover
some interesting paint textures?
• Did you find it difficult to
create an image without
trying to represent something in particular?
• Were you able to make
use of the exercises of your
classmates to create your
image?
• Can you think of a word
to describe your creation? A
sensation, an emotion, an
impression?
• Can you think of a word
to describe the images your
classmates have made?
• Does everyone interpret
creations in the same way?
Would all of us use the
same word to describe the
same creation?
Guide the students towards
the awareness that their
creations can be interpreted in a variety of ways,
depending on the experience of the individual.
• Did you like this experience?
• Are you satisfied with
your creations ? Why ?
Students
Answer the teacher’s ques tions, voice their opinions.
Perform the same activity
with traditional materials
in a large format.
Visit an exhibition of works
done by the members of
the Automatist movement.
Reinvest the exploration of
surfaces that can be created with paint by doing a figurative painting.
Template : Andrée-Caroline Boucher, arts education advisor, Commission scolaire des Patriotes,
Service national du RÉCIT domaines des arts, February, 2002
Activity : Paule Belleau, educational advisor, Loplop/LopArt, September, 2002
28
Evaluation
Students fill out selfassessment sheets on
their work.
• I made a work of nonfigurative visual art
+
+ or • I used different materials
created with the software
to create my image
+
+ or • I am satisfied with my
image
+
+ or • If I had to make another
creation of this kind, this is
what I would change in the
way I do it :
_____________________
_____________________
_____________________
_____________________
_____________________
Planning for a Learning
and Evaluation Situation
Title: My name in animation
Grade: 3-4 (Elementary)
Time needed: Approximately 2 periods of 45 minutes
Summary
Students are invited to use the LopArt software looped animation function to put their name in animation. They explore the software tools to find the brushstrokes they like best and use them to create the
animation. The students will then present their creations to one another.
Broad area of learning : Personal and career planning
Educational aim: To enable students to undertake and complete projects that develop their potential
and help them integrate into society
Axis of development: Awareness of self, of one’s potential and modes of self-actualization
Cross-curricular competencies
• Putting your creative mind to work
Subject-specific competencies
• Produce an individual work in the visual arts
• Appreciate personal productions and those of
others
Evaluation criteria
• Grasp of the elements of the lesson
Evaluation criteria
• Relationship between his/her production and the
stimulus for creation
Disciplinary content
Gestures and technique
• Freehand drawing
Materials
• LopArt visual arts software
• Mouse or electronic pen
Visual arts language
• Light and dark values
• Superimposition
• Repetition and alternance
Terminology
• Light and dark values
• Superimposition
• Repetition and alternance
Teacher’s preparation
Prepares in advance an example of a simple form that is made to flicker with the LopArt software.
1. Prepare a single-colour background, and using the brushstroke, apply colour in a continuous, uninterrupted gesture to ensure the animation flows smoothly.
2. Draw a simple shape and superimpose several contrasting colours.
3. Save the image by clicking on the portfolio.
4. Return to the image and activate the looped animation.
29
Class Activity
Teacher
Preparation
Development
Inspiration
30
The teacher presents
animation he/she has
pared and asks the
dents to guess how it
done.
Students
the
prestuwas
Students voice their theories, try them out, look for
the solution to the problem.
The teacher explains the
procedure, telling the students about the principles
for putting an image into
movement. Next
he/she
invites the students to
explore the animation of a
simple form
(a simple
brushstroke or a circle).
They will be able to check
the effects of different
superimposed
textures,
and explore light and dark
values to obtain contrasts
that give the impression
that the form is flickering.
They can vary the speed of
the looped animation to
choose the one that produces the most interesting
effect. The goal of the exercise is to select the colours
that most correspond to
his/her personality, using
these colours to create a
similar animation with their
first name.
The students explore the
procedure and the LopArt
software tools. They put
textures together
with
colours they like, preparing
to make an animation with
their name.
Leads the students in sharing their exercises. Half
the group can move around
the laboratory while the
others present their exercises to their classmates,
activating the looped animation function. While
doing this, they can slow
down their speed in order
to demonstrate the different steps in the process.
Observe the exercises of
their peers and ask them
about the tools they used.
Present their own exercises
to their peers and explain
how they did them.
Invites the students to proceed with their creation:
the animation of their first
name.
The
animation
should bring out features of
each student’s personality
through colour choice, patterns or textures that will
help present his/her to the
others.
Proceed to the production
of their animation.
Evaluation
Teacher
Integration
Focus
Proceeds with the integration activity by asking students to take turns presenting their animations
and explaining the choices
they have made.
Students
Present their animations
and appreciate the productions of their peers.
Evaluation
Verification of the connection between the initial
stimulus to creation and
the students’ works.
• Are you satisfied with
your animation ?
• How does this animation
reflect your tastes or your
personality?
Reinvestment
Find the way to make
shapes move with the
LopArt software.
Template : Andrée-Caroline Boucher, arts education advisor, Commission scolaire des Patriotes,
Service national du RÉCIT domaines des arts, February, 2002
Activity : Paule Belleau, educational advisor, Loplop/LopArt, September, 2002
31
Planning for a Learning
and Evaluation Situation
Title: Mail Art projects
Level: Secondary
Time needed: According to project
Summary :
Students are introduced to Mail Art through information and images presented by the teacher. They are
then invited to develop stimuli for creation with the aim of involving their classmates in a mail art project. Using the LopArt software, each student creates an image based on his/her stimulus for creation,
and chooses another project in which to participate. The various projects are shared then transmitted.
As the programme has not yet been developed for classes at the secondary school level, the author has
taken the liberty of using the components and competency-based approach of the Education Program for
Elementary School students. This learning activity can be adapted to all levels of secondary school,
although contents of the Art and Society unit particularly concern the curriculum for Grade 11/12
Broad Areas of Learning: Community life and citizenship
Educational aim: To help students develop a spirit of openness to the world and a respect for diversity
Axis of development : Participation in class activity in a spirit of cooperation and solidarity
Cross-curricular competencies
• Put the creative mind to work
• Cooperate
Subject-specific competencies
• To produce individual works in the visual arts
• To appreciate his/her own works and those of
others
Evaluation criteria
• Comprehend the main elements of the lesson
• Participate in a group activity
Evaluation criteria
• Relationship between his/her production and the
stimulus for creation
• Pertinent elements in the description of his/her
appreciation experience
Cultural references:
Mail Art : http://www.phi.lu/postcards.html
Electronic Museum of Mail Art : http://www.actlab.utexas.edu/emma/
Subject-specific content
Gestures and technique
• Freehand sketch
32
Materials
• LopArt visual arts software
• Mouse or electronic pen
Class Activity
Teacher
Preparation
Inspiration
The teacher presents works
of Mail Art to the students
(ref. galleries on internet
sites suggested above:
http://www.phi.lu/postcards.html
Students
Evaluation
Students
observe
and
comment upon works of
Mail Art presented by the
teacher, acquire information about this art form and
reply to questions.
The teacher highlights the
following elements by presenting images.
Mail Art is above all a medium of exchange whereby
stimuli for creation are
transmitted
to,
and
received from others: you
send your images and
receive the images of
others.
The creators of Mail Art
often combine image and
text.
Can you think of situations
that could be compared to
the exchange of Mail Art ?
(Exchanges
of
gifts
between clans of native
communities on the West
Coast, for example, or
exchanging presents at
Christmas, etc.).
Have
you
ever
been
involved in a project in
which you replied to a stimulus for creation with a
creative work of your own?
(Drawing contests, correspondence for school,
“pen pals“, chat groups,
etc., can be compared and
contrasted with Mail Art as
students accumulate information on the subject).
Mail Art does not go
through
a
selection
progress, as do works that
are shown in galleries or
museums. With mail art, all
participants’ works are
shown. Artists are free of
the rules,regulations and
financial constraints that
apply in conventional exhibition sites such as galleries
and museums. With Mail
Art, anyone can exhibit.
33
Teacher
Envelopes, cards, letters,
packages, postal stamps,
rubber stamps, cancellation
stamps are just a few of
the
objects
explored
through Mail Art.
Students
Evaluation
Can you spot these different objects in the presented images?
Works
are
transmitted
between creators, but can
also be assembled in the
form of art books or exhibited in shows, both virtual
and material.
The stimuli for mail art creations come in all sort of
forms: theme-based invitations to create; collective
images to which contributors add elements, according to a format predetermined by the person who
proposed the idea; projects
with or without a deadline.
Instruction
Development
Integration
Focus
34
The teacher invites students to develop, in groups
of 2 or 3, a stimulus for
creation to be issued to
their class or to other
same-level classes in the
school. This stimulus for
creation must propose a
specific form of transmission: the LopArt internet
site, the school’s site, email, a slide-show (“diaporama”), a collection of
printed images, etc. They
will then use the LopArt
drawing software to develop an image in response to
their own stimulus for creation, and choose another
group’s project in which to
participate. The teacher
must impose a deadline for
finishing images so he/she
can plan the sharing/appreciation activity.
The teacher initiates the
sharing and appreciation
activity, pointing out the
different ways in which students have responded to
the same stimulus to creation.
In groups of 2 or 3, students conduct a brainstorming. They make a list
of possible themes (politics,
humour, etc.). They select
one and write it up. They
must decide upon an idea
that is stimulating enough
to inspire creative responses.
Students orally present
their stimuli for creation to
their peers. The stimuli
must remain accessible to
all, so students can refer
back to them in making
their choices.
Students produce at least
one image per stimulus, for
creation, and respond to
someone else’s idea using
the LopArt software.
Students share and appreciate the productions.
Students write a short text
on one or several works
that they found particularly
interesting, justifying their
choice.
Participation in a group
project.
Comprehension of the key
elements of the lesson.
Relationship
between
his/her production and the
initial stimulus for creation.
Pertinent elements in the
description
of
his/her
appreciation experience.
Teacher
Reinvestment
Students
Evaluation
Proposes a project of mail
art directed to a group of
students at another school,
in another province or
country.
Template : Andrée-Caroline Boucher, arts education advisor, Commission scolaire des Patriotes,
Service national du RÉCIT domaines des arts, February, 2002
Activity : Paule Belleau, educational advisor, Loplop/LopArt, September, 2002
35
36
FEEDBACK
We would appreciate your comments on the LopArt software, as well as short
summaries of the experiences you have had using the software in class.
Please do not hesitate to contact us.
Marie Imbault
Marketing
[email protected]
(T) 514 844-4994
(F) 514 844-3732
4416, St-Laurent suite 301
Montréal, Québec, H2W 1Z5
37
Les produits logiques LopLop inc.
(T) 514 844-4994 - (F) 514 844-3732 - (E) [email protected]
(W) www.lopart.net - www.loplop.com


