1
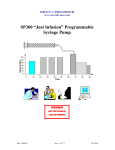
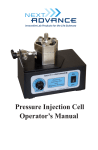
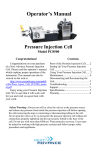
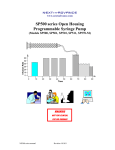
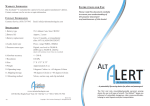
OPERATOR’S MANUAL FOR THE BULLET BLENDER® Operator’s Manual The Bullet Blender® Models: Bullet Blender®; Bullet Blender® Storm; Bullet Blender® Blue and Bullet Blender® Blue 5 Congratulations! Congratulations on your purchase of a Bullet Blender® by Next Advance, Inc., for mixing, lysing, disrupting, and homogenizing your samples. Please read this operator’s manual which explains proper operation of the instrument. This manual is posted on our website, www.nextadvance.com. Click on SUPPORT in the left window and then on the appropriate link to the manual. We’re confident that your Bullet Blender® will become an essential tool in your laboratory and we wish you success with your work. BBmanual_CE_v121111 Contents Parts of the Bullet Blender® ....................... 2 Setup............................................................ 3 Operation..................................................... 3 Protocols and Sample Settings .................... 4 Cleaning ...................................................... 4 Troubleshooting .......................................... 5 Support ........................................................ 5 Specifications .............................................. 6 Warranty...................................................... 6 Warnings and Cautions ............................... 6 Disclaimer ................................................... 7 Contact Info................................................. 8 NEXT >>> ADVANCE 1 OPERATOR’S MANUAL FOR THE BULLET BLENDER® Parts of the Bullet Blender® Cover Gasket Sample Tubes Sample Plate Enclosure Operator Panel NEXT >>> ADVANCE 2 OPERATOR’S MANUAL FOR THE BULLET BLENDER® SYMBOLS USED ON THE BBX AND BBY MODEL BULLET BLENDERS Start Operation Caution: Follow the Instructions in the Operator’ Manual . This product complies with the European Low Voltage and EMC Directives. Please dispose the test tubes and the BBX or BBY Bullet Blender in accordance with local regulations. NEXT >>> ADVANCE 3 OPERATOR’S MANUAL FOR THE BULLET BLENDER® SETUP Place the Bullet Blender® on a stable, level lab bench. Plug the AC power supply cord connector into the AC Input Receptacle on the back of the Bullet Blender® and then insert the plug into a wall outlet. You should see lights on the time setting flash for several seconds, indicating that the unit is receiving power. It is now set up. OPERATION To use your BBX-or BBY- series Bullet Blender® lift open the cover, insert the appropriate tubes, and close the cover. For BBX24 models (BBX24 and BBX24B) place up to 24 closed 1.5mL to 2.0mL polypropylene high quality snap-top (e.g. Eppendorf® Safe-Lock) microcentrifuge tubes containing samples into the sample plate, and close the cover. When using 2.0mL tubes we recommend using at least 2 tubes per homogenization cycle. For the screw-cap BBX24 models (BBX24W and BBX24BW), use 1.5ml conical, polypropylene Corning or Axygen tubes (other tubes may work, but we can not assure good results with them). For the Bullet Blender Storm (BBY24M), use 1.5mL Eppendorf® Safe-Lock tubes. In the Bullet Blender® Blue 5 (BBX5MB), load up to 12 5mL Axygen brand transport tubes. The snap caps on the microcentrifuge tubes must be on securely. The threads on all screw-cap tubes must be dry and the caps must be screwed on very tightly. Do not operate a Bullet Blender® loaded with any empty BBmanual_CE_v121111 tubes, as this may result in breakage of the tubes. If their use is necessary, “blank” tubes should be filled partially with water. For best results, the tubes should be evenly spaced. Set the duration, in minutes, and the speed to the desired value. Push the start button. As each minute passes, another LED will light up. On the BLUE and BBY models, the air cooling will continue for half a minute post-homogenization. Do not operate with the cover open. There will be excess noise, your samples will not be properly processed and the tubes may be knocked entirely out of the instrument potentially causing injury. If you turn the “minutes” knob to “0”, the instrument will stop. Example: The figure above shows the Bullet Blender® set to run for 4 minutes at a speed of 8, after running for 2 minutes. To operate, press the “START” button. After the first minute, the LED light by the number 1 will light up. After the second minute, the second LED light by the number 2 will light up. And so on. At the settings shown above, after 4 minutes, the Bullet Blender® will stop. In the Blue versions, the words “Air Cooling™” will light up in blue during NEXT >>> ADVANCE 4 OPERATOR’S MANUAL FOR THE BULLET BLENDER® operation and for about one half minute afterward as the fan continues to operate. more than 1g of sample, or a total of 3mL of buffer, tissue, and beads (per tube). Note that the Bullet Blender® Storm models have additional time settings for 15 and 30 second pulses. In addition, the Bullet Blender® Storm has additional, more powerful speed setting of 12. Cutting the tissue into smaller pieces will generally yield better results. Tissue with a high aspect ratio (long, thin strips) will homogenize better than tissue that is round or cubic. PROTOCOLS AND SAMPLE SETTINGS The following ratio should be used as a guideline for determining the amount of beads and buffer to use given a certain sample size - 1 volume/mass of tissue : ½ volume of beads : 2 volumes of buffer. For more specific information regarding the use of various beads as well as specific protocol information, please refer to our website www.nextadvance.com. As the tissue amount becomes smaller, the above recommended ratio may differ due to the limitations of handling of the small volumes. With microcentrifuge tubes, we recommend using a minimum of 25L of buffer regardless of your sample size. For the 5mL tubes, we recommend a minimum volume of 100L. With microcentrifuge tubes, the maximum sample mass is 300mg of tissue or 300L of pelleted cell culture per microcentrifuge in the Bullet Blender®, and the tube should not be filled more than two-thirds of the way (this includes sample, beads, and buffer). This is because the mechanics of homogenization require empty space in the tube. For 5mL tubes, do not operate with Do not operate the Bullet Blender® using the same tubes for longer than 15 minutes. Protocols for many types of samples are posted on our website, at www.nextadvance.com/FAQs/protocols.htm. Notes: Use high quality polypropylene snap top tubes, such as Eppendorf® Safe-Lock® microtubes. The Bullet Blender® Blue 5 is designed to work with 5mL Axygen brand tubes only. At high speed settings there may be some flaking of the tubes. This is a normal side effect of homogenization. The higher speed enables homogenization of tougher tissue. CLEANING If you wish to clean your Bullet Blender, clean the outside of the unit only with mild soap water and a soft cloth. Under normal conditions, the Bullet Blender® should never need to be disassembled for cleaning. In the case of a large spill, unplug the instrument, remove the sample tube plate with an 1/8” hex wrench, wipe out the spill using standard laboratory safety precautions, and replace the sample tube plate. Do not touch or tamper with the electronics. NEXT >>> ADVANCE 5 OPERATOR’S MANUAL FOR THE BULLET BLENDER® TROUBLESHOOTING SPECIFICATIONS In addition to the tips given below, a thorough list of troubleshooting tips is at http://www.nextadvance.com/FAQs/FAQsBullet_Blender.htm. Size: 23 cm (9 in.) deep x 20 cm (8 in.) wide x 22 cm (8.5 in.) high. If the Bullet Blender doesn’t start, the plug of the power supply cord might not be in a live wall outlet or the power supply connector might not be fully inserted in the AC Input Receptacle of the Bullet Blender®. Power Requirement: BBX24, BBX24W, BBX24B and BBX24BW models: 24 VDC, 0.75 Amp For Bullet Blender® 5 units, Make sure the Power Switch is in the ON (I) position. If the unit stops working, turn the system off for 15 minutes to allow the electronics to reset. If the Bullet Blender® does not turn on after this period, contact customer service. If the caps on the microcentrifuge tubes pop open or the caps on 5 mL tubes loosen, make sure that the interface regions or screw threads between the lids and the caps is dry when you close the caps or screw them on, so that there is enough friction for the caps to remain tight. Using recommended types of tubes will minimize cap failure. SUPPORT FAQs, protocols, and other helpful information is available on our website, http://www.nextadvance.com. Click on the Bullet Blender, then on the appropriate link. If you cannot find an answer there, please contact customer service by email at [email protected] or by telephone at 1.518.674.3510 or (800) 738-1681. Weight: 4 to 5 kg (8.5 to 11 lbs.), depending upon model. BBY24M and BBX5MB models: 24 VDC, 2.5 Amp Capacity: 24 of 1.5 - 2.0mL poly-propylene high quality (e.g. Eppendorf) sample tubes, 24 of 1.5 Axygen brand 1.5mL conical screw cap tubes or 12 of 5mL Axygen brand 5ml transport tubes, depending upon model. Relative Humidity: 5 - 90% non-condensing Operating Temperature: 4 - 40°C Altitude: <2000m Storage Temperature: -40 to 50°C Meets requirements (-CE models only). WARRANTY Next Advance warrants its Products against defects in materials and workmanship for time periods which vary according to the Product. Within these time periods, Next Advance will replace or repair, without charge to the original purchaser, any part which is defective. Bullet Blender Two years The warranty is void if the Product is defective due to product accident, product NEXT >>> ADVANCE 6 OPERATOR’S MANUAL FOR THE BULLET BLENDER® modification, exposure to radiation other than for sterilization, connection to an improper electrical supply, lack of proper maintenance, contamination, improper installation or misuse. If the product is used in a manner not specified by the manufacturer, the protection provided by the equipment may be impaired. The warranty shall also not apply to defects arising from fire, flood, lightning or other conditions unrelated to correct operation of the Product. Operator’s Responsibility Next Advance’s liability is limited, at the company’s election, to (1) refund of the original purchaser’s purchase price for the Product (2) repair of the Product, or (3) replacement of the Product or defective parts. Evidence of purchase by the original purchaser is required. Next Advance may also request documentation of proper maintenance, if applicable. Do not insert fingers or objects other than recommended tubes into sample tube holes. Provide proof of purchase and provide normal care and maintenance. WARNINGS AND CAUTIONS Read the user’s manual before operating. Do not operate Bullet Blender® 5 units with fewer than 3 tubes. Do not operate Bullet Blender® units with empty tubes. Do not open lid when Bullet Blender® is in use. Use caution when closing Bullet Blender® lid- do not close on fingers. Use recommended tubes only. No user serviceable parts are inside. For indoor use only. Pollution Degree 2 per EN 61010-1. Overvoltage Category II per EN 61010-1 Next Advance makes no other warranty, express or implied, with respect to its Products. NEXT ADVANCE MAKES NO WARRANTY RESPECTING THE MERCHANTABILITY OF THE PRODUCTS OR THEIR SUITABILITY OR FITNESS FOR ANY PARTICULAR PURPOSE OR USE. Next Advance shall not be liable for, indirect, special, incidental or consequential damages of any nature. Any recovery for any claim shall be limited to the original purchase price for the product. Enclosure Protection: Not Protected Against the Ingress of Moisture Sound Pressure Level: up to 90dBA for BBX24 models; up to 100dBA for BBY24M and BBX5MB models. Use hearing protective devices that reduce exposure to below 85 dBA during prolonged exposure. Do not immerse in liquid. Before touching the Bullet Blender®, touch a bare metal surface to discharge static electricity. NEXT >>> ADVANCE 7 OPERATOR’S MANUAL FOR THE BULLET BLENDER® DISCLAIMER CONTACT INFO Next Advance, Inc. makes no representations or warranties, expressed, statutory or implied, regarding the fitness or merchantability of this product for any particular purpose. In no event shall Next Advance be liable for incidental or consequential damages. Next Advance, Inc. is not liable for any damages, including but not limited to, lost profits, lost savings, or other incidental or consequential damages arising from ownership or use of this product, or for any delay in the performance of its obligations under the warranty due to causes beyond its control. Next Advance, Inc., Averill Park, NY, USA Telephone 518-674-3510 www.nextadvance.com Email: [email protected] [email protected] [email protected] Next Advance, Inc. also reserves the right to make any improvements or modifications to the product described in this manual at any time, without notice of these changes. Next Advance, Inc. products are not designed, intended, or authorized for use in applications or as system components intended to support or sustain human life, as a clinical medical device for humans, or for any application in which the failure of the product could create a situation where personal injury or death may occur. All brand and product names used in this manual are the trademarks of their respective owners. NEXT >>> ADVANCE 8