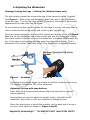
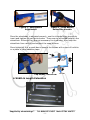
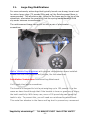
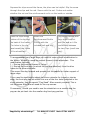
1
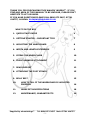
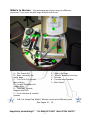
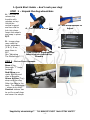
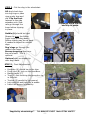
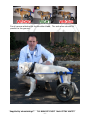
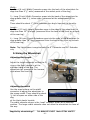
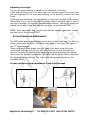
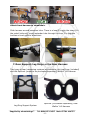
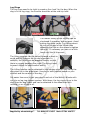
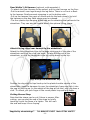
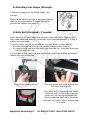
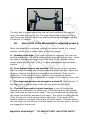
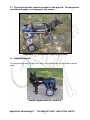
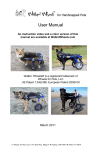
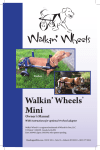
Walkin’ Wheels™ User Manual 2014 WALKIN’ WHEELS® IS A REGISTERED TRADEMARK OF WHEELS FOR PETS, LLC US PATENT 7,549,398. EUROPEAN PATENT 2050418 Available from, and supplied by: wheels4dogs™ Inglewood, Castle Drive Praa Sands, Penzance Cornwall U.K. TR20 9TF Supplied by wheels4dogs™ Tel:0800 072 3697 Mob: 07791414757 Email:[email protected] Website: www.wheels4dogs.co.uk Tel: 0800 072 3697 Mob: 07791 414757 THANK YOU FOR PURCHASING THIS WALKIN’ WHEELS®. IF YOU FIND ANY AREA OF THIS MANUAL TO BE UNCLEAR, PLEASE DON’T HESITATE TO LET US KNOW. IF YOU HAVE QUESTIONS PLEASE CALL 0800 072 3697, 07791 414757, OR EMAIL [email protected] WHAT’S IN THE BOX 3 1. QUICK START GUIDE 4 2. GETTING STARTED – IMPORTANT TIPS 7 3. ADJUSTING THE WHEELCHAIR 8 4. WIDTH AND LENGTH EXTENDERS 9 5. SIZING THE WHEELCHAIR 10 6. FRONT HARNESS ATTACHMENT 11 7. REAR SUPPORT 12 8. ATTACHING THE FOOT STRAPS 15 9. BELLY BELT 15 10. HOW TO TELL IF THE WHEELCHAIR IS ADJUSTED PROPERLY 16 11. LARGE PET MODIFICATIONS 18 12. MAINTENANCE, GUARANTEE ETC. 20 ____________________________________________________________________________ Supplied by wheels4dogs™ Tel: 0800 072 3697 -2- Mob: 07791 414757 What’s in the box – the packaging and layout may be different, especially if you have bought large wheels and struts: A – The Frame Kit B – Rear connector for wider dogs C – Tool kit & Cup screws stop rattling D – Length Extenders for longer dogs E – Tote bag, Manual, Magnet and DVD F – Front Harness & comfort sleeves G – Rear Leg Rings H – Wheels attached to struts J – Stirrups K – Convenience Handles L – Belly Band N.B. the Large Dog Walkin’ Wheels comes with different parts. See Pages 18 - 19 ____________________________________________________________________________ Supplied by wheels4dogs™ Tel: 0800 072 3697 -3- Mob: 07791 414757 1. Quick Start Guide – don’t rush your dog! STEP 1 – Unpack the dog wheelchair. A - Turn dial to release the knuckle with notches on top. Unfold the vertical support and turn dial to lock into place. Insert the wheels and snap in place B/C. D - Longer dogs may need the larger extenders (3 & 4). If so, snap them in B/C. See “Adjusting The Wheelchair”. A - The notches are on TOP B - Use Snap Buttons to Adjust D. C - Use a Pen for Snap Buttons when they are behind the knuckle STEP 2 – Put on Front Harness Base of the Neoprene “T” faces forward. Red Strap goes under the dog and clips to harness. Green or Blue (Top) strap over the dog. Side clips face to the back. Top strap tight – others only snug. Comfort sleeves can be cut for small dogs and cover the straps. ____________________________________________________________________________ Supplied by wheels4dogs™ Tel: 0800 072 3697 -4- Mob: 07791 414757 STEP 3 – Put the dog in the wheelchair. Lift dog’s back legs into leg rings or pass rings under legs and clip. Clip the front harness to the side extender rails. Side rails go through the loops before clipping in place. Straps go OVER top bar and clip to posts. Saddle (A) should be tight. Straps clip over the frame, finger loops pointing down. Rubber tubing may be cut back if needed to adjust for smaller dogs. Dog’s legs go through the rubber tube loops. Excess strapping goes over the pet’s back. This is optional. Optional stay-on straps clip over dog’s back. STEP 5 – Final Adjustments. Knuckles (A) should be on the hips. Front clips (B) high on the shoulders. Back straight (C). Toes (D) just touching the ground or up in Stirrups. Top bar (E) parallel to the ground. Leg rings flat and tight like a saddle. Insert set screws for stability. Proper Fit ____________________________________________________________________________ Supplied by wheels4dogs™ Tel: 0800 072 3697 -5- Mob: 07791 414757 Front harness attaches at the shoulder blade. The side arms should be parallel to the ground ____________________________________________________________________________ Supplied by wheels4dogs™ Tel: 0800 072 3697 -6- Mob: 07791 414757 2. Getting Started – IMPORTANT TIPS We supply the Walkin’ Wheels cart in the hope that you will adjust the wheelchair, put it on your dog, and in a few moments watch him or her running and playing again. It can happen that way, but it doesn’t always. A wheelchair can be a major adjustment for a dog. On the one hand, the frustration of painfully dragging an immobile back end is suddenly gone. Freedom! On the other, there’s a strange device following the dog around; sometimes making odd noises and getting caught on furniture and doorways. Be patient. Be calm, quiet, and slow when putting on the wheelchair for the first time. In fact, every time. Let your dog get used to the sight of the wheelchair and the harnesses before attaching the wheelchair. Leave the wheelchair where our dog can see it and inspect it. Lots of stroking and reassurance is needed here. Treats help, too. Walking Backwards. Dogs use their back legs to move and their front legs to stop. It is normal, therefore, for the dog to push back on the front legs and move backwards. With encouragement, they quickly learn to move by pulling themselves forward with their front legs. Harnesses. It may take a few minutes or a few hours for him or her to get used to the harnesses. Again, start slowly and let them get used of on bit at a time. Keep in control of the dog’s movement at first. Keep the dog in a clear area at first and keep him on a short lead. If the dog does become frightened, then disconnect the harness from the wheelchair and try again later. Little and often. Until your dog gets used to the Walkin’ Wheels, limit the amount of time spent in it. The Walkin’ Wheels is designed to allow your dog to get exercise and physical therapy. Dogs cannot lie down in the wheelchair. Proper Fit If they do not move at all, check for proper fitting. You can email digital pictures of side and rear views to us at [email protected]. We’ll review these and give you some guidance. After the first few uses, check for chafing from the harness. Adjust it if needed. Doing their business Dogs will be able to pee and poop while in the wheelchair. Note: If one side of the wheelchair rides up a wall, steep bank or any other structure it is possible it will roll over. Don’t panic or alarm your dog. Simply right the wheelchair, check everything is fitted and then carry on, taking more time to observe what your dog is doing. Anything will tip over given a steep enough angle. ____________________________________________________________________________ Supplied by wheels4dogs™ Tel: 0800 072 3697 -7- Mob: 07791 414757 3. Adjusting the Wheelchair Opening/Locking the Legs – Folding Flat (Medium frame only) The black plastic pieces that connect the legs to the frame are called “knuckles” (see Figure 1). Dials on the side knuckles (called “dial caps”) can be turned to loosen the legs. Turn the dial caps so that the teeth on the inside of the knuckle separate and you can move the leg freely. Do not unscrew the dial cap all the way off, although if you do, just push down a little to compress the spring inside, and screw the dial cap back on. There are raised markers on the top of the knuckle and the top of the leg (Figure 1a); One on the wheelchair-side of the knuckle and two on the leg-side. Line up the raised marks so that the mark on the wheelchair is between the marks on the leg. In the case of active dogs, you can angle the wheels back further. This is discussed in the section titled “How to tell if the Wheelchair is Adjusted Properly.” Notches (3) on the TOP of the Knuckle Figure 1 - Knuckles Figure 1a Loosening the knuckles allows the wheels to fold flat (medium frame only). The notches indicate the TOP of the wheelchair. Adjusting the size with snap buttons Note: Make sure the set-screws shown below are loosened or removed before adjusting. Snap buttons are used to adjust the height, length, and width of the wheelchair. Push them in with your fingertip to change the size. When the snap button is behind the knuckle, use the back end of a pen or any thin, blunt object to release it (Figure 2 and 3). ____________________________________________________________________________ Supplied by wheels4dogs™ Tel: 0800 072 3697 -8- Mob: 07791 414757 Figure 2 - Snap Button Adjustment Figure 3 - Snap Button behind the knuckle Once the wheelchair is adjusted properly, use the included Allen wrench to insert and tighten the set/grub-screws. There are six set-screw holes on the wheelchair. Although they are not necessary for sturdiness, they keep the wheelchair from rattling and support the snap buttons. Once tightened, it is a good idea to secure the screws with a spot of Locktite or a piece of clear adhesive tape. “Cup Screw” Set Screw 4. Width & Length Extenders ____________________________________________________________________________ Supplied by wheels4dogs™ Tel: 0800 072 3697 -9- Mob: 07791 414757 Width 1 – Short (6 inch) Width Connector snaps into the back of the wheelchair for dogs less than 9 ½” wide (measured at the widest point of the dog). 3 – Long (9 inch) Width Connector snaps into the back of the wheelchair for dogs greater than 9 ½ inches wide (measured at the widest point of the dog). There should be about 1” (2cm) between your dog’s hips and the knuckle. Length 2 – Short (15 inch) Length Extenders snap in the sides of the wheelchair for dogs less than 19” in length (measured from the back of the front leg to back of the rear leg). 4 – Long (26 inch) Length Extenders snap into the sides of the wheelchair for dogs greater than 18” long (measured from the back of the front leg to back of the rear leg). Note: The Large frame is supplied with the 9” Connector and 26” Extender only 5. Sizing the Wheelchair Adjusting the Length. Adjust the length extender so that the D ring on the front harness is at the shoulder blade of the dog. The wheelchair will connect to the harness right above the front leg. Adjusting the width Use the snap buttons on the width connector to adjust the wheelchair to the proper width. There should be about ½ inch of space on either side of the dog at the black plastic knuckle. The width extender shown is the ‘small’ extender shown at its smallest position. The larger width extender does not allow the wheelchair to close all the way. ____________________________________________________________________________ Supplied by wheels4dogs™ Tel: 0800 072 3697 - 10 - Mob: 07791 414757 Adjusting the height The correct height setting is based on the condition of the dog. If the dog has some use of his back legs, then set the height so the toe pads are on the ground. If the paws are scraping on the ground, protect them with boots. If the legs are paralysed, use the stirrups to hold them an inch or two above the ground. If you use the stirrups, you may need to put both legs in, even if one leg is stronger, so that the dog maintains balance. The stirrup should be placed on the dog’s hock and adjusted snug by using the push-lock. NOTE: When taking the dog out of the wheelchair always remember to take the feet out of the stirrups FIRST. 6. Front Harness attachment. The RED strap goes under the dog, at the back of the front legs. The Blue (or Green) strap over the back. The black strap goes to the front. The base of the “T” faces forward. Place the Black & Blue straps over the head, then buckle the red strap underneath the dog and clip into the front harness. It may be helpful to remove the comfort sleeves while adjusting the front harness then replace them once the harness is adjusted. Typically, the top strap is fairly tight and the other two are just snug. The clip should be positioned just over the shoulder blade. Proper positioning and adjustment of the front harness ____________________________________________________________________________ Supplied by wheels4dogs™ Tel: 0800 072 3697 - 11 - Mob: 07791 414757 Attach front harness to wheelchair. Slide harness around extension tube. There is a loop/D ring in the strap. Put the metal (side-rail) length extender tube through the loop. Clip the side buckles on each side to wheelchair. 7. Rear Support: Leg Rings or the Rear Harness Two types of rear harnessing systems are available; the Leg Rings (included) and the Optional (needs to be purchased separately) Walkin’ Lift Harness. Leg Ring Support System Optional (Purchased Separately) Rear Walkin’ Lift Harness ____________________________________________________________________________ Supplied by wheels4dogs™ Tel: 0800 072 3697 - 12 - Mob: 07791 414757 Leg Rings The Leg rings need to be tight to create a firm ‘seat’ for the dog. When the dog is in the leg rings, the knuckle should be at the mid-hip level. The rubber tubing of the leg ring can be shortened if necessary with scissors. Avoid cutting the strap inside. Try cutting about an inch off an end of the rubber then adjusting the clips on the straps to tighten them up. If necessary you can cut a little more until the fit is correct. The Velcro wrapper can be moved forward or back to avoid putting pressure on the dog’s genitals. In addition, the Velcro can be wrapped loosely so that there is a space between the rings. The Velcro must be used. Adjust for best comfort and fit. The Lifting handles can be attached to the harness clips for help lifting the dog when not in the wheelchair. Use one or both handles based on your comfort and the comfort of the dog. It’s easier than ever to get your dog in and out of the Walkin’ Wheels with our clip-on leg ring support system. With these, the leg rings clip on to the dog, then the dog’s back end can be attached to the wheelchair with minimal, or no lifting at all. ____________________________________________________________________________ Supplied by wheels4dogs™ Tel: 0800 072 3697 - 13 - Mob: 07791 414757 Rear Walkin’ Lift Harness (optional, sold separately): -To attach the Rear Harness to the animal, put the rear harness on the floor. -Put the animal’s rear legs through the leg-holes. There is no Front or Back to the harness. Reinforcement strapping is on the bottom side. -Pull up the harness like a pair of shorts and clip the back-strap(s) to hold the harness on the dog. Back straps may be crossed. -The four plastic clips hanging at the side are for attaching the harness to the wheelchair. They can also be used to attach the optional lifting straps. Attach the leg rings/rear harness to the wheelchair Attach the four wheelchair-clips to the pegs sticking out of the side of the wheelchair and click the clips into place. To take the dog out of the wheelchair, un-clip the wheelchair clips by pulling down on the clip. Clip/Unclip the wheelchair clip Position the dog with its hips lined up to the plastic knuckle section of the wheelchair. Loop the harness clip over the wheelchair frame and lock it into the peg by pushing up (or the weight of the dog will do this) until you hear a click. To unlock, put your finger in the round plastic loop and pull down. Cutting Excess Strap Note that the straps can be cut if there is excess. After cutting, you can seal the end of the strap by briefly touching it with the flame of a lighter. This will melt the end and keep it from fraying. ____________________________________________________________________________ Supplied by wheels4dogs™ Tel: 0800 072 3697 - 14 - Mob: 07791 414757 8. Attaching foot straps (Stirrups) If feet are dragging or knuckling under, use stirrups. Place the animal’s hind legs in the foot straps so that the foot rests about 2 inches above the ground and tighten to a snug fit. 9. Belly Belt (included), if needed Some animals will need additional support under their belly. You can tell if they need additional support if the dog’s spine bows downward, or if dog is elderly or overweight. To put the belly belt on the wheelchair you can either (photos below). a) place the side rail through the looped opening in the strap or b) undo the clip and loop the strap over the side rail, then feed the strap back through the clip The purpose of the rope is to prevent the belly belt from sliding backwards toward the rear of the dog. Loop strap inside side rail Clip and secure with cord to keep the belt from sliding back. Your Belly Belt is equipped with Velcro (Photo to Left) on one side. Loop the strap over the railing and attach the Velcro under the dog’s belly. A rubber band can be used to secure excess strap if needed. ____________________________________________________________________________ Supplied by wheels4dogs™ Tel: 0800 072 3697 - 15 - Mob: 07791 414757 The belly belt is looped around the side rail from the inside, through the rope, then back through the clip. The rope looped around the front clip is used to prevent the belly strap from sliding backwards underneath the dog. Cut and tie it if desired. 10. How to tell if the Wheelchair is adjusted properly When the wheelchair is adjusted properly, the animal stands in a ‘natural’ position. Here’s what to check. Refer to the figure below. A – Knuckle at the hips. If you were to draw an imaginary line from one knuckle to the other, the line would pass right through the dog’s hips… where the bone of the leg meets the bones of the body. If not, tighten harness and/or adjust length. Allow ½” to 1” on each side between dog and black knuckle. B – Front Support loop at the shoulder. The loop on the front harness that the length extender goes through should be at the shoulder. Adjust the straps so that the loop is held firmly against the shoulder. Then clip into wheelchair. If the loop is too tight, you can cut the plastic tie-wraps. Replacement tie wraps are available at no charge. It will loosen up over time. C – The dogs back needs to be straight or arched UP (slight hunch). If the dog’s back is arched down a little the dog needs the Belly Belt. D – The back legs need to be just touching, or just off the ground, depending on the health of the back legs. If the dog wants to use his back legs, then allow his feet to touch lightly. This can be adjusted by tightening the straps that hold the harness to the frame – this brings the dog’s seat up. (Take the dog out of the harness before adjusting.) If the height of the harness cannot be changed, then adjust the wheel height. Consider boots if the feet drag. Use the stirrups if the dog cannot use his back legs or the feet are dragging on the ground. ____________________________________________________________________________ Supplied by wheels4dogs™ Tel: 0800 072 3697 - 16 - Mob: 07791 414757 E – The horizontal bar must be parallel to the ground. The dogs back should be straight, not dipping in the centre. Ridgeback in a wheelchair needs a Belly Belt G – Adjusted wheels For active dogs with strong front legs, the wheels can be adjusted to angle back. Wheels angled back for stability ____________________________________________________________________________ Supplied by wheels4dogs™ Tel: 0800 072 3697 - 17 - Mob: 07791 414757 11. Large Dog Modifications For some extremely active dogs that typically bound over bumpy terrain and for active heavy dogs (70 pounds/30kg and up) the Reinforcement Brace is recommended. This aluminium bar, bolted to the frame and to the leg of the wheelchair, eliminates the possibility that the spring-loaded knuckle could slip under extreme circumstances. The reinforcement brace can be put on with a pair of pliers and a screwdriver. Walkin' Wheels Dog Wheelchair with optional reinforcement brace installed. Please note the brace supplied will be blue, like the wheelchair. Installation Instructions Reinforced Leg Attachment You’ll need pliers and a screwdriver. The knuckle is designed to hold a pet weighing up to 150 pounds. In a few cases we have found though that if the knuckle is loose or goes over a bump, the teeth could slip. With heavy use, even a 100 pound dog can cause the teeth to slip. To prevent this, you will need our reinforced leg attachment. This metal bar attaches to the frame and leg strut to prevent any movement. ____________________________________________________________________________ Supplied by wheels4dogs™ Tel: 0800 072 3697 - 18 - Mob: 07791 414757 Squeeze the clips around the frame, the pliers can be helpful. Slip the screw through the clips and the rod. Secure with the nut. It does not matter whether the nut and the reinforcement rod is on the inside or outside. Place the clips on the Attach the The Reinforcement Rod bottom of the leg and Reinforcement Rod to has a slight bend at the back of the frame. the clip with the each the end so it fits The holes in the clip included bolt and nut. comfortably between face toward the inside the two Clips (small size of the wheelchair. only). To accommodate very large dogs you need to make a small modification to the Walkin’ Wheels to move the animal forward in the wheelchair. This modification involves: 1 – Moving the knuckle forward 2 inches 2 – Moving the front peg (to which the harness attaches) from the blue frame to the silver extender. This moves the dog forward and spreads out the saddle for better support of larger dogs. If you need to significantly adjust the silver extender for longer or shorter dogs, the front peg can be moved into one of the four holes provided in the silver extender. Use the special “Peg Sized” Allen wrench provided. This is not the same Allen Wrench used for the cup screws. If necessary, should you need to use the wheelchair on a smaller dog the peg can be put back into the smaller dog front peg position. ____________________________________________________________________________ Supplied by wheels4dogs™ Tel: 0800 072 3697 - 19 - Mob: 07791 414757 12. Maintenance, Guarantee, Liability and Returns Maintenance With proper use and maintenance, the wheelchair is designed to last a lifetime. The wheels will wear out, but are easily replaced. If you need replacement parts, they may be purchased from wheels4dogs. In addition, the stickers on the side may fade or develop scratches, but this will not detract from the usefulness or resale value of the wheelchair. The wheelchair will not rust, you can hose it off. If dirt or sand gets inside the wheelchair, all components can be removed and cleaned. Oiling is not necessary. The snap buttons that hold the railings in place could, with a great deal of use, become bent. These are also easily replaced. Guarantee The Walkin’ Wheels frame is guaranteed by the manufacturer, Wheels for Pets, LLC, for one year from the date of purchase against defects in materials or workmanship, subject to the wheelchair having been correctly assembled and adjusted and having had reasonable usage and care. The soft parts i.e. harnesses are guaranteed for three months. Should your wheelchair need service, please contact wheels4dogs to arrange a return. You may be asked to ship the wheelchair back to be serviced at our discretion. You may be asked to pay shipping charges. Limited Liability Walkin’ Wheels is provided as a walking aid for animals that are under the care of a veterinarian and for which a dog wheelchair has been recommended. Wheels4dogs, Wheels for Pets, LLC, and its affiliates, agents, and distributors make no representation as to the effectiveness or appropriateness of this product. Return Policy Please see the website for the return policy. Note that all returns must be authorised. Please [email protected]. ____________________________________________________________________________ Supplied by wheels4dogs™ Tel: 0800 072 3697 - 20 - Mob: 07791 414757