1
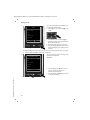
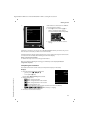
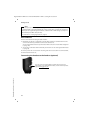
Gigaset C530IP / IM-Nord en / A31008-M2506-R201-1-PG19 / web-conf.fm / 06.03.2014
Configuring the phone via the Web configurator
Deleting handset directories and downloading to/from the PC
The functions to edit the directories are on the web page:
Settings ¤ Directories ¤ Directory Transfer
The Web configurator has the following options for editing the directories of the registered
handsets.
u Store the directories on a PC. Entries are stored in vCard format in a vcf file on the PC. You can
download these files onto every registered handset. You can also copy phonebook entries to
your PC address book.
u Copy contact details from your PC address book to handset directories. Export the contacts
in vcf files (vCards) and transfer them to directories of the handsets with the Web
configurator.
u Delete the phonebook on the handset.
If you have edited the phonebook file (vcf file) on the PC and would like to load this modified
phonebook to the handset, you can delete the current phonebook on the handset before the
transfer.
Tip: Back up the current phonebook on your PC before deleting it. You can then reload it if
the modified phonebook is affected by formatting errors and some, or all, of it cannot be
loaded onto the handset.
Notes
u You can find information on vCard format (vcf ) on the Internet, e.g. at:
www.en.wikipedia.org/wiki/VCard (English)
www.de.wikipedia.org/wiki/VCard (German)
(You can set the display language at the bottom left side in the navigation area of the
web page)
u If you wish to copy a phonebook (vcf file) with multiple entries stored on the PC to the
Microsoft Outlook™ address book, please note the following:
Microsoft Outlook™ only ever transfers the first (directory) entry from the vcf file to its
address book.
Transfer rules
Template Borneo, Version 1, 21.06.2012
The phonebook entries from a vcf file that are loaded onto the handset will be added to the
directory. If an entry already exists for a name, it will either be supplemented or a new entry for
the name will be created. The process will not overwrite or delete any phone numbers.
Note
Depending on your device type, up to three entries with the same name are created in the
directory for each vCard – one entry per entered number.
128