1
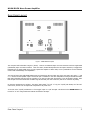
ROCK
Mono Power Amplifier
___________________________________________________________________________
Owner’s Manual
MOON ROCK Mono Power Amplifier
Table of Contents
Congratulations ................................................ 3
Unpacking........................................................ 3
Introduction ..................................................... 4
Installation & Placement ................................... 4
Rear Panel Layout ............................................ 5
Connecting the ROCK ........................................ 6
Balanced Operation ........................................... 6
Operating the ROCK .......................................... 7
Specifications .................................................. 8
www.simaudio.com
IMPORTANT: Please read this entire manual before using this product.
Installation and operating instructions inside.
____________________________________________________________________________________
MOON ROCK Mono Power Amplifier
Congratulations!
Thank you for selecting the MOON ROCK Mono power amplifier as a part of your hi-fi reproduction system. This power
amplifier has been designed to offer state-of-the-art high-end performance in an elegant package, while retaining all the sonic
hallmarks on which Simaudio has made its reputation. We have spared no effort to ensure that it is the very finest monoblock amplifier available. We have been building high-performance audio equipment for over 25 years, and the know-how
gained through our cumulative experience is an important reason why MOON amplifiers are so musically satisfying.
Your new amplifier is a true balanced differential design, whereby both the positive and the negative input signals have their
own separate completely independent circuitry from the power supply through the output stage. The performance of your
ROCK will continue to improve during the first 300 hours of listening. This is the result of a “break-in” period required for the
numerous high quality electronic parts used throughout this amplifier.
Before setting up your new MOON ROCK, we encourage you to please read this manual thoroughly to properly acquaint
yourself with its features. We hope you enjoy listening to the MOON ROCK Mono Power Amplifier as much as the pride we
have taken in creating this fine audio product. We understand the power and emotion of music and build our products with
the goal of faithfully capturing these elusive qualities.
Unpacking
The MOON ROCK Mono Power Amplifier is a very large and extremely heavy component that should be removed from its
custom flight case with care. We strongly advise that you seek at least one other person to help lift both the amplifier with its
accompanying granite base out of the crate, and place them in their final location.
The following accessories should be included inside the flight case with your amplifier:
9 20A AC power cable
9 Granite mounting base
9 This owner’s manual
9 Warranty and product registration information
(USA and Canada only)
As soon as the amplifier is safely removed from its custom flight case and placed down, perform a thorough physical
inspection and report any damage to your dealer immediately. We suggest that you keep all of the original packaging, storing
it in a safe, dry place in the event that you’re required to transport the amplifier. The customized flight case is specially
designed to protect the MOON ROCK amplifier from any potential damage that may occur during shipping.
________________________________________________________________
WARNING!
To reduce the risk of fire or electric shock, do not expose this product to rain or moisture. Do not
attempt to “lift the ground” by removing the ground pin from the AC cable. Make sure that your
household electrical wiring supports proper AC grounding techniques before plugging in this
product. Keep the heat sinks and top cover free of dust to allow for proper heat dissipation.
Never expose this product to extreme temperatures. Always connect the audio signal path cables
prior to connecting the AC mains.
CAUTION!
No user-serviceable parts inside. Do not remove top cover, as severe electrical shock may result.
IMPORTANT!
Make sure that your local AC voltage complies with the unit’s label. Damage caused by plugging
this component into an AC receptacle of the wrong voltage will not be covered by warranty.
____________________________________________________________________________________
Congratulations / Unpacking
3
MOON ROCK Mono Power Amplifier
Introduction
Your MOON ROCK Mono Power Amplifier incorporates many significant design features to achieve its “world class” level of
performance. This is an abbreviated list of the more important features:
A custom proprietary toroidal transformer design with lower magnetic, electrical and thermal loss, yielding an
improved power transfer and lower regulation factor, resulting in increased current speed and better dynamics.
An oversized power supply.
Fully balanced differential circuitry throughout the entire amplifier.
Output stable to any known speaker impedance.
Class A output to 20 watts for greater efficiency.
Extremely fast circuitry yielding real-time amplification.
Virtually non-existent transient intermodulation (TIM) distortion.
Mechanical grounding accomplished through the use of an exceptionally heavy solid granite base.
Precision matched, fully decoupled Bipolar output devices yielding superb linearity across the entire audio spectrum.
A high damping factor which yields superior musical dynamics, improved signal speed and refined timbre accuracy.
Extremely rigid chassis construction to minimize the effects of external vibrations.
Accurate matching of the highest quality parts to tolerances of less than 0.01% in a symmetrical circuit design.
A very short signal path for a faster transient response.
Pure copper circuit board tracings with low impedance characteristics.
Pure copper rods for critical electrical paths with extremely low impedance characteristics.
Designed to be powered up at all times for optimal performance.
A 12 Volt trigger for remote operations.
Installation & Placement
The MOON ROCK Mono Power Amplifier is powerful and very heavy. It requires reasonable ventilation to maintain an
optimum and consistent operating temperature, especially since it will radiate heat when driven hard. Consequently, it should
be placed in a location with empty space around it for proper heat dissipation. You should never place another component on
top of this amplifier. As well, the amplifier should be placed on a solid level surface. You should avoid placing it near a heat
source or inside a closed cabinet that is not well ventilated as this could compromise the amplifier’s performance and
reliability. The ROCK uses 2 large toroidal transformers in its power supply; even though they are well shielded, you should
not place this amplifier too close to source components sensitive to EMI, such as turntables and phono preamplifiers.
The ROCK is capable of delivering very high power output and its electrical consumption grows accordingly with its power
output. The amplifier comes with a 20 ampere power cord and corresponding 20A IEC connector on the back panel. Most
domestic 120V household AC circuits are rated at 15 Amperes. This amplifier will function normally on these circuits. To
realize the full power potential of this amplifier, more than 15A will be drawn from your AC line on occasion. If you have the
willingness and budget necessary to arrange for a dedicated 20A circuit for this amplifier, you will be able to take full
advantage of the power potential of the MOON ROCK Mono Power Amplifier. If the AC voltage in your home is 220V or
240V, you will not have to worry about the previously described current limitations.
____________________________________________________________________________________
Introduction / Installation & Placement
4
MOON ROCK Mono Power Amplifier
Rear Panel Layout
Figure 1: MOON ROCK Rear panel
The rear panel will look similar to Figure 1 (above). There is one balanced input on an XLR connector and one single-ended
(unbalanced) input on an RCA connector. There is a switch, located directly above the two inputs connectors, to toggle from
balanced input to single-ended input. You may operate the amplifier in either mode, but it is preferable to use the balanced
mode to take full advantage of its capabilities.
Two pairs of heavy duty gold-plated binding posts are located near the top center area of the rear panel, each with a “-” and
a “+” terminal for the speaker output. The second pair is intended for use with loudspeakers having bi-wireable terminals.
Both pairs of binding posts are wired in a parallel, so you may use either pair when driving a “non bi-wireable” speaker. Note
that one pair has a red colored outer insulation ring and the other pair uses a white one; this has no relevance to polarity.
On the lower mid-section you will find; The power “main switch” (“0”=off, “1”=on); the “on/off” push button; the “AC Fuse”
socket cover; and the “AC” 20 ampere IEC receptacle for the power cord.
To the left of the “on/off” push-button is a “12V trigger” input on a 1/8” mini-jack. This allows for the MOON ROCK to be
turned “on” or “off” using a hard wired remote connected to this input.
____________________________________________________________________________________
Rear Panel Layout
5
MOON ROCK Mono Power Amplifier
Connecting the ROCK
1.
Connect the input cable running from your preamplifier’s output, whether balanced or single-ended, to the amplifier’s XLR
or RCA input respectively. We highly recommend that you use the balanced XLR input (provided that your preamplifier
has balanced outputs) to take full advantage of MOON ROCK Mono power amplifier’s capabilities. Please refer to the
next section “Balanced Operation” below for further information.
Don’t hesitate to use high quality interconnect cables. Poor quality interconnect cables can degrade the overall sonic
performance of your system. It is recommended, though not mandatory, to use balanced interconnects between your
preamplifier and the ROCK when using long cable runs (i.e. more than 3 meters in length).
2.
Connect your speaker, with the cable of your choice, to the ROCK’s speaker binding posts. Take care to respect the
polarity (“+” , “-” ) of the output. You may use either pair of binding posts. In the event that your speakers are biwireable, you should use both pairs of binding posts accordingly. Once again, don’t hesitate to use high quality speaker
cables. Poor quality speaker cables can degrade the overall sonic performance of your system.
3.
Connect the supplied AC power cable to the IEC receptacle, located on the amplifier’s rear panel. Alternatively, if you
wish, you may use a dedicated high-performance AC cable designed for high current applications. Ensure that the AC
wall outlet you use has a functioning ground. For the best sonic performance, it is preferable that you plug your ROCK
directly into a dedicated AC outlet and avoid using an extension cord. If you have the time and willingness, consider
installing a superior quality AC wall outlet such as a hospital grade Hubbell.
4.
In order to obtain the maximum performance from your audio system, we strongly recommend that the detachable
power cord not come into physical contact with either the interconnect cable or the speaker cable running to and from
your ROCK. In the event that this can’t be avoided, you should ensure that any cables coming into contact with each
other are crossed at ninety degree angles to minimize the contact area.
Balanced Operation
When using an unbalanced interconnect, the audio signal runs through both the center wire and the shield/ground wire. Any
noise picked up by this interconnect (i.e. nearby magnetic fields such as an AC power cord) will be reproduced by the
amplifier and heard through the loudspeakers. Conversely, a balanced interconnect has three separate conductors; one for
the ground and two for the actual signal. These two signals are identical except that one is 180 degrees out of phase with the
other. For example, when one conductor is carrying a signal of +5 Volts, the other will be carrying a signal of –5 Volts. When
these two inverted signals on a balanced line are input into a differential power amplifier such as the MOON ROCK, any noise
picked up by the interconnect will be eliminated since a differential circuit amplifies only the difference between these two
signals: Noise on a balanced interconnect will be equal on both conductors and therefore not be processed.
____________________________________________________________________________________
Connecting the ROCK /
Balanced Operation
6
MOON ROCK Mono Power Amplifier
Operating the ROCK
We recommend that you leave your MOON ROCK Mono Power Amplifier powered up at all times to maintain optimal
performance. In the event that you plan to be away from your home for a few days, powering off the amplifier may not be a
bad idea. Once fully “broken-in”, please keep in mind that your ROCK will require several hours of playing time before it
reaches its peak performance after you’ve powered it up again.
Turning on your MOON ROCK for the first time
Prior to turning the amplifier on for the first time, make sure that every cable is properly connected to avoid any problems.
Then turn on your preamplifier connected to the ROCK. Finally, power up your ROCK in the following manner:
1)
Flick the main rocker switch labeled “MAIN POWER” to the ‘1’ (on) position.
2)
Next, momentarily press the push button labeled “on/off” on the rear panel. The amplifier will make a faint click
sound, confirming that everything is in order. The blue LED on the front panel indicates the that the amplifier is
powered up and ready for use.
On and Off Sequence
To avoid having any annoying noises (i.e. “thumps” and “pops”) emanate from your speakers when powering your ROCK on
or off, you should:
1)
Always power up your preamplifier prior to powering up your ROCK.
2)
Always power down your ROCK prior your powering down your preamplifier.
Using the 12 Volt Trigger
When the ROCK is off, it can be powered on by either the trigger or the push button. When the ROCK is on, it can be
powered off by the trigger. It can also be powered off using the push button, but only if the trigger isn’t in «on» mode. The
“MAIN POWER” switch must remain in the “on” position (“1”) at all times for the 12 V trigger to function
Troubleshooting
Your MOON ROCK Mono power amplifier is equipped with a self-diagnostic system that will automatically shut itself down
when it detects DC (direct current) from any input. If your ROCK power amplifier turns itself off or will not power up, there
may very well be DC present in one (or more) of the amplifier’s inputs coming from one (or more) of your
preamplifier/processor’s outputs. You must determine if there is any DC present. The best way to accomplish this is by first
powering down the ROCK via the main power rocker switch, then disconnecting the input to the ROCK leaving only the
speaker connected. Attempt to power up your ROCK again: A successful power up will indicate the presence of DC coming
from your preamplifier or one of your signal sources (i.e. CD Player).
If your ROCK still doesn’t power up, turn off the main power switch and check the AC fuse. If the fuse appears OK, put it
back in its socket and then try to power up again the usual way. If the fuse is blown, replace it with a fuse of the same
rating, and repeat the above process. At this point, you should be able to power up your ROCK. If not, immediately consult
your dealer for assistance.
____________________________________________________________________________________
Operating the ROCK
7
MOON ROCK Mono Power Amplifier
Specifications
Configuration .........................................................
Power Supply Transformers ....................................
Power Supply Capacitance ......................................
Class Of Operation .................................................
Design ....................................................................
Input Impedance – Single-ended .............................
Input Impedance – Balanced ..................................
Input Sensitivity .....................................................
Output Device Type ................................................
Output Power at 8Ω ...............................................
Output Power at 4Ω ..............................................
Output Power at 2Ω ..............................................
Frequency Response ..............................................
Output Impedance .................................................
Damping Factor (static) .........................................
Gain ......................................................................
Dynamic Headroom ................................................
Signal-to-noise Ratio ..............................................
Maximum Output Voltage .......................................
Slew Rate ..............................................................
Maximum Current – Peak ........................................
Maximum Current – Continuous ..............................
Crosstalk @ 1kHz ...................................................
Intermodulation Distortion ......................................
THD (20Hz - 20kHz @ 1 watt) ................................
THD (20Hz - 20kHz @ 1 watt) ................................
Power Consumption @ idle .....................................
AC Power Requirements .........................................
Fuse Replacement - 120V .......................................
Fuse Replacement - 230V .......................................
Shipping Weight .....................................................
Actual Weight ........................................................
Dimensions (W x H x D, inches) ..............................
Mono
2 x 1.1kVA
282,000µF
A/AB
Fully Balanced Differential
24,900Ω
50,900Ω
2830mV
Bipolar - 36
1000 Watts
2000 Watts
4000 Watts
10Hz - 280kHz +0/-3dB
0.01Ω
800
30dB
6dB
> 120dB @ full power
120 Volts
160V/µs
95 amperes
45 amperes
Not applicable
Unmeasureable
< 0.01 %
< 0.03 %
60 Watts
120V / 60Hz or 240V / 50Hz
15A long fast blow (3AG size)
8A long fast blow (3AG size)
243 lb. / 32 Kg.
220 lb. / 32 Kg.
19 x 16 x 21
Balanced Input Pin Assignment:
Pin 1................................ Ground
Pin 2................................ Positive
Pin 3 .............................. Negative
12 Volt Trigger:
Logic ...............................
Connector ........................
Input Impedance..............
Current Consumption........
Direct (0V off, 12V on)
1/8” mini-jack
300Ω
40mA
____________________________________________________________________________________
Specifications
8