1
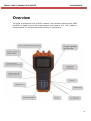
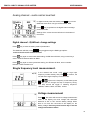
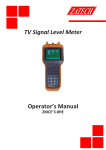
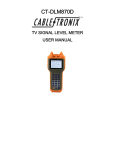
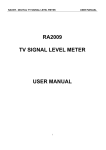
TV Signal Level Meter
Operator’s Manual
ZMCP 2.0
ZMCP 2.0 MB TV SIGNAL LEVEL METER
USER MANUAL
Please read this manual carefully
Prior to using this product.
The technical specifications and operating methods included in this
manual are subject to changes without notice. In case of any
inquires after a period of usage, please consult the distributor or
manufacturer.
2
ZMCP 2.0 MB TV SIGNAL LEVEL METER
USER MANUAL
Learn to use
Please be familiar with the functions of the instrument panel prior to operation.
RF input terminals
RF signal will be measured being input through connector. The connector can be replaced and
installed with TAC or F connector.
LCD Screen
Large character LCD with user-friendly back light that can switch automatically. Moreover, the
LCD contrast can adjust automatically.
Numeric key
-
Ten numeric keys.
Function key
Trunk line voltage and battery voltage measurement key
TILT measurement, Dual channel measurement
Carrier to Noise Ratio measurement key
Channel selection, audio carrier, and A/V measurement
Frequency input and parameter selection
Decimal point
Clear key
Up
Down
Charger jack
Insert the charger connector to the charger jack to provide external power for the meter when
the meter is on, it will charge the meter when the meter is power off.
Charging Indicator
While the meter is charging, the indicator is red.
3
ZMCP 2.0 MB TV SIGNAL LEVEL METER
USER MANUAL
Overview
The meter is designed for test of DVB-C network. It can measure channel power, MER
and BER of digital channel and single channel, dual channel, A/V, C/N, voltage of
analog channel. It is an ideal instrument for cable TV maintenance.
4
ZMCP 2.0 MB TV SIGNAL LEVEL METER
USER MANUAL
Operation of measurement
Starting up
To turn meter on, Press Power Switch button and hold until the meter “buzz” and show
de serial number in the display. Then it accesses the mode of single channel
measurement automatically. To turn meter off, press Power Switch button at any time.
0Single
channel measurement
Using
and
,
and
key enter the previous or
next channel, or using numeric key input channel number
and press
key to enter desired channel.
Note: Channel number must be from preset channel plan,
otherwise it’s invalid.
Switch between digital channel and analog channel
Hint: Press key to set the current channel to analog channel and digital channel. Setting will be
saved for next use.
Analog channel - video carrier level test
In this mode, the lower screen displays the channel number and it’s frequency, the upper
screen displays the signal level of video carrier and A/V ratio.
Analog channel - audio carrier level test
Press
key, the unit will show signal evel of audio
carrier and frequency.
Hint: In audio carrier level test mode, using
the volume of speaker.
key adjust
Digital channel - power test
If the current channel is analog channel, using
key
switch to digital channel. In digital channel test mode, the
channel number, frequency, channel average power, as
well as a “DVB” symbol on the left top.
5
ZMCP 2.0 MB TV SIGNAL LEVEL METER
USER MANUAL
Analog channel - audio carrier level test
In digital channel power test mode, press
key to enter
QAM test mode which can give result of MER, BER.
Press
key to get back to the digital channel average
power test mode.
Settings of the current channel will show in the bottom of
the screen.
Digital channel - QAM test: change settings
Press
key to enter the setting mode of parameters.
The QAM item will blink, using
keys toggle among the QAM type options:
16QAM/32QAM/64QAM/128QAM/256QAM
Press
key again to enter band width setting, the BW item will blink, using numeric keys
enter a number between 6MHz to 8MHz.
Press
key again to enter symbol rate setting, the SR item will blink, enter a number
between 1 MHz to 9MHz here.
Single frequency level measurement.
In the channel test mode, using numeric keys input
frequency number directly and press
to confirm, the
unit will enter single frequency level test mode.
Using
keys turn the frequency.In this status, press
key you can change the step of frequency tuning.
The step interval will toggle in following sequence:
100MHz, 10MHz, 1MHz, 100 KHz, 10 KHz.
Voltage measurement
Press
, the meter will access to voltage measurement
mode. It will display the trunk voltage with automatic
detection of “AC” or “DC” and the battery voltage. When
there is no trunk line connected it will display on the
battery voltage. Press any other function key to exit the
voltage measurement status.
6
ZMCP 2.0 MB TV SIGNAL LEVEL METER
USER MANUAL
Tilt measurement
In the status of level measurement,press
to access to TILT measurement mode.
The measured signal levels of two channels are displayed in the
screen, the channel numbers are displayed at the bottom. The
user can compare the two channels in this mode; it is also called
TILT measurement.
In this mode, press
button to enter the status of inputting
measuring channels. Pressing
, the cursor “CHV” blinks and
toggles between left channel and right channel, directly input the
channel number by numeric buttons or push arrow keys to adjust
the channel number.
Carrier to Noise Ratio Measurement
In the signal level measurement mode, press
mode, as showed in fig.
button to enter Carrier to Noise Ratio measurement
In signal channel measurement mode, the channel number is
displayed at the bottom left corner; the video carrier frequency is
displayed at the bottom right corner. The left is measured signal
level and the right is C/N value.
1. This function is only available when input level is higher than
70dB.
2. Theatrically, the noise level should be tested as the carrier
turned off, but the meter detects the noise with the carrier on, thus
the test result may not be accurate.
3. When entering C/N mode, C/N blinks when the meter is in
process of calculation.
2.7 Power Supply
The meter is equipped with a high performance rechargeable battery. The voltage of batter can
be monitored automatically, the meter will alarm when power is low. Press the voltage
measurement key, the instrument shall show the battery voltage.
The meter powers off automatically if there is no operation for set power-off time.
Please use only the charger provided with the meter, using any other battery charger may
overheat or distort the meter, or cause fire, injury or harm to the environment and will void the
warranty. The indicator on the front panel will turn red when the instrument is being charged.
The charging can be done when both the meter is power on and power off.
Charging time is approximately 8 hours. Remove the Connectors between the charger and
the AC current and the meter when the charge is complete.
7
ZMCP 2.0 MB TV SIGNAL LEVEL METER
USER MANUAL
If the charger is connected to the AC current for a long time the charger will enter protection
status and stop charging. You have to reconnect the charger to the AC current to charge again.
Technical Documents
Frequency Range
Frequency Resolution
Ratio
5MHz-870MHz
Measuring Hand-width
Measuring Range:
280KHz
Measuring Accuracy
Resolution ratio
Mode of Detection
Input Impedance
50KHz
25dBmV-120dBmV
<±2dB
0.1dB
peak detection
75Ω
C/N
Signal Input Range
>70dBmV
Measuring Accuracy
±2.5dBmV
Input Range
Measuring Accuracy
Input Range
30-80V(AC/DC)
±2V
30-80V(AC/DC)
Measuring Accuracy
±2V
Resolution ratio
1V
DC power supply
DC7.2V/1.5Ah (Built-in rechargeable battery)
Storage temperature
Storage humidify
-10--+50oC
40%--80%RH
Attention:
1. Keep the surface of the instrument clean. Do not use organic solvent, acid, alkali and solvent
to clean the surface of the instrument.
2. The instrument should avoid vibration or shaking. Do not use force on the LCD window, so as
not to damage the screen.
3. Charge batteries every 3 months if meter is not used for an extended period of time.
8