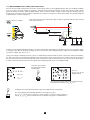
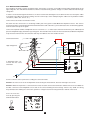
1
EARTH AND RESISTIVITY TESTER E N G L I S H User's manual C.A 6472 Thank you for purchasing a C.A 6472 earth and resistivity tester. To obtain the best service from your unit: read these operating instructions carefully, comply with the precautions for use. WARNING, risk of DANGER! The operator must refer to these instructions whenever this danger symbol appears. Equipment protected by double insulation. Earth terminal. CE marking indicates conformity with European directives, in particular LVD and EMC. The rubbish bin with a line through it indicates that, in the European Union, the product must undergo selective disposal in compliance with Directive WEEE 2002/96/EC. This equipment must not be treated as household waste. Definition of measurement categories: Measurement category IV corresponds to measurements taken at the source of low-voltage installations. Example: power feeders, counters and protection devices. Measurement category III corresponds to measurements on building installations. Example: distribution panel, circuit-breakers, machines or fixed industrial devices. Measurement category II corresponds to measurements taken on circuits directly connected to low-voltage installations. Example: power supply to electro-domestic devices and portable tools. PRECAUTIONS FOR USE This instrument is protected from accidental voltages of not more than 50 V with respect to earth in measurement category IV. The guaranteed level of protection of this equipment may be compromised if used in a manner not specified by the manufacturer. Make no measurements on conductors likely to be connected to the network or to earth conductors that are not disconnected. Do not exceed the maximum rated voltage and current and the measurement category. Never exceed the protection limits indicated in the specifications. Comply with the conditions of use, namely the temperature, the humidity, the altitude, the degree of pollution, and the place of use. Do not use the device or its accessories if they seem damaged. Use only the charging unit supplied with the tester to recharge the internal battery. Use connection accessories of which the overvoltage category and service voltage are greater than or equal to those of the measuring device (50V CAT IV). Use only accessories that comply with safety standards (IEC 61010-2-031 and 32). Troubleshooting and metrological checks must be done only by accredited skilled personnel. Wear the appropriate protective gear (insulating boots and gloves). Foreword: The potentials on the various rods used for an earth measurement may be different if a nearby electrical installation is defective or certain weather conditions prevail (thunderstorms). It is up to the operator to decide whether to continue or postpone a campaign of measurements in a given situation. 2 CONTENTS 1. START-UP.................................................................................................................................................................................. 4 1.1. Unpacking....................................................................................................................................................................... 4 1.2. Characteristics label....................................................................................................................................................... 4 1.3. Charging the battery...................................................................................................................................................... 5 2. PRESENTATION OF THE DEVICE............................................................................................................................................ 6 2.1. Functions of the device ................................................................................................................................................. 7 2.2. Keypad............................................................................................................................................................................ 7 2.3. Display unit..................................................................................................................................................................... 8 2.4. Operating principle......................................................................................................................................................... 9 3. AUTOMATIC MODE................................................................................................................................................................ 10 3.1. Resistance measurement............................................................................................................................................. 10 3.2. 3P earth measurement................................................................................................................................................. 13 3.3. 4P earth measurement................................................................................................................................................. 15 3.4. Measurement of soil resistivity r ................................................................................................................................ 18 3.5. Measurement of earth potential V pot......................................................................................................................... 22 3.6. Earth measurements with 2 clamps............................................................................................................................ 24 4. ERROR REPORTING.............................................................................................................................................................. 25 4.1. Electrode resistance too high...................................................................................................................................... 25 4.2. Out of range.................................................................................................................................................................. 25 4.3. Misconnection ............................................................................................................................................................. 25 4.4. Indicators of limits of use............................................................................................................................................. 25 5. MEASUREMENTS IN MANUAL MODE................................................................................................................................. 27 5.1. Choice of measurement frequency............................................................................................................................. 27 5.2. Switching of the measurement voltage....................................................................................................................... 27 5.3. Manual settings for the resistance measurement ...................................................................................................... 28 5.4. Manual settings for the 3P earth measurement.............................................................................................................. 28 5.5. Manual settings for the 4P earth measurement.......................................................................................................... 29 5.6. Manual settings for the soil resistivity measurement................................................................................................. 30 5.7. Manual settings for the earth potential measurement................................................................................................ 30 5.8. Manual settings for the measurement with 2 clamps................................................................................................. 30 5.9. Sweep mode (SWEEP)................................................................................................................................................. 30 5.10. Smoothing................................................................................................................................................................... 30 6. MEASUREMENTS WITH THE PYLON BOX.......................................................................................................................... 31 6.1. Description of the C.A 6474 Pylon Box and AmpFLEX sensors ............................................................................... 31 6.2. Measurements in automatic mode.............................................................................................................................. 33 6.3. Error reporting.............................................................................................................................................................. 37 6.4. Manual and sweep modes........................................................................................................................................... 37 7. MEMORY FUNCTION............................................................................................................................................................. 39 7.1. Storage of measurement results.................................................................................................................................. 39 7.2. Retrieval of stored results............................................................................................................................................ 40 7.3. Erasure of the memory................................................................................................................................................. 41 8. CONFIGURATION (SETUP).................................................................................................................................................... 43 8.1. Press the CONFIG key................................................................................................................................................. 43 8.2. Press the DISPLAY key................................................................................................................................................ 44 8.3. Press the MEM key....................................................................................................................................................... 44 8.4. Press the MR key......................................................................................................................................................... 44 8.5. Internal parameters...................................................................................................................................................... 44 8.6. Check of the display unit............................................................................................................................................. 45 9. ERROR MESSAGES .............................................................................................................................................................. 46 10. CONNECTION TO A PC AND ANALYSIS SOFTWARE....................................................................................................... 47 11. SPECIFICATIONS AND TECHNICAL CHARACTERISTICS............................................................................................... 48 11.1. Reference conditions................................................................................................................................................. 48 11.2. Electrical characteristics............................................................................................................................................ 48 11.3. Power supply.............................................................................................................................................................. 54 11.4. Environmental conditions.......................................................................................................................................... 55 11.5. Characteristics of contruction................................................................................................................................... 55 11.6. Conformity to international standards....................................................................................................................... 55 11.7. Electromagnetic compatibility................................................................................................................................... 56 12. TERMS AND DEFINITIONS.................................................................................................................................................. 57 13. GLOSSARY............................................................................................................................................................................ 58 14. MAINTENANCE..................................................................................................................................................................... 60 14.1. Cleaning...................................................................................................................................................................... 60 14.2. Replacement of the fuse............................................................................................................................................ 60 14.3. Replacing the battery................................................................................................................................................. 61 14.4. Metrological check..................................................................................................................................................... 62 14.5. Repair.......................................................................................................................................................................... 62 15. WARRANTY, SERVICE......................................................................................................................................................... 63 16. TO ORDER............................................................................................................................................................................. 64 16.1. Accessories................................................................................................................................................................ 64 16.2. Replacement parts..................................................................................................................................................... 65 3 1. START-UP 1.1. UNPACKING C.A 6472 Ohmmètre de terre x5 x5 FRANÇAIS Mémento x2 HX0056-Z 1 2 3 4 5 6 One line power adapter + 2-pole cable to recharge the battery. Data export software + an optical/USB communication cord. User manual in 5 languages, on CD-ROM. 5 simplified user manuals (1 per language). 5 characteristics labels (1 per language). 2 C182 clamps with 2 safety leads. 1.2. CHARACTERISTICS LABEL Affix the appropriate characteristics label to the inside of the cover of the device (labels in five different languages are provided). 4 1.3. CHARGING THE BATTERY H > 110 Vac < 240 Vac 50 / 60 Hz ± DC Ω ALARM Ω Ω E AUTO V Charging time: 3h30’ Start by fully charging the battery before the first use. The charging must be done between 0 and 40°C. After prolonged storage, the battery may be fully discharged. In this case, the first charge may last several hours. To enable the battery to recover its initial capacity, we recommend performing several successive complete charging/discharging cycles (3 to 5 cycles). For a discharging cycle, set the switch to mΩ. Switch the device to manual mode. Press the CONFIG key, then the key, then the CONFIG key 3 times. Short-circuit by connecting a lead between terminals H and E. H S ES mΩ E mΩ CONFIG x3 CONFIG OFF Let the measurement continue until the battery is fully discharged. Start the measurement by pressing the START/STOP button. H + DC Ω ALARM V mV START/STOP mA E MANUAL 5 V , and to configure the measurements and manage the memory Connection terminals Charging of battery 6 2nd Access the secondary functions of the keys E ES S H SMOOTH DISPLAY DISTANCE CONFIG./ FREQUENCY MEM / MR Store measurements and read the memory 2nd MR MEM SET-UP OFF mΩ 3 poles 4 poles V pot. 2 clamps AmpFLEX DISPLAY / SMOOTH Display all parameters of the measurement and smooth measurements GROUND TESTER C.A 6472 START / STOP X02870 Transfer of data to PC CONFIG/FREQUENCY DISTANCE Configure the measurements (expert mode) AmpFLEX START/STOP To start the measurements and compensate for the leads Choice of measurement function or SET-UP Connection of the Pylon Box C.A 6474 PYLON BOX 2. PRESENTATION OF THE DEVICE 2.1. FUNCTIONS OF THE DEVICE The C.A 6472 earth tester is a complete portable measuring device intended for earth measurements, soil resistivity measurements and with the C.A 6474 Pylon box accessory, pylon earth measurements. It is contained in a housing suitable for field use and supplied by a rechargeable battery with built-in charger. Measurement func- : resistance, 2-wire or 4-wire, tions earth resistance, 3-point or 4-point coupling of earth resistances selective earth resistance soil resistivity earth potential earth resistance with 2 clamps earth resistance of pylons with the C.A 6474 Pylon box accessory Control : 9-position switch, 6-key pad, and a START/STOP button Display : back-lit 108 x 84mm LCD display unit having 3 simultaneous numerical display levels 2.2. KEYPAD When the buzzer is active ( symbol displayed), the device confirms each key press by an audible beep. A higher-pitched beep means that the key press is disabled or has no effect. A long press (more than 2 seconds) is confirmed by a second audible beep. The functions of the keys are described briefly opposite. Special case: To increase a flashing figure or number, press the key. To decrease a flashing figure or number, press 2nd and . The 2nd symbol remains displayed to indicate that the 2nd key is still active and does not have to be pressed each time and that the key is directly accessible. To reverse the direction, press the 2nd key again. To change an item or a frequency, press the key. 7 2.3. DISPLAY UNIT 1 3 2 4 5 6 7 8 28 27 25 d 24 S 23 A 20 19 W S d ES ALARM< > E OBJ. mV k Ωm k Ωft TEST R 0 NOISE< DISTANCEFREQUENCY > Hz SMOOTH REMOTE MEMMR CONFIG MANUALAUTO SWEEP 2nd 18 17 16 15 10 11 12 mA kΩft = COM 9 DC AC mVA kΩft = d ± DC AC d d ALL EARTH COUPLING 1 2 3 4 OK dA 22 21 ρ >< H 26 12 34 S x 10 / 10 14 13 Fig. 1 1 DANGER symbol. 2 Audible tone On. 3 A flashing «>» or «<» indicates a value that is out of bounds. 4 Indicates the battery charge condition. 5 Indicates whether the 3-pole EARTH measurement or the EARTH COUPLING measurement has been selected. 6 Indicates the sensitivity of the Pylon Box: x1/10, x1, x10. 7 Number of turns of the AmpFLEX current sensors (1 to 4 turns). 8 Number of the AmpFLEX coils connected: 1 to 4. 9 Object (OBJ) and TEST no. for the storage of results. 10 Lead compensation for 2-wire measurements is active. 11 The DISTANCE function used to enter distances is active. 12 The FREQUENCY function for manual frequency changes during a measurement is active. 13 The 2nd key has been pressed. 14 The MANUAL, AUTO, or SWEEP mode is active. 15 NOISE interfering with the measurement has been detected. 16 The CONFIG mode, allowing modification of the measurement parameters, is active. 17 The MR mode, for the display of stored results, is active. 18 The MEM mode (storage of results) is active. 8 19 Indicates that the device is remote-controlled by a computer (REMOTE). 20 SMOOTHing of the measurement results is active. 21 Indicates that a clamp must be connected to terminal ES (flashing) or is connected to it (steady). 22 Display of the measured parameter (R, U, I). 23 Rotating arrows indicate that a measurement is in progress. 24 Indicates that the ALARM function is active. 25 Indicates the distances d or/and A. 26 Indicates that a clamp must be connected to terminal H (flashing) or is connected to it (steady). 27 Indicates which of terminals H, S, ES, and E are to be connected according to the measurement function chosen (fixed) or are missing (flashing). 28 Display of soil resistivity r measured by the Wenner or Schlumberger method (rW or rS). In this user manual, the symbol indicates flashing. 2.4. OPERATING PRINCIPLE The device has 2 operating modes: Automatic mode for routine applications, Manual/Expert mode in which the user can change the parameters of the measurement functions. 2.4.1. AUTOMATIC MODE Set the switch to the desired function, Make the connections appropriate to the function, Press the START button. The device makes the measurement and stops automatically. Read the measurement result on the display unit and the relevant parameters using the DISPLAY key. You can record all of this information in the internal memory of the device. 2.4.2. MANUAL OR EXPERT MODE Set the switch to the desired function, Make the connections appropriate to the function, Select “MANUAL” mode. Choose the various measurement parameters using the CONFIG key. Press the START button. The measurement frequency or the direction of the current (resistance measurement) can be changed during the measurement to view their impact upon the measurement and the parameters relevant to the measurement can be viewed using the DISPLAY key. When the measurement results are acceptable, stop the measurement by pressing the STOP button. View the result on the display and toggle through the relevant parameters using the DISPLAY key. You can save all of this information to the internal memory of the device. The instrument also incorporates a “SWEEP” mode (automatic execution of several measurements at several different frequencies), used to indicate how the measurement varies as a function of frequency. In this case, the device operates as in the automatic mode and the measurement process stops after taking the measurement at the final frequency. 9 3. AUTOMATIC MODE 3.1. RESISTANCE MEASUREMENT 3.1.1. 2-WIRE MEASUREMENT Connect the resistance to be measured between terminals H and E. It must not be live. Set the switch to mΩ. H ± DC H S R mΩ ES Ω E mΩ Ω E OFF Start the measurement by pressing the START/STOP button. H ± DC Ω ALARM Ω E START/STOP Ω ALARM The device makes a measurement with a positive current (R+), then reverses the direction of the current and makes another measurement (R-). R = (R+) + (R-) 2 Ω AUTO AUTO H ± DC Ω ALARM Ω Ω E AUTO To display the measurement parameters, press the DISPLAY key several times. The device displays the following quantities (see the glossary, §13): R+, R-, +UH-E, +IH-E, -UH-E, -IH-E, U-Act (UH-E and its frequency), and R∆0 if there is compensation for the measurement leads. DISPLAY 3.1.2. COMPENSATION FOR THE MEASUREMENT LEADS Lead compensation subtracts the resistance of the test leads from the measured result. Short-circuit the measurement leads. H S ES E Start the measurement by pressing the 2nd key, then the START/STOP button. This value will be deducted from all resistance values measured thereafter. H ± DC AC Ω R 0 ALARM Ω START/STOP 2nd E Lead compensation is lost when the select switch is turned to another function. 10 AUTO 3.1.3. ALARM FUNCTION This function exists only for the 2-wire resistance measurement. By default, the visual alarm (the ALARM symbol flashes) and the audible alarm (the buzzer sounds for a few seconds) are triggered when R < 2Ω. This threshold can be changed using the SETUP function. Set the switch to SET-UP. SET-UP SET-UP x2 ALARM< Ω DISPLAY OFF To turn the alarm On or OFF. To set the value of the alarm between 1 and 999 Ω. and To choose a low (<) or high (>) alarm. To access the direction of the alarm. ALARM< Ω To complete the adjustment of the alarm. DISPLAY 11 x3 3.1.4. 4-WIRE MEASUREMENT This measurement is used to improve the resolution (10x better than the 2-wire measurement) for weak resistance values; no compensation for the measurement leads is needed. The device must first be configured for the 4-wire measurement. Press the CONFIG key H ± DC CONFIG H ± DC CONFIG E E AUTO CONFIG H ± DC S ES CONFIG AUTO H ± DC S Ω ALARM Ω ES CONFIG E Ω E AUTO CONFIG AUTO To return to 2-wire measurement, simply repeat this procedure. Connect the resistance to be measured in 4-wire mode. It must not be live. H R S ES E Start the measurement by pressing the START/STOP button. H ± DC S Ω ES START/STOP E Ω ALARM To display the measurement parameters, press the DISPLAY key several times. The device displays the following quantities (see the glossary, §13): R+, R-, +US-ES, +IH-E, -US-ES, -IH-E, U-Act (US-ES and its frequency, UH-E and its frequency). DISPLAY 12 Ω AUTO 3.2. 3P EARTH MEASUREMENT This function is used to measure an earth resistance with 2 auxiliary electrodes. There are several measurement methods. We recommend the “62%” method. Plant electrodes H and S to form a straight line with the earth electrode. The distance between electrode S and the earth electrode is 62% of the distance between electrode H and the earth electrode; the distance between the electrodes H and S should be at least 30m. Set the switch to “3 poles”. H S 3 poles H 3 poles ES S E 62% d d > 80 m OFF In order to avoid electromagnetic interference, it is best to unwind the full length of each cable from the reel, to keep the cables as far apart as possible on the ground, taking care not to form loops, and to avoid placing the cables near or parallel to metallic conductors (cables, rails, fences, etc.). Connect the cables to terminals H and S; disconnect the earth strap, then connect terminal E to the earth electrode to be tested. Start the measurement by pressing the START/STOP button. H EARTH Ω S Ω E DISPLAY H EARTH Ω S mV mA START/STOP Ω E AUTO To display the measurement parameters, press the DISPLAY key several times. The device displays the following quantities (see the glossary, §13): RE, US-E, IH-E, U-Act (UH-E and its frequency, US-E and its frequency). Plus RH, RS if the measurement was started by a long press of START/STOP. To measure the resistances of electrodes H and S, or if the resistance of the electrodes is too large (see §4), start the measurement with a long press of the START/STOP button. H EARTH Ω S > 2s kΩ START/STOP E 13 kΩ AUTO AUTO 3.2.1 RECOMMENDATIONS FOR A RELIABLE MEASUREMENT Moving the auxiliary electrodes Move electrode S towards electrode H by a distance equal to 10% of d and make another measurement. Then move electrode S again by a distance equal to 10% of d, but towards the earth electrode. H S ES S H E 52% d 62% d 72% d d The 3 measurement results should be the same to within a few percent. If this is the case, the measurement is valid. If not, electrode S is in the zone of influence of the earth electrode. It will be necessary to increase distance d and repeat the measurements. Positioning of the auxiliary electrodes To make sure that your earth measurements are not distorted by interference, we recommend repeating the measurement with the auxiliary electrodes placed at a different distance and in another direction (for example rotated 90° from the first alignment). H H S d1 d2 S E If you find the same values, your measurement is reliable. If the measured values are substantially different, it is likely that they were influenced by earth currents or a groundwater course. It may be useful to drive the electrodes deeper and/or wet the ground near them to reduce their contact resistance with the soil. Avoid routing the connecting cables of the earth electrodes near or parallel to other cables (transmission or supply), metallic conductors, rails, or fences: high test frequencies may cause cross-talk and affect the measurements. 14 3.3. 4P EARTH MEASUREMENT 3.3.1. MEASUREMENT WITHOUT CLAMP This function is suited to the measurement of very low earth resistances. It provides better resolution (10x better than 3P measurement) and there is no need to compensate for the resistance of the measurement leads. Set the switch to “4 poles”. Place electrodes H and S at least 30m apart. H S 4 poles H 4 poles ES S E > 30 m OFF > 30 m In order to avoid electromagnetic interference, it is best to unwind the full length of each cable from the reel, to keep the cables as far apart as possible on the ground, taking care not to form loops, and to avoid placing the cables near or parallel to metallic conductors (cables, rails, fences, etc.). Connect the cables to terminals H and S; disconnect the earth strap, then connect terminals E and ES to the earth electrode to be tested. Start the measurement by pressing the START/ STOP button. H Ω ES E Ω S H mV ES mA Ω E AUTO START/STOP DISPLAY Ω S AUTO To display the measurement parameters, press the DISPLAY key several times. The device displays the following quantities (see the glossary, §13): RE, US-E, IH-E, U-Act (UH-E and its frequency, US-E and its frequency). Plus RH, RS, UH-E if the measurement was started by a long press of START/STOP. To measure the resistances of electrodes H and S, or if the resistance of the electrodes is too large (see §4), start the measurement with a long press of the START/STOP button. H Ω S > 2s kΩ ES START/STOP E kΩ AUTO We recommend repeating the measurement with the auxiliary electrodes placed at a different distance and in another direction (see §3.2.1). 15 3.3.2. MEASUREMENT WITH CLAMP (SELECTIVE EARTH) For this selective earth measurement you need a current clamp, either a C182 (supplied with the device) or an MN82 (available as an accessory). The C182 clamp is more precise, suited to the measurement of higher currents (up to 40 Arms) and to being placed on thicker conductors, while the MN82 clamp, which is easier to handle, accepts currents only up to 10 Arms and can be placed on conductors only up to 20mm in diameter. Use only these two types of current clamp, which are specially designed to work with the C.A 6472 earth tester. Set the switch to “4 poles” Place electrodes H and S at least 30m apart so that the potential wells that form around them do not intersect. . H H S S ES 4 poles > 30 m 4 poles E > 30 m OFF R E2 R E1 R E3 R E4 In order to avoid electromagnetic interference, it is best to unwind the full length of each cable from the reel, to keep the cables as far apart as possible on the ground, taking care not to form loops, and to avoid placing the cables near or parallel to metallic conductors (cables, rails, fences, etc.). Connect the cables to terminals H and S. Connect a cable between terminal E and the earth. Connect the clamp to terminal ES; the device recognises it automatically. Clamp the path of the earth to be checked. Connect the socket of the current clamp to this same path (connection to terminal ES). Take care not to place the cable of electrode H too close to the current clamp; this is in order to avoid any transmission of the AC signal to the clamp (especially if you use an MN82 clamp). Start the measurement by pressing the START/ STOP button. H Ω S Ω ES H Ω S VA RSEL= RE1 In the case of the diagram above. ES mA E Ω AUTO E START/STOP AUTO You can now move the clamp and its lead to measure the other earth resistances, RE2, RE3, etc. DISPLAY To display the measurement parameters, press the DISPLAY key several times. The device displays the following quantities (see the glossary, §13): RSEL, US-ES, IH-E, R-Act (RPASS), U-Act (UH-E and its frequency), I-Act (IES and its frequency). Plus RE, RH, RS, UE-S if the measurement was started by a long press of START/STOP. 16 To measure the resistances of electrodes H and S, or if the resistance of the electrodes is too large (see §4), start the measurement with a long press of the START/STOP button. H Ω S > 2s kΩ ES START/STOP E 17 kΩ AUTO 3.4. MEASUREMENT OF SOIL RESISTIVITY r To measure the resistivity of the soil, you can choose between the Wenner and Schlumberger methods. The difference between the two methods lies in the positioning of the electrodes. By default, the device selects the Wenner method, but if you want to vary the distance between the electrodes, use the Schlumberger method, which allows you to move only 2 measurement electrodes rather than 3. The soil resistivity measurement with different distances d, and therefore in different layers (in depth) of the soil, can be used to establish resistivity profiles of the soil in question, which can be useful for geological analysis, the exploration of deposits, hydrological studies, etc., and to determine the location of an earth electrode. 3.4.1. CHOICE OF MEASUREMENT METHOD By default, the Wenner method is selected. To select the Schlumberger method, proceed as follows: Set the switch to ρ. ρ H W d ρ Ωm S ρ d Ω ES d W d S d V ES Hz d m = E ρ H CONFIG AUTO E AUTO CONFIG OFF To confirm and exit. ρ H W d S d V S ES S CONFIG ρ x2 d Hz E AUTO CONFIG AUTO To switch back to the Wenner method, simply repeat this procedure. S Ωm d A ES V CONFIG E H d Hz d S A ES CONFIG ρ H The last measurement method selected (Wenner or Schlumberger) is stored in memory when the device is switched off. m = d m = E AUTO 3.4.2. PROGRAMMING OF THE DISTANCE The distance can be programmed before or after the measurement. If it is not programmed, only the value of RS-ES will be displayed, since the value of ρ remains indeterminate. Set the switch to ρ. Press the DISTANCE key. H ρ ρ ρ W d Ωm + S d Ω ES d OFF E ρ W d Ωm S d Ω ES 2nd m = H CONFIG d E AUTO 18 DISTANCE m = AUTO To select the hundreds (of metres). H ρ To s e l e c t t h e tens. W d Ωm S d Ω ES DISTANCE d To m o d i f y t h e tens. H Ωm d Ω ES DISTANCE d m = E AUTO To select and modify the metres and tenths of a metre. W d Ωm S d Ω ES DISTANCE d E W S AUTO ρ ρ d m = E H m = puis AUTO To terminate the programming of the distance. In the case of the Schlumberger method, it is also necessary to program distance A. This is done in the same way as for distance d. then 2nd CONFIG 3.4.3. WENNER METHOD Place the 4 earth electrodes on a straight line, at a distance d from one another and at a depth p < 1/3 d. Distance d must be between 2 and 30m. Connect the cables to the electrodes, then to terminals H, S, ES, and E. Set the switch to ρ. H ρ S ρ ES E S H OFF d ES d E p d In order to avoid electromagnetic interference, it is best to unwind the full length of each cable from the reel, to keep the cables as far apart as possible on the ground, taking care not to form loops, and to avoid placing the cables near or parallel to metallic conductors (cables, rails, fences, etc.). H ρ W d Ωm Program distance d and start the measurement by pressing the START/STOP button. Ω ES d E m = AUTO ρ W d k Ωm S S d H START/STOP 19 d Ω ES d E m AUTO ρW = 2.π.d.RS-ES To display the measurement parameters, press the DISPLAY key several times. The device displays the following quantities (see the glossary, §13): ρW, RS-ES, d, US-ES, IH-E, U-Act (US-ES and its frequency, UH-E and its frequency). DISPLAY > 2s To measure the resistances of electrodes H, S, ES, and E, or if the resistance of the electrodes is too high (see §4), start the measurement by a long press of the START/STOP button. The device displays RP-E and RP-H, then RP-ES and RP-S. START/STOP H ρ W d k Ωm S d kΩ ES ρ W d k Ωm S d kΩ ES d d DISPLAY kΩ E H kΩ E AUTO AUTO Metallic elements in the ground (railway lines, pipes, etc.) or underground water courses may influence the resistivity of the soil in a given direction. We therefore recommend making another measurement, with the electrodes aligned 90° from the first measurement, to detect any directional effects. We also recommend making several measurements, with different distances d, to eliminate local effects that might interfere with the measurement. The greater the distance between the electrodes and the deeper they are driven, the better the result for the deeper layers of the ground. 3.4.4. SCHLUMBERGER METHOD Place electrodes S and ES at a distance A apart. Then place electrodes H and E in the same straight line, at a distance d measured from the midpoint of distance A. Distance d must be between 2 and 30m. Drive the electrodes to a depth p of not more than 1/3 of d. Connect the cables to the electrodes, then to terminals H, S, ES, and E. Set the switch to ρ. ρ H ρ S ES E OFF H S ES E p A d d In order to avoid electromagnetic interference, it is best to unwind the full length of each cable from the reel, to keep the cables as far apart as possible on the ground, taking care not to form loops, and to avoid placing the cables near or parallel to metallic conductors (cables, rails, fences, etc.). ρ H S Ωm d A ES E ρ H S m = Program distance d and A (see §3.4.2.). S m = E AUTO 20 S Ωm d A ES d Start the measurement by pressing the START/ STOP button. m = d m = AUTO START/STOP ρ H S Ω m DISPLAY S Ωm d A ES d = E To display the measurement parameters, press the DISPLAY key several times. The device displays the following quantities (see the glossary, §13): ρS, RS-ES, d, A, US-ES, IH-E, U-Act (US-ES and its frequency, UH-E and its frequency). AUTO d2- A 4 .R ρs = π. S-ES A 2 > 2s To measure the resistances of electrodes H, S, ES, and E, or if the resistance of the electrodes is too high (see §4), start the measurement by a long press of the START/STOP button. The device displays RP-E and RP-H, then RP-ES and RP-S. START/STOP ρ H S S Ωm d A ES E kΩ d kΩ ρ H S S Ωm d A ES kΩ d DISPLAY E AUTO 21 kΩ AUTO 3.5. MEASUREMENT OF EARTH POTENTIAL V POT. The earth potential measurement is similar to the 3-pole earth measurement, but rather than measuring the resistance, the device measures the potential USrEL on electrode S at different distances d from earth E. The relative potential USrEL is the ratio between the voltage US-E measured on electrode S and the total applied voltage UH-E; it is therefore a dimensionless number between 0 and 1. After entering a set of values for different distances d, you can in this way determine the variation of the potential around an earth. Place electrode H at a distance A from the earth and electrode S at a distance d1 from the earth. Set the switch to V pot. H V pot. S V pot. ES H E S Earth OFF d1 d2 d3 d4 d5 A In order to avoid electromagnetic interference, it is best to unwind the full length of each cable from the reel, to keep the cables as far apart as possible on the ground, taking care not to form loops, and to avoid placing the cables near or parallel to metallic conductors (cables, rails, fences, etc.). Connect the cables to terminals H and S and connect terminal E to the earth. To program distances A and d, press the DISTANCE key. H S A m = d m = E then H DISTANCE E 2nd m = AUTO CONFIG To select the tens. To modify the tens. H m = d AUTO To select the hundreds (of metres). S A S A m = d DISTANCE m = E AUTO 22 To select and modify the metres and tenths of a metre. H S A m = d DISTANCE AUTO H m = d DISTANCE Start the measurement by pressing the START/ STOP button. m = E AUTO m = d m = S A DISTANCE E To terminate the programming of the distance. H Proceed in the same way as for d, using the and keys. S A then m = E To program A. AUTO 2nd then CONFIG H S A m = d E m = AUTO START/STOP DISPLAY To display the measurement parameters, press the DISPLAY key several times. The device displays the following quantities (see the glossary, §13): USrEL, A, d, UH-E and its frequency, RE, IH-E, U-Act (US-E and its frequency, UH-E and its frequency). Plus RH, RS if the measurement was started by a long press of START/STOP. To measure the resistances of electrodes H and S, or if the resistance of the electrodes is too high (see §4), start the measurement by a long press of the START/STOP button. H S A > 2s kΩ d E START/STOP kΩ AUTO Move electrode S to distance d2. Reprogram the value of d and make another measurement. Repeat for d3, d4, and d5. Record all of the measurements in order to be able to determine the variation of the earth potential between points H and E. 23 3.6. EARTH MEASUREMENTS WITH 2 CLAMPS This is a rapid way to measure the value of the earth (any error will be on the high side) without the need of an electrode. The current clamp connected to terminal H applies a voltage to the circuit to be measured. The value of the resulting current is determined by the impedance of the circuit to be measured. The current flowing in the loop is measured using the clamp connected to terminal ES. The device then calculates loop resistance RLOOP from these quantities. Use only C182 or MN82 current clamps; they are specially designed to operate with the C.A 6472. Connect a clamp to terminal H and clamp the earth. Connect the other clamp to terminal ES and clamp the part of the global earth to be measured. Set the switch to 2 clamps. 2 clamps H 2 clamps S ES R E1 R E2 R E3 E RE OFF Observe the following minimum distances between the two clamps in order to avoid direct electromagnetic influences between the transmitting clamp and the receiving clamp: Value measured (Ω) 0-1 1-5 5 - 10 10 - 50 50 - 100 100 - 500 Minimum separation (m) MN82 C182 0.1 0 0.4 0.1 0.5 0.2 0.7 0.3 0.9 0.5 1.2 0.5 Start the measurement by pressing the START/ STOP button. H Ω A ES Hz H Ω m A ES Hz AUTO AUTO START/STOP In the case of the diagram above, the earth impedance measured is equal to: RLOOP = RE + ( RE1 // RE2 // RE3) To display the measurement parameters, press the DISPLAY key several times. The device displays the following quantities (see the glossary, §13): RLOOP , IES and its frequency, I-Act (IES and its frequency). DISPLAY Remark: in the automatic mode, the measurement frequency is 1611 Hz. To make an earth measurement that is free of inductive effects, you must change to manual mode and choose a lower measurement frequency (see §5.1). 24 4. ERROR REPORTING 4.1. ELECTRODE RESISTANCE TOO HIGH This can happen in a 3- or 4-pole earth measurement, a resistivity measurement, or an earth potential measurement. This message is displayed when the measurement was triggered by a short press on the START/STOP button and the resistances of the electrodes are too high. The measurement must then be started by a long press on the START/ STOP button. The device then measures the values of the electrodes and compensates for them to display the correct result. > 2s START/STOP 4.2. OUT OF RANGE < or > The flashing > or < symbol indicates the measurement is out of range. < and > If both symbols flash together, it means that the accuracy of the value displayed is outside of the instrument specification or is subject to large fluctuations. Activating the smoothing function (SMOOTH) may correct this. SMOOTH 4.3. MISCONNECTION H S ES E This flashing indicates that a terminal or a current clamp needs to be either connected or disconnected. You must correct the connections or the measurement will not proceed. The flashing of terminal H may also indicate that current IH‑E is too low. The flashing of terminal S may also indicate that resistance RS is too high. The flashing of terminal ES may also indicate that the current IES measured by the clamp is too low. To reduce RH, you can add one or more electrodes, 2 metres apart from each other, in the H leg of the circuit, or increase the test voltage. To reduce RS, you can add one or more electrodes, 2 metres apart from each other, in the S leg of the circuit. To reduce the resistance of the electrodes, you can also drive them deeper, pack the ground around them well, or dampen them with water. 4.4. INDICATORS OF LIMITS OF USE This flashing during a passive measurement means that the device has detected the presence of an external voltage exceeding 42V on the terminals and that the measurement is impossible. This flashing during an active measurement means that the operating limits have been exceeded. If this symbol remains lit during an active measurement, it means that the values measured are subject to large fluctuations or that there is an incorrect connection. The display of an indefinite value for a passive measurement indicates that measurement current IES or ISEL or voltage US‑ES is too low. NOISE The display of the NOISE symbol indicates that a spurious external voltage is likely to interfere with the measurement. You should change to manual mode and change the measurement voltage and/or frequency in order to make a valid measurement. After the measurement has started there are indicators of when: 25 V alues RH and/or RS are too high, M easurement current IH-E, IES or ISEL is too low, The instability of the measurement is large. Those conditions that may give uncertain results are indicated on the display of the unit as follows: Frequency f > 513Hz f ≤ 513Hz Function Triggering threshold 3P, 4P, V pot. IH-E < 6 mA 4Psel, AmpFLEX IH-E’ < 6 mA (1) 3P, 4P, r, V pot IH-E < 1 mA 4Psel, AmpFLEX IH-E’ < 1 mA f > 513Hz All (except ρ and 2 RS > 5 kW clamps) f ≤ 513Hz All RS > 30 kW 4P sel IES < 1 mA Indication on the display unit flashes (3) H flashes (1) flashes (3) S flashes flashes (3) flashes flashes (3) AmpFLEX ISEL < 10 mA All Values measured (U, I, R) unstable, varying by more than 5% about their mean values. (2) RPASS IES < 3 mA ISEL < 30 mA US-ES < 10 mV RPASS IES < 0,3 mA ISEL < 3 mA US-ES < 1 mV All US-ES, US-E, UH-E > 42 V All Spurious voltage of which the frequency and/or value is likely to interfere with the measurement. flashes steady (3) < > flashes < > flashes -.--- (undefined) flashes (3) NOISE (4) 1)IH-E’: current IH-E measured at the start of the measurement before ISEL . (2) Not active if the SMOOTH function is selected. (3) (4) The symbol may also appear if there is an external voltage > 42 V on the terminals of the device. You should change to manual mode and modify the measurement voltage and/or frequency to make a valid measurement (when the NOISE symbol is no longer illuminated). 26 5. MEASUREMENTS IN MANUAL MODE It is possible to modify the parameters of all of the measurement functions described for the automatic mode in §3 by changing to manual mode. To access the manual mode, press the CONFIG key. The CONFIG symbol is displayed and the AUTO symbol flashes. By pressing the key, you can change to manual mode (display of the MANUAL symbol) or to sweep mode (display of the SWEEP symbol) for the 3- and 4-pole earth measurement functions. In manual mode, the device toggles between the parameters to be modified (dependant upon the measurement function) by successive presses on the CONFIG key. When you trigger a measurement in manual mode, by a short or long press on the START/STOP button (the circular arrows on the display will rotate), you can stop the measurement by a second press of this button. Whenever a new measurement function is selected, the device automatically changes back to automatic mode. 5.1. CHOICE OF MEASUREMENT FREQUENCY Functions concerned: all except mΩ. If the device cannot make a valid measurement because of spurious signals of a frequency that interferes with the measurement, it displays the NOISE symbol. It also displays the frequency of the spurious signals. You can then change the frequency of the test voltage and start another measurement to obtain a valid result. In the automatic mode, the device automatically chooses another frequency, while in the manual mode it is the operator who must choose another frequency. The NOISE symbol flashes for as long as spurious signals are present. To change the frequency, change to manual mode and press the CONFIG key until the frequency flashes. Choose the frequency by pressing the key : USr, 55, 92, 110, 119, 128 Hz (128 Hz is default). 128, 1367, 1611, 1758 Hz for the 2-clamps function (1611 Hz is default). To change the user frequency (USr), press the values available are stated in the table below. key (press the key to raise the value and 2nd + to lower it). The Table of possible user frequencies USr (91 values from 41 Hz to 5078 Hz): 41 98 238 537 1270 2930 43 101 244 549 1318 3125 46 110 256 586 1367 3223 49 119 269 635 1465 3516 50 122 275 659 1563 3809 55 128 293 684 1611 3906 60 134 317 732 1758 4102 61 137 330 781 1904 4297 64 146 342 806 1953 4395 67 159 366 879 2051 4688 69 165 391 952 2148 5078 73 171 403 977 2197 79 183 439 1025 2344 82 195 476 1074 2539 85 201 488 1099 2637 92 220 513 1172 2734 For soil resistivity measurements, the user frequency is limited to 128 Hz. There are therefore 2 user frequencies: one for resistivity and one for earth and soil potential measurements. These two values remain in memory even after the device is switched off. 5.2. SWITCHING OF THE MEASUREMENT VOLTAGE Functions concerned: all except mΩ and 2 clamps. When the device is used in a damp environment, we recommend lowering the test voltage from 32 to 16 V. To do this, change to manual mode and press the CONFIG key until the output voltage (Uout) flashes. Choose the voltage, 16 or 32 V, by pressing the key. This voltage setting is then valid for all functions concerned and all operating modes (automatic, manual, and sweep). It is retained in the memory even after the device is switched off. 27 5.3. MANUAL SETTINGS FOR THE RESISTANCE MEASUREMENT In manual mode, successive presses on the CONFIG key let you access the following parameters and change them using the key : Symbols of terminals H and E flash (2-point measurement) H S ES E flash (4-point measurement) POS on H and DC+ flash nEg on H and DC- flash (reversal of polarity on terminal H) 5.3.1. OUTPUT VOLTAGE POLARITY By default, output voltage UHE is positive. H + DC It is possible to make it negative. H - DC CONFIG E E CONFIG MANUAL CONFIG MANUAL In manual mode, the device does not automatically invert polarity. But you can do so manually by pressing the CONFIG key in the course of the measurement. 5.3.2. CONTINUITY CHECK The 2-wire mΩ measurement gives a rapid measurement result, accompanied by an audible beep, during a continuity check. The display is in a single range (0.5Ω to 1.99kΩ) and the check of the terminals is limited to terminal H (a cable must be connected to it), making it possible to start the measurement with the circuit open. For a continuity check, the following settings are essential (see § 3.1.3 and 8.2): The 2-wire mΩ measurement function must be selected, The device must be in manual mode, The alarm function must be active (On), The alarm threshold must be low (<), The buzzer must be activated (bEEP On). 5.4. MANUAL SETTINGS FOR THE 3P EARTH MEASUREMENT 5.4.1 3-POLE EARTH MEASUREMENTS In the manual mode, successive presses on the CONFIG key serve to access the following parameters, which can be changed using the key: EARTH flashes Measurement of earth coupling 128 Hz flashes Change of test frequency Test voltage flashes Change of test voltage 5.4.2. MEASUREMENT OF EARTH COUPLING This measurement calls for making and storing 3 intermediate measurements (at the same frequency). It is available only in manual mode. Earth 1 Measurement no1 R1 Measurement no3 R 1-2 Earth 2 Rb RA RC 28 Measurement no2 R2 After switching from EARTH to EARTH COUPLING, using the CONFIG and keys, proceed as follows: If you want to eliminate the resistance of the measurement leads, you can use lead compensation (2nd + START) before starting the actual coupling measurement (see §3.1.2). Set the function switch to the “3-pole” position. You may choose a test frequency (see §5.1) and a test voltage (see §5.2). The screen displays EARTH COUPLING 1. Make a 3-pole earth measurement on the first earth system (measurement of R1 in the connection diagram above). Stop the measurement by pressing the START/STOP button. The MEM symbol flashes to indicate that this result must be recorded in memory. Press the MEM key twice. To save to another location, refer to §7. The screen now displays EARTH COUPLING 2. Make a 3-pole earth measurement on the second earth system (measurement of R2). For this second measurement, leave the H and S electrodes in the same positions as for the first measurement. Store this result in the same memory location as before by pressing the MEM key twice. The screen now displays the message EARTH COUPLING 3. Disconnect terminal S and make a 2-wire resistance measurement with terminal H connected to earth 1 and terminal E to earth 2. Record this result by pressing the MEM key twice. The screen displays EARTH COUPLING 4 and the results of the measurements. EARTH COUPLING The coupling calculation uses the following formulas: 4 Ω MEM RC = (R1 + R2 – R1-2)/2 C1 = RC/R1 et C2 = RC/R2 Rb = R2 - RC RA = R1 - RC MANUAL To display the calculated parameters, press the DISPLAY key several times. The device displays the following quantities (see the glossary, §13): RC , C1, C2, RA, Rb, UOUT and its frequency. DISPLAY To scroll all of the measurements. To display all of the measurement parameters, press the MR key. then 2nd EARTH COUPLING 1 x4 OBJ. TEST Ω MEM MEM DISPLAY To display the parameters of each of the measurements, press the DISPLAY key several times. The device displays the following quantities (see glossary, §13): EARTH COUPLING 1: R1 , UOUT and its frequency, US-E, IH-E , U-In (US-E and its frequency) RH and RS if long press of START/STOP EARTH COUPLING 2: R2 , UOUT and its frequency, US-E, IH-E , U-In (US-E and its frequency) RH and RS if long press of START/STOP EARTH COUPLING 3: R1-2 , UH-E and its frequency, IH-E , U-In (UH-E and its frequency). EARTH COUPLING 4: RC , C1, C2, RA, Rb, Uout and its frequency. 5.5. MANUAL SETTINGS FOR THE 4P EARTH MEASUREMENT In the manual mode, successive presses on the CONFIG key let you access the following parameters and change them using the key: 128 Hz flashes Test voltage flashes Change of test frequency Change of test voltage 29 5.6. MANUAL SETTINGS FOR THE SOIL RESISTIVITY MEASUREMENT In the manual mode, successive presses on the CONFIG key let you access the following parameters and change them using the key: ρW flashes (Wenner method) 128 Hz flashes Test voltage flashes Switching to ρS (Schlumberger method) Change of test frequency Change of test voltage 5.7. MANUAL SETTINGS FOR THE EARTH POTENTIAL MEASUREMENT In the manual mode, successive presses on the CONFIG key let you access the following parameters and change them using the key: 128 Hz flashes Test voltage flashes Change of test frequency Change of test voltage 5.8. MANUAL SETTINGS FOR THE MEASUREMENT WITH 2 CLAMPS In the manual mode, successive presses on the CONFIG key let you access the frequency and change it using the 1611 Hz flashes key: Change of test frequency 5.9. SWEEP MODE (SWEEP) For the 3- or 4-pole earth measurements (without clamp, selective with clamp, or with the Pylon Box), it is possible to select the frequency sweep mode (SWEEP). Press the CONFIG key, then the key. The device then proposes a free memory location (OBJ: TEST) in which to store a series of measurements with a series of preset frequencies. H S E Start the measurement by pressing the START/ STOP button. EARTH OBJ. CONFIG H TEST EARTH Ω S V Hz SWEEP E SWEEP START/STOP The device makes a measurement at each of the following 15 frequencies: 41 64 92 128 256 513 1025 1465 2051 2539 3125 3516 4102 4687 5078 These frequencies are defined in the memory of the tester when it leaves the factory. Through the software the user can change them to suit his/her particular needs (see §10). After the measurement, the device returns to manual mode and you can display the measurement results vs. the frequency using the MR key. To do this, press the 2nd and MEM keys, then the key, twice, to make the frequency flash, then use the key to scroll through all of the measurements. 5.10. SMOOTHING In the manual mode, you can activate or deactivate the smoothing of the measurement results by pressing the 2nd + DISPLAY (SMOOTH) keys. This smoothing consists in displaying an exponential mean value, a significant help with highly fluctuating values. 30 C.A 6474 PYLON BOX AmpFLEX Connection terminals 1 31 4 3 2 50V CAT IV INPUTS 1.2.3 1.2.3.4 S x 1/10 Sx1 1.2 S x 10 1 2 3 3 INPUT SELECTION Overload Connection to C.A 6472 4 4 2 1 Connection to the C.A 6472 SENSITIVITY C.A 6474 PYLON BOX NUMBER OF TURNS Overload check light Selection of the measurement channels Selection of the sensitivity Selection of the number of turns 6. MEASUREMENTS WITH THE PYLON BOX 6.1. DESCRIPTION OF THE C.A 6474 PYLON BOX AND AMPFLEX SENSORS 6.1.1. THE C.A 6474 PYLON BOX 6.1.2. AMPFLEX CURRENT SENSORS These are flexible cables, also known as “Rogowski coils”. They are placed around a conductor and closed using a screw connector. This closed loop is then used to make a contact-free measurement of the current flowing in the conductor it is wrapped around; it is like a current clamp, but has a much larger capacity. AmpFLEX sensors are available as standard in lengths up to 5m, which can be wrapped around an object having a diameter of 1.5m, such as a high-voltage pylon or more generally any earthing structure to which conventional measurement methods, with or without clamps, are unsuited. 6.1.3. CALIBRATION OF AMPFLEX SENSORS AmpFLEX sensors are factory calibrated. Calibration is necessary only for a new sensor or one that is no longer identified. The calibration coefficients are then recorded in the C.A 6474. Start by identifying each sensor using the identification rings supplied with the device (brown, red, orange, and yellow). Connect the calibration loop between terminals H and E of the C.A 6472 (see the user guide of the C.A 6474 for the accessories delivered with it). Connect the C.A 6472 and the C.A 6474 using the connecting cable. Connect the AmpFLEX sensor with the brown ring to input 1 of the C.A 6474, the one with the red ring to input 2, the one with the orange ring to input 3, and the one with the yellow ring to input 4. Coil the AmpFLEX sensor four times in the calibration loop and close it using its screw connector. Place the connector as far as possible from the calibration device. Set the switch of the C.A 6472 to SET-UP. SET-UP Set the SENSITIVITY switch of the C.A 6474 to x1. Set the NUMBER OF TURNS switch of the C.A 6474 to 4. Set the INPUT SELECTION switch of the C.A 6474 to 1. SET-UP SENSITIVITY NUMBER OF TURNS 4 1 1 2 4 S x 10 3 Sx1 2 Sx1 S x 1/10 1 3 4 1.2 1.2.3 1.2.3.4 OFF 32 INPUT SELECTION Press the CONFIG key 5 times. 1 Sx1 4 H x5 A CONFIG 4 m A mA START/STOP A E 1 Sx1 H E AUTO AUTO The device starts by comparing the current IInt injected by the device into the calibration loop to the current IA measured by the AmpFLEX sensor. If they are too different, it makes the CAL symbol flash to recommend a calibration. Attention: do not touch the AmpFLEX sensor or the calibration loop during the calibration because that can cause measurement errors. To start the calibration, press 2nd + START. 1 Sx1 4 H The device calculates and stores a calibration coefficient for the AmpFLEX sensor connected to channel 1. m A mA 2nd START/STOP E This operation must be repeated for channels 2, 3 and 4; the INPUT SELECTION switch must be set to the corresponding position each time. AUTO 6.2. MEASUREMENTS IN AUTOMATIC MODE 6.2.1. PREPARATION The C.A 6474 Pylon Box is designed to be used only with the C.A 6472 device. The two devices must be connected by a special cable. The Pylon Box has no On/Off switch, and is supplied only by the C.A 6472 device, via this connecting cable. As its name indicates, the Pylon Box is intended primarily to measure the current that flows through a high-voltage pylon to the ground. You can wrap the 4 legs of the pylons with four AmpFLEX sensors and thereby measure the current flowing to earth through each of the legs or through several legs. After calibration, the AmpFLEX sensors must always be connected to their respective channels. Set the switch to AmpFLEX. AmpFLEX AmpFLEX H This message disappears as soon as the connecting cable is connected. S ES E AUTO OFF When you connect the Pylon Box to the tester, the latter automatically runs a self-test of the device. During this test, the OVERLOAD check light of the Pylon Box is lit. 33 1 S x 1 / 10 H then 3 S Ω ES Ω E Ω AUTO Connect the required number of AmpFLEX sensors to channels 1, 2, 3, and/or 4 of the Pylon Box. To increase the measurement sensitivity, we recommend, whenever possible, wrapping a maximum number of turns (up to 4) around the structure. The direction of coiling of the AmpFLEX loops around a conductor has no effect on the measurement, but all of the AmpFLEX sensors must be coiled in the same direction and have the same orientation (check the arrow on the connector of the sensor) and all of the AmpFLEX sensors must have the same number of turns. Set the INPUT SELECTION switch accordingly. You can measure the current flowing through only one AmpFLEX sensor (1, 2, 3, or 4), or through several sensors (1.2 or 1.2.3), or through all of the sensors (1.2.3.4). Indicate how many times the AmpFLEX loop is wrapped around the conductor to be measured (from 1 to 4 turns) on the NUMBER OF TURNS switch. INPUT SELECTION 1 NUMBER OF TURNS 2 4 3 4 4 3 4 2 1.2 1 1.2.3 1.2.3.4 Then choose the desired sensitivity: x1/10, x1, or x10. The choice of sensitivity depends on the expected current value. As a precaution, always start with the lowest sensitivity, x1/10, and increase it as needed. SENSITIVITY S x 10 Sx1 S x 1/10 S x 1/10 34 6.2.2. MAKING A MEASUREMENT Place auxiliary electrodes H and S on opposite sides of the pylon, as far away as possible and, if possible, perpendicular to the high-voltage line. This will eliminate interference with the measurement by spurious voltages or currents induced under the highvoltage line. In order to avoid electromagnetic interference, it is best to unwind the full length of each cable from the reel, to keep the cables as far apart as possible on the ground, taking care not to form loops, and to avoid placing the cables near or parallel to metallic conductors (cables, rails, fences, etc.). Connect these electrodes to terminals H and S. ES and E must be connected to a conducting metallic part of the pylon located above the AmpFLEX sensors. This ensures measurement of the current flowing downward and towards the earth. Otherwise, you would measure the current flowing upward, from the earth to the tip of the pylon. Connect the required number of AmpFLEX sensors to channels 1, 2, 3, and/or 4 (the channels for which they are calibrated) and place the AmpFLEX loop(s) around the legs of the pylon. The orientation has no effect on the measurement, but all of the AmpFLEX loops must be oriented in the same direction and they must all have the same number of turns. Overhead earth wire RH High-voltage lines H S ES E 4 AmpFLEX loops connected with the same orientation C.A 6472 1 2 3 4 C.A 6474 RS Set the 3 switches of the Pylon Box according the connection made. Attention: do not move or touch the AmpFLEX sensors during the measurement, because that might cause errors. Attention: When the Pylon Box is connected to the tester, the earth connected to terminals E and ES of the tester is available on the BNC connectors of the AmpFLEX sensors and on the connector linking the two housings. If there is any doubt concerning the potential, before making the connections, perform a voltage measurement using terminals S and ES of the tester. Start the measurement by pressing the START/STOP button. 2 Sx1 H 1 kΩ S V ES mA START/STOP E AUTO 35 DISPLAY To display the measurement parameters, press the DISPLAY key several times. The device displays the following quantities (see the glossary, §13): RSEL, US-ES and its frequency, ISEL, R-Act (RPASS), U-Act (US-ES and its frequency, UH-E and its frequency), I-Act (ISEL and its frequency). Plus RH, RS, UH-E, IH-E if the measurement was started by a long press of START/STOP. To measure the resistances of electrodes H and S, or if the resistance of the electrodes is too high (see §4), start the measurement by a long press of the START/STOP button. 2 Sx1 1 H kΩ S > 2s Ω ES START/STOP kΩ E AUTO 6.2.3. OTHER MEASUREMENTS As explained above, terminals ES and E must be connected to a metallic part of the pylon above the AmpFLEX loop in order to measure the current flowing ISEL downward through the AmpFLEX sensor, therefore to the earth. If connections ES and E are placed below the loop AmpFLEX, the latter measures the current flowing towards the top of the pylon via the overhead earth wire at its tip, and you can in this way evaluate the quality of this earth. You can even make this measurement without moving the contacts of ES and E on the pylon, but simply passing the 2 connecting cables through the AmpFLEX loop. The current in connecting cable E and the current through the leg of the pylon then cancel each other out. ES E You can also measure any leakage currents I-Act flowing through each leg of the pylon in normal operation of the high-voltage line. If you find different leakage currents in each leg, but they cancel out when added together, you can conclude that these currents, induced by the rotating field of the high-voltage lines, indicate an earthing fault of the pylon via the overhead earth wire at the tip of the mast. 36 6.3. ERROR REPORTING In addition to the errors already indicated in §4, the following errors may occur during measurements with the Pylon Box. H The switch of the C.A 6472 is set to the AmpFLEX position and no C.A 6474 Pylon Box is connected. Make this connection using the specific lead. S ES E AUTO 1 Sx1 4 H m A Calibration was not possible because the currents are too different. Check your connections, in particular the number of turns of the AmpFLEX sensor, and repeat the calibration procedure. mA E AUTO 2 S x 1 / 10 H 1 The selection of channels (INPUT SELECTION) is incompatible with the AmpFLEX sensors actually connected. Turn the switch to the right position or add the missing sensors or remove the excess sensors. S ES E AUTO 6.4. MANUAL AND SWEEP MODES Using the CONFIG and keys, you can change to manual mode and change the following parameters for the AmpFLEX measurements: the measurement frequency (see §5.1) the measurement voltage (see §5.2) You can also perform a frequency sweep (see §5.8) and a smoothing (see §5.9). In the sweep mode, the measurements can be made at frequencies up to 5kHz. On a single pylon, frequencies of the order of 5kHz do not always entail inductive effects, but the «current loops» formed by the adjacent pylons and the return channel through the ground may result in inductances that can be detected only at high frequencies. An equivalent diagram of the components forming this circuit is as follows: LLLL Overhead earth wire Point of injection of the current Rpylon Next pylon to the left Pylon measured 37 Next pylon to the right A measurement in sweep mode (SWEEP) of an installation like this having 10 pylons gives the following results assuming an earth resistance Rpylon of 10Ω for each pylon and an inductance L of 550 µH for the link via the overhead earth wire at the tip of the pylons: Impedance of the pylons 16 Z (ohm) 14 12 10 8 6 4 2 F (Hz) 0 0 1000 2000 3000 Measurement of the impedance of a pylon using the AmpFLEX sensors Conventional 4-point measurement (global resistance of the line) Measurement from the top of the pylon (iterative impedance in network) 38 4000 5000 7. MEMORY FUNCTION The device has a total of 512 memory locations. Each of these locations is defined by an object number (OBJ) from 01 to 99 and by a TEST number from 01 to 99. For 3- and 4-pole earth measurements, and for measurements using the Pylon Box, the sweep mode (SWEEP) can record several measurement results at the same memory location, with the frequency as third addressing criterion. During soil potential or resistivity measurements (Wenner or Schlumberger methods), several measurement results are recorded at the same memory location, with the distance between electrodes as the third addressing criterion. For earth coupling measurements (EARTH COUPLING 1, 2, 3, 4), the four measurements provide the third addressing criterion for the same memory location. None of the other measurements has an additional addressing criterion, so each occupies only one memory address. Since each measurement is dated, you must set the date and time of the device before any storage in memory (see §8.1). 7.1. STORAGE OF MEASUREMENT RESULTS ... the complete result can be stored by pressing the MEM key. After each measurement, ... H ± DC Ω ALARM Ω AUTO Press the DISPLAY key to exit from the MEM mode without recording. MEM DISPLAY If the memory location chosen is already occupied, you can overwrite it by pressing MEM, unless the measurement includes 3 addressing criteria. H ± DC TEST Ω MEM E MEM ± DC OBJ. E Press the MEM key a second time to record. OBJ. H TEST Ω MEM Ω E The device automatically proposes the first free location in memory (FrEE OBJ: TEST). AUTO 39 AUTO MEM Use the and keys to change the memory location. and When you change to sweep mode (SWEEP), the device automatically activates the memory mode (MEM). It proposes a memory location before starting the measurement. You can accept it or change it. All of the results obtained will be stored at this location at the end of the measurement. EARTH H S OBJ. E CONFIG TEST SWEEP For soil resistivity and potential measurements, if you make several measurements with different distances d, you can store them under the same OBJ:TEST number, with the distance as third addressing criterion. H ρ W d k Ωm S OBJ. TEST d ES d = E m MR It will subsequently be possible to overwrite values already stored with new ones having the same distance d, or even to add new results having other values for the distance d provided that all of the other measurement parameters are identical. 7.2. RETRIEVAL OF STORED RESULTS When a measurement function has been selected using the switch, the MR (2nd + MEM) key can be used to retrieve only the results stored in this function. then H EARTH S OBJ. The key is used to change the item that is flashing and the key is used to choose what you want to change: OBJ, TEST, or the third addressing criterion (the frequency in the example opposite). Hz 2nd MEM E MR Pressing the DISPLAY key displays the measurement time (tiME), year (dAtE), and date in mm.dd form. TEST Ω H SWEEP To display the measurement and its parameters. EARTH S To exit from the memory retrieval mode at any time. DISPLAY DISPLAY E MR SWEEP 40 MR The SETUP function (see §8) lets you read all memory addresses one after the other independently of which measurement function is chosen. 7.3. ERASURE OF THE MEMORY There are two ways to erase the internal memory of the tester: 7.3.1. COMPLETE ERASURE Press the MEM key to display the number of memory spaces available. Set the switch to SET-UP. SET-UP SET-UP MEM OFF Press the MEM key again. To perform a complete erasure of the memory. (long press) MEM > 2s MEM To exit without erasing (short press). MEM 7.3.2. PARTIAL ERASURE Set the switch to SET-UP. Press the MR key to display SET-UP all occupied memory locations, independently of the measurement function. SET-UP MR OFF 41 Use the and keys to select the record to be erased. To erase the selected record. In the case of a record having a third addressing criterion, only the one displayed will be erased. Press the MEM key. (long press) OBJ. TEST MEM Hz MR > 2s SWEEP MEM To exit without erasing (short press). MEM 42 8. CONFIGURATION (SETUP) Set the switch to SET-UP. The device prompts you to press a key with the following message: SET-UP SET-UP OFF 8.1. PRESS THE CONFIG KEY The CONFIG key is used to set the date, the time, and the data transfer rate. It is also used to reset the device to the factory settings, but the date, the time, and any stored measurement results will be kept. It is also used, if a Pylon Box is connected, to test it and to calibrate the AmpFLEX current sensors. Use the key to choose the digit to be changed and increment or decrement it with the the word proposed (for example ON or OFF) using the key. The date: year, month, and day. The time. CONFIG CONFIG The data rate: 9.6k, 19.2k, and 38.4k Reset of the device to the factory settings. k CONFIG CONFIG key, or, as the case may be, change 1 Sx1 4 H A CONFIG If a C.A 6474 Pylon Box is connected. Otherwise, the device returns to the initial screen. A E AUTO 43 8.2. PRESS THE DISPLAY KEY You can change the flashing parameter using the key, and choose the parameter to be changed using the The alarm is used in the 2-wire resistance measurement. You can activate the alarm (On) or de-activate it (OFF), choose its direction, high (>) or low (<), and its value (between 1 and 999Ω). See §3.1.3. The distance can be expressed in metres (m) or in feet (ft). key. m DISTANCE ALARM< Ω DISPLAY DISPLAY You can choose the bus address of the device (for communication with a PC) between 1 and 247. The buzzer can be activated (On) or deactivated (OFF). DISPLAY DISPLAY COM 8.3. PRESS THE MEM KEY By pressing the MEM key, you can display the level of occupancy of the memory of the device and possibly erase all records (see §7.3.1). 8.4. PRESS THE MR KEY By pressing the MR key, you can display all of the records and erase them individually (see §7.3.2). 8.5. INTERNAL PARAMETERS This information is important for any calibration or repair work on the tester. If you keep the CONFIG key pressed while turning the switch to the SET-UP position, ... SET-UP SET-UP + CONFIG OFF 44 ... The device displays its internal software version number (SOFt) and its serial number (InSt) on two lines. 8.6. CHECK OF THE DISPLAY UNIT If you keep the DISPLAY key pressed while turning the switch to the SET-UP position, ... SET-UP ... the device displays all segments of the display unit until you leave the SET-UP position or press any key. SET-UP ρ >< H W S S x 10 / 10 EARTH COUPLING 1 2 3 4 OK d + S A d ALARM< > dA d ES d DISPLAY E OFF 45 = d OBJ. TEST 12 34 ALL ± mVACDC k Ωm k Ωft R 0 DC AC mVA kΩft NOISE< DISTANCEFREQUENCY > SMOOTH Hz REMOTE COM = mA kΩft MEMMR CONFIG MANUALAUTO SWEEP 2nd 9. ERROR MESSAGES When started up, the C.A 6472 device automatically performs a self-test. If a fault appears during this self-test or during a measurement, the device displays a message in the form Err XX. There are 3 categories of errors: Harmless Errors 6, 7, 11, and 17 The message appears for approximately 1 second to inform the user. Consider a repair if the error recurs. Recoverable Errors 5, 9, 14, 15, 18, 19, 30, 31, 32, and 33 The error concerns the current measurement function and disappears if the function is changed. The device can therefore be used, but a repair will be necessary if the error persists. Fatal Errors 6 and 7 are always preceded by an automatic reset. During error 11, the device itself performs a reset to the default values. Error 18 reports that it is impossible to recharge the internal battery of the device. If error 18 is reported during the recharging of the battery, disconnect the cord from line power and proceed as described below for “fatal” errors. In the case of error 19, a complete erasure of the records may be a solution. In the case of errors 31, 32, and 33, a voltage or current that is too high occurred during a measurement. Check your measurement circuit in this case. Errors 0, 1, 2, 3, 8, 12, 13, 15, 16, 18 (during recharging of the batteries), and 21 These errors prevent any operation. Stop the device and switch it back on. If the error persists, a repair is necessary. 46 10. CONNECTION TO A PC AND ANALYSIS SOFTWARE You will find more detailed information about connection to a PC, remote control of the tester by a PC, reading measurement results stored in the device, and the modification of certain data in the memory (for example the values of the sweep frequencies) in the documentation of DataView software for earth testers. 47 11. SPECIFICATIONS AND TECHNICAL CHARACTERISTICS 11.1. REFERENCE CONDITIONS Quantities of influence Reference values Temperature 20 ± 3 °C Relative humidity 45 to 55 % RH Supply voltage 9 to 11,2 V Frequency band of the input signal 0 to 440 Hz Capacitance in parallel with the input resistance 0 µF Electric field < 1 V/m Magnetic field < 40 A/m In the paragraphs that follow, the intrinsic error is defined under the reference conditions and the operating error under the operating conditions in accordance with IEC standard 61557 -1, -4, and -5. 11.2. ELECTRICAL CHARACTERISTICS 11.2.1. FREQUENCY MEASUREMENTS Measurement method: digital by sampling at 4028 Hz, low-pass filter, FFT. The frequency displayed is that of the spectral component having the greatest amplitude. Measurement cycle: approximately 3 displays per second. Measurement range 5 to 450 Hz Resolution 1 Hz Operating error ± 2 Hz Minimum input voltage 10 mV Minimum current in the current clamp 0.5 mA Minimum current of the AmpFLEX signal 5 mA 11.2.2. VOLTAGE MEASUREMENTS Voltage overloads up to 75 Vrms are displayed by: “> 65 V”. Permanent voltage overloads between 70V and 75V on terminals H and E can overheat the protection varistance. They should therefore be avoided. Voltages exceeding 75 Vrms trigger error message 31 (external voltage too high) or 32 (overshoot of voltage measurement range). If terminals H and E are put into contact with the line voltage, the protection fuse blows. All other terminals withstand the nominal line voltage without difficulty. Measurement of external voltages Measurement method: digital by sampling at 4028 Hz, low-pass filter, FFT. The frequency displayed is that of the spectral component having the greatest amplitude. Measurement cycle: approximately 3 displays per second. Conversion of the signal: TRMS or sum of all harmonics from 10 to 450 Hz during selective earth measurements with clamp or AmpFLEX sensors. Measurement range Resolution 0.00 – 9.99 V 10.0 – 65.0 V 0.01 V 0.1 V Intrinsic error ± (2% + 1 pt) Operating error ± (5% + 1 pt) Input impedance ZH-E, ZS-E (ZS-ES ) Service frequency 1.2 MΩ DC and 15 - 440 Hz 48 Functional voltage measurements The values of UH-E, US-E and US-ES, used for DC and AC voltage resistance measurements, are called “functional voltages” and are measured by the instrument. In all AC voltage functions, it is the fundamental frequency of the voltage created by the test signal that is measured. The operating uncertainty of a functional voltage measurement may be greater than that indicated for an AC resistance measurement because, during the calibration of the instrument, the frequency characteristics of the voltage channel are matched to those of the current channel. Measurement range 0.00 - 9.99 mV 10.0 - 99.9 mV 100 - 999 mV 1.00 - 9.99 V 10.0 - 65.0 V 0.01 mV 0.1 mV 1 mV 0.01 V 0.1 V Resolution Frequency band DC and 41 – 513 Hz 537 – 5078 Hz Intrinsic error ± (2% + 1 pt) ± (4% + 1 pt) Operating error ± (5% + 1 pt) ± (7% + 1 pt) 11.2.3. CURRENT MEASUREMENTS EXTERNAL CURRENT MEASUREMENTS Measurement method: digital by sampling at 4028 Hz, low-pass filter, FFT. Measurement cycle: approximately 3 displays per second. Conversion of the signal: sum of all harmonics from 10 to 450 Hz. With C182 current clamp Measurement range 0.00 - 9.99 mA 10.0 - 99.9 mA Resolution 0.01 mA Frequency band 100 - 999 mA 1.00 - 9.99 A 10.0 - 40.0 A 1 mA 0.01 A 0.1 A 0.1 mA 16 - 49 Hz 50 - 99 Hz 100 - 400 Hz Operating error from 0.5 to 100 mA ± (10% + 2 pt) ± (5% + 2 pt) ± (3% + 2 pt) Operating error from 0.1 to 40.0 A > 20% ± (10% + 2 pt) ± (5% + 2 pt) With MN82 current clamp Measurement range 0,00 - 9,99 mA 10,0 - 99,9 mA Resolution 0,01 mA Frequency band 100 - 999 mA 1,00 - 9,99 A 10,0 - 40,0 A (1) 1 mA 0,01 A 0,1 A 0,1 mA 16 - 49 Hz (1) 50 - 99 Hz (1) 100 - 400 Hz Operating error from 0.5 to 100 mA ± (15% + 2 pt) ± (7% + 2 pt) ± (5% + 2 pt) Operating error from 0.1 to 40.0 A > 20% ± (15% + 2 pt) ± (7% + 2 pt) (1): The C.A 6472 device cannot tell which clamp is connected to the instrument. In the case of the MN82 clamp, with currents > 10 A and frequencies < 100 Hz, there will therefore be no warning message. The user is responsible for ensuring observance of the limits of use of the MN82 current clamp. With the C.A 6474 Pylon Box Measurement range Resolution 0.0 - 99.9 mA (1) 100 - 999 mA 1.00 - 9.99 A 10.0 - 99.9 A 0.1 mA (1) 1 mA 0.01 A 0.1A (1): Valid only in the SENSITIVITY x 10 position The current measured depends on the number of turns of the AmpFLEX sensor around the conductor to be measured: if the AmpFLEX sensor is wrapped 4 times around a conductor carrying a current of 1 A, the input signal will be the same as if the AmpFLEX sensor were wrapped once around a conductor carrying a current of 4 A. The operating error is therefore indicated for an input signal current in A.tr (Ampere.turns). The minimum current measured also depends on the setting of the SENSITIVITY switch as indicated by the table below: SENSITIVITY IMIN (A.tr) points additional error (pt-er) x 10 0.01 5 x1 0.04 2 x 1/10 0.16 2 49 Operating error Current (A.tr) 16 - 49 Hz 50 - 99 Hz 100 - 400 Hz IMIN - 0.399 ± (20% + pt-er) ± (5% + pt-er) ± (3% + pt-er) 0.4 - 39.9 ± (10% + 2 pt) ± (3% + 2 pt) ± (3% + 2 pt) 40 - 99.9 ± (10% + 2 pt) ± (3% + 2 pt) ± (20% + 2 pt) FUNCTIONAL CURRENT MEASUREMENTS The values of IH-E, IES and ISEL, used for DC and AC voltage resistance measurements, are called “functional currents” and are measured by the instrument. In all AC current functions, it is the fundamental frequency of the current created by the test signal that is measured. The operating error of a functional current measurement may be greater than that indicated for an AC resistance measurement because, during the calibration of the instrument, the frequency characteristics of the voltage channel are matched to those of the current channel. Measurement method: digital by sampling at 4028 Hz, low-pass filter, FFT. Measurement cycle: approximately 3 displays per second. Measurement range 0.00 - 9.99 mA 10.0 - 99.9 mA 100 - 350 mA 10 µA 0.1 mA 1 mA Resolution Frequency band DC and 41 – 513 Hz 537 – 5078 Hz Intrinsic error ± (2% + 1 pt) ± (4% + 1 pt) Operating error ± (5% + 1 pt) ± (7% + 1 pt) 11.2.4. DC RESISTANCE MEASUREMENTS Measurement method: Nominal output voltage: Max. output current: Maximum overload (permanent): Maximum inductive overload: Maximum spurious voltage: Automatic range selection: Duration of measurement: Measurement cycle: Compensation of leads: Adjustment of the alarm: Voltage/current measurement (Standard IEC 61557 part 4). 16 Vdc (if R < 22 Ω the output voltage is reduced to 10 Vdc) >200 mAdc for resistances < 20 Ω 50 Vrms (protection up to 250V is ensured) 2H 60 Vpeak > 10 Hz approximately 5 s 8 s with automatic polarity reversal 3 per second in manual mode possible from 0 to 5 Ω “>” or “<” between 1 and 999 Ω 2-wire mΩ measurements Measurement range Resolution 0.12 - 9.99 Ω 10.0 - 99.9 Ω 0.01 Ω 0.1 Ω 100 - 999 Ω 1.00 - 9.99 kΩ 10.0 - 99.9 kΩ 1Ω 10 Ω 100 Ω Intrinsic error ± (2% + 2 pt) Operating error ± (5% + 3 pt) 4-wire mΩ measurements Measurement range Resolution 0.020 - 9.999 Ω 10.00 - 99.99 Ω 100.0 - 999.9 Ω 1.000 - 9.999 kΩ 0.001 Ω 0.01 Ω 0.1 Ω Intrinsic error ± (2% + 2 pt) Operating error ± (5% + 5 pt) 50 1Ω 10.00 - 99.99 kΩ 10 Ω 11.2.5. AC EARTH RESISTANCE MEASUREMENTS Measurement method: No-load voltage: Test frequency: Short-circuit current: Rejection of spurious signals: Max. acceptable overload: Maximum value for RH and RS: Duration: Short press on START: Long press on START: Voltage/current measurement (IEC 61557 part 5) 16 or 32 Vrms, rectangular voltage (for currents > 240 mA the output voltage is reduced to 10 Vrms) choice of values from 41 to 5078 Hz (see §5.1) >200 mAac > 80 dB for frequencies 20% or more above or below the test frequency 250 Vrms 100 kΩ approximately 7 s to the 1st value of RE at 128 Hz, then 3 measurements per second. approximately 15 s to the 1st value of RE at 128 Hz, then 3 measurements per second. The following error indications apply to the reference conditions, with a test voltage of 32 V, a test frequency of 128 Hz, RH and RS = 1 kΩ, and no spurious voltage. The operating error of an AC earth resistance measurement can be less than that indicated for the voltage or the current because, during the calibration of the instrument, the frequency characteristics of the voltage channel are matched to those of the current channel. Measurement of resistance of auxiliary electrodes RH, RS Measurement range Resolution 0.14 - 9.99 Ω 10.0 - 99.9 Ω 0.1 Ω 0.1 Ω Operating error 100 - 999 Ω 1.00 - 9.99 kΩ 10.0 - 99.9 kΩ 1Ω 10 Ω 100 Ω ± (10% + 2 pt) For this measurement, keep the START key pressed for more than 2 s. Between 41 and 256 Hz, the resistances of the auxiliary electrodes are measured at the test frequency set. At higher test frequencies, the resistance of the auxiliary electrodes is measured at 256 Hz. 3-pole earth resistance measurement RE Measurement range Resolution 0.09 - 9.99 Ω 10.0 - 99.9 Ω 0.01 Ω 0.1 Ω Intrinsic error 100 - 999 Ω 1.00 - 9.99 kΩ 10.0 - 99.9 kΩ 1Ω 10 Ω 100 Ω ± (2% + 1 pt) Operating conditions: RE < 3 x RH, UOUT = 32 V Values for RH, RS and RE (RH + RS) / RE < 3000 (RH + RS) / RE < 5000 Operating error for RE Frequency (Hz) 41 - 513 ± (3% + 2 pt) 537 – 5078 ± (6% + 2 pt) RH > 3 kΩ, Rs ≤ 30 kΩ 41 - 513 ± (10% + 2 pt) RH > 30 kΩ, Rs <100 kΩ 41 - 128 ± (10% + 3 pt) RH ≥ 0 Ω, Rs ≤ 3 kΩ Note: for a test voltage UOUT of 16 V, halve value of RH 4-pole earth resistance measurement RE Measurement range Resolution Intrinsic error 0.011 - 9.999 Ω 10.00 - 99.99 Ω 100.0 - 999.9 Ω 1.000 - 9.999 kΩ 10.00 - 99.99 kΩ 0.001 Ω 0.01 Ω 0.1 Ω ± (2% + 1 pt) 51 1Ω 10 Ω Operating conditions: RE < 3 x RH, UOUT = 32 V Values for RH, RS and RE (RH + RS) / RE < 3000 (RH + RS) / RE < 5000 Operating error for RE Frequency (Hz) 41 - 513 RH ≥ 0 Ω, Rs ≤ 3 kΩ ± (3% + 2 pt) 537 – 5078 ± (6% + 2 pt) RH > 3 kΩ, Rs ≤ 30 kΩ 41 - 513 ± (10% + 2 pt) RH > 30 kΩ, Rs <100 kΩ 41 - 128 ± (10% + 3 pt) Note: for a test voltage UOUT of 16 V, halve value of RH. Selective 4-pole earth resistance measurement with C182 or MN82 clamp Same characteristics as 4-pole earth measurements with the following particular conditions: Minimum current: C182, IES >0.5mA MN82, IES >2mA Maximum RSEL/RE ratio: C182, (RSEL/RE ) <500 MN82, (RSEL/RE) <120 with RH + RE <20Ω 11.2.6. MEASUREMENT OF SOIL RESISTIVITY ρ Measurement method: Voltage/current measurement (IEC 61557, part 5) No-load voltage: 16 or 32 Vrms, rectangular voltage Test frequency: choice of values from 41 to 128 Hz (see §5.1) Short-circuit current: >200 mAac Rejection of spurious signals: >80 dB for frequencies 20% or more above or below the test frequency Max. acceptable overload: 250Vrms Maximum value for RH, RS, RES, RE:100kΩ (measurement error see §11.2.5) Calculation by Wenner method: ρW = 2π d RS-ES Calculation by Schlumberger method: ρS = (π (d2 - (A/2)²)/A) RS-ES Maximum value of ρ: 999 kΩm (display in kΩft is not possible) Duration: Short press on START: approximately 8s to the 1st value of RS-ES at 128 Hz, then 3 measurements per s. Long press on START: approximately 20s to the 1st value of RS-ES at 128 Hz, then 3 measurements per s. Measurement range Resolution 0.00 - 9.99 Ω 10.0 - 99.9 Ω 100 - 999 Ω 1.00 - 9.99 kΩ 10.0 - 99.9 kΩ 0.01 Ω 0.1 Ω 1Ω 10 Ω 100 Ω Intrinsic error ± (2% + 1 pt) The intrinsic error indication is given for the reference conditions, with a test voltage of 32 V, a test frequency of 128 Hz, RP-H, RP-S, RP-ES and RP-E = 1 kΩ, and no spurious voltage. Operating conditions RS-ES < 3 x RP-H and: Operating error for RS-ES Relectrode ≤ 100 kΩ Relectrode / RS-ES ≤ 2,000 ± (7% + 2 pt) Relectrode ≤ 50 kΩ Relectrode / RS-ES ≤ 10,000 ± (15% + 3 pt) Relectrode ≤ 10 kΩ Relectrode / RS-ES ≤ 20,000 ± (20% + 1 pt) Relectrode is the resistance of the earth electrodes RP-E, RP-ES, RP-S, RP-H, assumed identical. Note: for a test voltage UOUT of 16 V, halve value of Relectrode. Measurement of resistance of auxiliary electrodes RP-H, RP-S, RP-ES, RP-E Measurement range Resolution Operating error 0.14 - 9.99 Ω 10.0 - 99.9 Ω 0.1 Ω 0.1 Ω 100 - 999 Ω 1.00 - 9.99 kΩ 10.0 - 99.9 kΩ 1Ω 10 Ω 100 Ω ± (10% + 2 pt) For this measurement, keep the START key pressed for more than 2 s. Between 41 and 128 Hz, the resistances of the auxiliary electrodes are measured at the test frequency set. At higher test frequencies, the resistance of the auxiliary electrodes is measured at 128 Hz. 52 11.2.7. MEASUREMENTS OF EARTH POTENTIAL V POT Measurement method: No-load voltage: Test frequency: Short-circuit current: Rejection of spurious signals: Max. acceptable overload: Maximum value for RH, RS: Duration: Short press on START: Long press on START: Measurement range Voltage/current measurement 16 or 32Vrms, rectangular voltage choice of values from 41 to 5078 Hz (see §5.1) > 200 mAac > 80 dB for frequencies 20% or more above or below the test frequency 250 Vrms 100 kΩ (measurement error see §11.2. 5) approximately 7s to the 1st value of RE at 128 Hz, then 3 measurements per s. approximately 15s to the 1st value of RE at 128 Hz, then 3 measurements per s. 0.00 - 99.99 mV 100.0 - 999.9 mV 1.000 - 9.999 V 10.00 - 65.00 V 0.01 mV 0.1 mV 1 mV 10 mV Resolution Intrinsic error US-E ± (5% + 1 pt) The intrinsic error indication is given for the reference conditions, with a test voltage of 32 V, a test frequency of 128 Hz, RH and RS = 1 kΩ, and no spurious voltage. Operating conditions RE < 3 x RH and: RH RS < 3 kΩ ≤ 1 kΩ Operating error for US-E Freq. [Hz] US-E 41 - 512 < 3 mV 41 - 5078 > 3 mV ± (10% + 10 pt) 41 - 1025 3 - 60 kΩ 1 - 3 kΩ 41 - 512 3 - 10 kΩ 41 - 128 ± (5% + 4 pt) > 10 mV Note: for a test voltage UOUT of 16 V, halve value of RH. 11.2.8. EARTH MEASUREMENTS WITH 2 CURRENT CLAMPS Measurement method: Induced short-circuit current: Frequency of the signal: Suppression of spurious signals: Maximum acceptable spurious current: Maximum value RH, RS: Duration of measurement: Voltage/current measurement with rectangular AC signal < 26 Arms (with C182) and < 5 Arms (with MN82) Automatic: 1611 Hz. Manual: 128, 1367, 1611 or 1758 Hz > 80 dB for frequencies 20% or more above or below the test frequency 20 Apeak 100 kΩ (for measurement error see §11.2.5) approximately 7s for the 1st value of RLOOP, then 3 measurements per s. Measurement frequency 1367 Hz - 1611 Hz - 1758 Hz Measurement range Resolution Operating error (1) (without spurious current) 0,10 - 9,99 Ω 10,0 - 99,9 Ω 100 - 500 Ω 0,01 Ω 0,1 Ω 1Ω C182 ± (10% + 1 pt) MN82 ± (20% + 2 pt) Measurement frequency 128 Hz Measurement range Resolution Operating error (without spurious current) (1) 0,10 - 9,99 Ω 10,0 - 30,0 Ω 0,01 Ω 0,1 Ω C182 ± (20% + 2 pt) MN82 not specified (1): Observe the minimum distance between the two clamps indicated in the table of §3.6. 53 11.2.9. MEASUREMENTS WITH THE PYLON BOX AND THE AMPFLEX SENSORS Measurement method: No-load voltage: Test frequency: Short-circuit current: Suppression of spurious signals: Maximum acceptable overload: Maximum value RH, RS: Duration: Short press on START: Long press on START: Measurement range Measurement of voltage/current with rectangular AC signal 16 or 32 Vrms, rectangular voltage choice of values from 41 to 5078 Hz (see table in §4.1) >200 mAac >80 dB for frequencies 20% or more above or below the test frequency 250 Vrms 100 kΩ (for measurement error see §11.2.5) approximately 7s to the 1st value of RE at 128 Hz, then 3 measurements per s. approximately 15s to the 1st value of RE at 128 Hz, then 3 measurements per s. 0.067 - 9.999 Ω 10.00 - 99.99 Ω 100.0 - 999.9 Ω 1.000 - 9.999 kΩ 0.001 Ω Resolution 0.01 Ω 0.1 Ω Intrinsic error US-E 10.00 - 99.99 kΩ 1Ω 10 Ω ± (5% + 1 pt) The intrinsic error indication is given for the reference conditions, with a test voltage of 32 V, a test frequency of 128 Hz, RH and RS = 1kΩ, and no spurious voltage. The operating error for the measurements of RH, RS and RE is identical to that of the 4-pole earth measurement (see §11.2. 5). The operating error of an AC resistance measurement can be less than that indicated for the voltage or the current, because during the calibration of the instrument the frequency characteristics of the voltage channel are matched to those of the current channel. With test frequencies between 41 Hz and 5,087 Hz, between 1 and 4 turns of the AmpFLEX sensor, and a selection of 1 to 4 measurement channels, the operating errors are the following: SENSITIVITY and ISEL minimal Operating error for RS-ES S x 1/10 ISEL > 10 mA ± (10% + 4 pt) Sx1 ISEL > 5 mA ± (5% + 4 pt) S x 10 ISEL > 5 mA ± (5% + 4 pt) 5 mA > ISEL > 0.5 mA ± (15% + 10 pt) 11.3. POWER SUPPLY The instrument is powered by a rechargeable 9.6 V 3.5 Ah NiMH battery pack. This has many advantages: long life with small size and weight, the possibility of recharging your battery rapidly, a very small memory effect: you can recharge your battery rapidly, even if it is not fully discharged, without reducing its capacity, protection of the environment: no polluting materials such as lead or cadmium. The NiMH technology allows a limited number of charging/discharging cycles. The number depends on the conditions of use and on the charging conditions. Under optimum conditions, the number of cycles is 200. The instrument has 2 charging modes: rapid charging: the battery recovers 90% of its capacity in 3h; maintenance charging: this mode cuts in when the battery is very low and at the end of rapid charging. The device informs you, on the display unit, of the type of charging: bAtt CHrG Fast charging in progress (normal state). bAtt LOW Battery voltage too low for a fast charge charging at a lower current. bAtt Battery voltage too high for a fast charge charging at a lower current. bAtt HOt The battery is too hot for a fast charge (>40°C) charging at a lower current. bAtt COLd The battery is too cold for a fast charge (<0°C) charging at a lower current. bAtt FULL The battery is fully charged maintenance charge. The day before using your device, check its charge condition. If the battery symbol the device overnight (see §1.3). now displays only one bar, or none, charge Using a special power supply unit, the C.A 6472 device can also be recharged from a 12 Vdc outlet in a vehicle. 54 In this case, the low-potential contact of the vehicle’s 12 Vdc outlet is at the potential of inputs E and ES of the tester. As a precaution, the device must therefore not be used or connected if there is reason to suspect the presence of voltages exceeding 32 V on these inputs. In order to make the most of your battery and extend its effective life: Use only the charger supplied with your device. The use of another type of charger may be hazardous! Charge your device only between 0° and +40°C. Observe the conditions of use and of storage defined in this user guide. The time between charges depends on the ranges: Function Power consumed Device off Typical number of measurements (1) < 5 mW - Voltage measurement 1.5 W 4500 mΩ (2) 4.9 W 1500 3 poles 4 poles (3) 4.9 W 1500 ρ 4.9 W 1500 V pot. 4.9 W 1500 2 clamps 3.7 W 2000 AmpFLEX 5.5 W 1200 (4) (1): measurements in automatic mode at 25-s intervals. In sweep mode, the number of measurement is divided by 3 or 4. (2): with R = 1Ω. (3): with RH + RE = 100Ω. (4): with RH + RS-ES = 100Ω. 11.4. ENVIRONMENTAL CONDITIONS Use indoors or outdoors. Range of use 0°C to +45°C and 0% to 90% RH Specified operating range (5) 0°C to +35°C and 0% to 75% RH Storage (without battery) -40°C to +70°C and 0% to 90% RH Altitude< 3000 m Degree of pollution2 (5): This range corresponds to the one defined by standard IEC 61 557, for which an operating error including the quantities of influence is defined. When the device is used outside this range, 1.5%/10°C and 1.5% between 75 and 90% RH must be added to the operating error. 11.5. CHARACTERISTICS OF CONSTRUCTION C.A. 6472 tester Dimensions (L x D x H): 272 x 250 x 128 mm Mass: approximately 3.2 kg C.A 6474 Pylon Box Dimensions (L x D x H): 272 x 250 x 128 mm Mass: approximately 3.2 kg Index of protection PI 53 according to IEC 60 529 IK 04 according to IEC 50102 Fall test Vibrations according to IEC 61010-1 according to IEC 61557-1 11.6. CONFORMITY TO INTERNATIONAL STANDARDS Electrical safety as per IEC 61010-1 Measurement according to IEC 61557 parts 1, 4 and 5. Safety level categories: measurement category IV, 50V with respect to earth, 75V differential between terminals. 55 11.7. ELECTROMAGNETIC COMPATIBILITY The instrument satisfies the EMC and LVD directives required for the CE marking and product standard IEC 61326-1. Immunity in industrial environment Emissions in residential environment. 56 12. TERMS AND DEFINITIONS This section recalls the definitions of a few of the terms used in the context of earth measurements: Earth conductor The conductor that connects the installation to be earthed to its earth. Earth contact (E) The underground conductor that provides the electrical contact with the surrounding earth. Earth measurement The measurement made to check an earth; it may, depending on the situation, concern an individual earth contact or a complex earthing system. Passive earth measurement Measurement made using the spurious current flowing in the earthing installation. Active earth measurement Measurement made using a current from the internal voltage generator of the device, between terminals H and E. Earth A local group of interconnected earth contacts. An earth may be provided by metallic parts of an installation, such as the underground legs of pylons, metallic reinforcements (stays), foundations, the jackets of underground cables, earth conductors, etc. Auxiliary earth electrode (H) An auxiliary earth contact through which the measurement current flows. Auxiliary earth electrode (S) An auxiliary earth electrode used to measure the potential. The voltage proportional to the earth resistance to be determined is measured between electrode S and earth contact (E) or the auxiliary electrode (ES). Auxiliary earth electrode (ES) The measurement point connected to the earth or to an earthing system that is used to measure the electric potential existing at this point with respect to auxiliary earth electrode S. Earth resistance Resistance measured between the earth and reference earth. Selective earth resistance A partial resistance of an earth or of an earthing system. Its value can be measured by a selective measurement of the current flowing through this branch of the earthing circuit. Each selective earth resistance is by definition always greater than the total earth resistance (circuits in parallel). Soil resistivity (specific) (ρ) Can be represented by a cube 1 metre on a side filled with the soil in question, of which the resistance is measured between two opposed sides. The unit of measurement is the ohm-metre (Ωm). Earthing system The set of all connected equipment that provides an earth. Contact voltage The share of an earth voltage to which a person’s body is exposed by contact with the installation. The current resulting from this voltage is limited by the resistance of the person’s body and by the resistance of the ground on which he/she is located. Step voltage The share of an earth voltage to which a person is exposed by taking a step, in other words separating his/her feet by one metre. This voltage results in a current through the person’s feet. Earth voltage Voltage measured between the earth and the reference earth. Earth The point of connection to the earth. Reference earth The part of the earth (notably its surface) outside the zone of influence of the earth contact or of the earthing system. 57 13. GLOSSARY This glossary lists the terms and abbreviations used on the device and its digital display unit. 3 poles: earth resistance measurement with 2 auxiliary electrodes (3P). 4 poles: 4-wire measurement of low earth resistance using 2 auxiliary electrodes (4P). AmpFLEX: selective earth measurement using the C.A 6474 accessory and AmpFLEX current sensors. C1: coupling coefficient of earth RA with earth Rb (C1= RC/R1 ). C2: coupling coefficient of earth Rb with earth RA (C2= RC/R2 ). d, A: distances to be programmed for the resistivity calculation depending on the measurement method used. mΩ: low resistance/continuity measurement. E: terminal E (earth electrode, measurement current return terminal) EARTH: earth measurement (3-pole or 4-pole). EARTH COUPLING: measurement of coupling between 2 earth electrodes. ES: terminal ES (acquisition of reference potential for the 4P earth resistance calculation). H: terminal H (measurement current injection terminal). I-Act : external current presently (Act) measured by the clamp (IES) or the AmpFLEX sensors (ISEL). IES: current measured by the clamp connected to terminal ES (selective earth measurement with clamp). IH-E: measurement current flowing between terminals H and E. ISEL: current measured using the C.A 6474 (selective earth measurement with AmpFLEX). NOISE: indicates that a spurious external voltage is present and interfering with the earth or resistivity measurement. R: mean resistance calculated from R+ and R-. R+: resistance measured with a positive current flowing from terminal H to terminal E. R-: resistance measured with a negative current flowing from terminal H to terminal E. R-Act (1): present (Act) resistance calculated from values U-Act and I-Act. R1: first value measured to calculate the coupling between 2 earth electrodes (R1 = RA + RC ). R2: second value measured to calculate the coupling between 2 earth electrodes (R2 = Rb + RC ). R1-2: third value measured to calculate the coupling between 2 earth electrodes (R1-2 = RA + Rb ). RA: first earth value calculated (RA = R1 - RC ). Rb: second earth value calculated (Rb = R1 - RC ). RC: coupling resistance between earths RA and Rb (RC = (R1 + R2 - R1-2 )/2). RE: resistance of the earth connected between terminal E and electrode S. RH: resistance of the electrode connected to terminal H. RLOOP: earth loop resistance (2 clamps). RPASS: value of resistance R-Act (PASS for “passive” measurement made with the spurious current flowing in the installation). RS: resistance of the electrode connected to terminal S. (1) RSEL: selective earth resistance (current measurement using clamp or AmpFLEX). RS-ES : resistance between electrodes S and ES (used for the resistivity measurement). R∆0: measurement leads compensation resistance. (2) S: terminal S (acquisition of measurement potential for the earth resistance calculation). U-Act : present (Act) external voltage on the terminals of the device. UH-E: voltage measured between terminals H and E. UOUT: voltage generated by the device between its terminals H and E (32V or 16V). (1) 58 US-E: voltage measured between terminals S and E. US-ES: voltage measured between terminals S and ES. USr: frequency chosen by the user (“user” shortened). USrEL: voltage of terminal S (with respect to E) in relative (rEL) form; dimensionless value. V pot.: soil potential measurement. ρS: soil resistivity measured by the Schlumberger method. ρW: soil resistivity measured by the Wenner method. (1): The suffix Act becomes In (for “Input”) when this value is recorded in the device, then read, in order to distinguish between present value and recorded value. In both cases, the quantity displayed is associated with its frequency. (2): In this case, the resistances of the 4 electrodes used for the measurement are indicated by RP-H, RP-S, RP-ES, RP-E. 59 14. MAINTENANCE For maintenance, use only the spare parts specified. The manufacturer cannot be held liable for any accident that occurs following a repair not performed by its customer service department or by an approved repairer. 14.1. CLEANING Disconnect the unit completely and turn the rotary switch to OFF. Use a soft cloth, dampened with soapy water. Rinse with a damp cloth and dry rapidly with a dry cloth or forced air. Do not use alcohol, solvents, or hydrocarbons. 14.2. REPLACEMENT OF THE FUSE The device has two protection fuses with identical characteristics: Fuse in terminal H: If this fuse is defective, the instrument ceases to produce an output voltage and active resistance measurements are therefore impossible. To check the condition of the fuse, turn the switch to the 2-wire mΩ function, connect terminals H and E with a lead, and start a resistance measurement. If the instrument makes no measurement and if the symbol of terminal H flashes, the fuse must be replaced. Fuse on clamp input ES: If this fuse is defective, the instrument ceases to detect the presence of a clamp on input ES. Selective 4-pole earth measurements with clamp and two-clamp measurements become impossible. To check the condition of the fuse, choose the 4-pole function and connect a clamp to terminal ES. If no clamp symbol appears alongside the symbol of terminal ES, the fuse must be replaced. To keep the device safe, replace the defective fuse only with a fuse having strictly identical characteristics: C.A reference of the batch of 10 F 0.63A – 250V – 5x20mm – 1.5kA fuses: AT0094 Replacement procedure: 1. Disconnect anything connected to the device, set the switch to OFF, and close the cover. 2. Unscrew the four captive screws of the bottom of the housing but do not withdraw them. 3. Open the cover of the housing; lift the instrument cautiously, supporting the front panel so that it does not fall. Delicately remove the front panel with the body of the device from the housing. The fuse of terminal H is now accessible and can be replaced. 3 4 4. If only the fuse of terminal H needs to be replaced, go directly to point 9 below. If you also wish to replace the fuse of clamp input ES, unscrew both screws of the battery compartment cover and remove the cover. 60 5 4 5. Slide the battery a short way out of its compartment, without forcing on the wires, in order to be able to loosen the two screws at the bottom of the battery compartment. Then put the battery back in its place. 6. Delicately lift the bottom of the device and withdraw it without forcing on the wires of the battery. Hold the battery to prevent its falling, then set the bottom down on the side to leave the fuse apparent. The fuse of the clamp input of terminal ES is now accessible on the printed circuit and can be replaced. Avoid touching the circuit and its components with your hands. 6 7. Put the bottom back in place on the front panel and put the electronics of the device back in place without forcing on the wires of the battery. Before lowering the bottom, align the four holes with the four attachment posts. Take care not to snag or crush any battery wire or other cable or component during this operation. 8. Slide the battery a short way out of its compartment, without forcing on the wires, and screw the two screws at the bottom of the compartment back in. Then put the battery back in its place. 9. Put the battery compartment cover back in place and tighten the screws. 10.Remove any dirt there might be on the seal and on the edge of the housing, using a lint-free soft cloth. 11 10 11.Place the body of the device in the housing, close the cover, and tighten the attachment screws. 14.3. REPLACING THE BATTERY The battery of this device is specific: it has precisely matched protection and safety elements. Replacement of the battery by a model other than the one specified may result in damage to equipment or bodily injury by explosion or fire. To keep the device safe, replace the battery only with the original model: C.A reference of the 9.6V, 3.5Ah rechargeable NiMH battery: P01.2960.21 Replacement procedure: 1. Disconnect anything connected to the device, set the switch to OFF, and close the cover. 2. Unscrew the four captive screws of the bottom of the housing but do not withdraw them. 3. Open the cover of the housing; lift the instrument cautiously, supporting the front panel so that it does not fall. Delicately remove the front panel with the body of the device from the housing. 4. Unscrew the two screws of the battery compartment cover and remove the cover. 5. Slide the battery a short way out of its compartment, without forcing on the wires, in order to be able to loosen the two screws at the bottom of the battery compartment. Then put the battery back in its place. 6. Delicately lift the bottom of the device and withdraw it without forcing on the wires of the battery. Hold the battery to prevent its falling, then set the bottom down on the side to leave the battery connector apparent. 61 7 7. Disconnect the 4-point connector of the battery, pushing the tab slightly out of the way. Avoid touching the circuit and its components with your hands. 8. Remove the old battery from its compartment and install the new battery in its place. Pass the connecting wires and connector through the slot provided for this purpose. 9. Connect the battery connector with the two pins towards the clip. Avoid touching the circuit and its components with your hands. 10.Put the bottom back in place on the front panel and electronics of the device, without forcing on the wires of the battery. Before lowering the bottom, align the four holes with the four attachment posts. Take care not to snag or crush any battery wire or other cable or component during this operation. 11.Slide the battery a short way out of its compartment, without forcing on the wires, and screw the two screws at the bottom of the compartment back in. Then put the battery back in its place. 12.Put the battery compartment cover back in place and tighten the screws. 13.Remove any dirt there might be on the seal and on the edge of the housing, using a lint-free soft cloth. 14.Place the body of the device in the housing, close the cover, and tighten the attachment screws. 15.Fully charge the new battery before using the device. 16.Reprogram the date and time of the device (see §8.1). 14.4. METROLOGICAL CHECK Like all measuring or testing devices, regular instrument verification is necessary. This instrument should be checked at least once a year. For checks and calibrations, contact one of our accredited metrology laboratories (information and contact details available on request), at our Chauvin Arnoux subsidiary or the branch in your country. 14.5. REPAIR For all repairs before or after expiry of warranty, please return the device to your distributor. 62 15. WARRANTY, SERVICE Except as otherwise stated, our warranty is valid for twelve months starting from the date on which the equipment was sold. Extract from our General Conditions of Sale, communicated on request. The warranty does not apply in the following cases: inappropriate use of the equipment or use with incompatible equipment; modifications made to the equipment without the explicit permission of the manufacturer’s technical staff; work done on the device by a person not approved by the manufacturer; adaptation to a particular application not anticipated in the definition of the equipment or not indicated in the user manual; damage caused by shocks, falls, or floods. 63 16. TO ORDER C.A 6472 earth and resistivity tester ........................................................................................................................ P01.1265.04 Delivered with: Line power adapter + 2-pole cord for recharging the battery, Data export software + an optical/USB communication cord, 2 C182 clamps with 2 safety leads, 5 user guides (one per language) on a CD-ROM, 5 simplified user guides (one per language), 5 characteristics labels (one per language), 1 carrying bag. 16.1. ACCESSORIES 100m earth & resistivity kit ....................................................................................................................................... P01.1020.24 Comprising: 4 earth electrodes, 4 coils of cable (100m red, 100m blue, 100m green, 30m black), 1 cable reel (10m green), 1 mallet, 5 spade-tip/banana plug adapters, dia. 4mm, 1 prestige carrying bag with space for the C.A 6472 device. 150m earth & resistivity kit ....................................................................................................................................... P01.1020.25 Comprising: 4 earth electrodes, 4 coils of cable (150m red, 150m blue, 100m green, 30m black), 1 cable reel (10m green), 1 mallet, 5 spade-tip/banana plug adapters, dia. 4mm, 1 prestige carrying bag with space for the C.A 6472 device. C.A 647X continuity kit (mΩ setting) ......................................................................................................................... P01.1020.37 Comprising: 4 1.5m cables terminated by 4mm-dia. banana plugs, 4 alligator clips, 2 probe tips. C.A 6474 adapter pylon earth measurements (PYLON BOX) ................................................................................ P01.1265.10 Delivered with an accessories carrying bag containing: 1 C.A 6472-C.A 6474 connecting cord, 6 BNC/BNC cables 15m long, 4 flexible current sensors (AmpFLEX) 5m long, 1 set of 12 identification rings for AmpFLEX, 2 cables (5m green, 5m black) with safety plugs, on reel, 5 spade-tip/banana plug adapters, dia. 4mm, 3 C-clamps, 1 calibration loop, 5 user guides and 5 characteristics labels (one per language). C182 clamp (dia. 52mm) for C.A 6472 ...................................................................................................................... P01.1203.33 Delivered with: 1 2m cable for link to terminal ES. MN82 clamp (dia. 20mm) for C.A 6472 .................................................................................................................... P01.1204.52 Delivered with: 1 2m cable for link to terminal ES. Adapter for charging of battery from a cigarette lighter ....................................................................................... P01.1020.36 DC/DC adapter + 5m connecting cord for cigarette lighter outlet. DataView software for PC ........................................................................................................................................ P01.1020.58 Software for export and processing of stored data and remote operation. 64 Optical/RS communication cable ............................................................................................................................ P01.2952.52 GB power cord ........................................................................................................................................................... P01.2952.53 Miscellaneous Earth & resistivity kit: other combinations and lengths available (see list attached to the standard kit) or by special order (contact your Chauvin Arnoux agency or your approved dealer). AmpFLEX flexible current sensors: other lengths available by special order (contact your Chauvin Arnoux agency or your approved dealer). 16.2. REPLACEMENT PARTS Batch of 10 F 0.63A, 250V, 5x20mm, 1.5kA fuses ................................................................................................... AT0094 Adapter for charging of battery from line power .................................................................................................... P01.1020.35 18V/1.5A AC/DC adapter + 2-pole line power cord. Rechargeable battery: 9.6V, 3.5Ah NiMH storage battery ..................................................................................... P01.2960.21 C.A 6472 – C.A 6474 connecting cord ..................................................................................................................... P01.2952.71 15m BNC/BNC cable ................................................................................................................................................. P01.2952.72 5m AmpFLEX flexible current sensor for C.A 6474 ................................................................................................ P01.1205.50 Delivered with a set of 12 identification rings for AmpFLEX Set of 12 identification rings for AmpFLEX ............................................................................................................. P01.1020.45 Set of 3 clamps .......................................................................................................................................................... P01.1020.46 Green cable, 5m long, for C.A 6474 (link to terminal E) ......................................................................................... P01.2952.91 Black cable, 5m long, for C.A 6474 (link to terminal ES) ........................................................................................ P01.2952.92 Optical/USB communication cable ......................................................................................................................... HX0056-Z Prestige carrying bag ................................................................................................................................................ P01.2980.67 Miscellaneous Replacement parts for Earth & resistivity kit: see the list enclosed with the standard kit or contact your Chauvin Arnoux agency or your approved dealer. 65 66 67 04 - 2013 Code 692322C02 - Ed. 2 DEUTSCHLAND - Chauvin Arnoux GmbH Straßburger Str. 34 - 77694 Kehl / Rhein Tel: (07851) 99 26-0 - Fax: (07851) 99 26-60 SCHWEIZ - Chauvin Arnoux AG Einsiedlerstraße 535 - 8810 Horgen Tel: 044 727 75 55 - Fax: 044 727 75 56 ESPAÑA - Chauvin Arnoux Ibérica S.A. C/ Roger de Flor N° 293, Planta 1- 08025 Barcelona Tel: 902 20 22 26 - Fax: 934 59 14 43 UNITED KINGDOM - Chauvin Arnoux Ltd Unit 1 Nelson Ct - Flagship Sq - Shaw Cross Business Pk Dewsbury, West Yorkshire - WF12 7TH Tel: 01924 460 494 - Fax: 01924 455 328 ITALIA - Amra SpA Via Sant’Ambrogio, 23/25 - 20050 Bareggia di Macherio (MI) Tel: 039 245 75 45 - Fax: 039 481 561 MIDDLE EAST - Chauvin Arnoux Middle East P.O. BOX 60-154 - 1241 2020 JAL EL DIB (Beirut) - LEBANON Tel: (01) 89 04 25 - Fax: (01) 89 04 24 ÖSTERREICH - Chauvin Arnoux Ges.m.b.H Slamastrasse 29/2/4 - 1230 Wien Tel: 01 61 61 961-0 - Fax: 01 61 61 961-61 CHINA - Shanghai Pu-Jiang - Enerdis Instruments Co. Ltd 3 F, 3 rd Building - N° 381 Xiang De Road - 200081 SHANGHAI Tel: +86 21 65 21 51 96 - Fax: +86 21 65 21 61 07 SCANDINAVIA - CA Mätsystem AB Box 4501 - SE 18304 TÄBY Tel: +46 8 50 52 68 00 - Fax: +46 8 50 52 68 10 USA - Chauvin Arnoux Inc - d.b.a AEMC Instruments 200 Foxborough Blvd. - Foxborough - MA 02035 Tel: (508) 698-2115 - Fax: (508) 698-2118 http://www.chauvin-arnoux.com 190, rue Championnet - 75876 PARIS Cedex 18 - FRANCE Tél. : +33 1 44 85 44 85 - Fax : +33 1 46 27 73 89 - [email protected] Export : Tél. : +33 1 44 85 44 86 - Fax : +33 1 46 27 95 59 - [email protected]