1
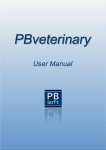
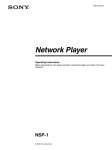
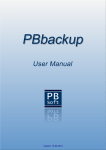
Version 1.3 / 16.06.2015 / 23:47 Copyright 2015 - PB-Soft www.pb-soft.com PBmemory - User Manual Content 1 Introduction................................................................................................. 6 2 Features of PBmemory............................................................................... 6 2.1 New in Version 1.3.................................................................................. 7 2.2 New in Version 1.2.................................................................................. 7 3 System Requirements ................................................................................ 8 3.1 Hardware ................................................................................................ 8 3.2 Software - Host ....................................................................................... 8 3.3 Software - Client ..................................................................................... 8 4 User Requirements ..................................................................................... 8 5 Software Installation................................................................................... 9 5.1 Unpack the Archive................................................................................. 9 5.2 Content of the Archive .......................................................................... 10 Folder "pbmemory"........................................................................................... 10 Folder "source"................................................................................................. 10 Folder "webserver" ........................................................................................... 10 File "PBmemory.exe" ....................................................................................... 10 File "readme.txt" ............................................................................................... 10 6 Starting the Game..................................................................................... 11 6.1 First - Direct Start (Firefox / QtWeb) ..................................................... 12 6.2 Second - Modify Shortcut (Google Chrome / Opera) ............................ 13 6.3 Third - Start with the Webserver (Internet Explorer) ............................. 14 7 The Navigation Bar ................................................................................... 16 7.1 Name and Version ................................................................................ 16 7.2 The Button "New".................................................................................. 16 7.3 The Menu "Size" ................................................................................... 16 7.4 The Menu "Time" .................................................................................. 17 7.5 The Display "Pairs" ............................................................................... 18 7.6 The Display "Moves"............................................................................. 18 7.7 The Button "Manual" ............................................................................. 19 7.8 The Button "Hint" .................................................................................. 20 Page 3 of 32 PBmemory - User Manual 8 Playing the Game...................................................................................... 21 9 Script Configuration ................................................................................. 22 9.1 Specify the Default Table Number ........................................................ 22 9.2 Specify the Image Type ........................................................................ 22 9.3 Specify the Image Directory.................................................................. 23 9.4 Specify the Image Pool Size ................................................................. 23 9.5 Specify the Default Turn Time .............................................................. 23 9.6 Specify the Fade Time .......................................................................... 24 9.7 Specify the Image Preloading ............................................................... 24 10 Images- and Graphics Files ................................................................... 25 10.1 GIF Graphics ...................................................................................... 25 10.2 JPG Photos......................................................................................... 26 11 Customize PBmemory............................................................................ 27 11.1 Modify CSS Styles .............................................................................. 27 11.2 Minify HTML, CSS and JavaScript Files ............................................. 29 11.3 Use Your own Image Files.................................................................. 30 1. Prepare your Memory Images...................................................................... 30 2. Create a Folder for your Images .................................................................. 30 3. Copy your Images ........................................................................................ 31 4. Edit the Configuration File ............................................................................ 31 5. Start the Memory Game ............................................................................... 31 6. Problem Solving ........................................................................................... 31 12 Support .................................................................................................... 32 13 Feedback ................................................................................................. 32 Page 4 of 32 PBmemory - User Manual Dear customer Thank you for using PBmemory! I hope you will like this memory game! This manual will show you how to get started with PBmemory. It provides detailed step by step instructions so that it will be easy for you to install and use this game. One of our objectives is to provide superior support, so that we have happy customers. Therefore, if you have questions or problems while installing or using our software, please do not hesitate to contact us! Sincerely Patrick Biegel Page 5 of 32 PBmemory - User Manual 1 Introduction The PBmemory game is an software version of the old and well known table game. The rules are exactly the same, but you can play the game wherever you want. You can copy it on your flashdrive and take it with you, because the game is fully portable. There is no need for using a webhost because only static HTML files are used. But if you want to have worldwide online access to the game (optional), you can install it on a webhost and access the game from everywhere. The PBmemory game was made with the Bootstrap 3.3 framework and therefore is fully responsive and can be used on very different screens and/or devices like desktop computers, notebooks, tablets and smartphones. Due to the restrictions of different webbrowsers when opening or including local files, the newest version of PBmemory has an integrated mini webserver (for Windows users). By running the PBmemory game over the local webserver, the browsers will will not restrict the access anymore. 2 Features of PBmemory Some of the features of the PBmemory game are: Fully portable JavaScript / HTML / CSS game. Different sizes can be used: 8 - 108 memory cards. Fully customizable JavaScript / HTML / CSS code. Responsive game which can be used on different devices. Runs on your local computer, in your favorite webbrowser. No webhost, database or PHP installation is required. Can be installed on a webhost to get worldwide access. Bootstrap and jQuery powered user interface. User manual in PDF format (32 pages). Images are interchangeable (you can use your own images). Easy to install and configure. Very well documented JavaScript code. Small size of the game (installed about: 4.5 MB, download 3.5 MB). Runs in a normal webbrowser (like Firefox, Chrome, Opera...). Low hard- and software requirements. Page 6 of 32 PBmemory - User Manual 2.1 New in Version 1.3 Images now in GIF and JPG format (68 JPG images added). New configuration option "imageDir" to specify the image directory. Choose between different image sets (setting in config file). JavaScript configuration file in directory 'pbmemory/config'. JavaScript file can be minified (without the configuration!). Fully JSLint compatible / approved JavaScript code. Template system for including different 'memory table' parts. Faster loading of the PBmemory pages (optimized HTML). Debugging code removed from JavaScript file (cleaner code). Minimized file versions (HTML, CSS and JavaScript) added. Included local mini webserver (Mongoose) for Windows users. You can play the PBmemory game in your internal network. Step by step instructions on how to use your own images. Updated user manual. 2.2 New in Version 1.2 Image preloading for faster images. New hover and card match effects. Hint panel which displays all the cards. Improved dropdown menus. More animal icons / images (Total 82). Random selection of images. Updated user manual. Page 7 of 32 PBmemory - User Manual 3 System Requirements PBmemory has very low hard- and software requirements. You can use the little checklist below to see if your hard- and software meet the specific needs. 3.1 Hardware PC, Notebook, Tablet or Smartphone Computer mouse or touchscreen 5 MB free disk space (without your own images) Internet access (only if installed on a webhost) 3.2 Software - Host Normally you do NOT need a webhost to use this game! But here are the requirements if you want to upload the memory game to your webhost: Webserver like Apache / Nginx on the host Host able to deliver HTML / CSS / JavaScript documents. Possibility to change directory/file permissions on the host 3.3 Software - Client New webbrowser (like Firefox, Opera, Chrome, or IE). FTP client application like Filezilla (for installation on host) PDF viewer to show the user manual (like Sumatra Reader) 4 User Requirements This manual is available before you buy the PBmemory game. I would like that you can get the most of the game and therefore please make sure, you are comfortable doing the following actions: Check the hard- and software requirements. Upload files to your webhost (only if installed on a webhost) If you have a question about the PBmemory game, please send me an email message to [email protected]. I'm always glad to help! Page 8 of 32 PBmemory - User Manual 5 Software Installation 5.1 Unpack the Archive If you have downloaded the newest PBmemory archive from the Codecanyon Website your download folder should contain an archive called "PBmemory_1.3.zip": Now you have to unpack the archive with an unzip utility like 7-Zip. You can download the free 7-Zip archiver from the 7-Zip Website. After unzipping the PBmemory archive you will get the directory "PBmemory_1.3" which contains three folders and two files: Unpacking the ZIP file is the whole installation of the PBmemory game and now you are ready to play and train your brain! Page 9 of 32 PBmemory - User Manual 5.2 Content of the Archive The content (folders and files) of the unpacked PBmemory ZIP file will be explained on this page: Folder "pbmemory" This folder contains the whole PBmemory game and this is also the folder you have to upload to your webhost if you want to use the PBmemory game over the Internet. Uploading the game to a webhost is totally optional! You also can play the game on your local computer without access to the Internet. Folder "source" This folder contains the HTML / CSS and JavaScript source code of the PBmemory game. In the "pbmemory" folder the minified versions of those files are used for a better performance (faster download time). If you want to modify something, make a copy of the source files and don't edit the original ones! Folder "webserver" This folder contains a mini webserver for Windows users called "Mongoose" which can be used to play the memory game (The earlier versions of the Mongoose webserver were licensed under the terms of the MIT license). For Windows users this is the easiest option to play PBmemory. Mongoose project website: GitHub File "PBmemory.exe" The file "PBmemory.exe" is used to start the PBmemory game on Windows computers. It will first start the included webserver and then open the default browser and display the PBmemory game. It will also show you your actual IP address which you can use to connect to the webserver in your internal network and play the memory game on different devices like tablets and smartphones. File "readme.txt" The file "readme.txt" only informs the user about the location of this user manual: "pbmemory/pdf/PBmemory.pdf". Page 10 of 32 PBmemory - User Manual 6 Starting the Game There are different ways to start the PBmemory game. The problem is, that some browsers restrict the access to local resources because of security of reasons. Then the following error message will be displayed: Because I don't know what kind of browser you will use and how their restrictions will change in the future, there are 3 different ways to start the PBmemory game. Feel free to pick the one that works best for you! Two browsers which worked without any problems (until now) are: Firefox webbrowser version 38.0.5 Website QtWeb webbrowser version 3.8.5 Website The first and second way we explain below should work on all platforms (Apple operating systems, Microsoft Windows and Linux) but not with all kind of browsers. The second way should work with all kind of browsers but just on the Windows platform (because the integrated webserver is a Windows executable). Page 11 of 32 PBmemory - User Manual 6.1 First - Direct Start (Firefox / QtWeb) The normal way to start the PBmemory game is over the "index.html" file. That should work for the "Firefox" and "QtWeb" browsers. Just open the folder "pbmemory" and doubleclick on the file "index.html": The PBmemory game will be displayed in your favorite (default) browser like you can see on the following image: If starting the PBmemory game this way does not work for you, please try one of the other two options! Page 12 of 32 PBmemory - User Manual 6.2 Second - Modify Shortcut (Google Chrome / Opera) The Google Chrome and Opera browsers block the content if it's loaded/included from a local computer due to the security risk it implies. You can create an extra shortcut which disables this security check and use it to play the PBmemory game. You can do that like described here: First create a shortcut of your Google Chrome or Opera browser on your desktop: Right-click on the shortcut and choose the option "Properties" from the context menu: The property window will be displayed (example of the Google Chrome shortcut): Page 13 of 32 PBmemory - User Manual Add the following parameter to the "Target" string (the same parameter for the Google Chrome or Opera browser): --allow-file-access-from-files Then press the button "Apply" to check the syntax and if there is no error, press the button "OK". Now that you have created your modified shortcut, you can start the game like explained in the section above. Open the folder "pbmemory" and doubleclick on the file "index.html". 6.3 Third - Start with the Webserver (Internet Explorer) If you have another browser like the Internet Explorer, you can use the integrated webserver to play the game. Just doubleclick on the executable "PBmemory.exe" to start the game. Page 14 of 32 PBmemory - User Manual The webserver will be started and you will see an icon in the tray: The first time you will be asked if you want to allow the application to pass through the internal firewall like on the following screen: Please press the button "Allow access" to allow the connection. Then your default browser will be started and the PBmemory will be displayed. To exit the webserver right-click on the tray icon and choose the option "Exit" to shutdown and exit the webserver: If you are using the integrated webserver you can also access the PBmemory game in your internal network with all kind of devices and play at the same time! Therefore the actual IP address will be displayed: Page 15 of 32 PBmemory - User Manual 7 The Navigation Bar The navigation bar holds all the necessary elements to use the game. On the following pages the different elements will be explained: 7.1 Name and Version On the left side you can see the name of the game and the actual version. If you click on the name or version, you will be forwarded to the PB-Soft Website. 7.2 The Button "New" The button "New" will reset the game and start a new one. 7.3 The Menu "Size" If you click on the menu "Size", a dropdown list with different memory sizes will be displayed. You can choose one: Page 16 of 32 PBmemory - User Manual There are four categories with different memory arrangements. Each category is optimized for a group of devices The following screen sizes are supported by the Bootstrap Framework and therefore by PBmemory: 1. Extra small devices: Resolution <768 pixel Phones 2. Small devices: Resolution ≥768 pixel Tablets 3. Medium devices: Resolution ≥992 pixel Notebooks 4. Large devices: Resolution ≥1200 pixel Desktops Maybe you have to try a little until you find out what configuration fits best your device. 7.4 The Menu "Time" If you click on the menu "Time", a dropdown list with different waiting times will be displayed: This time specifies, how many seconds the application will wait before turning the cards back after you have selected two cards to see if they match. If you select 2 seconds, the two cards will be displayed for 2 seconds and then turned back. Page 17 of 32 PBmemory - User Manual 7.5 The Display "Pairs" This display shows how many pairs of matching memory cards you already have found: If the memory game has 40 cards, you have to find 20 pairs to finish the game. If you click on the link, some information will be displayed like on the following screen: 7.6 The Display "Moves" This display shows how many times you have tried to match the cards: The less times you need to finish the memory game the better! If you click on the link, some information will be displayed like on the following screen: Page 18 of 32 PBmemory - User Manual 7.7 The Button "Manual" This button will display the user manual (this document) in PDF format: You will need a PDF viewer to display the user manual. If you don't have one, you can get the free Sumatra Reader. Page 19 of 32 PBmemory - User Manual 7.8 The Button "Hint" This button will show all the cards of the memory and you can see where are the matches. If you click again, the cards will be hidden. All the cards will be turned around like on the following image: PBmemory on a PC PBmemory on an Android Tablet Page 20 of 32 PBmemory - User Manual 8 Playing the Game To play the game just select a size from the menu "Size" and then you can begin to search for matching cards. If you click on a card the image of this card will be displayed. At the begin there are a lot of different cards laid out in a grid and all of them are put face down so you cannot see the images on the cards. For every image there are two cards which build a pair. If there are 40 cards, you will have 20 pairs of matching cards. Now you can flip over a card and see the image, then you should try to flip over a second card with the same image on it. If the two images match, they will be removed from the game and you made your first "pair" of cards. The total number of pairs and moves will be displayed at the top of the game: If the cards do not match, they will be turned back after a specified time. This time you can choose in the menu "Time". Everytime you display two cards, that will be counted as a "move". Page 21 of 32 PBmemory - User Manual 9 Script Configuration If you want to configure the script, you can use your favorite text editor to open the JavaScript file "pbmemory/comfig/configuration.js". If you don't have a good text editor already, you may try the free text editor Notepad++ or PSPad. On the following pages you will see the different configuration settings. Normally you don't have to change anything to get the PBmemory game up and running but there are some settings in the JavaScript file: 9.1 Specify the Default Table Number You can specify which memory configuration (table) you want to be active as default. There are 22 different memory configurations to choose from. If you enter 13, the memory table (page) 13 with 40 memory cards will be activated each time you start the game. 9.2 Specify the Image Type If you want, you can change the images of the PBmemory game and use your own images. This setting specifies what kind of image files will be used. You can specify the 'gif', 'jpg', 'jpeg' or 'png' format. Page 22 of 32 PBmemory - User Manual 9.3 Specify the Image Directory Here you can specify in which folder the memory card images are stored. The folder has to be inside the directory 'pbmemory/img/'. There are already two folders called 'gif' and 'jpg' with images inside, but you can also create your own folders like 'jpg1', 'jpg2'... 9.4 Specify the Image Pool Size Here you have to specify how much images you want to use as an image pool from where the random images are selected. Just enter the number of images available to the memory game. If you choose the directory 'jpg1' for your images, then you have to enter the number of your jpg images here. 9.5 Specify the Default Turn Time Here you can specify the default time which will be paused until the two cards which are displayed will turned back. Every time you start the game, this default value will be applied. Page 23 of 32 PBmemory - User Manual 9.6 Specify the Fade Time This setting specifies how long the transition effect of the card will last. You can specify how long the fade-in or fade-out process will be. You have to specify this value in milliseconds. If you specify the value 500, the card will be displayed in half of a second. If you set the value to 0, the fading effect will be disabled. 9.7 Specify the Image Preloading This setting specifies if the image preloading for the memory cards is enabled or disabled. If you use the game on a local computer (not over the Internet), you can disable this setting. If you enable this setting, you have to be sure that your browser is caching the images! That depends on the browser configuration and the cache settings on your webhost. Page 24 of 32 PBmemory - User Manual 10 Images- and Graphics Files The PBmemory game comes with two different sets of memory card files: 10.1 GIF Graphics In the directory "pbmemory/img/gif/" you will find 82 graphic files in the GIF format. To use them for the memory game, you have to specify the following settings in the configuration file: var imageType = "gif"; var imageDir = "gif"; var imagePool = 82; Please also check the section "Script Configuration" for more information about editing the configuration file! Page 25 of 32 PBmemory - User Manual 10.2 JPG Photos In the directory "pbmemory/img/jpg/" you will find 68 graphic files in the JPG format. To use them for the memory game, you have to specify the following settings in the configuration file: var imageType = "jpg"; var imageDir = "jpg"; var imagePool = 68; Please also check the section "Script Configuration" for more information about editing the configuration file! Thanks a lot to Mathias Appel for his great animal photos!! On his Flickr Site, Mathias Appel has provided a lot of different animal photos, from which I used some for this memory game. The photos are licensed below the Creative Commons License (CC0). Take a look at his Flickr Site to see more... Page 26 of 32 PBmemory - User Manual 11 Customize PBmemory There are different ways to customize the PBmemory game. The easiest way is to change the CSS styles and to use your own images. On the following pages this will be explained: 11.1 Modify CSS Styles The PBmemory game contains CSS styles to specify the style of the HTML output. You can edit this CSS specifications to change the look of the game. If you want to edit the CSS styles, please open the stylesheet "pbmemory/source/pbmemory.css" in your favorite text editor. If you don't have a good text editor, you may try the free text editor Notepad++ or PSPad. The PBmemory styles are separated into different sections. Each section specifies the settings for a specific component. The description of each section shows for which component(s) the settings are. Here you can see an example of a description: /* =============================================== // This is an example description. // =============================================*/ Below each of the the descriptions, a group of settings are placed. Here you can see such a group of settings: body { background-color: #C3D4E3; color: #003366; font-family: Arial, Helvetica, sans-serif; font-weight: bold; } Each of the settings consist of the "settings-name" and the "settings-value". They are separated by a colon ":". At the end of each setting, a semicolon ";" character is needed to separate it from the next setting. In the following example "font-weight" is the name and "bold" is the value: font-weight: bold; Page 27 of 32 PBmemory - User Manual Here you can see an example from the CSS file "pbmemory.css": If you want to know more about HTML and CSS you can visit the HTML Dog Website where you can find a lot of information. There you will find also a CSS Tutorial for Beginners. Page 28 of 32 PBmemory - User Manual 11.2 Minify HTML, CSS and JavaScript Files As default, the minified versions of the HTML, CSS and JavaScript files are used in the upload folder "pbmemory". If you want to see or modify the source code for your own use, you can find the files in the directory "source": After you made your changes you can minify these files with the following two free tools: For CSS and JavaScript code the "Microsoft Ajax Minifier" For HTML code the "htmlcompressor" There are a lot of other tools around, so feel free to use whatever you want! Be sure to always use a copy of the original files and NEVER minify the original files! Page 29 of 32 PBmemory - User Manual 11.3 Use Your own Image Files If you would like to use your own image files, you have to do the following 5 steps to get it running: 1. Prepare your Memory Images Cut all your images to a size of 200 x 200 pixel. To make it look nicer (optional), you can use a frame like on the following image: The frame size is 200 x 200 pixel and the image inside is 180 x 180 pixel. Use a graphics or photo application and save the files in GIF, JPG, JPEG or PNG format. Please always use lowercase characters for the file endings! For this example let's say we have 55 files and we will use the "JPG" file format! So name the files "1.jpg", "2.jpg", "3.jpg"... (In your case the file ending can vary, depending on the type of files you will use!) 2. Create a Folder for your Images Create a new subfolder inside the directory "pbmemory/img/". For this example let's say we make a folder called "vacations": pbmemory/img/vacations Page 30 of 32 PBmemory - User Manual 3. Copy your Images Copy all your images to the newly created folder, in this example "vacations". Be sure that the names are correct: "1.jpg", "2.jpg", "3.jpg"... AND NOT "01.jpg", "02.jpg", "03.jpg"... 4. Edit the Configuration File Open the configuration file "pbmemory/config/configuration.js" and enter the following information: var imageType = "<your file type>"; var imageDir = "<your image directory>"; var imagePool = <your number of files>; In our example that would look like the following: var imageType = "jpg"; var imageDir = "vacations"; var imagePool = 55; 5. Start the Memory Game Now if you restart the memory game, your images / graphics will be used! You can 6. Problem Solving If there is a problem and your images are not displayed correctly, please check the following settings again! Be sure that the setting "imageType" matches the file ending used by your images and be sure that you put it in lowercase! That would be "gif", "jpg", "jpeg" or "png". Be sure that the setting "imageDir" is set to the correct subdirectory which holds your image files and don't enter any slashes, just the directory name! As an example "vacations" and NOT "/vacations" or "vacations/" or "/vacations/"! Be sure that the setting "imagePool" is set to the correct number of files. If your image directory contains 55 files, enter 55! Page 31 of 32 PBmemory - User Manual 12 Support If you have a question or a problem while installing or using PBmemory, please contact us - we are always glad to help you! You can contact us using the following methods: Website: www.pb-soft.com E-Mail Address: [email protected] 13 Feedback We always like feedback from you so that we can improve our products. If you think there is something missing or there is an error in this manual, please contact our support so we can add the missing information or fix the error in the manual! Thank you a lot for your attention and have a nice day! Patrick Biegel Page 32 of 32