1
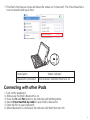
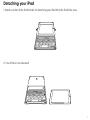
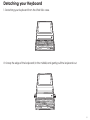
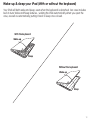
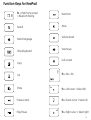
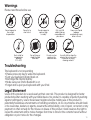
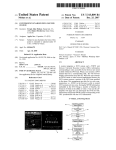
English Version
KeePad User Manual
O!tool KeePad
Welcome
The OZAKI O!tool KeePad is an adjustable and detachable Bluetooth keyboard folio for your
iPad Air and iPad Air 2. The SlideAngle Keyboard Folio allows you the ability to shape-shift your
iPad into a laptop. From fun to functionality, KeePad turns your recreation companion, into a
business partner.
Product Information
1
2
3
4
5
6
11
7
8
9
1. Power key
2. iPad holder
3. iPad Air 2 inserter
4. iPad folio case
5. Stand with 3 upright positions
6. Slide rail
7. Detachable Bluetooth® Keyboard
8. Hidden magnets
9. Function keys
10. Inner rail
11. Power On/Off switch
12. Micro-USB charging port
13. Status indicator
14. QIG
15. Micro-USB charging cable
12
13
O!tool KeePad for iPad Air & iPad Air 2
Installing your iPad
1
14
2
iPad Air
4
3
fn
iPad Air 2
pdf
http://m.ozakiverse.com/otool-keepad-ot290/services
10
15
1
Getting Started
Step 1: Installing your iPad
1. Align your iPad to the edge of the iPad holder and push forward.
iPad Air
iPad Air 2
2. Align the edge of iPad with the built-in magnetic keyboard strip to secure it. Your KeePad is
now ready for precision typing!
2
Step 2: Establishing the connection with your iPad
1. Turn on the keyboard. You must pair keyboard with your iPad for first time use.
Description
Status indicator
Power on
The indicator stays solid white for 1 seconds.
Power off
The indicator will turn off.
Note:
Standby - When idle for ten minutes the keyboard will automatically switch to standby mode.
Wake up - Press any key to wake the keyboard from standby mode.
3
2. Press and hold down the fn and Pair buttons to connect to your iPad. The status indicator
will blink to indicate pairing.
fn
Description
Bluetooth pairing
Status indicator
The indicator will blinking white once per second for two minutes.
3. Navigate to the iPad Settings menu and select Bluetooth.
4
4. Tap the switch to turn ON Bluetooth.
5. The KeePad will show up under Other Devices on the tablet.
Select O!tool KeePad by ozaki to connect. You will be prompted to enter a PIN code.
6. Enter the PIN code as shown in the pop-up message, followed by the enter key.
5
7. The iPad’s My Devices menu will show the status as “Connected”. The O!tool KeePad is
now connected with your iPad.
Description
Bluetooth connected
Status indicator
The indicator will flash then turn off.
Connecting with other iPads
1. Turn on the keyboard.
2. Make sure the iPad’s Bluetooth is on.
3. Press the fn and Pair buttons, the indicator will blinking white.
4. Select O!tool KeePad by ozaki on your iPad’s devices list.
5. Enter the Pin on your keyboard.
6. When Bluetooth is connected, the indicator will flash then turn off.
6
Detaching your iPad
1. Bend a corner of the iPad holder for detaching your iPad from the iPad folio case.
2. Your iPad is now released.
7
Detaching your Keyboard
1. Detaching your keyboard from the iPad folio case.
2. Grasp the edge of the keyboard (in the middle) and gently pull the keyboard out.
8
Attaching your Keyboard
1. Align the inner rails of the keyboard to the slide rails of the iPad folio case.
2. Slide the keyboard into the iPad folio case.
9
Multi-Slide Viewing Angles
With freely adjustable views and typing angles, KeePad makes any position or situation
optimal for an improved user productivity experience.
10
Separate the keyboard from folio for convenient use
With its detachable keyboard design, KeePad users can leave their keyboard in the office or
at home, while keeping the iPad safe inside the KeePad protective case.
11
Wake-up & sleep your iPad (With or without the keyboard)
Your iPad will both wake and sleep; even when the keyboard is detached. Our case includes
built-in Auto Wake and Sleep features - waking the iPad automatically when you open the
case, as well as automatically putting it back to sleep once closed.
With the keyboard
Wake-up
Sleep
Without the keyboard
Wake-up
Sleep
12
Charging the keyboard
1. Connect the Bluetooth keyboard to a desktop or laptop computer’s USB port via the supplied
micro-USB cable. Alternatively, you can connect the supplied micro-USB cable to your own
USB power source.
USB
Power source
DC 5V/500mA (Max.)
2. Charging is complete when the status indicator (White LED) turns off. (Charge the KeePad for
approximately 4 hours before first use.)
Description
Status indicator
Charging the battery
The indicator stays solid white during charging.
Fully charged (100%)
The indicator will turn off when charging is complete.
Low battery (Below 20%)
The indicator will blink white one time per second.
Battery Information
Battery life * - For approximately 3 months battery life, fully charge the rechargeable battery of the bluetooth
keyboard using the included micro USB cable. (*Based on an average use of two hours per day)
Extend battery life - Please switch the KeePad to the “OFF” position when not in use.
Battery low - Charge the battery if the status indicator blinks blue once per second.
Wake up - The keePad enters standby automatically if unused for 10 minutes. Press any key to wake it.
13
Function Keys for KeePad
fn + iPad Home screen
= Bluetooth Pairing
Next track
Search
Mute
Switch language
Virtual keyboard
Copy
Volume down
Volume up
Lock screen
Cut
fn + tab = Siri
Paste
fn + Left cursor = Select left
Previous track
fn + Down cursor = Select all
Play/Pause
fn + Right cursor = Select right
14
Warnings
Please read these before use
Do not expose to
fire or high
temperatures
Do not try to
short circuit
Best suited for
temperatures
between
0°C~40°C
Do not expose to
water or high
humidity
Do not throw or
shake the iPad
folio case
Only use USB
cables that are
compatible with
your device
Do not crush or
puncture the
iPad folio case
Cease use if liquid
leakage,
overheating, or any
other unusual
Use soft cloth to clean the
exterior. Do not use harsh
chemicals or strong
cleaning solvents
Troubleshooting
The keyboard is not responding
• Please press any key to wake the keyboard.
• Turn your keyboard off and back on.
• Recharge the internal baPery.
• Make sure your iPad’s Bluetooth is on.
• Forget and re-pair your keyboard with your iPad.
Legal Statement
Users of this product do so exclusively at their own risk. This product is designed for better
productivity when working with your tablet device. No product is capable of perfectly working
against contingency. Users should exert vigilance before making use of this product in
potentially hazardous environments or handling conditions. At no circumstance should Ozaki
or its associates, dealers or agents, assume the entire liability, cost of repair, correction or any
payment or other remedy for the misuse or abuse of this product. Ozaki reserves the right to
revise this statement and to make changes from time to time for the contents hereof without
obligation or prior notice for the changes.
15
Limited ONE (1)YEAR Warrant Information
Warranty Coverage
OZAKI’s warranty obligations are limited to the terms set forth below:
OZAKI warrants this OZAKI hardware product against defects in design, workmanship and materials under normal use for
a period of ONE (1) YEAR from the date of the original user purchase (“Warranty Period”). Accessories accompanying this
product are not covered under warrantee. This Warranty may be subject to OZAKl's change at anytime without prior notice.
Repair and replacement
The maximum liability of this OZAKI product shall not exceed the purchase price paid by the original purchaser. The original
purchaser shall without undue delay notify OZAKI of any defect which appears according to OZAKI‘s Policy, failure to do so
shall mean that the purchaser waives their right to have the defect remedied. A valid form of a bill of sale or receipt from an
authorized retailer/distributor with date of the original purchase must be presented to obtain warranty service. If a valid
claim is received within the Warranty Period, the sole remedy of the original purchaser and OZAKI’s sole and exclusive
liability shall be limited to, (at OZAKI’s sole discretion,) either repair of the defect using new or refurbished replacement parts,
or replacement of the product. The repaired or replacement product/part will be warranted for the remainder of the original
Warranty Period or thirty (30) days, whichever is longer. When a product or part is exchanged, the replacement product/part
becomes the property of the original purchaser and the replaced defect product/part shall become the property of OZAKI.
Exclusions and Limitations
This warranty does not apply: (a) to faulty and improper installation, maintenance, service, repair and/or alteration in any
way that is not contemplated in the documentation for the product or canted out with OZAKI's consent in writing, operational
adjustments covered in the operating manual for the product or normal maintenance, (b) to cosmetic damages, (c) if the
product is modified or tampered with, (d) to damage caused by acts of God, misuse, abuse, negligence, accident, normal
wear and tear and deterioration, improper environmental conditions (including, but not limited to, electrical surges, water
damage and/or heat/cold/ chemical exposure) or lack of responsible care, (e) if the product has had the model or serial
number altered, defaced or removed, (f) to consumables (such as batteries), (g) to products that have been purchased ‘as is’
and OZAKI, the seller or the liquidator expressly disclaim their warranty obligation pertaining to the product, (h) to any OZAKI
or non-OZAKI product, or any APPs or firmware level software (irrespective of packaged or sold with OZAKI product) products
purchased from a distributor/reseller not authorized by OZAKi, (i) to damage that occurs in shipment or (j) to damages by
any other causes not related to defective design, workmanship and/or materials.
Warranty Service
The Limited Warranty is applicable in all countries and may be enforced by contacting OZAKI support worldwide. For
questions and supports, please visit: ozakiverse.com/support
Customer Service
http://ozakiverse.com/