1
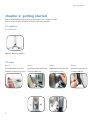
DIGITAL VISUALIZATION SYSTEM (DVS)
setup & user’s guide
v 1.0
Active Life Scientific, Inc.
Precision Instruments for Tissue Health Testing
header
BioDentTM is a trademark of Active Life Scientific, Inc.
©Active Life Scientific, Inc.
Santa Barbara, California
2
888.906.7770
www.activelifescientific.com
header
table of contents
1. introduction....................................................4
1.1 Intended Use.........................................4
1.2 BioDentTM Hfc Digital Visualization
System Technical Specifications.................4
1.3 Safety Precautions................................4
1.4 PC System Requirements ....................5
2. getting started................................................6
2.1 Supplies................................................ 6
2.1.1 Required................................................ 6
2.2 Setup.....................................................6
3. operating instructions...................................7
3.1 Digital Visualization System
Control Software..........................................7
3.1.1 Power Settings...................................... 7
3.1.2 Full Screen Mode.................................. 7
3.1.3 Picture Capture..................................... 7
3.2 Hardware..............................................8
3.2.1 Adjust Focus ......................................... 8
4. troubleshooting.............................................8
4.1 Frequently Asked Questions.................8
5. warranty.......................................................10
5.1 Life Expentacy....................................10
6. limited liability.............................................10
3
3
header
chapter 1. introduction
1.1 intended use
The BioDentTM Hfc (BioDentTM) Digital Visualization System (DVS) is designed for
specific tasks: allowing visualization when positioning and indenting calcified and
hard materials ex vivo and in vivo.
1.2 BioDentTM DVS technical specifications
Resolution.................................................................1.3M
1 optical lens.............................................................Built-in
Magnification Power.................................................10x~200x
Measurement Function.............................................Via software
Microtouch Function................................................ Built-in
LE light with LED software switch..........................Built-in
Frame rate.................................................................up to 30 FPS
Interface....................................................................USB (PC)
USB connectivity......................................................1.1/2.0 compliant
Nework connectivity.................................................Gigabit Ethernet port
54 MB/s wireless
note
The magnification power is the
ratio of the real size of the an
observed object vs. the image
shown on a 15” monitor. ✎
1.3 safety precautions
Precautions
4
1.
Avoid touching the lens with finger to protect the product from electrostatic damage.
2.
Do not attempt to service this product yourself. Opening the covers may
expose you to dangerous voltage points or other risks.
3.
When hands are wet, do not plug in or remove the adaptor or other connectors.
4.
Using or storing Digital Visualization System, do not plug in any other
cables, not belong to Dino Digital Microscope.
5.
Do not use any detergent or volatile solution, which will damage the camera case, painted surfaces & lens. Only use a soft cleaning cloth.
6.
If the lens is dirty, please use a kens brush on soft cloth to wipe clean.
Avoid touching them with your fingers. Exercise care to avoid scratching
the lens.
warning!
To ensure the safe operation of
this product, heed all warnings
and follow instructions. Ignoring
warnings or using the product in a manner other than
the recommended may place you
and other parties at risk.
introduction
caution!
Damage to equipment is
possible if instructions concerning proper use of the
product are not adhered to.
7.
Without protection, do not put Dino Digital Microscope outdoor to avoid
the lens damaged by high temperature or humidity.
8.
Using and storing Dino Digital Microscope at Temp: 0°C~ 40°C, Humidity: 45%~85%.
9.
If water has entered Dino Digital Microscope device and the inspection
stage, immediately turn the power off and remove the USB cable. Do not
use dryer neither.
10.
Using or storing Digital Visualization System, need to watch all cables to
avoid trip over or Dino-Lite Handheld Microscope fall down.
11.
To avoid electric shock, remove all electricity source before moving PC or
TV.
Failure to observe safety precautions contained herein may result
in injury to the user or third parties and may invalidate the product
warranty.
✎ note
Only authorized service technicians may perform repairs,
adjustments, or alterations to the
product. Any violation voids the
manufacturer’s warranty. Authorized service technicians
are trained and certified by the
manufacturer.
1.4 pc system requirements
OS.............................................................................Windows 98se, 2000, XP
CPU........................................................................... Pentium IV 1.5G, Celeron, AMD
Athlon or above Digital Visualization System User’s Manual
Memory.....................................................................128MB
HDD storage space...................................................≥ 150MB (for driver and application software installation)
Graphic card.............................................................16-bit or above
Driver........................................................................CD-ROM
USB...........................................................................2.0 / 1.1 port
Interface....................................................................USB (PC)
USB connectivity......................................................1.1/2.0 compliant
5
getting started
chapter 2. getting started
Refer to the DVS Setup Guide for proper setup procedure. Once complete, proceed
below to ensure you have everything you need to begin using your DVS.
2.1 supplies
2.1.1 Required
Dino-Lite Mounted on Bracket 2.2 setup
Step 1
Step 2
Loosen the bottom screw and Spread the bracket and position
completely remove the top screw. around the MHU arm. 6
Step 3
Step 4
Tighten the bottom screw and Plug miscroscope into an screw in the top screw. available USB port. operating instructions
chapter 3. operating instructions
3.1 Digital Visualization Control Software
The DVS control software is integrated to your BioDentTM software. You are able to
conveniently control your DVS diretctly from the Measurement Console.
3.1.1 Power Settings
Power ON/OFF
Lights ON/OFF
3.1.2 Full Screen Mode
3.1.3 Picture Capture
7
troubleshooting
3.2 hardware
3.2.1 Adjust Focus
Place your sample on the BioDent Sample Plate and adjust the focus using the thumb to
rotate area A as shown.
A
When the object is located at the top of the front cap, there are two focus positions,
each with different magnification power, can be found by rotating the focus knob.
chapter 4. troubleshooting
4.1 frequently asked questions
Q: There is no display/live feed from the miscroscope. A: Please ensure all necessary connections have been made.
Q: I’ve ensured all connections have been made and that the miscroscope is connected to my PC, why isn’t it working?
A: Ensure the driver installation is complete and that the USB cable is connected to the
microscope and PC USB port.
Q: How do I install the driver?
A: Do not connect the USB cable to the miscroscope before installing the driver. Insert
the installation CD into CD-Rom driver and select “driver installation”.
Q: I connected the USB cable to the microcope before installing the driver, what
do I do?
A: Remove the USB cable from the microscope for 5 seconds then plug it back to the
miscroscope.
8
✎ note
The magnification power will be
higher if the DVS is closer to the
observed object.
Q: How do I connect “DinoCapture”?
A: Complete the driver installation, connect the USB cable to the miscroscope and
execute “DinoCapture” application procedure.
Q: How do I uninstall the driver?
A: Remove USB cable from Digital Visualization System, execute “uninstall” in application procedure “Dino Digital Microscope”.
Q: When connecting to a PC, why is the picture slow or unsmooth?
A: Your PC’s configuration might not be sufficient enough. Please verify syste requirements as mentioned in this User’s Manual.
A. Your PC’s CPU or memory might be overloaded by executing too many application programs. Shut down other applications and restart your system to release
the memory.
A. Your system might have a virus, which may dramatically degrade your system’s
performance.
Q: What should I do if the miscroscope is not working normally?
A: Please reset the system by disconnecting all cables from the microscope, wait 5
seconds and re-connect the cables to restart the DVS.
For all other issues, contact Customer Care at [email protected]
9
warranty
chapter 5. warranty
5.1 life expectancy
The standard warranty period for the DVS is one year. The products’ expected life is
in excess of the warranty period under normal use and prescribed care.
chapter 6. limited liability
The manufacturer, importer, and the dealer cannot be held responsible for accidental
damage, including personal injury or any other damage, due to inappropriate usage of
the product. Information in the user manual is written for the current specification of
the product. The manufacturer of Dino Digital Microscope continues to provide additional functions and apply new technology to it. All specifications may be changed
without notice to individual users.
10