1
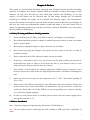
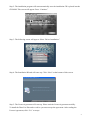
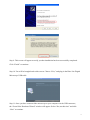
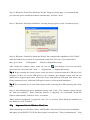
BEIJING NUBWAY S&T DEVELOPMENT CO., LTD
ADD: Room 808,New Fortune International,Chaoyang Road,Chaoyang District,Beijing,China
TEL: 86-10-85725366
FAX: 86-10-85725399
Mobile: 0086-13581726676
Website: www.nubway.com
Intelligent Skin Diagnosis System
Model: NBW-C
Skin Analyser System (NBW-C)
User Manual
1
Content
Chapter I: Preface
1-1 Safety Warning and Issues Needing Attention. ..................................................... 3
1-2 Driver Installation .................................................................................................. 3
1-3 Images Debugging ................................................................................................. 4
Chapter II: Software Installation
2-1 Install Intelligent Diagnosis Software........................................................................6
2-2 Install Softdog............................................................................................................6
2-3 Important Tips to Windows Vista Users....................................................................6
Chapter III: Preparation before Program Running
3-1 System Setup..............................................................................................................7
3-2 Product Pre-recording................................................................................................ 10
3-3 New Member Clients................................................................................................. 10
3-4 Non-Member Clients................................................................................................. 11
Chapter IV: Enter Diagnosis Program
4-1 Sebum Analysis(diagnosis, production,selection,comparison, and 3D comparison) 12
4-2 Spots Analysis............................................................................................................16
4-3 Pores Analysis............................................................................................................17
4-4 Elasticity Analysis......................................................................................................18
4-5 Moisture Analysis...................................................................................................... 19
4-6 Examine Report......................................................................................................... 21
Chapter V: FAQ
5-1 How to confirm normal operation of intelligent skin tester?.....................................22
5-2 There is no image in shooting area, what can we do? ............................................22
5-3 When pre-record the product, the product image can not be imported, what can we do?
..........................................................................................................................................23
5-4 The lens light does not work, what can we do?.......................................................... 23
2
Chapter I: Preface
This system is a kind of multi-functional equipment with beautiful interface and all-sided utility
functions. It comprises five analysis modules which are available to analyze the changes of skin
moisture, oil, spot, pore and skin age (also called skin resilience and flexibility). To our big
surprise, all skin images can be converted into 3D skin images through real 3D reduction
technology. In addition, the images can be analyzed from arbitrary angles. The comprehensive
report with excellent text and pictures present all test results to clients in the form of percentages. In
this way, the clients can understand the analysis results and status of real skin clearly. Also to
choose corresponding product to go with the test results is allowed. Meanwhile, you can promote
the new products in background.
1-1 Safety Warning and Matters Needing Attention
1.
Do not touch the lens or LED by your hand in order to avoid danger or lens damage;
2.
Do not disassemble the product or change its internal structure privately in order to avoid the
fault or eclectic shock;
3.
Do not plug or unplug the adapter or other connectors by wet hands;
4.
Do not insert any plug (not belong to the system) into the system at any time, in order to
avoid the accident;
5.
Do not clean the lens or LED with such organic solvent as alcohol;
6.
If the lens or viewfinder is dirt or wet, you’d better use dry cloth (exclude jute material) or
professional lens paper to clean it; do not touch the lens by your hand in order to avoid
scrape; please do not press the lens when you clean it;
7.
This product is not designed for outdoors application. Without proper protection, you’d
better not expose the system in the sun. High temperature and over moisture will damage the
lens;
8.
Please use and store the system at the temperature of 0℃ ~40℃ and relative humidity of
45%~85%;
9.
Please remove the USB line immediately if any fluid enters the tester and stands. Deliver the
system to the service center immediately for maintenance. Do not use blower to blow the
system dry. Please take care of idle USB line to prevent stumbling over someone, and take
care of the tester against dropping.
10.
In order to avoid electric shock or accident, please remove the tester power supply before
moving the computer or TV.
1-2 Driver Installation
Step 1: Start the computer and put the setup disk into the CD-ROM device.
Note: Do not connect tester’s connecting line with computer’s USB port before installation of
driver.
3
Step 2: The installation program will run automatically once the installation CD is placed into the
CD-ROM. This screen will appear. Press “Continue.”
Step 3: The following screen will appear. Select “Driver Installation.”
Step 4: The Installation Wizard will come up. Click “Next” on the bottom of this screen.
Step 5: The License Agreement will come up. Please read the License Agreement carefully.
To install the Dino-Lite Plus and we advice you must accept the agreement. After reading the
License Agreement, click “Yes” to accept.
4
Step 6: When the “Choose Destination Location” screen comes up, select “Browse” to choose
your own destination folder for program installation. Click “Next” to continue.
Step 7: When the “Ready to Install the Program” page comes up, click “Install” to continue.
Step 8: When the “Software Installation” warning message appears, click “Continue Anyway.”
5
Step 9: This screen will appear to notify you that installation has been successfully completed.
Click “Finish” to continue..
Step 10: You will be brought back to this screen. Choose “Exit,” and plug-in the Dino-Lite Digital
Microscope USB cable.
Step 11: Once you have connected the microscope to your computer via the USB connector,
the “Found New Hardware Wizard” window will appear. Select “No, not this time” and click
“Next” to continue.
6
Step 12: When the “Found New Hardware Wizard” brings you to this page, we recommend that
you select the option “Install the software automatically” and click “Next".
Step 13: When the “Hardware Installation” warning message appears, click “Continue Anyway.”
Step 14: When the “Found New Hardware Wizard” has completed the installation, click “Finish.”
After the window closes, check on your desktop for the Dino-Lite icon. If you cannot find it
there, go to “Start”
“All Programs”
“Dino-Lite Digital Microscope.
After closing the window, please check the icon on
your desktop. If you can not find it,
please look for it from the path: “Start” → “All programs” →“Digital Microscope”.
Tip 1: Before entering the system, please ensure the tester is connected with the USB port of the
computer. If there are several USB ports in your computer, the computer system will ask you
install driver program again when connect the tester with different USB port with former one.
Please connect the tester with initial USB port in order to avoid repeated installation.
Tip 2: We recommend you to close DinoCapture before removing the USB connecting line of the
tester.
Step 15: After finishing the driver installation, please click “Close”. The computer system will pop
up “find new hardware”. When following interface is appeared, we recommend “Install the
software automatically” and click “Next” to continue.
When “Software installation” is appeared, click “Go on” as below. When finish the installation of
new hardware, click “Finished”.
*Tip :
Important Note for Windows Vista Users
When attempting to run the DinoCapture with Windows Vista for the first time after installation
and update, please RIGHT CLICK the DinoCapture icon and select “Run as Administrator” from
7
the pop-up menu. Then confirm the operation by clicking “OK” on the Microsoft Vista pop-up
screen.
This is a one time process after which your computer will recognize that the running,This is
authorized by the administrator. After this additional one-time procedure, you will then be able to
double click on the DinoCapture at any time for future use.
1-3 Images Debugging
1.
In the “Start” menu, click “Program”. And then, find the installed “Digital Microscope”, click
“
” to run the program.
2.
Click the third item “video Cature filter…” (Picture 1) under
. Please adjust the
data within “video Cature filter…” until it is similar to the data showed in Picture 2. Different
display has different brightness. You can use the skin contrast picture attached with the
system as the debugging standard. To do your best, adjust the color near to the standard
picture. After completing adjustment, you can adjust the data a little through the mouse or the
keys “up, down, left and right”. And then, click “Apply”.Standard Picture:
8
3.
Click the fourth item “video Cature pin…” under “options” within hardware connection test
and change the output pixels into 1280*1024, and then, click “Apply”.
Tip 1: Before 1st time enter the system, please ensure the tester is connected with the USB port of
the computer. If there are several USB ports in your computer, the computer system will ask you
install driver again when connect the tester with different USB port from former one. Please
connect the tester with initial USB port in order to avoid repeated installation.
Tip 2: We recommend you to close program before removing the USB connecting line of the
tester.
Chapter II: Install Software
2-1 Install Intelligent Diagnosis Software
Run the CD, and find
. Double click it and install the software. After finishing
the installation, click
on the desktop. At this time, the system will pop up “Softdog makes a
mistake”. Then, it is time to install Softdog (Softdog is in the software box. It is the red one with a
USBKEY).
2-2 Install Softdog
9
We adopt the Softdog with Microsoft certification. You do not need install the driver. Please plug
the Softdog into the computer, the computer will identify it automatically.
2.3 Important Tips to Windows Vista Users
If you are a Windows Vista user, and you run
for the first time after installation or
update, please right-click the icon. Please choose “Run as the administrator” in the pop-up menu.
Then, click “Yes” to confirm. This step represent that the software has acquired the authorization
from the system administrator. From now on, you can double click the icon to run the system.
Chapter III: Preparation before Program Running
Please double click the icon (plug Softdog before running) and enter the initial page of the software
as below. If you run the program for the first time, please input user name as “admin” and password
as “admin”. (please modify your user name and password after entering the system). Input your user
name and password, and click “Log in”. After entering the system, first of all, we advice you to
learn about and finish “setup” and “product pre-recording” before making diagnosis for your skin.
10
3-1 System Setup
A. Basic setup
setup, including modify user name, password, import logo and remind member birthday.
Click “Setup” on the initial page. Through system setup, the user name and password can be
modified; your company’s LOGO can be imported into the system as well. Please click the import
button beside CBS and import your LOGO into the system. In addition, the system will remind the
members to set up their birthday according to the operator’s requirements. Please click “Save” after
finishing the setup as below.
11
B. Analysis setup
setup, please adjust following parameters according to the skin types of each area.
Generally, the parameters need not to be adjusted. We have input the most accurate standard data
into the system according to the skin types of our country. (If you need to modify following
parameters, please contact our company. Our engineer will instruct you to debug). If you do not
know how to adjust, please click the button “Restore factory settings”.
Adjustment of Analysis Setup Parameter (applicable to Asian Standard)
12
C.Data backup and reduction
reduction, if the clients are worry about data loss, please back up and restore
the data regularly.
13
-recording
3-2 Product Pre
Pre-recording
Please click “Product Pre-recording” on the initial page to input the setup of product pre-recorded.
First of all, click “New member”, the interface as below will appear. You’d better import your
product picture into the computer before input. (If the picture can not be imported, please refer
FAQ). Click “Import” to import the product pictures into the system. And then, you should classify
the products, type, model, product name, and price into the system, and write corresponding tabs for
the products on the basis of their efficiency. For example, if your product is a deoiling one, please
tick “Poor” in the blank of “Oil”.
Special tip: if you promote new product or hot product, please tick “Select all” and
“Advertisement”. No matter what kind of results will be got, the advertised product will be
displayed at the top. Please click “Save” after you add new product as shown in the picture below.
3-3 New Member Clients
Please click “Member” on the initial page to modify, add or delete members. Click “New Member”
and fill in the basic information of your customer. And then, please use 1X lens installed on the
14
equipment to shoot a photo for your customer. Click “Save” after you add the customers into system.
If there are too many customers in your list, please search your customer’s name or number to find
him. In addition, you can find your customer through “Show all”. Please click “Next” after
completing the operation. Analysis interface will be appeared.
3-4 Non-member client
clientss
In order to save computer memory, facilitate operation and save operation time, we set up nonmember client (as below). Only gender and age shall be input before entering analysis interface.
15
Chapter IV: Enter Diagnosis Program
After finishing above-mentioned steps, you can enter the main analysis interface. The main
interface includes five modules as below: oil analysis, moisture analysis, spot analysis, pore
analysis and analysis on skin age (including elasticity and wrinkle). Every picture will be displayed
through 3D technology. Skin evenness can be showed in the picture as well.
Tip: this series software can analyze the skin in many modules. The moisture module makes
analysis for dermis, while other modules make analysis for epidermis. So, we make suggest that
make analysis for oil, spot, pore and skin age first. And then, you’d better make an analysis on
moisture through dermis lens. In this way, you can make all analysis after shooting two photos
only. Of course, you have to make moisture analysis first and make other analysis later.
As Shown in the picture below:
4-1 Sebum Analysis
Analysis and product selection
selection: click “Sebum Analysis” at the left side of analysis operating zone,
click “Shooting”, and click the beauty picture on the right side to shoot pictures for T-zone and Uzone. After clicking “Freeze”, the picture will be fixed at chief shooting area. And then, click
“Analysis” under “Shooting” to analyze the skin. The analysis results will be showed in the left
corner of “Analysis Result Showcase”. It includes the description of oil content and oil status (as
shown in the picture, oil content is 21% with very poor condition). On the basis of this result,
relevant product information will be popped up for your reference. After you finish selection, the
system will tell you successful selection. The interface also will be closed automatically. Meanwhile,
you can make the next analysis (for example, spot) on the basis of your analyzed picture formerly.
Click “Spots Analysis” and “Analysis” on the right side to make analysis directly (we suggest you
make spot analysis next). As shown in the picture:
Examine historical pictures: if you want to look over former analysis pictures, please look for it in
the area of analyzed pictures. The time will be showed on every picture. Meanwhile, former
analysis results will be showed on the picture as well.
16
Comparison
Comparison:It is allowed to compare current pictures with historical pictures. To compare current
pictures with the pictures in the photo gallery is allowed as well. As shown in the picture below:
17
3D Comparison
Comparison: after you click “3D display” on the right side, the 3D skin image will be
displayed through the application of 3D reduction technology. In addition, you can analyze and
observe the skin from arbitrary angle. Main functions of this module lie in examination of skin
smoothness. On the basis of 3D images, we can see the skin’s smooth status. The 3D skin image
can be observed from arbitrary angle after you click and drag the skin picture by your right button
of the mouse. After you press “F3”, 3D skin image will be displayed in full screen. After you press
“F3”again, you will exit the full screen. After you press“F2”, 3D skin hatched drawing will be
displayed.
18
F3 Full Screen
Press F3 again- exit full screen
F2
F2:: Display 3D hatched drawing
19
4-2 Spot
Spotss Analysis
On the basis of former picture used for oil analysis, click the buttons of “Spots Analysis” and
“Analysis” on the right side to make analysis on spots. After finishing the analysis, the analysis
results will be showed in the left corner of “Analysis Result Showcase”. It includes the description
of spot content and spot status. On the basis of this result, relevant product information will be
popped up for your reference. After you finish selection, the system will tell you successful
selection. The interface also will be closed automatically. And then, you can make another analysis.
If you need to look over former analysis pictures, please look for it in the area of analyzed pictures.
The time will be showed on every picture.
In addition, you can make comparison and 3D comparison at this time.
20
4-3 Pore
Poress Analysis
On the basis of former picture used for oil analysis, click the buttons of “Pores Analysis” and
“Analysis” on the right side to make analysis on pores. A picture will be popped up (as shown in the
picture). You need to mark the automatic hollow pore manually. Click the two side of every pore. It
is not necessary to mark all pores. Just mark several typical pores. And then, click “Analysis”. At
this time, the analysis results will be showed in the left corner of “Analysis Result Showcase”. It
includes the description of pore size and pore status. On the basis of this result, relevant product
information will be popped up for your reference. After you finish selection, the system will tell you
successful selection. The interface also will be closed automatically. And then, you can make
another analysis.
If you need to look over former analysis pictures, please look for it in the area of analyzed pictures.
The time will be showed on every picture.
In addition, you can make comparison and 3D comparison at this time.
21
22
4-4 Elasticity Analysis
On the basis of former picture used for oil analysis, click the buttons of “Elasticity Analysis” and
“Analysis” on the right side to make analysis. After finishing the analysis, the analysis results will
be showed in the left corner of “Analysis Result Showcase”. It includes percentages of skin
elasticity and skin status. On the basis of this result, relevant product information will be popped up
for your reference. After finishing selection, the system will tell you successful selection. The
interface also will be closed automatically. And then, you can make another analysis.
If you need to look over former analysis pictures, please look for it in the area of analyzed pictures.
The time will be showed on every picture.
In addition, you can make comparison and 3D comparison at this time.
4-5 Moisture Analysis
You need to take another photo for making analysis on moisture. First of all, adjust the tester’s lens
into dermis lens. Then, click the button of “Moisture Analysis” on the left side of analysis operation
23
Area and the button of “Shooting”, and click the beauty picture on the right side to shoot pictures
for T-zone and U-zone. After clicking “Freeze”, the picture will be fixed at chief shooting area.
Next, click “Analysis” to analyze the skin. The analysis results will be showed in the left corner of
“Analysis Result Showcase”. It includes the description of moisture content and moisture status.
On the basis of this result, relevant product information will be popped up for your reference. After
you finish selection, the system will tell you successful selection. The interface also will be closed
automatically.
If you need to look over former analysis pictures, please look for it in the area of analyzed pictures.
The time will be showed on every picture.
In addition, you can make comparison and 3D comparison at this time.
4-6 Examine Report
After finishing above mentioned five tests, click “Print Skin Report” to print or supplement the
report. Former analysis results of every test have been showed in the report. After finishing all
analysis, the products you choose and the facial advices are contained in the report as well.
24
Meanwhile, beautician can supplement opinions into the report. After supplement, please click the
buttons of “Print” and “Save” on top right corner. All the results are shown as below:
Chapter V: FAQ
5-1 How to confirm normal operation of intelligent skin tester?
:The structure of skin tester with USB port is similar with other equipment with USB port.
Answer
Answer:
Therefore, please confirm normal operation of intelligent skin tester according to following steps:
right-click “my computer” � property� hardware� equipment manager�image processing
equipment. If you can not find the equipment or yellow question mark and exclamation mark
appear, it is showed that the skin camera does not installed successfully.
As shown in the picture below, if you do not install any other image driver, please right-click the
driver program and forbid the equipment. If you want to use this equipment again, please click
“Enabled” and restart the computer.
: Windows Vista users, please examine in the path: control panel � hardware and voice�
Tip
Tip:
25
equipment manager�image process.
5-2 There is no image in shooting area, what can we do
do?
: Click “Program” in “Start” menu, find installed “
Answer
Answer:
formerly, and click “
”
”to run the system. Click “Options”�tick “Preview” (as shown in
the picture below):
record the product, the product image can not be imported, what can we do
5-3 When prepre-record
do??
Please convert the pictures into BMP or JPG image with 24 bit. The operations are as follows:
right-click the product picture � choose “Open with” � choose “Paint” to open the product
picture. Within the “Paint” software,choose “Save as” under “Document”, then, a dialog box will
be popped up. Choose “Save as type” to save the picture as BMP or JPG image with 24 bit. Next,
click “Save”. After writing down the picture path, click “Capture image”, a dialogue box will be
provided to you to choose treated product picture. Then, the picture will be displayed on the screen.
5-4
5-4.. The lens light does not work
work,, what can we do
do??
The white protruding line on the dermis and epidermis lenses shall be matched with the gap where
install the handle. The lens light does not work if not matched with the gap. The black part on the
skin lens can be circumvolved left and right for alternatives of dermis test and epidermis test.
26