1
MyLifeOrganized
User's Guide
MyLifeOrganized - Help
© 2015, mylifeorganized.net. All rights reserved.
No parts of this work may be reproduced in any form or by any means - graphic, electronic, or mechanical, including
photocopying, recording, taping, or information storage and retrieval systems - without the written permission of the
publisher.
Products that are referred to in this document may be either trademarks and/or registered trademarks of the
respective owners. The publisher and the author make no claim to these trademarks.
While every precaution has been taken in the preparation of this document, the publisher and the author assume no
responsibility for errors or omissions, or for damages resulting from the use of information contained in this
document or from the use of programs and source code that may accompany it. In no event shall the publisher and
the author be liable for any loss of profit or any other commercial damage caused or alleged to have been caused
directly or indirectly by this document.
Contents
I
Table of Contents
Chapter I Introduction
5
Chapter II Installation
8
1 System...................................................................................................................................
Requirements
8
2 Installing
...................................................................................................................................
MyLifeOrganized
8
3 How To...................................................................................................................................
Register
8
Registering MLO
..........................................................................................................................................................
to launch from a rem ovable m edia
9
What if I have lost
..........................................................................................................................................................
m y Activation Code?
9
Chapter III Getting Started
12
1 The Main
...................................................................................................................................
Window
12
2 The Basic
...................................................................................................................................
Steps
16
Chapter IV Working with MLO Data Files
20
1 Create,
...................................................................................................................................
Open, and Save MLO Files
20
2 Import/Export
................................................................................................................................... 20
3 Templates
................................................................................................................................... 21
4 Searching
................................................................................................................................... 22
5 Auto-Save
................................................................................................................................... 23
6 Advanced
...................................................................................................................................
Backup of Data Files
23
Chapter V Basic concepts: Outline, To-Do, View,
Workspace
26
1 Outliner
................................................................................................................................... 27
Default Outline..........................................................................................................................................................
View s
29
Adding a Task..........................................................................................................................................................
or Subtask
30
Deleting a Task
..........................................................................................................................................................
or Subtask
31
Rearranging the
..........................................................................................................................................................
Tasks and Subtasks
31
Perform ing Actions
..........................................................................................................................................................
on Tasks
32
Zoom In and Zoom
..........................................................................................................................................................
Out
34
Outline Navigation
.......................................................................................................................................................... 34
Creating Links
.........................................................................................................................................................
Betw een Tasks
35
Bookmarks......................................................................................................................................................... 36
2 The To-Do
...................................................................................................................................
List
37
Default To-Do ..........................................................................................................................................................
List View s
37
3 Views................................................................................................................................... 39
Manage View s
.......................................................................................................................................................... 39
Task Filtering.......................................................................................................................................................... 41
Filter Controls
......................................................................................................................................................... 43
Task Grouping
..........................................................................................................................................................
and Sorting
45
Understanding
.........................................................................................................................................................
Task List Ordering
45
User's Guide
II
Contents
Computed-Score .........................................................................................................................................
Priority
46
More Details on Computed-Score
...................................................................................................................................
Priority
46
Colum ns
.......................................................................................................................................................... 51
4 Workspace
...................................................................................................................................
tabs
51
Chapter VI Task properties
56
1 Assigning
...................................................................................................................................
Contexts to a Task
56
2 Importance
...................................................................................................................................
for parent
57
3 Urgency
................................................................................................................................... 57
4 Goal for
...................................................................................................................................
week, month and year
58
5 Task To-Do
...................................................................................................................................
List Visibility
58
6 Timing...................................................................................................................................
& Reminder
59
Start, Due date..........................................................................................................................................................
and Lead tim e
59
Recurrence .......................................................................................................................................................... 60
Rem inder
.......................................................................................................................................................... 62
7 Effort ................................................................................................................................... 63
Task Effort .......................................................................................................................................................... 63
Tim e Required
..........................................................................................................................................................
for a Task
63
8 Dependencies
................................................................................................................................... 64
9 Project
................................................................................................................................... 65
10 Review
................................................................................................................................... 65
11 Task Format
................................................................................................................................... 66
12 Task Statistics
................................................................................................................................... 67
13 Flags ................................................................................................................................... 67
14 Starred
................................................................................................................................... 68
15 Advanced
...................................................................................................................................
Task Properties
68
Chapter VII Contexts
70
1 Creating
...................................................................................................................................
and Deleting Contexts
70
2 Included
...................................................................................................................................
Contexts
71
3 Context
...................................................................................................................................
Hours
71
4 Context
...................................................................................................................................
Options
71
Chapter VIII Keyboard Shortcuts
Chapter IX More Advanced Features
74
78
1 Automatic
...................................................................................................................................
Formatting
78
2 Synchronization
................................................................................................................................... 79
Synchronization
..........................................................................................................................................................
profiles
80
Adding a Synchronization
.........................................................................................................................................................
Profile
80
Synchronizing
.........................................................................................................................................................
Data Files
83
Editing a Synchronization
.........................................................................................................................................................
Profile
85
Deleting a Synchronization
.........................................................................................................................................................
Profile
85
Importing and
.........................................................................................................................................................
Exporting Synchronization Profiles
85
Synchronization
..........................................................................................................................................................
w ith MyLifeOrganized Cloud
86
User's Guide
Contents
III
Automatic sync
.........................................................................................................................................................
w ith Cloud
87
Synchronization
..........................................................................................................................................................
w ith MLO BlackBerry
88
WiFi Synchronization
.......................................................................................................................................................... 89
Collaboration .......................................................................................................................................................... 89
Collaboration
.........................................................................................................................................................
using MLO Cloud
90
Collaboration
.........................................................................................................................................................
using sync to a hub file on LAN or FTP
90
Synchronization
..........................................................................................................................................................
for Portable Scenarios
91
Resolving Synchronization
..........................................................................................................................................................
Conflicts
92
Outlook Sync ..........................................................................................................................................................
User Manual
92
1. Performing
.........................................................................................................................................................
the Synchronization
93
2. Setting Up
.........................................................................................................................................................
MLO for Outlook Synchronization
93
2.1 Outlook Folder......................................................................................................................................... 93
2.2 Tasks synchronization
.........................................................................................................................................
action
94
2.3 Advanced sync
.........................................................................................................................................
options
94
2.3.1 MLO Outlook
...................................................................................................................................
Sync Presets
94
2.3.2 General Tab
................................................................................................................................... 95
2.3.3 Outlook Categories
...................................................................................................................................
Tab
97
2.3.4 Priority Mapping
...................................................................................................................................
Tab
99
2.3.5 User defined
...................................................................................................................................
fields Tab
100
2.3.6 Tab Buttons
................................................................................................................................... 101
3. Notes and
.........................................................................................................................................................
Troubleshooting
101
3.1 Changing MLO
.........................................................................................................................................
Outlook sync settings after sync operation
101
3.2 Changing Outlook
.........................................................................................................................................
folder after sync process
101
3.3 Recurring task
.........................................................................................................................................
in both places MLO and Outlook
101
3.4 Deletion of a.........................................................................................................................................
task in Outlook w hich has subtasks in MLO
102
3.5. How backup and restore of your Outlook tasks could affect MLO
sync
......................................................................................................................................... 102
3.6 The MLO Sync
.........................................................................................................................................
Log
102
3.7 Misc Notes ......................................................................................................................................... 102
3 Input...................................................................................................................................
parsing
102
4 Drag'n'Drop
................................................................................................................................... 106
5 The Rapid
...................................................................................................................................
Task Entry Dialog
107
6 Alternative
...................................................................................................................................
complete
108
7 Printing
...................................................................................................................................
and Reporting
108
8 Printing
...................................................................................................................................
PocketMod
109
9 Archiving
................................................................................................................................... 110
Archiving Manually
.......................................................................................................................................................... 111
Archiving Using
..........................................................................................................................................................
AutoArchive
111
10 Using...................................................................................................................................
the Command Line
112
Chapter X Options
116
1 Current
...................................................................................................................................
MLO data file
116
Appearance .......................................................................................................................................................... 116
Autom atic Form
..........................................................................................................................................................
atting
116
To-Do List Ordering
..........................................................................................................................................................
Options
116
To-Do List Form
..........................................................................................................................................................
at
117
WiFi Synchronization
.......................................................................................................................................................... 118
AutoArchive .......................................................................................................................................................... 118
Passw ord protection
.......................................................................................................................................................... 119
2 General
...................................................................................................................................
Application Options
119
User's Guide
IV
Contents
Them es and..........................................................................................................................................................
Form atting
119
Behavior
.......................................................................................................................................................... 120
Auto-Save Files
.......................................................................................................................................................... 121
The Rapid Task
..........................................................................................................................................................
Entry Dialog
121
Backup
.......................................................................................................................................................... 122
E-m ail Account
.......................................................................................................................................................... 123
Hot Keys
.......................................................................................................................................................... 123
Troubleshooting
.......................................................................................................................................................... 123
Chapter XI Technical Support
126
Chapter XII License Agreement
128
Chapter XIII Glossary
132
Index
135
User's Guide
Acknowledgements
I would like to express my deeply-felt gratitude to all those who have helped me make MyLifeOrganized happen.
I am deeply indebted to the MLO community for their help and advice that have resulted in a large number of
important corrections and improvements. My special thanks go to:
Bob Pankratz, for his outstanding support in the initial phase of the MLO project. Bob is the author of
the computed score priority algorithm and other great ideas. MLO would not be the way it is now
without Bob's help.
Mark Levison, for his ideas, promotion of MLO, and support.
Luciano Passuello, for his excellent and easy-to-implement feature requests as well as for the bug
reports.
Keith Russell and Tim Howland, for their meticulous technical writing work.
Tom Drahokoupil (tomd), for his active role in the MLO community from the beginning of MLO
development.
Ilias Sarris, for the detailed and well-thought-out posts, extremely useful feedback and support of the
MLO community.
Jon Rumens (Kudos), for the excellent work on AutoHotkey Scripts for MLO
Thanks to Lisa Stroyan, Dwight Arthur, Ron Stockfleth, Steve Wynn, Jim McGowan (J-Mac), David
Rees (reesd), Josh Powell (Swifty) and other people I may have forgotten to mention.
I am very grateful to my wife Katrin and my sons Michael and Ivan for their support and patience
throughout the development of MLO, which has resulted in my coming home late on many days.
Chapter
I
Introduction
1
5
Introduction
"Before you can do anything, you have to do something first."
Murphy's Law
MyLifeOrganized (MLO) is a personal task outliner that will help you organize your goals, projects and
tasks into a tree. A to-do list of actions that require immediate attention will be generated automatically.
This to-do list will be sorted in order of priority to keep you focused on your most important tasks. The
to-do list ordering is based on sophisticated algorithms to determine optimum prioritization.
There are the following mobile clients for MyLifeOrganized: Android, iPhone, iPad.
There is the MyLifeOrganized Cloud Sync service allows you to synchronize data between different
devices with MyLifeOrganized installed.
This manual mainly covers MyLifeOrganized for Windows and synchronization with other platforms.
However many ideas from this manual may be applied to MyLifeOrganized on mobile platforms. More
information may be found on our site: www.MyLifeOrganized.net
MLO can be synchronized with Outlook, and can import/export data from MindManager.
MLO will help you track your personal projects and achieve your most important goals.
Time management means planning and organizing your time in such a way that you accomplish your
most important goals as quickly as possible. Yet many people work very hard with no idea of what their
real goals are. If you do not have goals for yourself, you will be forever working to achieve the goals of
someone else. Every day, many of us spend time on urgent but low priority tasks, while the most
important tasks get put off to another day. Unfortunately, "another day" never seems to arrive. If you
keep putting things off, you'll eventually wake up one day and realize life has passed you by. MLO
encourages you to think and act differently -and doing things differently is the first step to digging
yourself out of the procrastination rut.
The main idea of MLO is to help you stay focused on the activities which drive you to achieve your most
important goals as quickly as possible. One of the key advantages of MyLifeOrganized is that, despite
being a very powerful and sophisticated piece of software, it is extremely easy for even the most novice
computer user. MLO will not replace your Calendar, Outlook or Excel, but it will help you organize your
tasks into an outline, determine the most important ones, and generate a concrete and sequential list of
specific actions to achieve your goals as quickly as possible. MLO is being actively developed, so join
the MLO community and share your ideas: http://groups.google.com/group/MyLifeOrganized.
Key Features
- Hierarchical to-do list manager (outliner)
- Generate to-do list (next actions) based on sophisticated algorithms to determine optimum
prioritization
- Easy set and manage goals
- Complete the tasks in a specific order
- Simple personal projects tracking
- Dependencies
- Custom views
- Search-as-you-type
User's Guide
6
Chapter 1
- Intuitive and customizable interface
- Extremely easy for everyday usage
- Cloud sync and collaboration
- Synchronization with MLO on mobile devices
- Smart synchronization with MS Outlook
- XML import/export that can be used to create project templates and exchange data with other
applications including Excel and MindManager.
- Advanced printing functionality
- Easy one-click Excel export can be used to create and print any reports in MS Excel
www.MyLifeOrganized.net
User's Guide
Chapter
II
8
Chapter 2
2
Installation
2.1
System Requirements
MyLifeOrganized - Windows System Requirements:
- Windows 8, Windows 7, Vista, XP, 2003
- 12 MB of disk space
- MS Outlook 2000+ if you want to sync MLO with Outlook
2.2
Installing MyLifeOrganized
How to install
1. If you downloaded the MLO installer, MLO-Setup.exe, just run it and follow the instructions. If you
already have a previous version of MLO installed, just close the application before updating, and it will be
updated with the new version automatically (no uninstall needed).
2. If you downloaded the zip file, MLO.zip, then no installation is needed. Simply unzip the files to a
folder of your choice and run the application mlo.exe.
Tip: MLO is specially designed to be able to run from USB flash drives. You
can store your data files along with mlo.exe on your flash drive and run
MLO directly from it.
How to uninstall
1. If you used the MLO installer to install the program, then use "Add or Remove Programs" from your
Windows Control Panel to completely uninstall MLO.
2. If you used the zip archive to install MLO, simply delete all the files from the folder you copied the
application to.
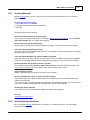
2.3
How To Register
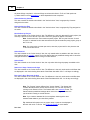
There are two ways to register MyLifeOrganized: you may register from within the application, or on our
website.
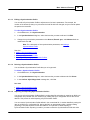
To register using the MyLifeOrganized application
1) Select Help > Registration... from the application menu
2) In the Registration dialog, click the buy online link. You will be taken to the Registration web
page.
3) Select the Application Edition you would like to buy a license for, and click the Buy using share*it
button on this web page.
4) Follow the instructions on the share*it website to complete your secure order and receive an
Activation Code.
5) Enter the Activation Code you receive into the appropriate text input in the MLO Registration dialog.
User's Guide
Installation
9
6) Click the Register button. Your application is now registered!
To register using our website
1) Click on the link below, select the MyLifeOrganized product, and follow the instructions.
http://www.mylifeorganized.net/shop/buy.htm
2) Enter your Activation Code in the application, as described in steps 5 and 6 above.
See also
What if I have lost my Activation Code
What if my Activation Code does not work?
How to register FAQ
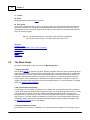
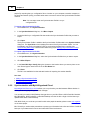
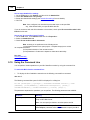
2.3.1
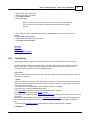
Registering MLO to launch from a removable media
How do I launch a registered copy of MyLifeOrganized from removable media (such as a USB
Flash drive) ?
1. Register MyLifeOrganized using the Activation Code provided.
2. From the application menu, select Help > Registration, to open the Registration dialog.
3. In the Registration dialog, click "Export registration information to a file" and specify a folder where the
file mlo.keym should be created.
4. Copy the following files to the same folder on your removable media:
mlo.exe - the main application
mlo.keym - the file containing the registration information
You can also copy any *.ml files that contain your data.
5. You can now run mlo.exe from the removable drive on any computer.
See also
How To Register
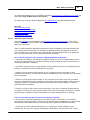
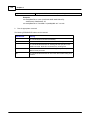
2.3.2
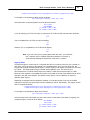
What if I have lost my Activation Code?
What if I have lost my Activation Code?
What if my Activation Code does not work with a new version of MyLifeOrganized?
Use our Online Activation Recovery Service to have a new Activation Code
emailed to you:
http://www.mylifeorganized.net/support/activator.htm
How do I change the registration email?
What do I do if I have forgotten the e-mail address used when registering, or if the e-mail
account is not valid anymore?
Use our Online Activation Recovery Service:
http://www.mylifeorganized.net/support/activator.htm
See also
How To Register
User's Guide
Chapter
III
12
3
Chapter 3
Getting Started
MyLifeOrganized (MLO) is a personal task outliner and to-do list manager that will help you organize
your goals, projects, and tasks into a tree, and generate the to-do list of actions that require immediate
attention. This to-do list will be sorted in order of priority to keep you focused on the most important
tasks. The to-do list can be filtered, grouped, and ordered based on sophisticated algorithms, to
determine optimum prioritization.
We recommend you start your discovery of MLO with the following topics:
1.
2.
3.
4.
5.
6.
The Main Window
The Basic Steps
Basic concepts: Outline, To-Do, View, Workspace
Contexts
Goals
Projects
After you have reviewed these topics and understand the basic concepts of MyLifeOrganized, you can
learn even more about the application in later topics of this help documentation.
You can also download the printable version of MyLifeOrganized User's Guide from our web site.
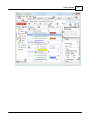
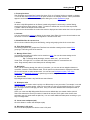
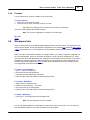
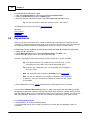
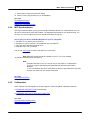
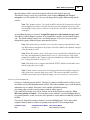
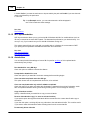
3.1
The Main Window
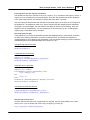
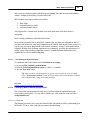
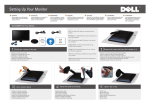
Here is a brief overview of each element in the MyLifeOrganized main window.
User's Guide
Getting Started
User's Guide
13
14
Chapter 3
1. Task Outline
The Task Outline contains your folders, goals, projects, tasks, and subtasks in a hierarchical structure.
2. To-Do List
After you have entered all your goals, projects, and tasks into the Outline, MLO can display only those
tasks that require immediate attention. These tasks are placed in the To-Do list. The To-Do list is a
simple list of actions which can be grouped by contexts or other task properties. See more information
about Outline, To-Do, Views and Workspaces.
3. Show/Hide Task Properties
This button opens and closes the task properties pane and notes window.
4. Task Notes or Notes Preview
The task notes section contains a plain text editor to add notes to a task. There are two modes to edit
notes: 1) Notes preview with text edit in full panel 2) Edit notes without preview. To switch modes right
click on Properties pane, select Configure... and click "Edit notes in full panel"
The task notes editor supports hyperlinks and links to other tasks.
5. Properties Pane
The Task Properties Pane contains many parameters that can be set for each task. It is here, for
example, that Contexts can be assigned to the task, as well as other parameters, such as Task
Importance or Due Date.
User's Guide
Getting Started
15
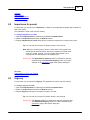
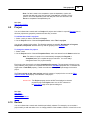
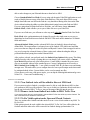
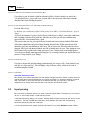
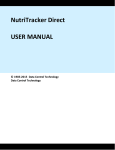
6. Property Sections
Task properties are grouped into Property Sections. Click on a Property Section to expand or collapse
it. You can also use Keyboard Shortcuts for quick access to the Property Sections. Which parameters
appear in each section can be set in the Options dialog box, on the Appearance page.
7. Views
All tasks in MyLifeOrganized can be filtered, sorted and grouped in various ways, and the filtering,
sorting and grouping rules stored as "views". To switch to another view, use one of the ways below:
1) Select a view in the left panel with Views tree
2) Click on the column where the current view name is displayed and select other view in the list opened
8. Columns
You can choose which columns to display in the current View. Right-click on the column header to see
the full list of columns. The columns configuration is stored for each view.
9. Show/Hide filter for current view
Click to show or hide the filter pane with filtering, sorting and grouping rules for the current view.
10. Filter Pane Sections
The filtering properties are grouped into Filter Sections and allow creating various custom filters,
groupings, and sorting rules for the task list.
11. Manage Views Pane
Any filtering and grouping you define can be saved as a View. You can also reset settings to the
previous state on this panel.
Tip: To manage views (rearrange, rename, delete, etc.), you can use the
Views Pane. Just right click on a View in the Views pane and select a command from the
menu. Drag and drop views in the Views pane to rearrange them.
12. Navigation
While you are browsing through the outline of your tasks, you can use various navigation buttons to
move back, forward or select different levels. The full path to the selected task is displayed under tabs.
Click on the full path to select another level. You can also use Workspaces (tabs), Task Links,
Bookmarks and Keyboard Shortcuts to speed up your outline navigation.
13. Search tasks
MyLifeOrganized includes a very fast full-text search feature.
14. Workspace tabs
Workspace tabs are used to switch quickly to a different way to see your tasks. For example, in one tab
you can focus on a current project, while in a second tab you view your household chores list. In a third
tab, you might choose to manage your Inbox. And you can switch between these Workspaces with a
single click!
When you create new MyLifeOrganized file there are two default tabs are created: Outline (with All
Tasks view selected to see all your tasks in hierarchical view) and To-Do (with Active Actions view
selected to see only active tasks as plain list). You can create additional Workspaces according to your
way to manage tasks.
15. Create new workspace (tab)
Click this button to create new Workspace (tab)
16. Edit notes in full panel
Click to hide task properties to edit the notes in full panel
User's Guide
16
Chapter 3
17. Toolbar
18. Zoom
Displayed the task name of the Zoom you set.
19. View group
Views can be organized in groups. When you click a group in the Views pane the last used View from
this group is selected. The view groups are highlighted with blue line and the View inside this group is
selected with red line and red font. Expand the View group to see what is the actual view was selected
when you select this group.
Tip: You can temporally hide tabs, views pane, toolbar and task properties to
see your task list full screen. Just select View->Full screen (F12).
See also
The Basic Steps
Basic concepts: Outline, To-Do, View, Workspace
The Outliner
The To Do List
Views
Appearance
3.2
The Basic Steps
Here are four basic steps to help you start using MyLifeOrganized.
1. Outline your tasks
Use the MLO Outliner to organize your goals, projects, and tasks into a tree. Start by entering what you
would like to accomplish. If a task is large, break it down into its component elements, by creating subtasks underneath it. If these components are themselves large, break them down further into their own
sub-tasks. Mark tasks as Projects by checking "This is a project" in the task's properties (under the
Project section of the properties pane). Mark tasks as Goals by setting the "This tasks is a goal for"
property of the task (under the general section of the properties pane). For more information on creating
tasks, see Adding a Task or Subtask.
2. Ask yourself what is important
For each task, you can specify its importance to it's parent task, to the goal the task will contribute to.
In other To-Do programs, when you set the priority of a task, you must set an absolute priority in relation
to all other tasks in your list. This is very difficult to determine sometimes! In MLO, the process of
setting priorities is made easier: you only consider how important each task is to completing its parent
task or project. If you later change the importance of a project, all of it's sub-tasks will be reprioritized
accordingly, without you having to change the importance sliders for those subtasks individually. See
the Importance for parent topic for more details.
3. Assign Contexts to each task
Some tasks in your list can be completed only in certain Contexts or situations. For example, say the
User's Guide
Getting Started
17
task "Buy new mouse" cannot be completed unless you are in a computer store. Thus, you may want
to create a new Context named "Computer store", or "Shopping", and assign this Context to the task.
Later on, you can filter or group the To-Do list by assigned Contexts.
A Context can include other Contexts, so it is easy to construct a realistic model of your everyday
Contexts or situations. For example, the Context "Computer store" could be included by the more
general context "Shopping", so you can either bring up all shopping tasks, or bring up tasks only for the
Computer store.
Another way to think of Contexts is as categories for the tasks. Several contexts can be assigned for a
task. The contexts could be also open or closed.
4. View the automatically generated To-Do list
After you have entered your goals, projects, and tasks into the Outliner, MLO will display only those
tasks that are ready for your immediate attention. These tasks are placed in the To-Do list -a simple list
of actions. In the default "Active Actions" view, tasks that have uncompleted subtasks are not shown in
the To-Do list, and scheduled tasks appear in the list only at appropriate times. See the To-Do List topic
for more details on how the to-do list is created.
The To-Do list can be sorted by priority so that you stay focused on what is really important to you,
separate importance from urgency, and overcome procrastination.
The tasks in the To-Do List can also be filtered based on different parameters, such as context, amount
of time you have available right now, etc.
The tasks on the To-Do list can also be grouped by various properties. It is easy to create a customized
To-Do List View that is filtered, sorted, and grouped according to your needs.
Each time you complete a task, the to-do list is regenerated, properly updated and ordered.
See also
Getting Started
Basic concepts: Outline, To-Do, View, Workspace
Timing & Reminder
Setting Goals
Personal Projects Tracking
User's Guide
Chapter
IV
20
Chapter 4
4
Working with MLO Data Files
4.1
Create, Open, and Save MLO Files
MLO stores your data in a single binary file. The default file extension for MLO data files is *.ml
To create a new MLO file:
1. Select File > New...
2. Choose to create a blank file or choose a template to start with. (Template files have a *.mlt file
extension.)
3. The current file will be closed and the new file created.
To save an MLO file:
1. Select File > Save
Note: Each time you save your data file a back up file is created, named
<YourFileName>.ml.bak. (The file will be named slightly differently if
you chose "Keep last N back ups" in the advanced back up settings.)
Another back up is also created right before every Outlook sync, named
<YourFileName>.ml.sync.bak
Tip: To save the file under a different name, select File > Save as... and
enter a new file name.
Note: By selecting different file types in the File > Save as... dialog, you can
export the entire outline to different formats.
To open an MLO file:
1. Select File > Open...
2. Chose the type of the file you want to open.
3. Browse to and select the file you want to open.
4. Click the Open button.
Note: By selecting different file types in the File > Open dialog, you can
import data in different formats.
Note: To recover from a back up file, simply open the back up file in the
MyLifeOrganized application.
See also
Import/Export
Auto-Save Options
Advanced Backup Options
4.2
Import/Export
Import and Export commands are used to exchange data between MyLifeOrganized and other
applications. When exporting, you are given a choice to export only the selected branch (a task and all
of its subtasks), or the entire outline. When importing, you can import into the selected task, or into the
root of the outline.
User's Guide
Working with MLO Data Files
Import and Export is accessed with menu File > Import or Export.
Export Formats
MyLifeOrganized can export to the following formats:
1) MyLifeOrganized XML Document (*.xml)
2) MyLifeOrganized Template (*.mlt)
3) Tab-delimited Text Document (*.tab)
4) Excel XML Document (*.xml)
5) MindManager XML Document (*.xml)
Import Formats
MyLifeOrganized can import from the following formats:
1) MyLifeOrganized XML Document (*.xml)
2) MyLifeOrganized Template (*.mlt)
3) Tab-delimited Text Document (*.tab)
4) MindManager XML document (*.xml)
XML and tab-delimited text are standard formats supported by a variety of applications.
Note: You can also export or import the entire outline by selecting File >
Save as... or File > Open... respectively. You just need to select the
type of file you would lik e to export to, or import from.
Tip: By exporting to an Excel XML document, you can use the power of
Excel's reporting to create all k inds of reports about your projects and
task s. For example you can use Excel's Autofilter to report on all the
task s you completed last week and print out the report.
Tip: Export can be used to duplicate task s and entire projects, and creating
reusable templates that can be imported into your main file any time
needed.
Tip: You can use XSLT (http://www.w3.org/TR/xslt), a relatively easy
language, to apply further magic on your xml exports (outside of MLO),
such as conversion to other file formats or creating custom reports.
See also
Create, Open, and Save MLO Files
Templates
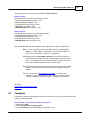
4.3
Templates
Templates are used to store predefined content and structure so that you can reuse it later when
creating new MLO data files.
How to create a new data file based on a template
1. Select File > New...
2. Choose Create from existing template
3. In the File Dialog, select the template you would like to use.
User's Guide
21
22
Chapter 4
4. Click the Open button
Note: Each time you create a data file based on a template, MLO processes
it to "catch-up" all the recurring task s to the current date.
Tip: One special template, called the "MyLife Organized - Demo.mlt", can be
used to create a demo outline with some tips and examples of how to use
MLO.
Tip: You can also import data from a template into a selected task of the
current data file.
How to create new template
1. Open or create a data file that you would like to store as a template to reuse later.
2. Click File > Save as...
3. In the Save as type list select MyLifeOrganized Template (*.mlt)
4. Enter a file name
5. Click Save
Tip: You can use export to create a template based on only the selected
branch of the current outline.
See also
Create, Open and Save MLO Files
Import/Export
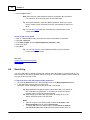
4.4
Searching
You can locate tasks by searching all the task captions and/or task notes in your MLO data file. The
search feature is very fast and provides search-as-you-type: it immediately displays search results as
you type the text you want to find.
To search for text in the task captions and/or task notes:
1. Click into the Search text box in the upper-right corner of the MyLifeOrganized window.
2. In the search box, type the text you want to find.
The search results are displayed in a pane at the top of the window.
Tip: MLO implements Google-lik e search, which means that it can search for
any combination of typed words, or can search for a specific phrase if
quotation mark s are placed around the phrase.
Tip: After entering your search text, press Enter to change focus to the
search results and jump to the first result.
Notes:
·
There is an option in the Search panel to search in All Tasks, in All
Except Completed, and in only the Current View.
·
To narrow down the list of search results, use the Search in captions
and Search in notes check boxes above the search results pane. For
User's Guide
Working with MLO Data Files
·
·
3.
23
example, to search only in the task captions of open task s, select the
Search in captions check box, clear the Search in notes check box
and select All Except Completed.
If more than one match is found in the task notes, a plus sign is
displayed next to the task caption. Click the plus sign to display
additional rows. The number of rows corresponds to the number of
matches found in Task Notes. Click one of these rows to see the
corresponding matching text highlighted in the Task Notes.
You can sort the search results by any column in the search results
pane. Click the name of the column that you want to use for the sort
order. To reverse the direction of the sort (ascending or descending),
click the name of the column again.
Select a row in the search results pane.
The matching task name is highlighted on the current tab. If the matching text is found in the task
notes, it is highlighted on the Task Notes.
Note: If task is not found in the current tab MLO will continue search in the
first tab. If task is not found in the first tab the new tab is created without
filter (to show all task s there) and the task is found in this new tab.
Tip: To change focus to the Task list, press Enter.
4.
4.5
To hide the search results pane, click Close in the upper-right of the search results pane or press
Esc when focus is in the Search Panel.
Auto-Save
By default MLO automatically saves your data file. However you can set manual saving mode.
There are two options:
1) Save all changes automatically
2) User manually saves the changes
To select an Auto-Save option:
1. Select Tools > Options...
2. Select Autosave files page
3. Select the Auto-Save option you need.
See also
Option - Auto-Save Files
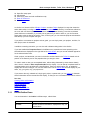
4.6
Advanced Backup of Data Files
Advanced Backup stores backup copies of your MLO data files on each save. Should you lose your
data, you can open a backup file or use import/export to restore your data.
MLO can retain daily, weekly, and monthly backup files, as well as the last N copies of your data files.
Advanced Backup is not enabled by default.
User's Guide
24
Chapter 4
To configure Advanced Backup settings:
1. Select Tools > Options...
2. Select the Backup section.
3. Select the backup settings you need. (See backup settings for more details.)
Tip: To recover from a back up, simply open the back up data file (*.bak ) in
MyLifeOrganized application (menu: File >Open)
See also
Backup Settings
Archiving
User's Guide
Chapter
V
26
5
Chapter 5
Basic concepts: Outline, To-Do, View, Workspace
Below you can find the description of the main concepts of MyLifeOrganized application and how they
work together.
Outline
Outline is the list of Goals, Projects, and other tasks displayed in hierarchy that shows the relationships
of subtasks to their respective parents. The Outline is used to organize your tasks. You can view your
Outline using different views. When you create a new data file, MyLifeOrganized creates several default
Outline views for you. The new tab Outline is also created. When you click on this tab the Outline view
All task s is selected.
Note: The Outline is just a definition of filtered task s (views) presented hierarchically. You
can create your own Outline view by creating new custom hierarchical view.
More details about Outline.
The To-Do List
After you have added all your goals, projects, tasks and subtasks to the Outline, MLO can display only
those tasks which require immediate attention and place them in the To-Do List. This is a simple nonhierarchical list of actions selected from the entire Outline. This list can be sorted and grouped using
different parameters. You can view your To-Do list using different views. When you create a new data file,
MyLifeOrganized creates several default To-Do list views for you. The new tab To-Do is also created.
When you click on this tab the To-Do view Active Actions is selected.
Note: The To-Do list is just a definition of filtered task s (views) presented in a plain (nonhierarchical) list. You can create your own To-Do lists by creating non-hierarchical views.
More details about To-Do list.
View
View is a particular way of displaying a filtered, sorted and grouped tasks. By default MyLifeOrganized
creates several default views such as Outline views (hierarchical) and To-Do list views (non-hierarchical).
Views are displayed in the left Views pane so that you can select a view with a single click.
Note: Views can be organized into the groups. When you click a group in the Views pane
the last used View from this group is selected. The view groups are highlighted with blue
line and the View inside this group is selected with red line and red font. Expand the View
group to see what is the actual view was selected when you selected this group. By default
the following groups of views are created in MLO: Outline, To-Do, Completed, More Views.
More details about views.
Workspaces (tabs)
There are tabs on the top of the MyLifeOrganized application we call Workspaces. The Workspaces are
used to store and quick access the particular configuration for the selected view, additional filters, zoom,
selected tasks etc. The Workspaces can show different parts of the same data files in different views.
For example, in one tab you can work on a current project in the other – view a small household chores
and the third tab -handle the Inbox. And you can switch between these Workspaces with a single click!
User's Guide
Basic concepts: Outline, To-Do, View, Workspace
27
When you create new data file, MyLifeOrganized creates two default Workspaces for you: Outline and
To-Do so that you can quickly switch between hierarchy in All Tasks view on Outline tab to the plain list
in Active Actions view on To-Do tab.
When you select a view inside Workspace or change the filter, you actually change the configuration of
the current Workspace. When you click other Workspace you will see other configuration in it. When
you return back to the first Workspace your changes for this Workspace will be still there. If you want to
propagate the changes to filtering, sorting and grouping in one Workspace to other Workspaces, you
must first save these changes into a View. This way all the Workspaces which are using this View in
unchanged state will receive the new settings.
Note: Some parameters lik e Selection and Zoom may be configured to sync with the first
tab. This is needed, for example, when you want to see the place in the Outline of the task
selected in the To-Do list. To configure the Work space right click on it and select Set up
work space...
More details about Workspaces.
See also
The Basic Steps
Zoom In and Zoom Out
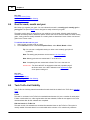
5.1
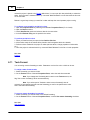
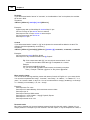
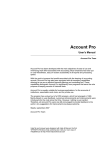
Outliner
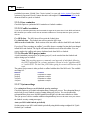
The Outliner is where you organize your tasks. Here is an overview of its many features.
User's Guide
28
Chapter 5
1. Switch from Outline to To-Do list
2. Hide completed tasks
3. Current view. Click to change the view
4. View group
5. Navigation buttons and full path to the selected task
6. Completed task
7. Completed Goal
8. Weekly goal
9. This task is a Project
10. Project completion progress bar
11. Folder
12. Context column
13. Flag
14. This task has notes
15. Due date set for this task
16. Reminder set for this task
17. Dependency set for this task
18. Open task properties pane
19. Side color bar
20. Starred task
21. Add new Workspace
22. Active Action
23. Overdue task
User's Guide
Basic concepts: Outline, To-Do, View, Workspace
24.
25.
26.
27.
28.
29
Open filter setup pane
Add subtask
Cloud sync (there are local modifications now)
Zoom in / Zoom out
Current zoom
An Outline is a hierarchical list of Goals, Projects, and other Tasks displayed in a way that shows the
tasks relationships, including Parent Tasks and their Subtasks. This hierarchy is sometimes referred to
as a tree, with root items (top-level items, or items at the top of the hierarchy), branches, and leaves
(tasks that have no subtasks). If you have a list of goals that you wish to work on, you can first enter
these goals at the top level of the outline. Then, for each goal, you can enter sub-projects and subtasks
that will help you to accomplish that goal.
If you prefer to concentrate on projects and not goals, you can simply enter your projects, and then, for
each project, enter its subtasks.
In addition to entering new tasks, you can also edit or delete existing tasks in the Outline.
If you have enabled the Properties Pane in the View menu, properties and notes pertaining to the
selected tasks are displayed on the right side of the main window, and you can set individual properties
for the selected tasks there.
Goals, projects, and tasks that you enter in the outline are then listed in the To-Do List based on their
position in the hierarchy and on the properties that you assign to them.
To make it easier to view your uncompleted tasks, without being distracted by those that are already
done, there is a button to hide completed tasks from the display. You can hide all completed tasks or
completed tasks which are older than a specified time. There is a refresh option (F5), to update the
display with all recent changes. You can also select from a list of Outline views that will display all your
tasks, only your goals, only your projects etc.
If you want to view only subtasks of a single goal, project, or parent task, you can zoom in to that task
and all other tasks will be removed from the display, so that you can concentrate on the branch at hand.
See also
Creating Tasks and Subtasks
Rearranging the Outline
Outline Navigation
Actions on Tasks
Zoom In and Zoom Out
Views
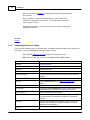
5.1.1
Default Outline Views
You can view tasks in the Outline in different ways, called Views.
View name
View description
All Tasks
Shows all tasks and subtasks, displayed the way you
entered them.
User's Guide
30
Chapter 5
Projects
Shows tasks with property Project checked with their
subtasks.
Goals
Shows tasks set as Goals with their subtasks. (you
can assign this property from the General section of
the task Properties Pane).
Review
Shows all tasks (and their subtasks) with property
Next Review set for today or for the past. This view is
used to perform periodical review of your projects and
tasks. Once the project is reviewed mark it by
command "Mark Reviewed" to move the review on next
date.
To change the View from views pane:
1. Double click Outline in the left panel with views to expand all Outline views.
2. Select the view you need.
To change the View from menu:
1. Click the Views: <View Name> header to open the pop-up menu containing a list of views.
2. From the pop-up menu, select the view you need.
Tip: You can create your custom views using filtering, grouping and sorting.
Tip: You can use the Alt+V shortcut to open the view pop-up menu.
Tip: To save the space on the screen you can hide task views pane by
selecting menu: View->Task views pane. (Alt-F1) .
See also
Outliner
Workspace tabs
Goals Setting
Projects Tracking
Zoom In and Zoom Out
5.1.2
Adding a Task or Subtask
A task can be added below the selected task, or as a child of the selected task.
To add a task:
1.
On the Task menu, click New task, and type a task name.
Tip: You can also press the Insert key shortcut or use New task toolbar
button.
User's Guide
Basic concepts: Outline, To-Do, View, Workspace
31
To add a subtask:
1.
2.
Click the task you want to add a subtask to.
On the Task menu, click New subtask, and type a subtask name.
Tip: You can also press Alt+Insert as a shortcut or use the toolbar button.
See also
Actions on Tasks
Outliner
5.1.3
Deleting a Task or Subtask
To delete a task or subtask:
1.
2.
Right-click the task or subtask.
On the shortcut menu, click Delete task.
Tip: You can also use Ctrl+Del as a shortcut or the button in the toolbar.
Tip: If you want to revert the deletion you made, use the undo command. To
undo, select menu Edit > Undo or press CTRL+Z.
See also
Actions on Tasks
Outliner
5.1.4
Rearranging the Tasks and Subtasks
You can change the hierarchy and position of any task or subtask displayed in a hierarchical view.
To move a task or subtask into another task:
1.
2.
In any hierarchical view left-click a task you want to move.
Drag the selected task onto the task you want to move it under.
The task you have moved will be displayed as a subtask under the corresponding outline item.
Note: if the task you moved to is collapsed, drag & drop puts the subtask as
the last subtask in the list; otherwise, if the task is expanded, drag &
drop puts it as the first subtask in the list.
To convert a subtask into a task:
1.
2.
User's Guide
In any hierarchical view left-click a subtask.
Drag the selected subtask into the left side of the task list, and then release the mouse button.
32
Chapter 5
Tip: You can also use shortcuts to rearrange the task s (see Rearrange task s
in the outline).
Tip: If you want to cancel the rearrangement you made, use the undo
command as many times as necessary. To use undo select menu Edit >
Undo or press CTRL+Z.
Tip: Drag & Drop task s to a group in the task list to assign corresponding
properties for the task .
See also
Outliner
5.1.5
Performing Actions on Tasks
You can perform different actions on the task items. All available actions are listed in the Task menu or
local menu. To open the local menu, right-click a task in the list.
Tip: There are Keyboard Shortcuts assigned for many task actions.
Note: After most actions, you can use the Undo operation: Edit > Undo.
Action name in the local menu
Action description
New task
Create a new task
New subtask
Create a new subtask
New folder
Create a new folder
New project
Create a new project
New from template...
Create a new task branch using one of the existing tasks as a
template
Zoom In
Perform Zoom In action. See Zoom in and Zoom out for details.
Zoom out
Perform Zoom Out action. See Zoom in and Zoom out for
details.
Refresh
Update the display with all recent changes in the Outline
Set due date...
Activate the Timing & Reminder property section and focus on
the Due Date control to select new due date for the task.
Skip occurrence...
Skip occurrence of a recurring task.
Cut task
Cut the selected task to the clipboard. When you paste the task
to another location or another MLO window this task will be
removed.
Copy task
Copy the selected task to the clipboard. Tasks copied to the
clipboard can be pasted to other MLO instances or to other
applications as outlined text.
Copy as
User's Guide
Basic concepts: Outline, To-Do, View, Workspace
33
Copy as local link
Copy as a link to the selected task to the clipboard
Copy as URL
Copy as a URL to the selected tasks using mlo: protocol. You
can paste this link into the Explorer address bar to navigate to
this task. You can also use it to create links between MLO
tasks located in different data files.
Paste task as
Paste the previously copied task as Child or Sibling of the
selected task.
Child
Sibling
Duplicate task
Create a copy of the selected task
Move to...
Opens a dialog to move the selected task to another task
Set bookmarks
Set a quick bookmark to a task
Goto bookmarks
Jump to a task using a bookmark
Import...
Import the task outline from an external file in one of the
supported formats.
Export...
Export the selected branch or the entire outline to an external
exchange file in one of the supported formats.
Archive...
Run manual archiving.
Advanced
Advanced outline commands
Complete task and all
subtasks...
Mark the task and all subtasks as completed
Uncomplete task and all
subtasks...
Mark the task and all subtasks as uncompleted
Sort subtasks...
Sort subtasks of the selected task according to the entered
sorting parameters.
Copy tasks as text...
Copy the outline to the clipboard as text. A number of options
can be set for this operation (i.e. copy only expanded, mark
completed etc)
Paste text as subtasks...
Paste text from the clipboard as subtasks of the selected task.
Each text line from the clipboard will create a new task. The text
in the clipboard is parsed to preserve the indention.
Add Contexts to all subtasks...
Add the Contexts of the selected tasks to all its subtasks.
Replaces Contexts in all
subtasks...
Replace the Contexts in all subtasks of the selected task with
the Contexts of the selected task.
Clear Contexts for task and
subtasks...
Clear the Contexts property of the selected task and all
subtasks.
Properties...
Delete task
See also
Outliner
User's Guide
Advanced Task Properties.
Delete the selected task branch.
34
5.1.6
Chapter 5
Zoom In and Zoom Out
If you have a complex tree of tasks with many branches and want to concentrate on one project and
temporally hide all the others, you can use the Zoom in command.
To
1.
2.
3.
Zoom in:
Select a task in the Outline
Right-click the task
Click Zoom-in... .
Tip: you can also use shortcut Ctrl+R or toolbar button to Zoom in
The task you selected will be the new Root for your task tree. Its name will be shown on the top of the
outline.
Tip: You can use this command as many times as you want to move deeper
and deeper into the task tree.
Note: The Zoom in command in the first Work space (tab) will also affect the
other Work spaces if these Work spaces configured with option "Sync
zoom with first tab". If this option is not set then the Zoom in command
does not affect this Work space.
To return to the normal view
1. Click the Zoom information bar on the top of the outline.
See also
Views
Workspace tabs
5.1.7
Outline Navigation
While you are browsing through the outline of your tasks, you can use various navigation buttons to
move back, forward or to other level. You can also use: Workspace tabs, Task Links, Bookmarks and
Keyboard Shortcuts to speed up your outline navigation.
Note that a full path to the task you selected is always displayed in the path control on top of the
application window. It can be used to jump quickly to other level of the outline.
User's Guide
Basic concepts: Outline, To-Do, View, Workspace
35
See also
Workspace tabs
Links to Tasks
Bookmarks
Keyboard Shortcuts
5.1.7.1
Creating Links Between Tasks
You may need to associate a task to related tasks or files. You can do this by inserting links into the
task notes. When you click a task link, the linked task is selected in the Outline. When you click a file
link, the linked file opens in its associated program or viewer.
You can insert the following types of links:
· A link to a task in the same MLO file.
· A link to a task in another MLO data file.
· A link to a file or hyperlink.
You can also link to MLO tasks from other applications using the registered protocol mlo:// .
To
1.
2.
3.
4.
5.
insert a task link by using the Task Notes command:
Click the Task Notes tab of the task in which you want to create a link.
Right-click in the Task Notes tab.
On the menu, select Insert link to a task.
In the "Select Task" dialog box, select the task you want to link to and click OK.
Repeat steps 2–4 to insert additional links.
To
1.
2.
3.
4.
5.
6.
paste a task link into the task notes:
In the Outline select the task that you want to link to.
Right-click this task.
On the menu, select Copy as > Copy as link. A link to this task is placed into the clipboard.
Right-click in the Task Notes tab of the task in which you want to create a link.
On the menu, select Paste.
Repeat steps 1–5 to insert additional links.
Note: An example of a link to a task in the same MLO file:
\\mlo:{9FBDC6E4-3D95-4F02-8EF0-3AB5D4CE6507}
To
1.
2.
3.
4.
5.
6.
7.
insert a link to a task in another MLO data file:
Open the MLO data file containing the task that you want to link to.
Right-click this task in the Outline.
On the menu, select Copy as > Copy as URL. The URL of this task is placed into the clipboard.
Open the MLO data file containing the task in which you want to create a link.
Right-click in the Task Notes tab of this task.
On the menu, select Paste.
Repeat steps 1–6 to insert additional links.
Note:
To convert the pasted URL to a link (so that it is underlined in the notes),
type two back slashes (\\) at the beginning of the URL. An example of a
link to a task in another MLO data file:
\\mlo://c:\MyMLOFiles\Sample%20MLO%20file.ml?{F9BA410A-AB32-41BB-AE04-
User's Guide
36
Chapter 5
869F0F490981}
Tip:
You can use this command to link to a MLO task from other application
using the mlo:// registered protocol. For example you can enter this URL
in the explorer address bar and press Enter. MLO will open the task
specified by Task GUID:
mlo://c:\MyMLOFiles\Sample%20MLO%20file.ml?{F9BA410A-AB32-41BB-AE04869F0F490981}
To
1.
2.
3.
4.
5.
insert a link to a file:
Select a task from in want to create a link.
Right-click in the Task Notes tab of this task.
On the menu, select Insert link to a file.
Browse to the file you want to link to.
Select the file and click Open.
Notes:
· If you create a link to a task from the zoomed-in view using the Copy
as link or Copy as URL command, the task link will include the zoomin command. So when you click the task link , the caption of the
destination task will be highlighted in the zoomed-in view.
· You can specify both absolute and relative (in relation to the folder
containing the current MLO data file) paths in file link s.
See also:
Outline Navigation
Outliner
5.1.7.2
Bookmarks
To speed up the navigation in the outline, you can set a bookmark to a task and then jump back to it
anytime with a single key stroke. There are 10 slots available for quick bookmarks: keys 0 through 9.
To set a bookmark to a task
1. Select a task in the outline you would like to set a bookmark to.
2. Select menu View > Set bookmarks > Bookmark <N> , or press Ctrl + Shift + <N>,
where <N> is any key from 0 through 9.
To jump to a task using bookmark
1. Select menu View > Go to bookmarks > Bookmark <N> or press Ctrl + <N>,
where <N> is any key from 0 through 9.
User's Guide
Basic concepts: Outline, To-Do, View, Workspace
37
Tip: You can use shortcuts "Ctrl + >" and "Ctrl + <" to navigate to the next
and previous book mark s.
To review the list of all bookmarks available, select menu View > Go to bookmarks > Bookmarks... or
press Ctrl + Alt + > .
See also
Outline Navigation
Links to Tasks
Outliner
Keyboard Shortcuts
5.2
The To-Do List
After you have added all your goals, projects, tasks and subtasks to the Outline, MLO can display only
those tasks which require immediate attention and place them in the To-Do List. This is a simple nonhierarchical list of actions selected from the entire Outline. This list can be sorted and grouped using
different parameters. You can view your To-Do list using different views.
The To-Do list is updated automatically once you complete a task, change context or if it is time to
update the To-Do list.
To understand how MLO selecting tasks for the To-Do list basing on your Outline and task parameters,
learn how default To-Do views are working.
Note: The To-Do list is just a definition of filtered task s (views) presented in a plain (nonhierarchical) list. You can create your own To-Do lists by creating non-hierarchical views.
See also
Default To-Do List Views
Manage Views
To-Do List Format
5.2.1
Default To-Do List Views
When you create a new MLO data file, the standard To-Do List Views are created. You can also create
any custom To-Do List Views.
Below is a description of the standard To-Do Views.
Active Actions
This is the basic view for generating To-Do lists in MLO. It is important to understand how it works since
many views are based on it. The following tasks appear on the To-Do list in Active Actions view:
1) Tasks without open subtasks (whose subtasks have all been completed)
2) Tasks that do not have completed parent tasks
3) Tasks without a Start Date, or whose Start Date is today or in the past
4) Tasks that do not have the option Folder checked
5) Tasks that do not have the option Hide branch in To-Do List checked for this task as well as for any of
its parents
6) If one of the task's parents has the option Complete subtasks in order checked, this task must have
User's Guide
38
Chapter 5
all above siblings completed - or these siblings must have their Hide in To-Do or Folder option set.
7) Tasks that do not have dependency or these dependencies are completed
Active Actions by Context
This view contains all the tasks described in the "Active Actions" view, but grouped by Contexts
assigned to the tasks.
Active Actions by Flag
This view contains all the tasks described in the "Active Actions" view, but grouped by Flag assigned to
the tasks.
Next Actions by Project
This view is based on the "Active Actions" view. The difference is that only one task for each project (the
first one) is placed on the To-Do list in this view. This list is grouped by project of the tasks.
Note: If there are Active Task s without a parent project, then only the first task for each
root task is selected for this view and these task s placed under the (none) project group on
the To-Do List.
Note: If a project does not have open task s, then this project itself is also placed on the
To-Do list as Next Action.
Active Starred
This view is based on the "Active Actions" view, but only starred tasks are added to this view. Also the
Active Starred view is manually sorted. The Active Starred view has predefined settings which cannot be
changed because it is synced to MLO running on mobile devices.
Active Goals
This view is based on the "Active Actions" view, but only tasks with the goal property are added to this
view.
Start next 7 days / Start next 30 days
This view is based on the "Active Actions" view. The difference is that only active actions with Start date
are displayed in this view including future tasks if their Start date within next 7 or 30 days accordingly.
Due next 7 days / Due next 30 days
This view is based on the "Active Actions" view. The difference is that only active actions with Due date
are displayed in this view including future tasks if their Due date within next 7 or 30 days accordingly.
Note: The "Starred" view is different from "Active Starred". The Starred view
contains all starred task s (active and non-active). You can star any task by
click ing on the Starred column. The Starred view is also manually sorted. The
Starred view has predefined settings which cannot be changed because it is
synced to MLO running on mobile devices.
Note: if you create a new data file from a template, there might be other
standard views added to your data file by default.
Tip: Additional information such as project name or path can be displayed in
the task title on the To-Do list. See To-Do List Format for more details.
See also
User's Guide
Basic concepts: Outline, To-Do, View, Workspace
39
Manage Views
To-Do List Format
5.3
Views
View is a particular way of displaying the filtered, sorted and grouped tasks. When you create new data
file, MyLifeOrganized creates default views for you. All available views are displayed in the left panel
called Views pane. You can create your own views using built-in MLO features for filtering, sorting and
grouping of your tasks.
The views can be hierarchical and in this case we call them Outline views. The views can be nonhierarchical and in this case we call them To-Do views.
Views can be organized into the groups. When you click a group in the Views pane the last used View
from this group is selected. The view groups are highlighted with blue line and the View inside this group
is selected with red line and red font. Expand the View group to see what is the actual view was
selected when you selected this group. By default the following groups of views are created in MLO:
Outline, To-Do, Completed, More Views.
To save the space on the screen you can hide task views pane by selecting menu: View->Task views
pane. (Alt-F1). In this case you can open the view list by clicking the header of the task list.
You can open any view in new window so that you can drag&drop tasks from one list of tasks to another
one.
See the topics below for more information about Views:
Default Outline Views
Default To-Do List Views
Task Filtering
Task Grouping and Sorting
Manage Views (create, rename, delete, rearrange, etc)
To-Do List Format
5.3.1
Manage Views
The Views pane is used to create new views, rename view names, reorder views in the list, delete views,
assigning icons to views. You can also assign hotkeys for the selected views. Use these hotkeys to
activate selected views with a single click.
You can use export/import to move your views to other MyLifeOrganized data file.
Right click on a view in Views pane to access all available commands.
To create a new custom view
1. Open Views pane if it is closed (Alt+F1)
2. Right click to open local menu
3. Select New view... The new view will be created under selected view.
4. Enter the view name
To change the settings of the created view
User's Guide
40
Chapter 5
1.
2.
3.
4.
5.
Select this view from in the Views pane
Click Filter button to open Filter settings for this view.
Change its settings (see filtering, grouping and sorting for more details)
Click "Save view..." in the bottom of the Filter pane
Change name if needed and click OK in the View Name dialog
Tip: You can also create a new view based on your current view. Just select a
view and click "Save view..." on Filter pane. Enter new name for the view. A
duplicate of the current view with new name will be created.
To rename a view
1. Select view in the Views pane
2. Right click to open local menu
3. Click Rename view...
4. Enter the new name
5. Click OK
To reorder the views list
1. Drag the view in the Views pane to the desired position.
To assign a hotkey to a view
1. Select view in the Views pane
2. Right click to open local menu
3. Click Assign hotkey...
4. Press the new hotkey in the edit box.
5. Click Assign hotkey button
Views can be organized into the groups. When you click a group in the Views pane the last used View
from this group is selected.
To convert a view into view group
1. Select view in the Views pane
2. Right click to open local menu
3. Click This is a view group...
To delete a view
1. Select a view (or several views ) in the Views pane
2. Right click to open local menu
3. Click Delete... and confirm deletion of the selected view(s)
If you have changed or deleted standard views, you can always recreate them or restore their default
settings.
To reset standard views
1. Right click Views pane to open local menu
2. Click Restore default views... and confirm this action
To export views
User's Guide
Basic concepts: Outline, To-Do, View, Workspace
1.
2.
3.
4.
41
Select views in the Views pane
Right click to open local menu
Click Export view(s)...
Enter a file name.
Note: The views you created in one data file are not synced to other data files.
You can export your views from one data file and import them into another
data file.
You can open any view in new window so that you can drag&drop tasks from one list of tasks to
another.
To open view in new window
1. Right click Views pane to open local menu
2. Click Open in new window...
See also
To-Do List
Task Filtering
Task Grouping and Sorting
5.3.2
Task Filtering
Use filtering to select the tasks from the entire outline which should be placed on the current view.
The filter parameters are set on the Filter Pane. To open the Filter Pane click Filter button on Views
pane or press Alt+F. The tasks are selected using a conjunction of Action Filter, Hierarchy Filter,
Completion Filter, other Filter Controls and Advanced Filter.
Action Filter
With the Action Filter you should select what types of the tasks are placed to the filtered list. There are
five options for this filter:
1. Active
If Active is selected as the Action Filter then only Active tasks are placed in the list first and then other
filters can be used to select tasks from this list. To be placed on the list of Active actions, a task must
meet all criteria listed below:
1) the task must not have subtasks or these subtasks should be completed
2) the task must not have completed parent tasks
3) the Start Date for the task is not set or Start Date is now or in the past
4) the task must not have the option Folder checked
5) the task must not have the option Hide branch in To-Do List checked for this task as well as for any of
its parents
6) If one of the task's parents has the option Complete subtasks in order checked, this task must have
all above siblings completed to be placed in the list. Or these siblings can have Hide in To-Do option
set.
7) If the task has dependency tasks these dependency tasks must have been completed.
2. Available
User's Guide
42
Chapter 5
If Available is selected as the Action Filter, then only Available tasks are placed in the list first and then
other filters can be used to select tasks from this list. To be placed on the list of Available tasks a task
should meet all the criteria listed for Active Actions except #6 and #7. This means that the option
"Complete subtasks in order" and "Dependency" are not considered when retrieving the tasks for this
list. The subtasks will appear on the list normally even if the parent task has "Complete subtasks in
order" option set and even if dependency is set.
3. Next Actions
If Next Actions is selected as the Action Filter then only Next Actions are placed in the list first and then
other filters can be used to select tasks from this list. To be placed on the list of Next Actions a task
should meet all the criteria listed for Active Actions. However only one (first) active task for each project
is placed in the list.
Note: If there are Active Task s without parent project then only first task for each root task
is selected.
Note: If a project does not have open task s then this project itself is also placed on the list
as Next Action.
4. Completed
If Completed is selected as the Action Filter then only Completed tasks from all levels of the outline are
placed in the list first and then other filters can be used to select tasks from this list.
5. All
If All is selected as the Action Filter then all tasks from all levels of the outline are placed in the list first
and then other filters can be used to select tasks from this list.
Hierarchy Filter
With Hierarchy Filter you should select if parent tasks and/or subtasks should be also placed to the
filtered list together with the tasks matched the filter. There are two options:
1) Show Hierarchy: No - the parent and children tasks will be not placed to the filtered list. The result
of the filter will be the plain non-hierarchical list of tasks (To-Do List)
2) Show Hierarchy: Yes - the parent and/or child tasks of the filtered items will be also placed to the
resulted list. The result of the filter will be a hierarchy (Outline).
When you choose to show the hierarchy you can continue to set the parameters for this view. Click
Config button to see more options:
- Include parent items - include parent tasks for the tasks filtered with the main filter. You can also set
additional filter for these parent tasks by clicking the link Set parent filter.
- Include child items - include child tasks to the tasks filtered with the main filter. You can also set
additional filter for these child tasks by clicking the link Set children filter
- Continue searching in branch after main filter match - set this option to extract tasks matched
to the main filter from the children branch to the root of the hierarchy.
- Highlight matched to the main filter - highlight the tasks in the list which match the main filter.
Completion Filter
With Completion Filter you should select if completed tasks must be added to the filtered list. There are
three options:
1) Show Completed: Yes - include completed tasks to the filtered list
2) Show Completed: No - exclude completed tasks from the filtered list
3) Show Completed: Recent - include only recently completed tasks to the filtered list. You can
configure the date of the completion to include the task in additional settings for this option.
User's Guide
Basic concepts: Outline, To-Do, View, Workspace
43
Filter Controls
After selecting the Action Filter, Hierarchy Filter and Completion Filter (placed in General section of the
filter pane) additional filters can be applied to the filtered list. For example you might want to select only
Active tasks with specified Contexts and Effort parameters.
The special controls are used to apply additional filtering to the list. These controls are placed in the
sections which could be expanded and collapsed. To be placed on the filtered list a task should meet all
criteria specified in the filter sections. See Filter Controls for more details.
Note: if filter settings are changed for controls in a section, the caption of this
section changes to bold.
Tip: You can reorder or hide filter sections that are not used. To reorder just
drag a section using its caption. To hide unused sections, right click the
sections and select items in Sections submenu.
Advanced Filter
Advanced filter is used to add additional power to the filtered list. Using advanced filter, more complex
queries can be added to the filter. To use Advanced filter, open Advanced section, check "Add
advanced" checkbox and click "Setup..." button. In the "Setup Advanced Filtering" dialog setup the rules
and click OK.
Please note that Advanced Filter is used in conjunction with parameters set in Action Filter, Hierarchy
Filter, Completion Filter and Filter Controls.
The selected list of tasks can also be grouped and sorted. You can also save the current list's settings
as View. Just click "Save View..." link in the bottom of the Filter Pane. See Manage Views for more
details.
Tip: The asterisk ( * ) next to the view name indicates the filter criteria of the
view have been edited and require saving. If you wish to retain the change
click "Save View..." link at the bottom of the "Filter" panel and the ' * ' will
disappear. You can also roll-back to the View as last saved, by click ing on
"Reset Settings" button.
See also
Filter Controls
Grouping and Sorting on the To-Do list
Manage Views
5.3.2.1
Filter Controls
The filter settings of the selected View can be changed "on the fly" using Filter Controls. The filter
controls are placed to the sections which are described below.
User's Guide
44
Chapter 5
Tip: if you do not see the filter pane click Filter in the bottom of the views
list (#9 in the Main Window overview). Some of the sections in the filter
pane maybe hidden. To unhide them, right click any section and check
the hidden sections in the menu.
General
This section contains the following filters: Action Filter, Hierarchy Filter and Completion Filter. These
filters are described in Task Filtering section.
Text
You can filter the task list by any text contained in the task title, task notes or context assigned to a
task. Click the configuration button in this section to select where to find the text.
Contexts
You can filter the task list by Context. In this case, only tasks assigned to this Context (or any of its
included Contexts) will be listed in list.
If a Context you have selected is closed at the moment, the tasks associated with this Context will NOT
be shown in the list unless you check the Include closed check box.
Several contexts can be selected if Ctrl+Click is used. Change "operation" to AND to see the tasks that
contain all selected contexts. Change operation to OR if you want to see tasks that contain at least one
of the selected contexts.
Flags
You can filter the task list by Flag. In this case, only tasks assigned to the selected flags will be listed
in list.
Time
You can filter the list by the time you have available now. MLO will list all tasks that fit into the time
using current sorting order for you to choose the best fit. So for a task to be listed in the list with the
Time filter set, its Time required for the task Min and Max values must be inside the range selected
in Time filter.
Tip: click to "Look up in Outlook " link to calculate the time you have
before next appointment in your Outlook calendar.
Effort
You can filter the list by the Effort required for the task. When the Effort filter is set, for a task to be
listed in the list, its Effort parameter value must be between the selected range in the Effort filter
References
You can filter the list to show all tasks that depend on the selected task(s) or link to the selected task
(s). Right click on a task in the main list and select one of the commands: "Tasks that depend on this
task..." or "Tasks that link to this task...". The selected tasks will be added to the References filter and
you will get the filtered task list. Click the configuration button in this section to select filter type or clear
this filter.
Start Date
You can filter tasks by Start Date. When the Start Date filter is set, for a task to be listed in the list, its
Start Date parameter must be between the selected range in the Start Date filter.
User's Guide
Basic concepts: Outline, To-Do, View, Workspace
45
See also
Task Filtering
To-Do List
Contexts
Assigning Contexts to a Task
5.3.3
Task Grouping and Sorting
The filtered list of tasks in a view can also be grouped and sorted.
To group and sort the tasks in the View
1. On Views pane click Filter button (or Alt+F)
2. Open the Group&Sort section
3. Click "Group by..." button to group the list or "Sort..." to sort the list
You can also save the current list as a view. Just click "Save view..." button in the bottom of the Filter
Pane. See Manage To-Do List Views for more details.
See more about automatic and manual sorting.
See also
Task Filtering
Manage Views
Manual sorting
5.3.3.1
Understanding Task List Ordering
Tasks on the list can be sorted either automatically or manually.
Automatic sorting
You can select different options to automatically sort the task list. Automatic sorting of the task list
depends on the parameters you set for the tasks.
One of the automatic sorting mode is Computed-Score Priority You will get excellent results if you take
the time to configure the tasks more or less correctly. You will find that MyLifeOrganized will do an
excellent job in presenting to-do lists that are sensibly prioritized according to the importance, urgency
and date.
Manual sorting
You can switch from automatic sorting to manual sorting for any View. When a View is in manual sorting
mode you can manually reorder the tasks in the list by dragging them to the desired positions. To switch
to and from manual sorting mode click Sort... button in Filtering Pane and select Manual sorting
option.
See also
Computed-Score Priority
To-Do List Ordering Options
User's Guide
46
Chapter 5
To-Do List
5.3.3.1.1 Computed-Score Priority
Computed-Score Priority mode uses the details you supply about each task to compute an individual
score for each task in your outline. These scores are then used to provide a priority-ordered task list.
The factors that contribute to each task's score are its Importance, its Urgency and Time.
1) Importance: Set the importance of each task only with regards to its parent item. Items with higher
importance will be near the top of the task list. If a parent task has a lower importance; that will lower the
importance of its child tasks (Importance inherits down the).
2) Urgency: Set the urgency of each task only with regards to its parent item. Items that have a higher
urgency will be near the top of the task list. If a parent task has a higher urgency; that will raise the
urgency of its child tasks (Urgency inherits down the outline).
3) Time: If you set a due date or a due date + start date; then the urgency of the task will be boosted as
those dates get closer and are passed. Urgency will continue to climb even if the task is severely
overdue.
How much effect the start and due date will have on the overall urgency of the task can be configured in
the MLO preferences. The preferences allow you to set the start and due date weighting factors
individually. The higher you set the weights, the more influence the dates will have on the list ordering.
MLO allows you to configure it to order tasks by just importance, just urgency or a combination of both.
More details on Computed Score Priority
5.3.3.1.1.1 More Details on Computed-Score Priority
Computed-Score Priority mode uses the details you supply about each task to compute an individual
score for each task in your outline. These scores are then used to provide a priority-ordered To-Do List.
The factors that contribute to each task's score are its Importance and its Urgency. The To-Do List will
include tasks that have no uncompleted children tasks, ordered by their Computed-Score Priorities.
The To-Do list can be configured to order tasks by just Importance, just Urgency, or a combination of
both.
Importance Slider
The absolute importance of each task is a computed value and is not directly set by the user. Instead,
for each task you set the importance of that task with regards to its immediate parent. Once you have
done that, the program will compute the task's actual importance. A task's importance to its parent is
controlled by a slider. The slider ranges along an inverted natural logarithm curve. This actual curve is
documented below. The slider values range from 0.9964 to 1.0036, with a midpoint value of 1.0000.
Because of the logarithm curve applied any position on the slider to the left of the midpoint has an exact
opposite to the right of the midpoint. This allows a lower importance to be nullified by an equal but
opposite higher importance.
Suppose that you have two projects in the root of the outline (Prj1 and Prj2), and that each of them has
one subtask (p1 and p2, respectively. The importance of each task will be calculated as follows:
Computed actual importance of p1 =(Prj1 Importance to outline) * (p1 Importance to Prj1)
User's Guide
Basic concepts: Outline, To-Do, View, Workspace
47
Computed actual importance of p2 =(Prj2 Importance to outline) * (p2 Importance to Prj2)
For example, if the importance values are set as follows:
Prj1 = 0.9972, Prj2 = 0.9964, ps1 =1.0036, ps2 = 1.0036
then these tasks' computed importance scores will be as follows:
Prj1 = 0.9972
Prj2 = 0.9964
p1 = 0.9972 * 1.0036 = 1.0001
p2 = 0.9964 * 1.0036 = 1.0000
If you are ordering your To-Do List solely by importance, the To-Do List will order the tasks as follows:
p1
p2
If p2 is completed first, the To-Do List will now display:
p1
Prj2
However, if p1 is completed first, the To-Do list will display:
p2
Prj1
Note: if you use a task just to group together other lik e task s, you should set
this "container" task to midpoint importance relatively to its parent, to
avoid artificially lowering the importance of the task s it contains.
Urgency Slider
The absolute urgency of each task is a computed value and is not directly set by the user. Instead, for
each task, you set its urgency with regards to its immediate parent. Once you have done that, the
program will compute the task's actual urgency. A task's urgency with respect to its parent is controlled
by a slider . The slider ranges along an inverted natural logarithm curve. This actual curve is
documented below. The slider values range from 0.9964 to 1.0036, with a midpoint value of 1.0000.
Because of the logarithm curve applied any position on the slider to the left of the midpoint has an exact
opposite to the right of the midpoint. This allows a lower urgency can be nullified by an equal but
opposite higher urgency...
Repeating our example from the importance overview, you have two projects in the root of the MLO
outline (Prj1 and Prj2), and each project has one subtask (p1 and p2, respectively). The urgency of each
task is computed as follows:
Computed actual urgency of p1 =(Prj1 urgency to outline)*(p1 urgency to Prj1)
Computed actual urgency of p2 =(Prj2 urgency to outline)*(p2 urgency to Prj2)
For example, if the importance values are as follows:
Prj1 = 0.9979, Prj2 = 0.9960, ps1 =1.0030, ps2 = 1.0030
and if the tasks have no due dates set (see a later section for the effect of due dates on urgency), the
computed urgency scores will be as follows:
Prj1 = 0.9979
Prj2 = 0.9960
p1 = 1.0030 * 0.9979 = 1.0009
p2 = 0.9960 * 1.0030 = 0.9990
User's Guide
48
Chapter 5
If you are ordering your To-Do List solely by Urgency, the To-Do List will be ordered as follows:
p1
p2
If p1 is completed first, the To-Do List will now be ordered as follows:
p2
Prj1
However, if p2 is completed first, the To-Do List will now be ordered like this:
p1
Prj2
Weekly Goal Weighting factors
If a task is marked as a weekly goal, then the urgency gets an extra boost. The weekly goal slider value
ranges from 0.02 – 6.00. This boost re-computes the urgency as:
Computed actual urgency of p1 = (Prj1 urgency to outline) * ((p1 urgency to Prj1) +
(WeelkyGoalSliderWeight/150))
Importance and Urgency Combined
If you set MLO to consider both Urgency and Importance in calculating task scores, the score for each
task will be the product of its important and its urgency.
Revisiting the examples in the previous two sections, the assigned importance values were:
iPrj1 = 0.9972, iPrj2 = 0.9964, ips1 =1.0036, ips2 = 1.0036
and the assigned urgency values were:
uPrj1 = 0.9979, uPrj2 = 0.9960, ups1 =1.0030, ups2 = 1.0030
The combined importance and urgency scores will then be:
Prj1 = 0.9972 * 0.9979 = 0.9951
Prj2 = 0.9964 * 0.9960 = 0.9924
p1 = 0.9972 *1.0036 * 0.9979 * 1.0030 = 1.0017
p2 = 0.9964 *1.0036 * 0.9960 * 1.0030 = 0.9990
If you are ordering your To-Do List by both urgency and importance, then, the To-Do List will display the
tasks ordered as follows:
p1
p2
If p2 is completed first, the To-Do List will now be ordered as follows:
p1
Prj2
However, if p1 is completed first, the To-Do List will now be ordered as follows:
p2
Prj1
User's Guide
Basic concepts: Outline, To-Do, View, Workspace
49
Factoring Dates into the Urgency Calculation
If the preferences are set to order the To-do List by "Urgency" or by "Importance and Urgency" (that is, if
Urgency is to be considered and not just Importance), then start and due dates are used to weight the
score of each task based on the nearness to today's date of the dates in question.
How much effect the start and due date will have on the overall urgency of the task can be configured in
the preferences. The preferences allow you to set the start and due date weighting factors individually.
The higher you set the weights, the more influence the dates will have on the list ordering. Since the
weights can be set independently, you can configure the to-do list the way you like, including giving
higher priority to start dates than to due dates.
Date dependant weights
In the preference you can set the start dates and due date weighting factors. These factors control the
net effect of the following calculations on the final computed scores. The DateScoreContribution is
computed based on which dates are set and whether or not the overdue boosting is turned on where the
StarDateWeightFactor and DueDateWeightFactor range from 0 to 6
If No Start Date and No Due Date
DateScoreContribution=0
If Start Date and no Due Date
Elapsed = now - StartDate
StartDateScore = (StartDateWeightFactor * Elpased) /500
DateScoreContribution = StartDateScore
If Due Date and no Start Date
Remaining = now – DueDate
If OverDueBoost Is turned on AND remaining < 0 then
boost = remaining * -0.25
Else
boost = 1.0
End If
DueDateScore = (DueDateWeightFactor * Remaining * boost)/500
DateScoreContribution = DueDateScore
If Due Date and Start Date both set
Compute DateDateScore and StartDateScore as above
DateScoreContribution = DueDateScore +_StartDateScore
Determining the final score
Once the start and due date score contributions are computed, they are simply added to the current
priority score. If you are viewing the To-Do List by just urgency you then get:
Score = UrgencyScore + DateScoreContribution
User's Guide
50
Chapter 5
If you are viewing the To-Do List by importance and urgency combined, you get:
Score=(ImportanceScore * UrgencyScore) + DateScoreContribution
Providing a meaningful example of these results in writing is beyond the scope of this documentation.
You are encouraged to play with the program settings and observe the results. It will quickly become
apparent that items increase in priority as their start and due dates approach. Just how much they
increase depends on how the weighting preferences are set. The program defaults should provide a
reasonable starting point for just about everyone.
The Really Heavy Math
As mentioned above the importance and urgency sliders ranges along an inverted natural logarithm
curve. That curve is calculated with the formula below. Why is this formula used? (1) The natural log
curve is very predictable. (2) If can be reversed through simple multiplication. Items (1) and (2) allows a
slider at a positive position of X to be reverse by a slider at position –X.
Through this approach inherited importance and urgency are calculated using a simple lightweight
multiplication formula that is very fast. More importantly this formula allows for importance and urgency
to have a Neutral Center position allowing each task to either raise OR lower it's importance and urgency
values.
Minimum Slider Position Input Value = 1000
Maximum Slider Position Input Value = 1050
Default Slider Position Input Value = 1025
For the current importance slider the value = A
For the current urgency slider the value = B
You compute x=importance and u=urgency with this formula
If A <= 1025 then
x = LogN(1025, A)
Else if A > 1025 then
x = 1+(1-(LogN(1025, 1025-(A-1025))))
end if
If B <= 1025 then
u = LogN(1025, B)
Else if B > 1025 then
u = 1+(1-(LogN(1025, 1025-(B-1025))))
end if
Now computing these computing logs is not a very CPU friendly proposition especially on the ppc, to
avoid this overhead MLO uses a lookup table. This introduces a very minor rounding error into the
calculations; which is the trade off for much greater speed. This rounding error should not affect the
results unless an outline is greater than 10 levels deep and even then it will be inconsequential.
User's Guide
Basic concepts: Outline, To-Do, View, Workspace
5.3.4
51
Columns
You can select which columns to display in the current view.
To select columns:
1. Right-click on the task list header.
2. From the pop-up menu, select the columns you need.
Tip: Select Auto Resizing in the columns pop-up menu if you want task
columns to resize together with the MLO window.
Note: The column configuration is stored for the current view.
See also
Views
5.4
Workspace tabs
There are tabs on the top of the MyLifeOrganized application we call Workspaces. The Workspaces are
used to store and quick access the particular configuration for the selected view, additional filter controls
, zoom, selected tasks etc. The Workspaces can show different parts of the same data files in different
views.
When you select a view inside Workspace or change the filter, you actually change the configuration of
the current Workspace. When you click other Workspace you will see other configuration in it. When
you return back to the first Workspace your changes for this Workspace will be still there. If you want to
propagate the changes to filtering, sorting and grouping in one Workspace to other Workspaces, you
must first save these changes into a View. This way all the Workspaces which are using this View in
unchanged state will receive the new settings.
To create a new Workspace
1. Click "+" button in the tabs line
2. Enter name for the new Workspace
3. If needed, set other parameters (see below)
4. Click any part of the main window to hide the popup window
To rename a Workspace
1. Right click on a Workspace tab
2. Select "Set up workspace..." from menu
3. Enter new name in the popup dialog
4. Click any part of the main window to hide the popup window
To delete a Workspace
1. Click sign "x" in the right part of the Workspace tab
Note: The last work space cannot be deleted
You can set default settings for a Workspace to restore them quickly at any time. You can set zoom,
view and additional filters to store them as default for this Workspace.
User's Guide
52
Chapter 5
To set default for a Workspace
1. Set necessary settings for a Workspace
2. Right click on this Workspace tab
2. Select "Set as default for this tab" from menu
Now if the settings of the Workspace are changed the tab will be marked with "*" symbol. If you double
click on the tab (or select command "Restore default for this tab") the default setting for the tab will be
restored.
Tip: With the command "Lock default in this tab" you can also lock the
default settings so that they are not changed for the tab. The new tab is
created if you try to change the settings of the lock ed tab.
You can pin Workspace tab so that it is placed in first position and protected from accidental deletion.
To pin a Workspace
1. Right click on a Workspace tab
2. Select "Pin this tab" from menu
When you set Workspace option "Sync selection with first tab" the task selection in this tab will be in
sync with the selection in the first tab. It means that if you select a task in the first tab and then switch
to other tab, with this option set, the selected task will be also selected in the new tab after switching (if
it is found on this tab).
To sync selection with the first tab
1. Right click on a Workspace tab
2. Select "Set up workspace..." from menu
3. Check option: "Sync selection with first tab"
To assign an icon for the tab
1. Right click on a Workspace tab
2. From the menu select "Assign icon":
Current view icon - the tab icon will be always the same as the icon of the selected view
Custom icon - the selected custom icon will be always visible
No icon - there will be no icon for this tab
To select a hotkey for the tab
1. Right click on a Workspace tab
2. Select "Assign hotkey" from the menu
3. Press a hotkey for this tab and click "Assign hotkey"
When you set Workspace option "Sync zoom with first tab" the zoom you set in this tab will be also set
in the first tab. It means that if you set zoom to a task in the first tab and then switch to other tab, with
this option set, the same zoom will set in the new tab after switching.
To sync zoom with the first tab
1. Right click on a Workspace tab
2. Select "Set up workspace..." from menu
3. Check option: "Sync zoom with first tab"
User's Guide
Basic concepts: Outline, To-Do, View, Workspace
53
You can open any Workspace in new window so that you can drag&drop tasks from one list of tasks to
another one.
To open Workspace in new window
1. Right click on a Workspace tab
2. Select "Open in new window" from menu or F3
See also
Basic concepts: Outline, To-Do, View, Workspace
Views
Zoom
User's Guide
Chapter
VI
56
6
Chapter 6
Task properties
You can set additional parameters on a task. These parameters are used in the task. For example, Task
Importance or Due Date parameters are used in the to-do list ordering algorithm. All these parameters
are placed in the Properties Pane and grouped into Property Sections. Click on a Property Section to
open or close it. You can also use Keyboard Shortcuts for quick access to the Property Sections.
To open a Property Section and enter task parameters:
1. Open the Properties Pane by selecting menu View > Properties Pane
2. Select the Properties tab and open the section you need
3. Enter parameters for the selected task
Tip: double-click ing on the splitter between the task list and Properties Pane
will optimize the width of the Properties Pane.
See also
Understanding of Main Window
6.1
Assigning Contexts to a Task
Many tasks in your list can be completed only in certain Contexts or situations. You can assign specific
Contexts for tasks so that you can filter these tasks later in the To Do list. You can also think of
Contexts as categories for the tasks. Each Context can also include other Contexts in a hierarchy.
To select Contexts for a task
1. Open the Properties Pane by selecting menu View > Properties Pane
2. Select the Properties tab and open the General section
3. Write the Context name in the Contexts edit box.
Note: If you enter a Context name which does not exist in the Contexts list,
you will be prompted to create the new Context.
Tip: You can assign hotk eys to particular Contexts to toggle these Contexts
for a task with a single k eystrok e.
Tip: You can use the Alt+2 shortcut to perform actions 1 and 2 above.
Tip: You can also use a hotk ey (the default is Alt+L) to open Contexts
dialog.
Note: Multiple Contexts may be assigned to a task .
IMPORT ANT : The Contexts will NOT be displayed on the task properties
page if the Contexts check box is NOT selected on the
Appearance page of the Options dialog box.
See also
User's Guide
Task properties
57
Contexts
Filter Controls
Options - Appearance
Keyboard Shortcuts
6.2
Importance for parent
For each task you can specify its importance in relation to accomplishing the project that contains this
task in the outline.
This parameter is used in the to-do list ordering.
To change importance of a task:
1. Open the Properties Pane by selecting menu View > Properties Pane
2. Select the Properties tab and open the General section
3. Drag the Importance for parent slider right to increase the importance of a task for the project.
Tip: You can use Alt+2 shortcut to perform actions 1 and 2 above.
Note: When you set the priority of a task in most other To-Do programs you
actually set the absolute priority, and must compare it to all other task s
in the list. In MLO, however, you only consider how important it is to
complete the task with respect to the parent project.
IMPORT ANT : The Importance for parent will NOT be displayed on the task
properties page if the Importance/Urgency check box is NOT
selected on the Appearance page of the Options dialog box.
See also
Understanding of To-Do List Ordering
Options - Appearance
6.3
Urgency
For each task you can specify its Urgency. This parameter is used in to-do list ordering.
To change urgency of a task:
1. Open the Properties Pane by selecting menu View > Properties Pane
2. Select the Properties tab and open the General section
3. Drag the Urgency slider right to increase the urgency of a task.
Tip: You can use Alt+2 shortcut to perform actions 1 and 2 above.
IMPORT ANT : The Urgency will NOT be displayed on the task properties page
if the Importance/Urgency check box is NOT selected on the
Appearance page of the Options dialog box.
User's Guide
58
Chapter 6
See also
Computed Score Priority
Understanding of To-Do List Ordering
Options - Appearance
6.4
Goal for week, month and year
MLO helps you organize your goals. You can indicate that a task is a weekly goal, monthly goal or
yearly goal. The special Goals view is designed to easily review all your goals.
The weekly goal is what you should focus your activities on for the week. Monthly goals should be
reviewed on a weekly basis to determine specific actions that can be done this week to achieve monthly
goals. Yearly goals are usually reviewed on a monthly basis to determine if some of them can become
goals for the current month.
To indicate that the task is a goal
1. Select a task you want to set as a goal
2. On the General section of the task Properties Pane, select Week, Month or Year
Tip: You can use a configurable hotk ey to mak e a task a week ly goal (Alt+W
by default).
Note: The week ly goal parameter can be used in to-do list ordering.
Note: Week ly goal task s are mark ed with "!" in the task list
Note: Completed goals are mark ed with a Green Tick icon in the task list.
IMPORT ANT : The Goals will NOT be displayed on the task properties page if
the Goals check box is NOT selected on the Appearance page
of the Options dialog box.
See also
Outline Views
Options - Appearance
Understanding of To-Do List Ordering
Projects Tracking
6.5
Task To-Do List Visibility
Task To-Do List Visibility determines whether the task should be included in the To-Do list in standard
views.
Folder
This task is not shown in the To-Do list in standard views because it is just a container for other tasks.
Folders contain tasks but, unlike regular tasks that have subtasks, folders do not appear in the To-Do
list themselves after all their subtasks are completed.
Hide the branch in To-Do List
This task and all of its subtasks are excluded from standard views on the To-Do list. This option is
usually needed if the entire branch is not actionable at the moment or if it contains only reference
User's Guide
Task properties
59
information.
Note: Task s which are set to be hidden in the To-Do list will appear dimmed
in the Outline.
Complete subtasks in order
You can instruct MLO to place the next subtask of a project in the To-Do list only after the previous
subtask is completed. This way you can create projects where certain tasks are dependent on the
completion of other tasks.
Note: This option can be suppressed and all subtask s shown in the To-Do
list if Available is set in Action Filter.
To
1.
2.
3.
assign To-Do visibility parameter to a task:
Select task(s) in the outline.
Click the Properties Pane and open the General section.
Select an option in the Task To-Do Visibility group.
See also
To-Do List
Options - Appearance
Importance of the Task
6.6
Timing & Reminder
The Timing & Reminder property section contains the following parameters for a task:
- Start date, due date, lead time
- Task recurrence
- Reminder
IMPORT ANT : The Timing & Reminder property section will NOT be
displayed on the task properties page if the Timing &
Reminder check box is NOT selected on the Appearance page
of the Options dialog box.
Tip: Date and time text input fields are very powerful: they are interpreted and
converted to valid dates and times. For example you can type
"in 30 min" or "tomorrow at 2pm". See Input parsing for more
details.
See also
Options - Appearance
Input parsing
6.6.1
Start, Due date and Lead time
You can specify when a task should appear in your to-do list and when a task is the due. The Start date
parameter indicates when this task should appear in the to-do list. Due date shows when this task
should be completed. Lead time is the time between Due date and Start date.
User's Guide
60
Chapter 6
To set start and due date for a task:
1. Open the Properties Pane by selecting menu View > Properties Pane
2. Select the Properties tab and open the Timing & Reminder property section
3. Enter start date and due date in the appropriate controls.
Note: By default all subtask s inherit the dates of the parent task unless you
set specific dates for the child task . If you want to revert the subtask
dates to the inherited parent dates just check the "Inherit parent dates"
check box.
Tip: In addition to the date, you can also enter start and due time. Just
check Use time check box and enter time in appropriate controls.
Tip: Date and time text input fields are very powerful: they are interpreted and
converted to valid dates and times. For example you can type "in 30 min"
or "tomorrow at 2pm". See Input parsing for more details.
Tip: Today, next day, next week link s will set the corresponding date in the
active date control. For example Next day adds one day to the date
currently set in the active control.
Note: The Start date field is disabled if you set recurrence for the task . Start
date can be changed only in the Recurrence dialog.
See also
Task recurrence
To-Do List
Understanding To-Do List Ordering
Input parsing
6.6.2
Recurrence
You can set a task to occur repeatedly. For example a task that occurs on a regular basis, such as a
weekly status report or periodical car maintenance, can be set up as a recurring task.
To make a task a recurring task:
1. Open the Properties Pane by selecting the menu option View > Properties Pane
2. Select the Properties tab and locate the Timing & Reminder property section
3. Check the Set due date check box
4. Click the Recurrence button to open the Task Recurrence dialog
5. Click the frequency (Hourly, Daily, Weekly, Monthly, Yearly) at which you want the task to recur.
6. Select the desired options on the right side of the Recurrence pattern group box and click OK.
Note: Recurring task s appear one at a time in the Outline. When you mark
one occurrence of the task complete, the next occurrence appears in the
list.
Note: After you set a task as recurring, the Start, Due, and Lead Time date
controls in the Timing & Reminder property section will be disabled. To
User's Guide
Task properties
61
change the date/time parameters of a recurring task you should open the
Task Recurrence dialog and change them there. This is because in the
case of a complex pattern (for example: "first Monday of every other
month") the date parameters should be controlled to fit this pattern.
Tip: To repeat a task based on the date it is mark ed complete, in the Task
Recurrence dialog click Regenerate new task, and then type a time
interval in the box.
Note: The task 's Due date is used for recurrence (not the Start Date). For
example if you set a task to "reoccur every Sun" this means that the due
date will be set to Sunday for each future occurrence.
Recurring tasks: Advanced options
The following settings become available when you click on the Advanced options button of the Task
Recurrence dialog.
Automatic resetting of subtasks when this task recurs
This option is used if you want all subtasks of the recurring task to be unchecked with a new
occurrence.
Automatic recurring behavior for this task
This option is used if you want the recurring task to automatically recur when its subtask is completed.
Automatically recur if any subtask is completed - the task will recur if any subtask is completed
(even without checking off the recurring task itself).
Automatically recur if all subtasks are completed - the task will recur if all subtasks are completed
(even without checking off the recurring task itself).
Disable automatic recurrence - you would have to check off the task itself before it recurs.
Do not create a completed copy of this task on recurring
Set this option to not create a completed copy of the recurring task on each new occurrence.
Note: If subtask s of a recurring task have their own start and due dates, the
shift between the recurring task 's date and the dates of each its
subtask s will be preserved on its next occurrence. To preserve this shift
with the next occurrence, the option Automatic resetting of subtask s
when this task recurs must be set.
Example:
Thank sgiving Dinner
Invite relatives I lik e
Clean house
Buy turk ey
Thaw turk ey
Cook dinner
Clean house
To stop a recurring task
User's Guide
(due 3rd Thursday every November)
(due 20 days before event)
(3 days before event)
(due 1 week before event)
(2 days before event)
(day of event)
(1 day after event)
62
Chapter 6
1.
2.
3.
4.
Select the recurring task you want to stop.
Locate the Timing & Reminder property section as indicated above.
Click the Recurrence button to open the Task Recurrence dialog.
Click Remove Recurrence.
To skip occurrences of a recurring task
1. Select the recurring task you want to skip.
2. Select Task >Skip occurrence... command
4. Choose if you want to skip only current occurrence or all occurrences of the task up to today.
6.6.3
Reminder
You can set a reminder for a task.
To set a reminder for a task
1. Open the Properties Pane by selecting the menu option View > Properties Pane
2. Select the Properties tab and locate the Timing & Reminder property section
3. Check the Reminder check box
4. Set date and time for the reminder
You can configure different Alert Actions for each reminder such as "play sound", "send e-mail" etc.
To set Alert Actions for a reminder
1. In the Timing & Reminder property section click the Advanced... button
2. In the dialog Setup Reminder check Alert Actions you want to be executed for this reminder
3. Click OK.
List of Alert Actions
Alert Action
Description
Activate in Reminders Window
Activate Reminders Window and place the task
description in it. You can then dismiss or snooze
the reminder in this window.
Show Desktop Alert
A Desktop Alert is a notification that appears on
your desktop and fades automatically. Set this
option to show the task description in a Desktop
Alert.
Note: If you want to k eep a Desk top Alert visible
so that you can tak e more time to read it, pause
your cursor on the alert before it fades from view.
Send e-mail
Sends an e-mail message with the task
description to selected e-mail addresses. Separate
e-mails with semicolons (;). Click Setup to
configure SMTP options
User's Guide
Task properties
63
Run application
You can run any application or reminder. Type the
application command line in the text input.
Show modal dialog
Check this option to show a modal dialog with task
description when the reminder is activated.
Play sound
Check this option and select a sound file to play it
when the reminder is activated.
Note: You can set Repeat Alert Actions option to repeat alerts several times
or until you dismiss the reminder.
See also
Start, Due date and Lead time
6.7
Effort
The Effort property section contains the following parameters of a task:
- Effort
- Time Required for a Task
IMPORT ANT : The Effort property section will NOT be displayed on the task
properties page if the Effort check box is NOT selected on the
Appearance page of the Options dialog box.
6.7.1
Task Effort
You can select how much Effort it will take you to complete the task.
This value affects the dynamically calculated completion percentage for a project. This percentage is
based on how many subtasks of the project are completed and what their Task Effort properties are. If a
task has higher value of Task Effort property it adds more value to the completion percentage for the
entire project.
Task Effort is also used in To-Do List filtering.
Note: This parameter is different from Time required for a task parameter. For
example if you just read a book , it would require less effort than if you
write MLO help documentation :-). It might tak e you the same amount of
the time to accomplish these task s but the Effort would be different.
See also
Projects Tracking
Time required for a task
6.7.2
Time Required for a Task
You can enter how much time is required to accomplish a task. The minimum and maximum values can
be entered. This time will be used in the Time filter in the To-Do list.
User's Guide
64
Chapter 6
To enter the time required for a task
1. Open the Properties Pane by selecting menu View > Properties Pane
2. Select the Properties tab and open the Effort section
3. Enter the minimum and maximum time in the Time required for the task controls.
Tip: You can use the Alt+3 shortcut to perform actions 1 and 2 above.
Time Required for a Task is also used in To-Do List filtering.
See also
Filter Controls
Task Effort
Keyboard Shortcuts
6.8
Dependencies
There can be tasks in the outline which cannot be started until some tasks from other branches are
completed. To prevent a task from being shown in the To-Do list in Active Actions view until other tasks
are completed, add these tasks to the Dependencies section for the task you want to block.
To hide task A on the To-Do list in Active Actions view until tasks B, C and D are completed:
1. Select task A in the outline
2. On the Dependencies section of the task Properties Pane, click Add... link
3. Select tasks B, C, D (use Ctrl for multi select) and press OK
The task A will appear in Active Actions view only when all tasks (B, C, D) are completed.
Tip: If you want to unblock task A when only one of the task s B, C, D are
completed click on ALL/ANY link to set the appropriate option.
Tip: If the task has a dependency set, a corresponding icon is displayed in
the Icons column.
Note: The dependency can be ignored if Available is set in Action Filter.
Note: If a task in a dependency list cannot be completed a special indicator
is added to it. Point your mouse at this indicator to see why the task cannot
be completed.
A special Dependency Counter column shows how many tasks depend on the current task.
You can also set Delayed Dependency for tasks. If delay is set together with dependency then after
the dependency tasks are completed, the task will continue to be inactive for the delay period you have
specified. After the delay is over, the task will be shown in the To-Do list. For example, you can see the
task "Hang wallpaper" activated in 1 day after you completed the dependency task "Paint the door".
To set Delayed Dependency
1. Set dependency for a task as described above
2. In the field Delay set the time to delay the activation of the task after the dependency tasks are
completed
User's Guide
Task properties
65
Note: if all task s need to be completed to open the dependency (option ALL
set) then the delay will count from the time of the last task completed. If ANY
option is set for the dependency then the delay will count from the time of the
first task completed in the dependency list.
See also
Task To-Do Visibility
6.9
Project
You can indicate that a certain task is a Project. All projects are included in a special Projects view. In
this view, projects are grouped by statuses and are easy to review.
To indicate that a task is a project:
1. Select a task you want to indicate as a Project
2. On the Project section of the task Properties Pane, select This is a project
You can set a status for the project. The following statuses are possible: Not Started, In Progress,
Suspended, Completed. Statuses are only uses for grouping in the Projects view.
To change the status of a project:
1. Select a task
2. On the Project section of the task Properties Pane, select new status from the Status combo box.
Note: The status of a project is not automatically changed (to In Progress or
Completed) when you complete the project subtask s. You must always
change the status of a project manually.
Each project has dynamically calculated Completion Percentage. This percentage is based on how
many subtasks of the project are completed and what their Task Effort properties are. If a subtask has
higher value of Task Effort property, it adds more value to the completion percentage for the entire
project.
The Time required for the entire project read-only property of a project is the sum of the Time
required for the task property of all subtasks of the project.
IMPORT ANT : The Project property section will NOT be displayed on the task
properties page if the Project check box is NOT selected on
the Appearance page of the Options dialog box.
See also
Task Effort
Outline Views
Options - Appearance
Review
6.10
Review
You can indicate that a certain task should be periodically reviewed. For example you can review a
project weekly to add new tasks to it or to change priorities of the subtasks. When it is time for the next
User's Guide
66
Chapter 6
review this project is placed to the Review default view. You can open this view periodically to review the
tasks. Once the task is reviewed mark it by command "Mark Reviewed" to move the review for this task
on the next date.
Review is a good way to keep your task list in order and keep the most important project running.
To configure current task for periodical review
1. Open the Properties Pane by selecting menu View > Properties Pane (if it is closed)
2. Open the Review section
3. Check Next Review option and select a date for the next review.
4. In the filed Review Every set the period for the review.
To perform periodical review
1. When you have free time just open the view Outline->Review
2. All the tasks ready for the review will be placed to the list together with their subtasks
3. Perform actions needed for the project in review (add new tasks, change properties of other tasks,
etc.)
4. Once the project is reviewed mark it by command "Mark Reviewed" in the list or in task properties
See also
Projects
6.11
Task Format
You can assign custom formatting to tasks. Parameters such as font color or bold can be set.
To assign custom format to task:
1. Select the task(s) you want to format
2. On the Format section of the task Properties Pane, select the task format needed.
Note: if you change task formatting with controls on the Format section, the
flag "Use custom formatting" will be set automatically.
Note: if you select option "Subtask s inherit custom formatting" then all
subtask s of the selected task will have the formatting you set for the parent unless child
task s have their own formatting.
To remove custom formatting from task(s):
1. Select the task(s) you want to revert to the default formatting
2. On the Format section of the task Properties Pane, uncheck Use custom formatting checkbox.
See also
Task Properties
User's Guide
Task properties
6.12
67
Task Statistics
You can review task statistics. The following properties are available: Created, Modified, Completed.
Each is indicated with date and time.
To review task statistics:
1. Open the properties pane by selecting menu View > Properties Pane
2. Select Properties tab and open Task Statistics section
Tip: You can also open the Task Statistics section with the Alt+5 shortcut.
IMPORT ANT : The Task Statistics property section will NOT be displayed on
the task properties page if the Task Statistics check box is
NOT selected on the Appearance page of the Options dialog
box.
See also
Keyboard Shortcuts
6.13
Flags
You can mark a task with a flag. This is used to visually highlight tasks with icons and separate them
from other tasks while grouping in the To-Do list.
To assign a flag to a task:
1. Make sure that the Flag column is displayed in the task list. If it is not, Right-click on the task tree
header and select Flag.
2. Select task(s) you want to flag
3. Right-click in the Flag column and select a flag.
You can customize the flag list and assign any icon to a flag.
To customize the flag list
1. Click Tools > Manage Flags... to open the Manage Flags dialog.
2. To add a new flag, right-click in the flag list and select New Flag...
3. To delete a flag, right-click in the flag list and select Delete Flag
4. To change a flag's position, drag and drop the flag in the list
5. To assign a new icon to a flag, click the Icon... button and select an icon from the list in the Select
Icon dialog..
Tip: in the Manage Flags dialog, you can assign a shortcut to a flag and use
it to flag task s quick ly while editing them in the task list.
Tip: to add new icons to the Select Icon dialog, click Load from file... and
select an icon from the file.
Please note that MLO supports only 16x16,24x24,32x32 32-bit images in the .
ico format.
User's Guide
68
Chapter 6
See also
Assigning Contexts to a Task
Starred
6.14
Starred
You can mark a task with a star by clicking on the corresponding column in the list. This is used to
include tasks in a special Starred view.
Tip: If the Starred column is not visible just right click on the header and
select it from the list.
See also
Assigning Contexts to a Task
Flags
Starred view
6.15
Advanced Task Properties
In the Advanced Task Properties dialog, you can edit task properties like completion date and custom
AutoArchive settings for current task.
How to open Advanced Task Properties dialog
1. On the Task menu, click Advanced and then click Properties...
System properties tab
Created
Modified
Completed
Dates of creation, modification and completion of the selected task.
Task ID
Internal task ID.
AutoArchive tab
Do not archive tasks in this branch
If this option is set, the current tasks and all subtasks will not be archived during AutoArchive.
See also
Archiving Using AutoArchive
Task properties
User's Guide
Chapter
VII
70
7
Chapter 7
Contexts
Understanding Contexts
Many tasks can be completed only in certain Contexts (or situations). For example you can complete
task "Buy the compact disk " only when you are in the music store. So you can create new Context "
Music store" and assign this Context to the task. Now you can select Context "Music store" in the
Context filter to see only tasks assigned to this Context.
You can also think of the Contexts as categories for the tasks.
Each Context can also include other Contexts in the hierarchy.
Each Context can have an open/closed schedule.
You can create, rename, delete and assign parameters for Contexts in Manage Contexts dialog. To
open this dialog select menu Tools >Manage Contexts...
See also
Creating and Deleting Contexts
Assigning Contexts to a Task
Filter Controls
7.1
Creating and Deleting Contexts
To create a Context:
1.
2.
3.
Select menu Tools > Manage Contexts... or click F8 to open the Manage Contexts dialog
Right-click on the list of Contexts to open the local menu and select the New Context command
Enter a name for new Context
Tip: You can use the Insert k eyboard shortcut to create a Context
To delete a Context:
1.
2.
3.
Select menu Tools > Manage Contexts... or click F8 to open the Manage Contexts dialog
Select the Context(s) you want to delete
Right-click to open the local menu and select the Delete Context command
Tip: You can use the Del k eyboard shortcut to delete Context(s)
Note: In all task s that have the Context being deleting, the Context will be
removed or replaced with another Context depending on the option you
select in the confirmation dialog.
Note: Included Contexts will not be deleted but will be disconnected from the
deleted Context
See also
User's Guide
Contexts
71
Included Contexts
Assigning Contexts to a Task
7.2
Included Contexts
Each Context may include other Contexts. This can form a hierarchy of contexts.
For example Contexts "Phone" and "Internet" can be included by the Context "Work" as well as by the
Context "Home".
So imagine that you have a task "Call Bob" which is assigned to the Context "Phone". If you select
"Home" in the Context filter you will see this task in the to-do list. This is because Context "Home" has
Context "Phone" included. The same situation will happen if you select "Work" in the Context filter: you
will see "Call Bob" in the to-do list because this task is assigned to Context "Phone" which is included
by the selected Context "Work".
To include Contexts in another Context:
1.
2.
3.
Select menu Tools > Manage Contexts... or click F8 to open the Manage Contexts dialog
Select a Context that will include other Contexts.
Set included Contexts on the Included Contexts tab
See also
Creating and Deleting Contexts
Assigning Contexts to a Task
Filter Controls
7.3
Context Hours
A Context may have a schedule: specific times during which it is open or closed. If a Context you select
as a To-Do filter is closed at the moment, the tasks associated with this Context will NOT be shown in
the To-Do list, unless you check the Include closed check box in the Context filter group.
To set Open/Closed schedule for a Context
1. Select menu Tools > Manage Contexts... or click F8 to open the Manage Contexts dialog
3. In the Manage Contexts dialog, select the Hours tab
4. Click and drag the mouse in the Context open/closed schedule to set open and closed times.
Note: The green line in the calendar shows the current time.
See also
Contexts
To-Do filtering by a Context
7.4
Context Options
Additional parameters can be set for a Context on the Properties tab in Manage Contexts dialog.
Hide this Context in the To-Do list Context filter
User's Guide
72
Chapter 7
If this option is set, the Context will not be shown in the Context filter list on the filter pane.
Hide this Context in the task properties Context selector
If this option is set, the Context will not be shown in the Context Selector for task Contexts option.
Hotkey
You can specify a hotkey to toggle the context for a task.
Tip: if you assign the identical hotk eys for different contexts then a local
menu with the list of all these contexts will be shown when this hotk ey is
pressed.
User's Guide
Chapter
VIII
74
8
Chapter 8
Keyboard Shortcuts
The MLO team pays special attention to accelerating application usage. There are keyboard shortcuts
for frequently used operations. The most important keyboard shortcuts are listed below.
Note: Not all k eyboard shortcuts are listed here. Please investigate the
application menu, local menus, and hints to find out the shortcut for the
operation you need.
Shortcut
Alt+F1
Alt+F2
F12
Alt+1
Alt+2
Alt+3
Alt+4
Alt+5
Alt+6
Alt+7
Alt+8
Alt+9
F6
F7
F3
Alt+Shift+Left
Alt+Shift+Right
Alt+Shift+Up
Alt+Shift+Down
Ctrl+Up
Ctrl+Down
Alt+Up
Alt+Down
Ctrl+Alt+Up
Ctrl+Alt+Down
Ctrl+`
Shift+Ctrl+0
Shift+Ctrl+1
...
Shift+Ctrl+9
Ctrl+0
Ctrl+1
...
Ctrl+9
Ctrl+<
Ctrl+>
Ctrl+Alt+>
Alt+C
Alt+L
Alt+V
Alt+P
Alt+Y
Action or command
Task views pane open/close
Properties pane open/close
Full screen
Toggle between Task List and Task Notes (Contexts List and Contexts Notes)
General properties section open/close
Timing & Reminder properties section open/close
Effort properties section open/close
Project properties section open/close
Dependencies properties section open/close
Format properties section open/close
Review properties section open/close
Task Statistics properties section open/close
Collapse entire task list
Expand entire task list
Open current workspace in new window
Rearrange tasks in the outline
Select next/previous visible task without focusing this task list. The current
active control will be still focused during task change by this shortcut. Useful to
iterate quickly through the list of tasks and change specific task parameter.
Select next/previous sibling in the current outline
Select next/previous project in the current outline
Collapse/Expand all subtasks of the current task
Set quick bookmark #1, 2...9 to a task in the outline
Go to bookmark #1, 2...9 in the outline
Go to previous/next bookmark set
Open Bookmarks dialog
Edit Context for a task
Select Context for a task from the list
Select View
Toggle complete subtasks in order
Toggle hide in todo
User's Guide
Keyboard Shortcuts
Alt+R
Alt+J
Alt+X
Alt+W
Reminder
Toggle "This is a Project"
Max time required
Toggle Weekly goal
Alt+D
Ctrl+=
Ctrl+Ctrl+Alt=
Ctrl+AltInsert
Alt+Insert
Ctrl+Del
Ctrl+R
Ctrl+Alt+R
Alt+Left
Alt+Right
Ctrl+H
Set Due Date for a task
Increase/decrease task due date by one day.
75
Increase/decrease task due date by one week.
Create a task (Context)
Create a subtask
Delete a task (Context)
Zoom-in
Zoom-out
Jump back/forward to previously selected task
Jump forward to the next task in history
Highlight a task
The list of the shortcuts is not complete here. Please discover other shortcuts
in the application main menu, local menus, and hints to the commands. In task
properties, press Alt to see underlined chars which are the shortcuts for
corresponding commands.
Note: You can change the default k eys or k ey combinations assigned to the
common MLO functions or commands. For more information, see Hot Keys.
User's Guide
Chapter
IX
78
Chapter 9
9
More Advanced Features
9.1
Automatic Formatting
Automatic Formatting uses rules to format tasks individually, based on their properties.
For example, you may want to underline and set an icon for all the tasks that were created this week
and contain the word "report" in the subject. Below is how you can do this.
To create a custom Automatic Formatting rule
1. Click menu Tools > Options..., select the Automatic Formatting page, and click Automatic
Formatting Rules... .
2. To create a new rule, click Add... in the Automatic Formatting dialog and then edit the rule name in
Rule name text input.
3. Click Condition... to set rules for the tasks to be formatted
4. In the Setup AutoFormat Rule dialog create two rules:
4.1. For tasks created this week:
4.1.1 Click Add rule
4.1.2 Select field CreatedDateTime
4.1.3 Select condition This week
4.1.4 Make sure that operation And is selected for the next rule.
4.2 For tasks with the word "report" in the caption:
4.2.1 Click Add rule
4.2.2 Select field Caption
4.2.3 Select condition Contains
4.2.4 Type 'report' in the text input
4.3 Click OK to close the condition editor dialog
5. Click the Format... button to add formatting for the tasks you selected.
In our example check the Underline check box in the Color Coding dialog and click OK.
6. Click Icon... and select an icon you want add for the tasks.
Tip: You can add your icons to the list by click ing Manage icons...
7. Type the icon position where the icons should be displayed.
Type 1 or 2 or 3 etc to display the icon in the corresponding position in the Icons column
Type 0 to display the icon before the task caption in the task tree.
8. In the Icon hint, you can type text which will be displayed as the hint for the icon.
For example "Report tasks created this week".
9. Click OK to close the Automatic Formatting dialog and Close to close Options.
Now you can see that all the tasks with the specified conditions are underlined and have the icon you
set.
Note: Automatic Formatting will overwrite theme settings but will not change
any custom formatting set on a task in the Format property section.
Note: The position of the rules in the Automatic Formatting dialog is important
when you set different rules for the same formatting. In this case if the
first rule is applied for the task then the second rule for the same
formation will not be used. The rules which change other formatting will
be still used. To change the position of the rule just use Drag & Drop
User's Guide
More Advanced Features
79
For example you may define two rules which set different icons to the same
position.
Rule1: If Task created today set icon New to position 1.
Rule2: If Task caption contains "!" set icon ! in position 1
The rules will work this way:
If the task was created today and contains "!" in the caption, you will see
icon New since Rule1 overwrites Rule2 for icon position 1
If the task was created yesterday and contains "!" in the caption you will see
icon ! since Rule1 does not work and Rule2 is used to place the icon to
position 1
Note: The Icon type in the Automatic Formatting dialog contains predefined
types of the icons with the following behaviour:
Dependency: This icon type displays task dependency in the hint and opens
the dependency editor if you click on this icon
Goal: This icon type displays the goal type in the hint.
Notes: This icon type displays task notes in the hint and opens the notes
editor if you click on this icon
Reminder: This icon type displays reminder details in the hint and opens the
reminders editor if you click on this icon.
(Custom): This icon type displays the text you entered for the hint.
Tip: By default there are several optional rules that are disabled in the
Automatic Formatting dialog. For example there are rules that display
icons for new task s or mark the task s you edited recently. You may want
to enable these rules to see how they work .
See also
Themes and Formatting
Custom Formatting
9.2
Synchronization
You can synchronize the tasks contained in an MLO data file with:
· MyLifeOrganized Cloud (recommended) - Use this type of synchronization to sync your tasks
between different devices in which you are using MyLifeOrganized task manager. This way you can
wirelessly sync your tasks on PC with iPhone/iPod/iPad, Android, BlackBerry or Windows Mobile
device. You can perform synchronization anytime and in any location while you have Internet
connection. You can also share your tasks with other people located anywhere or even work
together on the same project. Low cost subscription required to use MLO Cloud: https://sync.
mylifeorganized.net
· WiFi sync allows you to synchronize MLO-Windows with MLO on mobile devices (such as iPhone)
connected to the same WiFi network. The data transfer performed to your device directly. It works
faster than Cloud however you can sync only if you located near your PC with MLO-Windows
running on it.
User's Guide
80
Chapter 9
· Tasks stored in another MLO data file, which is located on another computer on the LAN or on an
FTP server - You can use this type of synchronization if you collaborate with other people on the
same projects or tasks.
Tip: this type of synchronization is not recommended anymore since entire
file transferred on each sync.
Use MLO Cloud instead since it work s better sending only updates to/from
the Cloud and handling conflicts.
· Tasks stored in another MLO data file, which is located on removable media (such as a USB flash
drive) - Choose this type of synchronization for various portable scenarios such as working on tasks
both at work and home or working on tasks during travel.
Tip: MLO Cloud work s better for these portable scenarios if you have
Internet connection
· Tasks stored in MLO BlackBerry using USB connection - Use this type of synchronization if you
want to synchronize tasks between MLO Desktop and MLO BlackBerry connected using USB.
Tip: It is recommended to use MLO Cloud instead if you want to use over
the air synchronization
· Microsoft Outlook data - Use this type of synchronization if you want to synchronize your tasks with
Microsoft Outlook data or the Outlook GTD Add-in through Outlook. Using advanced filtering you
can select a list of tasks which should be synced to Outlook.
Note: Microsoft Outlook does not support hierarchy of task s so after the sync
your hierarchy is stored only in MLO and Outlook will contain task s you
selected for sync in plain list
See also:
Synchronization profiles
Adding a Synchronization Profile
9.2.1
Synchronization profiles
This section of the help documentation describes how to configure synchronization profiles to sync with:
1) MLO Cloud sync service
2) Your FTP server
3) BlackBerry connected to USB
4) Other MLO data file located on local computer, flash drive or LAN.
See also the following synchronization types which described in other sections:
WiFi Synchronization
Synchronize to MS Outlook.
9.2.1.1
Adding a Synchronization Profile
To synchronize one data file with another, you need to add a new Synchronization Profile. A
Synchronization Profile specifies the synchronization parameters such as the name and location of the
remote data file with which to synchronize the current (local) data file and the synchronization direction.
You can add a Synchronization Profile by using only the basic synchronization parameters or by using
all the available parameters (both basic and advanced). Use only the basic synchronization parameters if
you want to quickly add a new Synchronization Profile. Use both basic and advanced parameters if you
want to fine-tune the Synchronization Profile to your specific needs.
User's Guide
More Advanced Features
Tip: Instead of adding a new Synchronization Profile, you can reuse an
existing item by importing that item into the current data file from an MLO
sync configuration file.
To add a Synchronization Profile using the basic parameters:
1. On the File menu, click Synchronization.
2.
Click New in the Synchronization dialog box.
3.
On the General tab, specify the following basic synchronization parameters:
Parameter
Description
Sync profile name
Type a name for the synchronization profile
Sync to MLO Cloud on the
Internet
Select this option to sync your data to MLO Cloud
sync service (subscription required).
1. Click Setup Connection to specify the following
Cloud settings
e-mail - your MLO Cloud account email
password - your MLO Cloud account password
Note: to create new account click Create new
account in MLO Cloud and follow instructions.
To configure advanced parameters such as Proxy
click Advanced >>
2. Click Browse... to select or create new MLO Cloud
data file you want to sync with.
Sync to remote data file
located on my FTP server
Select this option if the data file with which you want
to synchronize the current file is stored on a FTP
server (if you do not want to use Cloud). Do the
following:
1. Click Setup FTP and specify the following FTP
settings in the FTP Connection Details dialog
box:
· Hostname - Type the host name of the FTP
sever.
· Username - Type your FTP user name.
· Password - Type your FTP password.
· Port - Specify the port number of the FTP
server (normally, 21).
Note: If the FTP server is behind a firewall and you
have trouble synchronizing with the data file on the
server, selecting the Use passive FTP check box
may help.
2.
User's Guide
If you use a proxy server to connect to the FTP
server, specify the proxy server settings under
proxy server details:
· Hostname - Type the host name of the proxy
81
82
Chapter 9
server.
· Username - Type your proxy login user name.
· Password - Type your proxy login password.
· Port - Type the port number of the proxy
server.
· Proxy type - Select a proxy server type.
3.
Click Test FTP settings to check whether MLO
can connect to the FTP server using the specified
settings. If the connection has been established,
MLO displays a "Logged in successfully"
message. If the connection attempt has failed,
MLO displays a corresponding error message.
Correct the FTP settings and click Test FTP
settings again.
4.
Click OK to return to the Sync Item dialog box.
Sync to BlackBerry
connected to USB
Select this option to sync your data file with MLOBlackBerry data file using USB connection if you do
not plan to use MLO Cloud.
1. Connect your BlackBerry device to USB cable
2. Click Browse... to browse to the remote database
on MLO-BlackBerry.
Sync to other data file
located on my computer,
flash drive or LAN
Select this option if the data file with which you want
to synchronize the current (local) file is stored on the
same computer, within the same local-area network
(LAN), or on a USB flash drive (if you do not plan to
use Cloud).
Click Browse to browse to the remote file.
4.
Click OK.
To add a synchronization profile using all the parameters (basic and advanced):
1. Complete the "To add a Synchronization Profile using the basic parameters" procedure above to
specify the basic synchronization parameters.
2.
Select the Add this sync item to quick synchronization check box to be able to quickly
synchronize the data files using this Synchronization Profile.
3.
Select Sync automatically this cloud profile to sync this profile with MyLifeOrganized Cloud
automatically.
4.
Click the Branch sync tab and select one of the following options:
· Synchronize all tasks - Select this option if you want to synchronize all the tasks in both data
files.
· Synchronize only selected branch of tasks - Select this option if you want to synchronize
only a specific branch of the task tree (a particular task and its subtasks). Specify whether the
task branch is contained in the local or remote file. Next, click OK, select the branch in the
Outline and click OK again. The Branch of task to sync box displays the name of the selected
branch.
Note: If the selected task branch exists only in one file, it will be added to the
User's Guide
More Advanced Features
83
other file as a result of the synchronization.
Note: The option to sync branch does not work for cloud sync.
5.
Click the Advanced tab and specify the following settings:
Setting
Description
Sync direction
Specify the direction of synchronization:
· Bidirectional (recommended) - The changes
to the task data contained in both data files will
be retained, and the files be updated with each
other's changes.
· Local to Remote - The remote file's task data
will be updated with the local file's task data.
· Remote to Local - The local file's task data
will be updated with the remote file's task data.
Do not sync reminders
Select this check box to synchronize the data files
without copying the reminders set within the tasks.
Clear this check box to copy the reminders during
synchronization.
Do
Do
Do
Do
Do
Do not sync corresponding properties of the task.
These options may be needed when you setup
collaboration and want to keep some parameters of
the task private and do not sync them to other data
files.
not sync contexts
not sync flags
not sync star
not sync color coding
not sync goals
Re-synchronize
6.
Use this option to resynchronize all the tasks in both
files. For more information about resynchronization,
see Synchronizing Data Files.
Click OK.
The new Synchronization Profile is added to the Synchronization Profiles table in the Synchronization
dialog box. The Sync Profile column displays the names of the Synchronization Profiles. The Last
Synchronized column indicates the last time that synchronization was performed using the
Synchronization Profile.
For information about synchronizing data files using a Synchronization Profile, see Synchronizing Data
Files.
See also:
·
·
·
·
9.2.1.2
Synchronizing Data Files
Editing a Synchronization Profile
Deleting a Synchronization Profile
Importing and Exporting Synchronization Profiles
Synchronizing Data Files
You can synchronize necessary data files by using an appropriate Synchronization Profile.
User's Guide
84
Chapter 9
You can quickly synchronize data files if a Synchronization Profile has been defined for them and that
item has been designated for quick synchronization. To define a Synchronization Profile, see Adding a
Synchronization Profile. To designate a Synchronization Profile for quick synchronization, select the
appropriate item in the Synchronization dialog box, click Edit and then select the Add this sync item
to quick synchronization check box on the General tab.
You have any problems synchronizing the data files, resynchronizing them may help. Resynchronizing
lets you re-apply synchronization to all the tasks in both files.
To synchronize data files using synchronization profile:
1. On the File menu, click Synchronization.
2.
In the Synchronization dialog box, select the appropriate synchronization profile and click Sync
Now.
If the data files have been synchronized successfully, the MLO status bar displays "Synchronized."
If the synchronization has failed, the Sync dialog box details the error. Correct the error and repeat
this procedure.
Note: If you have selected more than one Synchronization Profile, MLO will
synchronize the data files defined in the selected synchronization profiles
sequentially, in the order that the synchronization profiles are listed in the
Synchronization dialog box.
Important: If the files being synchronized specify conflicting task
information, MLO displays the details of the conflict in a dialog box. You must
resolve the conflict to complete the synchronization. For information about
resolving synchronization conflicts, see Resolving Synchronization Conflicts.
To quickly synchronize data files:
· Do one of the following:
On the Tools menu, click Synchronize.
Press customizable shortcut (default F9).
If the data files have been synchronized successfully, the Sync dialog box displays "Synchronized."
If the synchronization has failed, the Sync dialog box details the error. Correct the error and repeat
this procedure.
To resynchronize data files:
1. In the Synchronization dialog box, select the appropriate Synchronization Profile and click Edit.
2.
In the Sync Profile dialog box, click the Advanced tab and then click Re-synchronize.
3.
In the Confirm - MyLifeOrganized message box, click Yes.
4.
Click OK in the MyLifeOrganized dialog box and then in the Synch Profile dialog box.
5.
Click Sync Now.
See also:
· Resolving Synchronization Conflicts
· Adding a Synchronization Profile
· Editing a Synchronization Profile
User's Guide
More Advanced Features
9.2.1.3
85
Editing a Synchronization Profile
You can edit a Synchronization Profile to adjust some of an item's parameters. For example, the
location of the remote file that you synchronize the local file with has changed, and you need to update
the path to the remote file.
To edit a Synchronization Profile:
1. On the File menu, click Synchronization.
2.
In the Synchronization dialog box, select the item that you want to edit and click Edit.
3.
Change the synchronization parameters on the General, Branch sync, and Advanced tabs as
needed and click OK.
Note: For a description of the synchronization parameters, see Adding a
Synchronization Profile.
See also:
· Adding a Synchronization Profile
· Synchronizing Data Files
· Deleting a Synchronization Profile
· Importing and Exporting Synchronization Profiles
9.2.1.4
Deleting a Synchronization Profile
You can delete a Synchronization Profile that you no longer need.
To delete a Synchronization Profile:
1. On the File menu, click Synchronization.
2.
In the Synchronization dialog box, select the item that you want to delete and click Delete.
3.
In the Confirm - MyLifeOrganized message box, click Yes.
See also:
· Adding a Synchronization Profile
· Editing a Synchronization Profile
9.2.1.5
Importing and Exporting Synchronization Profiles
You can use a Synchronization Profile defined in another data file and previously saved as an MLO sync
configuration file (a file with the mlsc extension) by loading that sync configuration file into the current
data file. This process is called importing a Synchronization Profile.
You can reuse a Synchronization Profile defined in the current data file, in another data file by saving the
item as an MLO sync configuration file, placing the file in an appropriate location, and then loading
(importing) it from that location into the other data file. This process is called exporting a
Synchronization Profile. Exporting is useful if you want to share the Synchronization Profile with other
User's Guide
86
Chapter 9
people. By exporting the sync configuration file to a location on your computer or another computer on
the local-area network (LAN), you enable other users to access it and use the Synchronization Profile it
contains.
Note: You can export more one Synchronization Profile in a sync
configuration file.
To import a Synchronization Profile:
1. On the File menu, click Synchronization.
2.
In the Synchronization dialog box, click More>Import.
3.
Locate the MLO sync configuration file that contains the Synchronization Profile that you want to
import.
4.
Click Open.
The Synchronization Profile is added to the Synchronization Profiles table in the Synchronization
dialog box. The Sync Name column displays the name of the Synchronization Profile. You can
immediately use the Synchronization Profile to synchronize the data files it specifies (see
Synchronizing Data Files) or edit the item before using it (see Editing a Synchronization Profile).
To export a Synchronization Profile:
1. On the File menu, click Synchronization.
2.
In the Synchronization dialog box, select the Synchronization Profiles that you want to export.
3.
Click More>Export.
4.
In the Save MLO Sync Config dialog box, browse to the location where you want to place a new
mlsc file and type a name for the file in the File Name box.
5.
Click Save.
The file is now available from the selected location for importing into another data file.
See also:
· Adding a Synchronization Profile
· Editing a Synchronization Profile
· Synchronizing Data Files
9.2.2
Synchronization with MyLifeOrganized Cloud
MyLifeOrganized Cloud Sync service allows you to synchronize your data between different devices in
which you are using MyLifeOrganized task manager.
You can add your tasks in MLO-Desktop then get them on your MLO-iPhone, MLO-iPad, MLO-Android,
MLO-BlackBerry, MLO-PocketPC or other MLO-Desktop over the air with a single click and then sync
updated tasks back to MLO-Desktop.
With MLO Cloud you can share your task list with other people located anywhere or even work together
on the same project.
MLO Cloud Sync service takes precautions to protect your information both online and off-line. Periodical
backups of your data stored in secure and robust MLO Cloud environment.
User's Guide
More Advanced Features
87
To configure MLO-Desktop to sync with MLO Cloud follow the instructions to create new sync profile and
select option Sync to MLO Cloud on the Internet.
By default your cloud sync profile configured to sync automatically with MyLifeOrganized Cloud.
See also:
Synchronization profiles
Adding a Synchronization Profile
Collaboration using MLO Cloud
WiFi Synchronization
Automatic sync with Cloud
9.2.2.1
Automatic sync with Cloud
When you configure the synchronization with MyLifeOrganized Cloud Sync service it is set to sync
automatically with the cloud by default. When this option is set MyLifeOrganized keeps your desktop
data in sync with Cloud.
There is a special algorithm designed to optimize the number of requests to the server while still have
your changes from the cloud when you need them on desktop and send changed back to the cloud
when you need them on your devices. This algorithm also minimizes possible conflicts by prevent the
sync in the same time when you are editing your data file on desktop.
Here is the full algorithm of the autosync in MyLifeOrganized for Windows.
1. When MLO is started (or new data file is opened) the check for the cloud changes initiated. If there
are cloud changes the autosync is started immediately (to get modifications from the cloud before you
start working with MLO on desktop).
2. When MLO is being closed (or current data file is being closed) and there are local modifications the
autosync is started (to send local modifications to the cloud).
3. If MLO is running and there is full inactivity on your computer for 8-10 min and there are local
modifications the autosync is started (to send the local modifications to the cloud after you have already
left your computer).
4. If MLO is running and there was inactivity on your computer for more than 10 min and you started
using the computer after this long inactivity the check for the cloud changes initiated. If there are cloud
changes the autosync is started (to get possible modifications from the cloud before you continue
working with MLO on desktop)
5. If MLO is running but has not been used for more than 10 min and you started using MLO after this
long delay the check for the cloud changes initiated. If there are cloud changes the autosync is started
(to get possible modifications from the cloud before you continue working with mlo on desktop)
There are the following special cases for the autosync algorithm:
6. If there are more than 150 modifications on the cloud, the sync on first start (1) is not initiated
automatically to prevent long delay on MLO start. The sign that there are modifications on the cloud will
still be shown in the toolbar so that you could decide when to get these modifications manually.
7. If there are critical errors detected during the sync, the autosync will stop initiating the sync
automatically. The “sync error” sign will be displayed in MLO toolbar. The critical errors are: conflict,
User's Guide
88
Chapter 9
cloud account expired, invalid login.
8. If there are non-critical errors detected during sync (for example connection to the cloud lost) the
autosync will continue the attempts to complete the sync. The “sync error” sign will be displayed in MLO
toolbar until sync succeeded.
9. On each MLO window activation the check for the cloud modifications is initiated and special sign is
displayed in the toolbar if there are cloud modifications. The sync is not started unless other conditions
of the algorithm are met (1-5).
Note: The current implementation of the algorithm may show you a conflict
window if you continue editing a task while sync is in progress (for example
notes editing). We plan to improve this issue. In the meantime it is
recommended to try not to mak e changes to the task s during sync process
(usually several seconds).
See also:
Synchronization with MyLifeOrganized Cloud
Synchronization profiles
Adding a Synchronization Profile
9.2.3
Synchronization with MLO BlackBerry
You can synchronize your tasks to MLO-BlackBerry application with one of the methods:
1) Using MLO Cloud sync (recommended).
How to sync your BlackBerry device to MLO Cloud
1. Run MLO-BlackBerry application and open a database
IMPORTANT: if you have already synced your tasks to Cloud using MLO-Desktop then create new
empty database on MLO-BlackBerry and get your data from Cloud to avoid duplications.
2. Select menu Settings->Cloud Sync
3. Enter your MLO Cloud credentials
4. Select a file on MLO Cloud to sync with
5. Select Save
6. Select Synchronize from the main menu.
2) Using BlackBerry Device Manager and USB connection
How to sync MLO Desktop with MLO-BlackBerry using USB connection
1. Make sure BlackBerry Device manager is installed and running on your
computer
2. Connect your BlackBerry Device to your computer
3. Run MLO on BlackBerry
4. Run MLO on Desktop
5. In MLO on Desktop select File->Synchronization…
6. Click New…
7. Enter the Sync profile name (for example “Bob’s BB USB Sync”)
8. Click “Sync to BlackBerry connected to USB”
9. Click “Browse…” and select file on the BlackBerry you want to sync with
10. Click OK to save your Sync Profile
User's Guide
More Advanced Features
89
11. Click Close to close Synchronization dialog
12. Click F9 (Tools->Synchronize) to sync to BlackBerry
See also:
MyLifeOrganized Cloud
Synchronization profiles
Adding a Synchronization Profile
9.2.4
WiFi Synchronization
WiFi Synchronization allows you to synchronize MLO-Windows with MLO on mobile devices (such as
iPhone) connected to the same WiFi network. The data transfer performed to your device directly. You
can sync only if you located near your PC with MLO-Windows running on it.
How to sync your device with MLO-Windows on your PC using WiFi
1. Run MLO on your device (such as iPhone)
2. Run MLO on you PC, unblock it in Firewall and open your data file.
3. Pair your device with MLO-Windows on PC
4. Start WiFi sync from your device
Look at this online guide for step-by-step WiFi sync instructions.
Note: MLO WiFi module should be installed on your PC. If it is not installed
run the MLO installation again and select it.
Note:
Each MLO data file on your PC can sync only to one profile on a single device.
To sync your device with desk top the paired data file should be open in MLOWindows
To sync this desk top data file to other profile on device or with other device you need
to un-pair old profile from PC and pair new profile.
See also:
MyLifeOrganized Cloud
9.2.5
Collaboration
Team of people can work together on the same project or tasks using MLO collaboration features:
1) Collaboration using MLO Cloud (recommended)
2) Collaboration using sync to a hub file on LAN or FTP
See also:
Synchronization with MLO Cloud
Synchronization profiles
User's Guide
90
9.2.5.1
Chapter 9
Collaboration using MLO Cloud
You can share your MLO Cloud file with other Cloud users to work together on the same tasks or
projects.
To share your MLO Cloud file
1. Open your synchronization profile which is synced with MLO Cloud.
2. Click Browse... button to show the list of your MLO Cloud files
3. Select a MLO Cloud file which you want to share with other MLO Cloud user(s)
4. Click Properties... button to open file details
5. Select Sharing tab
6. Click Share... button and enter MLO Cloud user login you want to share your file with.
7. Click OK.
8. Click OK in Cloud Sync File Properties dialog
9. Click Close in MLO Cloud Sync Files dialog.
Tip: to remove sharing with specified user click Remove Sharing... button in
Cloud File properties dialog.
See also:
Synchronization with MLO Cloud
Adding a Synchronization Profile
9.2.5.2
Collaboration using sync to a hub file on LAN or FTP
Several people can work on the same project or tasks using sync to a hub file located on LAN or your
FTP.
Note: this method is outdated and MLO Cloud sync is recommended for
collaboration now.
MLO enables small and medium-sized teams to efficiently collaborate on projects and tasks by using
the synchronization feature. Managers can use this feature to centrally manage and track projects.
Team members can use the synchronization functionality to report on the progress of assigned tasks
and ensure that changes they made to their tasks are shared with the entire team.
To successfully collaborate using MLO, the team members must perform the following steps depending
on their role within the team.
Manager's Setup
1. Create an MLO data file and add tasks and subtasks to the file to represent a hierarchy of projects
and related tasks.
2. Create another data file in an appropriate location on the LAN or on an FTP server. This data file is
used as a shared database file which serves the sync hub.
3. Add a Synchronization Profile to be able to synchronize his or her data file with an MLO file located
on the LAN or an FTP server.
4. Synchronize his or her MLO data file with the one located on the LAN or an FTP server.
The manager can get the most up-to-date information on the progress of the assigned tasks and thus
calculate the percentage completion for the entire project by regularly synchronizing his or her file with
the one located on the LAN or a FTP server.
Each Subordinate's Setup
User's Guide
More Advanced Features
1.
2.
3.
91
Create an MLO data file.
Add a Synchronization Profile to be able to synchronize his or her data file with the MLO file located
on the LAN or a FTP server.
Synchronize his or her MLO data file with the one located on the LAN or an FTP server.
The team members can report to the manager on the current progress of the assigned tasks by
synchronizing his or her file with the one on the LAN or an FTP server at agreed intervals.
See also:
Collaboration using MLO Cloud
Adding a Synchronization Profile
Synchronizing Data Files
Editing a Synchronization Profile
Deleting a Synchronization Profile
Importing and Exporting Synchronization Profiles
9.2.6
Synchronization for Portable Scenarios
The synchronization feature of MLO enables users to manage tasks in various portable scenarios, that
is, those situations that involve using removable media such as a USB flash drive. Examples of portable
scenarios:
· Working on tasks at work and home and using a USB flash drive to synchronize the tasks between
the office and home computers.
· Synchronizing the tasks stored on the office computer with the ones on removable media to make it
possible to work on the tasks on business travel.
To synchronize tasks in portable scenarios, perform the following steps:
1.
Add a Synchronization Profile.
Note: Be sure to select the Sync to other data file located on my
computer, flash drive or LAN check box in the Sync Profile dialog box.
2.
Synchronize the data files containing the tasks.
Tip: MLO Cloud work s better for these portable scenarios
See also:
Synchronization with MLO Cloud
Resolving Synchronization Conflicts
User's Guide
92
9.2.7
Chapter 9
Resolving Synchronization Conflicts
A synchronization conflict refers to a situation when changes were made to a specific property (for
example, task due date or importance) of the same task or subtask in both data files before
synchronization, which results in different values of that property in the files and prevents the
synchronization from being completed. To resolve a synchronization conflict, you need to specify which
file—local (current) or remote—takes precedence. For example, if both files include different due dates
for the same task, you can specify that the due date in the local (current) file overrides the due date from
the remote file, or vice versa.
If MLO-Desktop detects that the data files include conflicting information, it displays the Resolve Sync
Conflict dialog box, which giving details of the conflict, and prompts you to resolve the conflict before
continuing with the synchronization. If more than one task in the data files gives conflicting information, a
separate row is displayed for each task in the Resolve Sync Conflict dialog box.
To resolve a synchronization conflict:
1.
To identify the conflicting information, click an ellipsis in the Details column in the Resolve Sync
Conflict dialog box.
The Task Difference dialog box lists all the task properties, and the properties that specify the
conflicting information are highlighted in red. The Local data and Remote data columns display
the conflicting values in the local file and remote file respectively.
2.
3.
Click Close to return to the Resolve Sync Conflict dialog box.
In the Action column, select one of the following values:
· Replace --> - Select this value to override the information in the remote file with the
corresponding information in the local file.
· <-- Replace - Select this value to override the information in the local file with the information in
the remote file.
4.
Click OK.
MLO complete the synchronization using the task property values of the data file specified to take
precedence.
Tip: for multiple update select all the task s in Resolve Sync Conflict window,
right click to open Local Menu and select conflict resolve action.
See also:
Synchronizing Data Files
9.2.8
Outlook Sync User Manual
This manual will help you in setting up synchronization between MyLifeOrganized (MLO) and
Microsoft Outlook. You might want to synchronize with Outlook if you are a power Outlook user
User's Guide
More Advanced Features
93
and want to use Outlook together with MLO in your planning. Note that the task synchronization
feature is available in the desktop version of MLO only.
MLO Outlook Sync supports three preset modes:
1. Basic Mode
2. Standard Palm User Mode
3. Advanced Outlook Mode
Also supported is a Custom mode for those users from whom none of the three modes is
appropriate.
MLO currently synchronizes only with Outlook tasks.
Most of what you need to know about MLO Outlook Sync, and what you will spend the bulk of
your time with, involves the setup and configuration of the Outlook Sync module. Once you have set
it up the way you want it, things should work relatively seamlessly. Section 2 of the manual, which
comprises the bulk of the document, explains how to set things up, as well as the consequences of
making various choices during configuration. Section 3 contains additional random notes and
explanations, as well as troubleshooting help.
9.2.8.1
1. Performing the Synchronization
To synchronize MLO and Outlook tasks with default sync settings:
1) go to menu File | Outlook synchronization...
2) select the Task Synchronization Action (i.e. MLO<-->Outlook)
3) click the "Sync now" button.
Tip: Once you have synchronization set up the way you want it, you can simply
select "Synchronize Outlook" from the Tools menu, and synchronization will take
place automatically, using the existing settings.
See also:
Setting Up MLO for Outlook Synchronization
9.2.8.2
2. Setting Up MLO for Outlook Synchronization
This section of the documentation describes how to perform advanced synchronization setup
between MLO and Outlook. To set up MLO Outlook sync, click on the File menu and select “
Setup Outlook sync”.
9.2.8.2.1 2.1 Outlook Folder
The first thing you need to do is select the Outlook folder with which you will be synchronizing your
MLO tasks. To do so, click on the Browse button in the initial dialog.
User's Guide
94
Chapter 9
Tip: You will usually want to synchronize with the Tasks folder in your Outlook
Personal Folders tree. If you are just a little squeamish, you might want to create a
new folder in Outlook for your initial testing or to separate all your MLO tasks in
Outlook. To do so, click on the New button and create it. Finally, click on the folder
you wish to synchronize and click OK. The selected folder path should now be
displayed in the text box.
9.2.8.2.2 2.2 Tasks synchronization action
Next, you will need to decide the direction of synchronization. You have three choices:
1. Outlook --> MLO (Copy Outlook tasks to MLO)– Typically, you will make this selection
only when you are starting out and want to move your Outlook tasks into MLO so that you
can work with them there. Once this is done, you will probably want to switch to one of the
following actions. (See the suggestion below for the best way to make this change.)
Note: existing MLO tasks (not connected to Outlook) will not be affected in this
mode.
2. MLO --> Outlook (Copy MLO tasks to Outlook) – You will want to choose this action
when you do not have existing Outlook tasks you want to work with and you want to copy
your MLO tasks to Outlook. This action would also be appropriate if you want to use
Outlook only for viewing your tasks and do not plan to ever make any changes to your tasks
from within Outlook.
Important: once you perform the sync using this mode, all your Outlook tasks
which are not connected to MLO will be deleted in this Outlook folder.
3. MLO <--> Outlook (Synchronize tasks)– This action allows you to make changes to your
tasks in either MLO or Outlook and to have these changes moved in both directions.
9.2.8.2.3 2.3 Advanced sync options
After you have selected your Outlook synchronization folder and chosen the direction of
synchronization you can click Advanced button to complete the setup.
9.2.8.2.3.1 2.3.1 MLO Outlook Sync Presets
The MLO Outlook Sync Presets dialog is displayed automatically only if you enter Advanced
mode the first time. You now need to make the decision as to which mode you will use for your
synchronization. Later you can open this dialog again (click Preset Modes button in the Outlook
Sync Options dialog) and change the preset mode.
If you are a Palm user and want to synchronize your MLO tasks with your PDA so that you can use
the data when you are separated from the desktop, you will probably want to use the Standard
Palm User Mode or the Advanced Outlook Mode. Using either of these modes, you will then be
User's Guide
More Advanced Features
95
able to make changes on your Palm and then move them back to MLO.
Choose Standard Palm User Mode if you are using only the native Palm PIM applications or tools
(such as Datebk) that run on top of the native Palm databases. This mode allows MLO to map
multiple data fields onto one field on the Palm in a way that allows filtering of the data on the Palm
device without breaking the ability to perform bidirectional syncing between the Palm and MLO.
If you are using advanced Palm tools such as KeySuite, you will want to choose Advanced
Outlook Mode, which will allow you to sync a richer data set to your Palm PDA.
If you are not a Palm user, you will want to select any mode other than Standard Palm User Mode.
Basic Mode is the synchronization mode designed for people who simply want an easy way to
shuttle data back and forth between Outlook and MLO. This mode makes minimal use of Outlook
fields and features.
Advanced Outlook Mode provides advanced MLO data via Outlook's advanced and userdefined fields. The target audience is advanced users of the Outlook GTD Add-in tool and Palm
power users that are using tools such as KeySuite and Beyond Contacts. Data is mapped in such as
way as to leverage the advanced features of these various tools without breaking the ability to
perform bidirectional syncing between the Palm and MLO.
After you have selected your preferred mode, the Outlook Sync Options dialog opens. This dialog
includes four tabs with a variety of settings that you can change if you want to create a Custom
Sync Mode different from any of the built-in presets. Custom Mode is intended for power users
who are not satisfied with any of the standard presets. Custom Configurations can be saved to a
MLO Outlook Sync Settings file - *.mos (which is actually XML file) for future reuse and sharing
amongst users. This mode allows you to configure the tool to meet specific unique needs that cannot
be anticipated ahead of time. Custom Modes can be saved to named mos files.
(If you plan to work in one of the preset modes, you can skip the following information and go on to
Section 3.0 – “Notes and Troubleshooting” )
9.2.8.2.3.2 2.3.2 General Tab
2.3.2.1 New Outlook tasks will be added to this root MLO task
If you create new tasks in Outlook, you might want to be able to easily find them in MLO so that
you can then set MLO-specific properties. One way to do this is to synchronize all such tasks into a
specific top-level task in MLO. To do so, just type the name of this task into the text box.
2.3.2.2 Remove tasks from Outlook not visible in MLO To-Do View
If you set this option then only tasks visible in selected MLO To-Do view will be synced to Outlook. The
rest of the tasks will be deleted on Outlook side.
2.3.2.3 To-Do Visible option tracks Open and Closed Contexts
These two options allow Outlook and other tools to create a view of tasks similar to any MLO ToDo List View.
If this option activated the tasks visible in the selected MLO To-Do List View will be added to the
Outlook and all the other tasks will be removed from Outlook during synchronization. Use
User's Guide
96
Chapter 9
predefined view name <Default View: "Active Actions"> to sync only Active Actions. If you check
option track Open and Closed Contexts then tasks with assigned Contexts which are closed at the
moment will not be synced to Outlook.
2.3.2.4 Sync reminders
Check this option to synchronize MLO reminders to Outlook reminders.
2.3.2.5 Conflict resolution
If you are synchronizing both ways and have made changes to the same item in both MLO and Outlook,
MLO Outlook Sync needs to know how to resolve the differences. The drop-down box gives you three
choices:
Use MLO data – The MLO item will overwrite the Outlook item.
Use Outlook data – The Outlook item will overwrite the MLO item.
Add records to both sides – Both versions of the item will be added to both MLO and Outlook.
If you check "Show warnings on conflicts", you will be shown a warning if an item has been changed
in both MLO and Outlook. The log file will contain detailed records about all conflicts. You can
want to analyze the conflicts and remove duplicated tasks from MLO or Outlook.
2.3.2.6 Encode MLO project name
A task's immediate parent project (its "primary project") can be encoded into the Outlook task
subject during sync to Outlook.
Note: This encoding supports a commonly used approach of individuals following
the GTD™ philosophy via a scheme sometimes referred to as the "pigpod method"
or "vanilla GTD". See the Palm_GTD Yahoo group for extensive discussions of this
topic.
The primary project name is either prefixed or suffixed with the title of the MLO task. The available
encodings are:
Notation
[Project]
[Project]
<Project>
<Project>
Location
Prepended to subject
Appended to subject
Prepended to subject
Appended to subject
2.3.2.7 System settings
Use redemption library to avoid Outlook security warnings
Check this option to use Outlook redemption library during sync process. The redemption library is
needed only to avoid Outlook security warnings during sync process. You can download the
redemption library from www.MyLifeOrganized.net and place it in the same with mlo.exe folder.
The sync process is able to continue without redemption library however in some cases you can see
the Outlook security warning message(s).
Auto sync MLO with Outlook periodically
Set this option to sync MLO with Outlook periodically using default settings configured for "Quick
Outlook sync" command.
User's Guide
More Advanced Features
97
Allow Outlook sync only on this computer
If enabled then MLO will sync with Outlook only on computer with specified name. It can be useful
if you move the same data file between computers (work and home for example) and only the work
computer should be synced with your Outlook.
9.2.8.2.3.3 2.3.3 Outlook Categories Tab
Outlook uses categories to group related tasks. MLO does not use categories, but it does include
the concepts of contexts and projects. You can choose whether or not you wish to have MLO
contexts and projects synchronize to particular Outlook categories.
2.3.3.1 Do NOT sync MLO Contexts with Outlook categories
If you prefer, you can completely disable the syncing of contexts and projects to Outlook
Categories. Once this feature is disabled, MLO contexts and projects will not be coordinated during
synchronization. However, several other legacy features become enabled that allow the selective
filtering of which categories sync and how task deletions are processed, through the use of the two
sub-options, described below . This mode exists for three reasons. First it is useful if you have
Outlook tasks that you want to be moved to MLO when first starting. Second, it allows you to use
the legacy sync behavior of MLO if you desire it. Lastly, this option provides a simple method for
creating a backup copy of all MLO tasks within Outlook to any desired folder.
Sync only Outlook tasks containing this string in the category
If you type a string of characters into this box, only Outlook tasks whose category includes this
string will be synchronized. For example, if this box contains "MLO", tasks in the "MLO Task" or
"MLO Project" Outlook categories will be moved to MLO, but tasks in the "Task" and "Project"
categories will not be moved during sync process.
If you leave this box empty all Outlook tasks will be synced with MLO.
When a task is deleted in MLO…
This option is enable is you typed process category described above. By making a selection from
this dropdown box, you can choose to have tasks which have been deleted in MLO also be deleted
in Outlook, or to have them moved to Outlook and assigned to a particular category specified in the
following text box. For example, you can use a category such as "Deleted from M_L_O".
Note: If you process all Outlook tasks during sync (substring for task category is
empty) the only option for deleted in MLO task is available. corresponding tasks
will be also deleted in Outlook.
Note: There is a limitation for Outlook category of deleted in MLO tasks. The delete
category should not contain process category as substring. This rule will prevent
deleted in MLO tasks appear in MLO again after sync.
Example: if you set the process category to "MLO" it is not allowed to set these
strings to delete category: "Deleted in MLO ", "MLO_Del" etc. You can enter the
following strings: "Deleted in M_L_O".
User's Guide
98
Chapter 9
The following table summarizes the sub-options available:
Function
Filter Categories
Deleted in MLO
Deleted in MLO
Execution
Allow entry of arbitrary string. Only
Outlook categories containing that
string will be synced.
Option 1 – Delete it in Outlook.
Option 2 – Move it to an Outlook
category specified by a string value.
2.3.3.2 Sync MLO Contexts and Projects with Outlook Categories
Tasks can be categorized in Outlook according to their contexts in MLO. When this option is
activated, the task will be placed in a category mapped to each context associated with it. Since
both MLO and Outlook allow multiple items in contexts and categories respectively, this mapping is
very straightforward. If you do choose to synchronize MLO contexts and projects with Outlook
categories, you have several options.
Contexts
Assign Context categories only for To-Do visible tasks – When this option is checked,
context categories will be assigned in Outlook to any tasks that appear in MLO's To-Do list. Tasks
that are not current to-do's will not be assigned a context category. Tasks not currently visible in the
to-do list will still be transferred to Outlook, but will not be assigned a context category. These nonactionable tasks can still be categorized by project, as described below.
Add prefix for "Contexts" categories – If this box is checked, context categories will be
created in Outlook, with a prefix added to each category name to identify it as an MLO context.
The default is "Cntx:", but you can change this to "Context:" or any other prefix you prefer.
Context reduction to 15 categories - The number of Outlook categories to which you sync
MLO contexts can be restricted to 15. This special mode is designed to support the synchronizing of
tasks from Outlook to PalmOS based PDAs running the legacy Palm applications, which support
only 15 categories. If projects are synced to a reserved category (as described below), the
restriction becomes 14 categories, with the 15th being consumed by the Reserved Projects
category.
When you check this box, another dialog will open so that you can map needed MLO contexts to
the 14 or 15 Outlook categories that you wish to be synchronized to Outlook. (You can also access
this dialog by clicking on the "Advanced" button.)
When active, this mode uses only the primary MLO context for synchronization. The Primary MLO
context is the first one in the list of contexts for each task. Currently, you will need to manually order
the context string to change the primary context, by editing Contexts edit box on the General task
option section.
Projects
If option Assign task to corresponding project category is set the tasks will be categorized in
Outlook according to the project they belong to. The Outlook category with the name of the project
User's Guide
More Advanced Features
99
this task belong to will be created and assigned to this task in the Outlook after sync.
This Outlook category can be also created with a prefix if option Add prefix for "Project"
categories is set. The default is "Prj:", but you can change this by typing a different string into the
text box.
Note: The "primary project" for a task in MLO is always the first parent in the tree
that is flagged as a project. If a task has three ancestors flagged as projects, that
task belongs to three projects. However only the first ancestor is sent to Outlook as
a category.
As an additional option you can check "Assign MLO projects to this Outlook category only:".
This will force all tasks flagged as projects to be brought into a special reserved Outlook category
only. The default Outlook category to be used for this purpose is "Projects", but you can also
change this by typing a different category name into the text box.
Note: This option takes precedence over any other category related features, and
any MLO contexts assigned to the project will not be added to the Outlook category
when this mode is active.
Note: When this option is active, ALL projects are synchronized to Outlook even if
they have uncompleted descendant tasks or are in "closed contexts" and would
normally be hidden by the "Remove tasks from Outlook not visible in MLO To-Do
List" setting described in section 2.3.2.2.
Note: This mode exists to support the Outlook GTD™ Add-in tool and other tools
that leverage this sort of setup.
Note: If both contexts and projects are being synchronized to Outlook categories,
either projects or contexts must use a prefix. This ensures that MLO can detect
whether a previously unseen Outlook category is a new context or a new project.
9.2.8.2.3.4 2.3.4 Priority Mapping Tab
Priority is a computed property in MLO. Therefore, it cannot be modified outside of MLO, but it is
nevertheless very useful information outside of MLO. MLO allows multiple ways to send the priority
information over to Outlook. Each mode can be enabled or disabled separately.
Any changes that you make to task priorities in Outlook will be ignored.
If you want MLO priorities to be sent to Outlook, check the first checkbox on this tab: “Map
MLO task priority to Outlook”. You can choose to use Outlook's Low/Normal/High priority for
very general priorities, or/and you can use MLO priorities to create multi-level numbered priorities in
Outlook.
If you check “Map MLO priority to Outlook's Low/Normal/High priority”, MLO tasks will be
assigned Outlook priorities as follows (depending on the current To-Do ordering method):
Outlook Priority
High
User's Guide
Computed Score Mode Hierarchical Mode
Priority > 3
Items marked as Weekly
100
Chapter 9
Medium
1.0 <= Priority <= 3
Low
Priority < 1.0
Goals in MLO
Top items on the MLO todo list
Items in the end of the
MLO to-do list
If you check “Encode MLO task priority into the Outlook task subject”, you can choose from
two optional encoding methods. The first method assigns simple three-digit priorities (001, 002,
003…..100…xxx). The second assigns a letter followed by a two-digit number (A01, A02, A03..
A10, B01, B02..B10, C01….xxx). These Outlook priorities are assigned to the MLO tasks by
walking the MLO To-Do list in linear order. The first ten tasks from this list get A01-A10 (or 001010), the tasks #11-20 from the To-Do list get B01-B10 (011-020), etc.
You can also choose the format and location of the encoded priority. It can be placed at either the
beginning or end of the task subject, and can be surrounded by bullets or tildes. Thus, if you have
the task “Weekly review” which receives an encoded priority of A01, you can use the dropdown
box to determine whether the task's name will be changed to “·A01· Weekly review”, “Weekly
review ·A01·”, “~A01~ Weekly review”, or “Weekly review ~A01~”.
9.2.8.2.3.5 2.3.5 User defined fields Tab
Many MLO properties do not map naturally to the built-in Outlook fields. Those that do are
mapped as shown in the following table (and are mapped bidirectionally, if you are using
bidirectional synchronization). This mapping is done automatically in all modes.
Outlook Field
ID#
Subject
Due Date
Start Date
Categories
Notes
Complete
MLO Field
Outlook ID#
Title
Due Date
Start Date
Contexts
Note
Status
You can choose to map additional MLO properties by checking “Fill the following User Defined
Fields in Outlook:”. When you check this option, the fields listed in the box will be created in
Outlook as User Defined Fields (UDFs) and mapped to the matching task properties in MLO.
Tip: UDF fields will not show up in normal Outlook views, but will be available for
advanced users creating their own views. To view these UDF fields in Outlook:
1.
2.
3.
4.
5.
6.
Set the UDF option in MLO.
Sync MLO > Outlook (or MLO <--> Outlook).
Open the folder in Outlook to which you synced the MLO data.
Right click on the header row of the table in Outlook and select "Field chooser".
Select "User-defined fields in folder" from the combo box.
Drag the needed MLO fields to the Outlook table header row.
User's Guide
More Advanced Features
101
9.2.8.2.3.6 2.3.6 Tab Buttons
The following buttons appear on all tabs, and perform the described functions:
OK – Exits the settings dialog and saves the selected settings.
Cancel – Exits the settings dialog without saving any changes.
Preset modes – Lets you change to any of the three preset modes, as described in section
2.3.1.
Import – Allows you to import from a file a set of settings created by another user.
Export – Allows you to save your current settings to a file for use by other users.
9.2.8.3
3. Notes and Troubleshooting
9.2.8.3.1 3.1 Changing MLO Outlook sync settings after sync operation
It is recommended to use the MLO --> Outlook sync action right after changing any critical Outlook
sync settings in MLO. Otherwise it can cause the resynchronization between MLO and Outlook
tasks. MLO will display this recommendation after you change the critical Outlook sync settings.
For example: if you want to change the Outlook sync settings after several MLO <--> Outlook sync
operations this is currently the most stable method:
1. Sync MLO <--> Outlook with the OLD (!) settings.
2. Change the settings.
3. Sync MLO --> Outlook (!) with the new settings.
4. Start MLO <--> Outlook sync (using the new settings).
9.2.8.3.2 3.2 Changing Outlook folder after sync process
3.2.1 If the Outlook folder was just renamed or moved inside the current pst file, MLO will detect
this situation and the sync process will continue with no changes.
3.2.2 If you change MLO sync setting to completely different Outlook folder, then all MLO tasks
will be disconnected from Outlook. So, after synchronization with new Outlook folder, all existing
MLO tasks will be considered as new tasks and will be processed according to the selected sync
action
9.2.8.3.3 3.3 Recurring task in both places MLO and Outlook
It is not recommended to set a task as recurring in both MLO and Outlook. Please set the items as
recurring in only one Program. Failure to do so will result in duplicated tasks and unexpected results
during the sync process.
User's Guide
102
Chapter 9
9.2.8.3.4 3.4 Deletion of a task in Outlook w hich has subtasks in MLO
If you delete a task in Outlook which has subtasks in MLO, all these subtasks are placed in a
<NewOutlookTasks> project after sync, because MLO does not know where these subtasks
should be linked after deleting the parent.
9.2.8.3.5 3.5. How backup and restore of your Outlook tasks could affect MLO sync
From the MLO FAQ:
Q: Outlook sync trashed my outline! All my tasks are in MLO <NewOutlookTasks> project
again.
A: Here is the situation: You have copied all your Outlook tasks to MLO, created the outline there
and everything worked well for some time. But after one of the sync all of your outlined tasks
appeared in the <NewOutlookTasks> again.
The reason is that one day you copied all your Outlook tasks into a backup Outlook folder then
deleted the original tasks and restored them from this backup folder. While restored tasks look
identical to you, they look different to MLO now. This is because the IDs of the tasks have been
changed. MLO uses only internal Outlook task IDs to identify tasks for sync. Thus, during the sync,
MLO deleted all your tasks in the outline and copied "new" Outlook tasks to the default project.
You can always identify what happened during sync, by reviewing Outlook sync log file (link to it is
placed in "Setup Outlook Sync" dialog).
9.2.8.3.6 3.6 The MLO Sync Log
If you have unexpected problems during synchronization, you can go to File | Setup Outlook sync
and click on “Open sync log”. This will display a log of all sync activity, which can be used in
troubleshooting the problem.
9.2.8.3.7 3.7 Misc Notes
Start Date without Due Date.
MLO allows you to set the Start Date of a task without setting a Due Date. Outlook. however, does not
support tasks which have a Start Date but do not have a Due Date. To resolve this situation, a special
date, 12/31/2900, is set for the Due Date in the Outlook task after sync from MLO. This date is
interpreted as an "empty date" when the task is synced back from Outlook to MLO.
9.3
Input parsing
MLO can parse -or interpret- the text you enter in some text input fields. For example you can enter "in
30 min" or "next Friday at 2pm" in date and time pickers.
In the Rapid Task Entry dialog, you can type "Call Bob about the party tomorrow at 3pm remind 10 min
in advance". The task "Call Bob about the party" will be added to the outline with corresponding
parameters parsed from the rest of the input.
You can also parse the task caption entered to the task list if you press Alt+Enter instead of Enter.
User's Guide
More Advanced Features
103
Parsing input in date time pickers
Date time pickers like Start, Due and Reminder can parse user's input and convert it to valid date and
time. Days of the week and months can be used in English and your current locale.
Here are the examples of valid input which can be converted to date and time:
tomorrow 3pm
in 5 days
Friday
(nearest Friday in future)
next Friday (next Friday after nearest Friday in future)
Tue 11:20
Jan26
August 26th
Nov 26 08
in 3 week s 2pm
in 3 week s Fri
in 30 min
in 2 months
today in 1h 25 min
next year
3-26-2008
26-3-2008
Parsing input in Rapid Task Entry dialog and Outline
If you want MLO to parse date and time from your input you should enter your tasks using the following
pattern:
<What?> <When?>
Examples:
Organize party with my friends 5/22
Call Jim tomorrow 4pm
Prepare report for Bob 15:10 22/5
Note: Parsing is deactivated in Rapid Task Entry dialog by default. To
activate it you should open this dialog, click Options button and check
Parse input like... check box.
Note: Date and time is parsed according to the rules applied for date time
pick ers described above.
Tip: use –s or –start to put the date only in the start date field when parsing in
RTE or the Outline: "Call Bob tomorrow -s"
Tip: use –d or –due to put the date only in the due date field when parsing in
RTE or the Outline: "Send report -due in 5d"
Tip: If MLO fails to parse your input correctly press Ctrl+Z in the main window
to return the original text to RTE change the text and try again.
User's Guide
104
Chapter 9
Reminder
If you add reserved words "remind" or "reminder", or the abbreviation "rmd" to the phrase, the reminder
will be set in MLO.
The pattern:
<What?> [<When?>] remind[er] I rmd [<When?>]
Examples:
Organize party with my friends May 22 reminder May 21 3pm
Call Jim in 3 days at 4pm remind 10 min in advance
Send report to Bob in 3 days remind me tomorrow 2pm
Call Jim tomorrow at 4pm remind me
Send report rmd 3pm
Context
If you add reserved words "context" or "@" to the phrase the contexts will be added to the task. The
contexts should be separated by semicolons (;)
The pattern:
<What?> [<When?>] [remind[er]] [<When?>] [context | @] <context1>; <context2>; <context3>
Examples:
Call Jim tomorrow context @office; @calls
Send report in 3 days remind tomorrow 10:00 @ ProjectX
Tip: If the context starts with "@" you can sk ip the reserved words. In this
case the first word which starts with "@" is interpreted as a context.
Example:
Call Jim tomorrow @office; @calls
Tip: you can use the +@ switch to add contexts to the task (not replace
them). Example: “Call Bob +@ phone” or "Buy ticket +@internet"
More complex inputs
You can use short and long week day names and names of months in English or in your current locale.
You can also use phrases like "today", "tomorrow", "next Friday", "in 3 week s", "in 4 week s Fri", "in 3
years", "in 2 months 1 week 4 days" etc. You can use abbreviation: d=day(s); w=week (s); m=month(s)
or = minute(s); min=minute(s); h, hr, hrs = hour(s).
Examples:
Send report
Send report
Send report
Send report
Send report
Send report
Send report
next Tue 11am
in 3 week s Monday 15:30 remind me tomorrow 10am
Jan 10
February8 2009 context
in 1 month 2 week s 1 day @ ProjectX; Reports
in 1 m 2 w 1 d
remind me in 3 hrs
Reserved words
MLO tries to interpret your input and separate reserved words from the task caption. However it is not
always possible. For example if you use numbers in the task caption, it may be interpreted as a date, or
User's Guide
More Advanced Features
105
you may want to use reserved words "reminder", "context" etc. If MLO fails to correctly parse your
entry, use quotation marks (") to separate you task caption from parameters that should be parsed.
Examples:
"Inform about meeting with Bob tomorrow 16:00" tomorrow at 16:00 remind me 10 m
"Send next reminder to Jim" tomorrow
The text inside quotation marks is not parsed and placed in the task caption.
Complete list of reserved words:
1) The week day names (short and log) in English and in your current locale (Mon, Monday, .. Sun,
Sunday)
2) Names of months (short and log) in English and your current locale (Jan, January... Dec, December
)
3) Numbers (0, 1..9)
4) The following words:
context,@, remind, reminder, next, in, after, before, day, days, d, month, months, m, year, years, y,
week , week s,
tomorrow, w, am, pm, p, h, hr, hrs, hours, hour, minute, minutes, min, mins, today, now
Additional parsing switches
Additional parsing switches can be used in Rapid Task Entry or Outline parsing
Additional parsing switches:
-i1 -i2 … -i5 : set Importance for the task 1=min .. 5=max
-u1 -u2 … -u5 : set Urgency for the task 1=min .. 5=max
-e1 -e2 … -e5 : set Effort for the task 1=min .. 5=max
-t<time> : set time required for the task. Examples –t10; -t2h15min
-tmax<time> : set time required max for the task
-l<time> : set lead time for the task. Example: -l2d; -l3d15m
-s or -start : the date will be placed in the Start field
-d or -due : the date will be placed in the Due field
-h : hide task in todo
-o : complete subtasks in order
-p : set IsProject option for the task
-f : set Folder option for the task
-g : set Goal option for the task
-fl<FlagName>: set flag for the task. Example: "Buy umbrella -flGreen"
-c<Color>: set font color for the task
-toprj<ProjectName> or -toprj=<ProjectName> : move task to a project. Example: "Paint wall toprjHome"
-tofld<FolderName> or -tofld=<FolderName> : move task to a folder
-to<TaskName> or -to=<TaskName> : move task to make it a subtask of specified task.
+@: add contexts to the task (not replace). Example: “Call Bob +@ phone”
-star or -* : set starred to the task. Example: "Call Mike tomorrow -star"
Example. Type this in the outline and press Alt+Enter when in-place editor is active:
“Call Katrin -t10 tomorrow 3p remind me 15 min in advance @calls -i1 -e4 -cr”
As a result of the parsing a task with the following parameters will be added to your outline:
Caption: “Call Katrin”,
User's Guide
106
Chapter 9
Due Date: tomorrow 3:00pm,
Reminder 2:45pm,
Context: @calls,
Time Required 10min,
Importance Max,
Effort: More,
Color: Red.
Parsing task caption in the Outliner
You can benefit from input parsing in the Task Outliner as well. To parse the task caption entered in the
Outliner, press Alt+Enter while you are in in-place editor mode. The task caption will be parsed
according to the rules described above.
Tip: If MLO fails to parse your input press Ctrl+Z several times to return to
the initial caption of the task .
See also
The Rapid Task Entry Dialog
Timing & Reminder
9.4
Drag'n'Drop
Drag & Drop operations can be used in MyLifeOrganized.
Drag & Drop inside MLO.
You can Drag & Drop MLO tasks from one branch to another. Depending on the options, the Contexts of
the task can be changed according to the new parent.
Alternative Drag & Drop
You can use the right mouse button for alternative Drag & Drop operations: Add to dependency and Add
links to notes. Just start the Drag process with the right mouse button and select the option from the
menu after the Drop.
Drag & Drop from Microsoft Outlook to MLO.
You can Drag & Drop items like e-mails, tasks, appointments etc from MS Outlook to MLO tasks. The
notes of the Outlook item are placed in the MLO task notes, together with additional parameters and a
link to the original item in Outlook. Multiple Outlook items can turn into multiple MLO tasks.
Note: if there are Outlook security warnings displayed during Drag & Drop
operations then download the redemption library from this location and
unzip it to the same folder where mlo.exe is installed.
See also
Actions on Tasks
Outliner
User's Guide
More Advanced Features
107
Options:Behavior
9.5
The Rapid Task Entry Dialog
It is very handy to use the Rapid Task Entry dialog to quickly add tasks to MyLifeOrganized while you
are working in other Windows applications. Rapid Task Entry can be configured to be accessed from the
MLO tray icon and via a hotkey. This dialog is also always accessible from MLO's main menu: View >
Rapid task entry window.
Text entered in Rapid Task Entry can be parsed to set specific options of a task before placing it in
MLO. For example if you enter "Call Jim tomorrow 3pm remind me 10 min in advance", the task "Call
Jim" will be added to MLO with the specified date, time and reminder. See Input parsing for more details.
To enable the Rapid Task Entry in MLO tray:
1. Open the application's Options dialog by selecting Tools > Options... from the menu..
2. Select the Rapid Task Entry dialog option page in the options tree on the left.
3. Check the Enable rapid task entry dialog from tray icon check box.
Note: for advanced dialog options see Options: Rapid Task Entry Dialog
To activate the Rapid Task Entry dialog from tray:
1. This function must be enabled as described above.
2. Now Right-click on MLO's system tray icon to open the tray menu.
3. Select the Rapid task entry... menu item.
Tip: You can assign a hotk ey to activate the Rapid Task Entry dialog at any
time. The default hotk ey Ctrl+Shift+M, is already set for you, but can be
changed.
To select a default task parent
To select a default task parent for your task entry, click the Parent button and choose a task from the
Select Task dialog.
Advanced options.
Click "Options" button to open advanced settings for Rapid Task Entry dialog which are described
below.
The Rapid Task Entry dialog works in two modes Multiple task entry and Single task entry.
To select Multiple task entry mode
Check the Multiple task entry check box
User's Guide
108
Chapter 9
In this mode, each text line will be interpreted as a separate task when you press the Add task(s)
button. You can use indentation to create subtasks.
To select Single task entry mode
Uncheck the Multiple task entry check box
In this mode, only one task will be added to the MyLifeOrganized application when you press the Add
task button. If the text you entered has more than one line, the first line will be used for the task name
and the entire text (including the first line) will be placed in the task note.
To enable parsing of the input
To enable parsing of the input, check Parse input like.... The input "Call Jim tomorrow 3pm remind me
10 min in advance" will be parsed before adding the task to MLO. See Input parsing for more details.
To inherit parent Contexts
If you want the entered task(s) to inherit the Contexts of the parent task, check the Inherit parent
Contexts check box. If you uncheck this option, you will be able to specify Contexts for the entered
task(s).
See also:
Options: Rapid Task Entry Dialog
Input parsing
9.6
Alternative complete
Alternative complete is a way to complete a task with some additional actions.
To use alternative complete instead of simple task complete just hold down the Ctrl key while you check
the task with a mouse click or with the space bar.
Right now the following additional actions are performed on alternative complete:
1) A completed copy of the task is created instead of the original task completion
2) The original task is moved to the end of the branch (if you completed it in the Outline) or to the end of
the current list (if you completed it in the To-Do).
Note: These additional actions are useful if you are using the Autofocus task
management system (by Mark Forster) or another system which requires these actions.
See also
Actions on Tasks
9.7
Printing and Reporting
You can print the tasks from the task list. The current view is used to generate print report.
User's Guide
More Advanced Features
109
To print tasks:
1. Select File > Print from the menu
2. In the Print dialog, select the Print template you want to use
3. In the Print what, select Current selection or All tasks in view
4. Click Print button
Tip: If you want to print only expanded items in the outline select Expanded
only check box
Tip: You can enter a custom title for your report in Report Title
Note: Before printing, each report is saved to a file. The default file name is
MLOPrint.htm and you can change this name in the Output file edit box.
If you click Open in browser, the current report will be opened in your default browser. Depending on
the print template you have selected you may setup the report in the browser and use the browser's print
functionality to print it.
Advanced options are available if you click Advanced button. You can select the information you would
like to include to your print report.
To limit the number of lines to be printed for each task notes select Limit notes to XX lines check
box.
Note: Lines are defined by the Return character. When typing a note, press
Enter to start a new line.
The Reset template button will restore the default print templates from resources. Press this button if
you edited the templates and want to revert all your changes to default.
The print templates are placed in a Reports sub folder:
Outline Style.mrpt - print template for Outline style reports
Memo Style.mrpt - print template for Memo style reports
You can use existing templates as an example to create your own print templates. If you place your
templates into the Reports sub folder, they can be used for printing.
See also
Import/Export
Printing PocketMod
9.8
Printing PocketMod
MyLifeOrganized can generate PocketMod-style reports. PocketMod is a piece of paper you can cleverly
fold into a small booklet. Each page of this booklet can contain different information you select.
More info about PocketMod.
How to print PocketMod using MyLifeOrganized
1. Select menu File > Print Pock etMod...
2. From the list on the left select a PocketMod profile or create a new one by clicking New.. button on
User's Guide
110
Chapter 9
the top.
3. Customize each page of the PocketMod on the right by clicking on the Setup... link for appropriate
page.
4. Click "Preview & Print" to open your PocketMod in MS Word.
When you customize PocketMod pages you can select from the following options:
Cover: prints a cover page with name of the MLO owner.
Blank : prints blank page
To-Do View: prints the current To-Do view with specified parameters. You can split a view on several
PocketMod pages by selecting "Print View Page#" parameter which specifies what page should
be taken from the view. So you can place View Page# 1 on the PocketMod Cover and View
Page# 2 on another PocketMod page.
Note: the settings for the views split across pages should be identical so that
pages are split correctly.
Outline/One task : prints selected task with its notes or branch of the outline.
Widget: prints different widgets like Lines or Day Hourly schedule. Widgets can be also imported
from files. RTF is used to create widgets. See example of PocketMod widget in this file:
<MLO>\Reports\PocketMod\Weekly.rtf
Note: The Microsoft Word application is needed to print MyLifeOrganized
Pock etMod
Tip: If your Pock etMod does not fit into the page, click Global Settings and
select Report template (for A4 or Letter), number of lines printed on each
Pock etMod page and width of each line in pixels. Adjust these parameters for
the Pock etMod to fit your page.
See also
Printing and Reporting
9.9
Archiving
Archiving is a way to backup or delete old completed tasks from MyLifeOrganized.
Depending on the configuration, completed tasks that are over a certain age can be moved to an archive
data file, copied to an archive data file or deleted permanently.
Archiving can be run manually or automatically according to a schedule you set in the AutoArchive
feature.
See also
Archiving Manually
Archiving Using AutoArchive
AutoArchive settings
Advanced Backup of Data Files
User's Guide
More Advanced Features
9.9.1
111
Archiving Manually
Manual archiving allows you to run archiving at any moment for the selected branch or for the entire
outline.
How to run archiving manually
1. On the File menu, click Archive....
2. Configure manual archive settings (see below)
3. Click OK
Configuring manual archive settings:
Archive all tasks according to default settings
Set this option to archive the entire outline according to default AutoArchive settings. Click the Default
Archiving Settings button to configure these settings.
Archive tasks from selected branch only
Set this option to archive only the selected branch according to custom archive settings (see below).
Clean out tasks completed before <date>
This option sets how old completed tasks must be, to be archived. The task must have been completed
before this date to be archived.
Clean out completed tasks only with all subtasks completed
Check this option if you want to archive only the tasks for which all subtasks are completed. Otherwise,
a task with uncompleted subtasks will be ignored during archiving even if it is old enough for archiving.
Include tasks with "Do not archive branch" checked
This overrides the option Do not archive tasks in this branch for a task and archives it anyway. See
Archiving Using AutoArchive for more details on the "do not archive branch" option.
Copy old tasks to archive:
Specify a data file where you would like to copy or move old tasks.
Remove old tasks after copy (i.e. move to selected archive)
If you set this option, the original archived tasks will be removed from the current data file after being
copied to the archive file.
If you clear this option, archiving will just copy old tasks to the selected archive file. This could be useful
if you want to review archived tasks before removing them from the current data file.
Permanently delete old tasks
If you select this option old tasks will be deleted permanently during archiving.
See also
Archiving Using AutoArchive
9.9.2
Archiving Using AutoArchive
MLO can perform archiving automatically, every N days. To activate this feature, you should setup
AutoArchive settings.
User's Guide
112
Chapter 9
How to setup AutoArchive settings
1. On the Tools menu, click Options, and then click the AutoArchive.
2. Check Run AutoArchive every N days
3. Setup other AutoArchive settings (see AutoArchive settings for more details).
4. Click OK
Note: Once configured, the AutoArchive procedure starts on the specified
day, a few minutes after you open the MLO data file.
If you do not want a task and all its subtasks to be archived, check option Do not archive tasks in this
branch for this task:
How to set "do not archive branch" option
1. On the Task menu, click Advanced and then click Properties...
2. Select the AutoArchive tab
3. Check Do not archive tasks in this branch
Note: archiving is not performed in the following cases:
1) Completed subtask s from open projects. Complete the project to archive
its completed subtask s
2) Completed subtask s of the recurrence task s
3) Completed task s if other task s depend on these task s with delay
See also
Archiving Manually
AutoArchive settings
9.10
Using the Command Line
You can perform certain operations on your MLO data files or tasks by using the command line.
To work with MLO from the command line:
1.
To display the list of available commands run the following command-line command:
mlo.exe /?
The following command-line syntax for MLO is displayed in a dialog box.
mlo.exe [<FileToOpen>] [-QuickSync] [-PocketMod="<PocketMod Profile>"] [-task=
{TASKGUID}] [-zoom={TASKGUID}] [-AddSubtask="<TaskCaption>"] [-Parse] [saveXML="<FileName>"] [-saveML="<FileName>"] [-console] [-help|-?]
The parameters represent the operations you can perform. The following parameters are available:
Parameter
Meaning
<FileToOpen>
Opens the specified MLO data file in MLO. The file must be in MLO
binary or MLO XML format.
Note: You can specify a relative or absolute path to the file.
-task
Selects the task with the specified GUID in the Outline. Put the
<FileToOpen> parameter before this parameter to specify the MLO
User's Guide
More Advanced Features
113
data file that contains the task. Make sure that the task's GUID is
enclosed in braces: { }.
Tip: To view a task 's GUID, select the task in the Outline, right-click
and select Advanced >Properties. The Task ID box on the System
properties tab displays the task 's GUID.
-zoom
Zooms in on the task with the specified GUID. Put the <FileToOpen>
parameter before this parameter to specify the MLO data file that
contains the task.
-AddSubtask
Adds a new subtask to the task with the GUID specified in the task
parameter. Enclose the name of the subtask in quotation marks. Put
the <FileToOpen> parameter before this parameter to specify the
MLO data file that contains the task.
-Parse
Use parsing when adding new subtask with parameter -AddSubtask
-QuickSync
Executes sync operation as if you press "Tools >Synchronize" in
MLO.
You can use this command to setup periodical sync in Scheduled
Tasks.
Example:
mlo.exe D:\MLO\home.ml -quicksync -console
Notes:
MLO v.4+ includes new cloud auto-sync functionality. It is
not needed to use this parameter with cloud sync
anymore
-PocketMod
="<ProfileName>"
Creates and opens for preview selected PocketMod profile.
Example:
mlo.exe D:\MLO\home.ml -pocketmod="ActiveTasks"
-saveXML
Save the MLO data file specified by <FileToOpen> as a new MLO
XML file. Enclose the file name of the new XML file in quotation marks.
Notes:
· You must specify a different file name for the new file. MLO will
not overwrite any existing files.
· If you want to save the file to a folder other than current folder,
specify an absolute or relative path to the file.
-saveML
Save the MLO data file specified by <FileToOpen> as a new MLO
binary file. Enclose the file name of the new file in quotation marks.
Notes:
· You must specify a different file name for the new file. MLO will
not overwrite any existing files.
· If you want to save the file to a folder other than the MLO folder,
specify an absolute or relative path to the file.
-console
User's Guide
Performs the command in console mode (without displaying the MLO
user interface). If this command is specified then MLO exists after
processing the commands.
114
Chapter 9
-help
Displays the MLO command-line syntax dialog box.
Examples:
mlo.exe MyDataFile.ml -task ={213DCA87-6D2E-254D772616FA} AddSubtask ="NewSubtask #1"
mlo.exe MyDataFile.ml -SaveXML="d:\path\MyXML.xml" -console
2.
Run the appropriate command.
The following ERRORLEVEL values can be returned.
ERRORLEVEL
Meaning
0
The command was executed successfully.
1
The command failed because it contains an invalid argument.
2
The command failed because an existing file was specified in the saveXX command. MLO will not overwrite any existing files.
3
The command failed because a data-writing error (for example, a
"disk full" error) occurred.
100
The command failed because an error other than a data-writing error
occurred.
User's Guide
Chapter
X
116
10
Chapter 10
Options
All MyLifeOrganized settings are accessible in the Options dialog.
To open the MLO options dialog:
1. Select menu Tools > Options...
2. Select the option page you need in the tree on the left part of the dialog.
10.1
Current MLO data file
The Current MLO Data File Options are stored in the current MLO data file. In other words, you can set
different options for different *.ml files.
10.1.1 Appearance
This options page allows you to setup the controls which should be visible in MLO. These parameters
are stored in the current MLO data file.
Importance/Urgency
Check to show Importance and Urgency controls in the General
property section
Contexts
Check to show all Contexts related controls: Contexts tab, Contexts in
the General property section
Goals
Check to show the Goals group box in the General property section
Timing & Reminder
Check to show the Timing & Reminder property section
Review
Check to show the Review property section
Effort
Check to show the Effort property section
Project
Check to show the Project property section
Dependency
Check to show the Dependency property section
Task Format
Check to show the Format property section
Task Statistics
Check to show the Task Statistics property section
See also
Understanding of Main Window
10.1.2 Automatic Formatting
Here you can setup Automatic Formatting rules.
See also
Automatic Formatting
10.1.3 To-Do List Ordering Options
This options page allows you to adjust the parameters used in the task list ordering algorithm when
Computed-Score is used to sort tasks. These parameters are stored in the current MLO data file.
User's Guide
Options
117
Weight factors (Due date, Start date, Weekly goal)
These settings control how greatly each parameter affects the position of the task in the task list. The
higher you set a weight, the more influence the parameter will have on the list ordering.
Use increased priority for overdue tasks - check this option to boost priority of overdue tasks
Prioritization method
This option represents which slider (Importance, Urgency or both) will affect the position of the task in
the task list.
Restore all Tasks to normal Importance and Urgency...
Click this button to reset Importance and Urgency parameters of all tasks to the Normal value.
Note: The Restore default button will reset all Computed-Score Priority
parameters to their default values.
For more details on how these parameters are used in the to-do list ordering please refer to the topic on
Computed-Score Priority.
See also
Understanding Task List Ordering
To-Do List
10.1.4 To-Do List Format
The To-Do list format options page allows you to set up the parameters which are used in formatting the
tasks in the To-Do list. For example, you can start each task in the To-Do list with its project name.
To encode the project name in To-Do list tasks
1. Choose Tools > Options from the menu and click on To-Do list format in the options tree on the left.
2. Check the Encode additional information for tasks on the To-Do list check box.
3. On the Projects tab, set the Encode project name check box.
4. Select whether you want the Immediate or Top level project to be displayed for tasks.
5. Enter the start and end string that will be used around the project name to separate it from the task
name.
6. Select Prefix if you want the task name to be preceded by the project and Postfix if you want the
task name to be followed by the project name.
7. Click OK.
To encode the project path in To-Do list tasks
1. On the To-Do list format options page, check the Encode additional information for tasks on the
To-Do list check box.
2. On the Task path tab, check the Encode task path check box.
3. Enter the task path depth, character limit. and separator character.
4. Enter the start and end string that will be used to separate the task path from the task name.
User's Guide
118
Chapter 10
5. Select Prefix if you want the task name to be preceded by the path and Postfix if you want the task
name to be followed by the path name.
6. Click OK.
Tip: In the Example section, you can review how task s will be displayed in
the To-Do list with the current settings.
See also
The To-Do list
10.1.5 WiFi Synchronization
WiFi Synchronization allows you to synchronize MLO-Windows with MLO on mobile devices (such as
iPhone) connected to the same WiFi network. The data transfer performed to your device directly. You
can sync only if you located near your PC with MLO-Windows running on it.
This options page will help you to pair with your mobile device. It displays the current status of WiFi
sync pairing for the opened file and additional information and instructions.
See also:
WiFi Synchronization
MyLifeOrganized Cloud
10.1.6 AutoArchive
You can setup AutoArchive settings to instruct MLO to perform archiving of old completed tasks
automatically every N days .
Run AutoArchive every NN days
Check this option to enable the AutoArchive feature.
Prompt before AutoArchive runs
Check this option if you want MLO to show a message before archiving begins.
Clean out tasks completed more than XX ago
This option shows how old completed task should be, to be archived.
Clean out completed tasks only with all subtasks completed
Check this option if you want only tasks with all subtasks completed to be archived. Otherwise, a task
with uncompleted subtasks will be ignored during archiving even if it is old enough for archiving.
Copy old tasks to archive:
Specify a data file where you would like to copy or move old tasks.
Remove old tasks after copy (i.e. move to selected archive)
If you set this option the original archived tasks will be removed from the current data file after copy to
archive file.
If you clear this option, archiving will just copy old tasks to the selected archive file. This could be useful
if you want to review archived tasks before removing them from the current data file.
Permanently delete old tasks
User's Guide
Options
119
If you select this option, old tasks will be deleted permanently during archiving.
Note: Once configured, the AutoArchive procedure starts on the specified
day, 3 minutes after you open the MLO data file.
See also
Archiving
Archiving Using AutoArchive
Advanced Backup of Data Files
10.1.7 Password protection
You can enter a password to open current MLO data file.
Note: it is not possible to restore your password for the MLO data file or open
this file without password.
10.2
General Application Options
The General Application Options are stored in the Windows registry and take effect in all instances of
the MLO application.
10.2.1 Themes and Formatting
On this options page you can choose themes and formatting for the MLO application. These parameters
are stored in the Windows registry and are in effect for all MLO instances.
Themes
Theme settings are used to change font and color for standard elements like Tasks, Projects, Folders,
Selection, Notes, Outline etc. You can select one of the predefined themes or create your own.
Tip: To format task s using rules based on their properties, use Automatic
Formatting
Tip: To change the format of individual task s, use Custom Formatting
Date and Time Format
This option represents the format of the date and time as it is shown in the task tree. You can select
different formats for different type of tasks. For example, future tasks can show the full date, while tasks
scheduled for this week can show only the day of the week.
The format string is used to define the date and time format. For example: d mmm yy ddd (R)
Here are the various date time format strings:
d
Displays the day as a number without a leading zero (1-31).
dd
Displays the day as a number with a leading zero (01-31).
ddd
Displays the day as an abbreviation (Sun-Sat) using the strings given by Window' regional
settings.
dddd
Displays the day as a full name (Sunday-Saturday) using the strings given by Windows
regional settings.
User's Guide
120
Chapter 10
ddddd Displays the date using the short format given by Windows regional settings.
ddddd Displays the date using the long format given by Windows regional settings.
d
m
Displays the month as a number without a leading zero (1-12).
mm
Displays the month as a number with a leading zero (01-12).
mmm Displays the month as an abbreviation (Jan-Dec) using the strings given by Windows regional
settings.
mmm Displays the month as a full name (January-December) using the strings given by Windows
m
regional settings.
yy
Displays the year as a two-digit number (00-99).
yyyy
Displays the year as a four-digit number (0000-9999).
/
Displays the date separator character given by Windows regional settings.
:
Displays the time separator character given by Windows regional settings.
'xx'/"x Characters enclosed in single or double quotes are displayed as-is, and do not affect
x"
formatting.
R
Displays number of days from today in long format: “in 3 days”, “– 5 days”
r
Displays number of days from today in short format: “+3d”, “–5d”
See also
Automatic Formatting
Custom Formatting
Understanding the Main Window
10.2.2 Behavior
Behavior options are used to setup MLO application behavior. All parameters listed here are stored in the
Windows registry and are in affect for all MLO instances.
Always show icon in system tray
Check to show the MLO icon in the system tray when MLO is
running.
Escape minimizes the application If set, the MLO application can be minimized by pressing the
Escape key
Minimize to system tray
If set, the minimized MLO application does not appear, neither
in the task bar nor in the Alt+Tab list. You can activate MLO by
clicking on the icon in the tray or using the MLO shortcut.
Close to system tray
If set, the Close Window icon will actually minimize the MLO
application. You can still exit the MLO application by selecting
menu File > Exit.
One click edit mode
If this option is set, you need only one mouse click to edit a
task caption in the task list.
Save window position
If this option is set, the MLO application stores its last window
position.
Associate with *.ml files
Associates MLO data files with the MLO application, so that
double-clicking an mlo file launches MLO and opens that file.
User's Guide
Options
121
Allow multiple instances
Set this option if you want to be able to run multiple instances
of the MLO application. Otherwise only one instance is allowed.
When Drag & Drop task to a new
parent
You can configure to inherit Contexts of the parent task when a
task is moved to another parent. If option "Ask what to do with
Contexts of moved task " is set a confirmation dialog will be
shown each time you Drag & Drop or move a task.
System Shortcut Key
You can select any shortcut to activate/deactivate the MLO
application.
See also
Understanding of Main Window
10.2.3 Auto-Save Files
There are two modes for saving your MLO data file. These parameters are stored in the Windows registry
and are in effect in all MLO instances.
Save all changes automatically
All your changes are saved to the data file automatically right after you made the modifications
User manually saves the changes
You need to click Ctrl+S to save your data file after changes as you usually do with document editors.
Critical updates like synchronization are still saved automatically in this mode
See also
Auto-save
Create, Open and Save MLO Files
Import/Export
Backup
10.2.4 The Rapid Task Entry Dialog
The Rapid Task Entry dialog option (accessed from Tools > Options) allows you to set up the behaviour
of the Rapid Task Entry dialog. The parameters you set are stored in the Windows registry and are
applied to all MyLifeOrganized instances.
Enable Rapid Task Entry dialog from tray icon Enables this advanced feature
Close dialog after adding task(s)
If this option is checked, the dialog will close
automatically when you press the Add task(s)
button.
Stay on top
The Rapid Task Entry dialog will stay on top of all
other Windows applications.
Clicking on tray opens Rapid Task Entry
dialog
If this option is checked, left clicking on the MLO
system tray icon will activate the Rapid Task Entry
dialog rather than open the MyLifeOrganized main
window.
Place additional text in task note if text
entered is greater than XX characters
If the name of a task you have entered in the Rapid
Task Entry dialog is longer than XX characters, the
task name will be truncated and the entire text will
User's Guide
122
Chapter 10
be placed in the task note.
Inactivity transparency
For Windows 2000/XP, the transparency can be
set for the dialog when it is inactive.
Hotkey
This option allows you to change the system
shortcut key, which can be used to activate/
deactivate the Rapid Task Entry dialog at any
time.
See also
Rapid Task Entry Dialog
10.2.5 Backup
On this page, you can configure how MLO should backup your data files.
Perform advanced backup for each data file during saving
Enables advanced backup functionality.
Keep last N backups of each data file as: <file>.ml-(NN).bak
MLO stores the last N copies of your data file, renaming them according to the given template.
For example if you set this option to 3 you will have the following files in your backup folder:
myfile.ml-(01).bak
myfile.ml-(02).bak
myfile.ml-(03).bak
In this example myfile.ml-(01).bak is the most recent file.
Tip:set this option to 0 to disable k eeping the last N back ups.
Backup in:
A folder where all backup files will be placed.
Keep daily backups as: <file>.ml-YYYY-MM-DD.bak
MLO stores one copy of your data file for each day, renaming it according to the given template. You
can select a custom folder for daily backups.
Keep weekly backups as: <file>.ml-YYYY-(NN week).bak
MLO stores one copy of your data file for each week, renaming it according to the given template. You
can select a custom folder for weekly backups.
Keep monthly backups as: <file>.ml-YYYY-(NN month).bak
MLO stores one copy of your data file for each month, renaming it according to the given template. You
can select a custom folder for monthly backups.
Restore default
Click to restore default backup settings.
Note: Back up settings are application related and stored in Windows registry.
User's Guide
Options
123
This means that once configured they will be used for back ing up all
MLO data files for the current user on this computer .
Tip: To recover from a back up, simply open the back up data file (*.bak ) in
MyLifeOrganized application (menu: File >Open)
See also
Advanced Backup of Data Files
Auto-save Files
Archiving
10.2.6 E-mail Account
On this page, e-mail SMTP settings are configured. These settings are used to send e-mails from MLO.
10.2.7 Hot Keys
The Hot Keys section of the General Application Options dialog box lists the default keyboard
shortcuts (hot keys) for the most common MLO functions and commands. You can customize the
keyboard shortcuts by changing the default keyboard shortcuts to the keys or combinations of keys that
you want to use.
To customize the keyboard shortcuts:
1.
2.
3.
4.
5.
6.
Select Tools > Options > Hotk eys
In the Hot Keys list, select the command or function that you want to assign a different keyboard
shortcut to.
In the Hotkey box, press the key or combination of keys that you want to assign. For example,
press SHIFT plus the key that you want to use.
Click Modify.
Repeat steps 1–3 to change the default keyboard shortcut for each additional function or command.
Click Apply or OK to save the change to the keyboard shortcut assignment.
Notes:
·
You can restore the k eyboard shortcut assignments to their default
settings by click ing Reset All.
·
You can remove the k eyboard shortcut assigned to a function or
command by selecting that function or command and click ing Clear.
See also:
Keyboard Shortcuts
10.2.8 Troubleshooting
This page is used to enable additional logging in MyLifeOrganized for troubleshooting and sending logs
to support for investigations of possible issues.
User's Guide
Chapter
XI
126
11
Chapter 11
Technical Support
If you have a question about MyLifeOrganized, you can:
1. Consult the MyLifeOrganized help and on-line documentation
2. Access our Frequently Asked Questions. There is a good chance that you'll find the answer to your
question there.
3. Post a message to the MyLifeOrganized community. People are very friendly there and can help you
with any MLO questions you may have.
4. If you can't find the answer from any of these sources, feel free to send an e-mail message to
[email protected]
User's Guide
Chapter
XII
128
12
Chapter 12
License Agreement
MyLifeOrganized Application - End User License
There are two versions of the MyLifeOrganized application:
1. Free 45-day Trial Version
2. Registered version (Standard Edition or Professional Edition).
You can find out what version you have by checking the About window at Help >About menu.
Please read the license agreement below. If you disagree with this agreement, please delete all
MyLifeOrganized application files from your computer.
Free 45-day Trial Version
You may freely distribute 45-day Trial Version to any number of people. Any user who installs and runs
the trial version is automatically subject to this license agreement.
You may not charge money for the Trial Version in excess of the distribution media and handling costs.
You may not misrepresent the program origin, claim the authorship, alter the program files, and
distribute the program without license file or help file. Reverse engineering, decompiling and
disassembling the program is strictly prohibited.
After using the program for 45 days you may either purchase the fully functional version of
MyLifeOrganized (Standard Edition or Professional Edition) or stop using the program and uninstall it
from your computer's disk. Use of this software after the trial period of 45 days is in violation of
international Copyright law!
Registered version (Standard Edition or Professional Edition)
When you purchase the fully functional version of MyLifeOrganized, one user license is granted to you.
You may choose from two editions of the application: Standard Edition or Professional Edition. You may
make copies of the software for backup purposes and to install it on up to five computers, as long as
only one person uses the software. This way, you may install it at home and in office for your personal
use. Additional licenses are necessary if more than one person is using the program.
Along with the license to use the software you will receive free updates of MyLifeOrganized to all new
minor versions in appropriate Edition. Anyone that bought the full (professional) version would get free
upgrade to all new updates (including major) released within 12 months from the date of their purchase.
Please visit the MyLifeOrganized application website at www.mylifeorganized.net for additional
information about acquiring the fully functional version.
Liability
Although we tried to make the MyLifeOrganized application as bug-free as possible, no software is
completely error-free. Descriptions of the bugs will be gladly accepted, but we cannot guarantee that we
will be able to correct them.
MYLIFEORGANIZED SOFTWARE IS PROVIDED "AS IS" WITHOUT WARRANTY OF ANY KIND,
EITHER EXPRESSED OR IMPLIED, INCLUDING BUT NOT LIMITED TO THE IMPLIED WARRANTIES
OF MERCHANTABILITY AND/OR SUITABILITY FOR A PARTICULAR PURPOSE.
User's Guide
License Agreement
129
THE USER ASSUMES THE ENTIRE RISK OF ANY DAMAGE CAUSED BY THIS SOFTWARE.
IN NO EVENT SHALL THE CREATOR OF THIS SOFTWARE BE LIABLE FOR ANY SPECIAL,
INCIDENTAL, INDIRECT, OR CONSEQUENTIAL DAMAGES WHATSOEVER (INCLUDING, WITHOUT
LIMITATION, DAMAGES FOR LOSS OF BUSINESS PROFITS, BUSINESS INTERRUPTION, LOSS OF
BUSINESS INFORMATION, OR ANY OTHER PECUNIARY LOSS) ARISING OUT OF THE USE OF OR
INABILITY TO USE THE SOFTWARE PRODUCT OR THE FAILURE TO PROVIDE SUPPORT
SERVICES.
(c) 2003-2015, MyLifeOrganized.net. All rights reserved.
User's Guide
Chapter
XIII
132
13
Chapter 13
Glossary
Listed here are terms that are commonly used in MyLifeOrganized (MLO), many of which have meanings
in this context that differ from everyday usage.
Note that within each definition, terms that are defined elsewhere in the
glossary are capitalized and colored blue.
Action – A piece of work that needs to be completed to accomplish a Goal.
Child Task – One of a group of smaller tasks that must be completed in order to complete a larger
Parent Task.
Completion Percentage – A number that is calculated for a Project, based on how many Subtasks of
the project are completed and how much Effort is required for each subtask.
Context – A particular location or situation in which a Task can be completed. A Context can also
include other Contexts in the hierarchy and can have Open/Close Schedule.
Due Date – The final date by which a Task absolutely must be completed.
Effort – An estimate of the amount of energy needed to accomplish a task. The amount of time needed
for the task's completion can also enter into this estimate; however, MLO has a separate Time Required
estimate, so the concentration here should be on the energy required.
Export – To save an MLO file in a format that makes it usable by another application.
Goal - A user's aim; the end to which Effort is directed. Any Task in the Outline can be indicated as a
weekly goal, monthly goal or yearly goal. The special Goals view is designed to easily review all your
goals.
Import – To insert tasks from a file that has been saved by another application, in a non-MLO format.
Importance – A judgment of how critical a Task is to the completion of its Parent. In MLO, importance
is not an overall rating of priority relative to all tasks. Rather, importance is set with regard to completing
the immediate Parent Task. Importance is also distinct from Urgency. It is possible (in fact, quite
common) for an unimportant task to be urgent; obviously, important tasks are not always urgent.
Lead Time – The number of hours or days that will be needed in order to complete a task by its Due
Date. Lead time is used to calculate the Start Date (due date – lead time).
Open/Closed Schedule – The hours during which a particular Context is available for accomplishing
tasks.
Outline – A list of Goals, Projects, and other Tasks displayed in a way that shows the relationships of
Subtasks to their respective Parents. Starting from MLO v.4 the Outline can be filtered, sorted and
grouped according to different settings and saved as View.
Parent or Parent Task – A task which contains or includes multiple Subtasks which must be
completed before the parent task is considered to be complete.
Project – In general terms, any Task that has Subtasks. In MLO you can indicate that a certain task is
User's Guide
Glossary
133
a Project by setting the special task property. All marked projects are included in the Projects view.
Start Date – The date by which a Task must be begun in order to complete it by its Due Date. Also the
first day a Task will appear in the To-Do List.
Subtask – A group of Tasks that must be completed in order for their Parent Task to be completed.
Task An item of work that needs to be completed. In general terms, a task can be either a single item
of work or a larger piece of work that can be broken down into easier, quicker Subtasks. In MLO any
task can be converted to a Goal or Project.
Time Required - An estimate of how long it will take to complete a task.
To-Do List – A non-hierarchical list of Tasks that require attention. The To-Do List can be filtered, sorted
and grouped according to different settings saved as To-Do List View.
Tree – Another name of the Outline.
Urgency – A measure of how necessary it is to complete a Task immediately. An urgent task is one
that has a deadline in the near future.
View – A particular way of displaying a filtered, sorted and grouped Tasks.
XML – A standard format that is recognized by various types of applications and that allows files to be
shared between those applications.
Zoom in – To display only a single branch of the Task Tree to avoid interference from other tasks. Only
items in this branch are displayed in the Outline and in the To-Do List.
Task GUID - Globally Unique Identifier of the Task or Task ID. To see the GUID of the task select menu:
Task > Advanced > Properties
Example of the Task GUID: {F9BA410A-AB32-41BB-AE04-869F0F490981}
Workspace - tabs on the top of the MyLifeOrganized application. The Workspaces are used to store
and quick access the particular configuration for the selected view, additional filter controls, zoom,
selected tasks etc. The Workspaces can show different parts of the same data files in different views.
For example, in one tab you can work on a current project in the other – view a small household chores
and the third tab -handle the Inbox.
User's Guide
Index
created
67
creating
70
context
70
task
30
Index
-AAction Filter
41
Actions
37
Activation Code does not work
Active Actions
37
Advanced Filter
41
advanced task properties
68
alert
62
Alternative complete
108
archiving
110
archiving manually
111
AutoArchive
111
Autofocus
108
Automatic cloud sync
87
automatic formatting
78
automatic resetting of subtasks
auto-save
23
-D9
-Bbackup
20, 23
bookmarks
36
-CCloud sync
86
collaboration
89, 90
Collaboration using Cloud
90
Columns
51
command line
112
complete subtasks in order
58
completed
67
Completion Filter
41
completion percent
65
Computed-Score Priority
45, 46
more details
46
Context
56
contexts
70
creating/deleting
70
included contexts
71
open/closed hours
71
options
71
User's Guide
Default outline views
29
Delayed dependency
64
deleting
70
context
70
task
31
demo file
21
Dependency
64
do not archive task
68
do not create a completed copy
drag&drop
31
drag'n'drop
106
drag'n'drop from Outlook
106
due date
59
60
-Eedit completion date
effort
63
68
-FFilter Controls
41, 43
Filtering
41
find
22
flags
67
flash drive
9
folder
58
fonts and color
119
format dates
119
formatting
119
-Ggeneral options
119
getting started
12
Glossary
132
goals view
58
Grouping
45
GUID
132
60
135
136
Index
AutoArchive
118
automatic formatting
116
auto-save files
121
backup
122
behavior
120
email
123
hot keys
123
password protection
119
rapid task entry
121
themes
119
to-do list format
117
to-do list ordering
116
troubleshooting
123
wifi sync
118
options of current data file
116
Ordering of To Do list
45
outline
26, 27
Outline views
29, 39
outliner
27
outlook sync
92
-Hhide task in to-do
58
Hierarchy Filter
41
how it works
16
-Iimport/export
20
importance
57
input parsing
102, 107
installing
8
-Kkeyboard shortcuts
74
customizing
123
-L-
-P-
lead time
59
License Agreement
128
logs
123
Lost Activation Code
9
PocketMod
109
Print
108, 109
printing
reporting
108, 109
project
65
projects view
65
purge completed tasks
110
-Mmain window
12
Manual ordering
45
mlo://
35
modifed
67
monthly goals
58
-R-
-NNext Actions
37
-OOnline Activation Service
open file
20
open/closed hours
71
options
116
appearance
116
9
rapid task entry
107
rearranging tasks in outline
31
recover from backup
20
recurring behavior
60
registration
Activation Code
8
registration for offline computer
8
reminder
62
removable media
9
reoccurrence
60
Review
65
User's Guide
Index
-Ssearch
22
search as you type
22
searching
22
send logs
123
set task as project
65
skip occurrences
60
Sorting
45
Starred
68
start date
59
subtask
30
Sync with BlackBerry
88
synchronization
79
between work and home computers
91
collaboration
90
portable scenarios
91
resolving synchronization conflicts
92
with Microsoft Outlook
92
synchronization conflicts
resolving
92
synchronization items
using for collaboration
90
using for portable scenarios
91
synchronization profile
adding
80
deleting
85
editing
85
exporting
85
importing
85
synchronizing data files with
83
Synchronization profiles
80
synchronizing data files
83
-TTab
26
tab delimited
20
task
30, 31
task effort
65
Task Format
66
task links
35
task properties
56
assigning context
56
complete subtasks in order
Dependency
64
User's Guide
due date
59
effort
63
flags
67
folder
58
goal
58
hide task in to-do
58
importance
57
lead time
59
project
65
reminder
62
reoccurrence
60
Review
65
Starred
68
start date
59
Task Format
66
task statistics
67
time
59
time & reminder
59
time required
63
urgency
57
tasks
actions
32
creating
30
creating links between
35
deleting
31
navigation
34
rearranging tasks in outline
31
working on at work and home
91
working on tasks on travel
91
technical support
126
templates
20, 21
themes
119
thumb drive
9
time & reminder
59
time required
63
To Do list
37
ordering
45
To-Do
26
To-Do views
37, 39
-Uurgency
57
-V58
View
26
137
138
Index
Views
29,
Create
Delete
Export
Manage
Rename
34, 39
39
39
39
39
39
-Wweekly goals
58
WiFi sync
89
window
12
Workspace
26
Worslpace tabs
51
-XXML
20
-Yyearly goals
58
-Zzoom in
34
zoom out
34
User's Guide
139
Endnotes 2... (after index)
© 2015, mylifeorganized.net