1
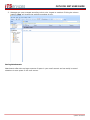
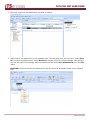
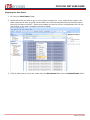
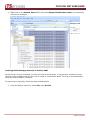
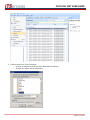
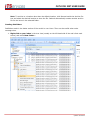
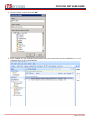
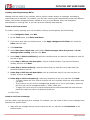
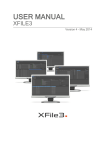
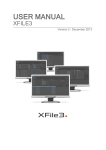
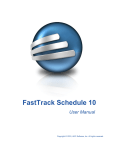
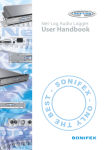
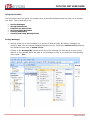
OUTLOOK 2007 USER GUIDE Using Outlook 2007 The information below will guide you through some of the Outlook features that can help you to manage your email. Topics listed below are: Sorting Messages Saving Attachments Emptying the Sent Folder Archiving Email Messages Creating Subfolders Creating and Using Message Rules Sorting Messages 1. Outlook allows you to sort messages in a number of different ways. By default, messages are sorted by date, with the newest messages appearing on top. Clicking the Newest on Top heading will change the sort order to Oldest on Top. Clicking on the Arranged By heading at the top of the message list will bring up a menu of sort options. In the example below, we want to sort messages by size, so we select the corresponding menu option – Size. updated: 10/12/2010 OUTLOOK 2007 USER GUIDE 2. Messages are now arranged according to their size, largest to smallest. Clicking the column heading "Size" will change the setting to smallest on top. Saving Attachments Attachments often take up large amounts of space in your email account and can easily be saved elsewhere to save space on the mail servers. updated: 10/12/2010 OUTLOOK 2007 USER GUIDE 1. Open the email with the attachment you wish to backup. 2. Right click on the attachment in the message pane. This will bring up a pop-up menu. Select Save As… to save the attachment or select Remove to detach it from the email message. Alternatively, you can also select the message with the attachment and select Save Attachments from the File menu. CAUTION: once you remove the attachment it will no longer be accessible unless you've saved it first. updated: 10/12/2010 OUTLOOK 2007 USER GUIDE Emptying the Sent Folder 1. Go into your Sent Items Folder. 2. Select the emails you wish to get rid of, by either pressing Ctrl + A to select all the emails in the folder (also can be done by going into the Edit menu and choosing Select All) OR manually select the email you want to delete – select the message you want to remove, holding down the Ctrl key and clicking on the other messages you wish to select. 3. Click on Delete key to move the emails from the Sent Items folder into the Deleted Items folder. updated: 10/12/2010 OUTLOOK 2007 USER GUIDE 4. Right click on the Deleted Items folder and select Empty Deleted Items Folder to permanently remove the messages. Archiving Email Messages Manually in Outlook 2007 As the number of email messages you have sent and received grows, it may become necessary to store (archive) older messages that you may not be ready to permanently delete. This can be accomplished by using the Archive feature in Outlook. To archive items manually, follow the steps outlined below: 1. From the Outlook menu bar, select File, then Archive updated: 10/12/2010 OUTLOOK 2007 USER GUIDE 2. Click to select one of the following: o Archive all folders according to their AutoArchive settings o Archive this folder and all subfolders: updated: 10/12/2010 OUTLOOK 2007 USER GUIDE Note: To archive to a location other than the default location, click Browse beside the Archive file: box and select the desired location to store the file. Outlook automatically creates another archive file for the items in the selected folder. Creating Subfolders Subfolders assist in the better sorting of the emails in your inbox. They are also useful when using message rules. 1. Right click on your inbox in the tree view (usually on the left hand side of the mail client main screen) and select New Folder… updated: 10/12/2010 OUTLOOK 2007 USER GUIDE 2. Give the folder a name and click OK. 3. Once created you can manually drag emails from your main inbox into the subfolders, or run a message filter to do it automatically. updated: 10/12/2010 OUTLOOK 2007 USER GUIDE Creating and Using Message Rules Message rules are useful if you routinely want to perform certain actions on messages, according to criteria that you've specified. For instance, you can have incoming mail automatically sorted into different folders, with certain messages labeled, marked as Junk, or even deleted. Filters can be applied automatically to incoming mail, or you can run them manually when desired. Create a rule from scratch To create a rule by choosing your own conditions, actions, and exceptions, do the following: 1. In the Navigation Pane, click Mail. 2. On the Tools menu, click Rules and Alerts. 3. If you have more than one email account, in the Apply changes to this folder list, select the Inbox that you want. 4. Click New Rule. 5. Under Start from a blank rule, select either Check messages when they arrive or Check messages after sending, and then click Next 6. Under Step 1: Select condition(s), select the conditions that you want the messages to meet for the rule to apply. 7. Under Step 2: Edit the rule description, click an underlined value if you have not done so already, and then click Next. 8. Under Step 1: Select action(s), select the action that you want the rule to take when the specified conditions are met. 9. Under Step 2: Edit the rule description, click an underlined value if you have not done so already, and then click Next. 10. Under Step 1: Select exception(s), select any exceptions to the rule, and then click Next. o To finish creating the rule, enter a name for the rule, and then select any other options that you want. o If you want to run this rule on messages that already are in one of your folders, select the Run this rule now on messages already in "folder" check box. o To apply this rule to all your e-mail accounts and the Inbox associated with each account, select the Create this rule on all accounts check box. 11. Click Finish. Create a rule from a message You can create a rule directly from a message. For example, you can create a rule to move messages from someone to a specific folder. 1. Right-click the message that you want to base the rule on, and then click Create Rule on the shortcut menu. updated: 10/12/2010 OUTLOOK 2007 USER GUIDE In the Create Rule dialog box, select the check boxes for the options that are already filled in with information from your selected message. 2. Select the Move the item to folder check box. 3. Click an existing folder or click New to create a new folder to store the messages. 4. To add more conditions, actions, or exceptions to the rule, click Advanced Options, and then follow the rest of the instructions in the Rules and Alerts Wizard. Tip To run the rule as soon as you create it, select the Run this rule now on the messages already in folder check box on the last page of the Rules and Alerts Wizard. All the messages in your Inbox, or any folder that you choose, that meet the conditions and exceptions associated with the rule are moved to the specified folder. To test your new rule, open your new folder. Run a rule periodically but not all the time If you want to run a rule periodically but not all the time, do the following: 1. On the Tools menu, click Rules and Alerts. 2. In the Rules and Alerts dialog box, turn the rule off by clearing the check box next to the rule. 3. Click Run Rules Now. 4. In the Run Rules Now dialog box, under Select rules to run, select the check box next to the rule that you want to run. 5. Select the folder that you want to apply the rule to. 6. Select the category of messages that you want to apply the rule to. For example, you can apply the rule only to unread messages in a folder. 7. Click Run Now. updated: 10/12/2010