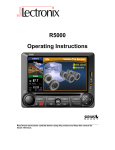
1
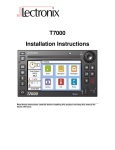
ALARMS
CAMERA SYSTEMS
The Navion™ R5000 continuously monitors system parameters and presents an
alarm when the parameter is outside of normal operating conditions. When there is
an alarm, an indicator in a red box appears in the background window, overriding
anything that is displayed in that window. You should take note of the alarm and
check your vehicle to correct the alarm condition. If there is an Alarm condition,
pressing INFO will take you to the Alarm screen.
The R5000 supports up to three cameras. Mount the cameras on the vehicle so that
there is a left, right and a rear camera. The rear camera supports a microphone that
can be automatically activated when the RV is shifted into reverse.
Viewing Alarms
Select the INFO button and scroll to Alarm. Press the SEL button or wait until the
Alarm screen is automatically selected. A list of alarms will appear.
How to Monitor Alarm Information in a
Background Window
You can view one of the fields from the alarm display in the Background window
even when the status display is not the main Application.
1)To select an item for display in the background window. Use the
UP and DOWN arrow keys to highlight the status item for display.
2)Press the SEL button to select the item. A check box will appear next
to your selection. Selecting a different parameter will remove the
previous item from the display.
3)To remove an item from the background window. Move to the selected
item and press the SEL button again to uncheck the item.
NOTE: Selecting an item will override the information in the Background window
unless there is an Alarm condition.
Disabling and Enabling Alarms
1)When in the Alarm screen, use the UP and DOWN arrow keys to highlight
the alarm of interest.
2)Press the MINUS (-) key to disable the Alarm.
3)To enable an alarm, press the PLUS (+) key.
!
Caution! A disabled Alarm will not appear in the Background
window. There will be no Alarm notification. The Alarm must
be manually enabled to display in the Background window.
CLOCK AND DATE
The Navion™ R5000’s clock and date are always displayed on the main screen in the
lower left hand corner.
Setting the Clock and Date
1)Press the INFO button repeatedly until Clock is highlighted.
2)Press the SEL button to select Clock or wait until clock is automatically
selected.
3)Press SEL button to edit the time and date values.
4)Use the LEFT and RIGHT arrow keys to select the field you want to modify.
5)Use the UP and DOWN arrow keys to change the highlighted field
6)When all of the changes have been made, press the SEL button to return to
the Clock display.
Selecting Cameras
1)To display a camera view on the main window, press the CAM button.
2)Press the CAM button to highlight the camera of interest (Left, Right or
Rear). This will define this camera view as the “preferred” camera view.
3)Press the SEL button to display the camera view or wait until the camera is
automatically selected.
4)When the preferred camera is viewed, use the LEFT, RIGHT or DOWN arrow
keys to provide a quick view of the other cameras. The camera view will
display for approximately five seconds after which the camera view will
return to the preferred camera view.
Navion™ R5000 – Quick Start Guide
Use this quick start guide as a supplement to the Navion™ R5000 Operating Instructions Manual.
Configuring the Camera Options
When in the CAM view, pressing the MENU button provides a list of camera
configuration options as shown below
Menu Option Description
Use Camera Audio Turns on the camera microphone. Once set, the
microphone remains active and will override any
entertainment audio sources when the camera view
is the active application.
Auto Reverse Camera Displays the rear camera view when the vehicle is
placed in reverse.
NOTE: If you have selected a preferred camera view
other than rear (i.e. left, right), then this auto reverse
selection will override your preferred selection and
switch to the rear camera view.
Auto Reverse
MicrophoneAutomatically turns on the microphone for the rear
camera when the vehicle is shifted into reverse. Audio
from other sources such as Radio, CD, or USB key will
be muted when the vehicle is shifted into reverse.
Auto Turn Signal CameraAutomatically switches the display to the left or right
camera when the left or right turn signal is activated.
When the turn signal is deactivated, the camera view
returns to the previous application.
NOTE: If Auto Reverse is enabled, then Auto Reverse
will take priority over Auto Turn Signal Camera.
Default to Camera When enabled the last camera viewed will be restored
if there is no activity in another application for
approximately 10 seconds.
Developed and Manufactured in the USA
Service, Technical Support and Warranty Contact
Lectronix, Inc. • 5858 Enterprise Drive • Lansing, MI 48911 • 1-888-423-1183 • [email protected]
Important System Information
DISCLAIMER — THIS IS A DISCLAIMER OF LIABILITY AND DAMAGE RESPONSIBILITY AS REGARDS TO LECTRONIX,
INC. AND GARMIN RELATING TO YOUR USE OF THE LECTRONIX NAVION™ R5000 SYSTEM. READ IT CAREFULLY. YOU
ASSUME TOTAL RESPONSIBILITY AND RISK FOR USING THIS SYSTEM.
Failure to properly focus on the operation of your motor vehicle can result in death, serious injury and property
damage. This R5000 device should never be used at a time or in a manner that distracts you from properly focusing
on operation of the motor vehicle in which it is installed. Our concern is for your safety. We ask that you fully
cooperate with and share that concern.
Always operate the vehicle in a safe manner and in full compliance with speed limits, road safety signs and all other
laws and devices which regulate operation of a motor vehicle. Be and remain aware of driving conditions at all times
when using this system while operating a motor vehicle.
Operation of this unit, including its camera, navigation, audio and other features can be distracting to your operation
of the motor vehicle. While the system is intended to provide both entertainment and helpful vehicle and navigation
information, it is not intended to, nor should you allow it to distract you from properly focusing on operating the
motor vehicle in which it is installed. It is up to you to minimize or prevent such distraction.
Take a moment to fill in the following information for your records.
Description
Record Here
R5000 Serial Number
Date Installed or Purchase
Date of Coach
Sirius Satellite System
Identification number (SID)
Sirius Satellite Lock Code
INTRODUCTION
USB Port
Equalizer
Press to select
one of seven
predefined modes
Audio Line In
USB Music
Tire Pressure Alarms and Conditions
The system will automatically detect and play MP3 and WMA encoded
music from a USB stick when it is inserted into the system (this may take
a few seconds).
• WMA protected content is not supported.
• The WMA lossless codec is not supported.
• Only a sampling frequency of 44.1 kHz is supported.
Alarm Condition
Low pressure Tire pressure is 12.5% below its initial value.
PULL OVER, INSPECT TIRE AND REPAIR.
Critical low pressure Tire pressure is 25% below its initial value.
PULL OVER, INSPECT TIRE AND REPAIR.
After installing the sensors, check for leaks by thoroughly covering the sensor,
extension and valve stem with a solution of one part liquid soap to two parts water
and look for bubbles indicating a leak.
Note: Once a sensor is added to the system, the sensor remains associated with that
tire position until deleted, regardless of attachment/removal from the actual tire.
Refer to the Operators Manual for further Tire Pressure Monitor
information.
Missing alarm The R5000 has not received a status update
from the sensor in the last 15-30 minutes.
VEHICLE STATUS (Status)
SEL
Selects display
options
Rotary Dial
Turn On & Off
One long push
Volume
Turn left or right
Mute
One quick push
Four-Way
Arrow
Scrolls through
selections
Minus (-) and
Plus (+)
CD Eject
AUDIO
CAM
Radio FM
Radio AM
Radio WB
Satellite
CD
USB
External
Rear
Left
Right
MENU
Application options
INFO
AUDIO tuning
controls
Status
Alarm
Maint
Trip
Check
Clock
Tires
NAV
Selects Navigation
Figure 1: Front Panel Controls
Turning the Navion™ R5000 On and Off
To turn the system on or off, press and hold the rotary dial for about two
seconds after the ignition is turned on in your vehicle. When the system
turns on, a standard display screen will appear. The R5000 will then
automatically transition to the most recent Application and Function.
Standby Operation
The Navion™ R5000 will be placed in a standby state for approximately
15 minutes when the vehicle’s ignition key is turned off. When ignition is
restored, the system will immediately return to the last Application and
Function. After 15 minutes the R5000 will be turned off.
AUDIO SYSTEM
The audio controls affect the sound source (CD, Radio, and Satellite) even if audio is
not the main application.
Mute
To mute audio, quickly press the rotary knob. “Mute” will appear
in red in the Audio Window.
To unmute audio, press the rotary knob again. “Mute” will disappear
from the audio window.
Satellite Radio Option
The Satellite selection will not be present if the optional Satellite
Radio is not connected to the R5000.
If you have the Satellite option, you must subscribe to the satellite service
to active the satellite radio. Refer to the Subscribing to Sirius Satellite Radio
section of the operator’s manual for subscription instructions.
Compact Disc (CD)
The CD player is compatible with standard audio CDs as well as audio
read/write CDs that include MP3 or WMA files.
Insert the CD into the CD slot with the text on the CD facing up. When
inserted, the audio source automatically changes to CD, and begins
playing the first track.
•A maximum of 99 folders per CD is supported.
Folders may be nested up to this limit.
• Only a sampling frequency of 44.1 kHz is supported
• UDF formatted CDs will play, but are not recommended.
NAVIGATION (NAV)
T he Navion™ R5000 includes support for the optional Garmin GVN52
Navigation system. Please refer to the Garmin User’s Manual included
with your RV for information regarding this Application.
When navigating, carefully compare information displayed on the
unit to all available navigation sources, including information from
street signs, visual sightings, and maps. Do not enter destinations,
change settings or access any functions requiring prolonged use of
the controls of the unit while operating your motor vehicle. For
safety, pull off the road before making any adjustments to the
system or resolving any navigation discrepancies or questions.
!
arning! You assume total responsibility and risk for
W
using this device. Failure to pay attention to the operation of
your vehicle could result in death, serious injury, or property
damage. Do not attempt to adjust this device while driving or permit
viewing the screen to distract you from safe vehicle operation.
Low battery Sensor’s battery is low – the sensor should be
replaced and a new sensor should be ordered now.
Battery life for the Sensor is expected to be 3 to 3 ½
years. Battery life can be affected by many factors,
including extremely hot or cold temperatures and
especially during low pressure alerts. When a pressure
alert exists, the Sensors transmit an alert to the R5000
until the alert is corrected – correct immediately –
as sensor battery life can be affected.
TIRE PRESSURE MONITOR
Using the optional tire pressure sensors installed on each tire, the Navion™
R5000 can monitor the vehicle’s tire pressure and alert you to possible tire
pressure problems.
The sensors determine operating pressure of the tire when the sensor is first
installed. Therefore the tire pressure at the time of installation is CRITICAL! All
tires MUST be inflated to the manufacturer’s recommended cold pressures
while the tires are cold. Refer to the owner’s manual.
!
Caution! Install the tire pressure sensors on the tires when
they are still cold. Failure to install at this “cold” temperature
may cause false alerts.
Carefully inspect tires and valve stems prior to installation of the system to ensure that
they are in good condition. DEFECTIVE VALVE STEMS MUST BE REPLACED. THE DILL
VALVE (small valve inside the valve stem) MUST DEPRESS FULLY AND RELEASE AIR
FOR THE SENSOR TO ACTIVATE. The sensor will not activate properly if the dill valve is
not the proper length (a common problem).
1)Press the INFO button repeatedly until Tires is highlighted.
2)Press SEL or wait until Tires is automatically selected.
3)Using the FOUR-WAY arrow keys, select the tire to add a
tire pressure sensor.
4)Hold SEL until the system prompts you to add a sensor.
To abort adding a sensor, tap the SEL button.
5)Screw the tire pressure sensor onto the tire selected.
TIGHTEN FIRMLY BY HAND.
You should hear the “hiss” of released air when the sensor is being screwed
on. Hold the valve stem with your free hand and tighten the sensor securely.
!
Tire Pressure Sensor Operation
Tire pressure is monitored approximately every 5 minutes with sensors
placed on each tire. If a low pressure condition exists, the tire pressure is
monitored more frequently (approximately every 15 seconds). When
there is a tire pressure alarm condition such as low pressure or low sensor
battery, an alarm in red will appear on your screen, alerting you to the
potential problem. The system generates four different alarm conditions
described below.
Engine View engine RPM, oil temperature and pressure,
coolant temperature and pressure and transmission
oil temperature and pressure in this screen.
Electrical Battery voltage and alternator status are available
in this screen.
Environment Interior and Exterior temperature as well as Barometric
pressure and Heading can be viewed in this screen.
Miscellaneous Washer Fluid Level and Engine Load can be viewed
in this screen.
Tire PressureThe pressure of the vehicle tires is displayed.
This requires the optional Tire Pressure Sensors.
NOTE: T he type and availability of status and alarm information is
dependant on the make and model of the recreational vehicle.
Installing Tire Pressure Sensors
Accessing the Navigation MAP
1) Press the NAV button to access the GARMIN navigation system.
2) Use the FOUR-WAY arrow keys to pan around a map.
3) Use the MINUS (-) and PLUS (+) keys to zoom out and into the map.
4) The GARMIN remote control can also be used for navigation.
Refer to the GARMIN GVN 52 manual for information on the use of
the GARMIN Navigation system.
5) Press the MENU button quickly to access the GARMIN menus.
Use the FOUR-WAY arrow keys to move around the GARMIN menus.
The menu item will be highlighted when selected.
Use SEL to select the highlighted menu.
Refer to the GARMIN GVN 52 manual for information on the use of
the GARMIN Navigation system.
The R5000 Vehicle Status display provides information about the operating
conditions of the vehicle. The following table describes the information available in
the status screens.
Screen Status Description
Road Traveling information such as road speed, fuel
economy, fuel level, average fuel economy, total
fuel used, instantaneous fuel rate and total vehicle
distance is found here.
Caution! Using a tool to tighten the sensor can damage the
sensor and nullify the warranty.
6)Wait for system to report new tire added (a green tire icon appears). This can
take up to one minute.
In the unlikely event that the system has not detected the sensor within one
minute after screwing on the sensor, remove the sensor, wait one minute, and
then reattach the sensor to tire. (The system can be left in ‘add sensor’ mode
during this process.) Repeat this step until the sensor is detected.
7)Repeat steps 1-6 for each tire.
How to View Status Information in a Background
Window
You can view one of the fields from the status display in the Background window
even when the status display is not the main Application.
1)To select an item for display in the background window. Use the UP and
DOWN arrow keys to highlight the status item for display.
2)Press the SEL button to select the item. A check box will appear next to your
selection. Selecting a different parameter will remove the previous item
from the display.
3)To remove an item from the background window. Move to the selected
item and press the SEL button again to uncheck the item.
NOTE: Selecting an item will override the information in the Background
window unless there is an Alarm condition.