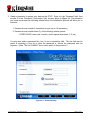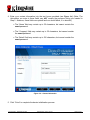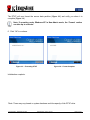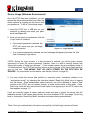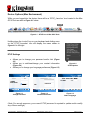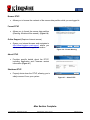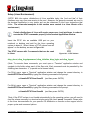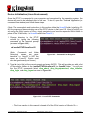
1
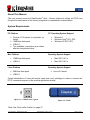
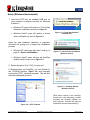
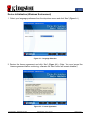
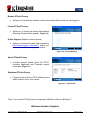
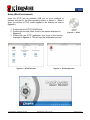
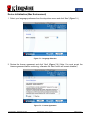
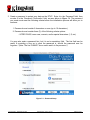
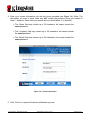
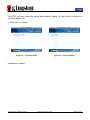
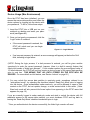
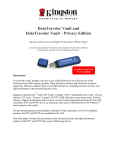
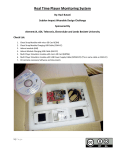
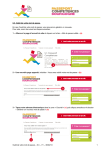
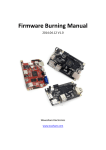
DataTraveler® Vault - Privacy User Manual
Document No. 48000012-001.A02
®
DataTraveler Vault - Privacy
Page 1 of 29
Table of Contents
About This Manual ................................................................................................................... 3
System Requirements .............................................................................................................. 3
Recommendations ................................................................................................................... 4
Setup (Windows Environment)................................................................................................ 5
Device Initialization (Windows Environment) ........................................................................ 6
Device Usage (Windows Environment) ................................................................................ 10
Device Options (Windows Environment).............................................................................. 11
Setup (Mac Environment) ...................................................................................................... 13
Device Initialization (Mac Environment) ............................................................................... 14
Device Usage (Mac Environment) ......................................................................................... 18
Device Options (Mac Environment) ...................................................................................... 19
Device Initialization (Linux Environment) ............................................................................ 22
Device Usage (Linux Environment) ...................................................................................... 24
Help and Troubleshooting ..................................................................................................... 25
Device Lockout ........................................................................................................................25
Forgot Password (Windows and Mac)...................................................................................26
Drive Letter Conflict (Windows Operating Systems) ...........................................................27
Error Messages........................................................................................................................28
DTVP Linux Commands..........................................................................................................29
Document No. 48000012-001.A02
®
DataTraveler Vault - Privacy
Page 2 of 29
About This Manual
This user manual covers the DataTraveler® Vault - Privacy (referred to simply as DTVP from
this point forward) based on the factory image with no implemented customizations.
System Requirements
PC Platform
•
•
•
•
PC Operating System Support
Pentium III Processor or equivalent (or
faster)
15MB free disk space
USB 2.0
Two available consecutive drive letters
after the last physical drive*
Mac Platform
•
•
Windows 7
Windows Vista® SP1, SP2
Windows XP SP2, SP3
Operating System Support
•
•
15MB free disk space
USB 2.0
Linux Platform
•
•
•
•
•
Mac OS X 10.5.x
Mac OS X 10.6.x
Operating System Support
•
5MB free disk space
USB 2.0
Linux v2.6 kernel
Certain distributions of Linux will require super-user (root) privileges in order to execute the
DTVP commands properly in the terminal application window.
Figure 1.1 – USB 2.0 Ports, Type A
Figure 1.2 – DTVP
*Note: See ‘Drive Letter Conflict’ on page 27.
Document No. 48000012-001.A02
®
DataTraveler Vault - Privacy
Page 3 of 29
Recommendations
To ensure there is ample power provided to the DTVP device, insert it directly into a USB port
on your notebook or desktop, as seen in Figure 1.3. Avoid connecting the DTVP to any
peripheral device(s) that may feature a USB port, such as a keyboard or USB-powered hub, as
seen in Figure 1.4.
Figure 1.3 – Recommended Usage
Document No. 48000012-001.A02
Figure 1.4 – Not Recommended
®
DataTraveler Vault - Privacy
Page 4 of 29
Setup (Windows Environment)
1. Insert the DTVP into an available USB port on
your notebook or desktop and wait for Windows
to detect it.
• Windows XP users will receive a ‘Found New
Hardware’ notification as seen in Figure 2.1.
• Windows Vista/7 users will receive a device
driver notification as seen in Figure 2.2.
Figure 2.1 – Found New Hardware
(Windows XP)
Once the new hardware detection is complete,
Windows will prompt you to begin the initialization
process.
• Windows XP users can skip step 2 and go to
page 6 – Device Initialization.
Figure 2.2 – Device Driver Installation
(Windows Vista/7)
• Windows Vista/7 users will see an AutoPlay
window similar to the one in Figure 2.3.
2. Select the option ‘Run DTVP_Launcher.exe’.
If Windows does not AutoPlay, you can browse to
the CD-ROM partition (Figure 2.4) and manually
execute the DTVP_Launcher program. This will also
start the initialization process.
Figure 2.3 – AutoPlay Window
(Windows Vista/7)
(Note: Menu options in the AutoPlay
window may vary depending on what
programs are currently installed on
your computer. AutoRun will start the
initialization process automatically.)
Figure 2.4 – DTVP Contents
Document No. 48000012-001.A02
®
DataTraveler Vault - Privacy
Page 5 of 29
Device Initialization (Windows Environment)
1. Select your language preference from the drop-down menu and click ‘Next’ (Figure 3.1.)
Figure 3.1 – Language Selection
2. Review the license agreement and click ‘Next’ (Figure 3.2.) (Note: You must accept the
license agreement before continuing; otherwise the ‘Next’ button will remain disabled.)
Figure 3.2 – License Agreement
Document No. 48000012-001.A02
®
DataTraveler Vault - Privacy
Page 6 of 29
3. Create a password to protect your data on the DTVP. Enter it in the ‘Password’ field, then
re-enter it in the ‘Password Confirmation’ field, as seen below in Figure 3.3. The password
you create must meet the following criteria before the initialization process will allow you to
continue:
1. Passwords must contain 6 characters or more (up to 16 characters.)
2. Passwords must contain three (3) of the following criteria options:
- UPPER CASE, lower case, numeric, and/or special characters (!, $, etc.)
You may also enter a password hint, but it is not a mandatory field. The hint field can be
useful in providing a clue as to what the password is, should the password ever be
forgotten. (Note: The hint CANNOT be an exact match to the password.)
Figure 3.3 – Password Setup
Document No. 48000012-001.A02
®
DataTraveler Vault - Privacy
Page 7 of 29
4. Enter your contact information into the text boxes provided (see Figure 3.4) (Note: The
information you enter in these fields may NOT contain the password string you created in
Step 3. However, these fields are optional and can be left blank, if so desired.)
• The ‘Name’ field may contain up to 32 characters, but cannot contain the
exact password.
• The ‘Company’ field may contain up to 32 characters, but cannot contain
the exact password.
• The ‘Details’ field may contain up to 156 characters, but cannot contain the
exact password.
Figure 3.4 – Contact Information
5. Click ‘Finish’ to complete the device initialization process.
Document No. 48000012-001.A02
®
DataTraveler Vault - Privacy
Page 8 of 29
The DTVP will now format the secure data partition (Figure 3.5) and notify you when it is
complete (Figure 3.6.)
Note: If operating under Windows XP in Non-Admin mode, the ‘Format’ routine
can take up to a minute.*
6. Click ‘OK’ to continue.
Figure 3.5 – Formatting DTVP
Figure 3.6 – Format Complete
Initialization complete.
*Note: Times may vary based on system hardware and the capacity of the DTVP drive.
Document No. 48000012-001.A02
®
DataTraveler Vault - Privacy
Page 9 of 29
Device Usage (Windows Environment)
Once the DTVP has been initialized, you can
access the secure data partition and utilize the
device options by logging into the device with
your password. To do so, follow these steps:
1. Insert the DTVP into a USB port on your
notebook or desktop and enter your password (see Figure 4.1.)
2. Once you’ve typed your password, click the
‘Login’ button to continue.
• If the correct password is entered, the
DTVP will unlock and you can begin
using the device.
•
Figure 4.1 – Login Window
If an incorrect password is entered, an error message will appear just below the ‘Hint’
field, indicating a login failure.
(NOTE: During the login process, if a bad password is entered, you will be given another
opportunity to enter the correct password; however, there is a built-in security feature that
tracks the number of failed login attempts*. If this number reaches the pre-configured value of
10 failed attempts, the DTVP will lock and require a device format of the secure data partition
prior to next use. THIS MEANS THAT ALL DATA STORED ON THE DTVP WILL BE
ERASED. For more details on this feature, see ‘Device Lockout’ on page 20.)
3. You may unlock the secure data partition in read-only mode, sometimes referred to as
“write-protect mode”, by selecting the checkbox labeled ‘Read-Only Mode’ prior to logging
into the device. Once authenticated under read-only, you will be allowed to open or view
content on the DTVP, but not update, change, or erase content while in this mode. (Note:
Read-only mode will also prevent the format option from appearing in the DTVP menu that
later appears on page 11.)
If you are currently logged in under read-only mode and wish to unlock the device with full
read/write access to the secure data partition, you must shutdown DTVP (see page 12) and log
back in, leaving the ‘Read-Only Mode’ checkbox unchecked during authentication.
*Note: Once you authenticate to the device successfully, the failed login counter will reset.
Document No. 48000012-001.A02
®
DataTraveler Vault - Privacy
Page 10 of 29
Device Options (Windows Environment)
While you are logged into the device, there will be a ‘DTVP’ icon located in the right-hand
corner of the Windows taskbar (Figure 5.1.) (Note: Windows 7 users will need to click on the
up-arrow button in the taskbar in order to access the ‘DTVP’ icon (Figure 5.2.)
Clicking once on the DTVP icon will display the following menu:
Figure 5.1 – DTVP icon in taskbar
Figure 5.2 – DTVP icon in taskbar
(Windows 7 users)
DTVault Privacy Settings
•
•
•
Allows you to change your password and/or hint (Figure 5.3)
Allows you to add/view/change your contact information (Figure 5.4)
Allows you to change your current language selection (Figure 5.5)
(Note: For security purposes, your current DTVP password is required to update and/or modify
any of these settings.)
Figure 5.3
Change Password
Document No. 48000012-001.A02
Figure 5.4
Contact Information
®
DataTraveler Vault - Privacy
Figure 5.5
Select Language
Page 11 of 29
Browse DTVault Privacy
•
Allows you to browse the contents of the secure data partition while you are logged in
Format DTVault Privacy*
•
Allows you to format the secure data partition
(Warning: All data will be erased.) (Figure 5.6)
Online Support (Requires Internet access)
•
Opens your Internet browser and navigates to
http://www.kingston.com/support/ where you
can access additional support information
Figure 5.6 – Format Warning
About DTVault Privacy
•
Provides specific details about the DTVP,
including Application and Firmware version
information (Figure 5.7)
Shutdown DTVault Privacy
•
Properly shuts down the DTVP, allowing you to
safely remove it from your system
Figure 5.7 – About DTVP
*Note: Your current DTVP password is required in Windows Vista and Windows 7
-Windows Section CompleteDocument No. 48000012-001.A02
®
DataTraveler Vault - Privacy
Page 12 of 29
Setup (Mac Environment)
Insert the DTVP into an available USB port on your notebook or
desktop and wait for the Mac operating system to detect it. When it
does, you will see a DTVP volume appear on the desktop, as seen in
Figure 6.1.
1. Double-click the DTVP CD-ROM icon.
2. Double-click the Mac folder found in the window displayed in
Figure 6.2.
3. Double-click the DTVP application icon found in the window
displayed in Figure 6.3. This will start the initialization process.
Figure 6.3 – DTVP Application
Figure 6.2 – DTVP Contents
Document No. 48000012-001.A02
Figure 6.1 – DTVP
®
DataTraveler Vault - Privacy
Page 13 of 29
Device Initialization (Mac Environment)
1. Select your language preference from the drop-down menu and click ‘Next’ (Figure 7.1.)
Figure 7.1 – Language Selection
2. Review the license agreement and click ‘Next’ (Figure 7.2.) (Note: You must accept the
license agreement before continuing; otherwise the ‘Next’ button will remain disabled.)
Figure 7.2 – License Agreement
Document No. 48000012-001.A02
®
DataTraveler Vault - Privacy
Page 14 of 29
3. Create a password to protect your data on the DTVP. Enter it in the ‘Password’ field, then
re-enter it in the ‘Password Confirmation’ field, as seen below in Figure 7.3. The password
you create must meet the following criteria before the initialization process will allow you to
continue:
1. Passwords must contain 6 characters or more (up to 16 characters.)
2. Passwords must contain three (3) of the following criteria options:
- UPPER CASE, lower case, numeric, and/or special characters (!, $, etc.)
You may also enter a password hint, but it is not a mandatory field. The hint field can be
useful in providing a clue as to what the password is, should the password ever be
forgotten. (Note: The hint CANNOT be an exact match to the password.)
Figure 7.3 – Password Setup
Document No. 48000012-001.A02
®
DataTraveler Vault - Privacy
Page 15 of 29
4. Enter your contact information into the text boxes provided (see Figure 7.4) (Note: The
information you enter in these fields may NOT contain the password string you created in
Step 3. However, these fields are optional and can be left blank, if so desired.)
• The ‘Name’ field may contain up to 32 characters, but cannot contain the
exact password.
• The ‘Company’ field may contain up to 32 characters, but cannot contain
the exact password.
• The ‘Details’ field may contain up to 156 characters, but cannot contain the
exact password.
Figure 7.4 – Contact Information
5. Click ‘Finish’ to complete the device initialization process.
Document No. 48000012-001.A02
®
DataTraveler Vault - Privacy
Page 16 of 29
The DTVP will now format the secure data partition (Figure 7.5) and notify you when it is
complete (Figure 7.6.)
6. Click ‘OK’ to continue.
Figure 7.5 – Formatting DTVP
Figure 7.6 – Format Complete
Initialization complete.
Document No. 48000012-001.A02
®
DataTraveler Vault - Privacy
Page 17 of 29
Device Usage (Mac Environment)
Once the DTVP has been initialized, you can
access the secure data partition and utilize the
device options by logging into the device with
your password. To do so, follow these steps:
1. Insert the DTVP into a USB port on your
notebook or desktop and enter your password (see Figure 8.1.)
2. Once you’ve typed your password, click the
‘Login’ button to continue.
• If the correct password is entered, the
DTVP will unlock and you can begin
using the device.
Figure 8.1 – Login Window
• If an incorrect password is entered, an error message will appear just below the ‘Hint’
field, indicating a login failure.
(NOTE: During the login process, if a bad password is entered, you will be given another
opportunity to enter the correct password; however, there is a built-in security feature that
tracks the number of failed login attempts*. If this number reaches the pre-configured value of
10 failed attempts, the DTVP will lock and require a device format of the secure data partition
prior to next use. THIS MEANS THAT ALL DATA STORED ON THE DTVP WILL BE
ERASED. For more details on this feature, see ‘Device Lockout’ on page 20.)
4. You may unlock the secure data partition in read-only mode, sometimes referred to as
“write-protect mode”, by selecting the checkbox labeled ‘Read-Only Mode’ prior to logging
into the device. Once authenticated under read-only, you will be allowed to open or view
content on the DTVP, but not update, change, or erase content while in this mode. (Note:
Read-only mode will also prevent the format option from appearing in the DTVP menu that
appears on page 19.)
If you are currently logged in under read-only mode and wish to unlock the device with full
read/write access to the secure data partition, you must shutdown DTVP and log back in,
leaving the ‘Read-Only Mode’ checkbox unchecked prior to login.
* Once you authenticate to the device successfully, the failed login counter will reset.
Document No. 48000012-001.A02
®
DataTraveler Vault - Privacy
Page 18 of 29
Device Options (Mac Environment)
While you are logged into the device, there will be a ‘DTVP_Launcher’ icon located in the Mac
OS X Dock as seen in Figure 9.1 below:
Figure 9.1 – DTVP Icon In Mac OS X Dock
Holding down the ‘control’ key on your keyboard and clicking once
on the ‘DTVP_Launcher’ icon will display the menu shown in
Figure 9.2 to the right.
DTVP Settings
•
Allows you to change your password and/or hint (Figure
9.3)
•
•
Allows you to add/view/change your contact information
(Figure 9.4)
Allows you to change your language preference (Figure 9.5)
Figure 9.3
Change Password
Figure 9.4
Contact Information
Figure 9.2
DTVP Options
Figure 9.5
Select Language
(Note: For security purposes, your current DTVP password is required to update and/or modify
any of these settings.)
Document No. 48000012-001.A02
®
DataTraveler Vault - Privacy
Page 19 of 29
Browse DTVP
•
Allows you to browse the contents of the secure data partition while you are logged in
Format DTVP
•
Allows you to format the secure data partition
(Warning: All data will be erased.) (Figure 9.6)
Online Support (Requires Internet access)
•
Opens your Internet browser and navigates to
http://www.kingston.com/support/ where you
can access additional support information
Figure 9.6 – Format Warning
About DTVP
•
Provides specific details about the DTVP,
including Application and Firmware version
information (Figure 9.7)
Shutdown DTVP
•
Properly shuts down the DTVP, allowing you to
safely remove it from your system
Figure 9.7 – About DTVP
-Mac Section CompleteDocument No. 48000012-001.A02
®
DataTraveler Vault - Privacy
Page 20 of 29
Setup (Linux Environment)
(NOTE: With the various distributions of Linux available today, the ‘look and feel’ of their
interfaces may vary from one version to the next. However, the general command set used in
the terminal application is very similar and can be referenced in the Linux instructions that
follow. The screenshot examples in this section were created in a Linux Ubuntu v10.x
environment.)
Certain distributions of Linux will require super-user (root) privileges in order to
execute the DTVP commands properly in the terminal application window.
Insert the DTVP into an available USB port on your
notebook or desktop and wait for the Linux operating
system to detect it. When it does, a DTVP volume icon will
appear* on the desktop, as seen in Figure 10.1.
The DTVP comes with 5 commands that can be used
in Linux:
Figure 10.1 – DTVP Volume
dtvp_about, dtvp_forgotpassword, dtvp_initialize, dtvp_login, and dtvp_logout
(Note: To execute these commands, you must open a “Terminal” application window and
navigate to the folder where each of the files exist. Each command must be preceded by the
following two characters: ‘./’ (a period and a forward slash.)
For 32-bit users, open a “Terminal” application window and change the current directory to
/media/DTVP/linux/linux32$ by typing the following command at the prompt:
cd /media/DTVP/linux/linux32
(and then press ENTER.)
For 64-bit users, open a “Terminal” application window and change the current directory to
/media/DTVP/linux/linux64$ by typing the following command at the prompt:
(and then press ENTER.)
cd /media/DTVP/linux/linux64
*Note: If the DTVP volume is not loaded automatically by the operating system, you will need to
load the volume manually in a terminal window using the Linux ‘mount’ command. Please refer
to the Linux documentation for your specific OS distribution or favorite on-line support site for
proper syntax and command options.
Document No. 48000012-001.A02
®
DataTraveler Vault - Privacy
Page 21 of 29
Device Initialization (Linux Environment)
Once the DTVP is connected to your computer and recognized by the operating system, the
device will need to be initialized prior to first use. To do so, open the ‘Terminal’ application (or
command-line window) and follow these steps:
(Note: The screenshots and instructions in this section utilize the linux32 folder (signifying 32bit) for purposes of demonstrating use of the DTVP device in the Linux OS. Keep in mind if you
are using the 64-bit version of Linux, simply navigate to and use the respective 64-bit folder in
place of the 32-bit folder, i.e. linux64 rather than linux32.)
1. Change directory to the DTVP
volume by typing the following
command at the terminal prompt
(as seen in Figure 10.2.):
cd /media/DTVP/linux/linux32
(Note: Commands and folder
(directory)
names
are
casesensitive, i.e. ‘linux32’ is NOT the
same as ‘Linux32.’ Syntax must
also be typed exactly as shown.)
Figure 10.2 – Command-Line Navigation
2. Type ls (as in list) at the current prompt and press ENTER. This will provide you with a list
of files and/or folders in the /media/DTVP/linux/linux32 (or linux64) folder. You will see
the five DTVP commands listed, dtvp_about, dtvp_forgotpassword, dtvp_initialize,
dtvp_login, and dtvp_logout as seen in Figure 10.3.
Figure 10.3 – List of DTVP Commands
– The Linux section in this manual is based off of the 32-bit version of Ubuntu 10.x –
Document No. 48000012-001.A02
®
DataTraveler Vault - Privacy
Page 22 of 29
3. To initialize the DTVP, type the following command at the terminal prompt and press
ENTER: ./dtvp_initialize* (Remember, commands are case-sensitive.) See Figure 10.4.
Figure 10.4 – Executing a DTVP Command
4. After pressing ENTER, the license agreement will display in the terminal window. Press ‘Y’
to accept the license agreement and continue. (Note: If you press ‘N’ and do not accept the
license agreement, you will be returned to the terminal prompt and unable to continue the
initialization process until you repeat step 3 and press ‘Y’.)
5. After you accept the license agreement, you will be prompted to input (create) a password,
which will be used to protect the files stored on the secure data partition. The password you
create must meet the following criteria before the initialization process will allow you to
continue:
a. Passwords must contain 6 characters or more (up to 16 characters.)
b. Passwords must contain three (3) of the following criteria options:
- UPPER CASE, lower case, numeric, and/or special characters (!, $, etc.)
6. Confirm your password by re-entering it on the command line when prompted to input it
again and press ENTER. If the passwords match, you will be notified that the DTVP has
been initialized successfully. If the passwords do not match, you will receive a message
indicating that you still need to confirm the password correctly. To do so, repeat steps 3
through 6 until they do.
After creating your password, a secure data volume (partition) will appear on the desktop. This
indicates that the initialization process was successful and is now complete. You may begin
using the DTVP.
*Note: Certain distributions of Linux will require super-user (root) privileges in order to execute
the DTVP commands properly in the terminal application window.
Document No. 48000012-001.A02
®
DataTraveler Vault - Privacy
Page 23 of 29
Device Usage (Linux Environment)
Once the DTVP has been initialized, you can access the secure data partition by logging into
the device using the DTVP password you created on page 23. To do so, follow these steps:
1. Open a ‘Terminal’ application window.
2. Type the following command at the terminal prompt: cd /media/DTVP/linux/linux32
3. With the command prompt now at /media/DTVP/linux/linux32$, type the following
command to login to the device: ./dtvp_login* and press ENTER. (Note: Commands
and folder names are case-sensitive and syntax must be exact.)
4. Enter for your DTVP password and press ENTER. After a successful login, the secure
data volume will open on your desktop and you can proceed to use the DTVP.
During the login process, if a bad password is entered, you will be given another opportunity to
enter the correct password by repeating step 3; however, there is a built-in security feature that
tracks the number of failed login attempts. If this number reaches the pre-configured value of 10
failed attempts, the DTVP will lock and require you to initialize the device by executing the
dtvp_forgotpassword command, prior to next use. This process will allow you to create a new
password, but in order to protect the privacy of your data, the DTVP will format the secure data
partition. This means that all of your data will be lost.
Once the dtvp_forgotpassword process is complete and you have successfully set up a new
password, the built-in security counter that tracks failed login attempts will be reset (Note: A
successful login prior to reaching the maximum number of attempts (MaxNoA, for short) will
also reset the failed-login counter.)
When you are finished using the DTVP, log out of the device and secure your data. To do so,
follow these steps:
1. Open a ‘Terminal’ application window.
2. Type the following command at the terminal prompt: cd /media/DTVP/linux/linux32
3. With the command prompt now at /media/DTVP/linux/linux32$, type the following
command to logout of the device properly: ./dtvp_logout* and press ENTER. (Note:
Commands and folder names are case-sensitive and syntax must be exact.)
4. Remove the DTVP from your system and store in a safe place.
*Note: Certain distributions of Linux will require super-user (root) privileges in order to execute
the DTVP commands properly in the terminal application window.
-Linux Section CompleteDocument No. 48000012-001.A02
®
DataTraveler Vault - Privacy
Page 24 of 29
Help and Troubleshooting
Device Lockout
The DTVP includes a security feature that prevents unauthorized access to the data partition
once a maximum number of consecutive failed login attempts (MaxNoA for short) has been
made; the default “out-of-box” configuration has a pre-configured value of 10 (no. of attempts.)
The ‘lock-out’ counter tracks each failed login and gets reset one of two ways: 1) A successful
login prior to reaching MaxNoA or 2) reaching MaxNoA and performing a device format.*
If an incorrect password is entered, an error
message will appear just below the ‘Hint’ field,
indicating a login failure. See Figure 11.1.
If and when a 7th failed attempt is made, you will
see an additional error message indicating you
have 3 attempts left before reaching MaxNoA
(which is set to 10 by default.) See Figure 11.2.
After a 10th failed login attempt, the DTVP will
permanently block the data partition and require
a device format prior to next use. This means
that all data stored on the DTVP will be lost
and you will need to create a new password.
Figure 11.1 – Login Failure
This security measure limits someone (who
does not have your password) from attempting
countless login attempts and gaining access to
your sensitive data.
If you are the owner of the DTVP and have
forgotten your password, the same security
measures will be enforced, including a device
format.*
For more on this feature, see ‘Forgot Password’
on page 26.
Figure 11.2 – 7th Login Failure
*Note: A device format will erase ALL of the information stored on the DTVP’s secure data
partition.
Document No. 48000012-001.A02
®
DataTraveler Vault - Privacy
Page 25 of 29
Forgot Password (Windows and Mac)
If you forget your password, you can click
on the ‘Forgot Password’ link that appears
in the login window when DTVP_Launcher
is executed (see Figure 11.3.)
This option will allow you to create a new
password, but in order to protect the privacy
of your data, the DTVP will be formatted.
This means that all of the data stored on the
secure area will be erased in the process.*
When you do click on ‘Forgot Password’, a
message box (Figure 11.4) will appear and
ask if you want to enter a new password
prior to executing the format. At this point,
you can either 1) click ‘OK’ to confirm or 2)
click ‘Cancel’ to return to the login window.
Figure 11.3 – Forgot Password
If you opt to continue, you will be prompted
to create a new complex password and a
new hint. The hint is not a mandatory field,
but it can be useful in providing a clue as to
what the password is, should the password
ever be forgotten.
Figure 11.4 – Prompt Before Format
(Note: The hint CANNOT be an exact match
to the DTVP password.)
Forgot Password (Linux)
If you forget your password, you can execute the dtvp_forgotpassword command from the
/media/DTVP/linux/linux32$ prompt in the “Terminal” application window. This option will
allow you to create a new password, but in order to protect the privacy of your data, the DTVP
will be formatted. This means that all data stored on the secure data partition will be erased in
the process.
*Note: A device format will erase ALL of the information stored on the DTVP’s secure data
partition.
Document No. 48000012-001.A02
®
DataTraveler Vault - Privacy
Page 26 of 29
Drive Letter Conflict (Windows Operating Systems)
As mentioned in the ‘System Requirements’ section of this manual (on page 3), the DTVP
requires two consecutive drive letters AFTER the last physical disk that appears before the
‘gap’ in drive letter assignments (see Figure 11.5.) This does NOT pertain to network shares
because they are specific to user-profiles and not the system hardware profile itself, thus
appearing available to the OS.
What this means is, Windows may assign the DTVP a drive letter that’s already in use by a
network share or Universal Naming Convention (UNC) path, causing a drive letter conflict. If
this happens, please consult your administrator or helpdesk department on changing drive
letter assignments in Windows Disk Management (administrator privileges required.)
Figure 11.5 – My Computer
In this example, the DTVP uses drive F:, which is the first available drive letter after drive E:
(the last physical disk before the drive letter gap.) Because letter G: is a network share and not
part of the hardware profile, the DTVP may attempt to use it as its second drive letter, causing
a conflict.
If there are no network shares on your system and the DTVP still won’t load, it is possible that a
card reader, removable disk, or other previously-installed device is holding on to a drive-letter
assignment and still causing a conflict.
Please note that Drive Letter Management, or DLM, has improved significantly in Windows XP
SP3, Vista, and 7, so you may not come across this issue, but if you are unable to resolve the
conflict, please contact Kingston’s Technical Support Department for further assistance.
Document No. 48000012-001.A02
®
DataTraveler Vault - Privacy
Page 27 of 29
Error Messages
Unable to create file – This error message will appear when attempting to CREATE a file or
folder ON the secure data partition while logged in under read-only mode.
Figure 12.1 – Unable to Create File Error
Error Copying File or Folder – This error message will appear when attempting to COPY a file
or folder TO the secure data partition while logged in under read-only mode.
Figure 12.2 – Error Copying File or Folder Error
Error Deleting File or Folder – This error message will appear when attempting to DELETE a
file or folder FROM the secure data partition while logged in under read-only mode.
Figure 12.3 – Error Deleting File or Folder Error
If you are ever logged in under read-only mode and wish to unlock the device with full read/write
access to the secure data partition, you must shutdown DTVP and log back in, leaving the
‘Read-Only Mode’ checkbox unchecked prior to login.
Document No. 48000012-001.A02
®
DataTraveler Vault - Privacy
Page 28 of 29
DTVP Linux Commands
Command
Syntax*
Description
dtvp_about
./dtvp_about
Displays serial no., firmware, and application version of
DTVP
Can be executed whether user is logged into the DTVP
or not
dtvp_forgotpassword
Resets the DTVP and allows you to create a new
password
./dtvp_forgotpassword
Can be executed only when user is NOT logged into the
DTVP device
(All data stored on the secure data partition will be lost)
dtvp_initialize
Initializes the DTVP and prepares device for first use
./dtvp_initialize
Executed prior to first use only
dtvp_login
Prompts for DTVP password to log user into secure data
partition
./dtvp_login
Can be executed only when user is NOT logged into the
DTVP device and only AFTER the device has been
initialized
dtvp_logout
Logs user out of DTVP and closes secure data partition
./dtvp_logout
Can be executed only when user is logged into the DTVP
device
*Note: To execute the DTVP Linux commands, you must open a “Terminal” application window
and navigate to the folder where each of the files exist. Each command must be preceded by
the following two characters: ‘./’ (a period and a forward slash as indicated in the table above.)
Document No. 48000012-001.A02
®
DataTraveler Vault - Privacy
Page 29 of 29