1
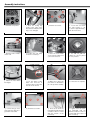
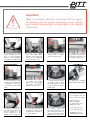
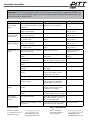
Assembly instructions
Montagehandleiding
Assembly instructions
Montagehandleiding
Assembly instructions
!
2
2
1
1
3
3
2.2.Druk
de the
afdichtingsring
Press
sealing ring
voorzichtig
de rand
gently on over
the edge
of van
the
het
hitteschild.
heathetshield.
Verify Controthat the
leer
in zijn geheel
ringofis de
notring
damaged.
goed aansluit.
3.3.Overzicht
Overviewstelschroeven.
set screws.
4.4.Draai
de stelschroeven
(in
Loosen
the set screws
volgorde
1, 2 1,
& 3)
(in orderpositie
position
2 &
terug
tot to
circa
3 mm boven3
3) back
approximately
de
unit.
mm
above the unit.
5.5.Plaats
de warmtegeleider
Place the
heat conductor
op
de
unit.
on the unit.
6.6.Positioneer
de unit
unit voorPosition the
gently
zichtig
onder
het
werkblad.
under the countertop.
7.7.Plaats
hitteschilden
Placedethe
heat shields
over
de
branders.
on the burners. Make sure
Let
de uitsparingen.
youopuse
the recesses.
8.8.De
2kW
en and
3kW3kW
brander
The
2kW
heat
kunnen
op
slechts
één
posishield can only be placed
tie
geplaatst.
in worden
one position.
9.
9. Schroef
Attach de
thehitteschilden
heat shields
handvast.
hand-tight.
10.
bij decooker
wok10. Zorg
For ervoor
the stir-fry
brander
dat dethat
V-vormige
make sure
the Vuitsparing
in lijn
staat
shaped notch
is in
linemet
with
de
as
van
de
brander.
the axis of the burner.
11.
op de
11.Let
Make
surefixatiepen
to place bij
the
het
de panpanplaatsen
carriers van
on the
fixation
nendrager.
Deze zorgt
voor
pin. This provides
stability.
stabiliteit.
12.
brander
12.De
The
burnerisiscompleet
complete.
opgebouwd.
1.1. Overzicht
Overview onderdelen.
components.
!
Gasaansluiting
Gasconnection
2
2
1
3
13.
de gasslang
13.Sluit
Connect
the gasaan.
hose.
Plaats
daarnathe
deplug
stekker
Then place
into a
ingrounded
een geaarde
wall wandcontactsocket.
doos.
1
!
!
1
2
3
14.
14.Overzicht
Overview stelschroeven.
set screws.
15.
stelschroe15.Draai
Pivotbeide
all set
screws (1)
ven
1 handvast
de
hand-tight
untiltot
thedat
thermal
warmegeleider
goed
conductor comes
in contact
maakt
onderkant
van
with met
the de
bottom
of the
het
werkblad.
countertop.
16.
beide
stelschroe16.Draai
Tighten
both
set screws
ven
handvast aan
tot dat
(2) 2 hand-tight
until
the
de
warmtegeleider
thermal
conductor goed
comesconin
tact
maakt
metthe
debottom
onderkant
contact
with
of
van
werkblad.
the het
countertop.
!
Belangrijk!
Important!
Bij het niet juist afstellen van de bedieningsknoppen
When
not properly adjusted, the burners will not ignite.
zullen de branders niet of slecht ontvlammen.
For warranty and the proper functioning of the cooking
unit,
theenmounting
as described
in kookunit
this manual
Om deensure
garantie
het goed is
functioneren
van de
to
the letter. dient de montage zoals beschreven in
te waarborgen
deze handleiding zorgvuldig uitgevoerd te worden.
!
!
3
17.
17. Positioneer
Positioningalle
allafdichsealing
tingschalen
inclusiefthe
de conscales including
bedieningsknoppen
op het
trols on the worksheet.
werkblad.
Let op:
niet
Please note:
firstnog
tweaking
vastplakken,
afstellen.
in position noeerst
adhesion
yet.
!
18.
de bedieningsknop
18.Druk
Press
the control
stevig
beneden.
het
knob naar
down
firmly. Bij
When
loslaten
komt
bedieningsreleasing,
thede
control
knob
knop
in de
(zie
will be
in afstelpositie
the adjustment
foto
19). (see Photo 19).
position
A
19.
onderzijde
19. DeThe
bottomvanofde the
bedieningsknop
control knob isiszichtbaar
visible
boven
above de
theafdichtingsschaal.
sealing scale.
20.
de stelschroeven
3
20.Draai
Tighten
the set screws
(zie
afb.
14)
rechtsom
zodat
(3) (see Photo 14) clockwise
de
de in
so bedieningsknop
that the controlinknob
afdichtingschaal
the sealing scalezakt.
drops.
23.
iedere
23. Controleer
Check each
gas gasburner
brander
of dezeand
ontsteekt
for ignition
if they
en
blijft lit.
branden.
remain
If that Indien
is not dat
the
niet
geval
is controleer
casehet
then
check
the button
dan
opnieuw
height
again. de knophoogte
24.
24.Verwijder
Remove de
theplakstrip
adhesive
van
afdichtingschaal.
stripdefrom
the sealing scale.
B
3
A
21.
de buttons
knoppengozakken
21. Laat
Let the
down
totdat
de button
knop minimaal
until the
extends for
5a mm
en maximaal
mm up
minimum
5 mm7 and
boven
de afdichtingschaal
to 7 mm
above the sealing
uitsteekt.
scale.
B
22.
22.Controleer
Check alle
all bediecontrol
ningsknoppen
opright
de juiste
buttons for the
height
hoogte
en stel deze
indien
and adjust
if necessary
nodig
metset
descrews
stelschroeven
with the
(3).
3 af.
If you have any questions,
youPITT
can® cooking-systeem
always give us a
Het
call,
or sendvoor
us an
e-mail.
is nu gereed
gebruik!
Reginox
East
Voor
meerFar
informatie
kunt u
PITT® op:
by Reginox
terecht
2 Loyang Lane # 03-03
Singapore 508913
www.pittcooking.nl
25.
de bedieningsknop
25. Steek
Plug the
control knob in
in
afdichtingschaal.
thedesealing
scale. MakeZorg
sure
thatdethe
indication
of knop
the
dat
indicatie
van de
button corresponds
the
overeen
komt met de to
indicaindication
the sealing scale.
tie
van de ofafdichtingschaal.
26.
bedieningsknop
26.Druk
Pressdethe
control knob
en
afdichtingschaal
als één
on the gas as a whole
and
geheel
de gaskraan
sealingopscale
and press it
en
deze vast op het
ondruk
the worksheet.
werkblad.
27.
27.Controleer
Check iedere
each gas-gas
brander
ontsteekt
burner of
fordeze
ignition
and if
en
blijftremain
branden
alles for
they
lit en
and/or
naar
behoren
werkt. Voor
proper
functioning.
Check
storingen
z.o.z.
malfunctions on next page.
+ 65 (0)67
88op
53 via
63
OfT neem
contact
F + 65 (0)67 88 38 35
[email protected]
[email protected]
Tel.
088 088 7070
www.pittbyreginox.com
Assembly instructions
Attention! The PITT® by Reginox-system may only be connected by an approved installer. To
ensure the safety and warranty repairs may only be performed by approved professionals. You
should only use original parts.
Defect
Cause
Solution
A burner ignites
and turns off
again.
The control knob is not pressed
Hold the button pressed for a
long enough to activate the flame few seconds after igniting.
protection.
See user manual.
The control knob is not adjusted
at the correct height.
Reset the control knob.
Assembly instructions
step 19 t/m 22.
The control-button touches the
sealing scale.
Hob is not mounted the right way Reset the control knob.
under the countertop.
Assembly instructions
step 14 t/m 22.
Sealing scale is not in the center
vs. control knob.
Assembly instructions
step 25 t/m 26.
Spark ignition
remains igniting.
Hob is not mounted the right way Set the control knob well off.
under the countertop
Assembly instructions
step 14 t/m 22.
Sealing scale is not in the center
vs. control knob.
Detach sealing scale and adhere
again.
Assembly instructions
step 25 t/m 26.
Reset the control knob
Assembly instructions
step 19 t/m 22.
The plug is not in the
outlet.
Insert the mains plug into the
wall outlet.
Installation instructions
step 13.
Fuse is defect or the central fuse
is turned off.
Mount a new
fuse or switch on the fuse again.
Spark ignition is polluted or
humid.
Clean or dry the spark ignition
See user manual.
Burner parts are not mounted
correctly.
Put the burner parts together by
the spigot.
See user manual.
Burner parts are polluted or
humid.
Clean/dry the
Burner parts. Make sure the
outflow holes are open.
See user manual.
Main gas tap is closed.
Open the main gas tap.
A burner does not The control knob is not adjusted
kindle.
at the correct height.
A burner is not lit
evenly.
Gas smells in
surroundings of
cooker.
Manual
Detach sealing scale and adhere
again.
Control knob is not pressed long Keep the control knob pressed
or deep enough.
long enough and sufficiently
between full-and small gas.
See user manual.
Burner parts are not properly
placed.
Burner parts are not properly
placed. Put the burner parts
together by the spigot.
See user manual.
Burner parts are polluted or
humid.
Clean/dry the burner parts. Make See user manual.
sure the outflow holes are open.
Gas connection leaks.
Check the connection. Turn main
gas valve off when you’re not
able to fix it right away.
There is a burner turned on, but
not ignited.
Close the control knob and wait
a few minutes with rekindling.
Reginox The Netherlands
Reginox Far East
PITT® by Reginox
2 Loyang Lane # 03-03
Singapore 508913
See user manual.
T + 65 (0)67 88 53 63
F + 65 (0)67 88 38 35
[email protected]
www.pittbyreginox.com
PITT® by Reginox
Noordermorssingel 2
7461 JN Rijssen
T + 31 (0)548 53 56 35
F + 31 (0)548 53 56 00
[email protected]
www.pittbyreginox.com