1
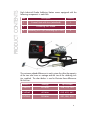
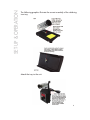
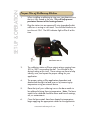
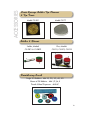
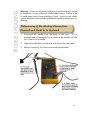
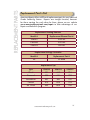
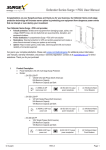
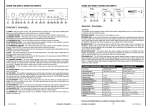
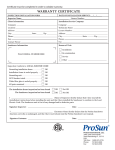
Soldering Solutions
User Manual for
Soldering Stations
www.americanbeautytools.com
1
TABLE OF CONTENTS
TABLE OF CONTENTS
2
INTRODUCTION3
PRODUCT CONTENTS
SAFETY
4
5-6
Safety - Personal
5
Safety - Workspace
5
Safety - Device
6
SET-UP & OPERATION
Selecting a Location
Assembly of Soldering Station
Proper Use of Soldering Station
MAINTENANCE & CARE
7-10
7
7-8
9-10
11
ACCESSORIES12
TROUBLE SHOOTING
13-14
REPLACEMENT PARTS
15
WARRANTY & SERVICE DETAILS
16
Company Information
American Beauty Tools are made just outside of Detroit Michigan, USA.
Ph:
1.248.280.2810
1.800.550.2510
Fax:
1.248.280.2878
Email:
[email protected]
Website:www.americanbeautytools.com
2
INTRODUCTION
American Beauty has been a fixture in the soldering tool marketplace since 1894. Our tools are a throw-back to a time when people
took pride in the tools they used and companies took pride in the
tools they manufactured. Today, American Beauty® tools are routinely
chosen to tackle the most challenging soldering, brazing and thermal
management applications with a diverse line of soldering irons and
stations, solder pots, resistance soldering systems and accessories.
Your American Beauty Industrial Grade Soldering Station has
been manufactured to stand-up to the rigors of today’s demanding
production environment. They are designed and produced to
provide the same high performance expected from our entire line
of Industrial Pencil-Style Irons while offering tighter temperature
control to meet the needs of more sensitive soldering applications.
All of our American Beauty soldering stations contain a compression
wound nichrome wire heating element made from the highest quality
materials for improved reliability during operation. And, all of our
elements and irons are wound and assembled right here in the USA.
With this type of tool, the operator plays an essential role in achieving
quality end-results, avoiding injury and ensuring a long product
lifespan. Please ensure that you take the time to read this manual
carefully. It contains all the information required to understand
how to properly set-up, operate & maintain this American Beauty
equipment. Additionally, please feel free to visit our full-service
website (www.americanbeautytools.com) for links to instructional
videos, product specifications, a technical blog, an on-line shopping
cart and much more.
The following video demonstrates
how to quickly get started using
your soldering station.
www.americanbeautytools.com/v/ss/quickstart
www.americanbeautytools.com
3
PRODUCT CONTENTS
Each Industrial Grade Soldering Station comes equipped with the
following components in each box:
Item
Description
Quantity
1
Control Unit with Iron (attached)
1
2
Soldering Iron Stand
1
3
Soldering Iron Tips (including tip in iron)
3
The customer related differences in each system lie within the capacity
of the iron also know as wattage and the size of the soldering iron
tips supplied. The chart below is used to illustrate these differences
for the user:
Model #
Wattage
Tips Included
V36GL3
60 Watt
704, 709, 724
V36GM3
40 Watt
610, 625, 643
V37GS3
20 Watt
501, 505, 510
4
SAFETY
Soldering irons are extremely hot. Operators of this product should
be made aware of and fully understand all of the warnings as they
relate to the operation or use of this device. Failure to observe the
following safety instruction could result in serious injury.
Safety - Personal
• Only use the soldering station for its intended use.
• Always wear Personal Protective Equipment (PPE) when operating
your soldering station. This includes safety glasses, protective
gloves, and sleeves (if necessary) to cover your body.
• Do not operate the soldering station while under the influence of
alcohol or drugs.
Safety - Workspace
• Always operate the soldering station in a well ventilated area.
Some solders and fluxes release fumes that can be harmful.
Proper attention should be given to these materials and the
ventilation required to exhaust these fumes.
• Do not operate the soldering station in the presence of water
and/or combustible & heat sensitive materials.
• Never leave an soldering station unattended unless it is unplugged
and completely cooled down.
• Be sure to properly label work area when in use to identify the
dangers of a hot soldering station.
www.americanbeautytools.com
5
SAFETY
Safety - Device
• Most American Beauty Industrial Grade Soldering Stations
are available in both a low voltage (110-120VAC) and high
voltage (220-240VAC) version. Please consult your cord label
to determine what version you have purchased and ensure your
solder station is properly plugged in to the appropriate outlet.
• The tip temperature of your iron can reach in excess of 900°F.
Mishandling of your iron can result in a serious burn or fire.
• Do not touch any metal parts of the iron while in operation.
• Do not use the iron for any application other than it’s intended
use.
• Do not leave a hot iron unattended.
• Soldering will produce smoke. Make sure the soldering location
selected is well ventilated.
• Always store the iron in the holder when not in use.
• Let the iron cool to room temperature prior to storage or before
changing tips.
• Always make sure the unit has been properly turned off when
finished using.
• Turn unit OFF and unplug device prior to moving unit.
• Never attempt to perform repair, replacement, diagnostics, or
routine maintenance while unit is plugged in.
• Repairs should only be performed by a qualified technician
familiar with the product.
• Do not modify the soldering station or use it with damaged parts.
6
SET-UP & OPERATION
Selecting a Location
Choosing a good location to station your Industrial Grade Soldering
Station is the first step to operating your soldering station safely
and efficiently. To assist with this, we have created a checklist of
considerations to guide you in selecting a location for your soldering
station.
• Area is well ventilated
• Surface is both flat and level
• Surface is both chemically and thermally resistant
• Area is away from high volume foot traffic zones
• Area is free from excess clutter
• Workspace is not in the direct path of airflow from AC or furnace
vent
• Workspace is preferably on an inside wall, or at-least away from
windows
• Workspace has access to a properly grounded outlet whose
output voltage matches that of your tool. (110-120VAC or 220240VAC)
• Workspace has adequate space that allows the power cord to
hang freely
Following these basic steps should ensure a suitably safe and efficient
location for the operation of your soldering station.
Assembly of Soldering Station
The V36G-series requires some minor assembly of the soldering
iron stand and attaching the stand to the unit. All of this can be
accomplished with a standard phillips screwdriver. See next page.
www.americanbeautytools.com
7
SET-UP & OPERATION
The following graphics illustrate the correct assembly of the soldering
iron tray:
Attach the tray to the unit:
8
SET-UP & OPERATION
Proper Use of Soldering Station
1.
When installing a soldering tip into your iron please ensure the tip is fully seated in the iron. This will help prevent premature burnout of the heating element.
2.
Plug the station into an approved 3-wire (grounded) outlet while iron is resting in iron stand. Turn the dial clockwise to turn the unit ‘ON’. The LED indicator light will be lit at this time.
3.
The soldering station will have output ratings ranging from 30% to 100% surrounding the dial. Turn the dial to the desired setting at this time. These ratings are there to help identify, note, and repeat the proper setting for your application.
4.
The proper setting will be application dependent and determined through trial and error or by measuring tip temperature using an external device.
5.
Place the tip of your soldering iron on the base metals to be soldered to bring them to temperature. Note: The base metals to be soldered should be clean and free of coatings, oils, or contaminants.
6.
Once the base metals have been heated to temperature, begin applying the appropriate solder for the application.
www.americanbeautytools.com
9
SET-UP & OPERATION
7. When finished, wipe the tip clean using a moist sponge and “tin”
the tip by applying fresh solder to it.
8. Turn unit “OFF”, unplug, and allow iron to cool to room temperature
prior to storing.
PROPOSITION 65 WARNING: American Beauty tools &
accessories are lead-free & RoHS Compliant. However, use of
this product with lead-bearing solders (or any other chemicals
found on the current Proposition 65 List) could expose the user to
chemicals known to the State of California to cause cancer and/
or birth defects or other reproductive harm.
10
MAINTENANCE & CARE
Solder Iron Tip
• While using the soldering iron, it is important to clean the tip
regularly using a moist sponge or brass sponge to remove
impurities and reduce oxidation.
• Avoid leaving the iron on for long periods of time (more than
1hr) without using it. This will cause your tip to become oxidized
creating a “dry” tip that will lose heat conductivity and prevent
solder from wetting to the tip surface.
• Periodically, after the iron and tip have cooled to room
temperature, the tip should be removed from the iron and the
shaft cleaned using an emery pad. This will help prevent the tip
from seizing in the iron due to the excessive build-up of oxides
and contaminants.
Note: Do not take a file to your American Beauty Paragon tip to
clean it. Using a file on your soldering iron tip will lead to the removal
of it’s iron plating which will significantly degrade the life of the tip.
Soldering Iron
• Periodically cycle the set screws of your iron. This will help
ensure they do not seize over time.
• When cleaning the shaft of your soldering iron tip, you should
also take the time to clean the bore (the cavity in which the tip
sits) of your iron using a wire brush.
Why not let us show you how to perform
basic maintenance on your soldering
irons.
www.americanbeautytools.com/v/ss/maintenance
www.americanbeautytools.com
11
ACCESSORIES
Brass Sponge Solder Tip Cleaner
& Tip Tiner
Model CS-BS1
Model CS-TT1
Solder & Fluxes
Solder, Models
CS-PBF1 & CS-PBF2
Flux, Models
CS-FX1, CS-FX2, CS-FX3
Desoldering Braid
Single 5 ft Bobbins: 484-1G, 2G, 3G, 4G, 5G
Sleeve of 25 Bobbins: 484-1,2,3,4,5
Thumb Wheel Dispenser: 485-8C
12
TROUBLE SHOOTING
Problem Description
Solution
Soldering iron produces
NO heat.
1.
•
2.
•
Is the power cord connected?
Connect power cord to outlet
Is the GCFI tripped on your oultet?
Unplug your iron, reset the GCFI,
and reconnect the power cord.
3. Determine if the heating element
needs replacing. (Pg. 14)
• Replace Heating Element with
the appropriate model for your
soldering iron. (Pg. 15)
Soldering iron
temperature is not
controllable or only runs
at maximum setting.
Replace Voltage Controller. (Pg. 15)
Soldering tip cannot be
removed.
Tips seize from oxidation build-up on
both the shank of the iron tip & inside
walls of the soldering iron. Both the tip
and heating element will need to be
replaced. (Pg. 15)
Soldering iron no longer
seems to reach the same
top temperatures.
American Beauty soldering irons are
‘full-output’ irons, meaning they either
operate at maximum potential or they
completely expire. ‘Less’ heat is almost
always a result of poor cleanliness.
• Clean the oxidation from both the
shank of the iron tip & inside walls
of the soldering iron.
www.americanbeautytools.com
13
TROUBLE SHOOTING
Warning: Disconnect the power cord prior to performing any service
or diagnostics on your Industrial Grade Solder Station. Failure to do
so could cause serious harm and electric shock. Service to your solder
station should be performed by qualified personnel to avoid injury or
damage.
Determining if the Heating Element has
Expired and Needs to be Replaced
1. Disconnect the handle from the body of the iron. This is
accomplished by loosening the set screw in the handle until the
iron is loose in the handle.
2. Slide the handle down on the cord and remove the cloth tape.
3. Perform Continuity Test (See instructional picture below).
14
REPLACEMENT PARTS
Replacement Parts List
American Beauty offers a full line of replacement parts for your Industrial
Grade Soldering Station Repairs are straight forward, however
for those wanting the work done for them, please see our website
www.americanbeautytools.com/repair to take advantage of our
Repair and Refurbish program.
Replacement Heating Elements
Model #
Replacement Element Part #
V36GL3
9012-60
V36GM3
9010-40
V36GS3
9014-20
Replacement Voltage Controller
Model #
Replacement Part #
All
V3-8058
Replacement Tips
Type
V36GL3
V36GL3
V36GL3
Chisel
501
643
704
Diamond
505
610
709
Screwdriver
507
618
720
Conical
510
625
724
Alt. Chisel
502
605
706
www.americanbeautytools.com
15
WARRANTY & SERVICE DETAILS
Warranty Details
American Beauty tools are warrantied to be free from defects in
material and workmanship as outlined below. No warranty is made
with respect to products which have been altered, subjected to abuse
or improperly used.
Consumable Parts - NOT COVERED
Items include such parts as Soldering Iron Tips, Desoldering Braid,
Resistance Soldering Elements and Electrodes, etc.
Serviceable Parts - 90-DAY PERIOD
Items include such parts as are Heating Elements, Thermostats, Voltage
Controllers, Cord-sets, etc. It is the customer’s responsibility to make
themselves aware of proper operating parameters, that when not
followed, can greatly reduce the life-span of this type of part.
Standard American Beauty Products - 3-YR PERIOD
These items include all American Beauty soldering tools that don’t fall
into the two categories highlighted above.
Complete warranty details can be located on our company website at
www.americanbeautytools.com/warranty
Repair Service
Eventually even the toughest soldering tools require minor repair work.
We have expanded our internal repair department and reassigned
our most experienced technicians to work on repairs. We implemented
customized software to ensure accurate and timely processing of
all returned products. Save yourself unnecessary downtime and
aggravation by taking advantage of American Beauty’s worldclass repair and refurbishment service. Contact us today to make
arrangements, or visit www.americanbeautytools.com/repair
16