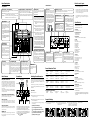
1
Thank you for purchasing the BOSS VT-1 Voice Transformer.
In order to take full advantage of the VT-1’s functionality, and to enjoy years of trouble-free service, please read this owner’s manual
carefully.
Before using this unit, carefully read the sections entitled: “USING THE UNIT SAFELY” and “IMPORTANT NOTES.” These sections
provide important information concerning the proper operation of the unit. Additionally, in order to feel assured that you have gained a
good grasp of every feature provided by your new unit, this manual should be read in its entirety. The manual should be saved and kept
on hand as a convenient reference.
IMPORTANT NOTES
In addition to the items listed under “USING THE UNIT SAFELY,” please read and
observe the following:
Power Supply
WARNING
CAUTION
Used for instructions intended to alert
the user to the risk of death or severe
injury should the unit be used
improperly.
Used for instructions intended to alert
the user to the risk of injury or material
damage should the unit be used
improperly.
* Material damage refers
other adverse effects
respect to the home
furnishings, as well
animals or pets.
to damage or
caused with
and all its
to domestic
The
symbol alerts the user to important instructions
or warnings.The specific meaning of the symbol is
determined by the design contained within the
triangle. In the case of the symbol at left, it is used for
general cautions, warnings, or alerts to danger.
The
symbol alerts the user to items that must never
be carried out (are forbidden). The specific thing that
must not be done is indicated by the design contained
within the circle. In the case of the symbol at left, it
means that the unit must never be disassembled.
The ● symbol alerts the user to things that must be
carried out. The specific thing that must be done is
indicated by the design contained within the circle. In
the case of the symbol at left, it means that the powercord plug must be unplugged from the outlet.
• The unit and the AC adaptor should be located so
their location or position does not interfere with
their proper ventilation.
• Never handle the AC adaptor body, or its plugs,
with wet hands when plugging into, or
unplugging from, an outlet or this unit.
• Always grasp only the plug or the body of the AC
adaptor when plugging into, or unplugging from,
an outlet or this unit.
• Before moving the unit, disconnect the AC adaptor
and all cords coming from external devices.
• Whenever the unit is to remain unused for an
extended period of time, disconnect the AC
adaptor.
• Try to prevent cords and cables from becoming
entangled. Also, all cords and cables should be
placed so they are out of the reach of children.
•
Do not use this unit on the same power circuit with any device that will generate line
noise (such as an electric motor or variable lighting system).
Placement
• Before cleaning the unit, turn off the power and
unplug the AC adaptor from the outlet.
• Whenever you suspect the possibility of lightning
in your area, disconnect the AC adaptor from the
outlet.
• Never climb on top of, nor place heavy objects on
the unit.
•
The AC adaptor will begin to generate heat after long hours of consecutive use. This
is normal, and is not a cause for concern.
•
Before connecting this unit to other devices, turn off the power to all units. This will
help prevent malfunctions and/or damage to speakers or other devices.
•
This device may interfere with radio and television reception. Do not use this device
in the vicinity of such receivers.
Maintenance
•
For everyday cleaning wipe the unit with a soft, dry cloth or one that has been slightly
dampened with water. To remove stubborn dirt, use a mild, non-abrasive detergent.
Afterwards, be sure to wipe the unit thoroughly with a soft, dry cloth.
•
Never use benzene, thinners, alcohol or solvents of any kind, to avoid the possibility
of discoloration and/or deformation.
Additional Precautions
• Before using this unit, make sure to read the
instructions below, and the Owner’s Manual.
• Do not open (or modify in any way) the unit or its
AC adaptor.
• Do not attempt to repair the unit, or replace parts
within it (except when this manual provides
specific instructions directing you to do so). Refer
all servicing to your dealer, or qualified Roland
service personnel.
• Never use or store the unit in places that are:
• Subject to temperature extremes (e.g., direct
sunlight in an enclosed vehicle, near a heating
duct, on top of heat-generating equipment); or
are
• Damp (e.g., baths, washrooms, on wet floors);
or are
• Humid; or are
• Dusty; or are
• Subject to high levels of vibration.
• This unit should be used only with a rack or stand
that is recommended by Roland.
• This unit, either alone or in combination with an
amplifier and headphones or speakers, may be
capable of producing sound levels that could
cause permanent hearing loss. Do not operate for
a long period of time at a high volume level, or at
a level that is uncomfortable. If you experience
any hearing loss or ringing in the ears, you should
immediately stop using the unit, and consult an
audiologist.
Use a reasonable amount of care when using the unit’s buttons, sliders, or other
controls; and when using its jacks and connectors. Rough handling can lead to
malfunctions.
•
To avoid disturbing your neighbors, try to keep the unit’s volume at reasonable levels
(especially when it is late at night).
• When you need to transport the unit, package it in the box (including padding) that
it came in, if possible. Otherwise, you will need to use equivalent packaging materials.
IMPORTANT: THE WIRES IN THIS MAINS LEAD ARE COLOURED IN ACCORDANCE WITH THE FOLLOWING CODE.
• Do not allow any objects (e.g., flammable material,
coins, pins); or liquids of any kind (water, soft
drinks, etc.) to penetrate the unit.
• Immediately turn the power off, remove the AC
adaptor from the outlet, and request servicing by
your dealer or qualified Roland service personnel
when:
• The AC adaptor or the power-supply cord has
been damaged; or
• Objects have fallen into, or liquid has been
spilled onto the unit; or
• The unit has been exposed to rain (or
otherwise has become wet); or
• The unit does not appear to operate normally
or exhibits a marked change in performance.
• When using the unit with a rack or stand
recommended by Roland, the rack or stand must
be carefully placed so it is level and sure to remain
stable. If not using a rack or stand, you still need
to make sure that any location you choose for
placing the unit provides a level surface that will
properly support the unit, and keep it from
wobbling.
• In households with small children, an adult should
provide supervision until the child is capable of
following all the rules essential for the safe
operation of the unit.
• Be sure to use only the AC adaptor supplied with
the unit. Also, make sure the line voltage at the
installation matches the input voltage specified on
the AC adaptor’s body. Other AC adaptors may
use a different polarity, or be designed for a
different voltage, so their use could result in
damage, malfunction, or electric shock.
• Do not force the unit’s power-supply cord to share
an outlet with an unreasonable number of other
devices. Be especially careful when using
extension cords– the total power used by all
devices you have connected to the extension cord’s
outlet must never exceed the power rating
(watts/amperes) for the extension cord. Excessive
loads can cause the insulation on the cord to heat
up and eventually melt through.
• Avoid damaging the power cord. Do not bend it
excessively, step on it, place heavy objects on it,
etc. A damaged cord can easily become a shock or
fire hazard. Never use a power cord after it has
been damaged.
For the U.K.
•
• Protect the unit from strong impact.
(Do not drop it!)
• Before using the unit in a foreign country, consult
with your dealer, or qualified Roland service
personnel.
BLUE:
NEUTRAL
BROWN: LIVE
As the colours of the wires in the mains lead of this apparatus may not correspond with the coloured markings identifying
the terminals in your plug, proceed as follows:
The wire which is coloured BLUE must be connected to the terminal which is marked with the letter N or coloured BLACK.
The wire which is coloured BROWN must be connected to the terminal which is marked with the letter L or coloured RED.
Under no circumstances must either of the above wires be connected to the earth terminal of a three pin plug.
For EU Countries
This product complies with the requirements of European Directives EMC 89/336/EEC and LVD 73/23/EEC.
For the USA
FEDERAL COMMUNICATIONS COMMISSION
RADIO FREQUENCY INTERFERENCE STATEMENT
This equipment has been tested and found to comply with the limits for a Class B digital device, pursuant to Part 15 of the
FCC Rules. These limits are designed to provide reasonable protection against harmful interference in a residential
installation. This equipment generates, uses, and can radiate radio frequency energy and, if not installed and used in
accordance with the instructions, may cause harmful interference to radio communications. However, there is no guarantee
that interference will not occur in a particular installation. If this equipment does cause harmful interference to radio or
television reception, which can be determined by turning the equipment off and on, the user is encouraged to try to correct the
interference by one or more of the following measures:
– Reorient or relocate the receiving antenna.
– Increase the separation between the equipment and receiver.
– Connect the equipment into an outlet on a circuit different from that to which the receiver is connected.
– Consult the dealer or an experienced radio/TV technician for help.
Unauthorized changes or modification to this system can void the users authority to operate this equipment.
This equipment requires shielded interface cables in order to meet FCC class B Limit.
For Canada
NOTICE
This Class B digital apparatus meets all requirements of the Canadian Interference-Causing Equipment Regulations.
AVIS
Cet appareil numérique de la classe B respecte toutes les exigences du Règlement sur le matériel brouilleur du Canada.
Copyright © 1996 BOSS Corporation
All rights reserved. No part of this publication may be reproduced in any form without
the written permission of BOSS CORPORATION.
00904990
’01-10-C2-41N
Panel Descriptions
Hints for voice input
< Rear Panel >
< Top Panel >
Bank Buttons / Bank Indicators
Number Buttons / Number Indicators
WRITE Button
Cord Hook
LINE OUT L/R Jacks
These buttons are used to select memory banks; they switch between the
Preset bank and the User bank.
These buttons are used to select memory positions 1 – 4;
the indicator of the selected number will light.
When you move the sliders or press the ROBOT button,
the number indicator will blink to indicate that the voice
character is now different than the contents of the memory.
This button is used to write (store) the
current voice character settings into memory
(the USER bank).
Loop the AC adaptor cord around
this hook; this will help prevent
damage to the cable and help prevent accidental disconnection.
These are output jacks (stereo, RCA phono type) for connecting the output of
the VT-1 to the line input jacks of an external device.
* To prevent the inadvertent disruption of power to your unit (should
the plug be pulled out accidentally),
and to avoid applying undue stress
to the AC adaptor jack, anchor the
power cord using the cord hook, as
shown in the illustration.
AC Adaptor Jack
INPUT Jack
Connect the included AC adaptor
(ACI/ACB Series) to this jack.
This is an (unbalanced) input jack
for connecting a microphone, etc.
Preset bank: This bank contains preset voice characters. It is not possible
to re-write the contents of these memories.
User bank:
Voice characters that you create using the sliders and the
ROBOT button can be stored in these memories.
Write procedure
Here’s how to write a voice character that
you’ve created into memory (USER bank).
By storing a voice character in memory, you
can later re-select it at the touch of a button.
1. Move the sliders and/or press the RO-
PEAK Indicator
BOT button to create the desired voice
character.
This indicator lets you check the
microphone input level. If the
indicator lights frequently, lower
the input level by adjusting the
INPUT LEVEL knob located on
the rear panel.
REMOTE Jack
1. Changing the orientation of the
microphone(s).
2. Relocating microphone(s) at a
greater distance from speakers.
3. Lowering volume levels.
This jack is for connecting a foot
switch (BOSS FS-5L; optional). A
foot switch allows you to turn the
voice character function on/off without affecting the reverb component.
2. Press the WRITE button. The bank
(USER) and number indicators will blink.
3. Press a number button (1 – 4) to select
the desired storage destination; the
number indicator will blink.
* The PEAK indicator will light 6
dB below the clipping point (the
level at which distortion will
begin).
* Howling could be produced depending on the location of microphones
relative to speakers. This can be remedied by:
The voice character will be stored in the
number you selected in step 3.
* If during the Write procedure you decide to
cancel the operation, hold down the BYPASS button and press the WRITE button.
You will return to where you were before
starting the Write procedure.
This button turns the Robot function on/off. When the Robot
function is on, the Robot indicator will light.
When the Robot function is on,
the voice will be output at a fixed
pitch (regardless of the input
pitch), producing a flat voice
character without intonation.
BYPASS Button / Bypass Indicator
PITCH Slider
FORMANT Slider
MIX BALANCE Slider
This slider adjusts the pitch of
the voice character. The pitch
can be adjusted over a range of
+/- one octave.
Formants are fixed frequency regions of
emphasis that are an important element
in determining how a voice sounds. This
slider adjusts the formants. Raising the
slider produces a voice character that
sounds as if the vocal cords have become
‘smaller.’ Lowering the slider produces
a voice character that sounds as if the
vocal cords have become ‘larger.’
This slider adjusts the volume
balance between the generated
voice character and the original
input sound. As the slider is
raised (toward the EFFECT end
of the scale), the generated voice
character will become louder.
Main Features
When pitch is shifted using a conventional pitch shifter, the
formants (regions of spectral emphasis determined by the
size of the vocal cords) are also shifted. This means that
raising the pitch produces a “chipmunk voice,” as if the
vocal cords had become smaller. Conversely, lowering the
pitch produces a “giant voice,” as if the vocal cords had
become larger.
The VT-1 controls basic pitch and formants independently,
allowing a variety of voice characters (characteristic types
of voice) to be created.
FS-5L (Optional)
etc.
AC adaptor
REMOTE Jack
A REMOTE jack is provided, allowing you to turn the voice
character function on/off with a foot switch, without
affecting the reverb.
INPUT LEVEL Knob
This is an output jack (mono,
unbalanced) for connecting the
output of the VT-1 to the microphone input jack of an external
device.
This knob adjusts the input level. Set this
knob so that when the input voice is at its
loudest, the PEAK indicator lights briefly.
* This unit is equipped with a
protection circuit. A brief interval (a few seconds) after power
up is required before the unit
will operate normally.
* The input level must be adjusted carefully.
If the PEAK indicator lights too frequently
or not at all, the correct effect will not be
obtained.
Be sure that sound from a speaker does not enter the
microphone you are using. This will have the same
effect as if several voices were input to the unit (i.e. the
VT-1 will not function properly).
–
We recommend that you use a unidirectional microphone; speak or sing as close to the microphone as
possible.
Specifications
Nominal Input Level
-50 dBu (INPUT LEVEL: MIC)
-20 dBu (INPUT LEVEL: LINE)
Input Range
62.5 Hz – 1 kHz (C2 – B5)
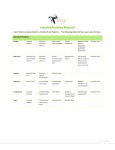
Preset Memories Table
Standard Settings
1: High Tone
1: Duck
2: Low Tone 2
2: Big Monster
Selecting Preset Memories
Vocal Applications with reverb
You can choose from five voice character types as appropriate for your musical or performance situation. The voice
character memories will be given settings of the selected
type. At this time, the contents of the USER bank will also
be re-written.
Vocal Applications with non-reverb
PRESET
USER
PRESET
USER
1: Normal Voice
1: Normal Voice
1: Normal Voice
1: Normal Voice
1: Low Tone 1
1: Low Tone 1
2: Detune; Up
2: Detune; Down
2: Detune; Up
2: Detune; Down
1: Duck
1: Chipmunk
Power Supply
DC 9 V: AC adaptor (ACI/ACB Series)
4: Computer Voice
4: Robot
3: Duet; High
3: Duet; Low
4: +3rd
4: +5th
Dimensions
178 (W) x 161.5 (D) x 52 (H) mm
7 (W) x 6-3/8 (D) x 2-1/16 (H) inches
3: Duet; High
3: Duet; Low
4: +3rd
4: +5th
Weight
480 g / 1 lb 1 oz (excluding AC adaptor)
Included Items
AC adaptor (ACI/ACB Series)
Owner’s Manual
Roland Service (information sheet)
2: Low Tone 2
2: Low Tone 2
3: High Tone
3: High Tone
4: Computer Voice
4: Computer Voice
2: Big Monster
2: Big Bear
3: Kids
3: Space Invader
4: Robot
4: Big Robot
Animation Character Settings
PRESET
USER
Indicators
PEAK Indicator
Bank Indicators (Preset, User)
Number Indicators (1, 2, 3, 4)
BYPASS Indicator
ROBOT Indicator
3: Kids
3: Space Invader
Narrations / DJ Performance Settings
PRESET
USER
Controls
Bank Button
Number Buttons (1, 2, 3, 4)
BYPASS Button
WRITE Button
ROBOT Button
PITCH Slider
FORMANT Slider
MIX BALANCE Slider
REVERB Slider
INPUT LEVEL Knob
POWER Switch
Connectors
INPUT Jack
MIC OUT Jack
LINE OUT Jacks L/R
REMOTE Jack
AC Adaptor Jack
2. While holding down the button for the desired type,
Current Draw
300 mA
* 0 dBu = 0.775 Vrms
* In the interest of product improvement, the specifications
and/or appearance of this unit are subject to change without
prior notice.
turn the power on again.
LINE IN R
Voice character settings can be stored in memory. At the
touch of a button, you can select User voice characters or
Preset voice characters to switch between a variety of sounds.
The on-board reverb is of a quality that rivals dedicated
reverb processors; the ideal reverb for your vocal part is
always be available.
This slider adjusts the
volume of the reverberation sound.
(Procedure)
1. Turn the power off.
The ROBOT button fixes the vocal pitch to produce a
special effect like that of a robot speaking.
High-Quality Reverb
MIC OUT Jack
This switch turns the VT-1 on/
off.
REVERB Slider
If All Memory Type is selected, you will be able to freely
modify the settings of the PRESET bank just as with the
USER bank.
Special effects using the ROBOT button
Memory Function
POWER Switch
PRESET
USER
Connections
A vocal effector that independently controls
basic pitch and formants
This button switches the bypass function
on/off.
When bypass is on, the BYPASS indicator
will light, and the voice character and reverb
will be turned off so that the input sound is
output without change.
If you use the REMOTE jack to turn off the
voice character (while leaving the reverb
unaffected), the Bypass indicator will blink.
–
Residual Noise
-100 dBu or less (INPUT LEVEL: MIC) (IHF-A)
* By pressing the WRITE button without moving the sliders or pressing the ROBOT button, you can copy the currently selected
voice character to another USER number.
ROBOT Button /
Robot Indicator
Input only a single voice. If several voices are input, the
VT-1 will not operate properly.
Nominal Output Level
-40 dBu (MIC OUT)
-20 dBu (LINE OUT)
4. Press the WRITE button once again.
* If the PEAK indicator lights too
frequently, the proper effect will
not be obtained.
–
LINE IN L
Amplifier
MIC IN
Amplifier
3. While the Preset indicator and the User indicator are lit,
press the WRITE button.
The voice character memories will be given settings of
the selected type:
* To prevent malfunction and/or damage to speakers or other
devices, always turn down the volume, and turn off the
power on all devices before making any connections.
* Once the connections have been completed, turn on power to
your various devices in the order specified. By turning on
devices in the wrong order, you risk causing malfunction
and/or damage to speakers and other devices.
VT-1
Amplifier
{ [BANK]: Standard Settings }
{ [1]: Vocal Applications with reverb }
{ [2]: Vocal Applications with non-reverb }
{ [3]: Narrations / DJ Performance Settings }
{ [4]: Animation Character Settings }
{ [ROBOT]: All memory types }
Sample Settings
1: Usual setup for transforming a man’s
voice to a woman’s.
2: Lowering a man’s voice by an octave.
3: Centering the Mix Balance slider lets
Can be used to make a woman’s voice
sound like a man’s.
you mix a man’s dry voice together
with the same voice transformed into a
woman's for a duet. Add reverb effect.
4: Robot Mode