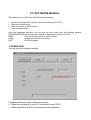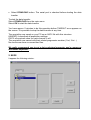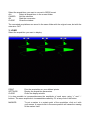
1
Seismograph for Civil Engineering
USER MANUAL
2002 Edition – Rev.1
CE-3S
MAIN FEATURES
•
•
•
•
•
•
•
•
•
•
•
•
•
•
3 simultaneous acquisition channels with 12 bit A/D converter
Floating Point data processing
Gain adjustable via software for each channel separately
Total / partial Enhancement with Freeze
Single channel display
Automatic recording up to 74 acquisitions
239 samples acquired for each channel
Minimum sample rate: 31 µs (standard version) or 7,8 µs (special version)
Maximum sample rate: 3ms (standard version) or 1 ms (special version)
Delay: post trigger up to 1s
3 independent markers
Serial Data Output
Hardcopy of the acquisition (on predefined printer)
Acquisition processing software for PC.
1 INTRODUCTION
The resolution of acquisition is 12 bits, that means the signal is divided into 212 (4096)
parts.
All data acquired are indicated in FLOATING-POINT format.
The management firmware is composed of graphical screens that can be easily followed
by the User.
All commands can be entered through the 4-buttons keyboard integrated in the front panel.
To guarantee a good and long period of use of the instrument it is recommended to
follow these steps:
• switch on the instrument ONLY AFTER cables and geophones have been placed in
the field
• verify if the polarity at the geophones terminals is respected (red = + pole, black= pole)
• do not submit the instrument to stress during its working
• please avoid any liquids get in contact with the connectors; in case this happens,
switch off the instrument and contact the Manufacturer to describe in details what happened
• Read the entire user manual at least once and, in case of problems, avoid
improvisation!
2 MAIN MENU
In the Main Menu you can find the following options
1. ACQUISITION
2 TRANSFER
3 DELETE
4. DATE/TIME
5 SETTINGS
• To move through the different functions press À and ¿ arrows
• To select each function press OK
• To visualize the current software version, press MENU
A black square indicates the selected function
2. 1 ACQUISITION MENU
Through the acquisition menu you can set all acquisition parameters and acquire data.
The following submenu will appear:
1.RECORD TIME
2.DELAY
3.GAIN 1
4.GAIN 2
5.GAIN 3
6.TRIGGER
7.ASAP
•
•
•
•
To select the following function press À
To select the previous function press ¿
To enter the selected function press OK
To come back to the main menu press MENU
The acquisition is automatically saved in the internal memory and signed with an order
number.
All settings are saved for following acquisitions.
You can save up to 74 acquisition
2.1.1 RECORD TIME
Record time set the registration length. The sample rate is strictly related to the frequency
of the acquisition.
1
freq =
sample _ rate
Sample rates and related record length are as follows:
-
standard version
Sample rate (µs)
Record time (ms)
-
31
7.4
62
14.9
125
29.8
250
59.7
500
119.5
1000
239
2000
478
3000
717
7.8
1.87
15.6
3.74
31.2
7.49
62.5
15.00
125
30.00
250
60.00
500
120.00
1000
239.00
special version
Sample rate (µs)
Record time (ms)
To modify the selected record time:
• Press OK
• Use arrows to increase or decrease the value
• Press OK to confirm
The number of samples acquired for each channel is fixed (239 sample/channel) and it is
not dependent by the record time.
2.1.2 DELAY
This option allows inserting a delay in the acquisition. It can be used only with TRIGGER
function.
This function is very important when the instrument can acquire a limited number of
samples per channel. We recommend you to proceed as follows: make a first acquisition
with a long record time (e.g. 717 ms) and verify the first arrivals on all channels using the
marker tool. If you are not able to see the first breaks you can introduce a delay between
the shot and the beginning of the recording. In this way the acquisition will start later and
you will have the possibility to see all the first arrivals.
You can set a max.delay value of 1000ms
To modify the selected delay:
• Press OK
• Use arrows to increase or decrease the value
• Press OK to confirm
2.1.3 GAIN
This function sets the gain for each channel.
The available value is:
1, 2, 5, 10, 20, 50, 100, 250, 500
If you set a too high gain, you will obtain a clipped wave.
If you set a too low gain, the acquired signal will not be clearly visible due to a weak
signal/noise ratio.
We suggest you first to set a high gain for all the three channels, make an acquisition and
verify which wave has been clipped. The channels with the clipped wave must be set with
a lower gain in the next acquisition.
The relation between the gain value and the acquisition range is described in the following
table:
Value
1
2
5
10
20
50
100
250
500
INPUT range
±500mV
±250mV
±100mV
±50mV
±25mV
±10mV
±5mV
±2mV
±1mV
Resolution
244µV
122µV
49µV
24µV
12µV
5µV
2.5µV
976nV
488nV
To modify the selected value:
• Press OK
• Use arrows to increase or decrease the value
• Press OK to confirm
Press MENU to come back to the main menu
2.1.4 TRIGGER
This function makes the acquisition start with the impulse trigger generated by the hammer
switch. You can energise the ground only after the message ENERGISE NOW appears on
the screen.
The acquisition is automatically saved and displayed.
Immediately after you shot the ground, the red LED positioned on the instrument panel just
above the EXTERNAL TRIGGER connector will blink for a few seconds.
If you have selected LIGHT ON in the SETTINGS menu, the backligth is automatically
switched off during the acquisition to avoid electric noise affect the measurement. In this
case, you can consider the strike accepted when the display is switched off.
2.1.5 ASAP
This function makes the acquisition start when you press OK button.
The acquisition will be automatically saved and displayed.
If you have selected LIGHT ON in the SETTINGS menu, the backligth is automatically
switched off during the acquisition to avoid electric noise affect the measurement.
2.2 DELETE
This function deletes all acquisitions saved in the internal memory. On the display you can
see the total number of the acquisitions in memory; a delete confirmation is requested.
Press OK to delete all acquisitions
Press MENU to come back to the Main Menu without deleting the internal memory
2.3 TRANSFER
This function allows you to transfer to an external PC all acquisitions via serial port.
For this operation is necessary to connect the PC and the instrument through the special
cable delivered with the CE-3S. The rounded connector must be inserted in
“PRINTER/RS232” connector on the instrument panel, while the 25 pins female connector
must be connected to the COM port of your PC. In case your PC has only a 9 pin male
serial connector, you may need a 9F/25M adaptor.
Every acquisition is transferred together with its setting parameters, identification number,
acquisition, gains, date and time, together with markers (if they have been set).
Press OK to start data transfer.
Press MENU to come back to the main menu
Note: to a correct data transfer, please carefully follow the instructions related to the data
transfer software to PC.
To stop the data transfer, simply switch off the instrument; your PC will automatically end
this operation a few seconds later.
It will take 9’30” to transfer 74 acquisitions (full memory capacity) plus a few additional
seconds to allow files processing.
2.4 DATE/TIME
This function allows you to set date and time. This is an important step, as each
acquisition can be identified through its date and time.
Date and time will be displayed in yyyy/mm/dd-hh:mm format.
The following menu will appear:
DAY
MONTH
YEAR
HOUR
MINUTE
To modify a certain value:
• Press OK to select a parameter
• Use arrows to increase or decrease the value
• Press OK to confirm
The new value will be automatically entered.
Press MENU to come back to the main menu
2.5 SETTINGS
This function allows you to set several parameters:
• LIGHT (ON/OFF)
Switch on/off the backlight using OK Button.
Please don’t forget the light is power consuming and it must be
used only if necessary.
Its predefined setting is OFF. When you switch on the
instrument, the backlight is always off.
• SMOOTHING
The smoothing function will improve the appearance of the
acquired wave, but it will decrease the instrument performance.
Its predefined setting is ON.
•
ITALIANO
Set the menu in Italian language
•
ENGLISH
Set the menu in English language
When a setting has been ticked, an X will appear aside it.
To change setting, use the arrows to move on the required parameter and press OK
button.
Press MENU to come back to the main menu.
All settings are saved even after the instrument switch-off.
3 DISPLAY AN ACQUISITION
On the first row of the display will appear, in the following sequence:
M1=
M2=
M2=
N=1
M1= marker associated to channel 1
M2= marker associated to channel 2
M3= marker associated to channel 3
N=Acquisition Order Number
The trace size of each channel is fixed; each wave is displayed at its best in relation both
to its amplitude and to the display dimension.
3.1 MARKER SETTING
Using the marker you can save the first break for each channel. The time indicated by the
marker must be added to the delay time in case this has been set.
To set a marker, follow this procedure:
• Use the arrows to increase/decrease the marker value in steps of 1.
• Press OK to move to the following channel setting
If you press OK together with the arrows, the fast marker mode is set and you can move it
in step of 5.
3.2 DISPLAY MENU
Pressing MENU button you access to the following options:
1. ENHANCEMENT
2. REPLAY
3. PRINT
4 SINGLE CHANNEL
5 CLOSEI
6 ACQUISITION MENU
Press MENU button to come back to the main menu
3.2.1 ENHANCEMENT
This function allows you to sum up a new acquisition to the previous one in order to
increase the signal/noise value.
The following submenu will appear:
CHANNEL 1
CHANNEL 2
CHANNEL 3
START WITH PREVIEW
START NO PREVIEW
You may do the enhancement of all channels or only of the one or two selected.
The max. number of enhancement for each channel is 10.
To select/unselect a channel for the enhancement:
Press OK
The X indicates the channel has been selected.
You can do the enhancement in two different ways: START WITH PREVIEW and START
NO PREVIEW.
In both cases you must only perform a shot in trigger mode. In ASAP mode the
enhancement option has no practical meaning.
START WITH PREVIEW:
With this option you can look at the new acquisition before adding it to the previous one.
1. First of all you have to do a new acquisition.
2. Press OK to sum-up and display the resulting acquisition. At this point you do not have
any possibility to come back to the original.
3. If you don’t want to sum-up the new acquisition, press MENU to null the enhancement
and come back to the original acquisition
START NO PREVIEW:
Selecting this option you cannot see the enhancement acquisition, but you can see directly
the waves resulting after the automatic sum-up. In this way you may increase your
productivity, but you cannot do anything in case the result of the enhancement would be
worse then the original wave.
1. Make a new acquisition and wait for results on display
3.2.2 REPLAY
This function allows you to replay the acquisition with the same parameters.
The new acquisition will overwrite the previous one.
3.2.3 PRINT
Selecting this function you can print the displayed acquisition, complete of the list of its
markers and settings.
For this operation is necessary to connect the PC and the instrument through the special
cable delivered with the CE-3S. The rounded connector must be inserted in
“PRINTER/RS232” connector on the instrument panel, while the 25 pins female connector
must be connected to the COM port of your PC. In case your PC has only a 9 pin male
serial connector, you may need a 9F/25M adaptor.
The printer must always be switch on AFTER the instrument.
3.2.4 SINGLE CHANNEL
With this option you will have a single channel display.
The following submenu appears:
CHANNEL 1
CHANNEL 2
CHANNEL 3
Use the arrows to select the desired channel and press OK.
Now you can see the selected channel displayed with double amplitude.
Press OK to display the following channel.
Press MENU to display all channels.
Also markers are activated with this option.
3.2.5 CLOSE
Close the menu and come back to the acquisition display
3.2.6 ACQUISITION MENU
If you choose this option you can come back directly to the acquisition menu.
APPENDIX: Technical Notes
TRANSPORT OF THE INSTRUMENT
1)
For transport by hand use the proper handle
2)
After airfreight, it is probable that the case does not open because it has stayed in a
pressurized environment. In this case, you only have to unscrew the knob under the
handle in order to restore the internal pressure. At this point, the cover can be opened and
the knob must be screwed on again.
3)
During transport it is advisable to place the case in such a way that it receives the
least possible physical stress, not placing it in direct contact with the carrying structures of
the vehicle.
4)
The instrument may never be transported during functioning
NOTES ON THE AUTO TRACE SIZE
The signal of the ADC (Analog/Digital Converter) is extensively enlarged by means of an
automatic process that tends to let the maximum values of the trace occupy all the
available space (1/3 of the display height) on the video during display.
Due to this, in case the acquisition would be ONLY noise, even if very low, it will be
displayed as it was very high. For the same reason you don’t have to worry about if, after
an ASAP acquisition with no signal, you may see at display waves in form of big “combs”.
In most cases, in fact, an acquisition made with the circuit open is composed by square
waves.
BATTERY
An internal battery powers the instrument. This is a Pb battery without maintenance and
with gas internal recombination. A Pb battery can be recharged even if it is not yet
completely discharged. Its battery charger is delivered by the Manufacturer together
with the instrument.
An additional external battery power cable is available on request. Even if the instrument is
protected against reverse polarity, while using an external battery you must be careful to
the terminal polarity: connect the red cable terminal to the + pole of the battery and the
black terminal to the - pole.
You cannot use the instrument during recharging.
CE-3S working temperature is between -30°C-+50°C.
When your internal battery does not keep its charge, you must substitute it with a spare
one delivered by the Manufacturer.
The standard life of this kind of battery is around 4-5 years.
* *** *
PC SOFTWARE MANUAL
The software of your PC allows the following operations:
•
•
•
•
Download all acquisition saved in the internal memory of CE-3S
Display the acquisitions
Data conversion in SEG2 format
Print the acquisitions
After your language selection, you can see the main menu with the following options:
DOWNLOADDownload all acquisition saved in the internal memory of CE-3S
SEG2
Convert the acquisitions in SEG2 format
LOAD
Display the selected acquisition
QUIT
End the program
1. DOWNLOAD
You can see the following window:
For data download, please follow these steps:
• Select the serial port of your PC connected to the CE-3S.
• Select destination PATH for the transferred acquisitions
• Select DOWLOAD button. The serial port is checked before starting the data
transfer
To start the data transfer:
Select DOWNLOAD from the main menu
Select OK to start the data transfer
You have approx. 5 minutes to do this operation before TIMEOUT error appears on
the screen. It is possible to stop the data transfer at any time.
The acquisition are saved on your PC as an ASCII file with this structure:
HEADER: it described all acquisition settings
DATA: all acquired value for each channel in mV
The acquisition are named with their related progressive number (1.txt, 2.txt…)
No checks are done on overwritten files.
We really recommend you to set a dot as decimal separator and a comma as
thousands separator.
2. SEG2
It appears the following window:
Select the acquisitions you want to convert in SEG2 format
ALL
Select all acquisitions in the current folder
CANCEL
Null the selection
OK
Start the conversion
CLOSE
Close the window
The converted acquisitions are saved in the same folder with the original ones, but with the
extension .DAT
3. LOAD
Select the acquisition you want to display:
PRINT
SETTINGS
CLOSE:
Print the acquisition on your defined printer
Display the acquisition parameters
Close the display window
It is also possible to increase/decrease the amplitude of each wave using “+” and “-“
buttons. The wave amplitude is increased/decreased by 5% at any click of the button.
MARKER
To put a marker in a certain point of the acquisition, click on it with
your mouse. A second click in the same position will cause the erasing
of the marker itself.