1
QuickStart Guide
SKP8CMINI
StarterKit Plus
Target/Bus
Power Mode
Selector
Thermistor
R8C/11
(R5F21114FP)
m
CdS Cell
s.
co
Slide
Switch S1
po
ICD LED Status:
Red – Target Stopped
Green – Target Running
Status – ICD Status
Red – ICD Power
MCU
Power
Clock Stop
Detect
3 User
LEDs
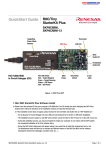
Figure 1. SKP8CMINI
on
lin
e
co
m
RTA-FoUSB-MON
In-Circuit Debugger (ICD)
ne
nt
Pushbutton
Switch S2
1. Mini R8C StarterKit Plus Software Install
a) Please insert the enclosed CD into your computer’s CD-ROM drive. The CD should auto-start, displaying the SKP8CMini
Install Screen. Follow the directions in the installation windows to install the Renesas tools.
i) If the installation screen does not appear, please browse the CD root folder and double-click on “SKP_Installer.exe”.
– Do not plug the In-Circuit Debugger into your USB port until instructed to in Section 2, USB Driver Installation.
– The installation process requires a valid SKP serial number. Locate the label on the PC board or on the side of your box.
– During the installation process, you may be prompted to restart your computer. Do not restart until the SKP installer
has completed installation of all of the software items.
– During the SKP install, dialog boxes will appear asking if you would like to install the development tools or not.
The development tools will allow you to evaluate the different features of the R8C/11 MCU and the software
development environment (debugger, compiler, linker, etc…).
SKP8CMINI StarterKit Plus QuickStart Guide
Page 1 of 5
2. USB Driver Installation
When you connect the RTA-FoUSB-MON In-Circuit Debugger (ICD) to your computer for the first time, Windows will recognize
this new device and will request the drivers. Follow the steps below to install the drivers. Administrator privileges are
required to install the driver on a Windows 2000/XP machine.
a) Plug one end of the USB cable into the RTA-FoUSB-MON and the other into a USB socket on your PC (the supplied USB
cable is keyed for the mini USB connector on the FoUSB-MON). The “Found New Hardware Wizard” window will appear.
b) If using Windows XP, skip to step 2 c); otherwise, click <Next>.
c) Verify the (Recommended) option is selected and click <Next>.
d) Select “Specify a location” and leave all other options un-checked, click <Next>.
e) Browse to the “C:\MTOOL\FOUSB\USB Drivers” folder.
m
f) Select the file “fousb.inf” and click <Open>.
co
g) Click <Ok> to install the USB Driver.
s.
– For Windows XP, a dialog box is displayed warning that the driver has not been tested for Windows XP compatibility.
Please disregard this warning and continue driver installation.
po
ne
nt
– You can verify that the driver is installed properly by looking at how fast the Status (yellow) LED is blinking on the
RTA-FoUSB-MON. If the driver is loaded correctly, the Status LED will be blinking once every second. If not, the Status
LED will blink 2-3 times a second (if you continue having driver installation problems, see SKP8CMINI User’s Manual,
Appendix A. Troubleshooting).
3. Demo Program
co
m
The kit ships with a demo program that runs on the board when connected to the ICD (RTA-FoUSB-MON).
As there is no connector polarity on the Mini R8C board, please verify the position of the Mini R8C and RTA-FoUSB-MON
as shown in Figure 1.
lin
e
a) If not already done in step 2, plug one end of the USB cable into the RTA-FoUSB-MON and the other into a USB socket
on your PC.
b) Plug the mini R8C board into the TARGET connector of the RTA-FoUSB-MON as shown in Figure 1. The demo should run!
on
c) The demo has two modes of operation: light and temperature. Switch S1 is used to determine which demo is running.
i) Light: If S1’s actuator is towards pushbutton S2, the light demo is running. The LED’s sequential blink speed varies
depending on the light level detected using the CdS Cell (the brighter it is, the faster the blink speed becomes and vice
versa). Pressing S2 changes the blinking sequence of the LEDs.
ii) Temperature: If S1’s actuator is away from S2, the temperature demo is running. Temperature is sampled and the LEDs
are lit based on rising or falling temperature. When the temperature of the Thermistor stays constant the yellow LED is
lit. When the temperature increases, the Red LED is lit, and when the temperature decreases, the Green LED is lit.
SKP8CMINI StarterKit Plus QuickStart Guide
Page 2 of 5
4. HEW (IDE) Quick-Start
HEW integrates various tools such as the compiler, assembler, debugger, and editor into a common Graphical User Interface.
To learn more on how to use HEW, open the HEW manual navigator on your computer (Start > (All) Programs > Renesas
High-performance Embedded Workshop > Manual Navigator).
a) Launch HEW from the Start menu (Start > (All) Programs > Renesas High-performance Embedded Workshop >
High-performance Embedded Workshop).
b) In the “Welcome!” dialog box:
i) Verify “Create a new project workspace” is selected.
ii) Click <OK>.
c) In the “New Project Workspace” Dialog box:
i) Verify the “CPU family” is set to “M16C”.
m
ii) Select “R8C StarterKit Plus” (Figure 2).
co
iii) Enter “skptestR8C” for the Workspace Name
(the Project Name will auto fill to “skptestR8C”).
iv) Click <OK>.
s.
Figure 2. New Project Workspace in HEW
d) On the “R8C StarterKit Plus - Step 1” Window:
nt
i) Click <Next>.
ne
e) On the “R8C StarterKit Plus - Step 2” Window:
i) Select “Demo2”.
f) In the “Project generator information” Window:
m
i) Click <Ok>.
po
ii) Click <Finish>.
co
g) Click the “Build” icon,
, to compile, assemble and link
the project. HEW will look similar to Figure 3.
lin
e
h) After ensuring there are no errors, proceed to section 5,
KD30 Debugger Quick-Start.
5. KD30 (Debugger) Quick-Start
Figure 3. HEW with the skptestR8C project
compiled
on
a) Connect the R8CMini SKP to the PC (described in detail
in steps 3a) and 3b) above).
b) Click on the debugger icon
to launch the KD30
debugger from HEW. The “Init” dialog box should open
(Figure 4).
c) Click <Refer…>.
d) Highlight “R5F21114.mcu” and click <Open>.
e) Select USB and click <OK>.
– If you get an error, check connectivity.
– If the message “We should download new firmware”
is displayed, click <OK>.
After initialization, the KD30 Program Window will appear.
SKP8CMINI StarterKit Plus QuickStart Guide
Figure 4. KD30 Init Window
Page 3 of 5
f) Click “File > Download > Load Module…”.
g) Surf to our output directory:
C:\Hew3\skptestR8C\skptestR8C\debug.
h) Select the file “skptestR8C.X30” and
click <Open>. After the module is downloaded,
the Program Window should look like Figure 5.
Figure 5. KD30 Program Window after download of
skptestR8C
co
j) Click the Stop icon
to halt the program.
If you now click the <Go> icon, the program will
resume execution from the point it stopped.
k) Exit KD30 by selecting “File > Exit” from the
pull-down menu.
l) Exit HEW by selecting “File > Exit” from the
pull-down menu in HEW.
m
i) Click the <Go> icon
to start the program.
This program is similar to the Demo program,
but the LEDs blink in a different sequence
(and a lot slower).
nt
s.
6. Downloading (re-loading) the Demo Program using the Flash-over-USB™
Programmer
ne
When we ran KD30, the original demo program was erased and the R8C was programmed with a different program.
You can use the Flash-over-USB™ Programmer to restore the original demo program.
a) Connect the R8CMini SKP to the PC. (Described in detail in steps 3a) and 3b) above.)
po
b) Start the Flash-over-USB™ Programmer (Start > (All) Programs > RENESAS-TOOLS > Flash-over-USB Ver. x.xx >
FoUSB Programmer) or double-click on the “FoUSB” icon on your desktop).
m
c) The first time the FoUSB Programmer is opened on your computer:
co
i) Under Select MCU Family, click on “R8C/Tiny Series”.
ii) Under Select MCU Part Number, click on “R5F21114”.
lin
e
iii) Click <Ok>.
iv) Click <OK> as requested until you are returned to the Flash-over-USB main menu.
d) Every other time: If the “Unlocked” window appears, click <OK>.
on
e) Click <Open> when the Flash-Over-USB main menu appears.
f) Browse to the “C:\MTOOL\SKP8CMINI\Sample_Code\Demo\Demo1\Release” folder.
g) Select “Demo1.mot” and click <Open>.
i) When the ID Code dialog box appears, click <OK>.
h) Click <Program> to open the Program Flash window.
i) Click <Program> to download the demo program.
j) When the FoUSB dialog box “Program completed
Successfully” appears, click <OK> (Figure 6).
k) Click <Exit> to close Flash-over-USB Programmer and
the demo program should start.
For more information on how to use the Flash-over-USB™
Programmer, click on the “Help” button.
Figure 6. Flash-over-USB™ Programmer Main Menu
after loading the Demo Code
SKP8CMINI StarterKit Plus QuickStart Guide
Page 4 of 5
7. What’s the next step?
After you have completed this quick-start procedure, please review the tutorials that came with the kit. The tutorials will help
you understand and jumpstart the software development process using Renesas’ development tools. You can access the
tutorials from the Start Menu (Start > (All) Programs > RENESAS-TOOLS > SKP8CMINI > Tutorial 1 – Development Process
or Tutorial 2 – Creating a New Project) or from (Start > (All) Programs > RENESAS-TOOLS > SKP8CMINI > Document
Description), which also lists other documents that come with the SKP. To check for any updates to the StarterKit Plus,
use the (Start > (All) Programs > RENESAS-TOOLS > SKP8CMINI > Check for Kit Updates) shortcut. This will take you to a
kit-specific page on the Renesas website which provides links to any available update downloads.
8. HEW3/C-Compiler
m
The High-performance Embedded Workshop User Manual will show you how HEW3 integrates various tools such as the
compiler, assembler, debugger and editor into a common Graphical User Interface. To access the manual on your computer,
go to the HEW menu (Start > (All) Programs > Renesas High-performance Embedded Workshop > Manual Navigator).
The NC30WA R8C version C-compiler included in the SKP has no time expiration, but has the following limits:
co
1. The compiler cannot generate load modules that exceed 64 Kbytes.
2. The software comes without support or warranty.
m
po
ne
nt
s.
3. See M3T-NC30WA v.5.20 Release 1 Release Note (R8C/Tiny only version) for further details.
co
If you require additional information or assistance,
on
lin
e
please send an email to [email protected].
© 2004 Renesas Technology America, Inc. Renesas Technology America, Inc. is a wholly owned
subsidiary of Renesas Technology Corporation. All trademarks are the property of their respective
owners. The information supplied by Renesas Technology America, Inc. is believed to be accurate
and reliable, but in no event shall Renesas Technology America, Inc. be liable for any damages
whatsoever arising out of the use or inability to use the information or any errors that may appear in
this publication. The information is provided as is without any warranties of any kind, either express
or implied. Renesas Technology America, Inc. reserves the right, without notice, to make changes
to the information or to the design and specifications of its hardware and/or software products.
Products subject to availability. Printed in U.S.A.
SKP8CMINI StarterKit Plus QuickStart Guide
Renesas Technology America, Inc.
450 Holger Way
San Jose, CA 95134-1368
Phone: 408-382-7500
Fax: 408-382-7501
www.renesas.com
Page 5 of 5