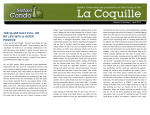
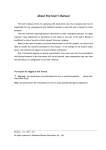
1
Roadmaps
A Guide for Intellectual
Entrepreneurs
Video Production: A First Timer’s Guide to
Creating Quality, Popular and Impactful Videos
Valerie Bischoff
R. J. Daniel Hanna
Andrew Leigh
Patrick Reasonover
Daniel T. Richards
Edited by
Patrick Reasonover and Andrew Leigh
Taliesin Nexus
AtlasNetwork.org
Video Production: A First Timer’s Guide to Creating Quality,
Popular and Impactful Videos
PREFACE
Refining how best to communicate the ideas of liberty is an important task for every one of Atlas Network’s
partner think tanks. As technology changes, new opportunities emerge that challenge business as usual.
Since 2010, Atlas Network has offered think tanks the Lights, Camera, Liberty program, an annual grant
and training opportunity designed to help think tanks transform and continually improve the way they
communicate liberty through online video.
To date, 59 organizations from five continents have participated, working together to elevate the quality
and effectiveness of their online videos and earning 5,000, 100,000, and even 500,000 or more views online.
More important than views for the sake of views, those organizations are also tying their messaging and
distribution efforts to strategic objectives related to the cause of liberty.
This issue of Roadmaps is not meant to replicate the rich experience of participating in the Lights, Camera,
Liberty program, where think tank professionals sit with successful TV and film screenwriters to workshop
their best ideas. What this issue does offer, however, is the next best thing — a crash course in tips,
shortcuts, and best practices to help you as you conceive, produce and distribute successful online video. And,
we’ve included a glossary of terms at the end of this issue.
Matt Warner
Vice President of Programs and Institute Relations
Atlas Network
Introduction
This guide was created to help advocacy organizations make more effective videos and reach a broader
audience. How do we define an “effective” video?
• It is a joy to watch.
• It conveys a message without the audience being fully aware, at the time they are watching it, that a
message is being conveyed.
• It reaches the widest possible audience.
• It inspires the audience to act on your message.
The Hollywood film industry emerged about a century ago, and over the years it has grown and matured
into a cultural powerhouse. As it developed, it had to solve several problems, including:
• How to figure out what people want;
• How to organize an effective development system to produce appealing content;
• How to allocate personnel in the most efficient way;
• How to allocate resources to maximize returns; and
• How to reach the widest audience possible.
In doing so, they’ve already solved a lot of the problems that new content creators now face: Namely, how
to make effective yet cost-efficient videos, how to build and keep an audience, and how to slip a moral
message into stories in a subtle yet powerful way.
Our general approach in this guide is to bring the collective wisdom of Hollywood to policy organizations
• 1 •
that are launching video enterprises. In the digital information age, your video department is in effect
a mini-studio. At Taliesin Nexus, we believe that in order to be successful you should look to how other
organizations have succeeded in this area, and figure out how to adapt those methods to your own unique
situation.
Granted, not everything that the movie studios do will be applicable. We have therefore already done the
work of tailoring these lessons to the conditions peculiar to non-profit policy organizations. Bear in mind
that every circumstance is different, but we encourage you to adapt what applies to your situation and to
feel free to leave behind what may not.
We have broken down this process into four major stages, each with its own guide:
1. Concept Development (p. 2): Every good video begins with a good idea that is developed into
a compelling story. In this section, we provide tips on how to come up with effective and compelling
concepts for your videos, and how to flesh them out into a script or outline for your video before you
begin shooting.
2. Production (p. 8): This is the actual shooting of the video. Here we provide organizational and
technical tips on making your production as smooth and polished as possible within your means.
3. Post-Production (p. 12): Tips on editing and storing your production.
4. Promotion and Distribution (p. 16): What do you do with the video after you’re done? This guide
helps you find an audience for your work, primarily through social media and other digital means.
We hope this guidebook helps you to make effective, inspiring videos within your budget. Good luck!
Part I: Concept Development: The Power of a Story
Hollywood movie studios long ago realized that ultimate success begins with concept development. If the
initial concept or story idea is weak, the resulting movie (or video) will be, too, no matter how well-acted or
slickly directed. In this guide, we will teach how Hollywood approaches the problem of concept and story
development, and how you can apply these methods to your videos and organization.
People learn best through story. Ancient people used myths, legends, and fables to pass on their culture
to new generations. Jesus taught through the telling of parables, as did many prophets and philosophers
throughout history.
Joseph Campbell researched myths and legends from around the world and found certain root elements
common to most. He called this pattern “the hero’s journey.” Lest you think it’s just theory, George Lucas used
Campbell’s teachings as the inspiration for the Star Wars trilogy. Some researchers believe that the patterns of
story are genetically rooted in the human brain, helping to explain their universal popularity.
Any policy issue, no matter how dry, can and should be presented as an entertaining story. Policy
organizations frequently fall into the trap of thinking that video
is simply an audio-visual adaptation of a magazine editorial or a
Bring the collective wisdom of
Hollywood to policy organizations white paper. Instead, we encourage you to think of policy videos
as mini-movies that tell a story.
Of course, we are speaking of creative projects. We realize that you may not have many chances to be creative
— that, frequently, your organization requires you to make relatively staid videos that may consist of, say,
taping a lecture. This guide for concept development is for those organizations and video-makers who have an
opportunity to make more creative work. Sometimes even a dry lecture can be livened up by wrapping a story
around it. We encourage you to open your minds to other possible approaches.
What is a Story?
In its simplest form, a story is a narrative that has a beginning, a middle, and an end. That may seem
• 2 •
laughably elementary, but how many videos have you watched that have failed even this fundamental test?
Most video-makers are aware that having a compelling opening is critical to grabbing eyeballs from the start.
But many videos fail to close in an equally strong manner. Instead, they typically trail off, like a bad Saturday
Night Live skit. Remember that the ending is the last impression viewers will have of your video.
The most compelling stories instill an irresistible urge to see what is going to happen next. In novels, such a
compelling story is referred to as a “page-turner” — you can’t stop reading because you must find out what
will happen next. The best videos have the same feature — they keep you watching because you’ve got to find
out how it will turn out.
The biggest threat to videos online is the short attention span of most viewers. The undeniable fact is, if a
video doesn’t grab a viewer within 10–15 seconds, most people will click away. (So, please, leave the credits for
the end. Nothing turns off a viewer faster than opening credits.)
How do you grab eyeballs and keep them tuned in? One way is to create a sense of mystery. No matter
what the genre, every great story is at bottom a mystery, with a (usually implicit) promise that if the viewer
stays with you, he or she will learn the secret by the close. You set up an interesting, or intriguing, or funny
situation that causes the viewer to wonder how it will turn out in the end.
At this point, you’re probably asking, “How do I make a video about, say, public choice theory into a mystery?”
One technique is to interweave a personal story (or stories) with the information you want to impart. Waiting
for “Superman,” which won the 2011 Oscar for best documentary feature, maintained people’s attention
throughout its critical exploration of the public school system by following five kids as they tried to get into
the charter schools of their choice via the school lottery. We kept watching through all of the drier material
because we were emotionally invested in the fates of the children.
Davis Guggenheim, the director/co-writer, cleverly ramped up the drama, keeping viewers on the edge of their
seat until the very end, when he finally revealed who got into the schools of their choice — and who didn’t.
In the process, we were fed information about the dire state of public schools and the advantages of charter
schools — information that most wouldn’t have had the patience to sit through if it weren’t for the personal
stories of those five kids and their families.
You can use this technique with virtually any topic. You don’t have to use five individual stories; in fact, we
would advise against that many unless you’re making a feature-length (usually 90–120 minutes) documentary.
One person is usually sufficient, especially if his or her story is compelling. Find someone whose life is
impacted by the issues you want to address and tell his or her story, interweaving it with the expert interviews
and other information you want the audience to know.
Video is primarily an emotional medium. When you watch a movie or even look at old photographs, notice
how the most effective ones evoke an emotional response. They make you gasp, giggle, choke up, or just get a
warm, fuzzy feeling.
Your video should aim to do that, too. Studies show that emotional triggers in a song or movie or other work
actually release dopamine (the pleasure drug) in people, and the more of these emotional triggers that we
encounter, the more we crave experiencing the work again and again. These emotional triggers don’t have to
be positive; sad images elicit just as much dopamine as happy ones. It may be why many people love to watch
sad movies or things that make them angry.
When you set out to create a video, think of what emotions you want to provoke in the viewer. It may be as
simple as anger at an injustice or government overreach. It might be sorrow at somebody’s plight, or fear of a
looming threat. Or it may be a humorous response to a ridiculous or absurd situation.
The best videos manage to evoke more than one emotion. An old advertising cliché states that a great movie
makes you laugh, cry, cheer, and more — “It will take you on a rollercoaster ride of emotions!”
Think of what emotions you would like your audience to feel when they watch your video. Don’t limit your
imagination; the Wikipedia entry for “emotion” lists more than 60 varieties of emotion. You have a palette
• 3 •
that ranges from despair to euphoria. Don’t be monochromatic.
Before the “Storm”
Okay, you’re ready to start brainstorming ideas for your video. Here are some questions to ask yourself before
you let loose:
1. Who is our audience?
Be specific. What are their demographics? How old are they, on average? What is the gender, nationality, or
ethnic mix? What is their average income? In which geographic regions are they located? What targets are you
after that you haven’t reached before? What kinds of videos do they watch? How do they watch them? Where
do they go to find them? What do they like and don’t like? (More on identifying your audience on Page 17.)
2. What do I want my audience to feel while watching my video?
3. What do I want them to do afterward?
In many advocacy videos, at some point there is a call to action — preferably near the end, after you’ve
motivated or inspired your viewers with your brilliant storytelling and compelling message. You shouldn’t
be too heavy-handed, but you shouldn’t shirk it entirely, either. (In some instances you might skip this step,
when it’s not appropriate or there isn’t anything that can be done.)
4. What represents a success?
Creating some type of metric that will gauge relative success before you create your video may help you decide
on how much time, energy, and resources to devote to it, and also what its character will be. Do you want
to reach a wide audience of Joe and Jane Six-Packs, or are you narrowly focused on D.C. types? How many
viewers do you want to reach? How many have you reached in the past, and how much better will this one do?
How many comments do you want to receive? How many emails, Twitter or Facebook mentions, or donations
do you want? Are you focused mostly on opinion leaders, major donors or political actors? If so, did they
respond as you wanted them to?
Brainstorm Time
After defining your audience and your goals, it’s time to develop the concept for your video. This is usually best
done with a group of people who are comfortable working together. Ideally, not too large a group — two to six
is a workable range.
Designate one person to keep notes. Set aside a good amount of time, say, one or two hours, when there are
no other distractions, open your minds, and let the ideas fly.
As you brainstorm, think about your audience. What kind of stories does your audience like? Don’t think
about what your audience should know or needs to know according to you. Think about what they want to
know or see. What moves them or makes them laugh?
At this stage, don’t be too critical. No idea is too goofy to say out loud. Now’s the time to be truly creative.
Write every idea down, no matter how crazy. (You never know what might spark another idea later.)
Do this for an hour or so, or until you’re all spent and have nothing left.
Now you start winnowing. Go through the list that your note-taker took down and briefly discuss each idea,
checking the ones that seem worth further discussion (and crossing out the ones that don’t work). Whittle the
list down to about three to five of the top ideas (unless one idea is a clear standout, in which case you can just
skip to the next step).
How do you know if an idea is any good? A good idea will be feasible with the resources you have (time,
personnel, experience, money), will appeal to the audience you have defined, will evoke the emotions you
want, and will achieve the goals you outlined before you started.
• 4 •
Next, consider the marketability of your concept. Does it have a hook, that intangible element that grabs
everyone by the lapels and compels them to watch all the way through to the end? A hook is usually
something original, something we haven’t seen before, and yet it also has an air of familiarity. It’s the most
prized (and difficult-to-find) feature of a truly captivating story or video.
The best ideas are usually the (rare) ones that you realize have never done before, and yet you think, “I can’t
believe no one’s ever done this before; it’s such an obviously good idea!”
The Story Inside
Now you attempt to find the story within the idea. What does that mean? Say you came up with this idea in
the brainstorm session: A web documentary about the struggles of entrepreneurs against EPA regulations.
That in itself is an issue, not a story.
Here is a story that illustrates that issue: a farm boy founded a small fishery and invented a new method
of aquaculture that could feed millions, but EPA regulations prevent him from putting it into widespread
practice. Or, a single mom working at a power plant loses her job when EPA regulations force her boss
to cut employees because of the cost of dealing with all the red tape, and the price of energy goes up for
nearby communities. Those are stories. And you can weave your expert interviews, charts, and other bites of
information throughout these stories.
Notice how each of those stories is summed up in a single sentence. In feature film development, this is called
a logline. It’s a great way to test the power of your story idea. If you can’t sum up your idea in one sentence,
then either you haven’t thought it through well enough, or it’s no good (most probably the latter).
What is a Logline?
A logline is a one-sentence summary of your story. It distills the basic elements, the structure and appeal and
characters, of your video into one bite-size chunk. It should suggest the beginning, middle and end of your
story, along with the nature of your main character(s) and the obstacles they must overcome. Most of all, it
should make people who hear or read it go, “Ah! I want to see that!”
For useful examples, consider the brief descriptions of movies and TV shows that you read on your cable or
DVR information guide. For example:
Jaws: When a great white shark begins devouring swimmers near a small New England beach town, the local
police chief partners with a nerdy biologist and a grizzled sea captain to destroy the killer fish.
A logline is what you tell someone when they ask you the all-important question, “What is your video (or
movie, show, article, book, etc.) about?” This is a question you will be asked at every stage of your video, from
conception to fundraising to production to distribution to marketing, so it’s best to get the answer down now,
before you start on that long journey.
So, now that you have three to five good ideas, it’s time to turn these into those finely honed loglines. You may
find that some ideas don’t fit neatly into a logline. That is an indication that they won’t work well as a video,
either. What you want to do is break the story out of the policy muck and find the compelling hook that you
need to make your video compelling, too.
The beauty of sorting things out at the logline level is that it saves you from wasting a lot of time and effort
trying to develop and produce projects that will go nowhere. If the logline is no good, chances are the final
product won’t be, either. (Have we hammered home this point enough yet?)
Once you have your logline, you also have your marketing tagline. When you put your video on YouTube
or whatever distribution channel(s) you use, you’re going to have to write a description that you hope is
compelling enough to get people to click “play.” With a great logline already developed, you know you have
• 5 •
a great marketing hook ready to go. This is why studios start thinking about marketing right from the start,
during concept development.
If you’ve still got nothing but a policy or an issue, try to figure out what sort of story would best make your
point. Are there any real-life people you’ve come across or interviewed whose lives are affected by this issue?
Is there a particular activist or expert or leader who is compelling on camera or has an especially fascinating
or poignant background or relationship to the issue? Can you use these real-life people’s stories to provide the
backbone, the structure, for your video?
Once you’ve created your batch of loglines, it’s time to start testing them on people to determine which one
has the most appeal. You can post them in an email and send
them to the most creative or most important (always one and
A good idea will be feasible with
the same, right?) people in your organization, asking them to
the resources you have
rank them or choose their favorite. Or you can just ask the people
around your office or cubicle, or your friends or people in the
street. Call this your “sounding-board team.”
In any event, you should get feedback from a variety of people, especially those drawn from a similar demographic
to the one you wish to reach, before deciding which logline or concept is the one you will make. It’s easy to get
tunnel vision when you’re creating. Feedback at critical stages (such as when you’re choosing what to make or
on before your final cut) should be sought out, not shunned. You don’t need to accept every bit of criticism
you receive, but if you’re getting the same note from several people, it may be time to pay attention.
Logline into Video
Now it’s time to write a script or outline for your video, using your logline as a jumping-off point. Much
depends on the kind of video you’re making, and there are many possibilities, depending on length, type (is
it composed of interviews or lectures, or are you free to create a story with actors?), genre, and the resources,
skillset, and time at your disposal.
It’s impossible to address every possible variation in a short guide like this. If it is a scripted piece, then write
the script in advance. If it is not scripted but consists of interviews with other real footage, you can still create
an outline of the finished product before you start shooting.
Typically, a story has three acts:
• Act I (“the beginning”): This is the setup, where you introduce the protagonist(s) (main
character[s]) and the problem or conflict that he or she will try to resolve in the course of the story. Act
I usually ends with an inciting incident, or the first turning point, that ramps up the action or conflict,
sending the story into a different direction. It may be when the protagonist leaves his or her home
to seek a solution, for example, or a new wrinkle to the problem presents itself, or the problem gets
worse.
• Act II (“the middle”): This is the confrontation, where the bulk of the story takes place. The
protagonist seeks a solution to the problem or wrestles with the conflict that is central to your story.
Action is usually “rising” throughout this section. Sometimes problems are overcome, only to be
replaced with even bigger ones. Act II usually ends with a second turning point. It may be the low point
in our protagonist’s struggle, a “false defeat” that leaves us demoralized. But it’s followed by a glimmer
of hope, which leads to....
• Act III (“the end”): Also called the resolution or climax, in this final section the conflict is finally
resolved or a solution is reached to the problem we’ve been struggling with. Usually the main
protagonist has learned something new by this point; his or her character arc is resolved as well.
• 6 •
As you can imagine, we have barely scratched the surface of storytelling structure and techniques. If you’d like
to learn more, there are many books and websites on the subject. Most are intended for feature-length films
that are usually a couple of hours long, but you may be able to adapt some of these techniques to your own
short video. Here are a few to get you started:
• Save the Cat! (by Blake Snyder): Geared toward feature screenplays, it is a popular primer for those
who have no previous exposure to formal screenplay structure. You will find many helpful tips there.
• Screenplay (by Syd Field): One of the seminal books on screenwriting structure.
• Writing Screenplays That Sell (by Michael Hauge): One of the better of the many other books on
screenwriting.
• The Writer’s Journey (by Chris Vogler): An adaptation of Joseph Campbell’s hero’s journey theory as
applied to screenwriting.
• Story (by Robert McKee): A thicker, more theoretical book than the others, this is for more advanced
storytellers who already know the basics of structure but want to delve deeper.
Proactive Development
Many organizations do not have a regularized system in place to develop new video ideas. Instead, they
operate on the fly, coming up with ideas on the spur of the moment, and then asking the video department to
produce something “yesterday.” (Sound familiar?)
We strongly recommend that you put a regular system in place to generate concepts outside of the daily grind.
It’s critical that you set aside time to develop ideas proactively, rather than merely racing to respond to events
in the news cycle or legislative calendar.
We recommend that, once a month or every three months (depending on the resources and time you have to
develop and make new videos), you set aside an hour or two to meet with your creative team for a brainstorm
session. Call this a “concept development meeting.” Follow the suggestions provided in the section on
brainstorming above. Depending on how many videos you can
proactively make, develop a corresponding number of loglines.
Set aside time to develop ideas
Let’s say you have the resources to make a proactive video
proactively every month. Then, every three months, you should meet for a
brainstorming session and generate at least six loglines. Then
narrow those down with your “sounding-board team” into the three videos that you will make over the next
three months. Knowing that far in advance what you will make two or three months out allows you to work on
the script in advance without a lot of time pressure, writing several drafts and getting feedback.
In some cases, you might only have the time and resources to make one or two creative scripted videos a year.
Or maybe you have a month of downtime (often August) when work is relatively slow and you will have more
time to make something really creative. Then plan ahead accordingly. Use both of your teams — the creative
team and the sounding-board team — to test all aspects of your proposed project in advance.
Conclusion
Policy or advocacy videos don’t have to be dull “talking heads” between two ferns. In a digital age when epic
battle scenes can be filmed with nothing but a green screen background, your imagination and skill level are
your only limits. Practice, get training at your local university or community college, and keep pushing the
envelope a little bit more with each new proactive video. You will see a corresponding rise in your videos’ reach
and change more minds.
• 7 •
Part II: Video Production Basics
Although the technical challenges can seem overwhelming, it’s worth taking the time to master the basics
of lighting, sound, and camera placement. A professional-looking and -sounding piece will give your
presentation more credibility and make it easier for audiences to absorb your intended message. Once you’ve
perfected your image and captured pristine sound, you’ll also need to copy your footage onto a hard drive
and prepare your media for an edit. Properly organized media files will simplify your editing process and help
ensure that no video clips go missing.
Following the simple guidelines below will help you to capture the highest-quality image and sound for your
given project.
Camera Placement
It’s important to think about your shot composition before you set up your lighting and camera. As a general
rule of thumb, choose a space where you can get some distance between your subject and the background.
This will give your composition depth and help blur out distracting elements in the frame. The goal is to
get viewers to completely focus on the subject. It’s also a good idea to avoid placing the subject in front of a
window.
Subject Placement
The next step is setting up a frame. Use a “stand in” (friend or colleague) before your subject arrives so that
everything is ready to go once they show up. Place the subject slightly left or right of center and give them
about an inch of headroom. You’ll also want to make sure the camera is the same height as the subject’s eye
line. Have your interviewer (the person asking the questions) sit as close to the camera lens as possible. This
will make the subject’s body position naturally align with the camera and keep the shot frontal. It’s harder to
feel the effect of someone’s message when you’re watching them in profile.
Framing a Subject for an Interview
• 8 •
If you are doing something other than an interview, well-thought-out camera placement and shot selection
can amplify your message because all of us have an inherent emotional response to images. For example, a
shaky handheld camera conveys a sense of urgency while a locked-off wide shot makes the viewer feel like
they’re observing the scene from the outside. A low angle (in which the camera is shooting up at a subject)
gives a grandiose feel, but a high angle (in which the camera is shooting down on a subject) will make the
person appear smaller. Incorporating dynamic shot choices into your shooting plan will help you reach your
audience on an emotional level.
If you are doing something other than an interview, well thought out camera placement and shot selection
can amplify your message because all of us have an inherent emotional response to images. For example, a
shaky handheld camera conveys a sense of urgency while a locked off wide shot makes the viewer feel like
they’re observing the scene from the outside. A low angle (where the camera is shooting up at a subject)
gives a grandiose feel but a high angle (where the camera is shooting down on a subject) will make the person
appear smaller. Incorporating dynamic shot choices into your shooting plan will help you reach your audience
on an emotional level.
Lighting
If you are conducting an interview, you’ll want to start with a basic three-point lighting setup. This consists of
a key light, a fill light, and a back light (or hair light).
Start by setting up your key light. First, make sure that the shadow side of the subject’s face faces the camera.
This will add dimension to your shot and prevent it from looking washed out. Second, it’s never a good idea
to light the subject with a bare light because it casts harsh shadows on the subject’s face. Diffusion (a soft box
or bounce) softens the light and flatters the subject’s features. After you’ve adjusted your key, you can use
a fill light to further soften the shadows on the other side of the subject’s face. Don’t eliminate the contrast
completely. The fill light will be further away from the subject than the key light. Finally, place the third light
behind the subject. This light will pop the subject out from the background. If you don’t have a C-stand,
place the light as close to the edge of frame as possible. The more evenly and directly the light falls on their
shoulders, the better. Invest in dimmers (found at your local hardware store) if they are not a fixture on your
lights. This will help you control the light if you are confined to a small space and can’t move the lights away
from your subject.
• 9 •
Camera Operation
Instruction on how to operate your specific camera model will be found in your user’s manual. However, the
following list of best practices can be used as a quick guide:
1. Choosing a lens: You may have one lens or an arsenal but choosing the right lens for the job is an
easy step to overlook. Generally for interviews, you’ll want to choose the “fastest” lens you have. The
lower the f-stop, the faster the lens. For example, a lens that opens to 1.8 is faster than one that only
opens to 3.5. A faster lens gives you a shallow depth of field, making less of the image in focus. This is
useful for interviews because it will blur out distracting elements in the background. However, if you
want to shoot something with more movement, you’ll want to choose something with a larger depth
of field because more of your image will be in focus.
2. Format media: Make sure you have a media card loaded into the camera and format the card. You
can do this through the format option found in the camera’s menu. This will erase everything that
was previously on the card, so make sure you’ve backed everything up before completing this step. It’s
crucial to format the card instead of merely deleting the prior content, because deleting individual
files can corrupt the media, making your future footage unusable.
3. Choose frame rate and shooting resolution: I recommend shooting in the highest resolution
that your camera will allow. This gives you more flexibility in post-production and expands exhibition
options. Even if you chose to compress the file later, the image will look better if you start at a higher
resolution. Most DSLR cameras shoot in 1920x1080, which is standard HD. In addition to choosing
the resolution, you’ll need to set the frame rate — 24 frames per second mimics film and feels more
cinematic, and 30 frames per second is the standard frame rate for video.
4. Set all functions to manual: The focus, aperture, shutter, and sound should all be set to manual.
This will prevent your camera from drifting out of focus when the subject moves. It will also prevent
sudden changes in lighting and sound that can occur while you are recording. The last thing you need
is for drifting focus to ruin your best take.
5. Color temperature: Different sources of light (the sun, fluorescent and incandescent lights) all have
different color temperatures. You will want to set your camera to read the correct temperature. If
you don’t, your footage will turn out blue or yellow and distract from the story you are trying to tell.
Generally, incandescent lights run at 3200K while outdoor sunlight will run at 5200K. You can also
create a custom white balance with most cameras. This function will balance the camera to the specific
color temperature of any given space.
6. Exposure: You can adjust the exposure by adjusting the f-stop and shutter speed. An f-stop of 1.8 lets
in more light, while f22 lets in a little light. Use zebra settings if your camera has them. Small lines will
appear in the parts of the image that are overexposed. If you don’t have this setting, check your light
meter located on top of the camera. These tools are useful in determining the right exposure. If you
overexpose, sections of the image will be blown out. If you underexpose, the image will appear muddy
and void of detail. Find the sweet spot in-between.
7. Critical Focus: You’ll want to check your focus by putting the camera in manual mode, zooming all
the way in on the subject’s eye, focusing until the eye is crisp and then zooming out. Many digital
cameras will have a focus assist button that will zoom in for you.
8. Sync camera settings: If you are shooting with more than one camera, match the resolution, frame
rate, shutter speed, and color temperature of both cameras. This will save you a lot of time in postproduction because you won’t have to color-match the images.
• 10 •
Sound
Good, clear sound can make or break a project. Always use an external microphone. For an interview, a wired
or wireless lavalier microphone — a small microphone that can be clipped onto the subject’s clothing — is
an ideal tool. To capture the best quality sound, place the mic approximately six inches below the subject’s
mouth. You don’t want to clip it against the neck because you will capture muffled sound. You’ll also want to
hide the mic wire in their clothing so it’s not flopping around in your shot.
Always test the quality of sound before you roll by listening in with headphones. It’s recommended to keep
the headphones on during the interview in case your sound goes awry. There’s nothing more embarrassing
that having to redo an interview because the microphone battery died three minutes after you started rolling.
Finally, once the subject is wired and you have a clean signal, ask them to speak as they normally would and
adjust the audio input level. There will be a meter on your camera that jumps when the subject speaks. You’ll
want to set the level to around -3db (make sure the meters aren’t jumping up to red). If your level is too high,
your sound will come out distorted and there’s nothing you can do to bring it back.
Media Management
The first thing you should do when you are finished shooting is to transfer
your media from your camera to your computer. Leaving important media
in the camera is always a bad idea. Invest in a card reader. It is usually easier
to transfer the data from a card reader than from the camera. Before you
import your files, set up a designated project folder. A well-organized project
will help you keep track of everything. It’s easy for files to get misplaced. If a
file is moved, the editing program will list it as offline and you’ll have to dig
through your computer to find it again. A file structure like the one to the
right is a good way to keep all of the elements of your project in one place.
Copy your media to the folder titled “raw”.
An example file structure
Conclusion
This guide covers the production basics. If you are curious to learn more about any and all aspects of
production, I’d recommend visiting Creative Cow and Lynda. Both websites offer a wealth of information.
• 11 •
Part III: Digital Post-Production
Preparing for production often takes up the majority of the filmmakers’ time and energy, but it’s important
to think about post-production workflow before and during the shoot to ensure a smooth process that will
allow you to create the best final product possible on time and on budget.
Before The Shoot
Hard Drives
In the switch from film to digital, many filmmakers take for granted that the cost of storing media has been
reduced to near zero. However, we still need to budget for our media’s storage in the form of hard drive space.
Because it’s so easy to shoot continuously, even a small project can result in dozens or hundreds of gigabytes
worth of footage. This footage then needs to be copied and transcoded, requiring drive space at three or four
times the size of the captured footage. If you are unprepared for your storage needs, you risk failing to meet
your post deadline or leaving footage without a backup.
It’s worth investing in designated hard drives for important projects so that you can keep footage organized
and ensure that all your media has been properly backed up. Scattering footage across drives, even if it is only
the raw footage that will not be used for editorial, puts you at risk for losing precious data.
For editing HD footage, drives with 7200 RPM and either Firewire 800 or USB 3.0 are recommended.
Research the drives that will work best for your editorial needs. G-Tech and Other World Computing drives
are known for low fail rates.
Camera
The type of camera you use to shoot, and the settings used
during the shoot, can influence the speed and cost of your postproduction process.
A well organized project will help
you keep track of everything It’s tempting to choose the easiest or best-looking camera option available to you at the time, but if you don’t
know how the footage goes from the camera to the finished export, post-production can quickly get out of
hand.
More expensive professional cameras, such as RED, require a transcoding process that usually requires a
third party and additional equipment before editorial can begin. And not all DSLRs are built the same. Canon
uses the h.264 codec, which can be imported into major editing systems like Avid, Premiere, and Final Cut,
but each of these programs handles the footage differently. Test the import and editing of these clips before
shooting. Understanding the post-production requirements before shooting can help you determine the
camera that best suits your budget and timeline.
If you plan to finish at 23.98 frames per second (fps), make sure that the camera shoots in this frame rate.
If multiple frame rates are to be used for the project, such as 60 fps for slow motion, test the process before
your actual shoot.
If you do not test the workflow, massive amounts of time can be lost in post-production. For example, let’s
say the decision is made on set to shoot the entire project at 60fps, even though the project will mostly play
at 23.98fps, simply to allow the option for slow-motion when needed. Depending on the camera and editing
software being used, this could require additional converting and transcoding for every piece of footage shot,
costing the production time and money.
• 12 •
During the Shoot
Your footage is the reason you’re investing time and money into a production. If your footage is lost, all the
work you’ve done means nothing. Off-loading media in a rush is how footage gets lost, erased, or copied over.
Know your backup process on set, and treat the footage with care.
Card Storage
Have a designated area to store each card, preferably in a zipped pocket of a bag in the care of one designated
person. This makes it less likely that a card will get lost or that someone mistakes a full card for a blank one.
Backup
Know your backup
process on set Back up cards on set when possible. Have a laptop computer and hard drive
available so that a designated person can copy the footage onto the drive, or
even two drives, as soon as the card comes out of the camera.
Many cameras record their footage within specifically worded and structured
folders. The folder names will be identical on every camera, with only the names of the individual clips
changing as per your camera settings. It’s crucial to leave these folders intact and not to change the names of
any of the folders generated by the camera. By altering even one syllable of these folder names, the footage
may not load into an editing system until the error has been corrected.
Therefore, when backing up footage, instead of changing the name of the folder generated by the camera,
create a new folder in which to store your footage. Although you can come up with your own naming
convention for your footage, it’s recommended to begin with Card_001 or Card A, and progress from there, to
better keep track of your footage and backups.
Formatting Footage
Take the time to
separate your footage
When possible, avoid formatting cards until you are finished shooting and
have reviewed your backups. If you do need to format on set, inform the
camera operator to always check with the person handling the backups in order to ensure that nothing is
erased prematurely.
Post Production Schedule
Even in small projects, a post schedule is important to keep everyone on track and make sure there are no
surprises. For example, in a project that includes animation coming from a third party, if you need to deliver
your final project on a Friday, schedule the final versions of the animation to be delivered by Thursday at the
latest, to avoid any delays in the delivery or inclusion of the animation.
Also include holidays, or times when members of your team are unavailable, to ensure that you meet
deadlines before these setbacks occur.
Here is a simple sample schedule for a documentary that features animation B-roll created by a third party, as
well as an original score and a professional color correction session:
It may seem like overkill, but if the animation and edits are due the same day, it might be impossible for the
editor to include the necessary footage in time, creating setbacks and feelings of frustration for the directors,
producers, and post team.
• 13 •
Sample Post-Production Schedule
January 5th - Receive footage from set. Begin transcoding.
January 9th - First pass of animation due to editor.
January 10th - Finish First Cut
January 11th - Notes on First Cut due from director and producer. Begin
Second Cut.
January 13th - Second Pass of animation due to director and producer for
tweaks.
January 14th - Final Animation due to editor for inclusion in piece.
January 15th - Finish Second Cut.
January 16th - Composer delivers Original Score to editor for inclusion
January 17th - Final notes/tweaks due from director, producer.
January 18th - Finish Final Cut, prepare for delivery to color correction.
January 19th - Martin Luther King Jr. day, Color Correction Facility closed.
January 20th - Deliver to Color Correction Facility.
Transcoding Your Footage
It will likely be necessary to transcode your footage before you edit. It’s important to understand this process,
because all editing programs handle media differently.
Let’s assume you shot using a Canon 7D. The footage will be in the h.264 codec. If you import your footage
directly into Avid, the footage will automatically be converted to the Avid .mxf format so that it can be edited
smoothly. This takes time that needs to be accounted for in your post schedule. If you’re using Final Cut Pro,
the footage will not be converted, so it will enter into the program instantly, ready to be edited. However, the
h.264 codec is highly compressed and will slow down your editorial process. It may be better to transcode
your footage using MPEG Streamclip into Apple Pro Res 422 codec for better editing within Final Cut Pro.
This time spent up-front can save you headaches later.
Research the smoothest post-production process for your camera and editing software of choice. Remember,
just because the software accepts your footage doesn’t mean it’s in the best possible format to enable smooth
editing.
Setting Up Your Project
When setting up your project, make sure your settings match those of the footage you shot. If your project
was filmed at 1920x1080 resolution at 23.976 frames per second, choose that option for your project. If
multiple formats were used, choose the settings that reflect your intentions for the finished project.
Organization
Organizing one’s footage depends on the personal preferences of the editor. However, it must be stressed
that the desire to save time by jumping into editorial before organizing your footage can wind up costing you
• 14 •
time down the road. Take the time to separate your footage by day shot, scene, subject, B-roll, etc. This will
not only help you find your footage, but help you find the right piece of footage when you need it. Make notes
in your bins or on the footage via markers to call your attention to important moments in the footage. It will
save time later, especially if you have a lot of footage to go through.
Exporting
Ultimately, what matters most is the version of your project that the public actually sees. You want a video
that looks great, but still loads quickly and doesn’t have so much data that picture quality overwhelms the
player.
Always finish with a digital “master” file that you can refer back to and from which you can make further
exports, use to edit into a reel of your larger work, or any other purpose your completed piece could serve in
the future. For most projects, a ProRes 422 file or DNxHD175 file makes for a high-quality digital master.
For online playback, exporting a QuickTime file with the h.264 codec at 5,000 megabits per second is a greatlooking, fast-loading file. Always make sure that your file dimensions and frame rate match your original
footage.
Conclusion
Your audience will only see the footage chosen to be part of the edit, and only view that footage the way you
have chosen for them to view it. Keep working on your edit until it feels right to you. Show it to others to
see if you are communicating the thoughts and emotions you hope to communicate. Remember that your
audience is looking for entertainment first, not information.
If you prepare properly, know your workflow, and keep organized, you can get the most out of your time and
the tools at your disposal to do what’s really important: make the best video possible.
• 15 •
Part VI: Distribution
You should start thinking about marketing and promotion before you make your video, not after you’re done.
The first step in planning your video is to figure out your audience. There are two questions to consider:
• Whom do you want to reach?
• Who will be most interested in watching the video you’re planning to make?
With any luck (and planning), the answer to both of those questions is identical.
You might be tempted to say “everyone,” but common sense should tell you that isn’t realistic. Try to narrow
it down as much as you possibly can. The more specific you are, the more you can focus all of your elements to
reach that particular audience.
For example: Are you trying to reach college kids? Legislators? Parents? Doctors? A particular state or city?
You can imagine how different each video might be depending on which of these
audiences you want to reach. A dry, academic, “talking-head” video is less likely
to appeal to college kids than something with a lot of humor or action.
Use the family and
friends test Write an audience description and brainstorm ways to make your video more
appealing to that audience.
If you’re still having trouble, use the family and friends test. Would your mom like this video? (Even if she
didn’t know you made it.) Your co-workers? Your best friend? And don’t forget, of course, the Lights, Camera,
Liberty email list! Once you’ve identified a test audience and gathered feedback on why it does or doesn’t
appeal to your test viewers, you’ll be on your way to identifying a larger audience.
Online Optimization
So, now you’ve made your video. What’s next? Before you put it out there, it’s a good idea to make it as easy
as possible for them to find you. Knowing the basics of search engine and social media optimization (SEO &
SMO) will help people find your content. A few tactics to get you started:
• Keep titles to 66 characters or fewer. Longer titles get cut off in searches.
• Write titles that highlight important, controversial, or emotional elements of your video, but don’t
give away everything!
• If you’re having trouble with wording, do a Google search to see which words are being searched for
more often.
• Include important keywords in your video description, and if you’re inserting a link make sure it’s the
first thing in the description and not the last. (Otherwise, it gets buried under “Read More.”)
• Almost all video hosting sites (YouTube, Vimeo, etc.) give you the option to “tag” your video with
keywords. Do not skip this step! It’s crucial to having your video show up in searches.
• Make sure that your video allows embedding on external sites and playback on mobile devices. I’m
shocked by how often these features are turned off.
• Be ready to respond to comments and encourage sharing. Beg your friends and co-workers to
comment. The more comments, the better!
• On YouTube, make sure that relevant links are included in your video — links to your other content, a
blog, external websites, etc. Here’s a short tutorial if you’re unfamiliar with the process.
• 16 •
Find Your Audience
Knowing your audience is only the first step to successful promotion. One reason you need to identify who
would like your video is so you know how and where to reach them.
The principle here is to know the community where your video will be successful and to immerse yourself in
it. Be a participant, not just an advertiser. Post comments on relevant blogs and message boards, even when
you don’t have something to promote (imagine that!), so people get to know you, even before you have a
video for them to watch.
Look for videos similar to yours either in message or execution. Make a list of publications or blogs that are
promoting these similar videos. (This list will come in handy throughout your promotion.) Make a comment
related to the current discussion on each such blog and be sure to provide a link to your video. (It’s best to add
something to the discussion other than simply blurting, “Hey, check out my video!”)
Examine your media list and think about the digital communities they serve — Twitter accounts and
Facebook pages, especially. Send personal messages to Facebook page managers (through the page) and tweet
at active accounts. You would be surprised how often Facebook managers or tweeters will post your material
if you simply ask.
If you find blogs on your list, take time to look at their blog-rolls — that is, the lists of other blogs that they
follow. It’s almost guaranteed that you’ll find dozens of other places to post comments and links or authors to
reach out to.
Offer to write guest posts for relevant high-value blogs or publications. Most writers and editors are thrilled
to have fresh content, and it gives you a chance to feature your video prominently.
Be polite, concise and
value oriented
Pitching to the Media/Bloggers
Now that you have a good sense of community and where your audience
“lives” on the web, it’s time to start identifying and pitching the influencers
— the journalists, writers, bloggers, and sharers whom your audience trusts and who can get you big views.
The key to a good pitch is knowing the value you provide to the publication. In other words, it’s not just what
they can do for you, but what you can do for them. Give them good reasons to share your video or write an
article about your message. For example, if they are opposed to Obamacare, tell them how this video exposes
a specific problem with that legislation. Explain also how your approach or message is unique, i.e., it’s not just
another anti-Obamacare video, but has a unique approach or uncovers something no one else has addressed.
There are five values you can focus on to get media attention:
• Timeliness: Breaking news or celebrating a famous news anniversary.
• Local: Pertains directly to the publication’s physical area.
• Significance: Profound or controversial or unique or affects a lot of people.
• Celebrity: Attention from someone famous.
• Interest: Special appeal to human interest or novelty.
It’s OK to have talking points, but for high-value targets, be sure to personalize the message for each
individual. Show them that you’re familiar with their writing and that you value their reporting. Flattery will
get you everywhere!
If you can’t reach a particular person by email, try pitching on Twitter. Be polite, concise, and value-oriented.
Don’t pitch through Facebook unless you know someone personally. It can be seen as intrusive.
• 17 •
Repurpose Your Content
Getting views is the ultimate goal, but that goal can be reached in some unexpected ways. Your video contains
a lot of content waiting to be repurposed for other media. Different media can gain attention that a video by
itself can’t. Here are some ideas to get you thinking:
• Release the text of your video as a blog post.
• Break the text down into tweets, Facebook posts, Pinterest pins (with screen captures), etc.
• Release the audio as a SoundCloud file or podcast.
• Create teaser clips for Instagram and Vine.
• Do a “director’s commentary” track for your video.
The key to promotion is
knowing your audience
Paid Promotion
Sometimes, the quickest way to reach an audience is by paying for promotion. Ads are an effective way to
put your video (or a link to it) in front of people who are likely to be interested. There are many options for
advertising, but a few outlets can give you the biggest return on your dollars. It would be difficult to provide a
tutorial for each outlet, but we’ll try to explain the basics and provide a link for a tutorial video.
First, let’s discuss some terminology that you’ll encounter:
• Return on Investment (ROI): What you receive (money, views, etc.) compared to how much you
spend.
• Cost-Per-Click (CPC): Every time someone clicks on your link, you’ll be charged.
• Cost-Per-Impression (CPM): Every time 1,000 people see your link, you’ll be charged.
• Bidding: Whether you choose CPC or CPM, you’ll be asked how much you’re willing to pay for one
click or for 1,000 impressions. Most sites will help you maximize the ROI for your bid. Anything over
$1 per click or 1,000 impressions means your audience might be too broad. Try to narrow it to reduce
the cost.
• Daily Budget: How much you want to spend per day. Budgets can usually be as small as $5 per day.
• Lifetime Budget: How much you want to spend over the entire length of your campaign. A good
starting budget for a campaign, if you’re trying to hone your audience, is $100. That will give you
enough data to make an informed decision.
No matter which outlet you choose, you’re going to be asked to narrow your audience by keyword, interest,
and demographics. Here’s another place where your audience description comes in handy!
• Google Ads: These ads appear when people search for keywords related to your content. Starting with
Google Ads is an excellent way to hone your advertising skills, because Google gives you the option
of “express” advertising. That is, you provide the title and a few sentences of description, and Google
automatically generates keywords.
• Facebook: For more advanced targeting, give Facebook a shot. It allows you to target people who like
specific pages (or who don’t), and gives you options to limit by a myriad of interests and demographic
information. (Note: There are several kinds of Facebook ads. Here I’m referring to the basic form, the
ads that you see on the side of your news feed or timeline.) If you’re promoting content through a
Facebook page, you can also pay to promote specific posts. This ensures that more of your followers
and their friends see your content.
• Twitter: There are two basic ad types on Twitter. You can sponsor specific tweets or you can promote
• 18 •
your account in general. Either way, you can target people who follow certain Twitter accounts or who
tweet about things related to your video. Warning: Twitter advertising can be fairly expensive, because
the cost per click (or retweet or favorite) can be more than $1 per interaction. That being said, it’s an
effective way to get people immediately engaged with your video. If you’ve got enough money, it may
be worth experimenting with it.
There are other avenues to explore for advertising, like StumbleUpon paid discovery, LinkedIn-sponsored
content, Pandora ads, etc. Most of them work on the same principles discussed here. Experiment with small
budgets and see what works.
Conclusion
The key to promotion is knowing your audience — where to find them, what messages and approaches work
best with them, and how best to engage with them. But it doesn’t have to be a chore. Start with social media,
blogs, and websites you enjoy and where you would love to see your video shared. Enthusiasm is contagious.
Let it shine through, both in your video and in your promotion of it.
The nice thing is, once you’ve figured this all out for one video — found your audience and how best to engage
with it — promoting the next videos will be that much easier. And if your audience knows who you are and
how great your videos are, they will be even more eager to see and share the next one. Focus on quality, both
in your video and in the types of views and engagement, and the rest will follow.
• 19 •
Writer/Director Valerie Bischoff hails from Reno, Nevada, a rugged part of the
country that continues to inspire her work. She recently graduated with Honors from
Columbia University’s Graduate Film School where her short film, Derby Kings (2012)
received the prestigious Princess Grace Graduate Film Scholarship and was selected for
the 2013 Palm Springs Short Film Festival among many others. She was also presented
with the Lewis Cole Award for Excellence for her work as a filmmaker and teacher. After
receiving her B.A. in Film from the University of California at Santa Cruz, Valerie was
selected for the Fulbright Grant for Filmmaking in Estonia (2006) where she created a
feature documentary on disappearing Soviet history. Valerie is currently in development
on her first feature film Massacre Creek with Sixgun Pictures.
R. J. Daniel Hanna is a writer-director-editor living in Los Angeles. An alum of USC’s
School of Cinematic Arts, Hanna has directed and edited web and national television
commercial content for Coca-Cola, Reebok, Subway, Cole Haan, and many other toptier brands. Narrative films Hanna has edited have been distributed by Cinedigm and
The Documentary Channel, and received awards from The Emmy Foundation, the DGA,
BAFTA, and the USC Editing Faculty. He is currently working as a freelance editor
while developing a writing career. His screenplays have received numerous awards and
recognition from The Austin Screenplay Competition and The Black List, among others.
Andrew Leigh is co-founder of Taliesin Nexus, a screenwriter, and a producer. He has
been hired to write and rewrite screenplays and TV pilots for several producers including Sid Ganis (former president of the Academy of Motion Pictures Arts and Sciences)
and Andrew Panay (Old Dogs, Wedding Crashers), and he is producing a documentary
feature called The Museum of Government Waste. Andrew has worked as a story editor
for several major companies including MGM, Sony Pictures, and the Creative Artists
Agency. He has contributed to many websites, including serving as one of the earliest
contributors to Breitbart.com’s Big Hollywood and Greg Gutfeld’s Daily Gut.com, and
has written for numerous publications including the Washington Post, the Los Angeles
Times,and the Weekly Standard. Andrew earned a B.A. from the University of Chicago
and a J.D. from the Vanderbilt University School of Law.
Patrick Reasonover is the president of Taliesin Nexus. Prior to his work with Taliesin
Nexus, Patrick was the director of the Film and Fiction Programs for the Institute
for Humane Studies. He is passionate about giving young libertarian filmmakers a
structure with the ability to support the growth of these creatives so that they can
bring about change in the entertainment industry and broadly shift the culture toward
a greater appreciation and desire for libertarian values. As a libertarian filmmaker
himself, Patrick believes it is critically important to continue to address the area of
talent development for young libertarian and free-market conservative filmmakers
trying to break into the entertainment industry.
Daniel T. Richards serves as digital strategist for The Federalist Society and works
as a communications consultant for projects that advance a free culture. He was new
media director for “FrackNation,” digital strategist for the Ayn Rand Institute, and has
consulted with Fox News, Forbes, and Penguin.
• 20 •
Glossary
Aperture: A hole or opening through which light travels. The aperture determines how collimated the
admitted rays are, which determines the appearance of the image plane. A wide aperture results in an image
that is sharp around what the lens is focusing on and blurred otherwise.
Back Light: The back light shines on the subject from behind, often (but not necessarily) to one side or the
other. It gives the subject a rim of light, serving to separate the subject from the background and highlighting
contours.
Bare Light: A bare light is a light bulb used without any reflectors or light-shapers, creating a high-contrast
image with sharp shadows. It is not recommended to use this kind of lighting when filming interviews.
C-Stand: A C-stand is primarily used to position light modifiers, such as silks, nets, or flags, in front of light
sources.
Codec (h.264): A video compression format that is currently one of the most commonly used formats for the
recording, compression, and distribution of video content.
Depth of Field: The distance between the nearest and farthest objects in a scene that appears acceptably
sharp in an image. A large depth of field will result in an entire sharp image, and a small depth of field will
emphasize the subject while de-emphasizing the foreground and background.
F-Stop: The ratio of the lens’s focal length to the diameter of the entrance pupil. It is a dimensionless number
that is a quantitative measure of lens speed.
Fill Light: The fill light shines on the subject from a side angle relative to the key, and is often placed at a
lower position than the key (about at the level of the subject’s face). It balances the key by illuminating shaded
surfaces, and lessening or eliminating chiaroscuro effects, such as the shadow cast by a person’s nose upon the
rest of the face. It is usually softer and less bright than the key light.
Focus: The degree to which reflected light rays from an object in the scene go through parts of the lens and
rejoin at the same point on the film frame, creating a sharp image of the object.
Frame Rate: The frequency at which a video camera produces unique consecutive images called frames.
Frame rate is most often expressed in frames per second (FPS).
Key Light: The key light shines directly upon the subject and serves as its principal illuminator; more than
anything else, the strength, color, and angle of the key determine the shot’s overall lighting design.
Locked-Off Shot: A locked-off shot is where you put the camera on the tripod and leave it running, letting
the action happen inside the frame.
• 21 •
QuickTime format: A multimedia format developed by Apple.
Shooting Resolution: Resolution is the term used to describe the number of dots, or pixels, used to display
an image. Higher resolution means that more pixels are used to create the image, resulting in a crisper, cleaner
image.
Shutter: A mechanical device for opening and closing the aperture of a camera lens to expose film.
Transcoding: The direct digital-to-digital conversion of one encoding to another, such as for movie data files.
This is usually done in cases where a target device does not support the format or has limited storage capacity
that mandates a reduced file size, or to convert incompatible or obsolete data to a better-supported or modern
format.
White Balance: a camera setting that adjusts for lighting in order to make white objects appear white in
photos. This is more difficult than it might seem, because light cast from different sources is different in color.
Zebra Settings: A camera setting that can give an indication of lighting levels. Moving lines will appear
over any area that is overexposed over a certain level. This feature can be used to guide the adjustment of the
aperture and shutter speed to make your shot brighter or darker depending on what you’re shooting.
• 22 •