1
Particle Magic
for the Casablanca Avio
and the Casablanca Kron
User‘s Manual
Safety notices
To avoid making mistakes during operation, we recommend that you carefully follow the instructions
provided in this manual.
We would also like to point out that Particle Magic has been designed with the hobby enthusiast in
mind.
We have taken a great deal of care while programming and checking this software.
Nevertheless, since it is not possible to guarantee totally error-free software applications in all
environments and at any time, we unfortunately cannot rule out the possibility that some errors may
have crept in. If, contrary to all expectations, this is indeed the case, we shall remedy any errors in the
program and supply the affected customers with the new software free of charge. We cannot, however,
accept any liability for loss of data/time or any consequential damages that may occur as a result,
particularly since we have no influence over correct software installation and operation by the
customer. MacroSystem Digital Video AG and its dealers therefore cannot be held liable for any defects
or unintentional damage in connection with the installation or use of Particle Magic.
MacroSystem Digital Video AG and its dealers do not guarantee error-free use of the software or
complete flawlessness of the program.
Any implied guarantee is null and void, including guarantee of suitability of the software or operating
instructions for a particular purpose.
Neither MacroSystem Digital Video AG nor its dealers are responsible for any damages resulting either
directly or indirectly through the use of the software or the operating instructions, e.g. for profit loss,
costs, hardware or software problems or other issues.
Contents
Page
1. General information .................................................................................... 1
1.1 General information ........................................................................ 1
1.2 Installation........................................................................................ 1
1.3 What is Particle Magic? .................................................................... 1
2. Individual components ................................................................................ 3
2.1 Effects ................................................................................................ 3
2.2 Archive .............................................................................................. 3
2.3 Preview .............................................................................................. 4
2.4 Screens .............................................................................................. 4
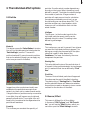
3. The individual effect options ...................................................................... 5
3.1 Particle .............................................................................................. 5
3.2 Source/Effect..................................................................................... 5
3.3 Movement ......................................................................................... 7
4. Tutorials ........................................................................................................ 9
4.1 PM Draw Tutorial ............................................................................ 9
4.2 PM Transition Tutorial .................................................................... 11
4.3 PM Static Tutorial ............................................................................ 12
4.4 PM Fly Away Tutorial....................................................................... 14
1
1. General information
1.1 General information
Thank you for purchasing Particle Magic from
your dealer.
We would like to thank you for placing your trust
in us and hope that this product will fulfill your
expectations.
Particle Magic allows you to use your Casablanca
even more extensively than ever before.
Particle Magic naturally supports the Power Key
Option. If you press the "F2" help function key on
the keyboard, all the possible key codes will be
displayed.
Please do not hesitate to contact us if you have
any further questions or wish to provide us with
suggestions for improvement.
To contact us, please refer to the addresses and
telephone numbers printed in the Casablanca
manual.
We kindly ask you to provide the serial number of
your device or your customer number whenever
you contact us.
1.2 Installation
The software that you acquired from your dealer
on the SmartMedia card must now be installed on
your Casablanca.
To do so, you will need at least version 1.8 of the
Casablanca system software.
You can look up the system versions using the
information item in the "System Settings" screen
(bottom left).
Now leave your Casablanca switched on and, in
"System Settings," select the "Install Product"
button to open the corresponding window. Now
insert the SmartMedia installation card into the
Casablanca’s drive. When you insert it, make sure
the gold-colored contacts are facing downwards
and the beveled corner is on the left pointing
towards the front (i.e. towards the Casablanca).
Push in the card until only around half a
centimeter remains protruding from the unit and
you feel some resistance.
You will now see the "Particle Magic" software
listed in the window. Select it in the list and click
on "License." A numerical keypad appears. You
can use it to enter the license code that you
purchased from your dealer. A notice will then
inform you that the installation process has
completed. You can now remove the SmartMedia
card.
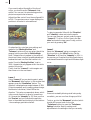
1.3 What is Particle Magic?
Particle Magic is a collection of four effects,
namely, three transition effects and one imageprocessing effect.
All effects are based on the ability to move many
tiny particles around the screen. The ways in
which the particles move can be adjusted using
several options. The screen content itself also
plays a role in some of the effects. An archive that
is available to all projects contains pre-defined
sequences to help introduce you to the software.
You can use these high quality video techniques to
do such things as make the ground, letters or
hearts burst into flames, simulate fog or a snow
blizzard or make texts whirl out of the screen...
you can let your imagination run free!
2
3
2. Individual components
2.1 Effects
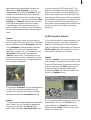
PM Draw
This image-processing effect superimposes
animated particles on scenes.
You can load predefined sequences from the
archive or create your own customized versions.
A mask, similar to the one used in the "Video
SpiceRack" and "Liquid Images" programs, is
used to define the basic characteristics ("Source"
button). Pressing the "Particle" and "Movement"
buttons will take you to other menus containing a
whole range of different options with which you
can influence the appearance of the effect.
PM Transition
You can use this transition effect to create a crossfade from one scene to another.
Again, you can load predefined sequences from
the archive or create your own customized
versions.
A mask, similar to the one used in the "Video
SpiceRack" and "Liquid Images" programs, is
used to define the effect ("Effect" button). A
crossfade between the two scenes is carried out
along the gradient level that’s defined by the
mask, and the particles form in the transition
region. The appearance and behavior in this
region is defined by various settings in the
"Particle" and "Movement" sections.
PM Static
This transition effect does not create a crossfade.
Instead it uses a special effect to place the scene on
the right in front of the scene on the left.
We recommend that you use a predefined title as
the subject of the right-hand scene. However,
interesting effects can also be created using
footage that you have recorded. The subject
should, if possible, be placed against a black
background, since black is interpreted as transparent and that is where the left scene can be seen.
If moving subjects are used on the right-hand
side, an additional effect is generated. A simple
moving dot, for instance, can be made to look like
a burning fuse.
You can load predefined sequences from the
archive or create your own customized versions.
The two scenes and the effect should all have the
same length.
PM Fly Away
This transition effect is a mixture of "PM Transition" and "PM Static." In this case too, the righthand scene is placed as the subject in front of the
left scene. Though here you can also select a mask
to fade out the subject.
For the right-hand scene, use a predefined title on
a black background. Again, you have the option of
loading predefined sequences from the archive or
creating your own customized versions.
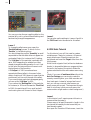
2.2 Archive
The archive contains numerous predefined
settings. You should start by loading and trying
out the supplied examples contained in the
archive.
The first two letters of the name refer to the type
of effect for which each particular entry has been
optimized. You can also use archive entries that
have been created using other effects, although the
results may not look quite as good.
FA
ST
TS
DR
- PM Fly Away
- PM Static
- PM Transition
- PM Draw
The archive can also be used as a place to store
your own creations or adaptations of existing
entries so that you can use them later - even in
other projects.
4
2.3 Preview
The preview feature allows you to view a preview
of an effect before the effect is created. You can
access the preview feature from the effect screens
and from the settings windows in Particle Magic.
However, the preview feature does have some
limitations as follows:
- The preview feature can only be used if the
effect has not yet been created (i.e. if the effect
icon in the storyboard is still red).
- The small preview might look considerably
different from the final result, especially around
the edges of the picture. Effects that run outside
the visible screen area in the final video might be
visible in the small preview.
- In the case of some effects (depending on the
settings), the calculation times might under some
circumstances be so long that the preview does
not run smoothly or is not usable at all.
In the case of the Kron and Avio (with the Pro
Package), you can also easily use the full-size
preview. Otherwise, you can also view the first few
frames after the calculation process has started
and then decide whether to cancel or continue
calculation.
- The Full Size preview will only be updated after
you click "Ok" to close the effect settings
windows.. If you are using the Avio, you will need
the Pro Package to use the full-size preview.
2.4 Menus
The menus contain a whole range of different
settings that you might find a little confusing at
first. However, if you turn your attention to one
setting after the other, you will soon start
understanding their various functions and can
then even create complex combinations yourself.
We recommend that you start off by using
predefined settings from the archive. To learn how
to use individual options, you should set as many
of the other options as possible to 0 to avoid
confusion. With a little experience you can then
create complex effects yourself. These can then be
saved in the archive and used again whenever you
want. Note: Please read through our practical
tutorials on this topic.
5
3. The individual effect options
3.1 Particle
particles. Since the actual number depends very
strongly on the type of effect, the setting is only
defined in percent. The higher the value the larger
the number of particles. A large number of
particles will require more time for calculation
(sometimes considerably more time), so you
should hardly ever use values above 30%. The
particles are often very close together, which
means you will not be able to work out their
actual number.
Life Span
The life span, i.e. the time during which the
individual particles remain visible, can be
adjusted using this value. This setting is also
defined by percentages.
Material
This button opens the "Select Pattern" window.
You will find suitable particles listed under the
"Particle Magic" product. There are 81
multicolored and 11 monochromatic particles
that can be selected (though you can apply any
color tone you want to the latter).
Intensity
This is where you can set (in percent) how intense
you want the individual particles to appear. This
setting can roughly be compared with the alpha
value that is used in other areas of the
Casablanca. The lower the intensity, the more
transparent the particles.
Starting Size
This value defines the size of the particle when it
is formed. As the particle develops, its size changes
until it reaches its final size as defined by "Final
Size".
Images from other products are hardly ever
suitable but the specialists amongst us can
certainly try them out to create unusual results.
If large numbers of particles overlay one another
in an effect, they will become very bright and
generally almost white. The original color will
usually only be retained at the edges where the
particles are less dense.
Quantity
This is where you can select the quantity of
Final Size
The size of the individual particles will approach
this value near the end of the effect’s duration.
The relationship of "Starting Size" to "Final Size"
and the selected lifespan will determine whether
the particles increase or decrease in size or remain
constant for the duration of the effect.
3.2 Source / Effect
This menu is different for all four effects.
In the case of "PM Fly Away" and "PM Transition," you will see the "Effect" button which you
can use to open the "Effect Settings" window.
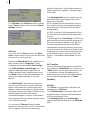
6
position (brightness). High tolerance values will
cause the particles to appear in a broader region
of the mask.
PM Draw
If you click on the "Source" button, the "Select
Draw" window opens in which you can define the
source position of the particles.
The "Starting Activity" function defines how far
advanced the activity of the particles is at the
beginning of the effect.
At 0%, the particles are just starting to form at
their origins and have not yet begun spreading
across the screen. The distribution then takes
place gradually.
At 100%, the effect is fully developed right from
the very start as if the particles had always been
moving.
The same applies to "Final Activity." At 100%, the
particles continue moving without stopping until
the end of the effect is reached. At 0%, particle
formation stops before the end of the effect is
reached and the remaining particles move slowly
out of the picture until they are no longer visible.
Depending on the various other settings options,
you should often select - particularly for Final
Activity - intermediate values between 0% and
100%.
Pressing the "Select Mask" button enables you to
select a mask from the "Image Pool." Other
products provide masks besides Particle Magic
(e.g. Video SpiceRack, Liquid Images, etc.). The
masks are black and white images that have
different gradient levels. Please also take note of
the "Mode" option (to differentiate between the
positive and negative settings) in the mask
selection.
PM Transition
You can directly access the selection window for
the image pool ("Select Effect") by clicking on the
"Effect" button. You can select any mask you like
in the selection window. We suggest you try
experimenting with some of the masks supplied
by other software packages, such as "Video
SpiceRack."
The "PM Static" and "PM Draw" effects, however,
have a "Source" button which opens the "Source
Settings" window.
The "Start Position" slider sets the brightness
value in the mask at which the particles should
appear. Lower values will cause the particles to
appear in darker picture areas, and higher values
in brighter picture areas. Please note that in some
masks the particles might under certain
circumstances appear in the non-visible areas of
the screen right at the very edge if settings close to
0% or 100% are selected.
You can use the "Tolerance" button to add a
range to the starting position. At 0%, the particles
will only appear precisely at the set starting
PM Static
The "Source" of the particles is selected in the
same way as for "PM Draw."
The "Threshold value" (in percent) defines the
brightness value in the right-hand scene above
which the particles will form.
The "Starting Activity" and "Final Activity"
settings have the same effect as in the "PM Draw"
effect.
7
PM Fly Away
In the "Effect Settings" window you will see the
"Select Effect" button, which you can use to open
the window of the same name. You can select a
mask in this window to define the effect that’s
superimposed on the right-hand scene.
The "Threshold Value" button defines the
brightness value in the right-hand scene (in
percent) above which the effect takes effect.
3.3 Movement
The "Movement Settings" window is accessed
using the "Movement" button and has the same
function for all four effects.
Gravitation
The "Direction" button that you see allows you to
select an angle of up to 360° (0° = top, 90° = right,
180° = bottom and 270° = left). You can of course
also use any values that lie between these values.
The default value for gravitation is 180°
(downwards) but you can just as easily use other
directions for creating special effects.
Gravitation generally produces an accelerated
particle movement (i.e. the longer they exist the
faster they get). You can use the "Intensity"
button to set how strong the acceleration due to
gravity should be.
Wind
Dispersion
If no "Dispersion" is selected (i.e. both slider
controls are set to 0%), the direction in which the
particles move after they form is only governed by
the "Wind" and "Gravitation" settings.
The dispersion setting can be used to give each
particle an additional randomly selected starting
direction at the point of particle formation (and
only at that point). The "Horizontal" and
"Vertical" dispersion strength can be set
separately.
You can therefore use it in conjunction with
"Gravitation" and/or "Wind" to create very
complex movements.
In the same way as for "Gravitation," you can set
the "Direction" and "Intensity" of the wind. If, of
course, you set a wind strength of 0%, the
"Direction" setting will be irrelevant.
Wind generally blows horizontally, i.e. around 90°
or 270°. However, you can of course also set other
directions to create special effects. In the case of
flames, for instance, a direction of 0° is useful for
simulating the upwards draft caused by the heat.
In contrast to "Gravitation," the "Wind" setting
makes the particles move at a constant speed.
For linear movements you should either select the
same direction for "Wind" and "Gravitation" or
set the intensity of one of these motion types to
0%.
8
Turbulence
The motion of the particles can be "loosened up"
by introducing many small waves of turbulence.
You can use the "Max. Quantity" button to set (in
percentages) how much turbulence is visible at
the one time (currently a maximum of 40 can be
displayed).
However, since the turbulence forms and
disappears at random, you will often see only
some of it at any one time. This depends on the
probability value that is entered for the
"Occurrence" of turbulence. At 100% all of the
set turbulence is active at the once. Lower values
will reduce the number accordingly. At 0% there
is no turbulence at all, and the other slider
controls no longer have an effect.
You can use the "Intensity" slider control to select
how strong you want the turbulence to be.
If only a small amount of turbulence is active, this
setting will produce an effect that looks more like
horizontal or "sideways" gusts of wind (the
turbulence generally will only take effect in a
horizontal direction). Only when the whole
screen is filled with particles will you clearly see
the large variety and complexity of the
movements.
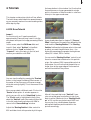
9
4. Tutorials
the lower button in this window. You’ll notice that
the particles are no longer generated at a single
point in the center of the picture but in a horizontal strip in the upper screen area.
This chapter contains tutorials for all four effects.
The tutorials are subdivided into separate lessons
so you can easily see how the various settings take
effect step-by-step.
4.1 PM Draw Tutorial
Lesson 1
For this tutorial, you’ll need a scene that’s
approximately 5 seconds long. Insert it into the
storyboard and open the Image-processing Effects
screen.
In this screen, select the PM Draw effect and
insert it. Next, select "Archive" in the effect
options, click on "Load" and select the
"-Lesson 1-" entry (first entry in the list) and
confirm your selection with "Ok".
As we already described in chapter 3.2 "Source /
Effect", the source of the particle is defined by the
mask and the "Starting Position". The "Starting
Position" defines the brightness value in the mask
at which you want the particles to form - the
higher the percentage, the greater the brightness
value (0% = black, 100% = white).
You can use the "Starting Position" control to set
the color nuance that is decisive for this particle
origin. Set a value of 50% here and take a look at
the preview. You will notice that the particles no
longer form at the upper edge of the screen but
around the middle of the picture.
You can view the effect by pressing the "Preview"
button in the Image-Processing Effects screen. In
the center of the picture you will see an orange/
white dot moving slightly. This is the source of the
particles.
Now you can select a different mask. Click on the
"Source" effect option. A window appears in
which you can click on the "Select Mask" button.
The "Circle" mask is highlighted initially. Now
select the "Vertical" mask (two masks further left
in the list) and close the window with "Ok" to
return to the "Source Settings" window.
Adjust the "Starting Position" slider control to
85% and take a look at the preview by clicking on
After all, the mask that is set ("Vertical") has a
color curve that goes from bottom to top, from
black to white. Relative to this, a "Starting Position" of 0% is at the very bottom and 100% is at
the very top. Any values between these two
settings are therefore positioned within the
picture accordingly.
10
If you want to adjust the width of the line of
origin, you should use the "Tolerance" slider
control. You can use it to set a starting position
plus/minus a particular tolerance.
Adjust the slider control from the configured 0%
to 20%. The preview now no longer displays the
particles in a line but in a broader area.
Try playing around a little with the "Direction"
and "Intensity" values and note the results.
You can now save your project under the name
"-Lesson 2-". To do so, click on Save in the "Archive" and enter the new name. Finally, confirm
your work by pressing "Ok".
Go ahead and try out a few more settings and
masks for the "Starting Position" and
"Tolerance" options so you can get an idea of the
range of options provided by Particle Magic.
Note: The particles only appear in the center of
the picture (when using our predefined settings)
because the mask is a circle that’s white in its
center. Since the "Starting Position" is set to
100%, the particles only appear within the white
center of the circle.)
Finally, load the "-Lesson 1-" archive again and
then move on to the next lesson.
Lesson 2
Using "-Lesson 1-" as your starting point, select
the "Movement" effect option. In the window that
appears, press the "Gravitation" button. The
direction is displayed as an angle between 0-359°
(0° points upwards, and increasing values change
the direction clockwise). Select 180° as the
direction. This value corresponds to down, which
is the normal direction for gravity (as we know
it!). Now set the "Intensity" to 5%. Next, confirm
the "Preview" and you’ll see that the particles
form in the middle and sink slowly to the bottom
- thus creating a gravitational effect.
Lesson 3
Select the "Movement" option once again, but
this time click on the "Wind" button. Set the
"Direction" to 90° and the "Intensity" to 10%. In
the preview you’ll see that the falling particles are
now steered towards the right and indicate a slight
curve.
Lesson 4
Since such a steadily blowing wind looks pretty
unrealistic, you can now liven things up a little!
To do so, go into the "Movement" window (which
should still be open) and click on the
"Turbulence" option to open the "Turbulence
Settings" window. Start by making small
adjustments to the settings to that you can easily
11
appreciate how the adjustments influence the
effect. Set the "Max. Quantity" to 10%, the
"Occurrence" to 5% and the "Intensity" to 20%.
Instead of indicating an even curve (as we did
before), the particles are now livened up due to a
change in direction. If you now increase the "Max.
Quantity" or "Intensity" settings, the movement
of the particles becomes much more intense.
These settings modify the otherwise smooth
particle trajectory to make it look as though the
particles are being disturbed by sideways gusts of
wind.
its current setting of 100% down to 0%. The
effect will now take time to fully develop after it
starts. Since the effect first has to develop, you
might have to adjust the current settings in the
case of shorter effect times so that you are able to
see the effect’s full sequence of movements. After
all, an effect that first has to develop during a
short effect time will appear much different than
one which is fully active right from the very
beginning.
4.2 PM Transition Tutorial
Lesson 5
Using the settings in Lesson 4 as your starting
point, the particle motion forms a line. This shape
can be modified using the "Dispersion" function
in the "Movement" Settings window (the basic
operation of this function has already been
described in chapter 3.3). In this tutorial, set the
"Horizontal" option to 12% and leave the
"Vertical" option at 0%. The preview will now
display the particle motion, though this time the
movement of the particles no longer appears as a
line but rather is dispersed.
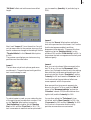
You can use this effect to create a transition from
one scene to another. Insert two scenes with a
length of 10 seconds each into the storyboard,
open the Transition Effects screen and insert the
PM Transition effect. Now use the xs control to
set a transition duration of 3 seconds.
Lesson 1
Load the "-Lesson 1-" entry from the archive and
view the result using the preview function in the
Transition Effects screen. Now simply adjust the
effect by clicking on the "Effect" option and, in
the window that then appears, selecting for
instance the "Heart" (first row, fifth effect from
the left) in "Negative" mode.
Changing the "Dispersion" for the vertical setting
would in this case have little effect since the
movement of the particles vertically is already
being influenced by the "Gravitation" setting.
Lesson 6
The effect that you’ve generated is fully developed
when it starts. You can change this appearance,
however, by clicking on the "Source" effect
option. Next, adjust the "Starting Activity" from
You can now also adjust the particles to suit your
selected effect. Click on the "Particle" effect
option and then on "Material" and select, for
instance, the red "Heart" (fourth row from the
bottom, on the very left).
12
You can now view the new resulting effect or the
preview. Why not try a few different settings and
see how they change the appearance.
Lesson 2
To change the effect some more, open the
"Particle Settings" screen. To do so, click on
"Particle" in the effects options.
You should keep the particle "Quantity" as small
as possible to that the effect does not appear too
overloaded. Select, for instance, the 5% setting.
The "Life Span" of the particles is probably still
set to 100% depending on whether you have
already changed the settings earlier or not. If set
to this value, the last particles will remain until
the last frame of the transition.
A "Life Span" of 100% sometimes has a
somewhat different effect in the case of other
effects. A setting of 100% does not mean that the
particles will survive until the end of the effect.
If you want the last particles to disappear gently,
you can set the "Life Span" to 95%.
If you reduce the "Starting Size" of the particles,
for instance, to 10% and increase the "Final Size"
to 100%, the particles will form small and will
continue to grow until the end of their lifespan.
Lesson 3
You can also use the settings in Lessons 2 and 4 in
the "PM Draw" tutorial exercise for this effect.
4.3 PM Static Tutorial
For this tutorial, you will first need to create a
suitable scene. Create, for instance, a 10-second
empty black scene. Place this scene into the
storyboard and insert the "Pages" effect from the
titling screen.
Write a brief snippet of text (without a shadow or
border) in large white letters on a page and place
the text in the center of the picture. Make the
system calculate this title and create a scene using
it.
(Note: If you own a Casablanca Avio without the
Avio Pro-Package, you can simply create this
scene by recording onto your video recorder and
then back again. Instead of using a few lines of
text, you can use a normal video scene or an
empty scene with a mask. The important thing to
bear in mind here is that you must ensure the
scene contains a light area on a dark background.)
Lesson 1
In this tutorial, you’ll superimpose a title onto a
scene and then animate it.
Place a scene of at least 10 seconds in length in the
storyboard followed by the text scene that you
have already created.
Now open the Transition Effects screen, insert the
13
"PM Static" effect and set the maximum effect
length.
Next, load "-Lesson 1-" from the archive. You will
not yet see an effect in the preview, since you first
have to make some changes to the settings. Set the
"Threshold Value" in the "Source" effect option
to 10%.
The preview now displays your text as moving
particles over the video scene.
Lesson 2
The text does not yet look quite as good as we
would want it. The particles are too big and the
text is not that easy to read.
you increase the „Quantity“ of particles (e.g. to
35%).
Lesson 3
Click on the "Source" effect option and take a
look at the preview from this screen. You’ll notice
that the text appears suddenly and then
disappears just as abruptly. To prevent this from
happening, set the "Starting Activity" in this
window to 0% and the "Final Activity" to 40%. In
the preview the text now appears more slowly and
fades out gently.
Lesson 4
Now you can introduce a little movement to the
text. To do so, click on the "Movement" effect
option (you’ll already be familiar with the settings
here since they’re the same as the settings in the
previous tutorials). Under "Gravitation", set the
"Intensity" to 8% and leave the "Direction" at 0°.
You’ll notice that the gravitational effect now
moves upwards within the preview.
Now we want the rising suns to appear to be
blown by the wind. To do so, open the "Wind"
menu in the "Movement settings" and set the
"Direction" value to 270° (the wind blows from
right to left) and the "Intensity" to 10%.
To make it easier to read, you can reduce the size
of the particles and increase their number. Click
on the "Particle" effect option to open the
"Particle Settings" window. Set the "Starting
Size" to 10% and the "Final Size" to 30%. The
text is now easier to read but can be optimized if
You can then adjust the "Turbulence". As an
initial test, set the "Max. Quantity" to 10%, the
"Occurrence" to 50% and the "Intensity" to 20%.
You’ll notice in the preview that the rising
particles are now even more animated.
14
Once you’ve found the right values to create the
effect that you want, you can move on to the final
setting in this tutorial.
To do so, click on the "Particle" effect option and
activate the "Material" button to open the Particle
Settings window, then select a balloon (e.g. the
red one, which is in second row from the bottom,
on the far left).
You should now also set the "Final Size" of the
particles to 60% so that the balloons appear more
clearly.
threshold value to optimize the appearance of the
text.
In the preview you now see your title dissolving in
a circular motion from the outside to the inside.
At the edges of the text you will notice that the
particles are displayed as suns again.
4.4 PM Fly Away Tutorial
You’ll need to make a scene for this tutorial too.
Create a 10-second empty black scene and place it
in the storyboard. From the Titling screen, insert
the "Pages" effect. Again, write a brief bit of text
(without a shadow or border) in large white
letters on a page and place it in the center of the
picture. Let the title render and then create a scene
with it.
(If you own a Casablanca Avio without the Avio
Pro-Package, you can create this scene by first
recording onto your video recorder and then back
again.)
Lesson 1
In this tutorial, you’ll superimpose a title onto a
scene and then make it fade out.
Place a scene of at least 10 seconds in length in the
storyboard, followed by the text scene that you’ve
already created with the "Scene" function. Now
open the Transition Effects screen and use the
"PM Fly Away" effect with the maximum effect
length.
Load "-Lesson 1-" from the archive. You won’t see
any change in the preview since you need to first
make some changes to the settings. Set the
"Threshold Value" in the "Effect" option to 10%.
You might still be able to make out some black
areas around the edges of the letters due to this
setting (you’ll see this most clearly in the singleframe preview). If this is the case, increase the
Due to the configured lifespan, the particles
remain visible until the very last frame of the
transition. To change this, click on the "Particle"
effect option and set "Life Span" to, say, 80%.
You will see in the preview that the particles begin
dissolving towards the end of the effect thus
creating a soft transition.
You can now try out some other particles to
familiarize yourself with Particle Magic. To do so,
click on the "Particle" effect option and then on
"Material" from where you can select other
particles.
You can also select various mask effects. Click on
"Effect" and, in the subsequently appearing
window, click on "Select effect" to select a new
mask. Note: You also have the option of playing
the masks in either "Negative Mode" or Mirrored.
Lesson 2
Now that you’ve selected the particles and the
effect, you can begin modifying the particle
movements. To do so, proceed as described in
lessons 2 to 4 in the first tutorial (the PM Draw
Tutorial).
15
16
17